Data That Is Not Copied from Production to Release Preview
The following items are not copied from production to Release Preview accounts:
-
Websites and web store domains
Domains are not copied from your production account to your Release Preview account. If you would like to test your websites or web store, you must set up domains in the Release Preview. For more information, see Manual Certificates and Set Up Domains for Web Stores.
-
Customer Center roles
Customer Center roles are not copied from your production account to your Release Preview account. Due to this limitation, customer login functionality does not work in Release Preview, even if it has been working in the production account. If you want to set up this functionality to work in Release Preview, you can do a CSV import of customer records into the Release Preview account. Then you can set passwords and check the Give Access box for customer users.
For more information, see CSV Imports.
-
SAML configuration
SAML configuration is not copied from your production account to your Release Preview account. For more information, see SAML SSO in Multiple NetSuite Account Types.
-
System notes on records
System notes are not copied from your production account to your Release Preview account. For more information about system notes, see System Notes Overview.
-
SuiteFlow (workflow) history logs
SuiteFlow (workflow) history logs are not copied from your production account to your Release Preview account.
Workflow instances are not copied from your production account to your Release Preview account either.
For more information, see SuiteFlow Overview and Workflow History Subtab.
-
Token-based Authentication (TBA) tokens
Tokens created in your production account are not copied to your Release Preview account. To test token-based authentication in your Release Preview, you must create tokens in your Release Preview account. For more information, see Manage TBA Tokens in the NetSuite UI.
-
Campaign response history
Campaign response history is not copied from your production account to your Release Preview account. For more information about campaign response history, see Campaign Response Summary Report.
Setting Preferences for Release Preview Email
Users with the Administrator role can set a preference for delivery of email messages for the Release Preview account. This is done in the production account. Users with the Administrator role can also set preferences directly in the Release Preview account on the Email Preferences page.
For example, during testing you may not want customers to receive email messages from the Release Preview account. In this case, you may want email from your Release Preview account delivered only to yourself, or to the people in your organization who are responsible for testing.
There are exceptions to the email routing rules you specify. Security-sensitive email is always sent to the owner of the email address. For example, password reset email does not obey preferences that override routing rules.
Examples of security-sensitive email include:
-
Reset Password
-
Change Password
-
Change Email Address
-
Security Questions (Setup or Update)
-
Two-Factor Authentication Setup (one-time password)
To set email delivery preferences for Release Preview:
-
Log in to your NetSuite production account.
-
Go to Setup > Company > Email > Email Preferences.
-
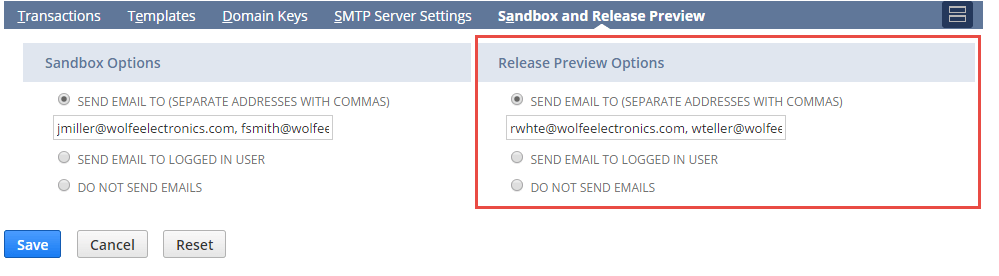
On the Sandbox and Release Preview subtab, select your preference under Release Preview Options.
Important:Choose the Send Email To option to have the most control over who receives these email messages.
Option
Description
Send Email To (suggested)
Choose this option to ensure email messages are delivered to specific addresses.
-
Enter the email addresses to receive email messages. Separate each email address entered with a comma.
-
Choose this option when testing your web store in your Release Preview account. This option ensures web store generated email messages are routed to the desired recipient.
Send Email to Logged In User (default)
Choose this option to send email messages to the user currently logged in to the NetSuite UI.
If you select this option, be aware of the following behavior:
-
Email messages initiated by an error in a scheduled script follow the notification settings in the script record.
-
Email messages generated from web stores are not sent to the user logged in to the NetSuite UI. For example, an order notification email message is sent to the shopper's email address, not to the logged in user's email address. To prevent this, choose the Send Email To option instead.
Do Not Send Emails
Choose this option if you do not want any email messages sent.
-
-
Click Save.
The email delivery preferences you set in your production account are applied to your Release Preview account.
Important:Release Preview is a copy of your production account as of a certain date, so the data in Release Preview may not be the same as data in your production account. If you recently changed Release Preview email preferences in your production account, they may not be reflected in the data snapshot used to generate your Release Preview account. Complete the following steps to verify the email preferences in the Release Preview account.
-
Access your Release Preview account. For more information, see Accessing Your Release Preview Account.
-
Go to Setup > Company > Email Preferences.
-
On the Email Options subtab, verify your email preferences and modify them if necessary.
To decrease the number of automatic email notifications, all saved searches in the Release Preview account are set to inactive by default. If you want to enable email notifications for a specific saved search, you can activate it. To learn more about inactivating and activating a saved search, see Marking a Search Inactive.
Credit Card Processing in Release Preview
Security enhancements in NetSuite require that an administrator complete the following procedure to process credit card transactions in your Release Preview account.
To enable credit card processing profiles for use in Release Preview:
-
In an Administrator role, access your Release Preview account. (See Accessing Your Release Preview Account if needed.)
-
Go to Setup > Accounting > Financial Statements > Payment Processing Profiles.
-
Click Edit next to the credit card processing profile you want to use in Release Preview.
-
On the credit card processing profile, under Authentication Credentials, enter the credentials required for this processor.
-
Click Save.
-
Repeat these steps for each credit card processing profile you want to use in your Release Preview account.