Creating a Transition
You can create a workflow transition in the diagrammer or in the Workflow State window for the state that you want to move from. When you create a transition in the diagrammer, you create it first and then edit its properties. When you create a transition from the Workflow State window, you specify the properties when you create it.
Creating a Transition in the Diagrammer
You can create a workflow transition in the Workflow Manager diagrammer. Create the transition and then edit it to specify the transition properties.
To create a transition in the diagrammer:
-
Open the existing workflow where you want to create the transition.
-
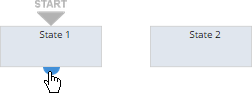
In the diagrammer, hover over the bottom of the state that you want to leave. The cursor becomes a filled half-circle.
-
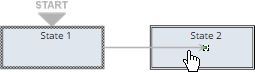
Drag the icon to the state you want to move to.
-
Release the mouse to create the transition.
-
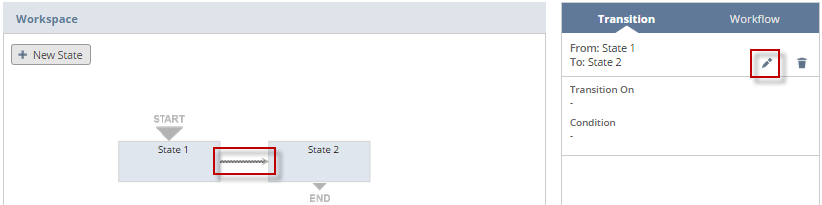
To edit the transition, click the Edit icon on the Transition tab in the context panel. See Editing a Transition.
Creating a Transition in the Workflow State Window
You can create a transition in the Workflow State window and specify its properties.
To create a transition in the Workflow State window:
-
Open the existing workflow where you want to create the transition.
-
Select the state in the diagrammer and click the Edit icon on the State tab in the context panel.
-
In the Workflow State window, click New Transition on the Transitions subtab.
-
The Workflow and From fields are already filled in with the workflow name and state, and you can't edit them.
Enter the following basic properties:
Property
Description
To
Name of the state you want to move to.
Insert Before
Where to place this transition. Transitions process in the order they appear on the Transitions subtab for the state.
Transition On
Optional trigger for when to run this transition.
For more information about triggers, see Workflow Triggers and Triggers Reference.
For more information about when to leave this property blank, see Blank Transition Trigger.
Event Types
The activity that resulted in the record being created, viewed, or updated. The workflow instance initiates only if the event happens.
For example, you can set the transition to run only if a record is copied. For more information, see Workflow Event Types and Event Types Reference.
Contexts
The NetSuite feature used to create, view, or update the record. The workflow instance initiates only if the context happens.
For example, you can have the workflow instance start only when the record for the workflow is created by a web service. For more information, see Execution Contexts and Execution Context Types.
-
To specify conditions for execution of the transition, enter the following properties:
Property
Description
Condition
Criteria that must be met for the transition to run, which can include a condition or a formula. All criteria must be met for the transition to process. Use a condition to limit when a transition runs.
For more information about using conditions, see Workflow Conditions.
Saved Search
Adds a saved search as a condition for running the transition. The transition runs if the current record in the workflow is returned by the saved search.
The saved search record type must be the same as the base record type for the workflow for the search to appear in the dropdown list,
For more information, see Executing an Action with a Saved Search Condition.
Workflow
Process the transition when the workflow in the Workflow dropdown list finishes. You can also select a specific state in the State dropdown list.
The child workflow can be any workflow that uses the same base record type as the parent workflow.
State
Name of a state in the selected workflow. When this state finishes, the transition executes.
Button
Process the transition when a user clicks the button on the record. You must add the button using the Add Button action before you can select it from the dropdown list.
Delay
Unit
Schedule the transition to run after a delay that occurs after the record enters the state. Specify the time unit in the Unit field and the amount in the Delay field.
You can use these options even if the trigger type isn't set to Scheduled.
For more information, see Scheduling a Transition.
-
Click Save.