Generating Statements
You send statements to remind customers to pay their invoices. Most companies send statements one time each month.
You can print, email or fax statements, in HTML or PDF format.
To generate statements:
-
Go to Customers > Accounts Receivable > Generate Statements.
-
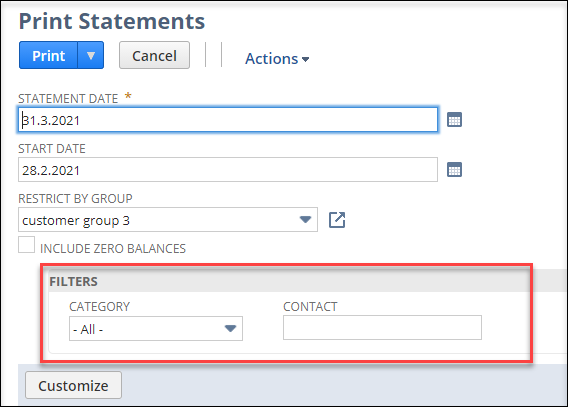
In the Statement Date field, accept or enter the date you want to appear on your statements.
Note:The system also uses this date to calculate aging.
-
(Optional) Enter a start date for your statements.
This is the date of the oldest transaction you want to appear on the statement.
If you don't enter a start date, the Balance Forward won't show and all transactions in the customer's history appear on the statement.
-
(Optional) To filter the customer list, from the Restrict By Group list, select a customer group.
Tip:To view or edit any Customer Group record in the list, click the
 icon to open the selected record in a new tab.
 -
(Optional) Check the Include Zero Balances box to generate statements for customer accounts that meet these requirements:
-
have a zero balance as of the statement date
-
have accounts receivable transaction activity between the statement date and the start date
-
-
(Optional) If you want to include only open transactions, check the Show Only Open Transactions box.
If you show only open transactions and don't include a start date, the statement includes all open transactions in your customer's history.
If you only show open transactions, the Charge and Payment columns on the statement will show the total transaction amount and won't reflect any payments made toward the invoice. The Balance column shows the remaining balance on each transaction.
The Statements in Queue field shows the number of statements that enter the print queue when you submit this page.
Note:The Show Only Open Transactions option is most useful for statements printed as of your current today date. If you select Show Only Open Transactions and are using a date other that today's date, you may have balance discrepancies.
-
(Optional) If you want the printed statements to show the consolidated balance information for customer-subcustomer hierarchies, check the Consolidated Statement box. Clear this box if you want to show the individual balance for each customer.
For more information, see Consolidated Payments.
-
(Optional) Select the form you want to use to generate statements.
You can select the standard form, select a custom form, or let the system decide. For information about creating your own custom forms in NetSuite, see Custom Forms.
-
Select the customers to receive statements. You can click the box at the top to select all customers in the list. Click the box again to clear the box for all customers.
Click Customize to customize the list to filter the customers listed or to add or remove columns.
-
Generate the statements:
-
Click Print to print the statements.
You can also hover over the print button and select Print in Customer's Locale to translate the transaction into the customer's predefined language. For more information, see Configuring Multiple Languages.
-
From the Actions list, select Email to email the statements.
To email the statements, each customer should have an email address entered in the Email field of the Email | Phone | Address section on their Customer record.
-
From the Actions list, click Fax to fax the statements.
Note:To fax statements, an administrator must first set up fax service at Setup > Company > Setup Tasks > Company Information > Fax. Each customer must also have a fax number entered on their Customer record.
-
When processing transactions, submit one page at a time. If you don't submit each page individually, information isn't saved and can be lost when you switch between pages. To process multiple pages of information, always submit each page individually.
Customize to Filter the Customer List
When you generate statements, you can filter the customer list by individual fields. This lets you generate statements only for specific customers.
To filter the customer list:
-
Go to Customers > Accounts Receivable > Generate Statements.
-
On the Print Statements page, click Customize.
-
To see additional columns in the customer list, click the Additional Columns subtab, then check the Include box beside the desired fields.
-
To see additional filters, click the Additional Filters subtab, then check the Include box beside the desired fields.
-
Click Save.
The additional columns you selected appear to the right of the standard (default) columns.
The additional filters you selected appear in the Filters area of the Print Statements page. When no filters are selected, this area remains hidden.
Now you can filter the customer list as needed.
You can also customize invoices to show a mini-statement at the bottom of the form. For more information, read Printing Mini Statements.
Generating Statements Using a Map Reduce Script or Workflow
As an alternative to the standard method, you can generate customer statements for NetSuite customers using one of the following methods:
-
a map reduce script
-
workflow
-
a combination of map reduce script and workflow
Each of these options requires deep knowledge of customizations within NetSuite. Be sure to test in a sandbox or development environment prior to implementing in a production environment.
|
Option |
How It Works |
|---|---|
|
Script |
|
|
Workflow |
The workflow runs on the customer record with a scheduled action. This action uses the send email action to send a statement to the primary email address or custom field email address. To use this method, in attachments, click the include statement by filling in the statement criteria fields. Add conditions to the action to filter out specific customers who no longer need statements. |