31 Working with the Portal Members Task Flow
This chapter describes how to add a Portal Members task flow to a page, and how to work with the task flow.
This chapter includes the following topics:
Permissions:
To perform the tasks in this chapter, you need the portal-levelManage Membership permission. Users with this permission can manage portal members and their role assignments. A portal moderator has this permission by default.
For more information about permissions, see Section 29.1, "About Roles and Permissions for a Portal."
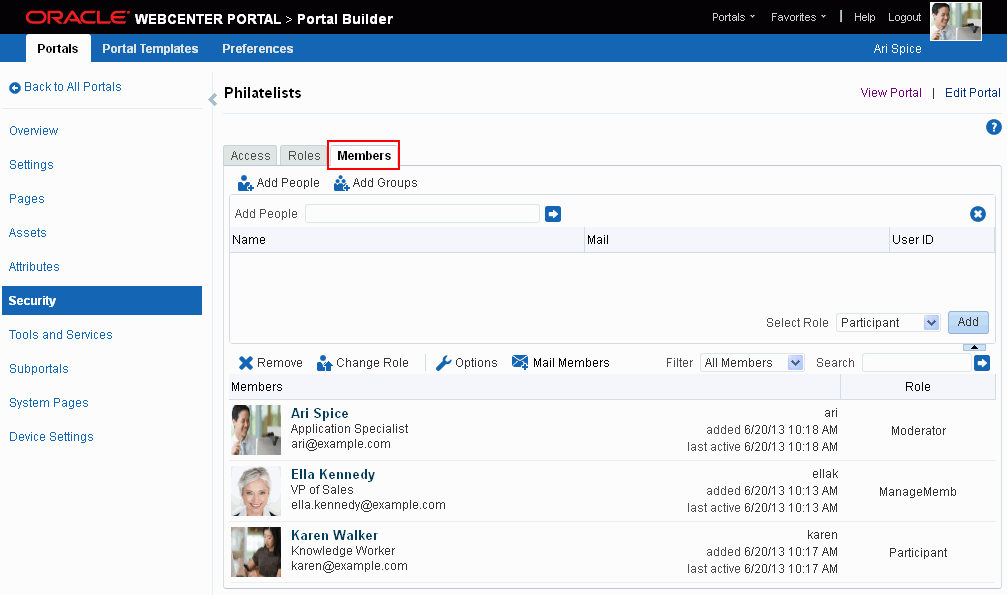
31.1 About the Portal Members Task Flow
WebCenter Portal provides two portal task flows that you can add to a page:
-
Portal Browser task flow: Adds an area that operates identically to the Portals page (portal browser) in the Home portal. For more information about this task flow, see Chapter 11, "Working with the Portal Browser Task Flow."
-
Portal Members task flow (Figure 31-1): Shows the portal members and provides controls to add new members, send a mail message to all members, filter the list by role, and search for members. It also provides a quick way of getting to the portal administration Members page where you can manage portal membership, if you have the appropriate permissions.

31.2 Adding a Portal Members Task Flow to a Page
Adding a Portal Members task flow to a page is the same as adding any other component to a page. See Section 14.2, "Adding a Component to a Page."
Note:
The Portal Members task flow is not available in the Default Portal Catalog provided with WebCenter Portal, so you will only see an entry for it if it has been added to a custom resource catalog that has been made available to the page.For more information, see Section 23.5.1, "Adding a Resource to a Resource Catalog" (in the Add Resource Catalog Item dialog, select Task Flows, then Design Time, then Portal Browser). To use the custom resource catalog for editing portal pages, make sure it is Available, and set for use by pages in the portal, as described in Section 7.3.5, "Changing the Resource Catalogs for Pages and the Page Template for a Portal."
31.3 Managing Portal Membership Through the Portal Members Task Flow
Moderators can quickly access the tools for managing portal membership from the Portal Members task flow.
To manage portal membership:
-
In the Portal Members task flow, click the Add icon (Figure 31-2).
The Add icon displays only to moderators or members with
Manage Membershippermission in the portal.Figure 31-2 The Add Icon in the Portal Members Task Flow

Description of ''Figure 31-2 The Add Icon in the Portal Members Task Flow''
-
On the Security page, click the Members tab (Figure 31-3), where you can add members as described in Section 30.5.2, "Adding Registered Users and Groups."
Figure 31-3 Portal Administration: Members Page
Description of ''Figure 31-3 Portal Administration: Members Page''
-
On the Members tab, you can also remove members, invite users to join the portal, and edit exiting member roles. For more information, see Chapter 30, "Managing Members and Assigning Roles in a Portal."
31.4 Contacting All Portal Members
From the Portal Members task flow, you can send a message to allportal members.
To contact all portal members:
-
In the Portal Members task flow, click Mail All Members in the toolbar (Figure 31-4).
If you are presented with a login window, enter your user name and password for your mail application. If your preferences are set up to deliver your login credentials automatically, then you can start your message right away. For more information about login credentials and preferences, see the "Setting Your Personal Preferences" chapter in Using Oracle WebCenter Portal.
Figure 31-4 Mail All Members Icon in the Portal Members Task Flow

Description of ''Figure 31-4 Mail All Members Icon in the Portal Members Task Flow''
-
Compose your message and click Send.
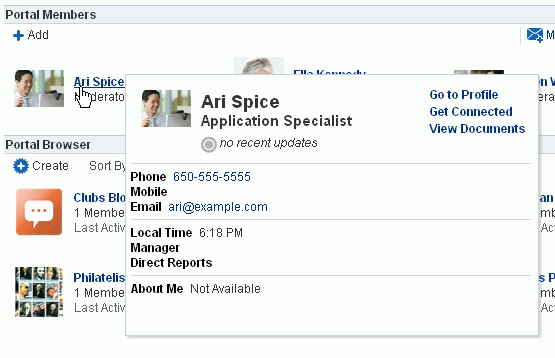
31.5 Contacting Individual Members of a Portal
It's easy to contact a portal member from the Portal Members task flow:
To contact a member:
-
In the Portal Members task flow, click the name of the member you want to contact (Figure 31-5).
Figure 31-5 Contacting a Member Using the Portal Members Task Flow
Description of ''Figure 31-5 Contacting a Member Using the Portal Members Task Flow''
By default, when you click a member's name their profile summary displays. From here, you can contact the member by mail, send them an instant message, and so on. For more information, see the "Viewing a Profile" section in Using Oracle WebCenter Portal.
The profile does not display if the Profile Launched on Selection parameter is disabled, for details see Section 31.8.2, "Portal Members Task Flow Parameters."
31.6 Sorting Portal Members
You can sort the list of members by name or by recent activity. Use the Sort Criteria parameter described in Section 31.8.2, "Portal Members Task Flow Parameters."
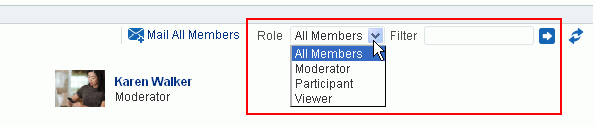
31.7 Filtering Portal Members
Use filtering to help find a particular member in the Portal Members task flow.
To filter the list of members:
-
In the Portal Members task flow, enter a full or partial name in the Filter field (Figure 31-6), and then click the Filter arrow icon to the right of the field.
Figure 31-6 Filtering Options in the Portal Members Task Flow
Description of ''Figure 31-6 Filtering Options in the Portal Members Task Flow''
-
The list of members refreshes, displaying only those members that match the search term.
Filtering searches against a listed member's user name. For example, if your search criteria is "c", the search results might include members named "chris", "vicki", or "monica".
-
Alternatively, filter the members by role by selecting a Role from the dropdown list.
-
To return the list of members to its default display, click the Clear Filter icon (Figure 31-7) and select All Members from the Role dropdown list.
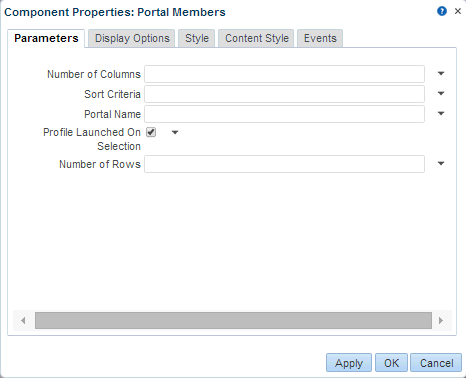
31.8 Setting Portal Members Task Flow Properties
The Portal Members task flow has associated properties, which users with sufficient privileges can access through the Component Properties dialog in Composer (Figure 31-8).
Figure 31-8 Portal Members Task Flow Component Properties
Description of ''Figure 31-8 Portal Members Task Flow Component Properties''
For information about accessing the Component Properties dialog, see Section 14.3, "Modifying Component Properties."
The following sections provide information about properties of the Portal Members task flow and describe the properties on the Parameters tab:
31.8.1 About the Portal Members Task Flow Properties
The properties on the Parameters tab of the Component Properties dialog control the default task flow content. For descriptions of the parameters on this tab, see Section 31.8.2, "Portal Members Task Flow Parameters" For some task flows, parameters on this tab facilitate the wiring of the task flow to page parameters and page definition variables. For more information, see Chapter 19, "Wiring Pages, Task Flows, Portlets, and ADF Components."
Changes to the properties on the Display Options, Style, and Content Style tabs affect the appearance and behavior of the task flow for all users. These properties are common to all task flows. For more information, see Section 14.3.4, "Working with Component Display Options" and Section 14.3.6, "Working with Style and Content Style Properties."
The contents of the Events tab depend on the events supported by the task flow. For more information, see Section 14.3.7, "Working with Component Contextual Events."
All properties on the Parameters and Display Options tabs provide access to an Expression Language (EL) editor, which you can use to select or specify a variable value instead of a constant value. Click the Show icon next to a property field to open the editor.
Note:
When you enter EL on the generic Display Options tab in the Component Properties dialog, the parser reports an error only if it detects invalid syntax, such as a missing closing bracket. Validation is performed only on syntax, not on the expression value. Generic Display Options are those cataloged in Table 14-1.EL validation is not performed on non-generic display options.
If you need EL assistance, an application developer can provide an EL expression; see the "Expression Language Expressions" appendix in Developing Portals with Oracle WebCenter Portal and Oracle JDeveloper.
31.8.2 Portal Members Task Flow Parameters
Table 31-1 describes the parameters that are unique to the Portal Members task flow.
Table 31-1 Portal Members task flow Properties: Parameters Tab
| Parameter | Description |
|---|---|
|
|
The number of columns used to display members. The default is null which means 'no limit' and in this case member details wrap to fill the entire width of the task flow. To fix the number of members displayed in each row, enter the number of 'columns' you require. Horizontal scroll bars display if there is not enough space to display the number of members specified here. Express values using the following formats:
|
|
|
The number of rows used to display members. The default is null which means that member details wrap to fill the space available. Vertical scroll bars display if there is not enough space to display all the members. To fix the maximum number of rows displayed, enter the number of 'rows' you require. Previous and Next buttons automatically display if more member details are available. Express values using the following formats:
|
|
|
Determines whether to launch a profile popup when you select a member's name. Deselect this option if you do not want to launch profile details. |
|
|
The order in which to sort the members. Specify |
|
|
The name of the portal for which to display members. The default value is the current portal. Use this parameter to display member details for a different portal. You can obtain a portal's name from its About this Portal dialog. Express values using the following formats:
|