| Exit Print View | |
Sun Blade 6000 Disk Module Administration Guide |

|
1. Overview of Using Sun Blade 6000 Disk Modules With Server Modules
2. Inserting, Moving and Replacing the Sun Blade 6000 Disk Module
5. Installing, Removing or Replacing Disks
Multipathing Using LSI Host Bus Adapters
Multipathing Using Adaptec Host Bus Adapters
Hardware RAID Hides Dual Paths From the OS
Multipathing With RHEL 5.x Linux and LSI Host Bus Adapters
Installing the OS on Multipath Disks
To Configure Multipathing After Installation
Multipathing With the Solaris OS and LSI Host Bus Adapters
To Install Multipathing for the Solaris OS
Multipathing With Windows Server 2008 and LSI Host Bus Adapters
To Install Multipathing for Windows Server 2008
To Select Disks for Multipathing
To Set Load Balancing Property to Failover Only
To View a Single Instance of MPIO Disk Drives
7. How LSI Host Bus Adapters Assign Target IDs to Expanders, Disks, and RAID Volumes
8. How Adaptec Host Bus Adapters Assign Target IDs to Expanders, Disks, and RAID Volumes
9. Setting Up Hardware RAID Volumes With LSI and Adaptec Host Bus Adapters
10. ILOM For the Sun Blade 6000 Disk Module
11. Oracle's Sun Storage Common Array Manager (CAM)
A. Using the SIA Application to Upgrade x86 Server Blade and Host Bus Adapter Firmware
C. Upgrading the Disk Module to Allow a SAS-2 Compatible Server Blade in the Chassis
This chapter covers the behavior of the supported LSI and Adaptec SAS host bus adapters, with both single and dual paths to SAS disks.
Here are the topics:
With a server blade in a Sun Blade 6000 chassis, there can be two different paths to each SAS disk drive in a disk blade. One path goes through one SAS-NEM and the other goes through a second SAS-NEM.
If there is only one SAS-NEM in the chassis, it must be in slot NEM 0. In such a case there is only one path to each SAS disk.
The information in this section is equally valid for an on-board LSI chip or an LSI RAID Expansion Module (REM). Much of the discussion is also relevant to Adaptec controllers.
Configuration: A server blade with four disk drives, one SAS-NEM in slot NEM 0 (providing a single path), and a disk blade with eight disk drives.
Initially, before any attempt to create volumes with the LSI SAS host bus adapter, all twelve disk drives seen by the SAS host bus adapter are passed to the server blade BIOS and the OS. The BIOS sees twelve disk drives at the outset and will continue to do so. The OS, which gets its disk drive information from the BIOS, can make RAID volumes and see a combination of volumes and disk drives.
Note - By definition, software RAID refers to RAID volumes created by an OS, while hardware RAID refers to RAID volumes created by firmware on the SAS HBA (typically configured through an HBA BIOS-based utility). In addition, there are software applications provided with the HBA that run on various operating systems that can utilize the HBA firmware to create hardware RAID (for example, LSI-based RAID controllers use MegaRAID Storage Manager which is available for Linux and Windows). Most of the discussion in this chapter involves hardware RAID.
The one SAS-NEM configuration is straightforward—the server blade BIOS and OS see all disk drives on the server blade and the disk blade as unique disk drives.
You can change this situation by using the LSI BIOS configuration utility or the Solaris utility raidctl to create SAS host bus adapter hardware RAID volumes:
For x86 blades with LSI host bus adapters, you can create hardware RAID volumes by entering the LSI HBA BIOS configuration utility available during server boot (by pressing Ctrl-C when prompted).
For SPARC blades with LSI host bus adapters, you can create hardware RAID volumes with the Solaris utility raidctl.
The 1068E SAS host bus adapter can create only two volumes. The two volumes can contain up to twelve disk drives plus one or two hot spares (no more than fourteen disk drives total).
RAID 0 can have from two to ten striped disk drives.
RAID 1 can have two and only two mirrored disk drives, plus one or two hot spares.
RAID 1E (RAID 1 Enhanced) can have up to twelve mirrored disk drives plus one or two hot spares (if all disk drives are in one volume and there is no other volume). RAID 1E requires a minimum of three disk drives.
Note - Hot spares created by the LSI HBA BIOS configuration utility are hidden from the server blade BIOS and OS.
Example 1:
Volume V1 contains three server blade disk drives in a RAID 1E volume. The fourth server blade disk drive is a hot spare.
Volume V2 contains seven blade disk drives in a RAID 1E volume. The eighth blade disk drive is a hot spare.
Now the BIOS and OS recognize just two “disk drives” (V1 and V2). The hot spares, which are known to the SAS host bus adapter, are unknown to the BIOS and OS.
Example 2:
Volume V1 contains two server blade disk drives in a RAID 1 volume. One server blade disk drive is a hot spare. One is not included in a volume.
Volume V2 contains three disk blade disk drives in a RAID 1E volume. The fourth disk blade disk drive is a hot spare. The other four disk blade disk drives are not included in a volume.
The server blade BIOS and OS recognize seven disk drives: V1, V2, and five other disk drives not including the hot spares.
Configuration: A server blade with four disk drives, two SAS-NEMs (providing a dual path), and a disk blade with eight disk drives. The second SAS-NEM allows the SAS host bus adapter to connect to each disk drive on the disk blade by two paths—one through each SAS-NEM.
The server blade disk drives have only one path (hard-wired).
Initially, the SAS host bus adapter passes twenty disk drives to the server blade BIOS and OS—four on the server blade and sixteen on the disk blade. The sixteen from the disk blade are actually just eight disk drives, each with two unique SAS addresses, one for each port on the disk.
The server blade BIOS and OS see two instances of each dual-pathed disk drive. OS multipathing, if enabled, hides the second path to dual-pathed disks (see
![]() Multipathing at the OS Level).
Multipathing at the OS Level).
Note - The LSI BIOS configuration utility displays a single path in the RAID creation menu so that you cannot create a RAID volume with a disk drive and itself.
After disk drives are configured as RAID volumes, only one instance will be displayed by the server blade BIOS and OS.
One path (the primary) is used by the SAS host bus adapter to read and write from the volume, The other path (secondary) is held in passive reserve in case the primary path is lost.
Note - If failover of the active (primary) path occurs, the SAS host bus adapter re-establishes contact through the passive (secondary) path without user intervention.
Example 1:
Volume V1 contains three server blade disk drives in a 1E RAID volume. The fourth server blade disk drive is a hot spare.
Volume V2 contains seven blade disk drives in a RAID 1E volume. The eighth blade disk drive is a hot spare.
The BIOS and OS report just two “disk drives” (V1 and V2) and not the hot spares.
Example 2:
Volume V1 contains two server blade disk drives in a RAID 1 volume. One server blade disk drive is hot spare. One is not included in a volume.
Volume V2 contains three disk blade disk drives in a RAID 1E volume. A fourth disk blade disk drive is a hot spare. The other four disk blade disk drives are not included in a volume.
The server blade BIOS and OS report eleven disk drives: V1, V2, and nine disk drives not in RAID (but not the hot spares). There are five disk drives not in volumes or hot spares and four of these are recognized twice. If multipathing is enabled, the OS hides the second path.
There are many similarities between the LSI and Adaptec SAS host bus adapters, and much of the discussion in ![]() Multipathing Using LSI Host Bus Adapters is relevant to Adaptec controllers as well. There are, however, important differences between the LSI and Adaptec functionality.
Multipathing Using LSI Host Bus Adapters is relevant to Adaptec controllers as well. There are, however, important differences between the LSI and Adaptec functionality.
When you have an Adaptec REM and you plug in a disk blade with eight dual-pathed disk drives, the REM recognizes the disk drives as eight disks with dual paths, but it does not present any disk drives to the server blade BIOS or the OS until volumes are created. Volume creation using the Adaptec REM utilities is required. The volumes can be either one-disk drive volumes or multi-disk drive RAID volumes. The Adaptec REM can create up to 24 volumes.
Note - In a situation of one SAS-NEM and single paths, the same volume creation requirement applies.
When volumes are created, the Adaptec REM presents each volume to the server blade BIOS and OS as one disk drive. The dual paths are hidden.
This means that OS software for multipathing cannot be used because it cannot see the two paths. With the Adaptec REM, the OS will never be presented with a disk drive that is not in a volume. Using the Adaptec RAID manager software, you can determine that two paths exist, but the OS still cannot recognize more than one.
The Solaris, Red Hat Linux 5.x, Windows Server 2008, and VMware ESX 3.5. operating systems all have utilities for managing dual paths at the OS level. This section contains the following subsections:
If you use a RAID configuration utility at the BIOS level to create RAID volumes, these volumes are managed by the SAS host bus adapter (as a hardware RAID) and they are seen by your OS as a single disk. All multipath behavior of disks in the volumes is hidden from the OS by the SAS adapter.
Note - A RAID configuration utility at the BIOS level is not available for SPARC systems. You can still create hardware RAID volumes that are managed by the SAS host bus adapter, however, by using the Solaris OS utility raidctl. RAID volumes created with raidctl are seen by the Solaris OS as a single disk, with multipath behavior hidden from OS.
Your options for using multipathing with your host bus adapter are as follows:
With an LSI host bus adapter, using its RAID configuration utility at the BIOS level (or raidctl at the OS level for Solaris) to create hardware RAID volumes is optional. Multipath behavior of disks in these volumes is hidden from the OS by the SAS adapter.
If you decide to use an OS-based software RAID, you can use multipathing software at the OS level for your disk blade drives.
With an Adaptec host bus adapter (such as the Sun Blade RAID 5 Expansion Module), using its RAID configuration utility at the BIOS level to create array volumes (for RAID or non-RAID installations) is mandatory. Consequently, you cannot use multipathing software at the OS level.
The RHEL 5.x linux utilities for multipathing are the multipath utility and the
multipathd daemon. Ensure that you have the minimum supported driver version for your LSI HBA listed in ![]() Updating Operating System Drivers on x86 Server Blades.
Updating Operating System Drivers on x86 Server Blades.
Note - Due to limitations of the OS, you cannot install your OS onto multipathed disks with RHEL 4.x or SLES 9 or 10. With these Linux OS versions, you have two alternatives: 1) Install your OS on a disk or RAID volume on your server’s on-board disks (which are single path). OR, 2) Create a RAID volume with the SAS host bus adapter BIOS configuration utility and install your OS on it.
With RHEL 5.x you can install your OS on dual-pathed SAS disks (requires two installed SAS-NEMs). By passing the mpath parameter during boot, you enable the multipath daemon (multipathd) during installation. You see any disks on the server as sda, sdb, and so forth. Disks on the server blade have only one path. You see the disks on the disk blade, which have two paths, as mpath0 through mpath7.
You can choose to install the OS onto any of the multipathed disks.
For all Linux operating systems, you can configure multipathing after your OS is installed. To do this, you run the multipathd daemon:
Find the multipath.conf file and edit it to remove the “blacklisting” of the disks you want to see.
You should blacklist the disk drives on your server blade because they do not have dual paths. Add devnode "sd[a-d]" to the blacklist and remove devnode sd* if it is present.
Run the multipathd daemon as root.
# service multipathd start
The multipathed disks are seen as /dev/mapper/mpath*. Partition them with fdisk.
For example, to partition /dev/mapper/mpath0, run
# fdisk /dev/mapper/mpath0
After the multipathed disks are partitioned, they can be used as regular disks.
Note - Henceforth, the multipath daemon must start at bootup. To start the daemon for run levels 1, 2, 3, 4, and 5 enter: # chkconfig --level 12345 multipathd on
The Sun Blade 6000 Disk Module supports multipathing with Solaris 10 05/08 and later Solaris 10 updates.
If you are using Solaris 10 05/08, you cannot manage disks with both the mpxio and raidctl utilities at the same time on Solaris systems. You must choose one or the other for managing your disks.
You can run raidctl first to make volumes and then run mpxio, but mpxio does not interact with the volume you created with raidctl. The OS sees the RAID volumes (for example, as c0t1do, where 1 is the target ID of the RAID volume), but the RAID volumes are not enumerated under mpxio.
When mpxio is running, raidctl doesn’t see any of the disks that mpxio is managing.
Before enabling multipathing, use the format command to identify the SAS drives by target number, as in the following example. For systems with two SAS-NEMs installed, there are two entries for each SAS drive.
# format
Your output will be similar to the following.
Searching for disks...doneAVAILABLE DISK SELECTIONS: 0. c2t0d0 <DEFAULT cyl 8921 alt 2 hd 255 sec 63> /pci@0,0/pci10de,5d@c/pci1000,1000@0/sd@0,0 1. c2t1d0 <DEFAULT cyl 8921 alt 2 hd 255 sec 63> /pci@0,0/pci10de,5d@c/pci1000,1000@0/sd@1,0 2. c2t2d0 <DEFAULT cyl 8921 alt 2 hd 255 sec 63> /pci@0,0/pci10de,5d@c/pci1000,1000@0/sd@2,0 3. c2t3d0 <DEFAULT cyl 8921 alt 2 hd 255 sec 63> /pci@0,0/pci10de,5d@c/pci1000,1000@0/sd@3,0To enable multipathing, enter the command:
# stmsboot -e
Your output will be similar to the following. Answer the prompts as shown.
WARNING: stmsboot operates on each supported multipath-capable controller detected in a host. In your system, these controllers are/devices/pci@0,0/pci10de,5d@c/pci1000,1000@0If you do NOT wish to operate on these controllers, please quit stmsboot and re-invoke with -D { fp | mpt } to specify which controllers you wish to modify your multipathing configuration for.Do you wish to continue? [y/n] (default: y) yChecking mpxio status for driver fpChecking mpxio status for driver mptWARNING: This operation will require a reboot.Do you want to continue ? [y/n] (default: y) yupdating /platform/i86pc/boot_archive...this may take a minuteThe changes will come into effect after rebooting the system.Reboot the system now ? [y/n] (default: y) yThe system reboots twice in succession. The first reboot automatically configures the multipath devices and reboots again.
At the Solaris prompt, use the format command to identify the drives by world-wide identifier, as in the following example. For systems with two SAS-NEMs installed, there is only a single entry for each SAS drive.
# format
Your output will be similar to the following.
Searching for disks...doneAVAILABLE DISK SELECTIONS: 0. c3t5000C50000C29A63d0 <DEFAULT cyl 8921 alt 2 hd 255...> /scsi_vhci/disk@g5000c50000c29a63 1. c3t5000C50000C2981Bd0 <DEFAULT cyl 8921 alt 2 hd 255...> /scsi_vhci/disk@g5000c50000c2981b 2. c3t5000C50000C2993Fd0 <DEFAULT cyl 8921 alt 2 hd 255...> /scsi_vhci/disk@g5000c50000c2993f 3. c3t500000E016AA4FF0d0 <DEFAULT cyl 17845 alt 2 hd 255...> /scsi_vhci/disk@g500000e016aa4ff0Note - By default when the Solaris OS is installed, multipath IO (MPxIO) to disks on a disk blade is disabled. When this feature is enabled, the load-balance variable in the file /kernel/drv/scsi_vhci.conf defaults to round-robin. It should be reset to none. Setting load-balance=”none” will cause only one path to be used for active IO, with the other path used for failover. A serious performance degradation will result if the load-balance variable is left set to round-robin, because that would result in IO being attempted on the passive path.
To disable multipathing, run the command stmsboot -d, and follow the prompts.
The Windows uses the MPIO utility for multipathing. Support for multipathing is currently only available for Windows Server 2008.
An MPIO utility is part of Windows Server 2008, but you must install it manually:
Click Start --> Administrative Tools and select Server Manager.
Select Features in the left-hand tree.
Click Add Features.
Check the Multipath I/O check box and click Next.
Click Install.
When installation is finished, click Close and reboot.
Click Start and select Control Panel. Verify that MPIO properties is present.
After MPIO is installed, you must inform Windows of which types of disks should be multipathed:
Click Start and select Control Panel. Double-click MPIO properties.
Select the Discover Multi-Paths tab.
You see a list of all the disk drives by manufacturer and type.
Select the disk drives to multipath and click Add.
Click OK and reboot.
At this point, MPIO is installed and configured for dual paths. The second path is hidden by Windows. By default, MPIO is configured for active passive path failover.
You can view the disks seen by the OS in several ways.
To configure MPIO properties for each disk, click Start and select Control Panel. Double-click the Device Manager. You see the view of the disks in ![]() Dual-Path Disks as Seen in the Device Manager.
Dual-Path Disks as Seen in the Device Manager.
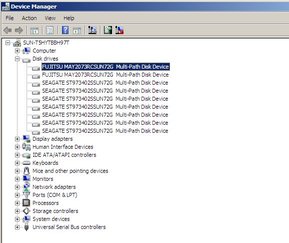
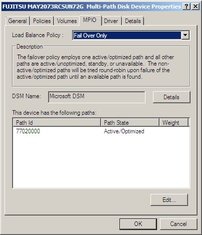
Next, you must make sure that the Load Balancing property for each disk is Failover Only.
Right-click a disk drive and select Properties.
Select the MPIO tab.
Choose Failover Only from the Load Balance Policy drop-down list.
Repeat steps 1 through 3 for each disk drive in the Device Manager window.
To view a single instance of MPIO disk drives in the Windows Disk Manager:
Click Start and select Run.
Type diskmgmt.msc in the Open dialog box.
Windows Disk Manager starts and displays a single instance of each MPIO disk drive.
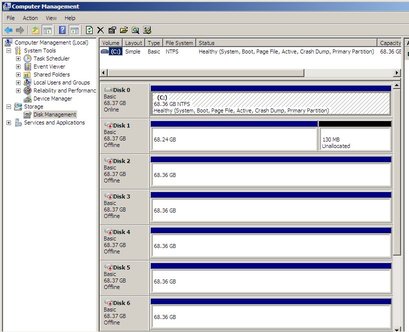
As before, Windows hides the second path to each SAS disk drive.
If you remove one path to a SAS disk by removing one of the two SAS-NEMs in your chassis, failover is handled automatically by MPIO. You continue to see the exact same list of disks in the Windows Device Manager and Windows Disk management views.
To support multipathing, ESX Server 3.5 does not require specific failover drivers. After ESX is installed, it scans the dual SAS-NEM paths to the drives. The default failover policy is active/active and works as follows:
NEM 0 is the default active path to disk blade drives (the path used by the host to communicate with storage devices)
NEM 1 is the failover path which is unused until needed
If failover of the active (primary) path occurs, the SAS host bus adapter re-establishes contact through the secondary path without user intervention.
Note - For active/active failover on the disk blade-connected ESX Server host, the Fixed multipathing policy is required (Round Robin is not supported).
Use the VMware Virtual Infrastructure (VI) Client to show status for the storage devices.
Login to the VI Client and select a server from the inventory panel.
Click the Configuration tab, and then Storage Adapters from the left pane.
![]() Storage Adapters Page shows paths to SCSI targets in the disk blade. Each disk contains two SCSI targets because each drive has two SAS ports. In this example, SCSI Targets 5 and 15 belong to the same disk. SCSI Target 5
(vmhba0:5:0) is the primary, or canonical, path to the disk. SCSI Target 15
(vmhba0:15:0) provides a redundant path in the event that the primary path fails.
Storage Adapters Page shows paths to SCSI targets in the disk blade. Each disk contains two SCSI targets because each drive has two SAS ports. In this example, SCSI Targets 5 and 15 belong to the same disk. SCSI Target 5
(vmhba0:5:0) is the primary, or canonical, path to the disk. SCSI Target 15
(vmhba0:15:0) provides a redundant path in the event that the primary path fails.
The canonical name for a disk is the first path (and the lowest device number) ESX finds to the disk after a scan.
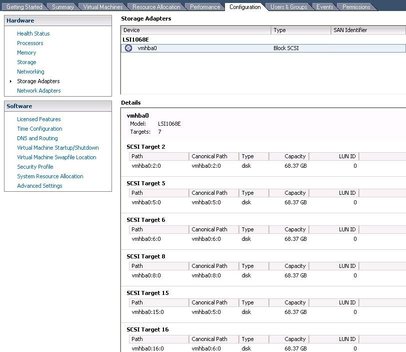
Note - When creating a VMFS datastore using the Add Storage Wizard, only the canonical paths are displayed.
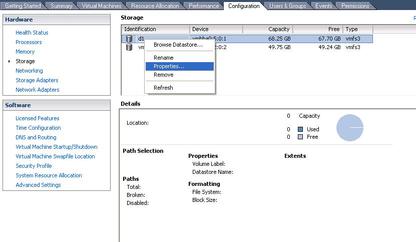
To manage multipath settings for a storage device, click on Configuration tab, and then click on Storage from the left pane.
From the Storage page, right-click on a storage device, and then click Properties from the drop-down menu (see ![]() Storage Device Page).
Storage Device Page).
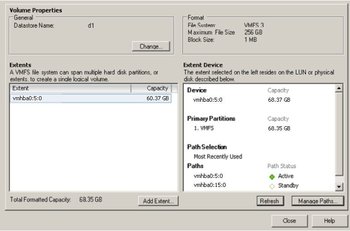
From the properties dialog box you can enable/disable paths, change failover policy, and view the failover status of any path.
Follow the instructions described in ESX Server 3 Configuration Guide at: