| Exit Print View | |
Sun Blade 6000 Disk Module Administration Guide |

|
1. Overview of Using Sun Blade 6000 Disk Modules With Server Modules
2. Inserting, Moving and Replacing the Sun Blade 6000 Disk Module
7. How LSI Host Bus Adapters Assign Target IDs to Expanders, Disks, and RAID Volumes
8. How Adaptec Host Bus Adapters Assign Target IDs to Expanders, Disks, and RAID Volumes
9. Setting Up Hardware RAID Volumes With LSI and Adaptec Host Bus Adapters
10. ILOM For the Sun Blade 6000 Disk Module
11. Oracle's Sun Storage Common Array Manager (CAM)
A. Using the SIA Application to Upgrade x86 Server Blade and Host Bus Adapter Firmware
C. Upgrading the Disk Module to Allow a SAS-2 Compatible Server Blade in the Chassis
This chapter contains these topics:
 | Caution - If you remove a disk, wait at least one minute before you insert another in order for the HBA to rescan and recover from the action. This applies to disks in the server blade as well as disks in the disk blade. |
Disks can be moved from one location to another, with several caveats:
A disk that is not in a hardware RAID volume can be moved to a different slot. You do not need to power down the disk blade to remove or insert a disk.
Note - Depending on your OS, you might have trouble locating the disk after it has been moved. The target IDs assigned to a disk are those of the slot it is in. When you move a disk, the target ID assigned by the SAS host bus adapter changes.
If a disk is a member of a mirrored RAID volume and is removed, the RAID volume will need to rebuild.
If there is a hot spare, the rebuild will occur automatically.
If there is no hot spare, you must replace the disk you removed with a new one in the same slot, and the mirror will use that disk to rebuild.
If the disk you removed did not fail and you replace it in a different slot, the mirror will rebuild automatically, using all the same physical disks that were present before, including the one you moved.
If a disk is a member of a striped RAID volume and is removed, various possibilities exist:
If the disk has failed, you have lost your striped volume. There is nothing you can do to recover it.
If the disk has not failed, you must reinsert it in the same slot or a different slot. The RAID volume will be restored.
If the disk has not failed, and you do not reinsert it, you have lost your striped volume. Reinserting the disk you removed will restore the RAID volume.
The following rules apply when mixing drives in the disk blade:
You can mix SAS disk drives with different specifications in a disk blade
You can have up to eight SSD drives in the disk blade
Do not mix SSD and mechanical drives in a single RAID volume
Do not mix SATA and SAS drives in a single RAID volume
Hot spares assigned to a volume must be of the same type as disks in the RAID volume (SAS or SATA; mechanical or SSD)
Use only supported disk drives in the disk blade (see ![]() Supported Disk Drives for a complete list).
Supported Disk Drives for a complete list).
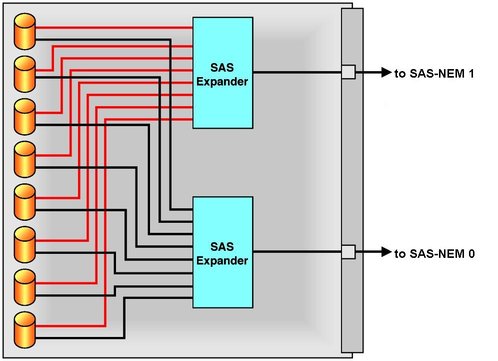
Multipathing to the disks on the Sun Blade 6000 Disk Module is accomplished by using SAS drives with two installed SAS-NEMs. ![]() Dual Paths to the Disk Drives on the Sun Blade 6000 Disk Module shows the configuration that is used.
Dual Paths to the Disk Drives on the Sun Blade 6000 Disk Module shows the configuration that is used.

Procedures for setting up multipathing are described in ![]() Chapter 6, Multipathing and RAID.
Chapter 6, Multipathing and RAID.
 | Caution - Before handling components, attach an ESD wrist strap to the grounding post that is built into the rear of the chassis. The system’s hard disk drives contain components that are extremely sensitive to static electricity. |
On occasion, a disk drive might fail. The status of the drive is indicated by its LEDs:
Green LED - Random or fast blink means normal disk activity, slow blink means that data is being rebuilt on that drive, and off means power is off. On means normal operation.
Amber LED - This LED is controlled by the expander firmware on the disk blade. Off indicates normal operation. Slow blink predicts imminent disk failure. On indicates that the system has detected a fault and service action is required.
Blue LED - Not used.
 | Caution - Possible data loss: You must not insert a disk that has been previously configured with a RAID volume into a new RAID volume. Before permanently removing a disk that is part of an active RAID volume, use the appropriate RAID tool to delete the RAID volume from the disk. |
A single disk drive failure does not cause a data failure if the disk drives are configured as a mirrored RAID volume. When there is no hot spare assigned to the mirror, the failed disk drive can be hot-swapped; when the new disk drive is inserted, the contents are automatically rebuilt from the rest of the array with no need to reconfigure the RAID parameters.
If the mirror was configured with a hot spare, the mirror is automatically rebuilt with the hot spare.
 | Caution - Possible data loss: You can remove the failed disk while the mirror is rebuilt to the hot spare, but you must not insert a new disk in its place until the rebuilding of the mirror is completed. While data is being rebuilt, the green LED on the rebuilding drive will blink slowly. The rebuild process can take a number of hours for large mirrors. |
The Sun Blade 6000 Disk Module disk drives can be replaced by users.
Observe the LEDs on the faces of the disk drives and identify the defective disk drive.
Execute the software commands appropriate to the software that you are using to prepare the hard drive for removal.
 | Caution - Do not operate the system with empty slots. Always insert a filler into an empty slot to reduce the possibility of module shut down. |
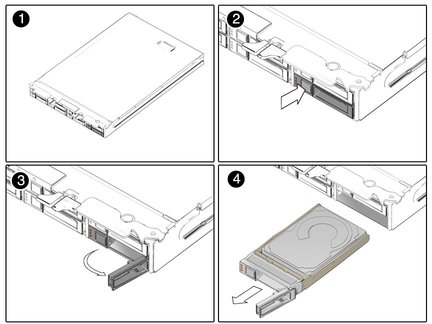
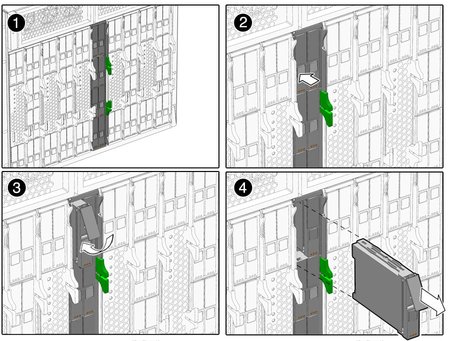
SAS disk drives in the Sun Blade 6000 Disk Module are hot-pluggable, so you can remove a SAS disk drive when the disk module is installed in the chassis, as well as when it is out of the chassis. See ![]() Removing a Hard Disk Drive From a Disk Module After Removing the Disk Module From the Chassis and
Removing a Hard Disk Drive From a Disk Module After Removing the Disk Module From the Chassis and ![]() Removing a Hard Disk Drive From a Disk Module Without Removing the Disk Module From the Chassis.
Removing a Hard Disk Drive From a Disk Module Without Removing the Disk Module From the Chassis.
Note - When you return the disk drives to their slots, you should return each disk drive to the same slot from which it was removed. Use an adhesive note or another method to temporarily label the disk drives when you remove them.


Press the button on the face of the disk drive to release the spring-loaded securing latch. See ![]() Removing a Hard Disk Drive From a Disk Module After Removing the Disk Module From the Chassis and
Removing a Hard Disk Drive From a Disk Module After Removing the Disk Module From the Chassis and ![]() Removing a Hard Disk Drive From a Disk Module Without Removing the Disk Module From the Chassis.
Removing a Hard Disk Drive From a Disk Module Without Removing the Disk Module From the Chassis.
Grasp the securing latch and remove the disk drive from the drive slot.
Installation is the reverse of the preceding procedure. When you install a disk drive, open its securing latch before you push the drive into the slot. Push the disk drive into the slot until it stops, and then close the securing latch to fully engage the connector on the disk drive backplane.
If the disk drives were previously configured as a mirrored RAID 1 array, an automatic resynchronization is invoked and the contents are automatically rebuilt from the rest of the array with no need to reconfigure the RAID parameters. If the bad disk drive was configured as a hot spare, the new disk drive is automatically configured as a new hot spare.