| Exit Print View | |
Sun Blade 6000 Disk Module Administration Guide |

|
1. Overview of Using Sun Blade 6000 Disk Modules With Server Modules
2. Inserting, Moving and Replacing the Sun Blade 6000 Disk Module
5. Installing, Removing or Replacing Disks
7. How LSI Host Bus Adapters Assign Target IDs to Expanders, Disks, and RAID Volumes
8. How Adaptec Host Bus Adapters Assign Target IDs to Expanders, Disks, and RAID Volumes
9. Setting Up Hardware RAID Volumes With LSI and Adaptec Host Bus Adapters
Setting Up Hardware RAID With LSI Host Bus Adapters
Deciding Whether to Configure RAID Before or After OS Installation
Configuring RAID for the Windows and Linux OS After the OS Is Installed
Configuring RAID for the Solaris OS After the OS Is Installed
To Configure RAID for SPARC Systems Before Installing the OS
To Configure LSI RAID for x86 Servers With Any OS From the BIOS Before the OS Is Installed
Setting Up Hardware RAID With the Adaptec Host Bus Adapters
Configuring Adaptec RAID After the OS Is Installed
Configuring Adaptec RAID for x86 Servers With Any OS from the BIOS
10. ILOM For the Sun Blade 6000 Disk Module
11. Oracle's Sun Storage Common Array Manager (CAM)
A. Using the SIA Application to Upgrade x86 Server Blade and Host Bus Adapter Firmware
C. Upgrading the Disk Module to Allow a SAS-2 Compatible Server Blade in the Chassis
This chapter contains these topics:
 | Caution - Possible data loss: You must not insert a disk that has been previously configured with a RAID volume into a new RAID volume. Before permanently removing a disk that is part of an active RAID volume, use the appropriate RAID tool to delete the RAID volume from the disk. |
The server modules that interoperate with the disk modules all have SAS host bus adapters that are capable of creating hardware RAID volumes.
The X6220 and T6300 server blades have an LSI 1068E SAS host bus adapter chip (with LSI firmware) on the blade’s motherboard.
Some server blades (see ![]() Supported RAID Controllers and Host Bus Adapters (HBA)) can use a RAID Expansion Module (REM) that uses the same LSI 1068E chip. This REM card is named the Sun Blade RAID 0/1 G2 Expansion Module.
Supported RAID Controllers and Host Bus Adapters (HBA)) can use a RAID Expansion Module (REM) that uses the same LSI 1068E chip. This REM card is named the Sun Blade RAID 0/1 G2 Expansion Module.
Note - REMs are daughter cards that mount on the server blades.
Some server blades (see ![]() Supported RAID Controllers and Host Bus Adapters (HBA)) can use a REM card that uses Intel chips and Adaptec firmware. This REM card is named the Sun Blade RAID 5 Expansion Module.
Supported RAID Controllers and Host Bus Adapters (HBA)) can use a REM card that uses Intel chips and Adaptec firmware. This REM card is named the Sun Blade RAID 5 Expansion Module.
All of these SAS host bus adapter options can control disks on the server blades (all the blades except X6450 can have on-board disks) and on the disk blade as well.
Both the LSI and the Adaptec controllers have two types of software for creating and managing RAID volumes. One type is a configuration utility that can be run from the BIOS before (or after) installation of an OS. The other type is a software application that runs on the server after an OS is installed.
![]() RAID Software lists the various RAID possibilities.
RAID Software lists the various RAID possibilities.
|
Documentation for this software can be found on http://www.docs.sun.com.
The LSI BIOS utility and MegaRAID Storage Manager are both documented in the Sun LSI 106x RAID User’s Guide (820-4933).
The Adaptec BIOS Utility is documented in the Sun Intel Adaptec BIOS RAID Configuration Utility User’s Manual (820-4708).
The Adaptec RAID Manager, also known as the Sun StorageTek RAID Manager, is documented in the Sun StorageTek RAID Manager Software User’s Guide (820-1177).
Note - You can configure hardware RAID either before or after loading the OS on your server module, with one exception: If you plan to create a RAID volume for your OS, the recommended procedure is to create the RAID first and then install the OS. You can do this with the LSI Logic RAID Configuration Utility (see ![]() To Configure LSI RAID for x86 Servers With Any OS From the BIOS Before the OS Is Installed) or with the Adaptec RAID Configuration Utility
(see
To Configure LSI RAID for x86 Servers With Any OS From the BIOS Before the OS Is Installed) or with the Adaptec RAID Configuration Utility
(see ![]() Configuring Adaptec RAID for x86 Servers With Any OS from the BIOS). For SPARC servers with LSI host bus adapters, you can use
raidctl to create a RAID volume before installing the Solaris OS (see
Configuring Adaptec RAID for x86 Servers With Any OS from the BIOS). For SPARC servers with LSI host bus adapters, you can use
raidctl to create a RAID volume before installing the Solaris OS (see ![]() To Configure RAID for SPARC Systems Before Installing the OS).
To Configure RAID for SPARC Systems Before Installing the OS).
Hardware RAID configurations can be set up with a server blade’s SAS host bus adapter. The type of controller varies from server module to server module
(see ![]() Supported RAID Controllers and Host Bus Adapters (HBA)).
Supported RAID Controllers and Host Bus Adapters (HBA)).
The X6220 and T6300 server modules that can be used with the Sun Blade 6000 Disk Module have an on-board LSI 1068E chip. Other server modules can use a RAID Expansion Modules (REM) that uses the same LSI 1068E chip.
The LSI 1068E SAS host bus adapter (an integrated RAID controller) simultaneously controls the disk drives on the server module itself (except for the X6450 servers that have no on-board disks) and the eight drives on the disk module, and can create RAID configurations involving all twelve disks. RAID 0 (striping), RAID 1 (mirroring), and RAID 1E (enhanced mirroring on three or more disks) are all supported by the firmware on the LSI 1068E chip.
You can configure hardware RAID either before or after loading the OS on your server module, with one exception: if you plan to create a RAID volume for your OS, the recommended procedure is to create the RAID first and then install the OS.
For x86 servers, depending on which HBA you have, you can do this either with the LSI Logic RAID Configuration Utility (see ![]() To Configure LSI RAID for x86 Servers With Any OS From the BIOS Before the OS Is Installed), or with the Adaptec RAID Configuration Utility (see
To Configure LSI RAID for x86 Servers With Any OS From the BIOS Before the OS Is Installed), or with the Adaptec RAID Configuration Utility (see ![]() Configuring Adaptec RAID for x86 Servers With Any OS from the BIOS).
Configuring Adaptec RAID for x86 Servers With Any OS from the BIOS).
For SPARC servers with LSI host bus adapters, you can use raidctl to create a RAID volume before installing the Solaris OS (see ![]() To Configure RAID for SPARC Systems Before Installing the OS).
To Configure RAID for SPARC Systems Before Installing the OS).
LSI has developed a software tool called the MegaRAID Storage Manager (MSM) for configuring and managing RAID on platforms running the Windows and Linux operating systems. Refer to Sun LSI 106x RAID User’s Guide (document number 820-4933) for a detailed description of MSM. You can download this document from:
http://docs.sun.com/app/docs/coll/blade6000dskmod
The MSM software is only available after the OS is installed.
Solaris includes a RAID hardware utility, accessed with the command: raidctl. This utility is used for LSI controllers and has functionality that is similar to that of the LSI BIOS utility. raidctl is also covered in the Sun LSI 106x RAID User’s Guide (820-4933).
Note - The man page for raidctl states that the utility is for the LSI 1064 SAS host bus adapter, but it can also be used with the LSI 1068E controller.
To create a RAID volume where you can install your Solaris OS:
Boot your server from a remote Solaris OS image.
Use raidctl to create a mirror.
Label the RAID volume.
Power-cycle your server.
Install the Solaris OS on your server.
The LSI RAID configuration utility that is entered from the server’s BIOS is valid for all x86 server blades and all supported operating systems.
Power-cycle your server module.
The BIOS screen appears.
Watch for the LSI Logic Corp. screen which comes up soon after the opening screen.
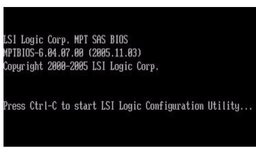
Press Ctrl-C to start the LSI Logic Configuration Utility.

With the LSI 1068E adapter highlighted in the first screen, press Enter.
The main screen of the utility opens
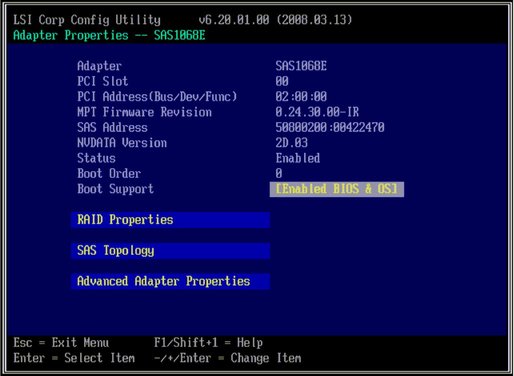
Use the arrow keys to select RAID Properties and press Enter.
The next screen allows you to choose the type of RAID
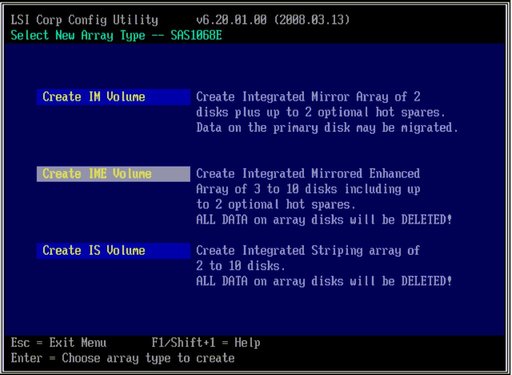
Select the type of volume you want to create, in this case an IME volume.
The next screen lists the disks you can choose to include in the volume and also disks you can choose as hot spares.
Note - Despite the fact that there are dual paths to disks 1 - 7, they are not shown in the BIOS configuration utility. The utility hides them so that you cannot include the same disk twice in a volume. That is, you cannot mirror a disk with itself.
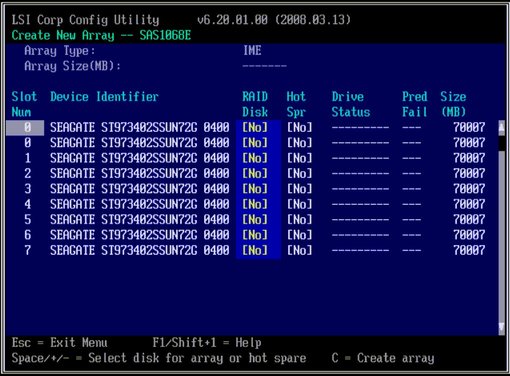
Note - Disks in the server blade are always listed first, followed by the disks in the disk blade. Here we see a single disk in the server blade (in bay 0) followed by eight disks in the disk blade (0 through 7).
Use the arrow keys to highlight the [No] item in the RAID Disk column for the disks you want to include in the volume. For each such disk, press the spacebar or type the + or - key to change the [No] to [Yes].
Use the arrow keys to highlight the [No] item in the Hot Spr column for the disks you want to use as hot spares. For each such disk, press the spacebar or type the + or - key to change the [No] to [Yes].
Your selections might look like this:
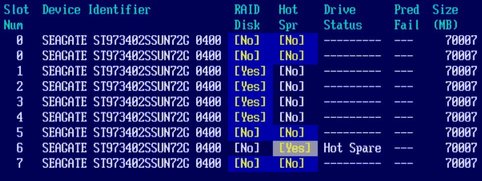
When you are satisfied with your choices, type c to create the array.
A confirmation screen appears.
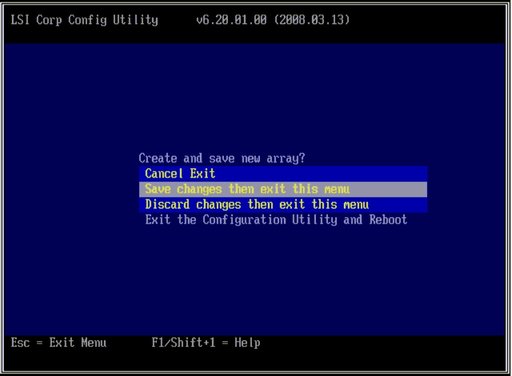
Select Save changes then exit this menu, and then press Enter.
The volume is created. When the utility finishes creating the volume, the main screen reappears.

Highlight RAID Properties and press Enter.
When the next screen appears, select View Existing Array and press Enter.
You see the volume you have created.
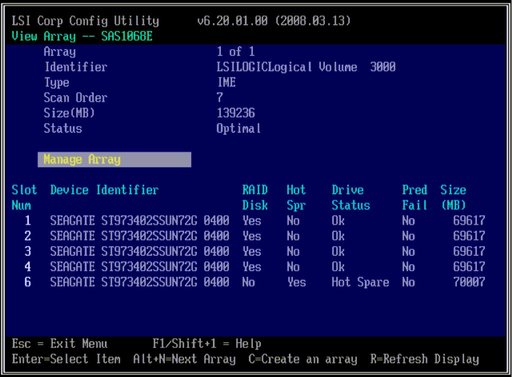
This section describes how hardware RAID configurations can be set up with a server blade’s Adaptec SAS host bus adapter.
You can create up to 24 volumes (arrays) using either the HBA BIOS-based utility or the Sun StorageTek RAID Manager software. If a volume contains more than one disk, it is created as a RAID volume. You can also create a volume that contains only one disk. This is the mechanism you use to present a single disk to the OS.
The Sun StorageTek RAID Manager software is used for configuring and managing RAID on platforms running the Solaris, Linux, and Windows operating systems. Sun StorageTek RAID Manager Software and is documented in Sun StorageTek RAID Manager Software User’s Guide (820-1177). You can download this document from http://docs.sun.com.
The Sun StorageTek RAID Manager software is only available after the OS is installed.
Note - The Adaptec BIOS utility is not available for SPARC systems so you must use the StorageTek RAID Manager to set up hardware RAID after the Solaris OS is installed.
This section describes how to use the Adaptec RAID Configuration Utility (ARCU) to create a RAID array. You can also use the procedure in this chapter to create single-drive volumes. A volume, by definition, consists of a single drive.
On servers equipped with an Adaptec SAS host bus adapter, all drives must be part of a volume before they can be used by the BIOS or the operating system. Adaptec controllers support single-drive volumes that can be used for drives that are not part of a RAID array. This is especially important when you add drives to a system.
Note - The Adaptec ARCU GUI uses the term “array” for a RAID volume and the term “volume” for a single-disk volume. An Adaptec array is synonymous with an LSI volume. The concept of a single-disk volume does not exist with LSI adapters.
Power-cycle your server.
During power up, type Ctrl-A to bring up the ARCU.
A message appears, and then the ARCU opens.
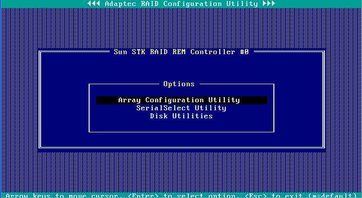
Select Array Configuration Utility.
The Array Configuration Utility appears
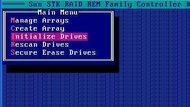
Select Initialize Drives.
A list of drives appears.

Select drives to initialize.
Use the arrow keys to scroll through the list and use the Insert key to select a drive.
Note - You can select many drives, and initialize them all at once, even if they are going to be in different volumes or arrays.
When you have selected all the drives to be initialized, press Enter.
A message warns you that initializing a drive erases array information from it.
Type yes.
The utility initializes the selected drives, and the main screen appears.
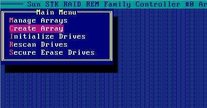
Select Create Array from the main menu.
A list of drives appears.

Select the drives to be included in the array or volume.
If you are going to create a one-disk volume, select the drive to be included in the volume. If you are going to create a RAID array, select all the drives to be included in the array. Repeat ![]() Step 9
through
Step 9
through ![]() Step 13 for each subsequent array or volume.
Step 13 for each subsequent array or volume.
Use the arrow keys to scroll through the list and use the spacebar to select a drive.
After you make your selections, press Enter.
The Array Properties view appears.
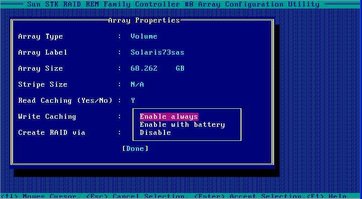
Make the following selections:
Press Enter or click Done to proceed.
Depending on the Write Caching selection, a number of warnings might appear:
If the Write Caching setting is Enable always, and if you do not have a battery, or if the battery is not charged sufficiently, several warnings might appear. Type Yes to proceed, or type No to return to the Array Properties screen.
If the write cache is enabled, a write cache warning appears.
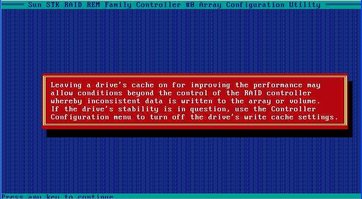
Click Enter to proceed.
The utility initializes the array.