| Exit Print View | |
Sun Blade 6000 Disk Module Administration Guide |

|
1. Overview of Using Sun Blade 6000 Disk Modules With Server Modules
2. Inserting, Moving and Replacing the Sun Blade 6000 Disk Module
Replacing Older X6220 Server Blades
To Verify the Correct 1068E Version
Overview of Upgrading Firmware on x86 Server Blades
Downloading SIA for Each x86 Server Blade
Checking SP Firmware and System BIOS Versions on x86 Server Blades
Upgrading SP Firmware and System BIOS on x86 Server Blades
Checking Host Bus Adapter Firmware Versions on x86 Server Blades
To Check LSI Adapter Firmware Version by Rebooting
To Check Adaptec Adapter Firmware Version Without Rebooting
To Check Adaptec Adapter Firmware Version by Rebooting
Upgrading Host Bus Adapter Firmware on x86 Server Blades
Updating Operating System Drivers on x86 Server Blades
To Upgrade Your Blade Server Windows Driver
Updating the Sun Blade 6000 Enclosure Device Driver in Windows
Upgrading Firmware on SPARC Server Blades
To Upgrade Your SPARC Blade Server System Firmware
To Upgrade Your SPARC Blade Server Disk Controller Firmware
Upgrading Disk Blade and SAS-NEM Firmware
Updating Solaris Network Installation Servers
5. Installing, Removing or Replacing Disks
7. How LSI Host Bus Adapters Assign Target IDs to Expanders, Disks, and RAID Volumes
8. How Adaptec Host Bus Adapters Assign Target IDs to Expanders, Disks, and RAID Volumes
9. Setting Up Hardware RAID Volumes With LSI and Adaptec Host Bus Adapters
10. ILOM For the Sun Blade 6000 Disk Module
11. Oracle's Sun Storage Common Array Manager (CAM)
A. Using the SIA Application to Upgrade x86 Server Blade and Host Bus Adapter Firmware
C. Upgrading the Disk Module to Allow a SAS-2 Compatible Server Blade in the Chassis
You need to make sure that your server blades and host bus adapters all have the minimum supported firmware and software. If they do not, they need to be upgraded.
Similarly, you need the most recent drivers so that your OS works correctly with the firmware on the host bus adapter.
This chapter discusses updating software and firmware, updating drivers, and other related subjects. It contains the following topics:
![]() Checking SP Firmware and System BIOS Versions on x86 Server Blades
Checking SP Firmware and System BIOS Versions on x86 Server Blades
![]() Checking Host Bus Adapter Firmware Versions on x86 Server Blades
Checking Host Bus Adapter Firmware Versions on x86 Server Blades
Older Sun Blade X6220 servers might have a version of the LSI 1068E SAS host bus adapter hardware that is incompatible with the Sun Blade 6000 Disk Module. Many older server blades have been upgraded to the newer 1068E controller, however, so you must check each older server that you intend to use with the disk blade.
You can use the LSI BIOS configuration utility to determine if your X6220 server blade has the correct hardware version of the 1068E controller.
Reboot your server.
Watch the server BIOS screen during reboot for the LSI BIOS entry. When you see it, press Ctrl-C.
When the configuration utility opens, highlight the adapter (SAS1068E) and press Enter.
The “Adapter Properties -- SAS1068E” screen opens.
Use the arrow keys to highlight Advanced Adapter Properties and press Enter.
The “Advanced Adapter Properties -- SAS1068E” screen opens.
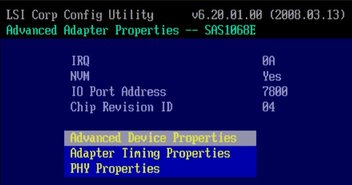
If the Chip Revision ID is 04, you have the correct version. If the Chip Revision ID is 02, you must have your server blade reworked or replaced by Oracle before you can use it with the Sun Blade 6000 Disk Module.
At a minimum the Chassis Monitoring Module (CMM) firmware needs to be at ILOM version 2.0.3.10, build 36968.
To check the CMM ILOM version, open a browser, browse to the IP address of the CMM, and log in. The opening screen will show the current ILOM firmware version. If it is not the version listed above, upgrade it before continuing. See ![]() Upgrading CMM ILOM Firmware.
Upgrading CMM ILOM Firmware.
Checking service processor (SP) firmware and system BIOS versions for x86 server blades can be done using ILOM without the need to shut down the blade.
Checking host bus adapter firmware versions requires a reboot.
Upgrading SP firmware and system BIOS (they are always upgraded together) and host bus adapter firmware all require shutting down the server blade and booting with Oracle’s Sun Installation Assistant (SIA) CD or image.
To upgrade your x86 server blade or host bus adapter firmware, use SIA. Each server blade has its own version of the SIA. To obtain an ISO CD-ROM image of the most recent SIA for each of your server blades go to:
http://www.sun.com/systemmanagement/sia.jsp
Scroll to your server and click Download. On the login page, select Installation from the Platform drop-down list box.
You can also obtain the SIA image from the disk blade page:
http://www.oracle.com/goto/blades
These are the minimum versions required in order to use the Sun Blade 6000 Disk Module:
|
Note - The system BIOS listed on the download site is often not the full name. For example, the complete name for the X6220 blade is OABJT110.
Open a browser, browse to the IP address of the CMM, and log in. Select each server blade in turn to leave the CMM and go to the server’s SP. The opening screen for each server’s SP shows the SP firmware version. In the following illustration it is 2.0.3.10, build number 36968.
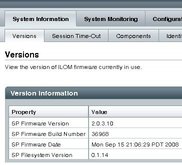
To view the BIOS version, select the Components tab. A list of all the components appears.
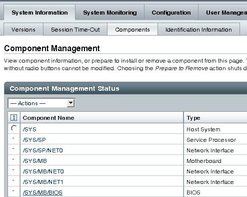
Click the component name that corresponds to the component type BIOS (here it is /SYS/MB/BIOS). A dialog box opens that shows the BIOS version, which is OABJT110 here.
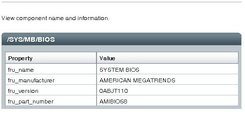
The SP firmware and system BIOS are upgraded together using SIA. See ![]() Appendix A, Using the SIA Application to Upgrade x86 Server Blade and Host Bus Adapter Firmware.
Appendix A, Using the SIA Application to Upgrade x86 Server Blade and Host Bus Adapter Firmware.
Note - The SIA CD or ISO image includes the correct firmware versions.
Tip - If you use SIA to upgrade the SP firmware and system BIOS, you need to boot to the SIA image. Because the SIA also upgrades host bus adapter firmware (for both LSI and Adaptec adapters), you should elect to upgrade the adapter firmware before exiting SIA. When you choose SIA’s Upgrade HBA Firmware task, SIA tells you the firmware version you have currently and the latest version. This saves you from needing to check your adapter firmware with an additional reboot.
At the time of initial release of the disk blade, the minimum firmware levels for on-board chip controllers or HBAs are shown below:
|
Power-cycle your server module.
The BIOS screen appears.
Watch for the LSI Logic Corp. screen which comes up soon after the opening screen.
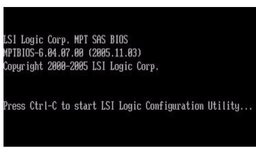
When the BIOS screen shows the LSI Logic Corp. message, press Ctrl-C to start the LSI Logic Configuration Utility.
The first screen of the utility appears after a short delay.

With the LSI 1068E adapter highlighted in the first screen, press Enter.
The main screen of the utility opens.
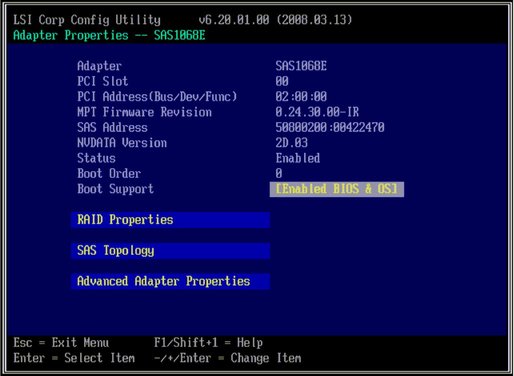
The MPT BIOS version number is at the top (LSI Corp Config Utility). Here it is 6.20.01.00. The MPT Firmware Revision shows the firmware version. Here it is 0.24.30.00.
If you are running the Sun StorageTek RAID Manager software, you can check the Adaptec host bus adapter firmware version without rebooting.
In the main screen of the GUI, select the host bus adapter (labeled controller) in the navigation tree on the left.
Click the Properties button on the tool bar.
The firmware version is shown.
Reboot and watch the BIOS screen.
When the Adaptec section of the BIOS appears, the firmware version is shown.
The host bus adapter firmware version is shown at the top as the build number. Here it is 15825.
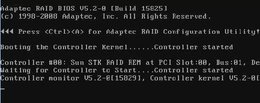
Note - You do not need to enter the Adaptec RAID configuration utility. Just note the number and continue booting.
Use SIA. See ![]() Appendix A, Using the SIA Application to Upgrade x86 Server Blade and Host Bus Adapter Firmware.
Appendix A, Using the SIA Application to Upgrade x86 Server Blade and Host Bus Adapter Firmware.
Note - The SIA CD or ISO image includes the correct firmware versions.
If you have an x86 server blade, such as a X6220, X6240, X6250, X6270, X6440 or X6450 server blade you need to confirm that you have the correct disk controller driver version installed to ensure compatibility with your disk module. The following tables list supported drivers as follows:
![]() Minimum HBA Drivers Required for Disk Module Support lists the minimum HBA driver versions required to support the Sun Blade 6000 Disk Module
Minimum HBA Drivers Required for Disk Module Support lists the minimum HBA driver versions required to support the Sun Blade 6000 Disk Module
![]() Minimum Drivers Required for SSD Support in a Disk Module lists the minimum HBA driver versions required to support SSD drives in the Sun Blade 6000 Disk Module
Minimum Drivers Required for SSD Support in a Disk Module lists the minimum HBA driver versions required to support SSD drives in the Sun Blade 6000 Disk Module
If your drivers are older versions, newer versions can be found at.
http://www.oracle.com/goto/blades
|
|
To determine the current LSI or Adaptec driver on your server.
For driver information on an LSI chip or HBA, enter the command:
% lsmod | grep mpt
For driver information on an Adaptec HBA, enter the command:
% lsmod | grep aac
If your drivers are older versions than those listed in ![]() Minimum HBA Drivers Required for Disk Module Support or
Minimum HBA Drivers Required for Disk Module Support or
![]() Minimum Drivers Required for SSD Support in a Disk Module (if you are using SSD drives in your disk blade), replace them with the listed ones. The latest drivers for your server are available at:
Minimum Drivers Required for SSD Support in a Disk Module (if you are using SSD drives in your disk blade), replace them with the listed ones. The latest drivers for your server are available at:
http://www.oracle.com/goto/blades
To determine the current LSI or Adaptec driver on your server.
For driver information on an LSI chip or HBA, enter the command:
% modinfo | grep mpt
For driver information on an Adaptec HBA, enter the command:
% modinfo | grep aac
If your drivers are older versions than those listed in ![]() Minimum HBA Drivers Required for Disk Module Support or
Minimum HBA Drivers Required for Disk Module Support or
![]() Minimum Drivers Required for SSD Support in a Disk Module (if you are using SSD drives in your disk blade), replace them with the listed ones. The latest drivers for your server are available at:
Minimum Drivers Required for SSD Support in a Disk Module (if you are using SSD drives in your disk blade), replace them with the listed ones. The latest drivers for your server are available at:
http://www.oracle.com/goto/blades
If you are running Microsoft Windows Server 2003 or Windows Server 2008, you will need to confirm that you have the correct disk controller driver version installed. If your drivers are older versions than those listed in ![]() Minimum HBA Drivers Required for Disk Module Support or
Minimum HBA Drivers Required for Disk Module Support or
![]() Minimum Drivers Required for SSD Support in a Disk Module (if you are using SSD drives in your disk blade), replace them with the listed ones.
Minimum Drivers Required for SSD Support in a Disk Module (if you are using SSD drives in your disk blade), replace them with the listed ones.
The latest drivers for your server are available at:
http://www.oracle.com/goto/blades
Follow these procedures to determine if your server requires a driver update.
Follow the steps below to check your disk controller driver version and, if necessary, perform a driver update.
Log in to the server blade you want to update.
Click Start, and then click Control Panel.
Double-click the System icon.
If you are running Windows Server 2008, go to Step 5. If you are running Windows Server 2003, select the Hardware tab.
Click Device Manager.
Scroll down the list of hardware types and do one of the following:
Expand "SCSI and RAID Host Bus Adapter" if your OS is Windows Server 2003.
Expand "Storage Controller" if your OS is Windows Server 2008.
An example showing an LSI 1068E on-board chip can be seen in ![]() Example of Device Manager Listing.
Example of Device Manager Listing.
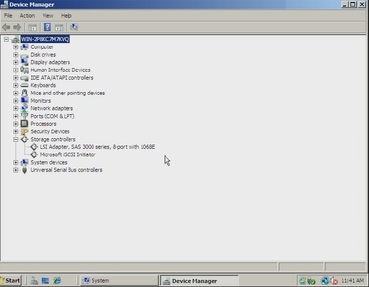
Right-click on the disk controller, and then click Properties.
You will see the Properties dialog box displayed (see ![]() Example Device Properties Dialog Box).
Example Device Properties Dialog Box).
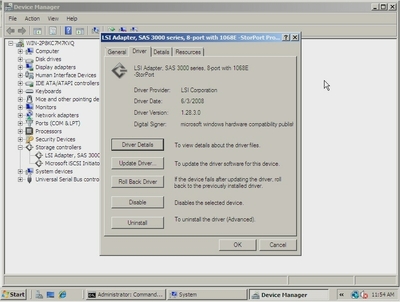
Compare the driver version listed with the minimum supported driver version required for your disk controller.
For the minimum version required for disk blade support, see ![]() Minimum HBA Drivers Required for Disk Module Support.
Minimum HBA Drivers Required for Disk Module Support.
For the minimum version required for SSD support in your disk blade, see
![]() Minimum Drivers Required for SSD Support in a Disk Module.
Minimum Drivers Required for SSD Support in a Disk Module.
If your disk controller driver is at or above the minimum version, skip to the next section.
If your disk controller driver is earlier than the minimum version required, do the following:
Go to the disk blade download page for your server and obtain the latest system software:
http://www.oracle.com/goto/blades
You can download the server’s latest Tools and Drivers CD ISO image, or the drivers specific to your Windows OS.
Copy (or extract if you downloaded a zip file) the driver files to a folder accessible by the server being updated.
Click the Update Driver button from the driver Properties dialog box (see ![]() Example Device Properties Dialog Box), and follow the instructions to update the driver with the new driver you downloaded from the Oracle download site.
Example Device Properties Dialog Box), and follow the instructions to update the driver with the new driver you downloaded from the Oracle download site.
If you are not at the driver properties dialog box, repeat steps 2-7.
Once the disk controller driver is updated, proceed to the next section.
The Sun Blade 6000 Disk Module requires an update to the standard enclosure device driver in Microsoft Windows Server 2003 or 2008 for the enclosure to be seen correctly by Windows Device Manager. You need to download and install an updated driver package from the disk blade site at:
http://www.oracle.com/goto/blades
Click the View by Category tab. Choose Systems Administration > Storage Management and look for the appropriate Sun Blade 6000 Disk Module downloadable package.
Download the executable file (.exe) to a folder on the server blade to be updated.
From the server blade, navigate to the folder where you downloaded the executable file and double-click it.
The device driver installation wizard starts.
Follow the on-screen instructions to complete the update.
If you have a T6300, T6320 or T6340 server blade, you need to check your server’s system firmware version and disk controller version to ensure compatibility with your disk module.
|
Follow these procedures to determine if your server requires a firmware upgrade patch.
For checking your server’s system firmware version, use the Advanced Lights Out Management (ALOM) feature.
If your server is configured to operate under an ILOM shell by default, you can create an ALOM compatibility shell to use the ALOM command specified in this section.
Log on to the service processor in CLI mode as root by entering the command:
ssh root@ipaddress
Where ipaddress is the IP address of your servers’ service processor.
After login, you want to be at the ALOM prompt:
sc>
If you see the ALOM prompt, skip to Step 3.
If you see an ILOM prompt:
->
You need to create an ALOM shell. Perform the following steps:
Create a user named admin, and then set the admin account role to Administrator and the CLI mode to alom.
If a user admin with the Administrator role has not yet been created, you can combine the create and set commands on a single line:
-> create /SP/users/admin role=Administrator cli_mode=alom
Creating user...
Enter new password: ********
Enter new password again: ********
Created /SP/users/admin
Note - The asterisks in the example do not appear when you enter your password.
If the user admin with the Administrator role already exists, you need only to change the CLI mode to alom:
-> set /SP/users/admin cli_mode=alom
Set ‘cli_mode’ to ‘alom’
Log out of the root account after you have finished creating the admin account:
-> exit
You are returned to the ILOM login prompt.
Log in to the ALOM CLI shell from the ILOM login prompt:
SUNSPxxxxxxxxxxxx login: admin
Password:
Waiting for daemons to initialize...
Daemons ready
Sun(TM) Integrated Lights Out Manager
Version 2.0.0.0
Copyright 2007 Sun Microsystems, Inc. All rights reserved.
Use is subject to license terms.
sc>
The sc> prompt indicates that you are in the ALOM CMT compatibility shell.
Enter the CLI command to show your server’s system firmware (SysFW) version:
sc> showhost
You will see output similar to the following example:
Sun System Firmware 7.1.6.d 2008/09/15 17:10
Hypervisor flash versions:
Hypervisor 1.6.7.a 2008/08/30 05:18
OBP 4.29.0.a 2008/09/15 12:01
Compare the system firmware version displayed with the required versions listed in ![]() Server Blade Minimum Required Firmware Versions.
Server Blade Minimum Required Firmware Versions.
If your system firmware is earlier than the minimum version required, go to:
http://www.oracle.com/goto/blades
If your system firmware is at or above the minimum version, skip to the next section to confirm your disk controller firmware.
You can check your server’s disk controller firmware version from the Solaris command line:
As root, enter the following command:
# /usr/sbin/prtconf -vp | egrep '(LSI|firmware-version|revision-id|mpt-version)'
Your output will look similar to the following example:
....
firmware-version: ‘1.18.00.00’
mpt-version: ‘1.05’
model: ‘LSI,1068E’
name: ‘scsi’
revision-id: 00000002
....
Compare the disk controller firmware version displayed with the required versions listed in
![]() Server Blade Minimum Required Firmware Versions.
Server Blade Minimum Required Firmware Versions.
If your disk controller firmware is earlier than the minimum version required, go to:
http://www.oracle.com/goto/blades
If your disk controller firmware is at or above the minimum version, you need do nothing further at this time.
Sun Blade 6000 Disk Modules and Sun Blade 6000 SAS-NEMs both contain SAS expanders. It is critical that these expanders have the correct firmware. The firmware versions must match for both devices.
The Common Array Manager (CAM) checks that these devices have the correct firmware and generates alarms if they do not. CAM also has a simple procedure for updating the firmware (see ![]() Upgrading Expander Firmware Using CAM).
Upgrading Expander Firmware Using CAM).
Note - At the release of this document, there is currently no support for using the Common Array Manager to upgrade disk module and SAS-NEM firmware to a level that supports SAS-2. For more information on upgrading disk module and SAS-NEM firmware to a level for SAS-2 host support, see ![]() Appendix C, Upgrading the Disk Module to Allow a SAS-2 Compatible Server Blade in the Chassis.
Appendix C, Upgrading the Disk Module to Allow a SAS-2 Compatible Server Blade in the Chassis.
If you use a Solaris network installation server for server blades that are paired with disk blades, and you are using Solaris 10 05/08, you need to add patches to the Solaris 10 05/08 OS image. Patches are not required for later versions of Solaris. For a list of required patches for Solaris 10 05/08, see ![]() Supported Servers, Firmware and Operating Systems.
Supported Servers, Firmware and Operating Systems.
The following is the command you use to apply a patch to a Solaris network installation image’s miniroot:
# patchadd -C <netinstall image>/Solaris_10/Tools/Boot <patch>If you do not use a Jumpstart server, you need to install Solaris 10 5/08 and then use patchadd to apply the patches.
If you use a Jumpstart server, you can have the patches automatically added by following these steps:
Install Solaris 10 05/08.
Download a stock image of Solaris 10 05/08 and copy the patches into the Solaris_10/Patches directory.
Note - The order of patch installation is based on the timestamp of the patches, oldest installed first.
This procedure must be done on an x86 system running the Solaris 10 05/08 with the latest available packaging and patching utilities already installed. You must then add required patches (see ![]() Supported Servers, Firmware and Operating Systems).
Supported Servers, Firmware and Operating Systems).
Change to your Solaris_10/Tools directory.
Run setup_install_server to a local directory:.
# ./setup_install_server -b /export/home/s10u5_patch
Unpack the miniroot.
# /boot/solaris/bin/root_archive unpackmedia /export/home/s10u5_patch /export/home/s10u5_patch_mr
Install the patch.
# patchadd -C /export/home/s10u5_patch_mr <patch directory>
Pack up the new miniroot.
# /boot/solaris/bin/root_archive packmedia /export/home/s10u5_patch /export/home/s10u5_patch_mr
On your installation server, use setup_install_server and then copy the newly generated x64.miniroot over:
Change to your Solaris_10/Tools directory.
Run setup_install_server to a local directory:
# ./setup_install_server /export/home/s10u5_patch
Save the old x86.miniroot file:
# cd /export/home/s10u5_patch/boot
# cp -p x86.miniroot x86.miniroot.orig
Copy the new x86.miniroot file from the machine on which you built it.
For example:
# cp -p /net/<machine_name>/export/home/s10u5_patch/boot/x86.miniroot