| Exit Print View | |
Sun Blade 6000 Disk Module Administration Guide |

|
1. Overview of Using Sun Blade 6000 Disk Modules With Server Modules
2. Inserting, Moving and Replacing the Sun Blade 6000 Disk Module
5. Installing, Removing or Replacing Disks
7. How LSI Host Bus Adapters Assign Target IDs to Expanders, Disks, and RAID Volumes
8. How Adaptec Host Bus Adapters Assign Target IDs to Expanders, Disks, and RAID Volumes
About Adaptec Host Bus Adapters
9. Setting Up Hardware RAID Volumes With LSI and Adaptec Host Bus Adapters
10. ILOM For the Sun Blade 6000 Disk Module
11. Oracle's Sun Storage Common Array Manager (CAM)
A. Using the SIA Application to Upgrade x86 Server Blade and Host Bus Adapter Firmware
C. Upgrading the Disk Module to Allow a SAS-2 Compatible Server Blade in the Chassis
The Sun Blade RAID 5 Expansion Module is a SAS host bus adapter that is based on an Intel chip set with Adaptec firmware. This chapter refers to it as the Adaptec host bus adapter, Adaptec disk controller, or just the Adaptec controller.
This chapter contains these topics:
With the Adaptec host bus adapter disks may not be used by the BIOS or OS unless they have been made members of an array. With the Sun Blade RAID 5 Expansion Module, an Adaptec host bus adapter, you must include every disk in an array volume if you want the OS to see it.
You can host bus adapter’s BIOS utility called the Adaptec RAID Configuration Utility (ARCU) to create arrays. This utility is entered by pressing Ctrl-A when prompted during the server boot process. Refer to the Sun Intel Adaptec BIOS RAID Utility User’s Manual (820-4708) for details.
![]() Opening Screen of the Adaptec RAID Configuration Utility (ARCU) shows the opening screen of the ARCU. There are three options:
Opening Screen of the Adaptec RAID Configuration Utility (ARCU) shows the opening screen of the ARCU. There are three options:
Array Configuration Utility: Use this for creating and managing arrays (including single-disk arrays), initializing disk drives, and re-scanning disk drives.
SerialSelect Utility: Use this for modifying adapter settings.
Disk Utilities: Use this option for viewing all drives, verifying their existence, and formatting them.
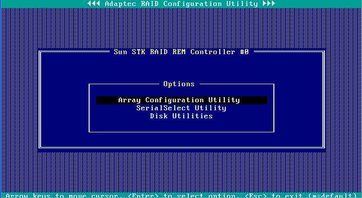
The ARCU can create up to 24 volumes (arrays). If a volume contains more than one disk, it is created as a RAID volume. You can also create a volume that contains only one disk. This is the mechanism you use to present a single disk to the OS.
Note - The volumes created by the ARCU take into account dual paths to SAS disks and hide the dual paths from the OS. See ![]() Multipathing Using Adaptec Host Bus Adapters. Because there are no disks presented to the OS that are not in volumes, you cannot manipulate dual paths at the OS level.
Multipathing Using Adaptec Host Bus Adapters. Because there are no disks presented to the OS that are not in volumes, you cannot manipulate dual paths at the OS level.
The Adaptec host bus adapter uses slot-based mapping. This means that a disk’s target ID is the ID of the bay it is in. If a disk is moved to a different bay, the adapter changes the disk’s ID to that of the bay it moves into.
The adapter assigns target IDs to disks using two parameters:
The enclosure number, which is labeled the “Box” number.
The bay that the disk is in, which is labeled the “Slot” number.
For example, a disk in bay 3 of a disk blade might have a target ID of Box04:Slot03, where Box04 refers to the disk blade as an enclosure.
The bays in a disk blade are numbered like this:
|
You can view the enclosure IDs and disk IDs of all the SAS targets that the Adaptec adapter sees by using the following tools:
The Adaptec RAID Configuration Utility (ARCU). See the Sun Intel Adaptec BIOS RAID Utility User’s Manual (820-4708) for a description.
The Sun StorageTek RAID Manager software. See the Sun StorageTek RAID Manager Software User’s Guide (820-1177) for a description.
![]() Disks and Enclosures Seen by an Adaptec Controller on an X6250 Blade shows a list of disks and enclosures seen by the Adaptec controller
(a Sun Blade RAID 5 Expansion Module) on an X6250 server blade, using the ARCU’s Disk Properties option.
Disks and Enclosures Seen by an Adaptec Controller on an X6250 Blade shows a list of disks and enclosures seen by the Adaptec controller
(a Sun Blade RAID 5 Expansion Module) on an X6250 server blade, using the ARCU’s Disk Properties option.
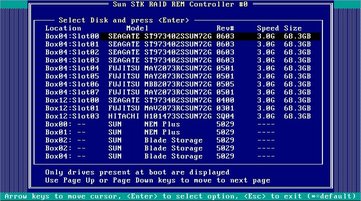
The listed targets are:
Box04:Slot00 through Box04:Slot07 are the disks in bays 0 through 7 of the disk blade that is paired with the X6250 server blade. The disk blade is an enclosure with the label Box04.
Box12:Slot00 through Box12:Slot03 are the disks in bays 0 through 3 of the X6250 server blade. (The server blade, as an enclosure, is labeled Box12.)
Note - If a disk bay is empty (for example, Box12:Slot02) no disk is reported by the ARCU. If a disk is inserted in this bay at a later time, it becomes Box12:Slot02.
Box00 and Box01 are the two SAS-NEMs in the Sun Blade 6000 chassis. Note that the Multi-Fabric NEMs are identified as “NEM Plus” in the above screen example.
Box02 is another disk blade (“Blade Storage”) somewhere else in the Sun Blade 6000 chassis.
We can infer from this list that the chassis holds two SAS-NEMs (Box00 and Box01) and two disk blades (Box02 and Box04), one of which (Box04) is paired with the X6250 server blade.
The enclosure numbers (Box00, etc.) are assigned when the X6250 server blade is booted up for the first time and the Adaptec controller scans for SAS devices.
The Adaptec host bus adapter sees:
All of the enclosures in the chassis. This includes SAS-NEMs, disk blades, and server blades if they can have on-board disks.
Some, but not all, of the disks in the chassis. The disks on its own server blade and those on a disk blade that is paired with the server blade are seen. The disk numbers used are always SLOT00, SLOT01, SLOT02, ... Disks that are not in either the server blade or its paired disk blade are not seen.
Volume IDs (Array IDs) are assigned in the order in which they are created with the ARCU. ![]() Opening Screen of the ARCU’s Array Configuration Utility Option Showing the Contents of Array 00 shows the opening screen of the ARCU’s Array Configuration Utility option. You can see that four arrays have been created, 00
through 03. Subsequently, Array 02 was deleted or has become inactive and is no longer listed.
Opening Screen of the ARCU’s Array Configuration Utility Option Showing the Contents of Array 00 shows the opening screen of the ARCU’s Array Configuration Utility option. You can see that four arrays have been created, 00
through 03. Subsequently, Array 02 was deleted or has become inactive and is no longer listed.
If Array 02 was deleted, the next array to be created will be labeled 02 (the lowest available number). However, if the array still exists but is inactive, it will retain the label 02 and a new array will become Array 04.
Note - In naming new arrays, the lowest available number is always used.
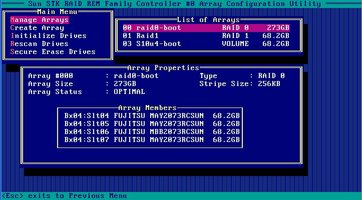
Array 00 is highlighted and you can see that it comprises four disks in a RAID 0 array (volume). The disks are Box04:Slot04 (abbreviated Bx04:Slt04) through Box04:Slot07.
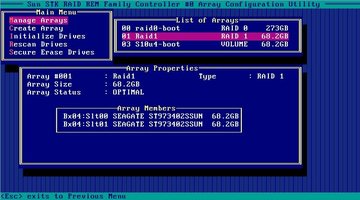
![]() Contents of Array 01 shows the contents of Array 01, a RAID 1 mirror
Contents of Array 01 shows the contents of Array 01, a RAID 1 mirror
![]() Contents of Array 03 shows the contents of Array 03, a single disk volume.
Contents of Array 03 shows the contents of Array 03, a single disk volume.
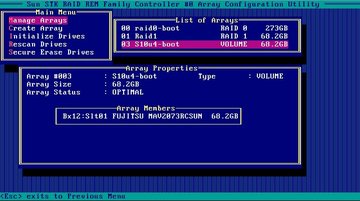
Looking at the preceding figures, you can see that the three existing arrays include only seven of the eleven disks listed in ![]() Disks and Enclosures Seen by an Adaptec Controller on an X6250 Blade. Because all disks must be in arrays, you need to put the other four in arrays (volumes) if you want your OS to see them.
Disks and Enclosures Seen by an Adaptec Controller on an X6250 Blade. Because all disks must be in arrays, you need to put the other four in arrays (volumes) if you want your OS to see them.
Highlight the Create Array menu item in the Array Configuration Utility screen and press Enter. The next screen that opens shows you the entire list of drives.
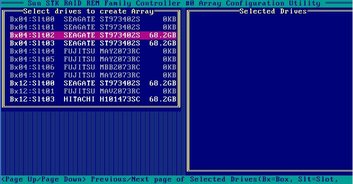
The drives that are dimmed are already in arrays. You can select one or more of the others to create additional arrays. The procedure is outlined in ![]() Setting Up Hardware RAID With the Adaptec Host Bus Adapters.
Setting Up Hardware RAID With the Adaptec Host Bus Adapters.