10g (9.0.4)
Part Number B12121-01
Home |
Solution Area |
Contents |
Index |
| Oracle® Application Server ProcessConnect User's Guide 10g (9.0.4) Part Number B12121-01 |
|
This chapter describes the host and remote trading partner identification, organization, cooperation, delivery, security, and endpoint capability tasks required to design an integration between enterprises. The host trading partner uses the Oracle Application Server ProcessConnect user interface tool to define the capabilities for all trading partners (both host and remote). The host trading partner consults with the remote trading partner to obtain the necessary details.
This chapter contains these topics:
The Oracle Application Server ProcessConnect user interface tool enables you to perform the trading partner management tasks required for an integration between enterprises. These tasks consist of creating, viewing, updating, and deleting host and remote trading partner profile data. Table 25-1 describes each trading partner task and provides references for more details.
The tasks described in this chapter enable you to define the host and remote trading partner capabilities. The host trading partner is the organization in which Oracle Application Server ProcessConnect is installed. The remote trading partner is the organization outside your enterprise with whom to conduct business.
These capabilities define how a trading partner is identified, the cooperations (collaborations) of a trading partner, the delivery and security characteristics of a trading partner, and the endpoints of a trading partner. After you define this profile data, you can create a trading partner agreement between the host and remote trading partners.
The host trading partner consults with the remote trading partner to obtain the necessary details and uses the Oracle Application Server ProcessConnect user interface tool to define the capabilities for both host and remote trading partners. While the concepts are nearly all the same, the access method into the Oracle Application Server ProcessConnect user interface tool by which you define host and remote trading partners is different, as shown in Table 25-2. This is because some of the host trading partner details are created during installation.
|
See Also:
"Creating Remote Trading Partner Identification" for instructions on creating remote trading partners |
The Oracle Application Server ProcessConnect user interface tool enables you to perform the trading partner identification management tasks shown in Figure 25-1 and Figure 25-2. Figure 25-1 shows the host trading partner and Figure 25-2 shows the remote trading partner. These tasks are described in detail in this section. The trading partner identification uniquely identifies the trading partner whose capabilities are described in a trading partner agreement.
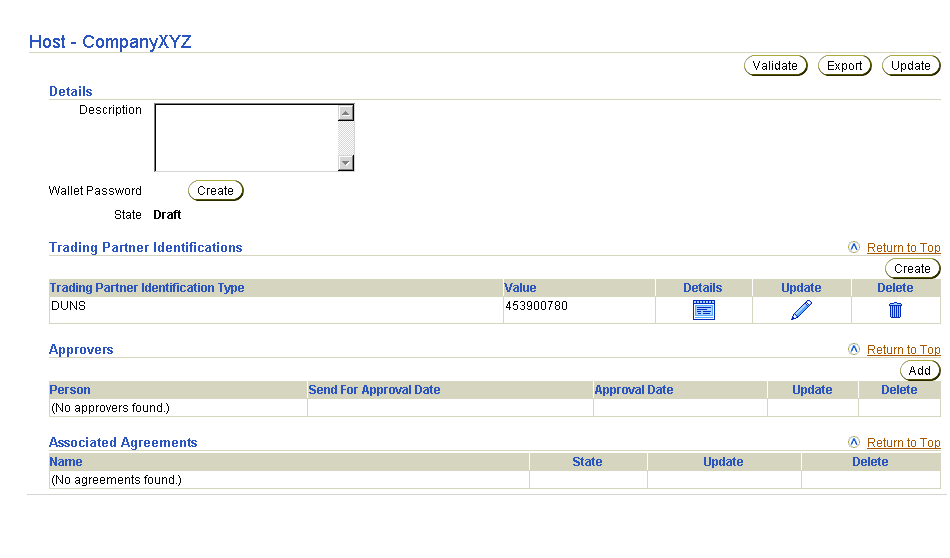
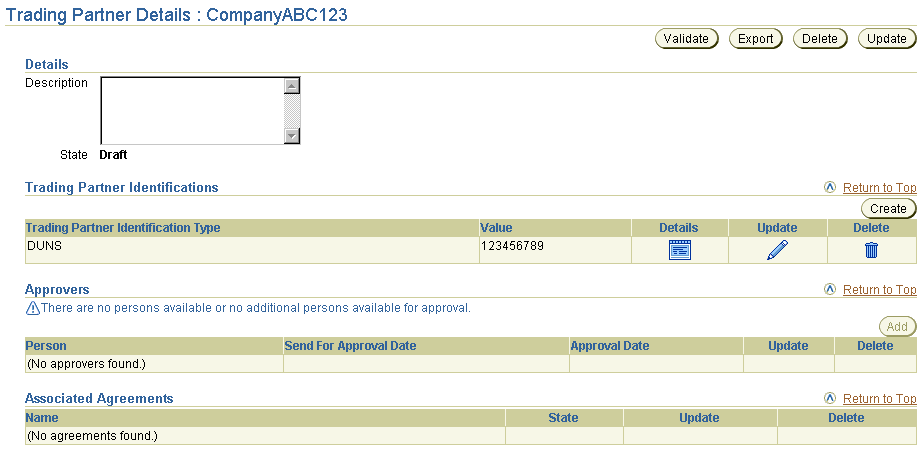
Table 25-3 identifies the trading partner identification management tasks shown in Figure 25-1 and Figure 25-2 and provides references to procedures for performing these tasks.
| Page Elements | Management Task | First See Section... | Then See Section... |
|---|---|---|---|
|
Update buttons at top or bottom of either Figure 25-1 or Figure 25-2 |
Update the trading partner name and description |
||
|
Create buttons in Trading Partner Identifications section of either Figure 25-1 or Figure 25-2 |
Create trading partner identification |
|
|
|
Delete columns in Trading Partner Identifications section of either Figure 25-1 or Figure 25-2 |
Delete trading partner identification |
||
|
Update columns in Trading Partner Identifications section of either Figure 25-1 or Figure 25-2 |
Update trading partner identification |
|
|
|
Details columns in Trading Partner Identifications section of either Figure 25-1 or Figure 25-2 |
View details about trading partner identification |
|
|
See Also:
|
Follow these instructions to access the host and remote trading partner identification management tasks shown in Figure 25-1 and Figure 25-2:
To access trading partner identification management tasks:
| For a... | Perform These Steps... |
|---|---|
|
Remote trading partner |
|
|
Host trading partner |
The trading partner organization name that appears was initially defined through the following methods:
organization during Oracle Application Server ProcessConnect installation.
Follow these instructions to update the trading partner name and description:
To update the trading partner name and description:
If you are updating the host trading partner name and description, the Update Host page appears. If you are updating the remote trading partner name and description, the Update Trading Partner page appears.
The trading partner name is updated.
Follow these instructions to create trading partner identification:
To create trading partner identification:
The Create Trading Partner Identification page appears.
The trading partner identification is created and the Trading Partner Identification Details page for the new trading partner identification appears.
|
See Also:
"Creating a Trading Partner Identification Type" to create your own identification types to display as selectable types in the Create Trading Partner Identification page |
Follow these instructions to delete trading partner identification:
To delete trading partner identification:
The trading partner identification is deleted.
Follow these instructions to update trading partner identification:
To update trading partner identification:
The Update Trading Partner Identification page appears.
Trading partner identification is updated and the Trading Partner Identification Details page for the updated trading partner identification appears.
Follow these instructions to view details about trading partner identification:
To view trading partner identification:
The Trading Partner Identification Details page for the selected trading partner identification appears.

Text description of the illustration details_tpid_details.gif
These pages, as with the Host - name and Trading Partner Details : name pages shown in Figure 25-1 and Figure 25-2, respectively, enable you to delete or update trading partner identification.
The Oracle Application Server ProcessConnect user interface tool enables you to perform the organization management tasks shown in Figure 25-3. These tasks are described in detail in this section.

This section describes the following organization management tasks:
You can create two person types under the People section:
Both person types are created from the Organization page shown in Figure 25-3. The method by which you access the Organization page determines the type of person that you can create, as shown in Table 25-4.
These two person types have different capabilities, as shown in Table 25-5.
You can assign a method for contacting this person (such as a phone number or e-mail address) from the Person Details page. (See the lower page of Figure 25-4.)
You can also assign a method for contacting an organization in the Contact Information section (such as a phone number or e-mail address). This contact method can then be used later for trading partner communication.
|
See Also:
"Viewing the State of Modeling Metadata and Profile Data on the Details Page" for details about agreement approvers |
The Oracle Application Server ProcessConnect user interface tool enables you to perform the person management tasks shown in Figure 25-4. These tasks are described in detail in this section.
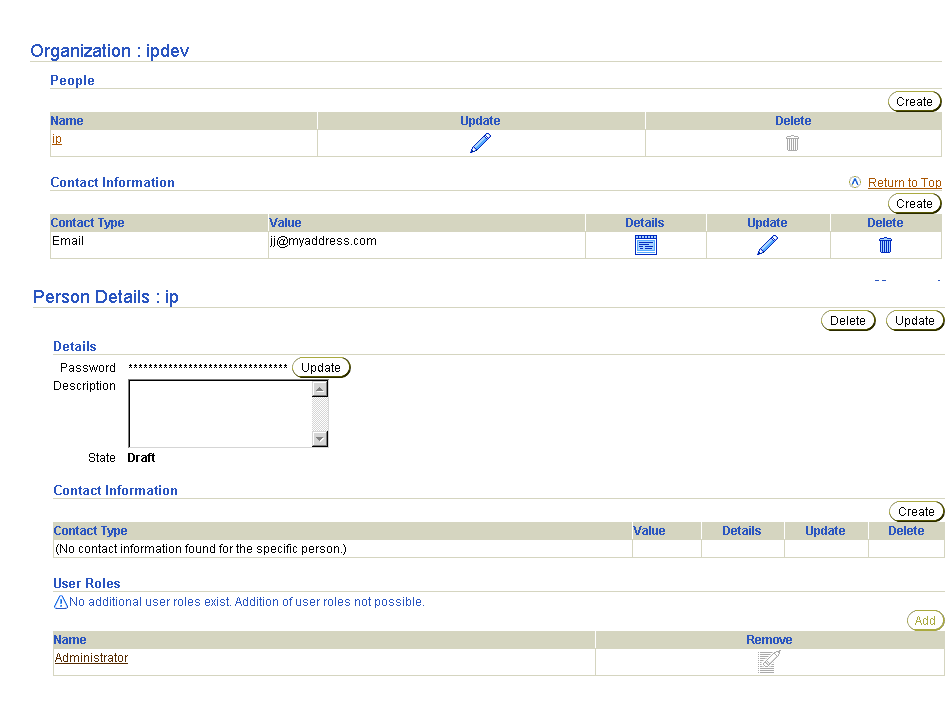
Table 25-6 identifies the person management tasks shown in Figure 25-4 and provides references to procedures for performing these tasks.
| Page Elements | Management Task | First See Section... | Then See Section... |
|---|---|---|---|
|
Create button in People section of Figure 25-4 |
Create a person |
||
|
Delete column in People section of Figure 25-4 |
Delete a person |
|
|
|
Update column in People section of Figure 25-4 |
Update a person |
|
|
|
Name column in People section of Figure 25-4 (To access the Person Details page shown in lower page of Figure 25-4) |
View details about a person and update the password |
|
|
|
Create button in Contact Information section of Figure 25-4 |
Create person contact details |
|
|
|
Delete column in Contact Information section of Figure 25-4 |
Delete person contact details |
|
|
|
Update column in Contact Information section of Figure 25-4 |
Update person contact details |
|
|
|
Details column in Contact Information section of Figure 25-4 |
View person contact details |
|
|
|
Add button in User Roles section of Figure 25-4 |
Add a user role to a host trading partner person |
|
|
|
Remove column in User Roles section of Figure 25-4 |
Remove a user role from a host trading partner person |
|
|
|
Name column in User Roles section of Figure 25-4 |
View user role and use case group details |
|
Follow these instructions to access the person management tasks shown in Figure 25-4:
To access person management tasks:
| For a... | Perform These Steps... |
|---|---|
|
Remote trading partner person |
|
|
Host trading partner person |
The Organization : name page appears.
Follow these instructions to create a person:
To create a person:
The Create Person page appears.
The person is created and the Person Details page for the new person appears. If this is a host trading partner person, the User Roles section appears at the bottom of the page. (See the lower page of Figure 25-4.) This section enables you to add the user role to the person. If this is a remote trading partner person, the User Roles section does not appear.
This person (for both host and remote trading partner person) can now be added to the list of approvers for profile data such as agreements, applications, and trading partners.
|
See Also:
The following sections for details on how this person appears in the list of potential approvers for a trading partner agreement:
|
Follow these instructions to delete a person:
To delete a person:
The person is deleted and the Organization : name page appears.
You can update the name or description of a person from this page. Follow these instructions to update a person:
To update a person:
The Update Person page appears.
The person is updated and the Person Details page for the updated person appears.
Follow these instructions to view details about a specific person and update the password:
To view a person and update the password:
The Person Details page for the selected person appears (for this example, a person named ip). For this example, a host trading partner person is shown because the User Roles section appears at the bottom of the page; for remote trading partners, this field does not appear.
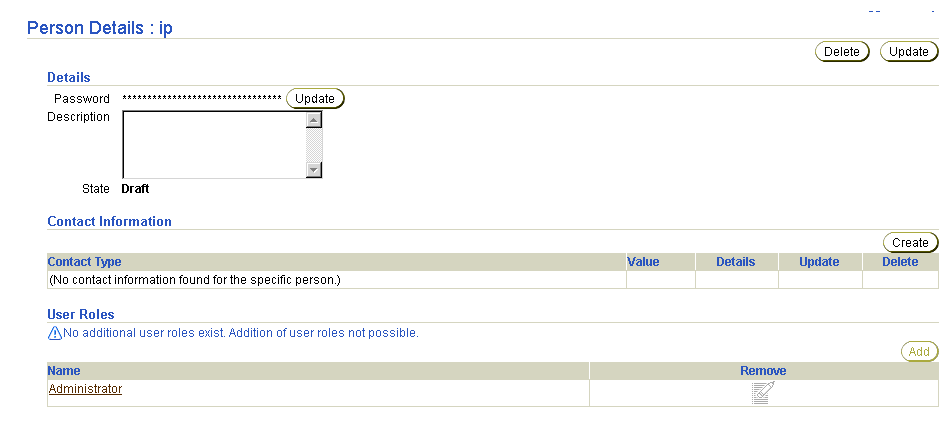
This page, as with the Organization : name page shown in the upper page of Figure 25-4, enables you to delete or update the selected person.
The Update Person Password page appears.
| Field | Description |
|---|---|
|
New Password * |
Enter a new password. |
|
Confirm New Password * |
Enter the new password a second time. |
The password is updated and the Person Details page appears.
Follow these instructions to create person contact details:
To create person contact details:
The Person Details page for the selected person appears.
The Create Contact Information page appears.
| Field | Description |
|---|---|
|
Contact Type * |
Select one of the available types (Phone, Email, Fax, or Contact Name) or your own contact type. See Also: "Creating a Contact Type" to create your own contact type to display as a selectable type in the Create Contact Information page. |
|
Value |
Enter a value for the selected contact type. For example, if you select Phone as the contact type, enter a phone number in this field. |
The contact details are created and the Contact Information Details page for the new contact details appears.
Follow these instructions to delete person contact details:
To delete person contact details:
The Person Details page for the selected person appears.
The person contact details are deleted and the Organization : name page appears.
Follow these instructions to update person contact details:
To update a person contact details:
The Person Details page for the selected person appears.
The Update Contact Information page appears.
The person contact details are updated and the Contact Information Details page for the updated person contact details appears.
Follow these instructions to view details about specific person contact details:
To view person contact details:
The Person Details page for the selected person appears.
The Contact Information Details page for the selected person contact details appears.

These pages, as with the Person Details page shown in the lower page of Figure 25-4, enable you to delete or update the selected person contact details.
You can add a user role to a host trading partner person, but not to a remote trading partner person. A user role is the group of related use cases (privileges) that permit a person to connect to and perform tasks with the Oracle Application Server ProcessConnect user interface tool. Follow these instructions to add a user role to a person:
To add a user rule to a host trading partner person:
The Person Details page for the selected host trading partner person appears.
The Create User Role Enrollment page appears.
The Person Details page for the host trading partner person appears. If the person does not have a password, you receive an error and the user role is not added.
The Person Details page appears.
|
See Also:
"Updating a Person" if you need to add a password to the host trading partner person |
You can remove a user role from a host trading partner person, but not from a remote trading partner person (they have none). Follow these instructions to remove a user role from a person:
To remove a user rule from a host trading partner person:
The Person Details page for the selected host trading partner person appears.
The user role is removed and the Person Details page appears.
User roles consist of use case groups that include the use cases (privileges) that permit a person to connect to and perform tasks with the Oracle Application Server ProcessConnect user interface tool. As a small example, the Administrator user role contains many uses cases, such as:
This use case enables you to update the modeling metadata of a translation step, as described in "Updating a Step"
This use case enables you to create the profile data for a transport, as described in "Creating an Endpoint"
Follow these instructions to view the user role and its associated use case group details:
To view user role and use case group details:
The Person Details page for the selected person appears.
The User Role Details page for the selected user role appears.

The Oracle Application Server ProcessConnect user interface tool enables you to perform the organization contact details management tasks shown in Figure 25-5. These tasks are described in detail in this section. The contact method details for the organization can then be used later for trading partner communication.

Table 25-7 identifies the organization contact details management tasks shown in Figure 25-5 and provides references to procedures for performing these tasks.
| Page Elements | Management Task | First See Section... | Then See Section... |
|---|---|---|---|
|
Create button in Contact Information section of Figure 25-5 |
Create organization contact details |
||
|
Delete column in Contact Information section of Figure 25-5 |
Delete organization contact details |
|
|
|
Update column in Contact Information section of Figure 25-5 |
Update organization contact details |
|
|
|
Details column in Contact Information section of Figure 25-5 |
View organization contact details |
|
Follow these instructions to access the organization contact management tasks shown in Figure 25-5:
To access organization contact management tasks:
| For a... | Perform These Steps... |
|---|---|
|
Remote trading partner |
|
|
Host trading partner |
The Organization : name page appears.
Follow these instructions to create organization contact details:
To create organization contact details:
The Create Contact Information page appears.
| Field | Description |
|---|---|
|
Contact Type * |
Select Phone, Email, Fax, or Contact Name. See Also: "Creating a Contact Type" to create your own contact type to display as a selectable type in the Create Contact Information page. |
|
Value |
Enter a value for the selected contact type. For example, if you select Phone as the contact type, enter a phone number in this field. |
The organization contact details are created and the Contact Information Details page for the new contact details appears.
Follow these instructions to delete organization contact details:
To delete organization contact details:
The organization contact details are deleted and the Organization : name page appears.
Follow these instructions to update organization contact details:
To update organization contact details:
The Update Contact Information page appears.
The organization contact details are updated and the Contact Information Details page for the updated organization contact details appears.
Follow these instructions to view details about specific organization contact details:
To view organization contact details:
The Contact Information Details page for the selected organization contact details appears.

These pages, as with the Organization : name page shown in Figure 25-5, enable you to delete or update the selected organization contact details.
The Oracle Application Server ProcessConnect user interface tool enables you to perform the cooperation (collaboration) management tasks shown in Figure 25-6. Cooperations are the result of a correct configuration setup of collaborations. These tasks are described in detail in this section.

This section describes the following cooperation management tasks:
After trading partner capabilities are defined (for example, RNIF, version 2.0), you can define more specific trading partner capabilities in a business collaboration (such as the role played by a trading partner, for example, Buyer - 3A4 V02 or Seller - 3A4 V02.00).
The business protocol identifies the implementation guidelines for the reliable transport of business document messages between trading partners (essentially the capabilities of the trading partner). One example of a business protocol is RNIF, version 2.0 using the RosettaNet Document Protocol. This business protocol consists of three protocols:
The Oracle Application Server ProcessConnect user interface tool enables you to perform the supported actor management tasks shown in Figure 25-7. These tasks are described in detail in this section. The supported actor defines the capabilities of a trading partner in a business collaboration (such as buyer or seller).

Table 25-8 identifies the supported actor management tasks shown in Figure 25-7 and provides references to procedures for performing these tasks.
| Page Elements | Management Task | First See Section... | Then See Section... |
|---|---|---|---|
|
Create button in Supported Actors (Collaborations) section of Figure 25-7 |
Create a supported actor |
||
|
Delete column in Supported Actors (Collaborations) section of Figure 25-7 |
Delete a supported actor |
|
|
|
Update column in Supported Actors (Collaborations) section of Figure 25-7 |
Update a supported actor |
|
|
|
Details column in Supported Actors (Collaborations) section of Figure 25-7 |
View a supported actor for a host trading partner View a supported actor for a remote trading partner |
|
|
|
Details column in Supported Actors (Collaborations) section of Figure 25-7 |
Update validation rules states for a host trading partner Update validation rules states for a remote trading partner |
|
"Updating Validation Rules States for a Host Trading Partner" "Updating Validation Rules States for a Remote Trading Partner" |
Follow these instructions to access the supported actor management tasks shown in Figure 25-7:
To access supported actor management tasks:
| For a... | Perform These Steps... |
|---|---|
|
Remote trading partner |
|
|
Host trading partner |
The Cooperations : name page appears.
| To... | Then... | See Section... |
|---|---|---|
|
Create a supported actor |
Click Create. |
|
|
Delete a supported actor |
Select a specific supported actor in the Delete column. |
|
|
Update a supported actor |
Select a specific supported actor in the Update column. |
|
|
View details about a supported actor for a host trading partner |
Select a specific supported actor in the Details column of a host trading partner |
|
|
View details about a supported actor for a remote trading partner |
Select a specific supported actor in the Details column of a remote trading partner |
|
|
Update validation rules states for a host trading partner |
Select a specific supported actor for which to update the validation rules states in the Details column of a host trading partner |
"Updating Validation Rules States for a Host Trading Partner" |
|
Update validation rules states for a remote trading partner |
Select a specific supported actor for which to update the validation rules states in the Details column of a remote trading partner |
"Updating Validation Rules States for a Remote Trading Partner" |
Follow these instructions to define a trading partner's capabilities by creating a supported actor:
To create a supported actor:
The Create Supported Actor page appears.
A supported actor represents the capability of a trading partner. The native role defines the external behavior for a business process. In this case, this is the behavior the trading partner exhibits while performing that business function (for example, buyer or seller).
The supported actor is created and the Supported Actor Details page for the new supported actor appears.
|
See Also:
|
Follow these instructions to delete a supported actor:
To delete a supported actor:
The supported actor is deleted and the Cooperations : name page appears.
Follow these instructions to update a supported actor:
To update a supported actor:
The Update Supported Actor page appears.
The supported actor is updated and the Supported Actor Details page for the updated supported actor appears.
Follow these instructions to view details about a specific supported actor for a host trading partner:
To view a supported actor for a host trading partner:
The Supported Actor Details page for the selected supported actor appears (in this example, for a RosettaNet actor). The upper section of the page displays the following details:
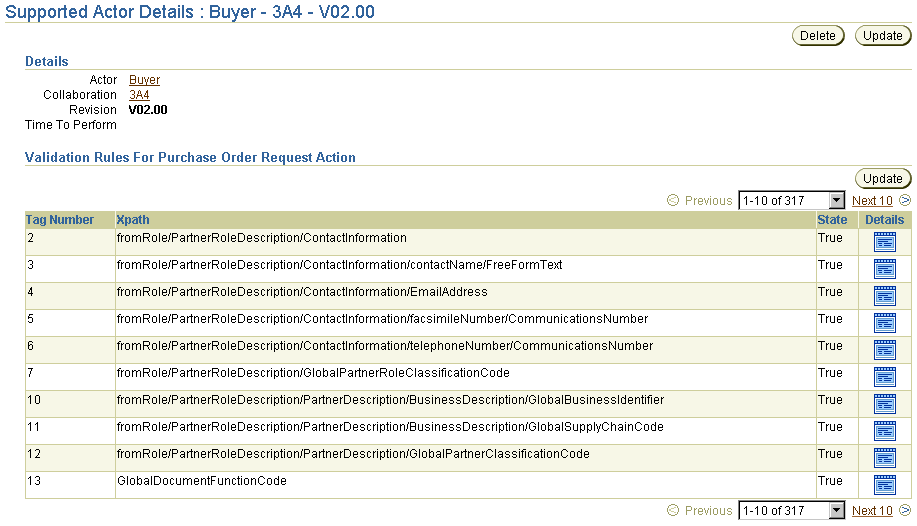
Text description of the illustration details_actor_details.gif
The lower section of the page displays the following details:
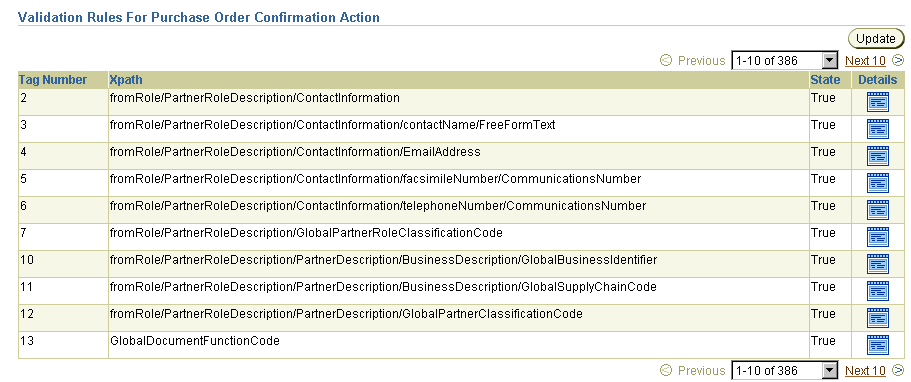
Text description of the illustration details_actor_details2.gif
Text description of the illustration details_valid_rules2.gif
Follow these instructions to view details about a specific supported actor for a remote trading partner:
To view a supported actor for a remote trading partner:
The Supported Actor Details page for the selected supported actor appears (in this example, for a RosettaNet actor). The upper section of the page displays the following details:
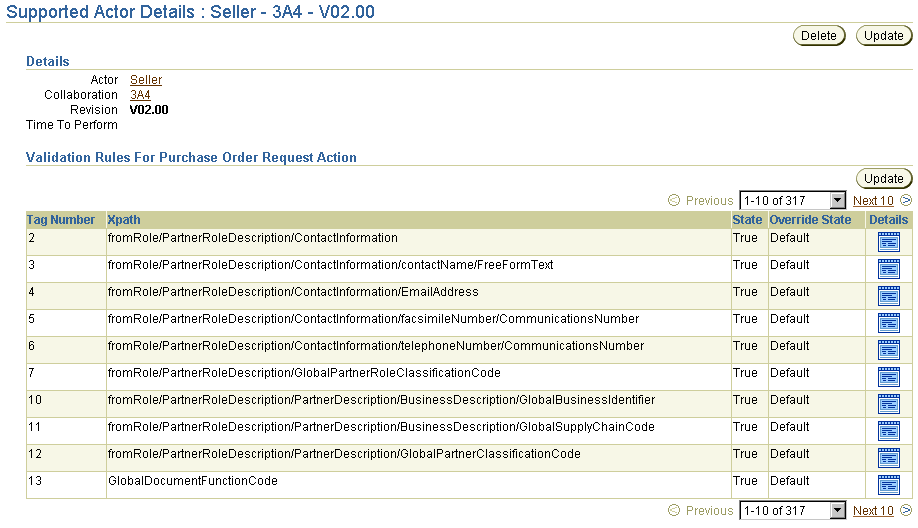
The lower section of the page displays the following details:
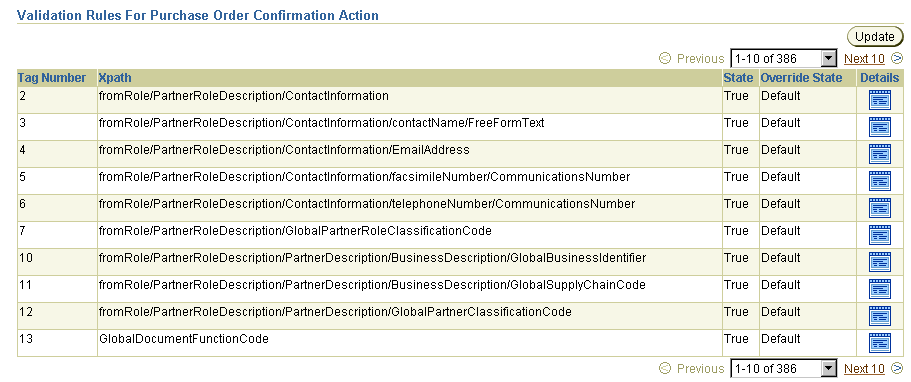
Text description of the illustration details_valid_rules.gif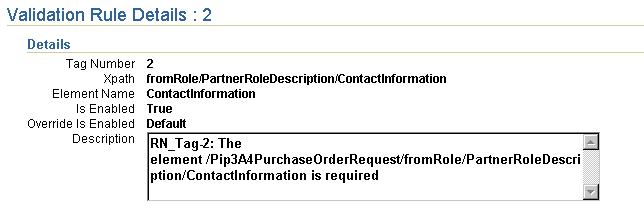
You can enable or disable specific validation rules states for the supported actor. Follow these instructions to update the validation rules states of a host trading partner:
To update the validation rules states of a host trading partner:
The Update Validation Rules State page appears.
The validation rules are updated and the Supported Actor Details page for the updated supported actor appears. Validation rules that are enabled display as True in the State column. Validation rules that are disabled display as False in the State column.
You can enable or disable specific validation rules states for the supported actor. Follow these instructions to update the validation rules states of a remote trading partner:
To update the validation rules states of a remote trading partner:
The Update Validation Rules State page appears.
The validation rules are updated and the Supported Actor Details page for the updated supported actor appears. Validation rules that are enabled display as True in the State column. Validation rules that are disabled display as False in the State column.
The Oracle Application Server ProcessConnect user interface tool enables you to perform the business protocol management tasks shown in Figure 25-8. These tasks are described in detail in this section.
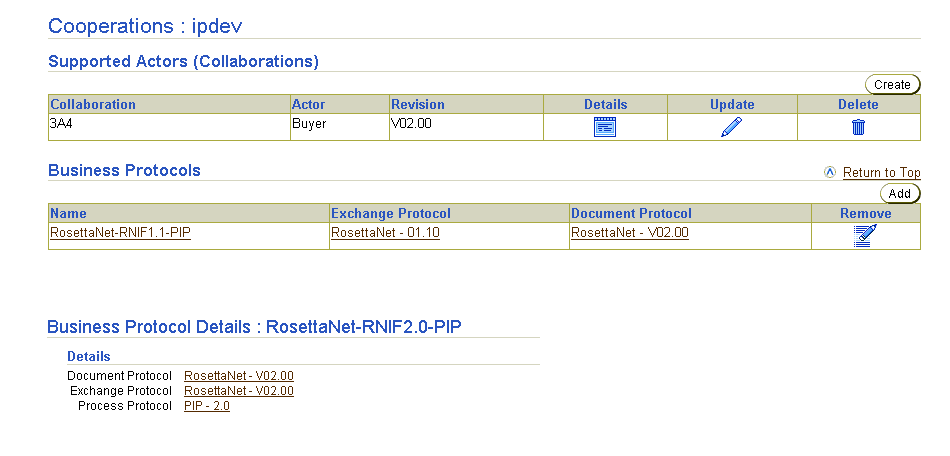
Table 25-9 identifies the business protocol management tasks shown in Figure 25-8 and provides references to procedures for performing these tasks.
| Page Elements | Management Task | First See Section... | Then See Section... |
|---|---|---|---|
|
Add button in Business Protocols section of Figure 25-8 |
Add a business protocol |
||
|
Remove column in Business Protocols section of Figure 25-8 |
Remove a business protocol |
|
|
|
Document Protocol column in Business Protocols section of Figure 25-8 |
View details about a document protocol |
|
|
|
Exchange Protocol column in Business Protocols section of Figure 25-8 |
View details about an exchange protocol |
|
|
|
Name column in Business Protocols section of Figure 25-8 (To access the Business Protocol Details page shown in the lower page of Figure 25-8) |
View details about a business protocol |
|
|
|
Process Protocol link of Business Protocol Details page of Figure 25-8 |
View details about a process protocol |
|
Follow these instructions to access the business protocol management tasks shown in Figure 25-8:
To access business protocol management tasks:
| For a... | Perform These Steps... |
|---|---|
|
Remote trading partner |
|
|
Host trading partner |
The Cooperations : name page appears.
Follow these instructions to add a business protocol:
To add a business protocol:
The Add Business Protocol page appears.
The business protocol is added and the Cooperations : name page appears.
Follow these instructions to remove a business protocol:
To remove a business protocol:
The business protocol is removed and the Cooperations : name page appears.
Follow these instructions to view details about a specific document protocol:
To view a document protocol:
The Document Protocol Details page appears.
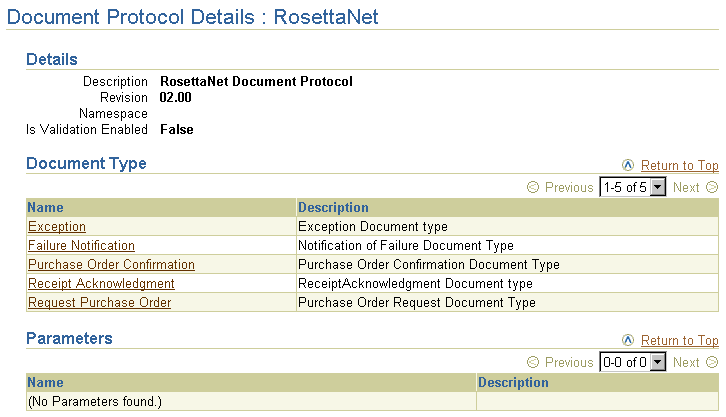
Text description of the illustration details_bus_proto_doc_proto.gif
An exchange protocol defines the protocol by which data is exchanged, such as RosettaNet - 01.00 or RosettaNet - 02.00. Follow these instructions to view details about a specific exchange protocol:
To view an exchange protocol:
The Exchange Protocol Details page appears. The upper section of the page displays the following details:
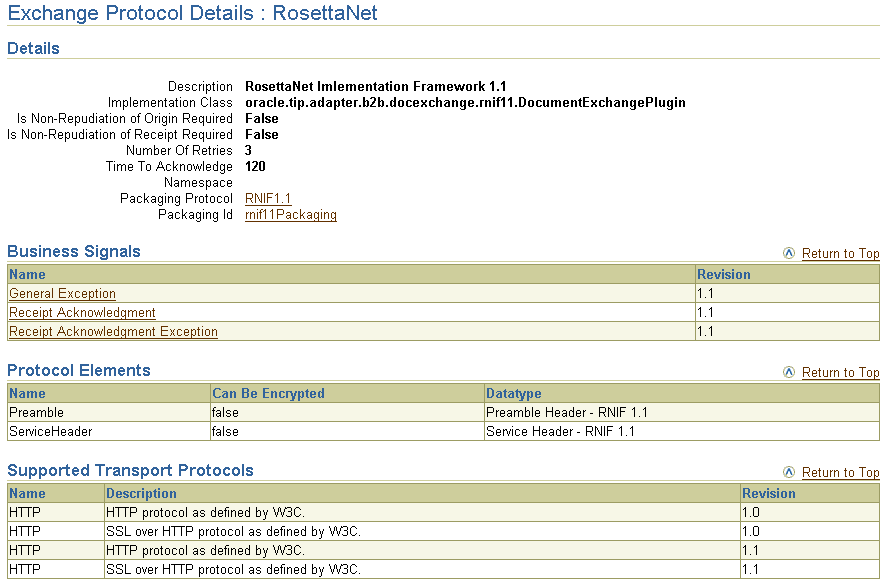
Text description of the illustration details_bus_proto_exchange_top.gif
The lower section of the page displays the following details:

Text description of the illustration details_bus_proto_exchange_bot.gif
Follow these instructions to view details about a specific business protocol:
To view a business protocol:
The Business Protocol Details page appears.

A process protocol defines the protocol used to exchange documents, such as through a RosettaNet PIP. Follow these instructions to view details about a specific process protocol:
To view a process protocol:
The Process Protocol Details page appears.

The Oracle Application Server ProcessConnect user interface tool enables you to perform the delivery and security management tasks shown in Figure 25-9. These tasks are described in detail in this section.
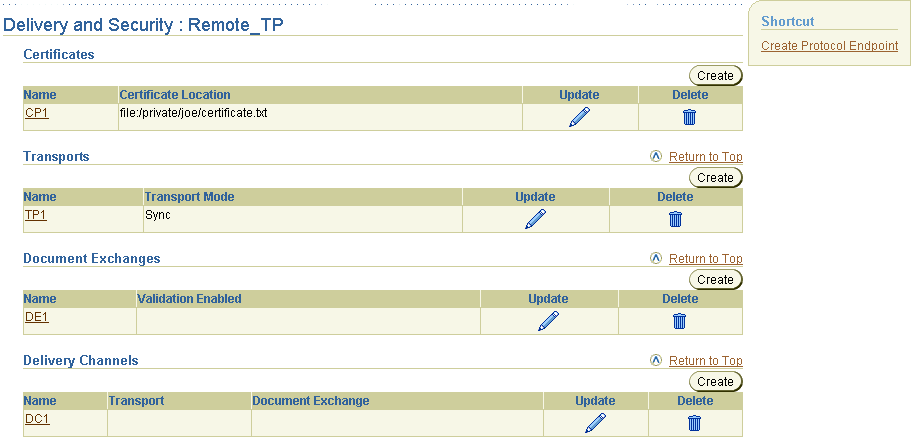
This section describes the following delivery and security management tasks:
See Also:
The Oracle Application Server ProcessConnect user interface tool enables you to perform the remote trading partner certificate management tasks shown in Figure 25-10. These tasks are described in detail in this section. A certificate securely binds an identity such as a trading partner to a public key. A certificate is created when a trading partner's public key is signed by a trusted identity known as a certificate authority (CA). This certificate ensures that the trading partner's profile data is correct and that the public key actually belongs to that trading partner during business transactions.
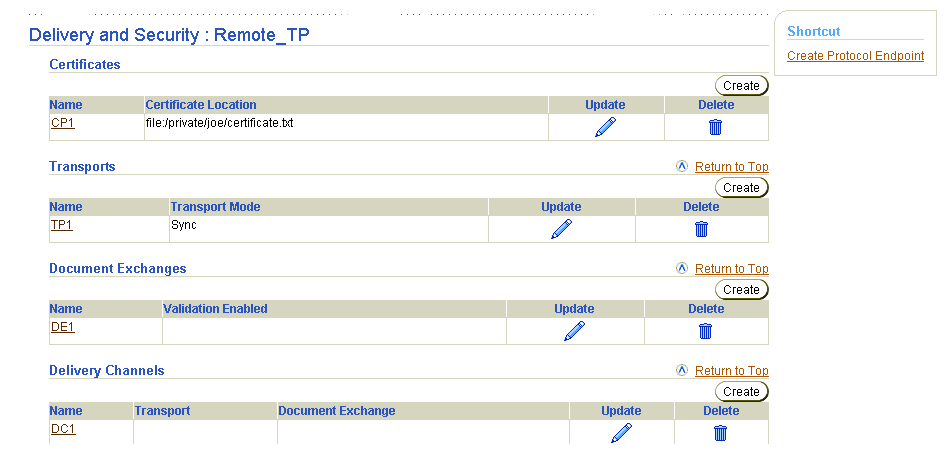
|
See Also:
"Managing the Host Trading Partner Wallet Password" for details about wallet passwords and wallet directory locations for the host trading partner |
Table 25-10 identifies the remote trading partner certificate management tasks shown in Figure 25-10 and provides references to procedures for performing these tasks.
| Page Elements | Management Task | First See Section... | Then See Section... |
|---|---|---|---|
|
Create button in Certificates section of Figure 25-10 |
Create a remote trading partner certificate |
"Accessing Remote Trading Partner Certificate Management Tasks" |
|
|
Delete column in Certificates section of Figure 25-10 |
Delete a remote trading partner certificate |
|
|
|
Update column in Certificates section of Figure 25-10 |
Update a remote trading partner certificate |
|
|
|
Name column in Certificates section of Figure 25-10 |
View a remote trading partner certificate |
|
|
See Also:
"Managing the Host Trading Partner Wallet Password" for instructions on creating a wallet password and wallet directory location for a host trading partner |
Follow these instructions to access the remote trading partner certificate management tasks shown in Figure 25-10:
To access remote trading partner certificate management tasks:
The Delivery and Security : name page appears.
Follow these instructions to create a remote trading partner certificate:
To create a remote trading partner certificate:
The Create Certificate page appears.
The remote trading partner certificate is created and the Certificate Details page for the new remote trading partner certificate appears. You assign this remote trading partner certificate to a document exchange with the Oracle Application Server ProcessConnect user interface tool.
Follow these instructions to delete a remote trading partner certificate:
To delete a remote trading partner certificate:
The remote trading partner certificate is deleted and the Delivery and Security : name page appears.
Follow these instructions to update a remote trading partner certificate:
To update a remote trading partner certificate:
The Update Certificate page appears.
The certificate is updated and the Certificate Details page for the updated remote trading partner certificate appears.
Follow these instructions to view details about a specific remote trading partner certificate:
To view a remote trading partner certificate:
The Certificate Details page for the selected certificate appears.

Text description of the illustration details_certificate.gif
This page, as with the Delivery and Security : name page shown in Figure 25-10, enables you to delete or update the selected certificate.
The Oracle Application Server ProcessConnect user interface tool enables you to perform the transport management tasks shown in Figure 25-11. These tasks are described in detail in this section. The transport defines the properties specific to a given usage of a protocol endpoint. The transport is responsible for message delivery using the selected transport protocol (such as HTTP 1.1) and protocol endpoint address. Endpoints are trading partner addresses (such as a URI). Protocol endpoints are a combination of an endpoint address (such as URI http://server.partner.com:5555/submit/rnmsg), a specific transport protocol (such as HTTP 1.1), and security (such as secure HTTP 1.1).
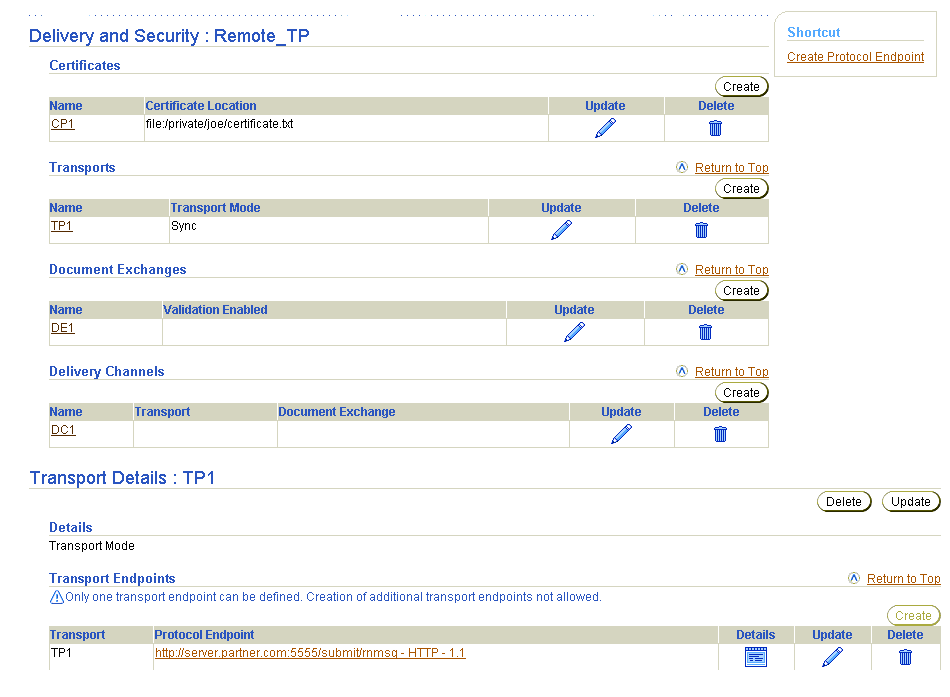
Table 25-11 identifies the transport management tasks shown in Figure 25-11 and provides references to procedures for performing these tasks.
| Page Elements | Management Task | First See Section... | Then See Section... |
|---|---|---|---|
|
Shortcuts section of Figure 25-11 |
Take a shortcut to create a protocol endpoint |
||
|
Create button in Transports section of Figure 25-11 |
Create a transport |
||
|
Delete column in Transports section of Figure 25-11 |
Delete a transport |
|
|
|
Update column in Transports section of Figure 25-11 |
Update a transport |
|
|
|
Name column in Transports section of Figure 25-11 (To access the Transport Details page shown in the lower page of Figure 25-11) |
View a transport |
|
|
|
Delete column of Transport Details page of Figure 25-11 |
Delete a transport endpoint |
|
|
|
Update column of Transport Details page of Figure 25-11 |
Update a transport endpoint |
|
|
|
Details column of Transport Details page of Figure 25-11 |
View a transport endpoint |
|
Follow these instructions to access the transport management tasks shown in Figure 25-11:
To access transport management tasks:
| For a... | Perform These Steps... |
|---|---|
|
Remote trading partner |
|
|
Host trading partner |
The Delivery and Security : name page appears.
You can create a single transport. You must first create a protocol endpoint before you can create a transport. If you have not yet creating a protocol endpoint, the Create button in the Transports section is disabled. Follow these instructions to create a transport:
To create a transport:
The Create Transport page appears.
| Field | Description |
|---|---|
|
Name * |
Enter a unique and recognizable transport name. |
|
Transport Mode |
Select Sync only. |
| Field | Description |
|---|---|
|
Protocol Endpoint * |
Select a protocol endpoint comprising a transport protocol and trading partner endpoint address. You created a protocol endpoint in "Creating a Protocol Endpoint". |
|
Transport Timeout |
Enter the amount of time in minutes in which a transport must complete before timing out. |
|
Client Authentication Enabled |
Select Yes or No. If you select Yes, you need valid client credentials for a remote trading partner to access an endpoint. If you select Yes, the remote trading partner must select a certificate in Step 5 of the Create Protocol Endpoint page. |
|
Base64 Encoding Enabled |
Select Yes or No. Set this to Yes only for transports that do not support binary delivery. |
The transport is created and the Transport Details page for the new transport appears.
Follow these instructions to delete a transport:
To delete a transport:
The transport is deleted and the Delivery and Security : name page appears.
Follow these instructions to update a transport:
To update a transport:
The Update Transport page appears.
The transport is updated and the Transport Details page for the updated transport appears.
Follow these instructions to view details about a specific transport:
To view a transport:
The Transport Details page for the selected transport appears, and displays the transport endpoints defined for this transport.

This page, as with the Delivery and Security : name page shown in Figure 25-11, enables you to delete or update the selected transport.
Follow these instructions to delete a transport endpoint:
To delete a transport endpoint:
The Transport Details page appears.
The transport is deleted and the Transport Details page appears.
Follow these instructions to update a transport endpoint:
To update a transport endpoint:
The Transport Details page appears.
The Update Transport Endpoint page appears.
The transport endpoint is updated and the Transport Endpoint Details page for the updated transport endpoint appears.
Follow these instructions to view details about a specific transport endpoint:
To view a transport endpoint:
The Transport Details page appears.
The Transport Endpoint Details page for the selected transport endpoint appears, and displays the transport endpoint defined for this transport.

This page, as with the Transport Details page shown in the lower page of Figure 25-11, enables you to delete or update the selected transport endpoint.
The Oracle Application Server ProcessConnect user interface tool enables you to perform the document exchange management tasks shown in Figure 25-12 and Figure 25-13. These tasks are described in detail in this section. The document exchange describes the supported exchange protocol (such as RosettaNet 1.1), certificate encryption and signing, digital envelopes and signatures, and RosettaNet validation support. The document exchange uses these capabilities to exchange messages with a trading partner.
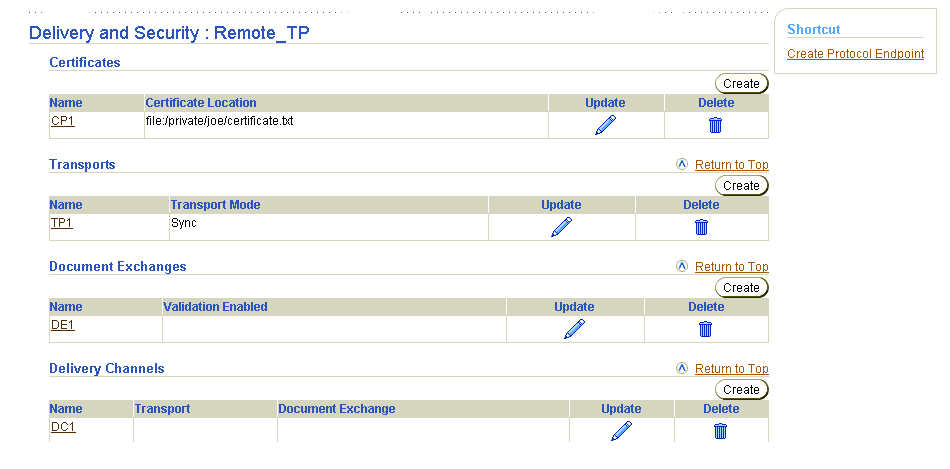
Selecting a document exchange in the Name column of the Document Exchanges section causes details pages such as that shown in Figure 25-13 to appear.
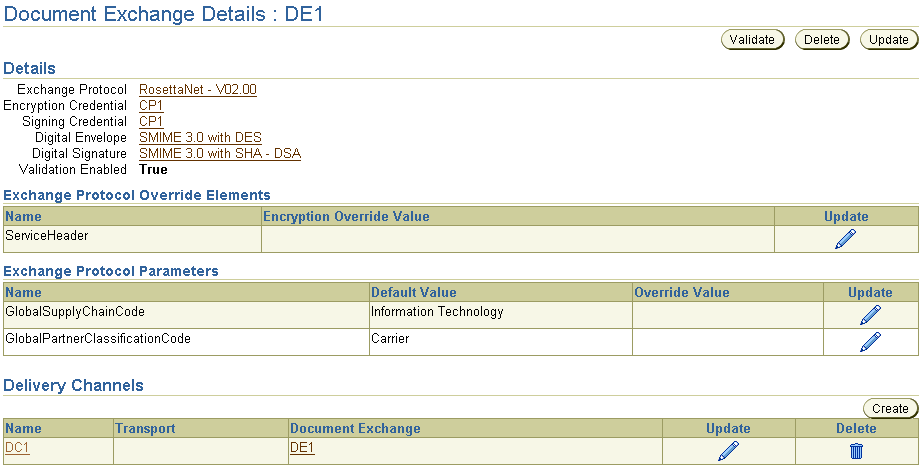
Table 25-12 identifies the document exchange management tasks shown in Figure 25-12 and Figure 25-13 and provides references to procedures for performing these tasks.
| Page Elements | Management Task | First See Section... | Then See Section... |
|---|---|---|---|
|
Create button in Document Exchanges section of Figure 25-12 |
Create a document exchange |
||
|
Delete column in Document Exchanges section of Figure 25-12 |
Delete a document exchange |
|
|
|
Update column in Document Exchanges section of Figure 25-12 |
Update a document exchange |
|
|
|
Name column in Document Exchanges section of Figure 25-12 (To access the Document Exchange Details page shown in Figure 25-13) |
View details about a document exchange |
|
|
|
Update column in Exchange Protocol Override Elements section of Figure 25-13 |
Update exchange protocol override elements |
|
|
|
Update column in Exchange Protocol Parameters section of Figure 25-13 |
Update exchange protocol parameters |
|
|
See Also:
"Managing Delivery Channels" for instructions on managing the delivery channel shown in the Document Exchange Details page of Figure 25-13 |
Follow these instructions to access the document exchange management tasks shown in Figure 25-12 and Figure 25-13:
To access document exchange management tasks:
| For a... | Perform These Steps... |
|---|---|
|
Remote trading partner |
|
|
Host trading partner |
The Delivery and Security : name page appears.
Follow these instructions to create a document exchange:
To create a document exchange:
The Create Document Exchange page appears. Some selections that you make on this page are related to selections that you must make on the Create Delivery Channel page in "Creating a Delivery Channel". Those relationships are described in this table.
| Field | Description |
|---|---|
|
Name * |
Enter a unique and recognizable name for the document exchange. |
|
Exchange Protocol |
Select RosettaNet - 01.10 or RosettaNet - V02.00. Note: The exchange protocol you select must match with the one selected in "Adding a Business Protocol". |
|
Encryption Credential |
Select Unspecified or a certificate created in "Creating a Remote Trading Partner Certificate". Note: If you are using RNIF 1.1, do not select a credential. If you select an encryption credential, you must also select a digital envelope from the Digital Envelope list. |
|
Signing Credential |
Select Unspecified or a certificate created in "Creating a Remote Trading Partner Certificate". Note: If you select a signing credential, you must also select a digital signature from the Digital Signature list. |
|
Digital Envelope |
Select Unspecified, SMIME 3.0 with DES, SMIME 2.0 with DES, SMIME 3.0 with 3DES, SMIME 2.0 with 3DES, SMIME 3.0 with RC2-40, SMIME 2.0 with RC2-40, SMIME 3.0 with RC2-64, SMIME 2.0 with RC2-64, SMIME 3.0 with RC2-128, or SMIME 2.0 with RC2-128 as the valid digital envelope. Note: If you select Yes in the Encryption Enabled field in Step 2 of the Create Delivery Channel page, you must also select a digital envelope. If you are using RNIF 1.1, do not select an envelope. If you select a digital envelope, you must also select an encryption credential from the Encryption Credential list for the remote trading partner only. |
|
Digital Signature |
Select Unspecified, SMIME 3.0 with SHA-RSA, SMIME 2.0 with SHA-RSA, SMIME 3.0 with SHA-DSA, SMIME 2.0 with SHA-DSA, SMIME 3.0 with MD5-RSA, or SMIME 2.0 with MD5-RSA as the valid digital signature. Note: If you select a digital signature, you must also select a signing credential for the remote trading partner only from the Signing Credential list. If you select Yes in either the Is Non-Repudiation of Origin Required or Is Non-Repudiation of Receipt Required list on the Create Delivery Channel page in Step 2, you must also select a digital signature. |
|
Validation Enabled |
Select Unspecified, No, or Yes. Selecting No disables RosettaNet Document validation. |
The document exchange is created and the Document Exchange Details page for the new document exchange appears.
Follow these instructions to delete a document exchange:
To delete a document exchange:
The document exchange is deleted and the Delivery and Security : name page appears.
Follow these instructions to update a document exchange:
To update a document exchange:
The Update Document Exchange page appears.
The document exchange is updated and the Document Exchange Details page for the updated document exchange appears.
Follow these instructions to view details about a specific document exchange:
To view a document exchange:
The Document Exchange Details page for the selected document exchange appears.

This page, as with the Delivery and Security : name page shown in the upper page of Figure 25-12, enables you to delete or update the selected document exchange.
"Managing Delivery Channels" for instructions on managing delivery channels
See Also:
This section only appears if RosettaNet 2.0 is the exchange protocol being used. Follow these instructions to update exchange protocol override elements for service header encryption:
To update exchange protocol override elements:
The Update Protocol Encryption Override page appears.
The exchange protocol override element is updated and the Document Exchange Details page displays your selection in the Encryption Override Value column.
An exchange protocol (for example, RosettaNet 2.0) includes its own set of parameters. Some parameters have default values. You can override these parameters so that they are applicable only to a specific trading partner. For example, RNIF 2.0 includes a parameter named GlobalSupplyChainCode that has a default value of Information Technology. You can override this setting with a value unique to a trading partner, such as Electronic Components.
Follow these instructions to update exchange protocol parameters:
To update exchange protocol parameters:
The Update Exchange Protocol Parameter Value page appears.
The exchange protocol parameter is updated and the Document Exchange Details page for the updated exchange parameter appears.
The Oracle Application Server ProcessConnect user interface tool enables you to perform the delivery channel management tasks shown in Figure 25-14. These tasks are described in detail in this section. The delivery channel describes whether security characteristics such as nonrepudiation, response modes, and encryption are required. The delivery channel also identifies the transport (with its trading partner endpoint address and transport protocol) and document exchange (with its exchange protocol, such as RosettaNet 1.1), certificate encryption and signing details, digital envelop and signature details, and RosettaNet validation support details.
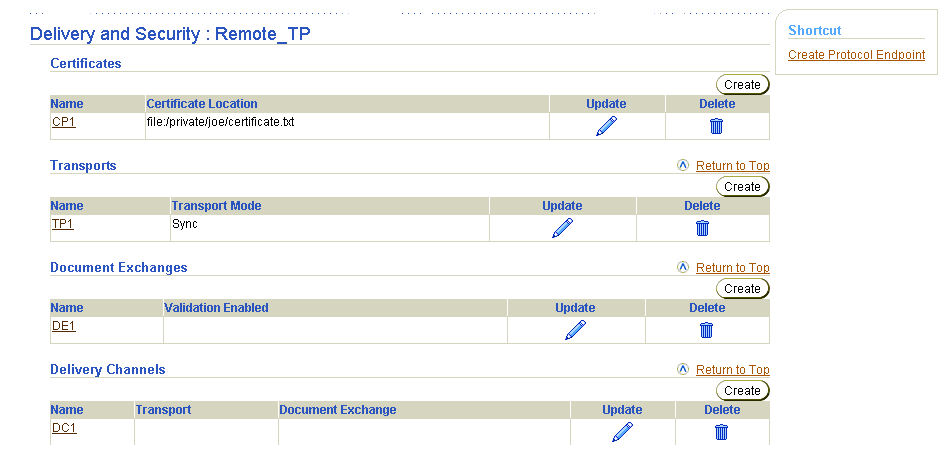
Table 25-13 identifies the delivery channel management tasks shown in Figure 25-14 and provides references to procedures for performing these tasks.
| Page Elements | Management Task | First See Section... | Then See Section... |
|---|---|---|---|
|
Create button in Delivery Channels section of Figure 25-14 |
Create a delivery channel |
||
|
Delete column in Delivery Channels section of Figure 25-14 |
Delete a delivery channel |
|
|
|
Update column in Delivery Channels section of Figure 25-14 |
Update a delivery channel |
|
|
|
Name column in Delivery Channels section of Figure 25-14 |
View details about a delivery channel |
|
|
See Also:
The following sections for instructions on creating components required by the delivery channel:
|
Follow these instructions to access the delivery channel management tasks shown in Figure 25-14:
To access delivery channel management tasks:
| For a... | Perform These Steps... |
|---|---|
|
Remote trading partner |
|
|
Host trading partner |
The Delivery and Security : name page appears.
Follow these instructions to create a delivery channel:
To create a delivery channel:
The Create Delivery Channel page appears. Some selections that you make on this page are related to selections that you must make on the Create Document Exchange page in "Creating a Document Exchange". Those relationships are described in this section.
| Field | Description |
|---|---|
|
Name * |
Enter a unique and recognizable name for the delivery channel. |
|
Document Exchange |
Select a document exchange created in "Creating a Document Exchange". The delivery channel requires one document exchange, which identifies the exchange protocol (for example, RosettaNet 1.1), certificate encryption and signing details, digital envelop and signature details, and RosettaNet validation support details. |
|
Transport |
Select a transport created in "Creating a Transport". The delivery channel requires one transport, which identifies the transport protocol and trading partner endpoint address. |
|
Acknowledgment Mode |
Select Async only. |
|
Global Usage Code |
Select Test or Production. This specifies the usage of the delivery channel. If it is set to Test, then the delivery channel is used only for testing purposes. If it is set to Production, then it is used only for production purposes. |
|
Is Non-Repudiation of Origin Required1 |
Select No or Yes only. If Yes is selected, the action message must be digitally signed. Note: If you select Yes, you must also select a digital signature in the Digital Signature field in Step 2 of the Create Document Exchange page. |
|
Is Non-Repudiation of Receipt RequiredFoot 1 |
Select No or Yes only. If Yes is selected, the acknowledgment must be digitally signed. Note: If you select Yes, you must also select a digital signature in the Digital Signature field in Step 2 of the Create Document Exchange page. |
|
Encryption Enabled1 |
Note: If you are using RNIF 1.1, do not make a selection. If you select Yes, you must also select a digital envelope in the Digital Envelope field in Step 2 of the Create Document Exchange page. |
|
Transport Security Enabled |
Select No, Yes, or Unspecified. |
|
Time to Acknowledgment |
Enter a value in minutes. This value specifies the time in which an acknowledgment message must be received. If an acknowledgment is not received, an error message is returned. |
|
Retry Count |
Enter a value. This value specifies the amount of time to wait before retrying. |
The delivery channel is created and the Delivery Channel Details page for the new delivery channel appears.
|
See Also:
Chapter 24, "RosettaNet B2B Protocol Standard" for descriptions of the types of details you defined in Step 2 |
Follow these instructions to delete a delivery channel:
To delete a delivery channel:
The delivery channel is deleted and the Delivery and Security : name page appears.
Follow these instructions to update a delivery channel:
To update a delivery channel:
The Update Delivery Channel page appears.
The delivery channel is updated and the Delivery Channel Details page for the updated delivery channel appears.
Follow these instructions to view details about a specific delivery channel:
To view a delivery channel:
The Delivery Channel Details page for the selected delivery channel appears.

This page, as with the Delivery and Security : name page shown in Figure 25-14, enables you to delete or update the selected delivery channel.
The Oracle Application Server ProcessConnect user interface tool enables you to perform the endpoint management tasks shown in Figure 25-15. These tasks are described in detail in this section.

This section describes the following endpoint management tasks:
Endpoints are trading partner addresses (a combination of the trading partner server, port, and any additional parameters required to send and receive messages) that are global to all trading partners. Protocol endpoint addresses apply only to a specific trading partner. Protocol endpoints are a combination of a specific endpoint address (such as http://server.partner.com:5555/submit/rnmsg), a specific transport protocol (such as HTTP 1.1), and security (such as secure HTTP 1.1). You can create an endpoint during creation of a protocol endpoint. You can then create and assign a protocol endpoint to a transport. The transport can then be assigned to a delivery channel.
The Oracle Application Server ProcessConnect user interface tool enables you to perform the endpoint management tasks shown in Figure 25-16. These tasks are described in detail in this section.

Table 25-14 identifies the endpoint management tasks shown in Figure 25-16 and provides references to procedures for performing these tasks.
| Page Elements | Management Task | First See Section... | Then See Section... |
|---|---|---|---|
|
Create button in Endpoints section of Figure 25-16 |
Create an endpoint |
||
|
Delete column in Endpoints section of Figure 25-16 |
Delete an endpoint |
|
|
|
Update column in Endpoints section of Figure 25-16 |
Update an endpoint |
|
|
|
URI column in Endpoints section of Figure 25-16 |
View details about an endpoint |
|
|
See Also:
"Managing Endpoints" for details on the differences between endpoints and protocol endpoints |
Follow these instructions to access the endpoint management tasks shown in Figure 25-16:
To access endpoint management tasks:
| For a... | Perform These Steps... |
|---|---|
|
Remote trading partner |
|
|
Host trading partner |
The Endpoints : name page appears.
Follow these instructions to create an endpoint:
To create an endpoint:
The Create Endpoint page appears.
The endpoint is created and the Endpoint Details page for the new endpoint appears.
Follow these instructions to delete an endpoint:
To delete an endpoint:
The endpoint is deleted and the Endpoints : name page appears.
Follow these instructions to update an endpoint:
To update an endpoint:
The Update Endpoint page appears.
The endpoint is updated and the Endpoint Details page for the updated endpoint appears.
Follow these instructions to view details about a specific endpoint:
To view an endpoint:
The Endpoint Details page for the selected endpoint appears and displays the protocol endpoints that use the specified endpoint.

This page, as with the Endpoints : name page shown in Figure 25-16, enables you to delete or update the selected endpoint.
The Oracle Application Server ProcessConnect user interface tool enables you to perform the protocol endpoint management tasks shown in Figure 25-17. These tasks are described in detail in this section.
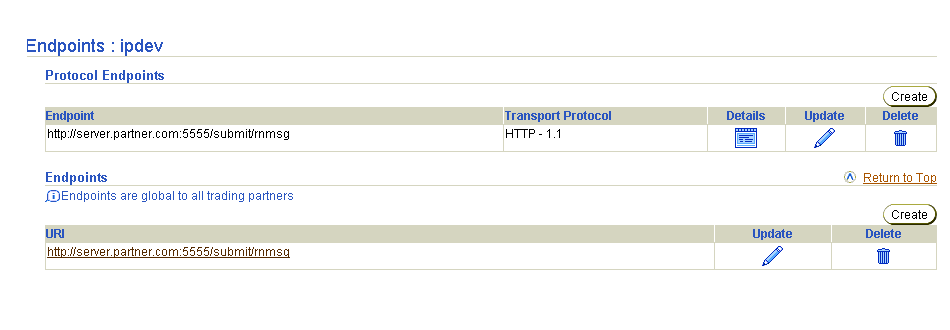
Table 25-15 identifies the protocol endpoint management tasks shown in Figure 25-17 and provides references to procedures for performing these tasks.
| Page Elements | Management Task | First See Section... | Then See Section... |
|---|---|---|---|
|
Create button in Protocol Endpoints section of Figure 25-17 |
Create a protocol endpoint |
||
|
Delete column in Protocol Endpoints section of Figure 25-17 |
Delete a protocol endpoint |
|
|
|
Update column in Protocol Endpoints section of Figure 25-17 |
Update a protocol endpoint |
|
|
|
Details column in Protocol Endpoints section of Figure 25-17 |
View details about a protocol endpoint |
|
|
See Also:
"Managing Endpoints" for details on the differences between protocol endpoints and endpoints |
Follow these instructions to access the protocol endpoint management tasks shown in Figure 25-17:
To access endpoint management tasks:
| For a... | Perform These Steps... |
|---|---|
|
Remote trading partner |
|
|
Host trading partner |
The Endpoints : name page appears.
Follow these instructions to create a protocol endpoint:
To create a protocol endpoint:
The Create Protocol Endpoint page appears.
Based on your selection, the page may refresh to display additional fields in which to enter details.
| If You Selected... | Go to... |
|---|---|
|
Step 4. |
|
|
Step 6. |
| If You Selected... | Go to... |
|---|---|
|
Create New |
Step 9 |
|
Use Existing |
Step 11 |
The endpoint is created and the Protocol Endpoint Details page for the new protocol endpoint appears.
Follow these instructions to delete a protocol endpoint:
To delete a protocol endpoint:
The protocol endpoint is deleted and the Endpoints : name page appears.
Follow these instructions to update a protocol endpoint:
To update a protocol endpoint:
The Update Protocol Endpoint page appears.
The protocol endpoint is updated and the Protocol Endpoint Details page for the updated protocol endpoint appears.
Follow these instructions to view details about a specific protocol endpoint:
To view a protocol endpoint:
The Protocol Endpoint Details page for the selected protocol endpoint appears, and displays the transport endpoints that use the specified protocol endpoint.

This page, as with the Endpoints : name page shown in Figure 25-17, enables you to delete or update the selected protocol endpoint.
The Oracle Application Server ProcessConnect user interface tool enables you to perform the host trading partner wallet password management tasks shown in Figure 25-18. These tasks are described in detail in this section. A wallet is a container in which certificates and trusted certificates are stored and managed. These data structures securely store a user private key, a user certificate, and a set of trusted certificates. A wallet password opens the user's wallet.

Table 25-16 identifies the host trading partner wallet password management tasks shown in Figure 25-18 and provides references to procedures for performing these tasks.
| Page Elements | Management Task | See Section... |
|---|---|---|
|
Create button |
Create a wallet password |
|
|
Update button |
Update a wallet password |
You must first create an initial wallet password when you create the Oracle Wallet with Oracle Wallet Manager. After that, you can create a host trading partner wallet password on this page in the Oracle Application Server ProcessConnect user interface tool. Follow these instructions to create a host trading partner wallet password:
To create a host trading partner wallet password:
The Host - name page appears, where name is the trading partner organization in which Oracle Application Server ProcessConnect is installed. (See Figure 25-18.)
The Create Host Wallet Password page appears.
| Field | Description |
|---|---|
|
New Wallet Password |
Enter the same wallet password that you created in Oracle Wallet Manager. |
|
Confirm Wallet Password |
Enter the same wallet password a second time. |
The Create button to the right of Wallet Password in the Details section now always displays as the Update button.
|
See Also:
"Oracle Enterprise Manager Application Server Control Tasks" for instructions on accessing the Server Properties page of Oracle Enterprise Manager to specify the wallet directory location with the Wallet Password parameter |
If you later update the wallet password in Oracle Wallet Manager, you must also update the password with the same value in the Oracle Application Server ProcessConnect user interface tool. Follow these instructions to update a host trading partner wallet password:
To update a host trading partner wallet password:
The Host - name page appears, where name is the trading partner organization hosting Oracle Application Server ProcessConnect. (See Figure 25-18.)
The Update Host Wallet Password page appears.
The host trading partner wallet password is updated and the Host - name page appears.
After completing the tasks described previously in this chapter, the profile data of host and remote trading partners (trading partner identifications, organization, cooperation, delivery, security, and endpoint details) must be validated and approved before it can be included in a deployed configuration. Approval typically involves assigning persons to approve the profile data, exporting the profile data to XML files, and submitting the files to the assigned approvers for review and eventual approval. The validation and approval tasks are performed from Validation, Send for Approval, Export, and Approve buttons that display at various stages in the top right sections of the following pages:
Table 25-17 identifies the host and remote trading partner validation and approval tasks and provides references to procedures for performing these tasks. All tasks with the exception of Task 4 are performed with the Oracle Application Server ProcessConnect user interface tool.
| Task | See Section... |
|---|---|
This chapter describes the identification, organization, cooperation, delivery, security, and endpoint tasks for managing host and remote trading partners. The host trading partner uses the user interface tool to define the capabilities for both host and remote trading partners.
|
|
 Copyright © 2003 Oracle Corporation. All Rights Reserved. |
|