Skip Headers

Oracle® Application Server ProcessConnect User's Guide
10g (9.0.4)

Part Number B12121-01
Go To Documentation Library
Home
Go To Product List
Solution Area
Go To Table Of Contents
Contents
Go To Index
Index

Go to previous page Go to next page

15
Managing Applications and Application Agreements

This chapter describes the application and application agreement tasks required to design an integration within an enterprise.

This chapter contains these topics:

Application and Application Agreement Overview

The Oracle Application Server ProcessConnect user interface tool enables you to perform the application and application agreement management tasks required for integrations within an enterprise. These tasks consist of creating, adding, viewing, updating, removing, and deleting profile data. Table 15-1 describes the components shown in Figure 15-1 and provides references for more details. You must perform these tasks to define the applications and application agreements of an integration.
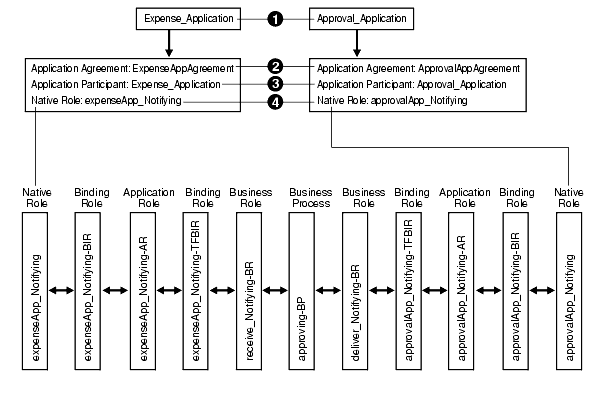
Figure 15-1 Application and Application Agreement Management Tasks

Text description of appsa.gif follows

Text description of the illustration appsa.gif

Table 15-1  Application Agreement Management Tasks (Within an Enterprise)
Key Component Description See Section...

1

Applications (and adapters)

You create applications to participate in an integration within an enterprise. For example, you create Expense_Application and Approval_Application.

You also assign an adapter and create its delivery channel to use with each application. The delivery channel describes the delivery, security, and endpoint details for messages. For example, you assign the AQ adapter and its delivery channel to the Expense_Application and the FTP adapter and its delivery channel to the Approval_Application.

"Managing Applications"

"Managing Adapters and Delivery Channels"

2

Application agreement

You create an application agreement for each application. For example, you create ExpenseAppAgreement and ApprovalAppAgreement.

"Managing Application Agreements"

3

Application agreement participant

When you create an application agreement, you assign one application to each application agreement as a participant. For example, you assign Expense_Application to ExpenseAppAgreement and Approval_Application to ApprovalAppAgreement.

"Managing Application Agreements"

4

Application agreement native role

You assign one native role to each application agreement.

For example, you assign native role expenseApp_Notifying to ExpenseAppAgreement and native role approvalApp_Notifying to ApprovalAppAgreement. This links your modeling metadata (roles, business processes, transformations, event types, datatypes, interactions, and condition expressions) with your profile data (applications, application agreements, adapters, and delivery channels).

"Managing Native Roles in Application Agreements"

After you create your applications and application agreements, you validate and officially approve them before including them in a deployed configuration.

See Also:

Managing Applications

The Oracle Application Server ProcessConnect user interface tool enables you to perform the application management tasks shown in Figure 15-2. These tasks are described in detail in this section.

Figure 15-2 Application Management Tasks

Text description of list_applications.gif follows.

Text description of the illustration list_applications.gif

Table 15-2 identifies the application management tasks shown in Figure 15-2 and provides references to procedures for performing these tasks.

Table 15-2  Application Management Tasks
Applications Page Elements Management Task First See Section... Then See Section...

Shortcuts sections in Figure 15-2

Take shortcuts to create an application agreement

"Accessing Application Agreement Management Tasks"

"Creating an Application Agreement"

Create button in Figure 15-2

Create an application

"Accessing Application Management Tasks"

"Creating an Application"

Delete column in Figure 15-2

Delete an application


"Deleting an Application"

Update column in Figure 15-2

Update an application


"Updating an Application"

Name column in Figure 15-2

View details about an application


"Viewing an Application"

Accessing Application Management Tasks

Follow these instructions to access the application management tasks shown in Figure 15-2:

To access application management tasks:

  1. Select the Profiles tab.

  2. Select the Applications tab.

    The Applications page appears.

  3. Select a task to perform and see the referenced section for instructions:

    To... Then... See Section...

    Create an application

    Click Create.

    "Creating an Application"

    Delete an application

    Select a specific application in the Delete column.

    "Deleting an Application"

    Update an application

    Select a specific application in the Update column.

    "Updating an Application"

    View details about an application

    Select a specific application name in the Name column.

    "Viewing an Application"

Creating an Application

Follow these instructions to create an application:

To create an application:

  1. Ensure that you followed the instructions in "Accessing Application Management Tasks" to access the page for creating an application.

    The Create Application page appears.

  2. Enter the following details to create an application. An asterisk (*) indicates a required field.

    Field Description

    Name *

    Enter a unique and recognizable application name (for example, Human Resources).

    Description

    Enter an application description.

    Application Type

    Select the application type. The application type is a folder in which to place the application. This field is required if you want to include an application in a deployed configuration. Several application types are included with Oracle Application Server ProcessConnect. You can also create application types that display in this list.

    See Also: "Creating an Application Type"

  3. Click Apply.

    The application is created and the Application Details page for the new application appears.

Deleting an Application

Follow these instructions to delete an application:

To delete an application:

  1. Ensure that you followed the instructions in "Accessing Application Management Tasks" to access the page for deleting an application.

  2. Select Yes when prompted to delete an application.

    The application is deleted and the Applications page appears.

Updating an Application

Follow these instructions to update an application:

To update an application:

  1. Ensure that you followed the instructions in "Accessing Application Management Tasks" to access the page for updating an application.

    The Update Application page appears.

  2. Make appropriate changes. (See Step 2 of "Creating an Application" for a list of fields you can update.)

  3. Click Apply.

    The application is updated and the Application Details page for the updated application appears.

Viewing an Application

Follow these instructions to view details about a specific application:

To view an application:

  1. Ensure that you followed the instructions in "Accessing Application Management Tasks" to access the page for viewing an application.

    The Application Details page for the selected application appears.
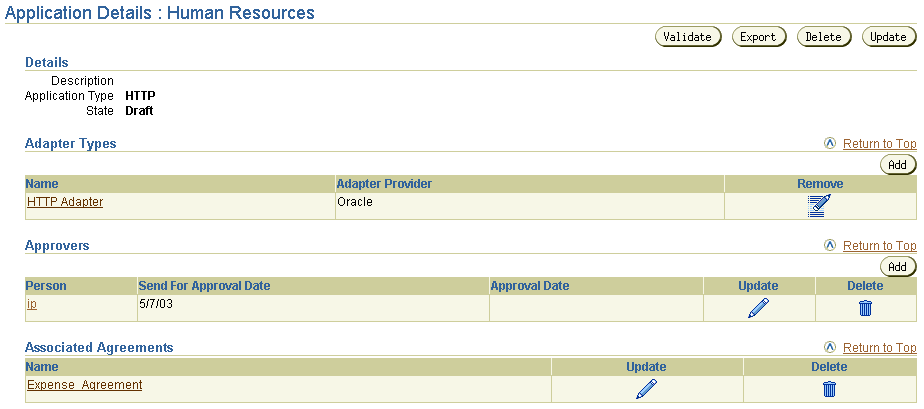
    Text description of details_application.gif follows.

    Text description of the illustration details_application.gif

  2. View specific details, including the following:

    • Adapter type (for example, HTTP) associated with this application

    • Persons assigned to approve the profile data of this application

    • Agreements with which this application is associated

    The state is Draft for this agreement (See the Details section). Depending on the current state of an agreement, different buttons can also display. If the state is Pending Approval, the Validate button is replaced with the Send for Approval button. If the state is Approved, no button displays.

    This page, as with the Applications page shown in Figure 15-2, enables you to delete or update the selected application.

  3. Click Return to List to return to the Applications page.

    See Also:

    The following sections for instructions on performing the following tasks:

Managing Adapters and Delivery Channels

The Oracle Application Server ProcessConnect user interface tool enables you to perform the adapter and delivery channel management tasks shown in Figure 15-3. Adapters enable communication between parties with their different interfaces and Oracle Application Server ProcessConnect. Delivery channels describe delivery, security, and endpoint details for messages delivered between parties. These tasks are described in detail in this section.
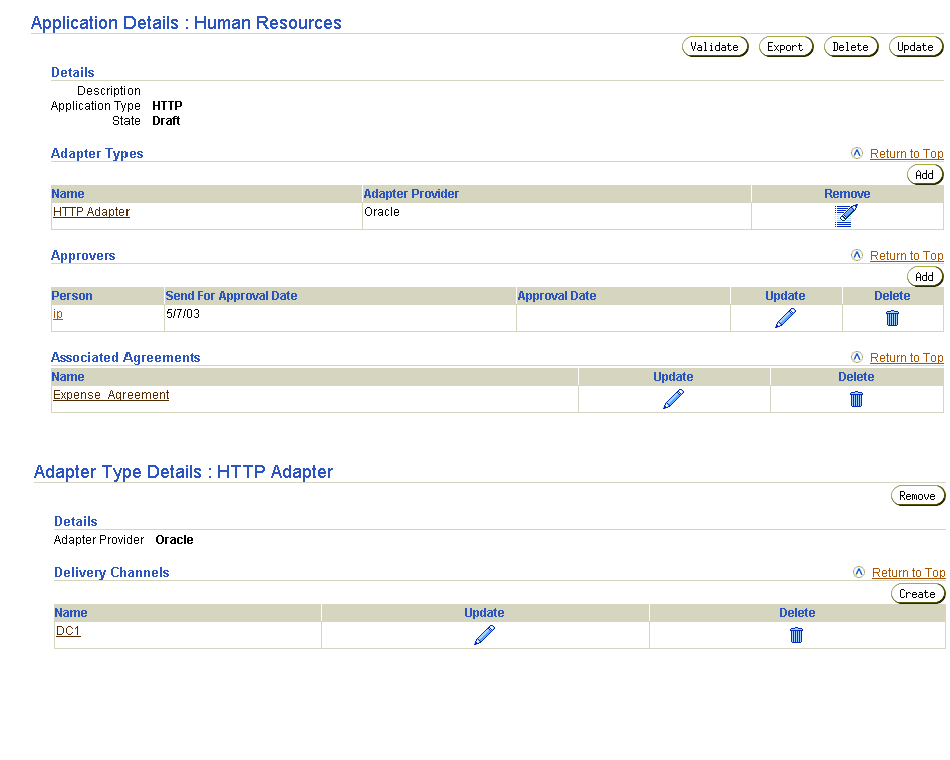
Figure 15-3 Adapter and Delivery Channel Management Tasks

Text description of apps4.gif follows

Text description of the illustration apps4.gif

Table 15-3 identifies the adapter and delivery channel management tasks shown in Figure 15-3 and provides references to procedures for performing these tasks.

Table 15-3  Adapter and Delivery Channel Management Tasks
Page Elements Management Task First See Section... Then See Section...

Add button in Adapter Types section of the Application Details page of Figure 15-3

Add an adapter to an application

"Accessing Adapter and Delivery Channel Management Tasks"

"Adding an Adapter to an Application"

Remove column in Adapter Types section of the Application Details page of Figure 15-3

Remove an adapter from an application


"Removing an Adapter from an Application"

Name column in Adapter Types section of the Application Details page of Figure 15-3

(To access the details page shown in the lower page of Figure 15-3)

View details about an adapter


"Viewing an Adapter"

Create button in Delivery Channels section of the Adapter Type Details page of Figure 15-3

Create an application delivery channel


"Creating an Application Delivery Channel"

Delete column in Delivery Channels section of the Adapter Type Details page of Figure 15-3

Delete an application delivery channel


"Deleting an Application Delivery Channel"

Update column in Delivery Channels section of the Adapter Type Details page of Figure 15-3

Update an application delivery channel


"Updating an Application Delivery Channel"

Name column in Delivery Channels section of the Adapter Type Details page of Figure 15-3

View details about an application delivery channel


"Viewing an Application Delivery Channel"

Accessing Adapter and Delivery Channel Management Tasks

Follow these instructions to access the adapter and delivery channel management tasks shown in Figure 15-3:

To access adapter management tasks:

  1. Select the Profiles tab.

  2. Select the Applications tab.

    The Applications page appears.

  3. Select a specific application in the Name column.

    The Application Details page for the specific application appears.

  4. Go to the Adapter Types section. (See the upper page of Figure 15-3.)

  5. Select a task to perform and see the referenced section for instructions:

    To... Then... See Section...

    Add an adapter to an application

    Click Add.

    "Adding an Adapter to an Application"

    Remove an adapter from an application

    Select a specific adapter in the Remove column.

    "Removing an Adapter from an Application"

    View details about an adapter

    Select a specific adapter name in the Name column.

    "Viewing an Adapter"

    Create an application delivery channel

    Select the specific adapter name in the Name column for which to create a delivery channel.

    "Creating an Application Delivery Channel"

    Delete an application delivery channel

    Select the specific adapter name in the Name column that includes the delivery channel to delete.

    "Deleting an Application Delivery Channel"

    Update an application delivery channel

    Select the specific adapter name in the Name column that includes the delivery channel to update.

    "Updating an Application Delivery Channel"

    View details about an application delivery channel

    Select the specific adapter name in the Name column that includes the delivery channel to view.

    "Viewing an Application Delivery Channel"

Adding an Adapter to an Application

Follow these instructions to add an adapter to an application:

To add an adapter to an application:

  1. Ensure that you followed the instructions in "Accessing Adapter and Delivery Channel Management Tasks" to access the page for adding an adapter to an application.

    The Add Adapter Type page appears.

  2. Select the type of adapter to use with this application from the Type list:

    • Advanced Queuing (AQ) adapter

    • E-Mail adapter

    • File/FTP adapter

    • HTTP adapter

    • Java Message Service (JMS) adapter

    • Oracle Database (DB) adapter

    • Web Service adapter

    Depending on what you installed, additional application adapters may appear in this list:

    • PeopleSoft 8 adapter

    • SAP R/3 adapter

    • Siebel 2000 adapter

    • J.D. Edwards OneWorld XE adapter

    • VSAM adapter

    • CICS adapter

    • IMS/TM adapter

    • IMS/DB adapter

    • Tuxedo adapter

    • Adapters not included with Oracle Application Server ProcessConnect, but available from other partners.

  3. Click Apply.

    The adapter is added to the application and the Adapter Type Details page for the added adapter appears.

    You can add additional adapters to the application. During runtime, however, only one adapter and its delivery channel (which defines the delivery, security, and endpoint details of the adapter) can be used with an application in an agreement.

    See Also:

    The following Web site for additional details about JMS:

    http://java.sun.com/products/jms/ 
    

Removing an Adapter from an Application

Follow these instructions to remove an adapter from an application:

To remove an adapter from an application:

  1. Ensure that you followed the instructions in "Accessing Adapter and Delivery Channel Management Tasks" to access the page for removing an adapter from an application.

  2. Select Yes when prompted to remove the selected adapter.

    The adapter is removed and the Application Details page for the selected application appears.

Viewing an Adapter

Follow these instructions to view details about a specific adapter:

To view an adapter:

  1. Ensure that you followed the instructions in "Accessing Adapter and Delivery Channel Management Tasks" to access the page for viewing an adapter.

    The Adapter Type Details page for the selected adapter appears.

    Text description of details_adapter.gif follows.

    Text description of the illustration details_adapter.gif

  2. View specific details, including the delivery channel for this adapter.

    This page, as with the Application Details page shown in the upper page of Figure 15-3, enables you to remove the selected adapter.

  3. Click Return to List to return to the Application Details page for the selected application.

Creating an Application Delivery Channel

Follow these instructions to create an application delivery channel for an adapter:


Note:

The application delivery channels that you create in this section appear as selections when you add an application delivery channel to an agreement in "Adding an Application Delivery Channel to an Application Agreement".


To create an application delivery channel:

  1. Ensure that you followed the instructions in "Accessing Adapter and Delivery Channel Management Tasks" to access the page for creating an application delivery channel.

    The Adapter Type Details page for the selected adapter appears.

  2. Go to the Delivery Channels section. (See the lower page of Figure 15-3.)

  3. Click Create.

    See the following section or document (for application adapters) based on the selected adapter type:

    For Adapter Type... See Section...

    AQ adapter

    "Creating an Advanced Queuing Adapter Delivery Channel"

    E-Mail adapter

    "Creating an E-Mail adapter Delivery Channel"

    File/FTP adapter

    "Creating a File/FTP Adapter Delivery Channel"

    HTTP adapter

    "Creating an HTTP Adapter Delivery Channel"

    JMS adapter

    "Creating a JMS Adapter Delivery Channel"

    Oracle DB adapter

    (also known as Oracle Database adapter)

    "Creating an Oracle Database Delivery Channel"

    Web Service adapter

    "Creating a Web Service Delivery Channel"

    PeopleSoft 8 adapter

    Oracle Application Server Integration Adapter for PeopleSoft 8 User's Guide

    SAP R/3 adapter

    Oracle Application Server Integration Adapter for SAP R/3 User's Guide

    Siebel 2000 adapter

    Oracle Application Server Integration Adapter for Siebel 2000 User's Guide

    J.D. Edwards OneWorld XE adapter

    Oracle Application Server Integration Adapter for J.D. Edwards OneWorld XE User's Guide

    VSAM adapter

    Oracle Application Server Integration Adapter for VSAM Installation and User's Guide

    CICS adapter

    Oracle Application Server Integration Adapter for CICS Installation and User's Guide

    IMS/TM adapter

    Oracle Application Server Integration Adapter for IMS/TM Installation and User's Guide

    IMS/DB adapter

    Oracle Application Server Integration Adapter for IMS/DB Installation and User's Guide

    Tuxedo adapter

    Oracle Application Server Integration Adapter for Tuxedo Installation and User's Guide


    Note:

    When creating a delivery channel, do not use environmental variables when specifying parameters (for example, $ORACLE_HOME).


Creating an Advanced Queuing Adapter Delivery Channel

The Create Delivery Channel page appears.

  1. Enter the following details to create a delivery channel. The database for which you define connection details on this page is the application (spoke) database of your application. An asterisk (*) indicates a required field.

    Field Description Example

    Name *

    Enter a unique and recognizable delivery channel name.

    ExpenseApp Queue DC

    JDBC driver to use to connect to database (Thin/OCI)

    Select the JDBC driver to use for database connections.

    Thin (default value) or OCI

    Database SID (if Thin) or TNS alias (if OCI)

    Select the database system identifier (SID) or enter a Transparent Network Substrate (TNS) alias, also known as the net service name.

    ORCL (default SID value)

    Database hostname (if Thin)

    Enter the name of the host on which the database is installed.

    myhost.us.oracle.com

    Database TNS Listener port (if thin)

    Enter the database listener port.

    1521

    Number of milliseconds between connection retries

    Accept the default selection or enter a different value.

    15000 (default value)

    Username for connecting to the spoke database

    Enter the database username.

    dbapp

    Password for connecting to the spoke database

    Enter the password for the database username.

    dbapp

    Name of database schema where queues are located

    Enter the schema name where the queues are created.

    pc_queue_schema

  2. Click Apply.

    The delivery channel is created and the Delivery Channel Details page for the created delivery channel appears.

Creating an E-Mail adapter Delivery Channel

The Create Delivery Channel page appears.

  1. Enter the following details to create a delivery channel. An asterisk (*) indicates a required field. If you define both inbound and outbound interactions for the E-Mail adapter, you must also define inbound and outbound delivery channel parameters. If you only define interactions in one direction, such as inbound, you only define inbound delivery channel parameters. The inbound or outbound direction of a delivery channel parameter is identified in the following table.

    Field Description Example

    Name *

    Enter a unique and recognizable delivery channel name.

    Initiating SMTP DC

    SMTP server hostname (outbound)

    Enter the hostname of the SMTP server to which Oracle Application Server ProcessConnect sends outbound messages.

    smtp.acme.com

    IMAP server hostname (inbound)

    Enter the hostname of the IMAP server from which Oracle Application Server ProcessConnect receives inbound messages.

    imap.acme.com

    Polling interval in milliseconds (inbound)

    Enter the time interval in milliseconds during which Oracle Application Server ProcessConnect polls the IMAP server for inbound messages.

    60000 (default value)

    E-mail address

    Enter an e-mail address based on the direction of the interaction.

    For the outbound direction, enter the e-mail address of the recipient of messages sent by Oracle Application Server ProcessConnect.

    For the inbound direction, the address you enter helps filter incoming e-mails. For example, if you only accept e-mail from joe at foo, set this to joe@foo.com. When an e-mail is received, its from header or reply-To header is compared to this e-mail address.

    your_app@foo.com

    Reply-To: e-mail address (outbound)

    Enter the e-mail address to which an external (outbound) party replies when sending inbound messages to the IMAP server.

    imap_server@foo.com

    Inbox name (inbound)

    Enter the IMAP Inbox name into which inbound e-mail messages are placed.

    INBOX (default value)

    IMAP server username

    Enter the username for the IMAP server from which Oracle Application Server ProcessConnect receives messages.

    imap_username

    IMAP server password

    Enter the IMAP password.

    imap_password

  2. Click Apply.

    The delivery channel is created and the Delivery Channel Details page for the created delivery channel appears.

Creating a File/FTP Adapter Delivery Channel

The Create Delivery Channel page appears.

  1. Enter the following details to create a delivery channel. Fields that only apply to the FTP part of the File/FTP adapter are identified. Fields that are not identified as FTP-only apply to both parts. An asterisk (*) indicates a required field.

    Field Description Example

    Name *

    Enter a unique and recognizable delivery channel name.

    Initiating FTP DC

    File or FTP mode

    Select the mode you want to use (either File or FTP).

    FTP

    FTP server hostname (FTP mode only)

    Enter the hostname of the FTP server from which Oracle Application Server ProcessConnect receives messages.

    ftphost.us.oracle.com

    FTP server port (FTP mode only)

    Enter the port on the FTP server.

    21 (default value)

    Polling interval in milliseconds (inbound)

    Enter the time interval in milliseconds during which Oracle Application Server ProcessConnect polls the FTP server for inbound messages. Enter a value greater than zero.

    60000 (default value)

    FTP server username (FTP mode only)

    Enter the username for the FTP server.

    ftphost_user

    FTP server password (FTP mode only)

    Enter the password of the FTP server username.

    ftphost_password

    Base directory

    Enter the absolute directory path where messages are sent or received. For FTP mode of the File/FTP adapter, this is a directory on the FTP server. For File mode of the File/FTP adapter, this is a directory accessible from the local host.

    Notes: Do not use the $ORACLE_HOME variable when specifying a base directory.

    /Oracle/Ora_904/ip/human_resources

    This directory path is related to the relative path you specify for an incoming files directory in "Adding a File/FTP Adapter Interaction". That directory can be under human_resources.

  2. Click Apply.

    The delivery channel is created and the Delivery Channel Details page for the created delivery channel appears.

Creating an HTTP Adapter Delivery Channel

The Create Delivery Channel page appears.

  1. Enter the following details to create a delivery channel. An asterisk (*) indicates a required field. If you define both inbound and outbound interactions for the HTTP adapter, you must also define inbound and outbound delivery channel parameters. If you only define interactions in one direction, such as inbound, you only define inbound delivery channel parameters. The inbound or outbound direction of a delivery channel parameter is identified in the following table.

    Field Description Example

    Name *

    Enter a unique and recognizable delivery channel name.

    Initiating HTTP DC

    Root URL (outbound) - for example, http://www.oracle.com

    Enter the URL of the outgoing HTTP server to which to send messages.

    http://www.outboundmessages.com

    Proxy server hostname (outbound)

    Enter the hostname of the proxy server.

    httphost.us.oracle.com

    Proxy server port (outbound)

    Enter the port number of the proxy server.

    80 (default value)

    Proxy server username (outbound)

    Enter the proxy server username.

    httpproxy_user

    Proxy server password (outbound)

    Enter the password of the proxy server username.

    httpproxy_password

    RMI instance name (inbound)

    Enter the remote method invocation (RMI) instance name. This must match the name of the host on which the HTTP adapter is installed. The HTTP adapter serves as the RMI server.

    iphttp (default value)

    RMI port (inbound)

    Enter the RMI registry port for communicating with the servlet. This port number must match with the setting in the web.xml file.

    1100 (default value)

    Remote username for filtering (inbound)

    Enter the username and the realm of the security realm.

    joe@foo

    where joe is the username and foo is the realm of which joe is a member.

    Authentication type (outbound)

    Select the authentication type to use for outbound messages.

    BASIC (default value) or DIGEST

    Authentication username (outbound)

    Enter the authentication type username to use for outbound messages.

    authentype_user

    Authentication password (outbound)

    Enter the password of the authentication type username

    authentype_password

    Authentication security realm (outbound)

    Enter the authentication security realm to use for outbound messages.

    ipt

    Oracle Wallet location (outbound)

    Enter the directory path and name of the wallet file. Specify the location if you are using secure HTTP.

    /private/username/certificate.txt

    Oracle Wallet password (outbound)

    Enter the Oracle Wallet Manager password. Specify the password if you specified an Oracle Wallet location.

    mywallet_password

    SSL handshake cipher suite (outbound)

    Enter the cipher suite used in the secure connection.

    SSL_RSA_WITH_RC4_128_SHA

  2. Click Apply.

    The delivery channel is created and the Delivery Channel Details page for the created delivery channel appears.

Creating a JMS Adapter Delivery Channel

  1. Enter the following details to create a delivery channel. An asterisk (*) indicates a required field.

    Field Description Example

    Name *

    Enter a unique and recognizable delivery channel name.

    ExpenseApp JMS Destination DC

    JNDI location or Java class name for JMS connection factory

    Enter the JNDI location or Java class name for the JMS connection factory.

    java:comp/resource/JMS_e2e/QueueConnectionFactories/qcf

    JMS vendor specific properties to pass to connection factory

    Enter the JMS vendor-specific properties to pass to the connection factory.

    When the JNDI location or Java class name for JMS connection factory property is assigned a Java class name (connection factory implementation class), this property enables the invocation of vendor-specific setter methods on the specified connection factory implementation class. The property contains zero or more name and value pairs separated by a semicolon. Each name must match a setter method (without the prefix setXX), and the value becomes the argument to the setXX method.

    The property value Host=myhost.com;Port=1414 causes the JMS adapter to invoke the following two setter methods:

    • vendorQueueConnection Factory.setHost("myhost.com");

    • vendorQueueConnection Factory.setPort(1414);

    Note: The JMS adapter determines the argument type at runtime.

    Default username for creating JMS connections

    Enter the username for creating JMS connections.

    jms_username

    Default password for creating JMS connections

    Enter the password for the username.

    jms_password

    Is this a JMS topic connection factory

    Select whether or not this is a JMS topic connection factory.

    Yes or No

    JNDI location of or Java class name for the JMS destination

    Enter the JNDI location of or Java class name for the JMS destination.

    java:comp/resource/JMS_e2e/Queues/$[DestinationName]

    JMS vendor specific properties used to instantiate the JMS destination

    Enter the JMS vendor-specific properties to instantiate the JMS destination.

    When the JNDI location of or Java class name for the JMS destination property is assigned a Java class name (queue or topic implementation class), this property enables the invocation of vendor-specific setter methods on the specified destination (queue and topic) implementation class. The property contains zero or more name and value pairs separated by a semicolon. Each name must match a setter method (without the prefix setXX) and the value becomes the argument to the setXX method. (See the example for the JMS vendor-specific properties to pass to connection factory property.)

    When the JNDI location of or Java class name for the JMS destination property is assigned a vendor-specific destination URI (for example, queue:///$[DestinationName]), this property is appended to the former, and the destination (queue or topic) is created through the JMS API jmsSession.createQueue()/-Topic(). For example, if the following three are set:

    • JNDI location of or Java class name for the JMS destination property is:

      queue:///$[DestinationName]

    • The JMS vendor-specific properties used to instantiate the JMS destination property is:

      ?targetClient=1

    • The DestinationName is:

      SEND.QUEUE

    Then the following destination is created:

    queueSession.createQueue ("queue:///SEND.QUEUE?targetClient=1");

    Note: The $[DestinationName] substring in bullet one is replaced by the DestinationName value in bullet three that you provided while creating a JMS interaction.

    JMS username

    Enter the JMS username.

    jms_user

    JMS password

    Enter the password for the JMS username.

    jms_user

    JMS Acknowledge Mode

    Select the JMS acknowledge mode to use.

    AUTO_ACKNOWLEDGE (default value), CLIENT_ACKNOWLEDGE, or DUPS_OK__ACKNOWLEDGE

    See Also:

    The following Web site for additional details about JMS:

    http://java.sun.com/products/jms/ 
    
  2. Click Apply.

    The delivery channel is created and the Delivery Channel Details page for the created delivery channel appears.

Creating an Oracle Database Delivery Channel

  1. Enter the following details to create a delivery channel. The database for which you define connection details on this page is the application (spoke) database of your application. An asterisk (*) indicates a required field.

    Field Description Example

    Name *

    Enter a unique and recognizable delivery channel name.

    EmpReadDB DC

    Database hostname (if Thin)

    Enter the hostname of the database (required for thin JDBC driver only).

    myhost.us.oracle.com

    Database TNS listener port (if Thin)

    Enter the TNS listener port for the database (required for thin JDBC driver only).

    1521

    Database SID (if Thin) or TNS alias (if OCI)

    Select the database system identifier (SID) or enter a Transparent Network Substrate (TNS) alias, also known as a net service name.

    ORCL (default value)

    JDBC driver to use to connect to the database (Thin/OCI)

    Select the JDBC driver to use for database connections.

    Thin (default value) or OCI

    Number of milliseconds between connection retries

    Enter the number of milliseconds to wait before retrying the connection if the database goes down.

    15000

    Username for connecting to the spoke database

    Enter the database username with which to connect.

    dbapp

    Password for connecting to the spoke database

    Enter the password for the database username.

    dbapp

    Name of schema where database objects are located

    Enter the database schema owning the database objects for this delivery channel.

    db_schema

  2. Click Apply.

    The delivery channel is created and the Delivery Channel Details page for the created delivery channel appears.

Creating a Web Service Delivery Channel

  1. Enter the following details to create a delivery channel. An asterisk (*) indicates a required field.

    Field Description Example

    Name *

    Enter a unique and recognizable delivery channel name.

    Inbound WebService DC

    Proxy serverFoot 1 hostname

    Enter the hostname of the proxy server.

    httphost.us.oracle.com

    Proxy server port1

    Enter the port number of the proxy server.

    80 (default value)

    Proxy server username1

    Enter the proxy server username.

    httpproxy_user

    Proxy server password1

    Enter the password of the proxy server username.

    httpproxy_password

    Web Service port name or URL

    Enter a Web service port name or a URL beginning with http:// or https://.

    Note: Even though this field is not identified as required, you still need to enter a port name or URL.

    http://foo-sun.us.oracle.com:8888/ip-test_server-context-root/Hotel?WSDL

    Authentication username1

    Enter the authentication type username to use for outbound messages.

    authentype_user

    Authentication password1

    Enter the password of the authentication type username.

    authentype_password

    Authentication security realm1

    Enter the authentication security realm to use for outbound messages.

    ipt

    Oracle Wallet Location1

    Enter the directory path and name of the wallet file. Specify the location if you are using secure HTTP.

    private/username/certificate.txt

    Oracle Wallet password1

    Enter the Oracle Wallet Manager password. Specify the password if you specified an Oracle Wallet location.

    mywallet_password

    1 This is the same parameter as with the HTTP adapter in "Creating an HTTP Adapter Delivery Channel".

  2. Click Apply.

    The delivery channel is created and the Delivery Channel Details page for the created delivery channel appears.

Deleting an Application Delivery Channel

Follow these instructions to delete an application delivery channel:

To delete an application delivery channel:

  1. Ensure that you followed the instructions in "Accessing Adapter and Delivery Channel Management Tasks" to access the page for deleting an application delivery channel.

    The Adapter Type Details page for the selected adapter type appears.

  2. Go to the Delivery Channels section. (See the lower page of Figure 15-3.)

  3. Select the application delivery channel to delete in the Delete column.

  4. Select Yes when prompted to delete the application delivery channel.

    The application delivery channel is deleted and the Adapter Type Details page for the selected adapter type appears.

Updating an Application Delivery Channel

Follow these instructions to update an application delivery channel:

To update an application delivery channel:

  1. Ensure that you followed the instructions in "Accessing Adapter and Delivery Channel Management Tasks" to access the page for updating an application delivery channel.

    The Adapter Type Details page for the selected adapter type appears.

  2. Go to the Delivery Channels section. (See the lower page of Figure 15-3.)

  3. Select the application delivery channel to update in the Update column.

    The Update Delivery Channel page appears.

  4. Make appropriate changes. The following sections describe the fields you can update for each adapter.

    For Adapter Type... See Section...

    Advanced Queuing adapter

    "Creating an Advanced Queuing Adapter Delivery Channel"

    E-Mail adapter

    "Creating an E-Mail adapter Delivery Channel"

    File/FTP adapter

    "Creating a File/FTP Adapter Delivery Channel"

    HTTP adapter

    "Creating an HTTP Adapter Delivery Channel"

    JMS adapter

    "Creating a JMS Adapter Delivery Channel"

    Oracle Database adapter

    "Creating an Oracle Database Delivery Channel"

    Web Service adapter

    "Creating a Web Service Delivery Channel"

  5. Click Apply.

    The application delivery channel is updated and the Delivery Channel Details page for the updated delivery channel appears.

Viewing an Application Delivery Channel

Follow these instructions to view details about a specific application delivery channel:

To view an application delivery channel:

  1. Ensure that you followed the instructions in "Accessing Adapter and Delivery Channel Management Tasks" to access the page for viewing an application delivery channel.

    The Adapter Type Details page for the selected adapter appears.

  2. Go to the Delivery Channels section. (See the lower page of Figure 15-3.)

  3. Select the application delivery channel to view in the Name column.

    The Delivery Channel Details page for the selected delivery channel appears (in this example, for the HTTP adapter):

    Text description of details_adc.gif follows.

    Text description of the illustration details_adc.gif

  4. View specific details about delivery, security, and endpoint settings for the delivery channel.

    This page, as with the Adapter Type Details page shown in the lower page of Figure 15-3, enables you to delete and update the selected application delivery channel.

  5. Click Return to List to return to the Adapter Type Details page for the selected adapter.

Managing Application Agreements

The Oracle Application Server ProcessConnect user interface tool enables you to perform the application agreement management tasks shown in Figure 15-4. These tasks are described in detail in this section.
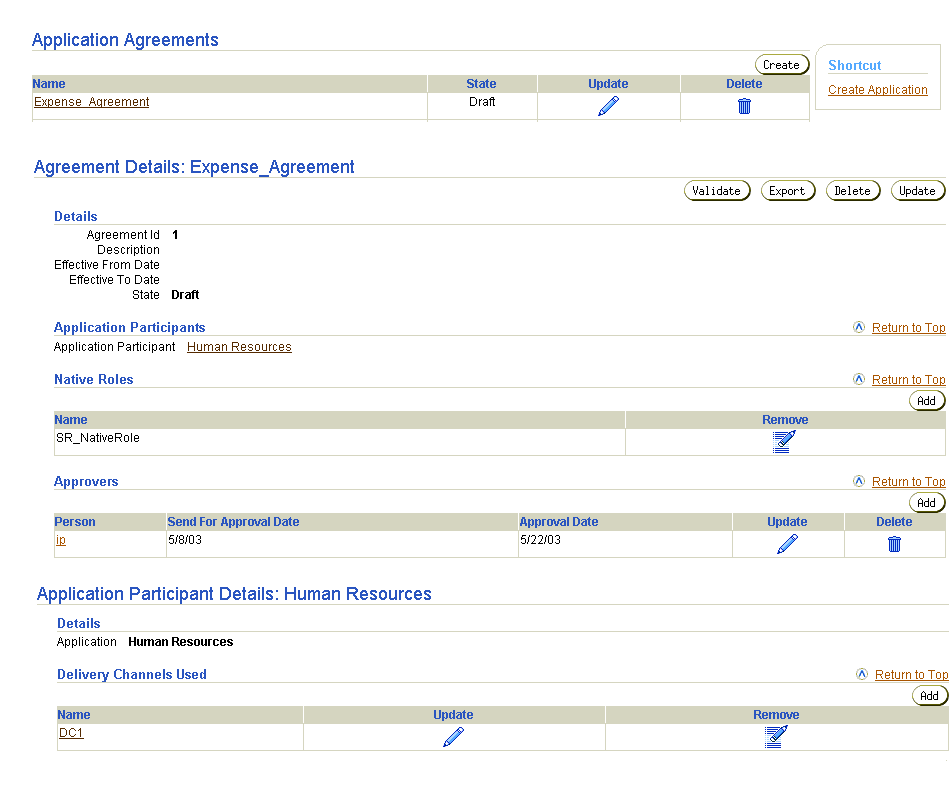
Figure 15-4 Application Agreement Management Tasks

Text description of apps7.gif follows

Text description of the illustration apps7.gif

Table 15-4 identifies the application agreement management tasks shown in Figure 15-4 and provides references to procedures for performing these tasks.

Table 15-4  Application Agreement Management Tasks
Page Elements Management Task First See Section... Then See Section...

Shortcuts section of Application Agreements page of Figure 15-4

Take a shortcut to create an application

"Accessing Application Management Tasks"

"Creating an Application"

Create button of Application Agreements page of Figure 15-4

Create an application agreement

"Accessing Application Agreement Management Tasks"

"Creating an Application Agreement"

Delete column of Application Agreements page of Figure 15-4

Delete an application agreement


"Deleting an Application Agreement"

Update column of Application Agreements page of Figure 15-4

Update an application agreement


"Updating an Application Agreement"

Name column of Application Agreements page of Figure 15-4

(To access the Agreement Details page shown in the middle page of Figure 15-4)

View details about an application agreement


"Viewing an Application Agreement"

Application Participants section of Agreement Details page of Figure 15-4

(To access the Application Participant Details page shown in the lower page of Figure 15-4)

View details about an application agreement participant


"Viewing an Application Agreement Participant"

Add button of Agreement Participant Details page of Figure 15-4

Add an application delivery channel to an application agreement


"Adding an Application Delivery Channel to an Application Agreement"

Remove column of Agreement Participant Details page of Figure 15-4

Remove an application delivery channel from an application agreement

"Accessing Application Agreement Management Tasks"

"Removing an Application Delivery Channel from an Application Agreement"

Update column of Agreement Participant Details page of Figure 15-4

Update an application delivery channel in an application agreement


"Updating an Application Delivery Channel in an Application Agreement"

Name column of Agreement Participant Details page of Figure 15-4

View details about an application delivery channel in an application agreement


"Viewing an Application Delivery Channel in an Application Agreement"

Accessing Application Agreement Management Tasks

Follow these instructions to access the application agreement management tasks shown in Figure 15-4:

To access application agreement management tasks:

  1. Select the Profiles tab.

  2. Select the Agreements tab.

    The Application Agreements page appears.

  3. Select a task to perform and see the referenced section for instructions:

    To... Then... See Section...

    Create an application agreement

    Click Create.

    "Creating an Application Agreement"

    Delete an application agreement

    Select a specific application agreement in the Delete column.

    "Deleting an Application Agreement"

    Update an application agreement

    Select a specific application agreement in the Update column.

    "Updating an Application Agreement"

    View details about an application agreement

    Select a specific application agreement in the Name column.

    "Viewing an Application Agreement"

    View details about an application agreement participant

    Select a specific application agreement in the Name column for which to view an agreement participant.

    "Viewing an Application Agreement Participant"

    Add an application delivery channel to an application agreement

    Select a specific application agreement in the Name column to which to add an application delivery channel.

    "Adding an Application Delivery Channel to an Application Agreement"

    Remove an application delivery channel from an application agreement

    Select a specific application agreement in the Name column from which to remove an application delivery channel.

    "Removing an Application Delivery Channel from an Application Agreement"

    Update an application delivery channel in an application agreement

    Select a specific application agreement in the Name column for which to update an application delivery channel.

    "Updating an Application Delivery Channel in an Application Agreement"

    View details about an application delivery channel in an application agreement

    Select a specific application agreement in the Name column for which to view an application delivery channel.

    "Viewing an Application Delivery Channel in an Application Agreement"

    See Also:

    "Agreements" for conceptual details about agreements.

Creating an Application Agreement

Follow these instructions to create an application agreement:

To create an application agreement:

  1. Ensure that you followed the instructions in "Accessing Application Agreement Management Tasks" to access the page for creating an application agreement.

    The Create Agreement screen appears.

  2. Enter the following details to create an application agreement. An asterisk (*) indicates a required field.

    Field Description

    Name *

    Enter a unique and recognizable application agreement name.

    Agreement Id

    Enter an agreement identifier.

    Description

    Enter a description for the application agreement.

    Effective From Date

    Select the calendar icon to access a table for selecting an agreement beginning date. If no date is specified, the agreement is always effective.

    Effective To Date

    Select the calendar icon to access a table for selecting an agreement ending date. If no date is specified, the agreement is always effective. Oracle Application Server ProcessConnect does not process events sent by parties if they are not within the date range specified by the agreement.

    Application Participant *

    Select the application to associate with this agreement as a participant (for example, Human Resources). If no selections are available, you must first create an application.

    See Also: "Creating an Application"

  3. Click Apply.

    The application agreement is created and the Agreement Details page for the new application agreement appears.

Deleting an Application Agreement

Follow these instructions to delete an application agreement:

To delete an application agreement:

  1. Ensure that you followed the instructions in "Accessing Application Agreement Management Tasks" to access the page for deleting an application agreement.

  2. Select Yes when prompted to delete an application agreement.

    The application agreement is deleted and the Application Agreements page appears.

Updating an Application Agreement

Follow these instructions to update an application agreement:

To update an application agreement:

  1. Ensure that you followed the instructions "Accessing Application Agreement Management Tasks" to access the page for updating an application agreement.

    The Update Agreement page appears.

  2. Make appropriate changes, including changing the participant in the application agreement. (See Step 2 for a list of fields you can update.)

  3. Click Apply.

    The agreement is updated and the Agreement Details page for the updated application agreement appears.

Viewing an Application Agreement

Follow these instructions to view details about a specific application agreement:

To view an application agreement:

  1. Ensure that you followed the instructions in "Accessing Application Agreement Management Tasks" to access the pages for viewing an application agreement.

    The Agreement Details page for the selected application agreement appears.
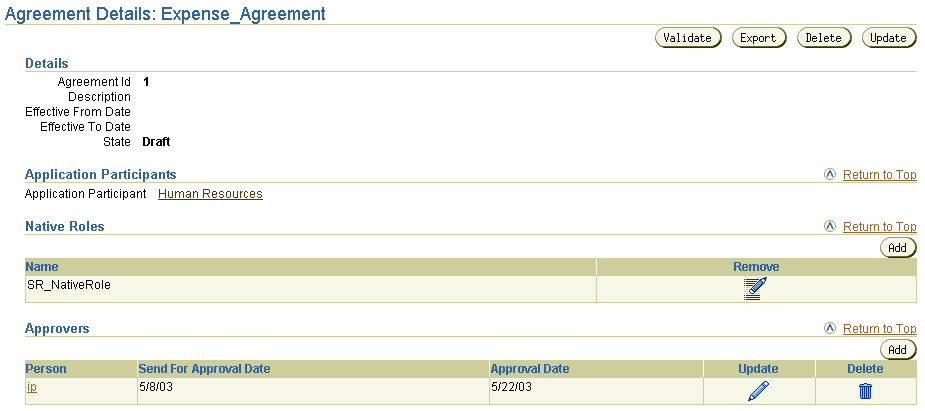
    Text description of list_application_agreements.gif follows.

    Text description of the illustration list_application_agreements.gif

  2. View specific details, including the following:

Viewing an Application Agreement Participant

Follow these instructions to view details about a specific application agreement participant:

To view an application agreement participant:

  1. Ensure that you followed the instructions in "Accessing Application Agreement Management Tasks" to access the page for viewing an application agreement.

    The Agreement Details page for the selected application agreement appears.

  2. Go to the Application Participants section.

  3. Click the application participant name.

    The Application Participant Details page for the selected application agreement participant appears.

    Text description of details_app_part.gif follows.

    Text description of the illustration details_app_part.gif

  4. View specific details, including the delivery channel for this application participant.

  5. Click Return to List to return to the Agreement Details page.

Adding an Application Delivery Channel to an Application Agreement

Follow these instructions to add an application delivery channel:

To add an application delivery channel:

  1. Ensure that you followed the instructions in "Accessing Application Agreement Management Tasks" to access the page for viewing an application agreement.

    The Agreement Details page for the selected application agreement appears.

  2. Go to the Application Participants section.

  3. Click the application participant name.

    The Application Participant Details page for the selected application participant appears.

  4. Go to the Delivery Channels Used section. (See the lower page of Figure 15-4.)

  5. Click Add.

    The Add Participant Delivery Channel page appears.

  6. Select a delivery channel from the Delivery Channel list. The selections that appear were created in "Creating an Application Delivery Channel".

  7. Click Apply.

    You are returned to the Application Participant Details page for the selected application participant.

Removing an Application Delivery Channel from an Application Agreement

Follow these instructions to remove an application delivery channel:

To remove an application delivery channel:

  1. Ensure that you followed the instructions in "Accessing Application Agreement Management Tasks" to access the page for viewing an application agreement.

    The Agreement Details page for the selected application agreement appears.

  2. Go to the Application Participants section.

  3. Click the application participant name.

    The Application Participant Details page for the selected application agreement participant appears.

  4. Go to the Delivery Channels Used section. (See the lower page of Figure 15-4.)

  5. Select a specific application delivery channel in the Remove column.

  6. Click Yes when prompted to remove an application delivery channel.

  7. The delivery channel is removed and you are returned to the Application Participant Details page for the selected application agreement participant.

Updating an Application Delivery Channel in an Application Agreement

Follow these instructions to update an application delivery channel:

  1. Ensure that you followed the instructions in "Accessing Application Agreement Management Tasks" to access the page for viewing an application agreement.

    The Agreement Details page for the selected application agreement appears.

  2. Go to the Application Participants section.

  3. Click the application participant name.

    The Application Participant Details page for the selected application agreement participant appears.

  4. Go to the Delivery Channels Used section. (See the lower page of Figure 15-4.)

  5. Select a specific delivery channel in the Update column.

    The Update Participant Delivery Channel page appears.

  6. Make appropriate changes. (See Step 6 of "Adding an Application Delivery Channel to an Application Agreement" for a list of fields you can update.)

  7. Click Apply.

    The delivery channel is updated and the Delivery Channel Details page for the updated delivery channel appears.

Viewing an Application Delivery Channel in an Application Agreement

Follow these instructions to view an application delivery channel:

  1. Ensure that you followed the instructions in "Accessing Application Agreement Management Tasks" to access the page for viewing an application agreement.

    The Agreement Details page for the selected application agreement appears.

  2. Go to the Application Participants section.

  3. Click the application participant name.

    The Application Participant Details page for the selected application agreement participant appears.

  4. Go to the Delivery Channels Used section. (See the lower page of Figure 15-4.)

  5. Select a specific delivery channel in the Name column.

    The Participant Delivery Channel Details page for the selected delivery channel appears (in this example, for the HTTP adapter):
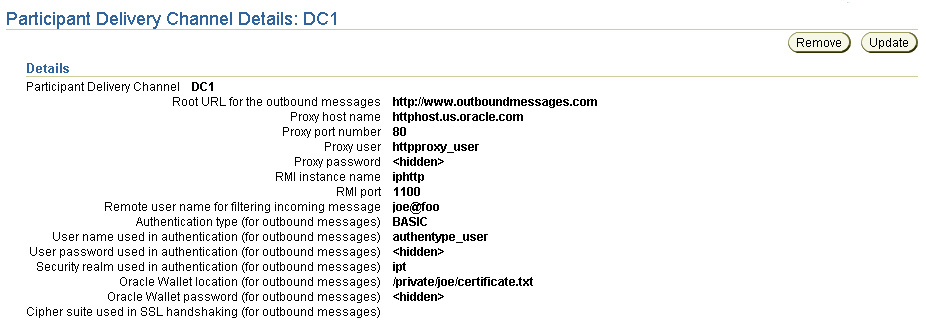
    Text description of details_adc2.gif follows.

    Text description of the illustration details_adc2.gif

  6. View specific details about delivery, security, and endpoint settings for the delivery channel. The word Participant displays in the page title when you view a delivery channel assigned to an application agreement.

    This page, as with the Application Participant Details page shown in the lower page of Figure 15-4, enables you to remove or update the selected application agreement participant.

  7. Click Return to List to return to the Application Participant Details page.

Managing Native Roles in Application Agreements

The Oracle Application Server ProcessConnect user interface tool enables you to perform the application agreement native role management tasks shown in Figure 15-5. The native role implements the application's behavior. These tasks are described in detail in this section.

Figure 15-5 Application Agreement Native Role Management Tasks

Text description of list_application_agreements.gif follows.

Text description of the illustration list_application_agreements.gif

Table 15-5 identifies the application agreement native role management tasks shown in Figure 15-5 and provides references to procedures for performing these tasks.

Table 15-5  Application Agreement Native Role Management Tasks
Page Elements Management Task First See Section... Then See Section...

Add button in Native Roles section in Figure 15-5

Add an application agreement native role

"Accessing Application Agreement Native Role Management Tasks"

"Adding an Application Agreement Native Role"

Remove column in Native Roles section in Figure 15-5

Remove an application agreement native role


"Removing an Application Agreement Native Role"

Accessing Application Agreement Native Role Management Tasks

Follow these instructions to access the application agreement native role management tasks shown in Figure 15-5:

To access application agreement native role management tasks:

  1. Select the Profiles tab.

  2. Select the Agreements tab.

    The Application Agreements page appears.

  3. Select a specific application agreement in the Name column.

    The Agreement Details page for the selected agreement appears.

  4. Go to the Native Roles section. (See Figure 15-5.)

  5. Select a task to perform and see the referenced section for instructions:

    To... Then... See Section...

    Add an application agreement native role

    Click Add.

    "Adding an Application Agreement Native Role"

    Remove an application agreement native role

    Select a specific application agreement native role in the Remove column.

    "Removing an Application Agreement Native Role"

    See Also:

    "Native Roles" for conceptual details

Adding an Application Agreement Native Role

Follow these instructions to add a native role to an application agreement:

To add an application agreement native role:

  1. Ensure that you followed the instructions in "Accessing Application Agreement Native Role Management Tasks" to access the page for adding an application agreement native role.

    The Add Native Role page appears.

  2. Select a native role from the Native Role list. The native roles that appear were created automatically with the modeling wizards in Chapter 9, "Creating Metadata with the Modeling Wizards" or manually in "Creating a Role".

  3. Click Apply.

    The application agreement native role is added to the application agreement and the Agreement Details page for the selected application agreement appears.

Removing an Application Agreement Native Role

Follow these instructions to remove an application agreement native role:

To remove an application agreement native role:

  1. Ensure that you followed the instructions in "Accessing Application Agreement Native Role Management Tasks" to access the page for removing an application agreement native role.

  2. Click Yes when prompted to remove an application agreement native role.

    The application agreement native role is removed and the Agreement Details page for the selected application agreement appears.

Managing Application and Agreement Validation and Approval

After completing the tasks described previously in this chapter, the profile data of applications (such as adapter and delivery channel characteristics) and application agreements (such as the participants and native role characteristics) must be validated and approved before it can be included in a deployed configuration. Approval typically involves assigning persons to approve the profile data, exporting the profile data to XML files, and submitting the files to the assigned approvers for review and eventual approval. The validation and approval tasks are performed from Validation, Send for Approval, Export, and Approve buttons that display at various stages in the top right sections of the following pages:

Table 15-6 identifies the application and application agreement validation and approval tasks and provides references to procedures for performing these tasks. All tasks with the exception of Task 4 are performed with the Oracle Application Server ProcessConnect user interface tool.

Table 15-6  Application and Application Agreement Validation and Approval Tasks
Task See Section...
  1. Validate the application and application agreement

"Validated State for Modeling Metadata and Profile Data"

  1. Select persons to approve the application and application agreement

"Pending Approval State for Profile Data"

  1. Export the application and application agreement to XML files

  2. Send the XML files to persons for approval

"Exporting Profile Data to an XML File"

  1. Specify a date by which persons must complete their approval or disapproval of the application and application agreement

"Update the Approver"

  1. Officially approve the application and application agreement when all persons have approved

"Approval State for Profile Data"

Common User Errors

The following are common application and application agreement user errors.

Chapter Summary

This chapter first describes how you create an application. You then assign an adapter to the application and create a delivery channel for the application that describes the communication capabilities (such as message exchange and security details) of the adapter. You then create an application agreement to which you assign the application. You also assign a native role to the application agreement to link your modeling metadata to your profile data. You must also validate and approve your application and application agreement before either can be included in a configuration.


Go to previous page Go to next page
Oracle
Copyright © 2003 Oracle Corporation.

All Rights Reserved.
Go To Documentation Library
Home
Go To Product List
Solution Area
Go To Table Of Contents
Contents
Go To Index
Index