10g (9.0.4)
Part Number B12121-01
Home |
Solution Area |
Contents |
Index |
| Oracle® Application Server ProcessConnect User's Guide 10g (9.0.4) Part Number B12121-01 |
|
This chapter describes the adapter interaction and event type management tasks required to design an integration.
This chapter contains these topics:
Table 11-1 describes Oracle Application Server ProcessConnect adapter interactions and event types and provides references to tasks for defining the adapter interaction and event type portions of an integration.
The user interface tool enables you to perform the adapter interaction management tasks shown in Figure 11-1. These tasks are described in detail in this section.
Adapter interactions define the communication between the Oracle Application Server ProcessConnect runtime system and various adapters to send and receive data.
Adapter interactions consist of two parts:
Figure 11-2 provides an example of an adapter interaction.
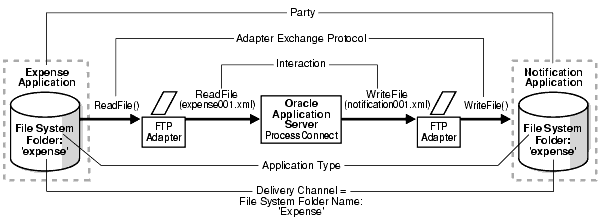
You create two adapter interactions (inbound and outbound) in this example. During the first session, you specify:
ReadFile() to submit an inbound expense report for approval to the expense directory of a notification application
During the second session, you specify:
WriteFile() to write an outbound expense report notification to the expense directory of the notification application.
Both the inbound and outbound adapter interaction create the Oracle record, which establishes the conceptual boundary between Oracle Application Server ProcessConnect and a party. Immediately after creation of an inbound and outbound adapter interaction, you can use this interaction to create a native event, specify a translator, create an application event, and create application event body elements for the various sections of the wire message, such as header details, attachments, and payload data. The native event body elements are created by the adapter.
Table 11-2 identifies the adapter interaction management tasks shown in Figure 11-1 and provides references to procedures for performing these tasks.
|
See Also:
|
Follow these instructions to access the adapter interaction management tasks shown in Figure 11-1.
To access adapter interaction management tasks:
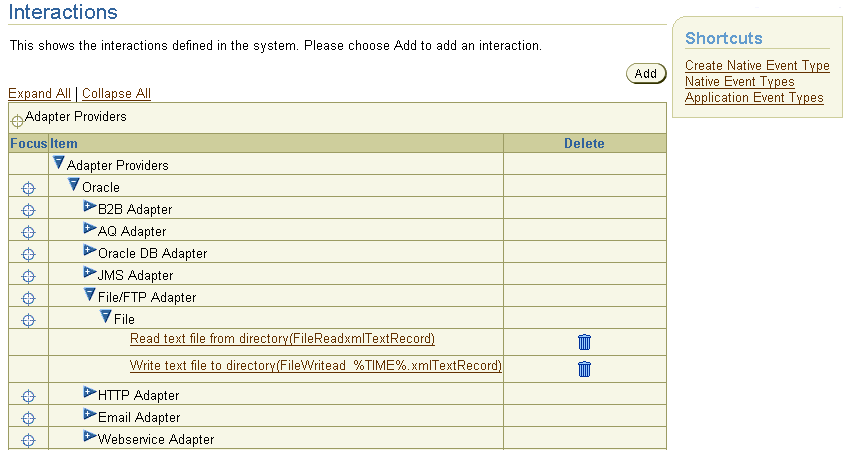
The Interactions page appears.
The list expands to display the available adapter types. (See Figure 11-1.)
|
See Also:
"Creating a Native Event Type" if you want to create a native event type to assign to an existing adapter interaction |
This section describes how to perform the following tasks:
You can also optionally start a wizard during this session to create a native event, an application event, and event body elements for the various sections of the native format (wire) message, such as header details, attachments, and payload data.
To add an adapter interaction:
The Add Interaction : Select Adapter Type page appears.
Available adapters appear, including the technology adapters described in this chapter and any application adapters that you have installed.
The Add Interaction: Select Interaction page appears and displays in the Inbound direction (for adapter interactions to use for messages being sent to Oracle Application Server ProcessConnect) and the Outbound direction (for adapter interactions to use for messages being sent from Oracle Application Server ProcessConnect).
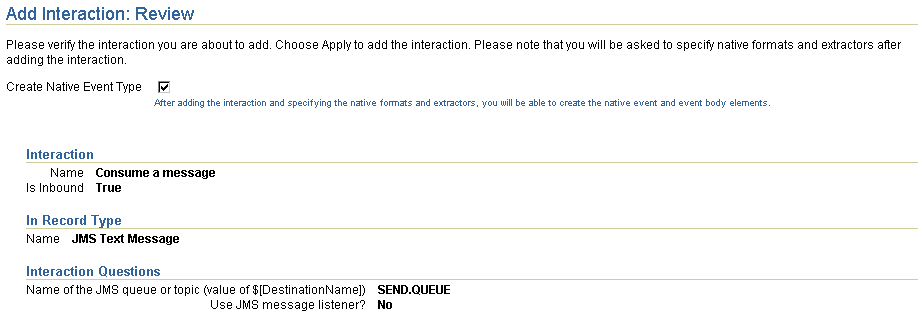
In this example, a specific adapter interaction for the JMS adapter is selected:

Text description of the illustration add_interaction_select.gif
|
Note: If an interaction has already been added, you cannot add it a second time. Attempting to do so causes an error message to appear. You must first delete the existing interaction. Expand the Interactions page shown in Figure 11-1 to display a list of currently-defined adapter interactions. |
| Adapter Exchange Protocol | See Section... |
|---|---|
|
Inbound |
|
|
|
|
|
|
|
|
|
|
|
Outbound |
|
|
|
|
|
|
|
|
|
|
See Also:
"Advanced Queuing Adapter" for additional Advanced Queuing adapter details |
Follow the procedures in this section. An asterisk (*) indicates a required field.
Follow the procedures in this section. An asterisk (*) indicates a required field.
| Direction | See Section... |
|---|---|
|
Inbound |
|
|
Outbound |
|
See Also:
"E-Mail Adapter" for additional E-Mail adapter details |
Follow the procedures in this section. An asterisk (*) indicates a required field.
Follow the procedures in this section. An asterisk (*) indicates a required field.
| Direction | See Section... |
|---|---|
|
Inbound |
|
|
|
|
|
Outbound |
|
|
|
"File/FTP Adapter" for additional File/FTP adapter details
See Also:
Follow the procedures in this section. An asterisk (*) indicates a required field.
| Field | Description |
|---|---|
|
Directory (relative path) for incoming files |
Enter the directory in which incoming files are located. This relative path must be a directory path that begins under This path is relative to the base directory delivery channel property you define in "Creating a File/FTP Adapter Delivery Channel".
For example, if the base directory delivery channel you defined is |
|
Maximum number of files to read for each poll |
Enter the maximum number of messages to process during polling (default value is 30). |
|
File extension for the incoming files - for example, txt * |
Enter the file extension. |
Follow the procedures in this section. An asterisk (*) indicates a required field.
| Adapter Exchange Protocol | See Section... |
|---|---|
|
Inbound |
|
|
Outbound |
|
See Also:
"HTTP Adapter" for additional HTTP adapter details |
Follow the procedures in this section. An asterisk (*) indicates a required field.
Follow the procedures in this section. An asterisk (*) indicates a required field.
| Adapter Exchange Protocol | See Section |
|---|---|
|
Inbound |
|
|
|
|
|
|
|
|
|
|
|
|
|
|
|
|
|
Outbound |
|
|
|
|
|
|
|
|
|
|
|
|
|
|
|
|
See Also:
|
Follow the procedures in this section. An asterisk (*) indicates a required field.
| Field | Description |
|---|---|
|
Name of the JMS queue or topic (value of $[DestinationName]) * |
Enter a value. The value of this field is most often the actual name of the underlying queue (or topic). Specifically, it simply replaces the |
|
Optional JMS message selector expression |
Enter a value between |
|
Optional durable subscriber name |
Enter a value between |
|
Use JMS message listener? |
Select Yes or No (the default) to specify if the JMS consumer is to use a JMS message listener for receiving messages. |
Follow the procedures in this section. An asterisk (*) indicates a required field.
| Adapter Exchange Protocol | See Section... |
|---|---|
|
Inbound |
|
|
Outbound |
|
|
"Review the Adapter Interaction Details". You are not prompted to answer any questions. |
|
|
See Also:
"Oracle Database Adapter Exchange Protocols" for additional details about these adapter exchange protocols |
Follow the procedures in this section. An asterisk (*) indicates a required field.
| Field | Description |
|---|---|
|
Enter a SQL statement for retrieving rows from the interface table - for example, select * from emp |
Enter a query by following these rules. |
The query must follow these rules:
WHERE clause excluding processed rows, for example:
SELECT name, salary FROM emp WHERE status <> 'Processed'
SELECT name, salary FROM emp ORDER BY name
Any additional questions that appear are based on the SQL statement you entered in Step 1.
SELECT statement is entered for the first question), perform Steps 3a through 3b. Otherwise, go to Step 5.
| Field | Description |
|---|---|
|
Select the columns from the interface table that uniquely identify a row |
Select one or more columns from a table to define a unique key. All columns for the table appear. |
|
Specify a method for marking the row as having been read |
Select whether to update or delete the row. If update is selected, the query specified in Step 1 must exclude processed rows. |
Follow the procedures in this section. An asterisk (*) indicates a required field.
| Field | Description |
|---|---|
|
Select an action |
This action (either Insert or Update) writes the record to the table. The record can be inserted as a new row or an existing row can be updated. |
| Field | Description |
|---|---|
|
Select the columns from the table that uniquely identify a row |
Select one or more columns that define a unique key. All table columns appear for selection. |
One outbound adapter interaction is supported. Inbound adapter interactions are not supported.
The Add Interaction : Questions page appears and prompts you to answer specific questions about selecting a Web Services Description Language (WSDL) file that describes the web service.
A second Add Interaction : Questions page appears and prompts you to select exactly one Web service operation from the many possible operations contained in the WSDL file. This page allows filtering on many attributes, such as operation name, message name, referenced URIs, and so on. Each question provides a list with many selections. Answer only enough questions to identify the operation. If the header in each list is Unspecified (the default), the behavior is as if all the remaining items are selected. You typically select the desired operation and treat the other filter values as additional information (for example, note which ports provide the desired operation, or which XML Schema datatypes are required). However, a Web service can sometimes provide the same operation with a choice of bindings (for example, RPC versus document style). You may also want to first eliminate undesired ports (corresponding to undesired parties) or undesired message part datatypes.
See Also:
The Add Interaction : Review page displays details on your responses. The following example is the review page for a JMS adapter interaction.
This adds the adapter interaction and creates a corresponding Oracle record type. The Oracle record represents the input or output to an adapter interaction. It represents the conceptual boundary between Oracle Application Server ProcessConnect and the application being accessed by the adapter.
The Specify Native Format page appears.
The record type elements for which to create native event body elements appear in the Record Type Element column. For this example, three record types for the JMS adapter appear.
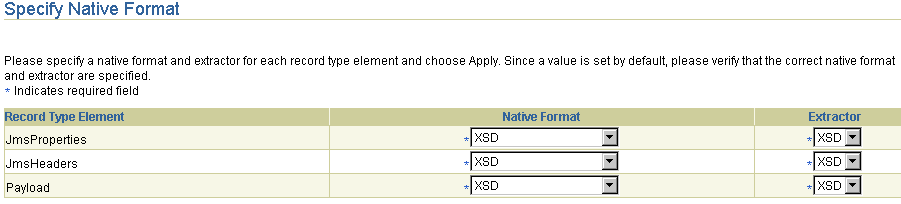
See Chapter 8, "Oracle Application Server ProcessConnect Technology Adapters" for details on which native formats are applicable to each record element. With the JMS Adapter, for example, the record elements JmsHeaders and JmsProperties can only have the native format XSD, whereas the payload record element can be any of the following native formats:
If your native message format uses XML
For specifying the subject and body of alert e-mail messages
If your native message format is not XML, but is instead a format of structured records of bytes, characters, or both
Be careful changing the native format of all record elements supported by a given adapter; this causes an undefined action to occur during runtime.
The screen refreshes to display your selection in the Extractor list. For example, if you select XSD in the Native Format list, XSD automatically appears in the Extractor list. Based on your native format selection, the extractor determines which type of translator to use.
The page that appears next is based on whether the Create Native Event Type box was selected on the Add Interaction : Review page.
| If the Create Native Event Type Box Was... | Then... | Go To... |
|---|---|---|
|
Selected |
The Create Native Event Type page appears. |
"Creating Native and Application Event Types and Body Elements" |
|
Not selected |
The Interaction Details page appears. |
"Viewing an Adapter Interaction" Note: You can also create native and application event types and body elements for this interaction at a later time. |
|
See Also:
The following sections for specific details about these native formats:
|
The Create Native Event Type page appears. This is the first page of a wizard from which to create native events, application events, and body elements for both from the Oracle record type elements.
The interaction and Oracle record type also display on this page.
The Create Event Body Element : record_type page appears, where record_type is the record type in the native format. This page displays details such as the following:
This page appears for each Oracle record element.
This wizard prompts you for details to create event body elements for each Oracle record type element. At some point in this process, you are may be prompted to specify the details described in Step 3 if one of your record type elements contains payload datatypes. An exception to this is the Advanced Queuing adapter's Object Queue adapter exchange protocol, which automatically defines payload details and does not prompt you to specify any information.
Note:
The fields that display in this section are based on the native format and translator selected in Step 1.
| Native Format and Translator | See Section |
|---|---|
|
XSD |
|
|
Token Substituted Text |
|
|
D3L |
Provide responses to the following questions.
| Field | Description |
|---|---|
|
Preserve Namespaces for Native Instances * |
|
|
DocType for Native Instances * |
Select one of the following:
|
The Create Event Body Element : record_type page refreshes to display additional questions based on your selection in the DocType for Native Instances list in Step 1.
Provide responses to the following questions.
Provide responses to the following questions.
definitions D3L file, which contains importable definitions that can be referenced (and thus not defined in) the main message D3L file.
"Additional D3L Sample Files and DTD" for details about both types of D3L files
See Also:
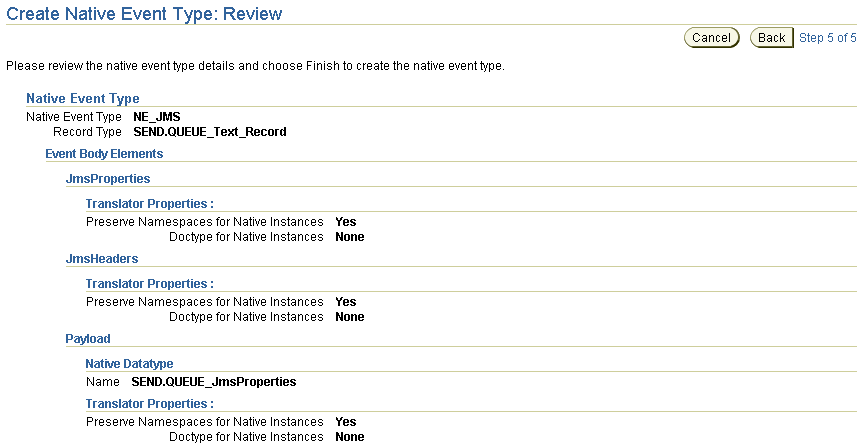
The Create Native Event Type: Review page appears when all body elements have been created. For example, the following page displays if you selected a JMS adapter interaction. Note that three event body elements (JmsProperties, JmsHeaders, and Payload) are to be created. Payload contains the native datatypes. For this example, the JMS adapter supplies the native format definitions (XSDs in this case) for the Oracle record elements JmsHeaders and JmsProperties.
When complete, the Native Event Types page appears.
See Also:
If an adapter interaction is part of an integration designed up through the business process, then attempting to delete the adapter interaction before deleting other modeling metadata results in error messages appearing. Ensure that you delete the modeling metadata in the following order:
Follow these instructions to delete an adapter interaction:
To delete an adapter interaction:
The adapter interaction is deleted and the Interactions page appears.
Follow these instructions to view an adapter interaction:
To view an adapter interaction:
The Interaction Details page for the selected adapter interaction appears.

Text description of the illustration add_interaction_view.gif
This page, as with the Interactions page shown in Figure 11-1, enables you to delete the selected adapter interaction.
The Oracle Application Server ProcessConnect user interface tool enables you to perform the native event type management tasks shown in Figure 11-3 and Figure 11-4. These tasks are described in detail in this section. A native event is created from an adapter interaction. A native event is the Oracle Application Server ProcessConnect internal implementation of the business data contained in an Oracle record. The body elements of the native event contain the various sections of the wire message, such as payloads, headers, or attachments. The representation of the wire message content is unchanged.

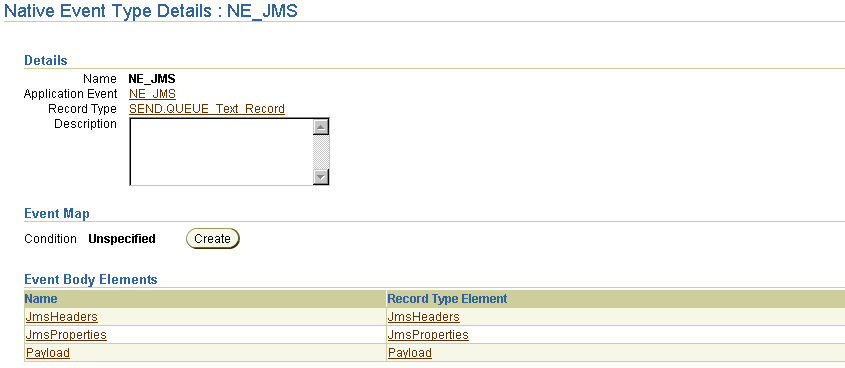
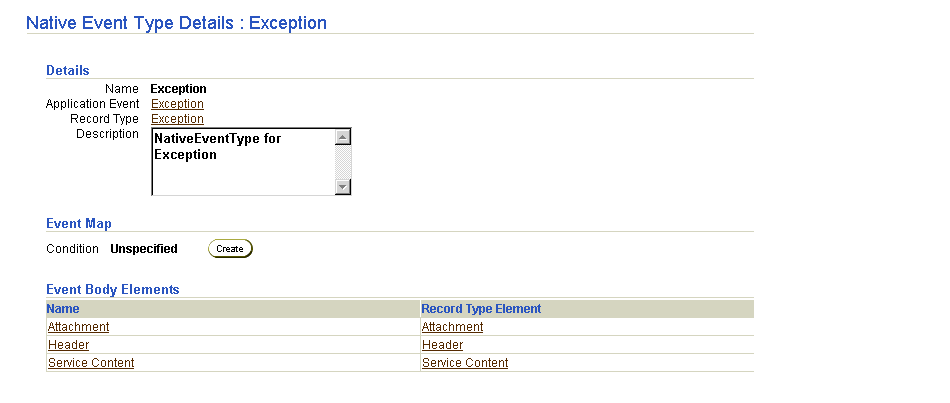
Selecting a native event type in the Name column of the Native Event Types section causes a details page such as that shown in Figure 11-4 to appear.
Table 11-3 identifies the native event type management tasks shown in Figure 11-3 and Figure 11-4 and provides references to procedures for performing these tasks.
| Page Elements | Management Task | First See Section... | Then See Section... |
|---|---|---|---|
|
Create button in Native Event Types page of Figure 11-3 |
Create a native event type |
||
|
Delete column in Native Event Types page of Figure 11-3 |
Delete a native event type |
|
|
|
Name column in Native Event Types page of Figure 11-3 |
View a native event type |
|
|
|
Record Type Elements column in Native Event Type Details page of Figure 11-4 |
View a record type element |
||
|
Event Body Elements column in Native Event Type Details page of Figure 11-4 |
View an event body element |
|
|
|
Event Body Elements column in Native Event Type Details page of Figure 11-4 |
Add event body element validation |
|
|
See Also:
"Native Events" for additional conceptual details |
Follow these instructions to access the native event type management tasks shown in Figure 11-3 and Figure 11-4:
To access native event type management tasks:
The Native Event Types page appears. (See Figure 11-3.)
Follow these instructions to create a native event type to which to assign an existing adapter interaction and translator. During native event type creation, you also create an application event, and create native and application event body elements for the various sections of the wire message, such as header details, attachments, and service content (payload data).
|
Note: Follow these instructions if you want to use an existing adapter interaction and record type with this native event. If the adapter interaction to use with this native event does not exist, you must first add the adapter interaction. See "Adding an Adapter Interaction" for instructions. |
To create a native event type:
The Create Native Event Type page appears. This is the first page of a wizard that enables you to create a native event type, specify a translator, create an application event type, and create native and application event body elements for the various sections of the wire message (such as the payload, header, and attachment).
| Field | Description |
|---|---|
|
Name * |
Enter a unique and recognizable name for the native event type. |
|
Interaction * |
Select an adapter interaction to associate with this native event (for example, an interaction named PurchaseOrderConfirmation or an interaction that retrieves a text file from an HTTP server). You added this interaction and specified a translator in "Adding an Adapter Interaction". |
|
Record Type * |
The page refreshes to display the record type associated with the selected adapter interaction (for example, record type PurchaseOrderConfirmation if that was your selection from the Interaction list). The record type name is part of the interaction name (it displays in the brackets). For example, for the Advanced Queuing adapter, the following can display: Interaction Dequeue from AQ_EXPENSE(AQ_ECXMSG_Record) - Inbound Record Type AQ_ECXMSG_Record |
The Create Event Body Element : record_type page appears, where record_type is the record type in the native format.
If a native event type is part of an integration designed up through the business process, then attempting to delete the native event type before deleting other modeling metadata results in error messages appearing. Ensure that you delete the modeling metadata in the following order:
Follow these instructions to delete a native event type:
To delete a native event type:
The native event type is deleted and the Native Event Types page appears.
Follow these instructions to view details about a specific native event type:
To view a native event type:
The Native Event Type Details page for the selected native event type appears.
This page, as with the Native Event Types page shown in Figure 11-3, enables you to delete the selected native event type.
Native events are created from record types. Follow these instructions to view details about a specific record type element:
To view a record type element:
The Native Event Type Details page appears. (See Figure 11-4.)
The Record Type Element Details page for the selected record type element appears.
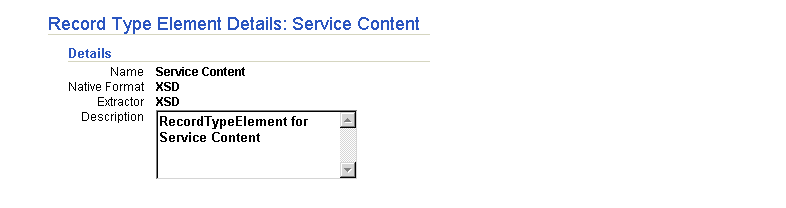
"Create and View the Native and Application Events and Body Elements" for additional details about record types
See Also:
Follow these instructions to view details about a specific event body element:
To view an event body element:
The Native Event Type Details page appears. (See Figure 11-4.)
The Event Body Element Details page for the selected event body element appears.
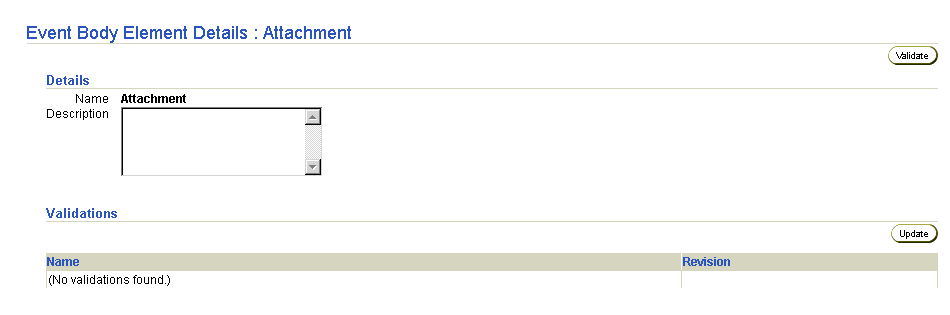
Follow these instructions to add validation to a native event body element. This ensures that the native event body element is validated when it is invoked at runtime when a wire message is received. If validation fails, the native event is not translated into an application event, and an error message displays onscreen.
To add native event body element validation:
The Native Event Type Details page appears. (See Figure 11-4.)
The Event Body Element Details page for the selected event body element appears.
Click Update.
The Specify Validation for Native Event Body Element page appears.
The Event Body Element Details page for the selected event body element now displays the added validation and revision number.
|
See Also:
"Native Event Validation" for additional conceptual details |
The Oracle Application Server ProcessConnect user interface tool enables you to perform the native event correlation management tasks shown in Figure 11-5. These tasks are described in detail in this section.
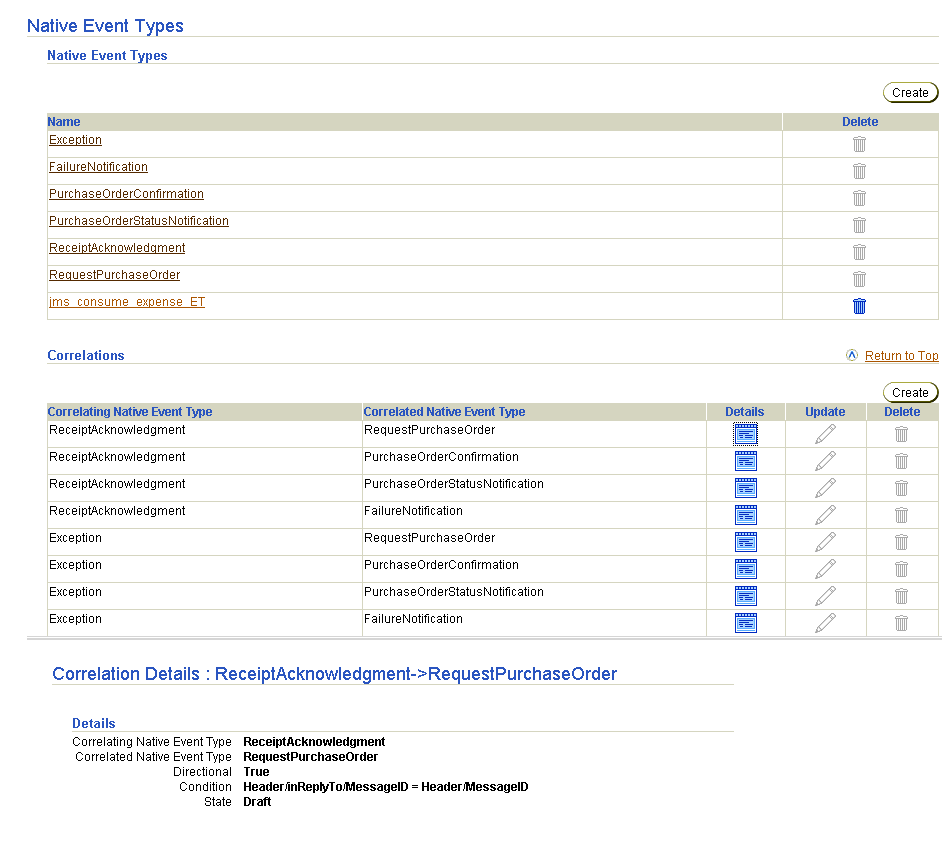
Native event correlation is an expression that defines when two native event instances are related; for example, a correlating (initiating) native event purchase order request (NE_PO in Figure 11-6) and a correlated (target) native event purchase order acknowledgment (NE_POA in Figure 11-6). Native event correlation ensures that the correct native event instances are matched and provided to the corresponding native role instances.
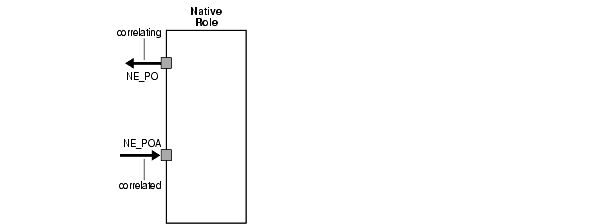
Table 11-4 identifies the native event correlation management tasks shown in Figure 11-5 and provides references to procedures for performing these tasks.
| Page Elements | Management Task | First See Section... | Then See Section... |
|---|---|---|---|
|
Create button in Correlations section of Native Event Types page in Figure 11-5 |
Create a native event correlation |
||
|
Delete column in Correlations section of Native Event Types page in Figure 11-5 |
Delete a native event correlation |
|
|
|
Update column in Correlations section of Native Event Types page in Figure 11-5 |
Update a native event correlation |
|
|
|
Details column in Correlations section of Native Event Types page in Figure 11-5 |
View a native event correlation |
|
|
See Also:
"Native Event Correlation" for additional conceptual details |
Follow these instructions to access the native event correlation management tasks shown in Figure 11-5:
To access native event correlation management tasks:
The Native Event Types page appears. (See the upper page of Figure 11-5.)
Follow these instructions to create a native event correlation:
To create a native event correlation:
The Create Correlation: Native Event Types page appears.
The Create Correlation: Correlation Condition appears.
The Create Condition Expression page appears.
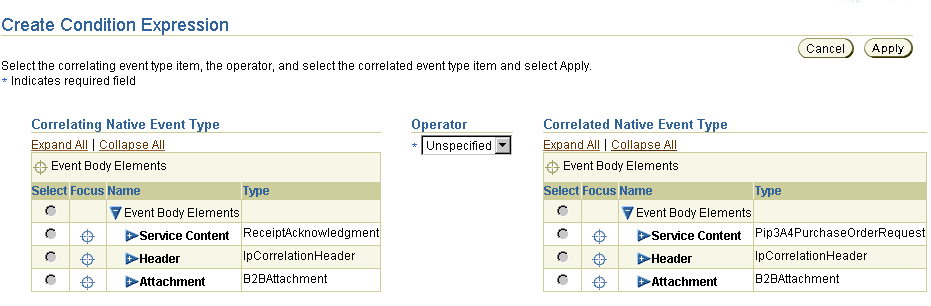
Text description of the illustration create_condition_express_ne.gif
The created native event correlation condition displays in the Create Correlation : Correlation Condition page.
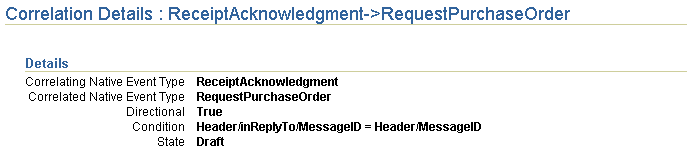
The Correlation Details page describes details about the new native event correlation.
Follow these instructions to delete a native event correlation:
To delete a native event correlation:
The native event correlation is deleted and the Native Event Types page appears.
Follow these instructions to update a native event correlation:
To update a native event correlation:
The Update Correlation: Native Event Types page appears.
The Update Correlation: Correlation Condition page appears.
The Update Correlation: Correlation Condition page appears.
The Update Condition Expression page appears.
The native event correlation is updated and the Update Correlation: Correlation Condition page appears.
Follow these instructions to view details about a specific native event correlation:
To view a native event correlation:
The Native Event Correlation Details page for the selected native event correlation appears.

This page, as with the Native Event Types page shown in Figure 11-5, enables you to delete or update the selected native event correlation.
The Oracle Application Server ProcessConnect user interface tool enables you to perform the event map management tasks shown in Figure 11-7. These tasks are described in detail in this section.
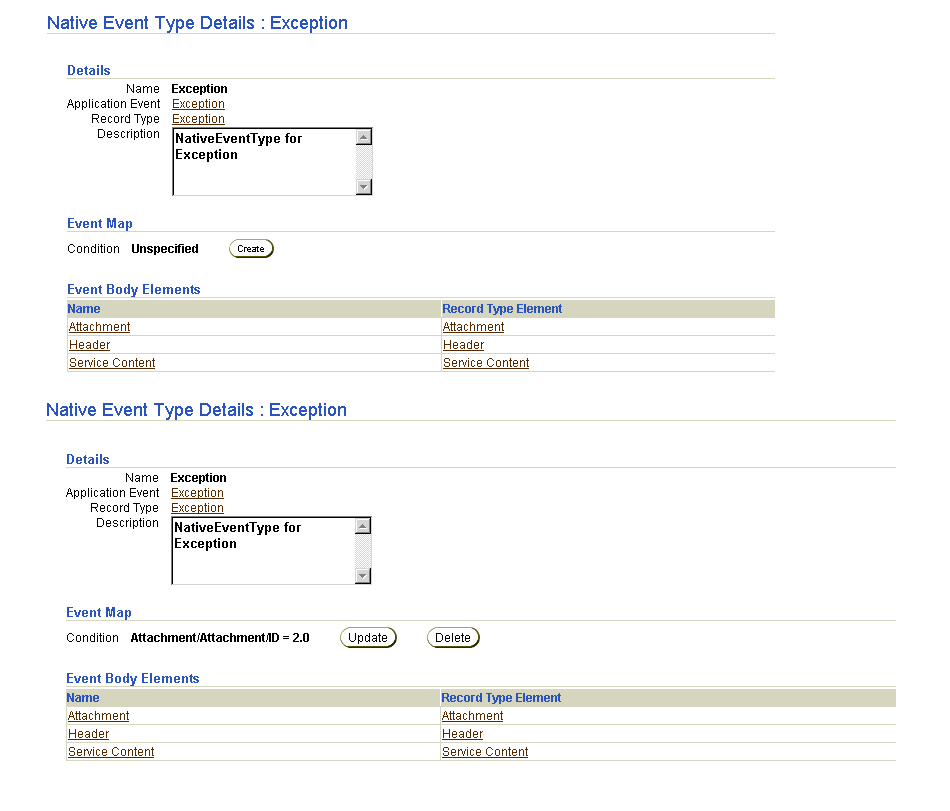
The purpose of an event map is to select a native event type from a record at runtime when there are multiple possible native event types for the record. If there is one native event type for the record, then no event map condition expression is required. If there are multiple native events for a record, then an event map must be defined for each native event. It must be ensured that the event maps for a given record are mutually exclusive so that the correct native event type is chosen. If you do not want a native event to be used or the event type is only used for outbound interactions, then you can define an event map to always evaluate to false (for example, checking for a value that can never exist in the message).
Figure 11-8 provides an example of a single Oracle record with two native event types.
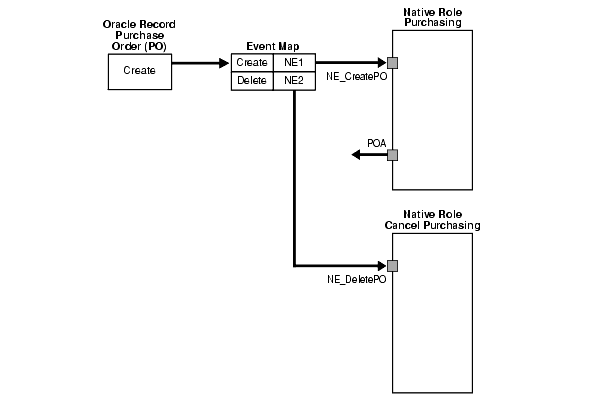
Table 11-5 identifies the event map management tasks shown in Figure 11-7 and provides references to procedures for performing these tasks.
| Native Event Type Details Page Elements | Management Task | First See Section... | Then See Section... |
|---|---|---|---|
|
Create button in Event Map section in upper page of Figure 11-7 |
Create an event map |
||
|
Delete button in Event Map section in lower page of Figure 11-7 |
Delete an event map |
|
|
|
Update button in Event Map section in lower page of Figure 11-7 |
Update an event map |
|
|
|
Event Map section in lower page of Figure 11-7 |
View an event map |
|
|
See Also:
"Event Maps" for additional conceptual details |
Follow these instructions to access the event map management tasks shown in Figure 11-7:
To access event map management tasks:
The Native Event Types page appears. (See Figure 11-5.)
The Native Event Type Details page appears. (See the upper page of Figure 11-7.)
Follow these instructions to create an event map:
To create an event map:
The Create Event Map page appears.
The Create Condition Expression page appears.
| If You Selected... | Then... |
|---|---|
|
= |
|
|
Exists |
The Create Event Map page displays the new event map.
The Native Event Type Details page describes details about the native event type, its event body elements, and its new event map.
Follow these instructions to delete an event map:
To delete an event map:
The event map is deleted and the Native Event Type Details page appears.
Follow these instructions to update an event map:
To update an event map:
The Update Event Map page appears.
The Update Condition Expression page appears.
The event map is updated and the Native Event Type Details page appears.
Follow these instructions to view details about a specific event map:
To view an event map:
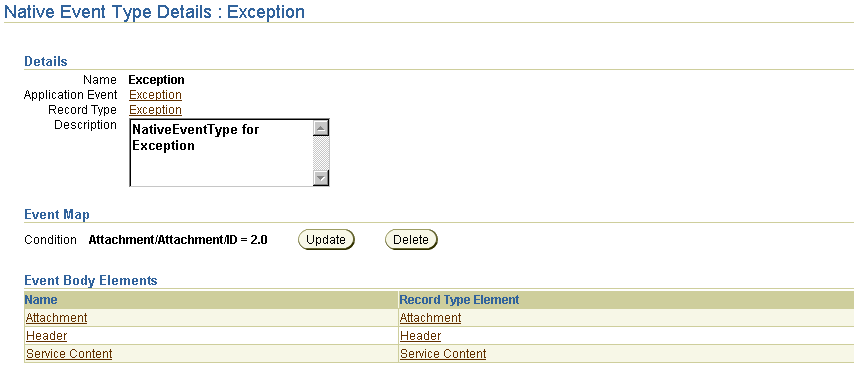
Event map details display to the left of the Update button. For example, the event map shown in the lower page of Figure 11-7 shows a constant value of 2.0 assigned to the Attachment/ID element of the Attachment event body element.
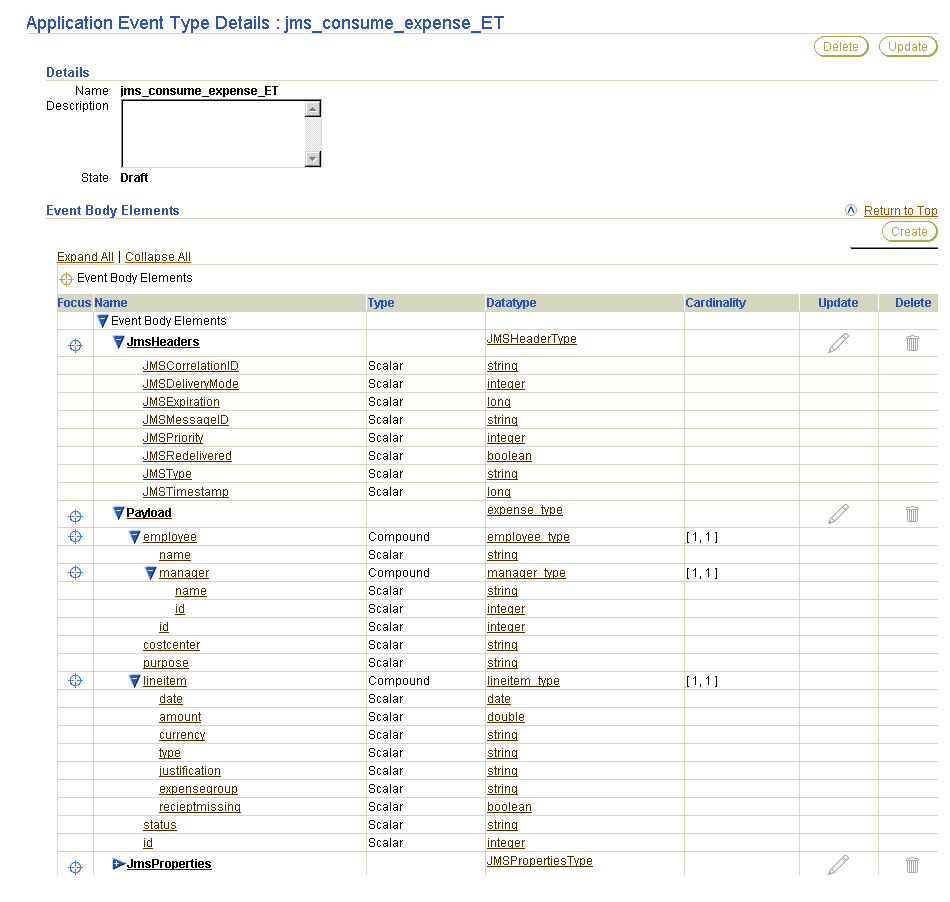
The Oracle Application Server ProcessConnect user interface tool enables you to view application event types. Application event types cannot be deleted or updated. Application event types are automatically created in the inbound or outbound direction when you add an adapter interaction or create a native event. For Oracle Application Server ProcessConnect to process the contents of native event body elements, the contents must be re-represented in an interpretable syntactic format. This interpretable format is called the application format. After the native event is represented as the corresponding application event, Oracle Application Server ProcessConnect can make decisions based on it, or transform it. For the outbound direction, application event types are transformed from business event types.
Follow these instructions to view application events:
To view application events:
The Application Event Types page displays the available application events.

Text description of the illustration view_application_events.gif
The details page for the selected application event type appears.
Application events contain no native formats. The particular native format of the expense application cannot be identified, and any specific syntactic properties have been removed.
|
See Also:
|
The Oracle Application Server ProcessConnect user interface tool enables you to perform the business event type management tasks shown in Figure 11-9. These tasks are described in detail in this section. A business event establishes a common event structure and vocabulary across all parties. Business events are completely removed from any party-specific properties, including data structure and vocabulary. All related events from all parties follow the same structure and the same vocabulary once they are translated and transformed into business events. The event body element of the business event contains a complete set of business data. You create an event body element inside a business event that contains the business event datatypes used by all parties in an integration. The business event type can be viewed as a superset of all the corresponding party-specific application datatypes.

Table 11-6 identifies the business event type management tasks shown in Figure 11-9 and provides references to procedures for performing these tasks.
| Business Event Types Page Elements | Management Task | First See Section... | Then See Section... |
|---|---|---|---|
|
Shortcuts section in Business Event Types page of Figure 11-9 |
Take shortcuts to add an adapter interaction, import datatypes, and manage transformations |
N/A |
|
|
Create button in Business Event Types page of Figure 11-9 |
Create a business event type |
||
|
Delete column in Business Event Types page of Figure 11-9 |
Delete a business event type |
|
|
|
Update column in Business Event Types page of Figure 11-9 |
Update a business event type |
|
|
|
Name column in Business Event Types page of Figure 11-9 (To access the details page in the lower page of Figure 11-9) |
View a business event type |
|
|
|
Create button in Business Event Type Details page of Figure 11-9 |
Create an event body element |
|
|
|
Delete column in Business Event Type Details page of Figure 11-9 |
Delete an event body element |
|
|
|
Update column in Business Event Type Details page of Figure 11-9 |
Update an event body element |
|
|
|
Event Body Elements column in Business Event Type Details page of Figure 11-9 |
View an event body element |
|
|
See Also:
|
Follow these instructions to access the business event type management tasks shown in Figure 11-9:
To access business event type management tasks:
The Business Event Types page appears. (See the upper page of Figure 11-9.)
Follow these instructions to create a business event type:
To create a business event type:
The Create Business Event Type page appears.
| Field | Description |
|---|---|
|
Name * |
Enter a unique and recognizable name for the business event type. |
|
Description |
Provide a description of the business event type. |
The business event type is created and the Business Event Type Details page for the created business event type appears.
Follow these instructions to delete a business event type:
To delete a business event type:
The business event type is deleted and the Business Event Types page appears.
Follow these instructions to update a business event type:
To update a business event type:
The Update Business Event Type page appears.
The business event type is updated and the Business Event Types page for the updated business event type appears.
Follow these instructions to view details about a specific business event type:
To view a business event type:
The Business Event Type Details page for the selected business event type appears.
This page, as with the Business Event Types page shown in the upper page of Figure 11-9, enables you to delete or update the selected business event type.
The business event body element contains the business datatypes. Follow these instructions to create an event body element:
To create an event body element:
The Business Event Type Details page for the selected business event type appears. (See the lower page of Figure 11-9.)
The Create Event Body Element page appears.
You are returned to the Business Event Type Details page. The business event type now includes the event body element and its namespace and business datatypes.
Follow these instructions to delete an event body element:
To delete an event body element:
The Business Event Type Details page for the selected business event type appears. (See the lower page of Figure 11-9.)
The event body element is deleted and the Business Event Type Details page appears.
Follow these instructions to update an event body element:
To update an event body element:
The Business Event Type Details page for the selected business event type appears.
The Update Event Body Element page appears.
The event body element is updated and the Business Event Type Details page for the event body element appears.
Follow these instructions to view details about a specific event body element:
To view an event body element:
The Business Event Type Details page for the selected business event type appears.
The Event Body Element Details page for the selected event body element appears.

This page, as with the Business Event Type Details page shown in Figure 11-9, enables you to delete or update the selected event body element.
The following are common interaction and event type user errors.
This chapter describes how to manage adapter interactions and takes you through the steps for adding an Advanced Queuing, E-Mail, File/FTP, HTTP, JMS, Oracle Database, and Web Service adapter interaction. Managing native event types, native event correlations, event maps, application event types, and business event types are also discussed.
|
|
 Copyright © 2003 Oracle Corporation. All Rights Reserved. |
|