Skip Headers

Oracle® Application Server ProcessConnect User's Guide
10g (9.0.4)

Part Number B12121-01
Go To Documentation Library
Home
Go To Product List
Solution Area
Go To Table Of Contents
Contents
Go To Index
Index

Go to previous page Go to next page

13
Managing Transformations

This chapter describes transformation concepts and management tasks for designing an integration.

This chapter contains these topics:

Transformation Overview

Different parties in an integration use a different structure for and a different vocabulary in their business messages. For example, an address can be presented in a single string by one party while it can be divided into street, city, and other details by another party. For business vocabulary, one party can use the term item in its purchase order while another party can use the term component in its purchase order. This creates a message structure and vocabulary mismatch between the two parties. Transformation eliminates such a structure and vocabulary mismatch by mapping one party's message to that of the other.

Before a business message can be mapped to one with a different structure and vocabulary, the logic for such a mapping must be designed. For example, it must be specified that one party's address with a separate street, city, and other details must be joined together into a single string for another party. This logic comprises a transformation map. Oracle Application Server ProcessConnect provides an easy-to-use, graphical way of defining these maps.

Where does transformation fit in into the overall integration picture? A transformation map is associated with a transformation step within a role responsible for mapping messages with different semantics. Transformation steps are typically defined in transformation binding roles to map an application event type to a business event type, and vice versa, but they can also be used within application roles or business roles and can operate over datatypes and event types.

See Also:

Transformation Maps Overview

A transformation map is the Oracle Application Server ProcessConnect structure that defines the transformation logic. A map transforms sources to targets, both of which can either be event types or datatypes. A single source typically gets transformed to a single target, but a map is free to have multiple sources and targets. You can use two types of transformation maps, depending on the types of sources and targets being transformed:

Event Type Transformation Maps

This section provides an example of an event type transformation map.

Assume you want to transform an invoice to a purchase order, both of which are event types. You do this by defining an event type transformation map, which defines a mapping between event types.

Formally, an event type transformation map defines mappings across event types and datatypes, including the following types of mapping:

Event type transformation maps can also transform a combination of an event type and a datatype to the same type of combination, or split an event type into a datatype and an event type. In short, any combination of these types is possible as long as at least one event type is involved:

Datatype Transformation Maps

This section provides an example of a datatype transformation map.

Assume you want to transform only a line item from an invoice to an item in a purchase order. You can do this in the map that transforms the invoice to the purchase order by individually mapping each required element from the line item to an element in the item. However, if you want to reuse this mapping elsewhere, you define a separate datatype transformation map.

Datatype transformation maps define mappings across datatypes. These maps are typically invoked from other maps though they can also be directly associated with transformation steps. Datatype transformation maps can either be:

Managing Event Type Transformation Maps

The Oracle Application Server ProcessConnect user interface tool enables you to perform the event type transformation map management tasks shown in Figure 13-1 and Figure 13-2. These tasks are described in detail in this section.
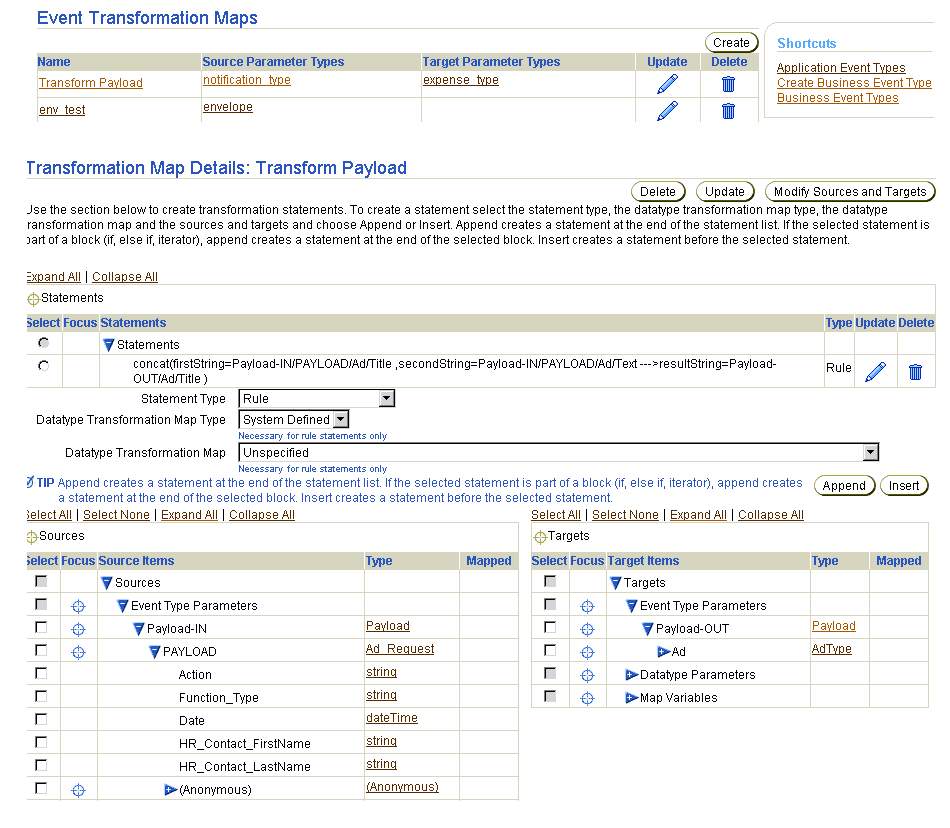
Figure 13-1 Event Type Transformation Map Management Tasks (Part 1 of 2)

Text description of transforms2.gif follows

Text description of the illustration transforms2.gif

Selecting Modify Sources and Targets in Figure 13-1 causes a Modify Sources and Targets page such as that shown in Figure 13-2 to appear.

Figure 13-2 Event Type Transformation Map Management Tasks (Part 2 of 2)

Text description of transforms43.gif follows

Text description of the illustration transforms43.gif

Table 13-1 identifies the event type transformation map management tasks shown in Figure 13-1 and Figure 13-2 and provides references to procedures for performing these tasks.

Table 13-1  Event Type Transformation Map Management Tasks
Page Elements Management Task First See Section... Then See Section...

Shortcuts section in Event Transformation Maps page of Figure 13-1

Take a shortcut to manage business and application event types

N/A

"Viewing Application Event Types" and "Managing Business Event Types"

Create button in Event Transformation Maps page of Figure 13-1

Create an event type transformation map

"Accessing Event Type Transformation Map Management Tasks"

"Creating an Event Type Transformation Map"

Delete column in Event Transformation Maps page of Figure 13-1

Delete an event type transformation map


"Deleting an Event Type Transformation Map"

Update column in Event Transformation Maps page of Figure 13-1

Update an event type transformation map


"Updating an Event Type Transformation Map"

Target Parameter Types column in Event Transformation Maps page of Figure 13-1

View details about an event type transformation map target

"Accessing Event Type Transformation Map Management Tasks"

"Viewing a Complex Datatype"

"Viewing a Scalar Datatype"

Source Parameter Types column in Event Transformation Maps page of Figure 13-1

View details about an event type transformation map source


"Viewing a Complex Datatype"

"Viewing a Scalar Datatype"

Name column in Event Transformation Maps page of Figure 13-1

(To access details page shown in lower page of Figure 13-1)

View details about an event type transformation map


"Viewing an Event Type Transformation Map"

Create button in Modify Sources and Targets page of Figure 13-2

Create an initial or additional source or target


"Creating Additional Sources or Targets"

Delete column in Modify Sources and Targets page of Figure 13-2

Delete sources and targets


"Deleting Sources and Targets"

Update column in Modify Sources and Targets page of Figure 13-2

Update sources and targets


"Updating Sources and Targets"

Type column in Modify Sources and Targets page of Figure 13-2

View event type source and target types


"Viewing Application Event Types"

"Viewing a Business Event Type"

Name column in Modify Sources and Targets page of Figure 13-2

View event type transformation map sources and targets


"Viewing an Event Type Transformation Map Parameter"

Accessing Event Type Transformation Map Management Tasks

Follow these instructions to access the event type transformation map management tasks shown in Figure 13-1 and Figure 13-2:

To access event type transformation map management tasks:

  1. Select the Modeling tab.

  2. Select the Transformations tab.

    The Event Transformation Maps page appears. (See the upper page of Figure 13-1.)

  3. Select a task to perform and see the referenced section for instructions:

    To... Then... See Section...

    Create an event type transformation map

    Click Create.

    "Creating an Event Type Transformation Map"

    Delete an event type transformation map

    Select a specific event type transformation map in the Delete column.

    "Deleting an Event Type Transformation Map"

    Update an event type transformation map

    Select a specific event type transformation map in the Update column.

    "Updating an Event Type Transformation Map"

    View details about an event type transformation map target

    Select a specific event type transformation map target in the Target Parameter Types column.

    "Viewing a Complex Datatype"

    "Viewing a Scalar Datatype"

    View details about an event type transformation map source

    Select a specific event type transformation map source in the Source Parameter Types column.

    "Viewing a Complex Datatype"

    "Viewing a Scalar Datatype"

    View details about an event type transformation map

    Select a specific event type transformation map name in the Name column.

    "Viewing an Event Type Transformation Map"

    Create an initial or additional source or target

    Select a specific event type transformation map name in the Name column for which to create sources or targets.

    "Creating Additional Sources or Targets"

    Delete sources and targets

    Select a specific event type transformation map name in the Name column for which to delete sources or targets.

    "Deleting Sources and Targets"

    Update sources and targets

    Select a specific event type transformation map name in the Name column for which to update sources or targets.

    "Updating Sources and Targets"

    View event type sources and target types

    Select a specific event type transformation map name in the Name column for which to view source or target types.

    "Viewing Application Event Types"

    "Viewing a Business Event Type"

    View event type transformation map sources and targets

    Select a specific event type transformation map name in the Name column for which to view sources or targets.

    "Viewing an Event Type Transformation Map Parameter"

Creating an Event Type Transformation Map

Follow these instructions to create an event type transformation map:

To create an event type transformation map:

  1. Ensure that you followed the instructions in "Accessing Event Type Transformation Map Management Tasks" to access the page for creating an event type transformation map.

    The Create Event Transformation Map page appears.

  2. Enter a unique and recognizable event type transformation map name in the Name field.

  3. Select if you want to create a single source and single target for this event type transformation map at this time (for example, a source application event type and a target business event type). You can also perform this task at a later time. You can also add additional sources and targets to this event type transformation map at a later time.

    If You Select... Then Go to...

    Define Source and Target Later

    Step 10.

    Note: You can define initial or additional sources or targets later by following the instructions in "Creating Additional Sources or Targets".

    Specify Source and Target

    Step 4.

  4. Go to the Source section.

  5. Enter the following details to create an event type transformation map source. An asterisk (*) indicates a required field.

    Field Description

    Name *

    Enter a unique and recognizable source name (for example, PO).

    Description

    Enter a source description.

    Type *

    Select Datatype or Event Type as the source type.

    The page refreshes based on your selection of Datatype or Event Type from the Type list.

  6. Provide responses to the following questions based on your selection in Step 5. An asterisk (*) indicates a required field.

    If You Selected... Then...

    Datatype

    1. Select Application Datatype, Business Datatype, or Core Datatype from the Classification list. *

    2. Select a namespace from the Namespace list.

    3. Click the flashlight to select a datatype for the Name field. *

    Event Type

    1. Select Application Event Type or Business Event Type from the Classification list. *

    2. Click the flashlight to select a specific event type for the Name field. *

  7. Go to the Target section.

  8. Enter the following details to create an event type transformation map target. An asterisk (*) indicates a required field.

    Field Description

    Name *

    Enter a unique and recognizable target name (for example, Invoice).

    Description

    Enter a target description.

    Type *

    Select Datatype or Event Type as the target type.

    The page refreshes based on your selection of Datatype or Event Type in the Type field.

  9. Provide responses to the following questions based on your selection in Step 8. An asterisk (*) indicates a required field.

    If You Selected... Then...

    Datatype

    1. Select Application Datatype, Business Datatype, or Core Datatype from the Classification list. *

    2. Select a namespace from the Namespace list.

    3. Click the flashlight to select a datatype for the Name field. *

    Event Type

    1. Select Application Event Type or Business Event Type from the Classification list. *

    2. Click the flashlight to select a specific event type for the Name field. *

  10. Click Apply.

    The event type transformation map is created and the Transformation Map Details page for the new event type transformation map appears.
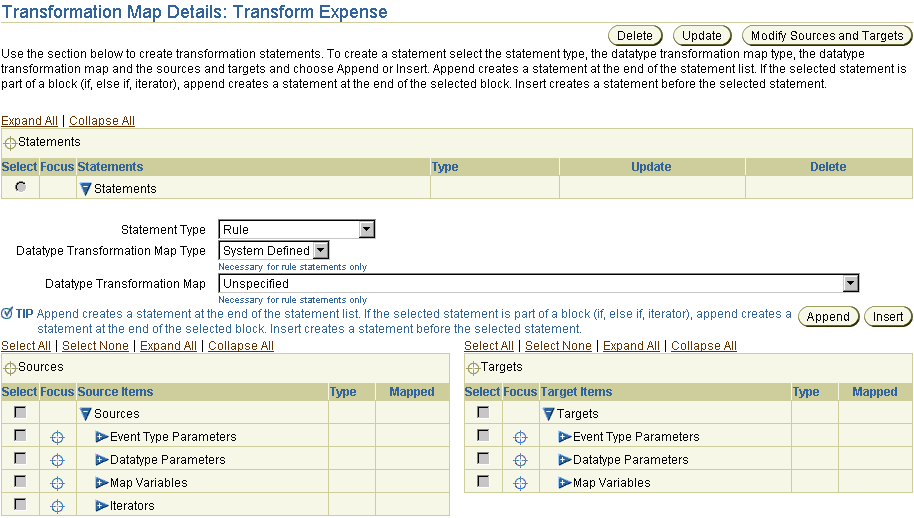
    Text description of sources_and_targets.gif follows.

    Text description of the illustration sources_and_targets.gif

    You can now add transformation map statements.

    See Also:

Deleting an Event Type Transformation Map

Follow these instructions to delete an event type transformation map:


Note:

You cannot delete a transformation map if it is currently associated with a step in a role (for example, if an event type transformation map called PO_to_Invoice is associated with a transformation step in a transformation binding role).


To delete an event type transformation map:

  1. Ensure that you followed the instructions in "Accessing Event Type Transformation Map Management Tasks" to access the page for deleting an event type transformation map.

    The Delete Transformation Map page appears.

  2. Click Yes when prompted to delete the event type transformation map.

    The event type transformation map is deleted and the Event Transformation Maps page appears.

Updating an Event Type Transformation Map

Follow these instructions to update an event type transformation map:

To update an event type transformation map:

  1. Ensure that you followed the instructions in "Accessing Event Type Transformation Map Management Tasks" to access the page for updating an event type transformation map.

    The Update Transformation Map page appears.

  2. Make appropriate changes to the event type transformation map name. No other details for the event type transformation map can be updated from this page.

  3. Click Apply.

    The event type transformation map is updated and the Transformation Map Details page for the updated event type transformation map appears.

Viewing an Event Type Transformation Map


Note:

You can also access an event transformation details page from the Details section of a transformation step details page. The Transformation Map section of the Details section of the transformation step details page displays the transformation map you created and associated with the role. Click the transformation map link to access its details page.


Follow these instructions to view details about a specific event type transformation map:

To view an event type transformation map:

  1. Ensure that you followed the instructions in "Accessing Event Type Transformation Map Management Tasks" to access the page for viewing an event type transformation map.

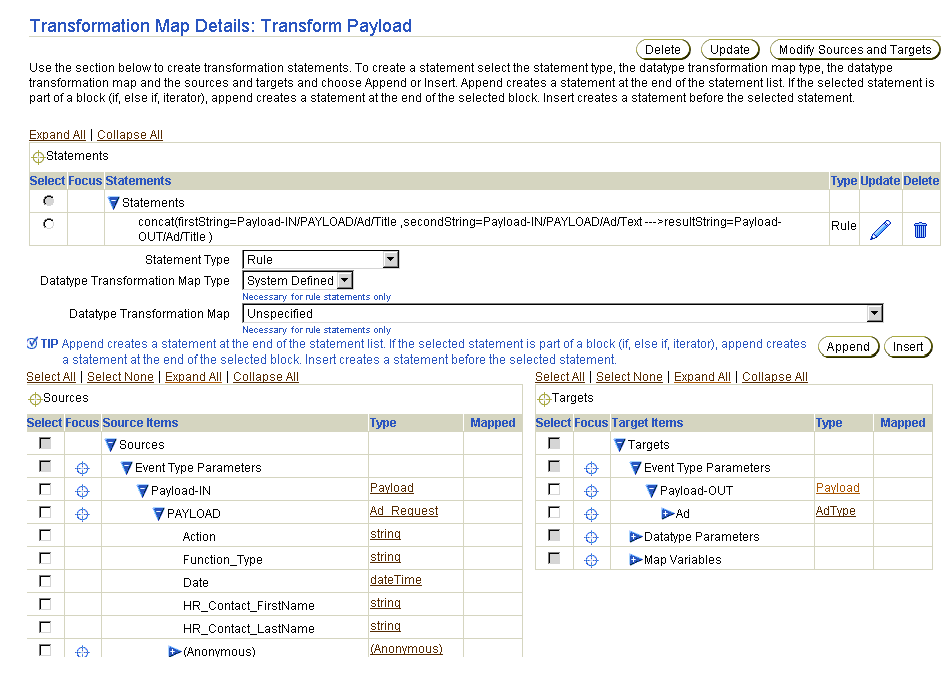
    The Transformation Map Details page for the selected event type transformation map appears (in this example, an event type transformation map named Transform Payload).
    Text description of transforms38.gif follows

    Text description of the illustration transforms38.gif

    This details page, as with the Event Transformation Maps page shown in the upper page of Figure 13-1, enables you to delete or update the selected event type transformation map from the Delete and Update buttons that display at the top right and bottom right sections.

  2. View specific details about any statements assigned to this event type transformation map. Statements display near the top of the page in the Statements table.

  3. Go to the Sources table and Targets table.

  4. Click a specific source or target item to expand or click Expand All in the Sources table and Targets table to expand both lists. Note that when you expand a specific event type parameter, all its body elements appear beneath.

    1. If you created a mapping from a source application event type to a target business event type, expand Event Type Parameters in both the Sources and Targets columns to display all events.

    2. Expand the source application event (for example, Payload-IN in the figure in Step 1) and the target business event (for example, Payload-OUT in the figure in Step 1) to display their event body elements.

    3. Expand the event body elements of both events (PAYLOAD for Payload-IN and Ad for Payload-OUT in the figure in Step 1). This displays the source and target datatypes of both event body elements for which you can create mappings.

      See Also:

      "Managing Transformation Statements" for a complete description of the functionality available in the Event Transformation Map Details page

Creating Additional Sources or Targets

Follow these instructions to create additional sources and targets to the transformation map:

To create additional sources and targets:

  1. Ensure that you followed the instructions in "Accessing Event Type Transformation Map Management Tasks" to access the page for creating additional sources and targets.

    The Transformation Map Details page appears.

  2. Click Modify Sources and Targets.

    The Modify Sources and Targets page appears.

  3. Click Create in either the Sources section or Targets section, depending on which type you want to create.

    The Create Event Transformation Map Parameter page appears.

  4. Enter a unique and recognizable name in the Name field.

  5. Select Datatype or Event Type from the Type list.

    The page refreshes based on your selection of Datatype or Event Type in the Type field.

  6. Provide responses to the following questions based on your selection in Step 5. An asterisk (*) indicates a required field.

    If You Selected... Then...

    Datatype

    1. Select Application Datatype, Business Datatype, or Core Datatype from the Classification list.

    2. Select a namespace from the Namespace list.

    3. Click the flashlight to select a datatype for the Name field.

    Event Type

    1. Select Application Event Type or Business Event Type from the Classification list.

    2. Click the flashlight to select a specific event type for the Name field.

  7. Click Apply.

    The Modify Sources and Targets page appears.

  8. Click Return To Map Details.

    The Transformation Map Details page appears.

Deleting Sources and Targets

Follow these instructions to delete sources and targets:


Note:

Event transformation map parameters can only be deleted if they are not being used in any transformation statements.


To delete sources and targets:

  1. Ensure that you followed the instructions in "Accessing Event Type Transformation Map Management Tasks" to access the page for deleting sources and targets.

    The Transformation Map Details page appears.

  2. Click Modify Sources and Targets.

    The Modify Sources and Targets page appears.

  3. Select a specific source or target to delete in the Delete column.

  4. Click Yes when prompted to delete the selected source or target.

    The source or target is deleted and the Modify Sources and Targets page appears.

  5. Click Return To Map Details.

    The Transformation Map Details page appears.

Updating Sources and Targets

Follow these instructions to update sources and targets:


Note:

Event transformation map parameters can only be updated if they are not being used in any transformation statements.


To update sources and targets:

  1. Ensure that you followed the instructions in "Accessing Event Type Transformation Map Management Tasks" to access the page for updating sources and targets.

    The Transformation Map Details page appears.

  2. Click Modify Sources and Targets.

    The Modify Sources and Targets page appears.

  3. Select a specific source or target to update in the Update column.

    The Update Event Transformation Map Parameter page appears.

  4. Select Datatype or Event Type from the Type list.

    The page refreshes based on your selection of Datatype or Event Type in the Type field.

  5. Provide responses to any of the following questions based on your selection in Step 4.

    If You Selected... Then...

    Datatype

    1. Select Application Datatype, Business Datatype, or Core Datatype from the Classification list.

    2. Select a namespace from the Namespace list.

    3. Click the flashlight to select a datatype for the Name field.

    Event Type

    1. Select Application Event Type or Business Event Type from the Classification list.

    2. Click the flashlight to select a specific event type for the Name field.

  6. Click Apply.

    The source or target is updated and the Modify Sources and Targets page appears.

  7. Click Return To Map Details.

    The Transformation Map Details page appears.

Viewing an Event Type Transformation Map Parameter

Follow these instructions to view details about a specific event type transformation map parameter:

To view an event type transformation map parameter:

  1. Ensure that you followed the instructions in "Accessing Event Type Transformation Map Management Tasks" to access the page for viewing an event type transformation map parameter.

    The Transformation Map Details page appears.

  2. Click Modify Sources and Targets.

    The Modify Sources and Targets page appears.

  3. Select a specific event type transformation map parameter source or target to view in the Name column.

    The Event Transformation Map Parameter Details page appears.

    Text description of view_etmp.gif follows.

    Text description of the illustration view_etmp.gif

  4. View specific details about the parameter. This page, as with the Modify Sources and Targets page, enables you delete or update the selected source or target parameter.

  5. Click Return to List to return to the Modify Sources and Targets page.

Managing Datatype Transformation Maps

The Oracle Application Server ProcessConnect user interface tool enables you to perform the datatype transformation map management tasks shown in Figure 13-3. These tasks are described in detail in this section. The maps that appear in the Datatype Transformation Maps page in Figure 13-3 also display in the Datatype Transformation Map list that appears on the Transformation Map Details page. (See Figure 13-1.)
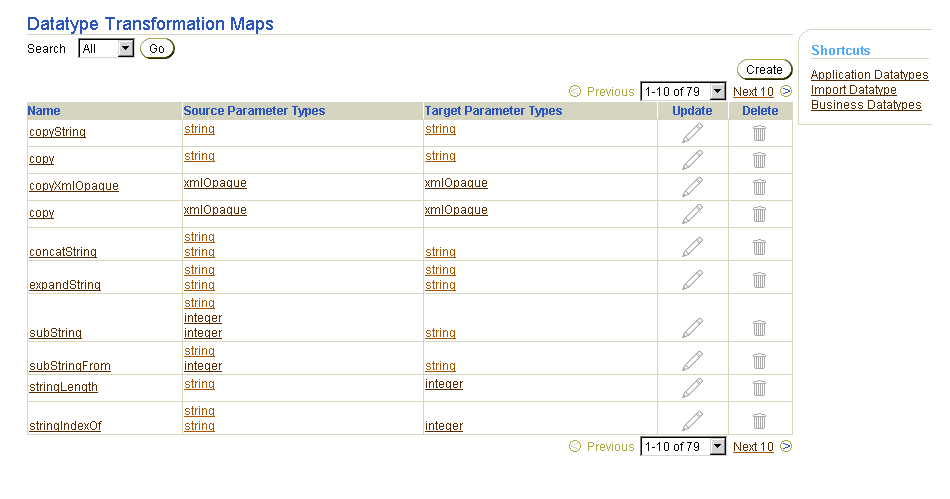
Figure 13-3 Datatype Transformation Map Management Tasks

Text description of transforms36.gif follows

Text description of the illustration transforms36.gif

Table 13-2 identifies the datatype transformation map management tasks shown in Figure 13-3 and provides references to procedures for performing these tasks.

Table 13-2  Datatype Transformation Map Management Tasks
Data Transformation Maps Page Elements Management Task First See Section... Then See Section...

Shortcuts section of Figure 13-3

Take a shortcut to view application datatypes, import XSD datatypes, and manage business datatypes

N/A

Create button of Figure 13-3

Create a datatype transformation map

"Accessing Datatype Transformation Map Management Tasks"

"Creating a Datatype Transformation Map"

Delete column of Figure 13-3

Delete a datatype transformation map


"Deleting a Datatype Transformation Map"

Update column of Figure 13-3

Update a datatype transformation map


"Updating a Datatype Transformation Map"

Target Parameter Types column of Figure 13-3

View details about a target datatype parameter


"Viewing a Complex Datatype"

"Viewing a Scalar Datatype"

Source Parameter Types column of Figure 13-3

View details about a source datatype parameter


"Viewing a Complex Datatype"

"Viewing a Scalar Datatype"

Name column of Figure 13-3

View details about a datatype transformation map


"Viewing a Datatype Transformation Map"

Accessing Datatype Transformation Map Management Tasks

Follow these instructions to access the datatype transformation map management tasks shown in Figure 13-3:

To access datatype transformation map management tasks:

  1. Select the Modeling tab.

  2. Select the Transformations tab.

  3. Select Datatype Transformation Maps.

    The Datatype Transformation Maps page appears.

  4. Select a task to perform and see the referenced section for instructions:

    To... Then... See Section...

    Create a datatype transformation map

    Click Create.

    "Creating a Datatype Transformation Map"

    Delete a datatype transformation map

    Select a specific datatype transformation map in the Delete column.

    "Deleting a Datatype Transformation Map"

    Update a datatype transformation map

    Select a specific datatype transformation map in the Update column.

    "Updating a Datatype Transformation Map"

    View details about a target datatype parameter

    Select a specific datatype transformation map target in the Target Parameter Types column.

    "Viewing a Complex Datatype"

    "Viewing a Scalar Datatype"

    View details about a source datatype parameter

    Select a specific datatype transformation map source in the Source Parameter Types column.

    "Viewing a Complex Datatype"

    "Viewing a Scalar Datatype"

    View details about a datatype transformation map

    Select a specific user-defined datatype transformation map name in the Name column.

    "Viewing a Datatype Transformation Map"

Creating a Datatype Transformation Map

Follow these instructions to create a datatype transformation map:

To create a datatype transformation map:

  1. Ensure that you followed the instructions in "Accessing Datatype Transformation Map Management Tasks" to access the page for creating a datatype transformation map.

    The Create Datatype Transformation page appears.

  2. Enter a unique and recognizable datatype transformation name in the Name field.

  3. Click Apply.

    The datatype transformation map is created and the Transformation Map Details page appears. You can now perform additional tasks, such as assigning transformation statements.

    See Also:

    Step 1 for the Datatype Transformation Map list from which the datatype transformation map can be selected

Deleting a Datatype Transformation Map

The system-defined datatype transformation maps included with Oracle Application Server ProcessConnect cannot be deleted. You can only delete a datatype transformation map that you created. In addition, the map can only be deleted if it is not currently being invoked from another transformation map or is associated with a transformation step. If you attempt to delete a datatype transformation map under these circumstances, an error displays.

Follow these instructions to delete a datatype transformation map:

To delete a datatype transformation map:

  1. Ensure that you followed the instructions in "Accessing Datatype Transformation Map Management Tasks" to access the page for deleting a datatype transformation map.

  2. Click Yes when prompted to delete a datatype transformation map.

    The statement is deleted and the Datatype Transformation Map Details page appears.

Updating a Datatype Transformation Map

System-defined datatype transformation maps included with Oracle Application Server ProcessConnect cannot be updated. You can only update a datatype transformation map that you created. Follow these instructions to update a datatype transformation map:

To update a datatype transformation map:

  1. Ensure that you followed the instructions in "Accessing Datatype Transformation Map Management Tasks" to access the page for updating a datatype transformation map.

    The Update Transformation Map page appears.

  2. Make appropriate changes to the datatype transformation map name. No other details for the datatype transformation map can be updated from this page.

  3. Click Apply.

    The datatype transformation map name is updated and the Datatype Transformation Map Details page for the updated datatype transformation map appears.
Viewing a Datatype Transformation Map

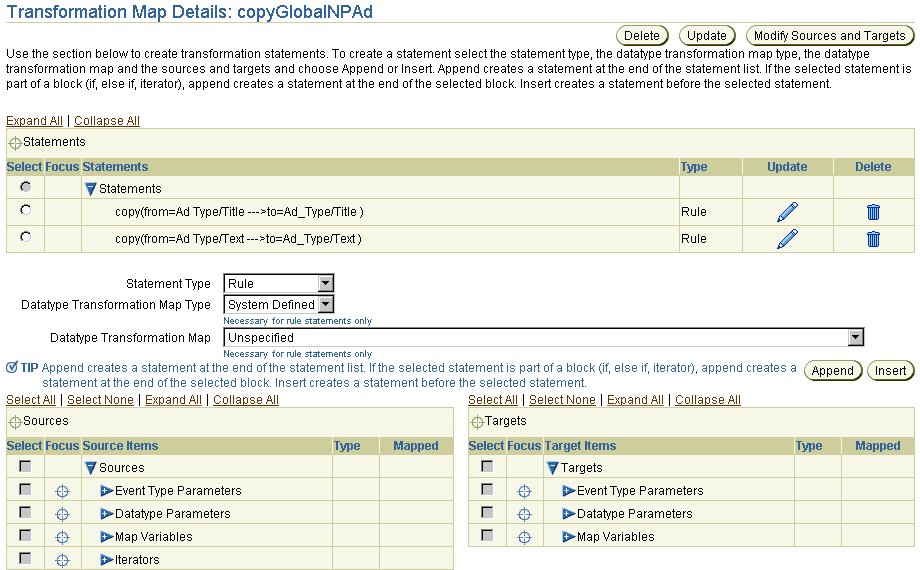
Follow these instructions to view a user-defined datatype transformation map:

To view a datatype transformation map:

  1. Ensure that you followed the instructions in "Accessing Datatype Transformation Map Management Tasks" to access the page for viewing a datatype transformation map.

    The Transformation Map Details page for the selected datatype transformation map appears.

    Text description of details_custdtm.gif follows.

    Text description of the illustration details_custdtm.gif

  2. View specific details. The datatype transformation map in this example is user-defined. Several transformation rule statements have been assigned to this datatype transformation map. (See the Statements section.)

  3. Click Return to List to return to the Datatype Transformation Maps page.

Transformation Statements Overview

Transformation statements are the logical operations to use when mapping the contents of sources and targets. Table 13-3 describes the many different statement types available for mapping.


Note:

You cannot create a transformation statement until at least one source or target parameter for the transformation map is defined.


Table 13-3  Statement Types
Statement Type Description See Section...

Rule

Enables you to perform mapping functions between sources and targets. The mapping between source and target is performed by selecting a datatype transformation map. For example:

  • copy:from=string->to=string to copy a source datatype string to a target datatype string

  • concatString:firstString=string,secondString=string->resultString=String to concatenate two source datatype strings to a target datatype string

"Transformation Rules"

"Transformation Rules Case Study: Basic Transformations Using Rules"

IF Condition

Statements associated with a condition are executed if the condition evaluates successfully. For example, you can specify to have a different set of statements executed based on whether a quantity ordered in a purchase order is greater than or less than three. Different types of statements such as rules, domain value map rules, and event header rules can be associated with a condition. You can also create complex conditions by combining condition expressions with AND and OR logical operators.

"Transformation Conditions"

"Transformation Condition Case Study: Converting Importance to Featured/Ordinary Ad"

ELSE Condition

You can add an ELSE condition to an existing IF Condition. You can then associate the ELSE condition with rules, domain value map rules, and event header rules.

Iterator

Enables you to specify a set of mappings for source items that can occur multiple times in the instance. For example, you can loop through multiple occurrences of a complex datatype named LineItem and perform a specific set of actions on the line items. Iterators can be associated with rules, domain value map rules, event header rule statements, and map variable statements that get executed for every occurrence of the source item being iterated.

"Transformation Iterators"

"Iterator Case Study: Transforming Ad Request with an Unbounded Number of Ads"

Map variable

Enables you to define a global variable to use across multiple statements. A typical usage is for function chaining, where you take the output of one invoked function as an input to another function.

For example, you can create a map variable and copy a person's first name to the variable. You then append a space character and concatenate the variable with the person's last name and store it in the target. The variable can then be used across multiple statements.

Other usage scenarios are for building an item through multiple rules before inserting it in the targets.

"Transformation Map Variables"

"Map Variable Case Study: Using Map Variables to Create a Formatted Name"

Event header rule

Enables you to access or set header data in a source or target. For example, you can:

  • Get data from the header of a source and map it to target data.

  • Set header data in the target from data in the source.

For example, you can map data from the header of an incoming event into a target item such as a fax number by accessing the from party through a header rule and then getting the appropriate contact information for the party through another rule.

"Event Header Rules"

"Event Header Rules Case Study: Sending to the Correct Target Newspaper"

Domain value map rule

Domain value map rules are used to map one party's vocabulary standards to another party's vocabulary standards. For example, this enables you to map the source item US to the target item United States by looking up the value for the target based on the value for the source and party of the event.

See Also: "Domain Value Maps" for procedures on creating domain values and parties

"Domain Value Maps"

"Domain Value Map Case Study: Changing Ad Vocabulary"

Managing Transformation Statements

The Oracle Application Server ProcessConnect user interface tool enables you to perform the transformation statement management tasks shown in Figure 13-4. These tasks are described in detail in this section.
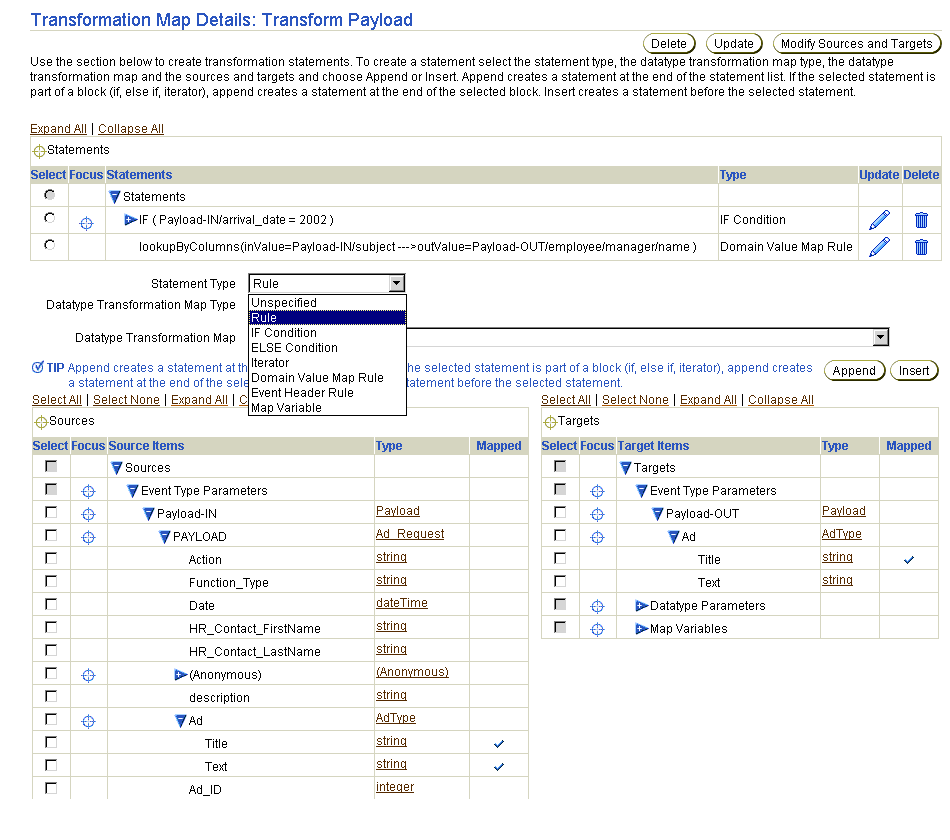
Figure 13-4 Transformation Statement Management Tasks

Text description of transforms44.gif follows

Text description of the illustration transforms44.gif

Table 13-4 identifies the transformation statement management tasks shown in Figure 13-4.

Table 13-4  Transformation Statement Management Tasks
Transformation Map Details Page Elements Management Task

Statement Type list

Create a transformation statement (rule, IF condition, ELSE condition, iterator, domain value map rule, event header rule, or map variable).

Delete column in Statements section

Delete a transformation statement.

Update column in Statements section

Update a transformation statement.

Statements list in Statements section

View a transformation statement.

Transformation Rules

This section describes transformation rules, the most basic type of transformation statement.

Assume you want to combine the state CA and zip 94043 into CA 94043. This is a simple task; all you must do is invoke a system-defined datatype transformation map named concatString, which concatenates CA and 94043 into a single CA 94043. This invocation is called a transformation rule.

A transformation rule is the most basic form of transformation statement, and only invokes other datatype transformation maps. These invoked datatype transformation maps can be user-defined or system-defined maps.

See Also:

Accessing Transformation Rule Management Tasks

Follow these instructions to access the transformation rule management tasks shown in Figure 13-4:

To access transformation rule management tasks:

  1. Select the Modeling tab.

  2. Select Transformations.

    The Event Transformation Maps page appears.

  3. Select a specific event transformation map in the Name column.

    The Transformation Map Details page for the selected event transformation map appears (for this example, event transformation map Transform Payload). (See Figure 13-4.)

  4. Select a task to perform and see the referenced section for instructions:

    To... Then... See Section...

    Create a transformation rule

    Go to the Statement Type list.

    "Creating a Transformation Rule"

    Delete a transformation rule

    Select a specific transformation rule to delete in the Delete column.

    "Deleting a Transformation Rule"

    Update a transformation rule

    Select a specific transformation rule to update in the Update column.

    "Updating a Transformation Rule"

    View details about a transformation rule

    View a specific transformation rule in the Statements section.

    "Transformation Statements Overview", Figure 13-4


    Note:

    Statements can be part of other statements (in which case, they are executed as part of that statement) or they can be standalone statements. Statements are executed in the order in which they appear in the Statements list.


Creating a Transformation Rule

Follow these instructions to create a transformation rule:

To create a transformation rule:

  1. Ensure that you followed the instructions in "Accessing Transformation Rule Management Tasks" to access the page for creating a transformation rule.

  2. Select Rule from the Statement Type list.

  3. Select a map type from the Datatype Transformation Map Type list:

    This list is only for use when creating transformation rules.

  4. Go to the Sources table and Targets table at the bottom of the page. (See Figure 13-4.)

  5. Click specific source and target items or click Expand All in both the Sources table and Targets table to display all selections.


    Note:

    Clicking Expand All can take some time.


    Depending on the sources and targets and datatype transformation map rule that you select, different pages can appear to prompt you for information to create a transformation rule.

  6. See the following table for an overview of what pages appear after you select the sources and targets and select either Append or Insert. Examples are provided for each type.

    If You Select... And Select a Datatype Transformation Map... For Example... See Section...

    A single source and a single target

    That maps evenly to a single source and a single target (that is, you select a datatype transformation map that contains a single source and a single target)

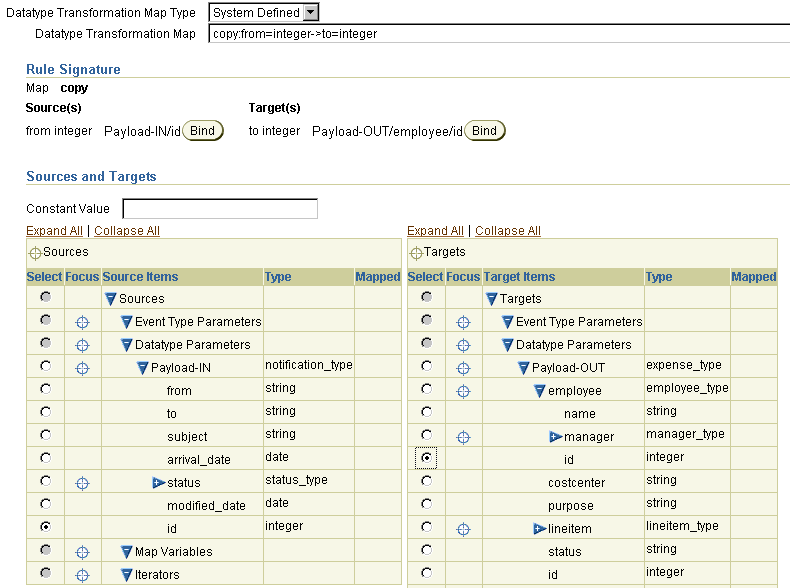
    1. Select a single source integer id and a single target integer identification.

    2. Select copy:from=integer->to=integer from the Datatype Transformation Map list, which evenly maps a single source and target integer.

    "Mapping a Single Source and a Single Target"

    Multiple sources and targets, for example, two sources and a single target

    That maps evenly, for example, to two sources and a single target (that is, you select a datatype transformation map that contains two sources and a single target)

    1. You select two source strings first_name and last_name and one target string name.

    2. Select ConcatString:firstString=string,secondString=string->resultString=string from the Datatype Transformation Map list, which evenly maps two source strings to one target string.

    "Mapping Multiple Sources and Targets"

    Any or no combination of sources and targets

    That does not evenly map to the combination of sources and targets you selected (that is, you select two sources and a single target, then select a datatype transformation map that contains only one source and one target)

    1. Select two source strings employee and department and one target string emp_dept.

    2. Select copy:from=string->to=string from the Datatype Transformation Map list.

      or

    3. Select no source or target strings.

    4. Select a rule from the Datatype Transformation Map list.

      Since the mapping is not clear, a page displays that enables you to explicitly map your sources and targets. This page also enables you to define numeric values for your sources and targets.

    "Explicitly Mapping Sources and Targets"

Mapping a Single Source and a Single Target

Follow these instructions to map a single source and target to a datatype transformation map that evenly maps a single source to a single target:

  1. Select the source item bound to the source parameter of the datatype transformation map invoked from the rule (For example, using the sources shown in Figure 13-4):

    1. Navigate within the Sources table to the Event Type Parameters.

    2. Navigate to the event type item Payload-IN.

    3. Navigate to the event body element PAYLOAD.

    4. Navigate to the datatype member Ad.

    5. Select the string Title.

  2. Select the target item bound to the target parameter of the datatype transformation map invoked from the rule (For example, using the targets shown in Figure 13-4):

    1. Navigate within the Targets table to the Event Type Parameters.

    2. Navigate to the event item Payload-OUT.

    3. Navigate to the datatype member Ad.

    4. Select the string Title.

  3. Select the datatype transformation map to be invoked from the Datatype Transformation Map list. For example, select copy:from=string->to=string. This rule copies the contents of the single source string Title to the single target string Title.

  4. Select where to place the new statement in the Statements list.

    1. Click Append to create a statement at the end of the statement list. If the selected statement is part of a block (for example, IF, ELSE IF, or iterator), Append creates a statement at the end of the selected block.

      or

    2. Select a specific statement in the Statements list and click Insert. This inserts the new statement before the selected statement.

  5. If the mapping between the selected target and source items and the parameters of the invoked datatype transformation map can be determined, the Transformation Map Details page is refreshed with the rule statement placed at the end of the Statements list (if Append was selected):

    Text description of details_rule.gif follows.

    Text description of the illustration details_rule.gif

  6. If the mapping between the selected target and source items and the parameters of the invoked datatype transformation map cannot be determined, a page displays that enables you to explicitly map your sources and targets. See "Explicitly Mapping Sources and Targets".

Mapping Multiple Sources and Targets

Follow these instructions to map multiple sources and targets to a datatype transformation map that evenly maps to multiple sources and targets.

  1. Select the source items bound to the source parameter of the datatype transformation map invoked from the rule (For example, using the sources shown in Figure 13-4):

    1. Navigate within the Sources table to the Event Type Parameters.

    2. Navigate to the event type item Payload-IN.

    3. Navigate to the event body element PAYLOAD.

    4. Select the string HR_Contact_FirstName.

    5. Select the string HR_Contact_LastName.

  2. Select the target item bound to the target parameter of the datatype transformation map invoked from the rule (For example, using the targets shown in Figure 13-4):

    1. Navigate within the Targets table to the Event Type Parameters.

    2. Navigate to the event item Payload-OUT.

    3. Navigate to the datatype Ad.

    4. Select the string Title.

  3. Select the datatype transformation map to invoke from the Datatype Transformation Map list. For example, select ConcatString:firstString=string,secondString=string->resultString=string. This statement concatenates the two sources strings to the one target string Title.

  4. Select where to place the new statement in the Statements list.

    1. Click Append to create a statement at the end of the statement list. If the selected statement is part of a block (for example, IF, ELSE IF, or iterator), Append creates a statement at the end of the selected block.

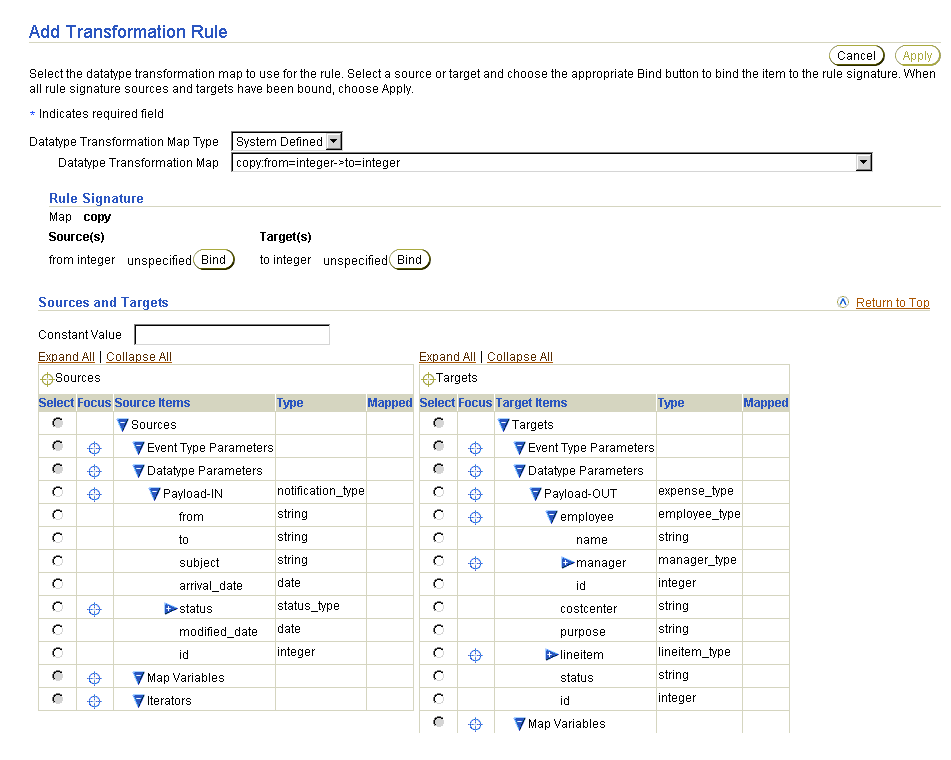
      or

    2. Select a specific statement in the Statements list and click Insert. This inserts the new statement before the selected statement.

    The Add Transformation Rule page appears.

    Text description of add_tr.gif follows.

    Text description of the illustration add_tr.gif

  5. Select the order in which to concatenate the two source strings (either first name first or last name first).

  6. Click Apply.

    The page refreshes to display the selected source and target parameters of the datatype transformation map in the Statements section.

    Text description of details_rule2.gif follows.

    Text description of the illustration details_rule2.gif

Explicitly Mapping Sources and Targets

Follow these instructions to explicitly map multiple sources and targets with a datatype transformation map. You explicitly set your targets and sources if the mapping cannot be automatically determined.


Note:

If you want to explicitly map your sources and targets, do not select any initially. Instead, select the datatype transformation map you want to use and click Append or Insert. This takes you to a page to explicitly map your sources and targets. You also have the option of entering numeric values with sources and targets from the page.


In this example, the following selections are made:

Deleting a Transformation Rule

Follow these instructions to delete a transformation rule:

To delete an transformation rule:

  1. Ensure that you followed the instructions in "Accessing Transformation Rule Management Tasks" to access the page for deleting a transformation rule.

  2. Click Yes when prompted to delete the transformation rule.

    The transformation rule is deleted and the Event Transformation Map Details page appears.

Updating a Transformation Rule

Follow these instructions to update a transformation rule:

To update a transformation rule:

  1. Ensure that you followed the instructions in "Accessing Transformation Rule Management Tasks" to access the page for updating a transformation rule.

    The Update Transformation Rule page appears. (See "Creating a Transformation Rule" for a list of fields you can update.)

  2. Make appropriate changes.

  3. Click Apply.

    The statement is updated and the Transformation Map Details page appears.

Transformation Rules Case Study: Basic Transformations Using Rules

This section provides an example of using transformation rules, based on modeling metadata you created when using the tutorial in Chapter 7, "Tutorial of an Integration within an Enterprise".

Phase A of the tutorial described in Chapter 7, "Tutorial of an Integration within an Enterprise" included an example of transformation mapping where one transformation rule each was created for inbound and outbound transformations. This tutorial extends those maps with additional transformation rules.

Extending the First Transformation (HR Ad to Common View)

  1. Select Modeling > Transformations.

  2. Select HR Ad to Common View in the Name column.

Converting the Date

The date from the source must be converted to a string. The rule you select in this section returns the string representation of the input dateTime in the required format.

  1. Select format:date=dateTime,formatPattern=string->resultString=string from the Datatype Transformation Map list.

  2. Click Append.

  3. Click Expand All for both the Sources table and the Targets table.

  4. Select Date in the Sources table.

  5. Click Bind date dateTime for the source.

  6. Enter the pattern yyyy-mm-dd in the Constant Value field.

  7. Click Bind for formatPattern sting for the source.

  8. Select Date in the Targets table.

  9. Click Bind for resultString string for the target.

    The Rule Signature section displays your selections.

    Text description of tcs_rule.gif follows.

    Text description of the illustration tcs_rule.gif

  10. Click Apply.

    The rule statement displays at the bottom of the Statements list.

    Text description of tcs_rule2.gif follows.

    Text description of the illustration tcs_rule2.gif

Copy First Name and Last Name

The first and last names of the contact must be mapped to target first and last names.

  1. Select HR_Contact_FirstName in the Sources table.

  2. Select HR_Contact_FirstName in the Targets table.

  3. Select copy:from=string ->to=string from the Datatype Transformation Map list.

  4. Create Append.

  5. Select HR_Contact_LastName in the Sources table.

  6. Select HR_Contact_LastName in the Targets table.

  7. Select copy:from=string ->to=string from the Datatype Transformation Map list.

  8. Click Append.

    The rule statements display at the bottom of the Statements list.

    Text description of tcs_rule3.gif follows.

    Text description of the illustration tcs_rule3.gif

Extending the Second Transformation (Common View to Global NP Ad)

  1. Select Modeling > Transformations.

  2. Select Common View to Global NP Ad in the Name column.

  3. Click Expand All for both the Sources table and the Targets table.

Placing a Value in the Action Field

You must place a value into the Action field, which is not in the business event. Do this by using the copy string rule and entering a value in the Constant Value field.

  1. Select Rule in the Statement Type list.

  2. Select copy:from=string->to=string from the Datatype Transformation Map list.

  3. Click Append.

  4. Expand all targets in the Targets table.

  5. Select the Action element in the Targets table.

  6. Click Bind for to string.

  7. Enter Global NP Ad in the Constant Value field.

  8. Click Bind for from string.

  9. Click Apply.

Date

You must map the date.

  1. Select Modeling > Transformations.

  2. Select Common View to Global NP Ad in the Name column.

  3. Select copy:from=string->to=string from the Datatype Transformation Map list.

  4. Select Date in the Sources table.

  5. Select Date in the Targets table.

  6. Click Append.

    The rule statement displays at the bottom of the Statements list.

    Text description of tcs_rule4.gif follows.

    Text description of the illustration tcs_rule4.gif

Transformation Conditions

Using a transformation rule, you can only invoke another map unconditionally. Assume you only want to copy an item amount that is greater than five. If the amount does not satisfy this condition, you want to copy zero. You perform these tasks with a transformation condition.

A condition is defined by comparing values with familiar comparison operators (=, !=, <, <=, > , >=, and exists). Exists checks whether or not a particular element exists in the instance. Even if a particular element exists, its value may be null; in which case, you can use = or != to compare the value to null. Conditions can be further combined by using logical AND and OR operators to obtain conditions of an arbitrary complexity.

Transformation statements can be defined to be executed only if the condition is evaluated to true (IF). Similarly, statements can be defined for execution in case of a condition being evaluated to false (ELSE).

See Also:

Table 13-3 for an additional description of transformation conditions

Accessing Transformation Condition Management Tasks

Follow these instructions to access the transformation condition management tasks shown in Figure 13-4:

To access transformation condition management tasks:

  1. Select the Modeling tab.

  2. Select Transformations.

    The Event Transformation Maps page appears.

  3. Select a specific event transformation map in the Name column.

    The Transformation Map Details page for the selected event transformation map appears (for this example, event transformation map Transform Payload). (See Figure 13-4.)

  4. Select a task to perform and see the referenced section for instructions:

    To... Then... See Section...

    Create an IF condition

    Go to the Statement Type list.

    "Creating an IF Condition"

    Create an ELSE condition

    Go to the Statement Type list.

    "Creating an ELSE Statement"

    Associate a statement with an IF condition or ELSE condition

    Go to the Statement Type list.

    "Associating a Statement with an IF Condition or ELSE Condition"

    Remove a statement from an IF condition or ELSE condition

    Go to the Statements table.

    "Removing a Statement from an IF Condition or ELSE Condition"

    Delete an IF or ELSE condition

    Select a specific condition to delete in the Delete column.

    "Deleting an IF or ELSE Condition"

    Update an IF condition

    Select a specific condition to update in the Update column.

    "Updating an IF Condition"

    View details about a condition

    View a specific condition in the Statements section.

    "Transformation Statements Overview", Figure 13-4

Creating an IF Condition

Follow these instructions to create an initial IF condition, insert an AND condition, and insert an OR condition.

To create an IF condition:

  1. Ensure that you followed the instructions in "Accessing Transformation Condition Management Tasks" to access the page for creating an IF condition.

  2. Select IF Condition from the Statement Type list.

  3. Select where to place the new statement in the Statements list.

    1. Click Append to create a statement at the end of the statement list. If the selected statement is part of a block (for example, IF, ELSE IF, or iterator), Append creates a statement at the end of the selected block.

      or

    2. Select a specific statement in the Statements list and click Insert. This inserts the new statement before the selected statement.

    The Create Transformation Condition page appears.

Creating an Initial IF Condition

Follow these instructions to create an initial IF condition:

  1. Click the Select button for the Condition expression not specified message.

  2. Click Update.

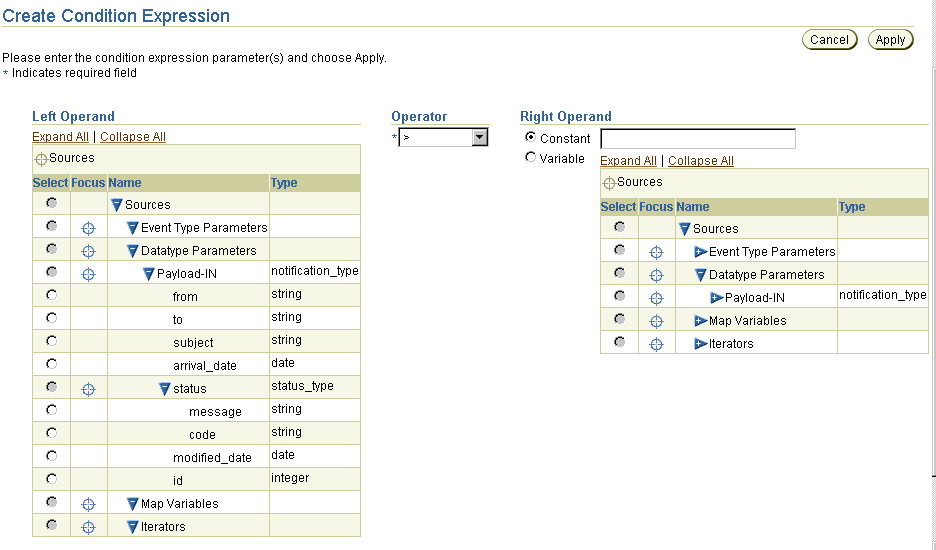
    The Create Condition Expression page appears.

  3. Click specific source items to expand or click Expand All for the Sources list.

  4. Select a left operand (for example, a parameter representing a quantity).

  5. Select an operator from the Operator list (for example, > if the condition expression you are building is to identity a quantity greater than a certain number):

    • != (not equal to)

    • < (less than)

    • <= (less than or equal to)

    • = (equal to)

    • > (greater than)

    • >= (greater than or equal to)

    • Exists

    Condition expressions can be defined across two source items or between a source and a constant value. (This example uses a constant value.) Condition expressions cannot access a target item. For this example, a constant value is defined.

    If you select an operator other than Exists, the Right Operand table appears.
    Text description of create_if_condition.gif follows.

    Text description of the illustration create_if_condition.gif

  6. Click specific target items to expand or click Expand All for the Targets list.

  7. Enter a value in the Constant field (for example, 50).


    Note:

    You can also select Variable and choose anything from the list of sources.


  8. Click Apply.

    The condition appears in the Create Transformation Condition page.

  9. Click the Select button for the new condition.

Inserting an AND Condition

Follow these instructions to insert an AND condition within an IF condition:

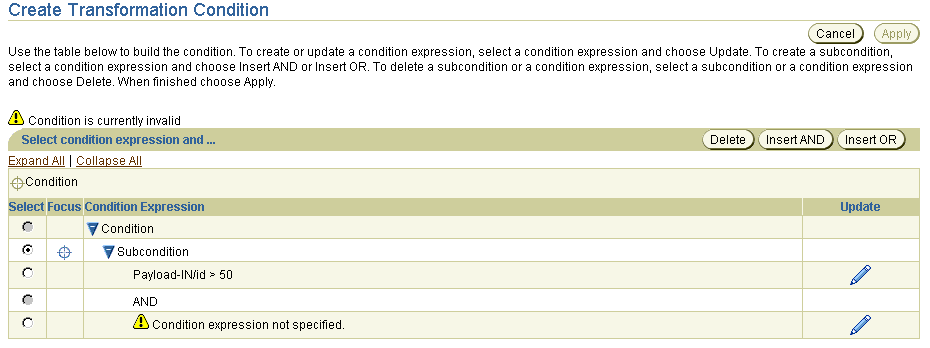
  1. Click Insert AND.

    The following condition is created:

    Text description of create_condition2.gif follows.

    Text description of the illustration create_condition2.gif

  2. Click the Select button for the Condition expression not specified message.

  3. Click Update.

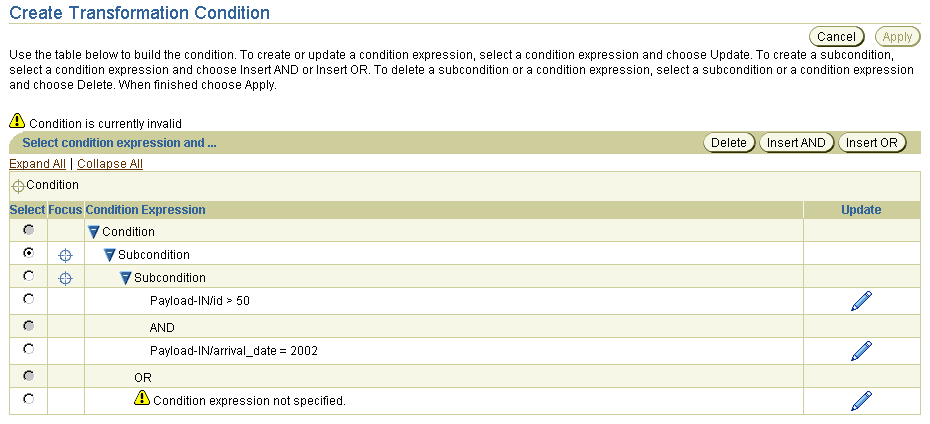
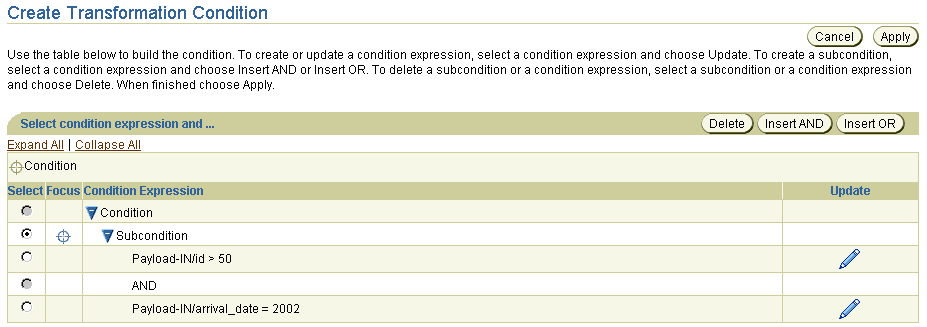
  4. Repeat Steps 4 through 8 to create the other subcondition for the AND condition (for this example, a subcondition that specifies to check for any quantity ordered in 2002).

    The AND condition appears in the Create Transformation Condition page:
    Text description of create_condition3.gif follows.

    Text description of the illustration create_condition3.gif

  5. Click the Select button for the new condition.

Inserting an OR Condition

Follow these instructions to insert an OR condition within an IF condition:

  1. Click Insert OR.

    The following condition is created:

    Text description of create_condition4.gif follows.

    Text description of the illustration create_condition4.gif

  2. Click the Select button for the Condition expression not specified message.

  3. Click Update.

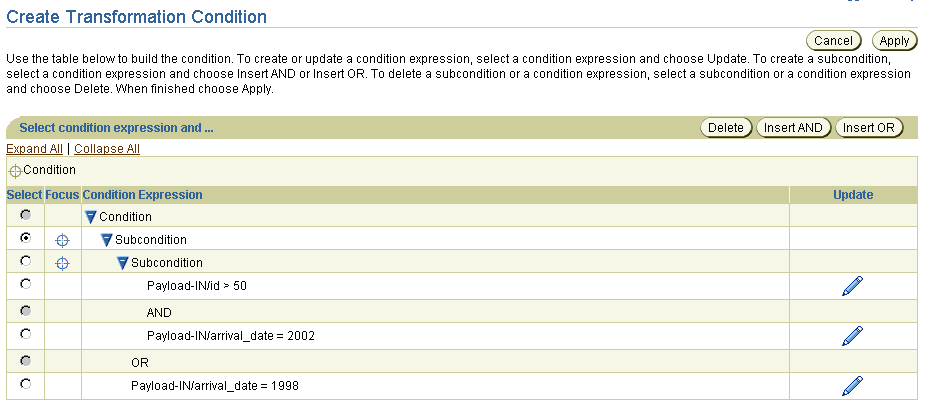
  4. Repeat Steps 4 through 8 to create the other subcondition for the OR condition (for this example, a subcondition that specifies to check for any quantity ordered in 1998).

    The OR nested block condition appears in the Create Transformation Condition page:
    Text description of create_condition5.gif follows.

    Text description of the illustration create_condition5.gif

  5. Click Apply.

  6. The Transformation Map Details page displays the IF condition statements in the Statements list.

    You can also delete any of the suconditions by selecting the specific condition in the Select column and clicking Delete.

Creating an ELSE Statement


Note:

You must first create an IF statement before you can create an ELSE statement.


  1. Ensure that you followed the instructions in "Accessing Transformation Condition Management Tasks" to access the page for creating an ELSE statement.

  2. Select ELSE Condition from the Statement Type list.

  3. Select an IF condition in which to place the ELSE condition in the Statements list and click Append.

    The ELSE condition is placed in the IF statement.

  4. Expand the IF statement to see the ELSE statement.

    Text description of else_condition.gif follows.

    Text description of the illustration else_condition.gif

    You can now create additional statement types as part of this ELSE condition.

Associating a Statement with an IF Condition or ELSE Condition

You can associate other transformation statements with IF and ELSE conditions. This example describes how to associate a rule statement with both conditions. These statements are executed if the condition evaluates to true at runtime.


Note:

You cannot currently move statements around in a condition. If you must do this, first delete and recreate the statement in the appropriate location within the condition.


To associate a rule statement with an IF or ELSE condition:

  1. Ensure that you followed the instructions in "Accessing Transformation Condition Management Tasks" to access the page for associating a rule statement with an IF or ELSE condition.

  2. Select the IF block with which to associate the rule statement.

  3. Select Rule from the Statement Type list.

  4. Create a rule statement by following the instructions in "Creating a Transformation Rule". For this example, single target and source strings are selected and the copy:from=string->to=string datatype transformation map is selected.

  5. Click Append to include this rule as part of the IF Condition.

    Text description of if_cond_state.gif follows.

    Text description of the illustration if_cond_state.gif

  6. Select the ELSE block with which to associate the transformation statement.

  7. Select Rule from the Statement Type list.

  8. Create a rule statement by following the instructions in "Creating a Transformation Rule". For this example, single target and source strings are selected and the copy:from=string->to=string datatype transformation map is selected.

  9. Click Append to include this rule as part of the ELSE Condition.

    Text description of else_cond_state.gif follows.

    Text description of the illustration else_cond_state.gif

Removing a Statement from an IF Condition or ELSE Condition

You can remove transformation statements from IF and ELSE conditions. This example describes how to associate a rule statement with both conditions.

To remove a statement from an IF condition or ELSE condition:

  1. Ensure that you followed the instructions in "Accessing Transformation Condition Management Tasks" to access the page for removing transformation statements from IF and ELSE conditions.

  2. Select a specific statement in a condition to delete in the Delete column (for example, the statement that is part of the ELSE condition shown in Step 9.

  3. Click Yes when prompted to delete the statement.

    The statement is deleted and the Transformation Map Details page appears.

Deleting an IF or ELSE Condition

Follow these instructions to delete an IF or ELSE condition:

To delete an IF or ELSE condition:

  1. Ensure that you followed the instructions in "Accessing Transformation Condition Management Tasks" to access the page for deleting an IF or ELSE condition.

  2. Click Yes when prompted to delete the condition.

    The condition is deleted and the Transformation Map Details page appears.

Updating an IF Condition

Follow these instructions to update an IF condition:

To update an IF condition:

  1. Ensure that you followed the instructions in "Accessing Transformation Condition Management Tasks" to access the page for updating an IF condition.

    The Update Transformation Condition page appears.

  2. Make appropriate changes based on the statement selected. (See "Creating an IF Condition" for a list of fields you can update.)

  3. Click Apply.

    The statement is updated and the Transformation Map Details page appears.

Transformation Condition Case Study: Converting Importance to Featured/Ordinary Ad

This section provides an example of using transformation conditions, based on modeling metadata you created when using the tutorial in Chapter 7, "Tutorial of an Integration within an Enterprise".

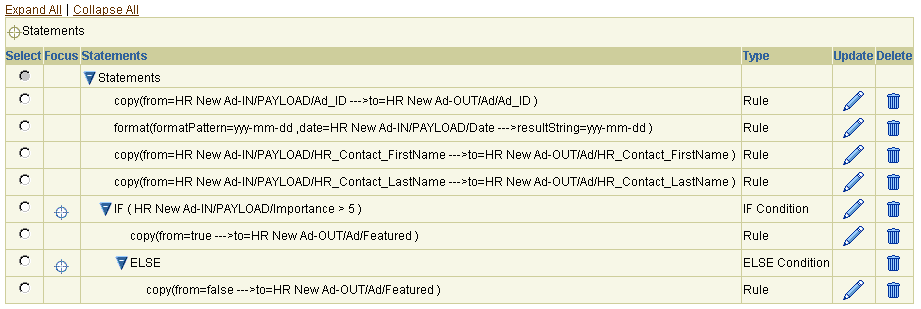
This example describes how a specific ad becomes a featured ad in a newspaper if its importance is rated as greater than five. If not, its importance is rated as an ordinary ad.

Creating an IF-ELSE Condition

  1. Select Modeling > Transformations.

  2. Select HR Ad to Common View in the Name column.

  3. Select IF Condition from the Statement Type list.

  4. Click Append.

  5. Select Update for Condition expression not specified.

  6. Click Expand All for the Left Operand table.

  7. Select Importance.

  8. Select > from the Operator list. The page refreshes to display the Right Operand table.

  9. Enter 5 in the Constant field.

  10. Click Apply.

  11. Click Apply on the Create Transformation Condition page.

    The IF condition displays at the bottom of the Statements list:

    Text description of tcs_if2.gif follows.

    Text description of the illustration tcs_if2.gif

  12. Select the newly-created IF condition in the Statements table.

  13. Select ELSE Condition from the Statement Type list.

  14. Click Append.

    An ELSE condition is added beneath the IF condition.

Associating Statements with IF-ELSE Blocks

  1. Select the IF condition in the Statements list.

  2. Select Rule in the Statement Type list.

  3. Select copy:from=boolean->to=boolean from the Datatype Transformation Map list.

  4. Click Append.

  5. Click Expand All for both the Sources table and the Targets table.

  6. Select Featured in the Targets table.

  7. Click Bind for to boolean under Targets.

  8. Enter true in the Constant Value field.

  9. Click Bind for from boolean under Sources.

    The Rule Signature section displays your selection.

    Text description of tcs_if3.gif follows.

    Text description of the illustration tcs_if3.gif

  10. Click Apply.

  11. Expand the IF Condition in the Statements list.

    The condition statement displays.

    Text description of tcs_if4.gif follows.

    Text description of the illustration tcs_if4.gif

  12. Select the ELSE Condition.

  13. Select Rule in the Statement Type list.

  14. Select copy:from=boolean->to=boolean from the Datatype Transformation Map list.

  15. Click Append.

  16. Click Expand All for both the Sources table and the Targets table.

  17. Select Featured in the Targets table.

  18. Click Bind for to boolean.

  19. Enter false in the Constant Value field.

  20. Click Bind for from boolean.

  21. Click Apply.

  22. Expand the IF and ELSE conditions in the Statements list.

    The conditions appear at the bottom of the list.
    Text description of tcs_if5.gif follows.

    Text description of the illustration tcs_if5.gif

Transformation Iterators

You may want to repeatedly perform a certain action (for example, invoke a certain map). Assume you want to transform all line items in an invoice to items in a purchase order. You use an iterator that enables you to loop over all line items and transform them. Defining a transformation iterator involves picking the item and value over which to iterate and specifying the transformation rules to be executed during each iteration.

See Also:

Table 13-3 for an additional description of iterators

Accessing Iterator Management Tasks

Follow these instructions to access the iterator management tasks shown in Figure 13-4:

To access iterator management tasks:

  1. Select the Modeling tab.

  2. Select Transformations.

    The Event Transformation Maps page appears.

  3. Select a specific event transformation map in the Name column.

    The Transformation Map Details page for the selected event transformation map appears (for this example, event transformation map Transform Payload). (See Figure 13-4.)

  4. Select a task to perform and see the referenced section for instructions:

    To... Then... See Section...

    Create an iterator

    Go to the Statement Type list.

    "Creating an Iterator"

    Delete an iterator

    Select a specific iterator to delete in the Delete column.

    "Deleting an Iterator"

    Update an iterator

    Select a specific iterator to update in the Update column.

    "Updating an Iterator"

    View details about an iterator

    View a specific iterator in the Statements section.

    "Transformation Statements Overview", Figure 13-4

Creating an Iterator

Follow these instructions to create an iterator:


Note:

When you create a rule, you can select an iterator or any of the fields underneath it. In addition, only the rules within the iterator must select the iterator or its fields as source.


To create an iterator:

  1. Ensure that you followed the instructions in "Accessing Iterator Management Tasks" to access the page for creating an iterator.

  2. Select Iterator from the Statement Type list.

  3. Select where to place the new statement in the Statements list.

    1. Click Append to create a statement at the end of the statement list. If the selected statement is part of a block (for example, IF, ELSE IF, or iterator), Append creates a statement at the end of the selected block.

      or

    2. Select a specific statement in the Statements list and click Insert. This inserts the new statement before the selected statement.

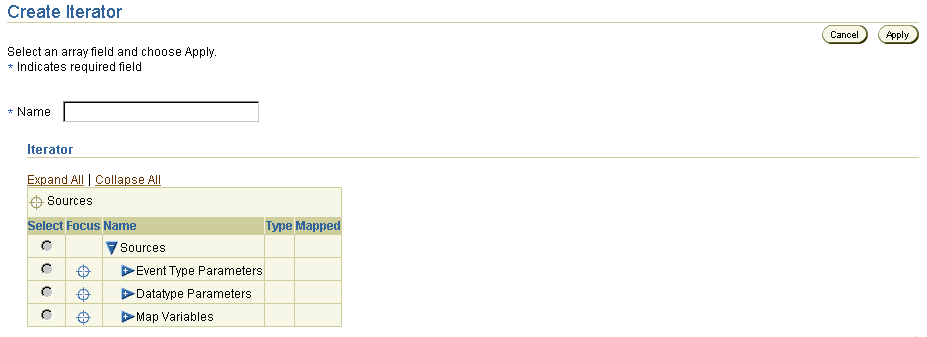
    The Create Iterator page appears.

    Text description of create_iterator.gif follows.

    Text description of the illustration create_iterator.gif

  4. Click a specific source parameter to expand or click Expand All to expand the entire list.

  5. Enter a unique and recognizable iterator name in the Name field (for example, Ad Iterator).

  6. Select a specific source parameter to identify the array over which to iterate.


    Note:

    Only items with maximum occurrences greater than one are allowed for iterators. Only those items have the Select button enabled.


  7. Click Apply.

    The Transformation Map Details page displays the iterator in the Statements list.

    The Ad Iterator iterator also appears in the Sources table of the Transformation Map Details page, where it can be included in rule statements defined within the iterator.

    You can create rules within an iterator that are executed as many times as the number of items in the array associated with the iterator. Create these rules as part of a user-defined datatype transformation map. That way, the rules are part of an independent datatype transformation map. Do not create a set of independent rules beneath the iterator.

Deleting an Iterator

Follow these instructions to delete an iterator:

To delete an iterator:

  1. Ensure that you followed the instructions in "Accessing Iterator Management Tasks" to access the page for deleting an iterator.

  2. Click Yes when prompted to delete the iterator.

    The iterator is deleted and the Transformation Map Details page appears.

Updating an Iterator

Follow these instructions to update an iterator:

To update an iterator:

  1. Ensure that you followed the instructions in "Accessing Iterator Management Tasks" to access the page for updating an iterator.

    The Update Iterator page appears.

  2. Make appropriate changes. (See "Creating an Iterator" for a list of fields you can update.)

  3. Click Apply.

    The iterator is updated and the Transformation Map Details page appears.

Iterator Case Study: Transforming Ad Request with an Unbounded Number of Ads

This section provides an example of using iterators, based on modeling metadata you created when using the tutorial in Chapter 7, "Tutorial of an Integration within an Enterprise". Since the number of ads to be copied is unbounded, you must create an iterator to copy them.


Note:

You must invoke a separate user-defined datatype map from within an iterator to map a complex target member of multiple occurrences from a complex source member of multiple occurrences.


See Also:

See "Not Creating a Submap to Populate a Multiple Occurrence Target Member" for details about invoking a separate user-defined datatype map from within an iterator

Creating an Iterator for the Inbound Direction

To iterate over the unbound complex datatype Ad, you must first create a datatype transformation map for the HR Ad to Common View event transformation map.

Create a datatype transformation map:

  1. Select Modeling > Transformations.

  2. Select Datatype Transformation Maps.

  3. Click Create.

  4. Enter copyHRAd in the Name field.

  5. Click Apply.

Create a source for the datatype transformation map:

  1. Click Modify Sources and Targets.

  2. Click Create in the Sources section.

  3. Enter HR Ad Type in the Name field.

  4. Select Application Datatype from the Classification list.

  5. Select http://www.oracle.com/human_resources from the Namespace list.

  6. Use the flashlight icon to select AdType for the Name field.

  7. Click Apply. The Modify Sources and Targets page appears.

Create a target for the datatype transformation map:

  1. Click Create in the Targets section.

  2. Enter Ad Type in the Name field.

  3. Select Business Datatype from the Classification list.

  4. Leave the Namespace list selection as Unspecified.

  5. Use the flashlight icon to select AdType for the Name field.


    Note:

    You can quickly search by entering Ad% in the blank field and clicking Go (% is the wildcard variable).


  6. Click Apply.

    The Modify Sources and Targets page displays the following details:

    Text description of tcs_iter1.gif follows.

    Text description of the illustration tcs_iter1.gif

  7. Click Return to Map Details.

Create two rules to copy the two strings in this datatype:

  1. Click Expand All for both the Sources table and the Targets table.

  2. Select Title in the Sources table.

  3. Select Title in the Targets table.

  4. Select copy:from=string->to=string from the Datatype Transformation Map list.

  5. Click Append.

  6. Select Text in the Sources table.

  7. Select Text in the Targets table.

  8. Select copy:from=string->to=string from the Datatype Transformation Map list.

  9. Click Append.

    The statements display in the Statements list.

    Text description of tcs_dtm.gif follows.

    Text description of the illustration tcs_dtm.gif

Return to the event transformation map:

  1. Select Modeling > Transformations.

  2. Select HR Ad to Common View.

  3. Click Expand All for both the Sources table and the Targets table.

  4. Select Iterator in the Statement Type list.

  5. Click Append.

  6. Enter Ad Iterator in the Name field.

  7. Click Expand All in the Iterator table.

  8. Select Ad.

  9. Click Apply.

  10. Select Modeling > Transformations.

  11. Select HR Ad to Common View.

Create a rule to iterate over HR Ad using the datatype transformation map:

  1. Select the statement FOR Ad Iterator in HR New Ad-IN/PAYLOAD/Ad in the Statements section.

    Text description of tcs_iter2.gif follows.

    Text description of the illustration tcs_iter2.gif

  2. Select Rule from the Statement Type list.

  3. Select User Defined from the Datatype Transformation Map Type list.

  4. Select copyHRAd:HR Ad=AdType->Ad Type=AdType from the Datatype Transformation Map list.

  5. Click Append.

  6. Click Expand All for both the Sources table and the Targets table.

  7. Select Ad Iterator from the Sources table.

  8. Click Bind for HR Ad Type AdType.

  9. Select Ad from the Targets table.

  10. Click Bind for Ad Type AdType.

    The Rule Signature section displays your selections.

    Text description of tcs_iter3.gif follows.

    Text description of the illustration tcs_iter3.gif

  11. Click Apply.

  12. Expand the FOR Ad Iterator statement.

    The iterator contents display at the bottom of the Statements list.

    Text description of tcs_iter4.gif follows.

    Text description of the illustration tcs_iter4.gif

Creating an Iterator for the Outbound Direction

These steps are identical to those in "Creating an Iterator for the Inbound Direction". The only difference is that you map from the common view to the global newspaper domain in the steps.

Create a datatype transformation map:

  1. Select Modeling > Transformations.

  2. Select Datatype Transformation Maps.

  3. Click Create.

  4. Enter copyGlobalNPAd in the Name field.

  5. Click Apply.

Create a source for the datatype transformation map:

  1. Click Modify Sources and Targets.

  2. Click Create in the Sources section.

  3. Enter Ad Type in the Name field.

  4. Select Business Datatype from the Classification list.

  5. Leave the Namespace list selection as Unspecified.

  6. Use the flashlight icon to select AdType for the Name field.


    Note:

    Search by entering Ad% in the blank field and clicking Go.


  7. Click Apply.

Create a target for the datatype transformation map:

  1. Click Create in the Targets section.

  2. Enter Ad_Type in the Name field.

  3. Select Application Datatype from the Classification list.

  4. Select http://www.oracle.com/global_newspaper from the Namespace list.

  5. Use the flashlight icon to select AdType for the Name field.


    Note:

    Search by entering Ad% in the blank field and clicking Go.


  6. Click Apply.

    The Modify Sources and Targets page displays the following details:

    Text description of tcs_iter5.gif follows.

    Text description of the illustration tcs_iter5.gif

  7. Click Return to Map Details.

Create two rules to copy the two strings in this datatype:

  1. Click Expand All for both the Sources table and the Targets table.

  2. Select copy:from=string->to=string from the Datatype Transformation Map list.

  3. Select Title in the Sources table.

  4. Select Title in the Targets table.

  5. Click Append.

  6. Select copy:from=string->to=string from the Datatype Transformation Map list.

  7. Select Text in the Sources table.

  8. Select Text in the Targets table.

  9. Click Append.

Return to the event transformation map:

  1. Select Modeling > Transformations.

  2. Select Common View to Global NP Ad from the Name column.

  3. Click Expand All for both the Sources table and the Targets table.

  4. Select Iterator from the Statement Type list.

  5. Click Append.

  6. Enter Ad Iterator in the Name field.

  7. Click Expand All in the Iterator table.

  8. Select Ad.

  9. Click Apply.

Return to the event transformation map:

  1. Select Modeling > Transformations.

  2. Select Common View to Global NP Ad in the Name column.

Create a rule to iterate over AdType using the datatype transformation map:

  1. Select FOR Ad Iterator in HR New Ad-IN/Ad/Ad in the Statements table.

  2. Select Rule in the Statement Type list.

  3. Select User Defined from the Datatype Transformation Map Type list.

  4. Select copyGlobalNPAd:AdType->Ad_Type=AdType from the Datatype Transformation Map list.

  5. Click Append.

  6. Click Expand All for both the Sources table and the Targets table.

  7. Select Ad Iterator in the Sources table.

  8. Click Bind for the Ad Type AdType source.

  9. Select Ad in the Targets table.

  10. Click Bind for the Ad_Type AdType target.

    The Rule Signature section displays your selection.

    Text description of tcs_iter.gif follows.

    Text description of the illustration tcs_iter.gif

  11. Click Apply.

    The iterator statement displays at the bottom of the Statements list.

    Text description of tcs_iter7.gif follows.

    Text description of the illustration tcs_iter7.gif

Transformation Map Variables

If you invoke a transformation rule to transform a source to a target, you cannot do anything further with the target. There may, however, be situations in which you want to save the result of an invocation. For example, you have a transformation condition that tests whether the target of a previous rule invocation has a certain value. Or, you want to use the target of one rule as the source of another rule. In these cases, use a map variable to save the results of a transformation. Use the map variable later in transformation conditions or transformation rules.

Map variables can only be used globally, and not locally. This means that map variables must be unique and accessible everywhere in the map. For example, you cannot define a map variable within a transformation condition and only use it with that condition.

See Also:

Table 13-3 for an additional description of map variables

Accessing Map Variable Management Tasks

Follow these instructions to access the map variable management tasks shown in Figure 13-4:

To access map variable management tasks:

  1. Select the Modeling tab.

  2. Select Transformations.

    The Event Transformation Maps page appears.

  3. Select a specific event transformation map in the Name column.

    The Transformation Map Details page for the selected event transformation map appears (for this example, event transformation map Transform Payload). (See Figure 13-4.)

  4. Select a task to perform and see the referenced section for instructions:

    To... Then... See Section...

    Create a map variable

    Go to the Statement Type list.

    "Creating a Map Variable"

    Use a map variable in a rule

    Go to the Statement Type list.

    "Using a Map Variable in a Rule"

    Delete a map variable

    Select a specific map variable to delete in the Delete column.

    "Deleting a Map Variable"

    Update a map variable

    Select a specific map variable to update in the Update column.

    "Updating a Map Variable"

    View details about a map variable

    View a specific map variable in the Statements section.

    "Transformation Statements Overview", Figure 13-4

Creating a Map Variable

  1. Ensure that you followed the instructions in "Accessing Map Variable Management Tasks" to access the page for creating a map variable.

  2. Select Map Variable from the Statement Type list.

  3. Click Append to create the statement in the Statements list.


    Note:

    Regardless of selecting Insert or Append, map variables always display at the top of the Statements list.


    The Create Map Variable page appears.

    Text description of create_mv.gif follows.

    Text description of the illustration create_mv.gif

  4. Enter the following details to create a map variable. An asterisk (*) indicates a required field.

    Field Description

    Name *

    Enter a unique and recognizable map variable name.

    Classification *

    Select Application Datatype, Business Datatype, or Core Datatype.

    Namespace

    Select a datatype namespace.

    Name *

    Click the flashlight and select a datatype name.

  5. Click Apply.

    Map variables are always global, and are placed in both the Sources table and Targets table. See the map variable named Map_Var1.
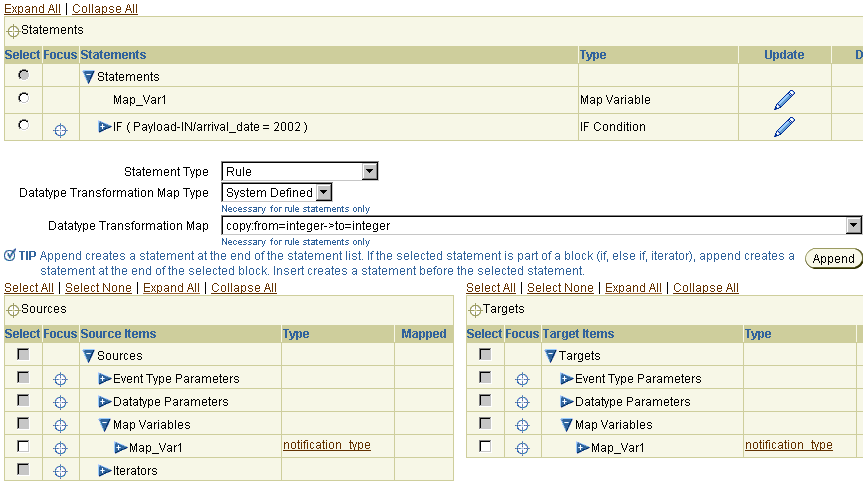
    Text description of create_map_var.gif follows.

    Text description of the illustration create_map_var.gif

    The map variable can be used in all statement types.

Using a Map Variable in a Rule

Follow these instructions to use a map variable in a rule:

To use a map variable in a rule:

  1. Ensure that you followed the instructions in "Accessing Map Variable Management Tasks" to access the page for using a map variable in a rule.

  2. Select Rule from the Statement Type list.

  3. Select the datatype transformation map to be invoked from the Datatype Transformation Map list.

  4. Select where to place the new statement in the Statements list.

    1. Click Append to create a statement at the end of the statement list. If the selected statement is part of a block (for example, IF, ELSE IF, or iterator), Append creates a statement at the end of the selected block.

      or

    2. Select a specific statement in the Statements list and click Insert. This inserts the new statement before the selected statement.

  5. Select a map variable as either the source or target in the rule.

  6. Click Apply.

Deleting a Map Variable

Follow these instructions to delete a map variable:

To delete a map variable:

  1. Ensure that you followed the instructions in "Accessing Map Variable Management Tasks" to access the page for deleting a map variable.

  2. Click Yes when prompted to delete the map variable.

    The map variable is deleted and the Transformation Map Details page appears. The map variable is removed from the Statements list and from the Sources table and Targets table.

Updating a Map Variable

Follow these instructions to update a map variable:

To update a map variable:

  1. Ensure that you followed the instructions in "Accessing Map Variable Management Tasks" to access the page for updating a map variable.

    The Update Map Variable page appears.

  2. Make appropriate changes based on the map variable selected. (See "Creating a Map Variable" for a list of fields you can update.)

  3. Click Apply.

    The map variable is updated and the Transformation Map Details page appears.

Map Variable Case Study: Using Map Variables to Create a Formatted Name

This section provides an example of using map variables, based on modeling metadata you created when using the tutorial in Chapter 7, "Tutorial of an Integration within an Enterprise".

You create a map variable named Name in this section, then copy the first name to the variable. You then append a space character and concatenate the variable with the last name and store it in the target.

  1. Select Modeling > Transformations.

  2. Select Common View to Global NP Ad in the Name column.

  3. Select Map Variable from the Statement Type list.

  4. Click Append.

  5. Enter Name in the Name field.

  6. Select Core Datatype from the Classification list.

  7. Leave the Namespace list selection as Unspecified.

  8. Use the flashlight icon to select string for the Name field.

  9. Click Apply.

Assign a value to a map variable (first name appended by a space):

  1. Ensure Rule is selected in the Statement Type list.

  2. Select the concat:firstString=string,secondString=string->resultString=string from the DataType Transformation Map list.

  3. Click Append.

  4. Click Expand All in the Sources table and Targets table.

  5. Select HR_Contact_FirstName in the Sources table.

  6. Click Bind for firstString string.

  7. Select map variable Name in the Targets table.

  8. Click Bind for resultString string.

  9. Enter a single blank space in the Constant Value field.

  10. Click Bind for secondString string.

    The Rule Signature section displays your selections.

    Text description of tcs_map.gif follows.

    Text description of the illustration tcs_map.gif

  11. Click Apply.

    The map variable statement displays at the bottom of the Statements list.

    Text description of tcs_map2.gif follows.

    Text description of the illustration tcs_map2.gif

Use the map variable (concatenate the variable with the last name):

  1. Ensure Rule is selected in the Statement Type list.

  2. Select the concat:firstString=string,secondString=string->resultString=string from the DataType Transformation Map list.

  3. Click Append.

  4. Select map variable Name in the Sources table.

  5. Click Bind for firstString string.

  6. Select HR_Contact_LastName in the Sources table.

  7. Click Bind for secondString string.

  8. Select HR_Contact_Name in the Targets table.

  9. Click Bind for resultString string.

    The Rule Signature section displays your selections.

    Text description of tcs_map3.gif follows.

    Text description of the illustration tcs_map3.gif

  10. Click Apply.

    The map variable statement displays at the bottom of the Statements list.
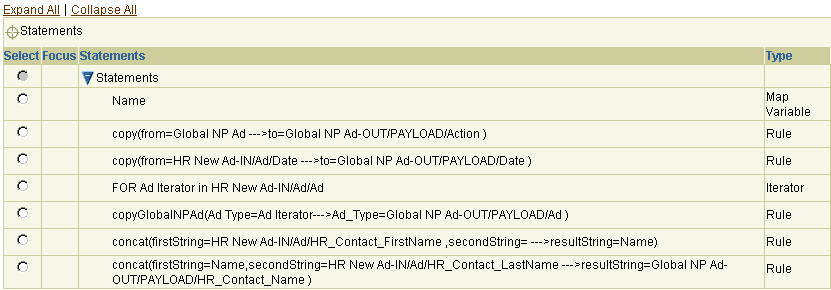
    Text description of tcs_map4.gif follows.

    Text description of the illustration tcs_map4.gif

Event Header Rules

In addition to the actual content body, events also include headers that contain details like the originating party and target party. Event header rules enable you to set or retrieve these header details through system-defined event header functions. For example, suppose an event destination is the party Oracle. Use an event header rule that invokes the event header function called setToParty and pass it Oracle.


Note:

After getting the party, you can retrieve more information about the party by invoking other rules.


See Also:

  • Table 13-3 for an additional description of event header rules

  • "Event Header Rule Design" for details about getting a party and retrieving more information about the party by invoking other rules

Accessing Event Header Rule Management Tasks

Follow these instructions to access the event header rule management tasks shown in Figure 13-4:

To access event header rule management tasks:

  1. Select the Modeling tab.

  2. Select Transformations.

    The Event Transformation Maps page appears.

  3. Select a specific event transformation map in the Name column.

    The Transformation Map Details page for the selected event transformation map appears (for this example, event transformation map Transform Payload). (See Figure 13-4.)

  4. Select a task to perform and see the referenced section for instructions:

    To... Then... See Section...

    Create an event header rule

    Go to the Statement Type list.

    "Creating an Event Header Rule"

    Delete an event header rule

    Select a specific event header rule to delete in the Delete column.

    "Deleting an Event Header Rule"

    Update an event header rule

    Select a specific event header rule to update in the Update column.

    "Updating an Event Header Rule"

    View an event header rule

    View a specific event header rule in the Statements section.

    "Transformation Statements Overview", Figure 13-4

Creating an Event Header Rule

Follow these instructions to create an event header rule:

To create an event header rule:

  1. Ensure that you followed the instructions in "Accessing Event Header Rule Management Tasks" to access the page for creating an event header rule.

  2. Select Event Header Rule from the Statement Type list.

  3. Select where to place the new statement in the Statements list.

    1. Click Append to place the new statement as a standalone entry at the end of the Statements list.

      or

    2. Select a specific statement in the Statements list and click Insert. This inserts the new statement as a mapping statement of the selected statement.

    The Create Event Header Rule page appears.

  4. Select the event header rule from the Event Header Rule list. These rules are described in "Event Header Rules".

    • setToParty

    • setFromParty

    • getToParty

    • getFromParty

  5. If you select a get event header function, the page refreshes to display details such as the following:

    Text description of create_event_header_rule.gif follows.

    Text description of the illustration create_event_header_rule.gif
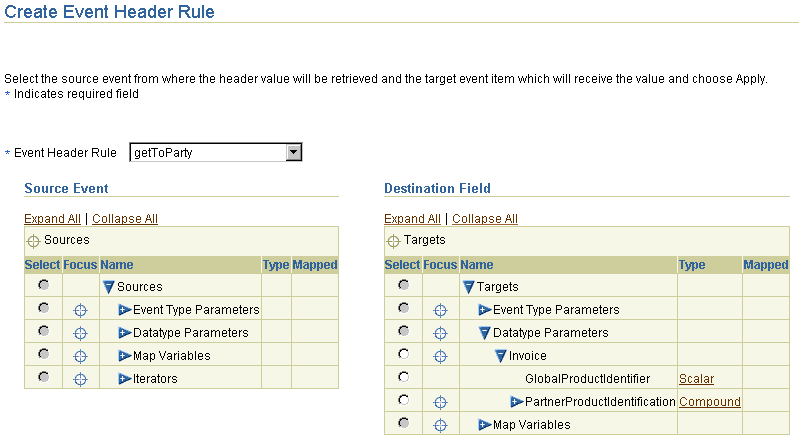
    1. Click a specific source item to expand or click Expand All to expand the entire source list.

    2. Select the source event from where the header value is retrieved by selecting the corresponding event type parameter from Source Event table.

    3. Click a specific target item to expand or click Expand All to expand the entire target list.

    4. Select the target item to receive the header value from the Destination Field Table.

    5. Click Apply.

  6. If you select a set event header function, the page refreshes to display details such as the following. The parameter associated with set event header functions is a target event.

    Text description of this figure follows.

    Text description of the illustration create_event_header_rule_set.gif
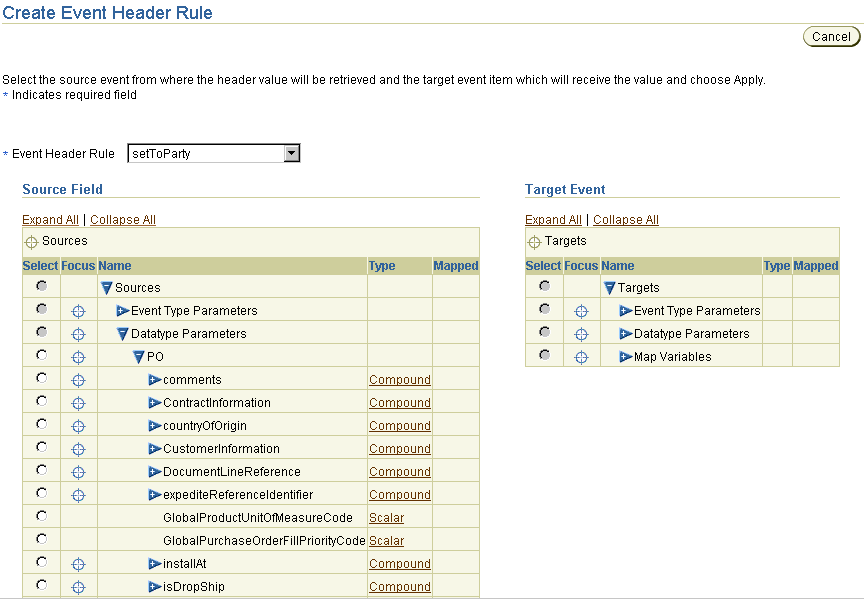
    1. Click a specific source item to expand or click Expand All to expand the entire source list.

    2. Select the source item from which the header value is being set from the Source Field Table.

    3. Click a specific target item to expand or click Expand All to expand the entire target list.

    4. Select the target event whose header value is being set by selecting the corresponding event type parameter from the Target Event table

    5. Click Apply.

Deleting an Event Header Rule

Follow these instructions to delete an event header rule:

To delete an event header rule:

  1. Ensure that you followed the instructions in "Accessing Event Header Rule Management Tasks" to access the page for deleting an event header rule.

  2. Click Yes when prompted to delete the event header rule.

    The event header rule is deleted and the Transformation Map Details page appears.

Updating an Event Header Rule

Follow these instructions to update an event header rule:

To update an event header rule:

  1. Ensure that you followed the instructions in "Accessing Event Header Rule Management Tasks" to access the page for updating an event header rule.

    The Update Event Header Rule page appears.

  2. Make appropriate changes based on the event header rule selected. (See "Creating an Event Header Rule" for a list of fields you can update.)

  3. Click Apply.

    The event header rule is updated and the Transformation Map Details page appears.

Event Header Rules Case Study: Sending to the Correct Target Newspaper

This section provides an example of using event header rules, based on modeling metadata you created when using the tutorial in Chapter 7, "Tutorial of an Integration within an Enterprise". When multiple newspapers are added, you must set the target party in the header of the Ad Request that identifies the newspaper to which it is to be sent. Since there is currently only one newspaper (Global Newspaper), you set the party to Global Newspaper in this example:

  1. Select Modeling > Transformations.

  2. Select Common View to Global NP Ad in the Name column.

  3. Select Event Header Rule in the Statement Type list.

  4. Click Append.

  5. Select setToParty from the Event Header Rule list.

  6. Click Expand All in the Target Event section.

  7. Enter Global Newspaper in the Constant Value field.

  8. Select Global NP Ad-OUT in the Target Event section.

  9. Click Apply.

    The event header rule displays at the bottom of the Statements list.
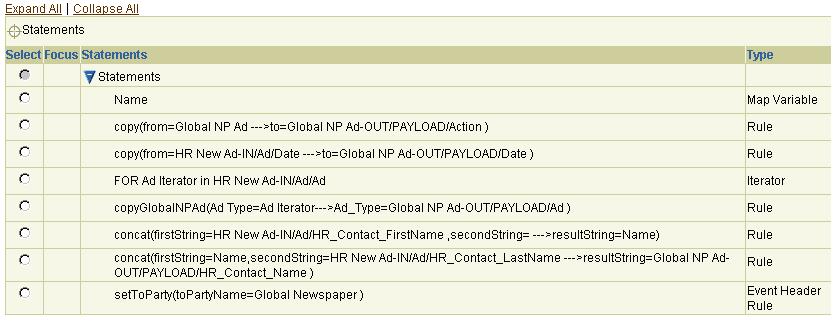
    Text description of tcs_ehr.gif follows.

    Text description of the illustration tcs_ehr.gif

Domain Value Maps

This section contains the following topics:

Domain Value Maps Overview

Parties participating in integrations (trading partners or applications) in different regions of the world use different currency standards, different methods for representing country codes, and other details in their messages. Oracle Application Server ProcessConnect includes a feature known as domain value maps that enables you to map one party's vocabulary standards to another party's vocabulary standards. This enables parties to send and receive messages while continuing to use their regional terminologies.

Domain value maps are used in the context of transformations and are executed when application events are transformed into business events, and vice versa.

Figure 13-5 and Table 13-5 provide an overview of key domain value map components described in this section. For domain ipdev, success is defined as a string named true. For domain APPS, success is defined as a string named Yes.

Figure 13-5 Domain Value Map Key Components

Text description of transforms27.gif follows

Text description of the illustration transforms27.gif

Table 13-5  Domain Value Map Key Components
Key Component Description

1

Domain value map

The map that identifies the:

  • Domain value map columns (and their domain parties) participating in an integration

  • Domain value map rows that define the mapping between the vocabularies

2

Domain party

After a mapping of vocabularies is defined, parties can subscribe to the vocabulary that is relevant to them.

3

Domain value map columns

The specific domain columns indicating a vocabulary for a specific domain value map

4

Domain value map rows

The vocabulary you assign to domain value map columns

The domain value map that you create in this section displays in the Domain Value Map list of the Create Domain Value Map Rule page shown in Step 3.

See Also:

"Creating a Domain Value Map Rule" for instructions on creating a domain value map rule in an event transformation map

Managing Domain Value Maps

The Oracle Application Server ProcessConnect user interface tool enables you to perform the domain value map management tasks shown in Figure 13-6. These tasks are described in detail in this section. The domain value map is the agreement that, when complete, identifies the:

Figure 13-6 Domain Value Map Management Tasks

Text description of transforms29.gif follows

Text description of the illustration transforms29.gif

Table 13-6 identifies the domain value map management tasks shown in Figure 13-6 and provides references to procedures for performing these tasks.

Table 13-6  Domain Value Map Management Tasks
Domain Value Maps Page Elements Management Task First See Section... Then See Section...

Create button in Domain Value Maps section of Figure 13-6

Create a domain value map

"Accessing Domain Value Map Management Tasks"

"Creating a Domain Value Map"

Delete column in Domain Value Maps section of Figure 13-6

Delete a domain value map


"Deleting a Domain Value Map"

Update column in Domain Value Maps section of Figure 13-6

Update a domain value map


"Updating a Domain Value Map"

Name column in Domain Value Maps section of Figure 13-6

View details about a domain value map


"Viewing a Domain Value Map"

Accessing Domain Value Map Management Tasks

Follow these instructions to access the domain value map management tasks shown in Figure 13-6:

To access domain value map management tasks:

  1. Select the Modeling tab.

  2. Select the Transformations tab.

  3. Select Domain Value Maps.

    The Domain Value Maps page appears. (See Figure 13-6.)

  4. Go to the Domain Value Maps section.

  5. Select a task to perform and see the referenced section for instructions:

    To... Then... See Section...

    Create a domain value map

    Click Create.

    "Creating a Domain Value Map"

    Delete a domain value map

    Select a specific domain value map in the Delete column.

    "Deleting a Domain Value Map"

    Update a domain value map

    Select a specific domain value map in the Update column.

    "Updating a Domain Value Map"

    View details about a domain value map

    Select a specific domain value map in the Name column.

    "Viewing a Domain Value Map"

Creating a Domain Value Map

Follow these instructions to create a domain value map:

To create a domain value map:

  1. Ensure that you followed the instructions in "Accessing Domain Value Map Management Tasks" to access the page for creating a domain value map.

    The Create Domain Value Map page appears.

  2. Enter a name for the domain value map in the Name field (for this example, Map_Agreement1 is entered).

  3. Click Apply.

    The domain value map is created and the Domain Value Map Details page for the created domain value map appears.

    See Also:

    "Creating a Domain Column" to create a domain column to assign to a domain value map

Deleting a Domain Value Map

Follow these instructions to delete a domain value map:

To delete a domain value map:

  1. Ensure that you followed the instructions in "Accessing Domain Value Map Management Tasks" to access the page for deleting a domain value map.

  2. Click Yes when prompted to delete a domain value map.

    The domain value map is deleted and the Domain Value Maps page appears.

Updating a Domain Value Map

Follow these instructions to update a domain value map:

To update a domain value map:

  1. Ensure that you followed the instructions in "Accessing Domain Value Map Management Tasks" to access the page for updating a domain value map.

    The Update Domain Value Maps page appears.

  2. Make appropriate changes. (See Step 2 of "Creating a Domain Value Map" for a list of fields you can update.)

  3. Click Apply.

    The domain value map is updated and the Domain Value Map Details page for the updated domain value map appears.

Viewing a Domain Value Map

Follow these instructions to view a domain value map:

To view a domain value map:

  1. Ensure that you followed the instructions in "Accessing Domain Value Map Management Tasks" to access the page for viewing a domain value map.

    The Domain Value Map Details page for the selected domain value map appears.
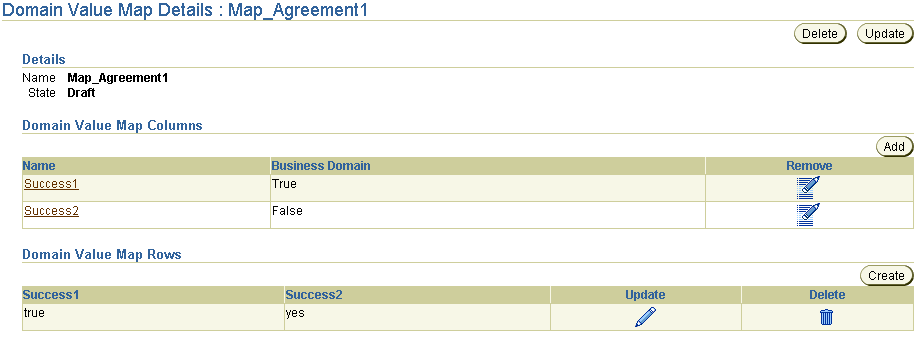
    Text description of details_dvm.gif follows.

    Text description of the illustration details_dvm.gif

  2. View specific details, including the associated domain value map column and row details.

    This page, as with the Domain Value Maps page shown in Figure 13-6, enables you to delete or update the selected domain value map.

  3. Click Return to List to return to the Domain Value Maps page.

Managing Domain Columns and Parties

The Oracle Application Server ProcessConnect user interface tool enables you to perform the domain column and party management tasks shown in Figure 13-7. These tasks are described in detail in this section. Domain columns define the column name and its datatype (such as a string). You assign domain parties (such as an organization name) to domain columns.
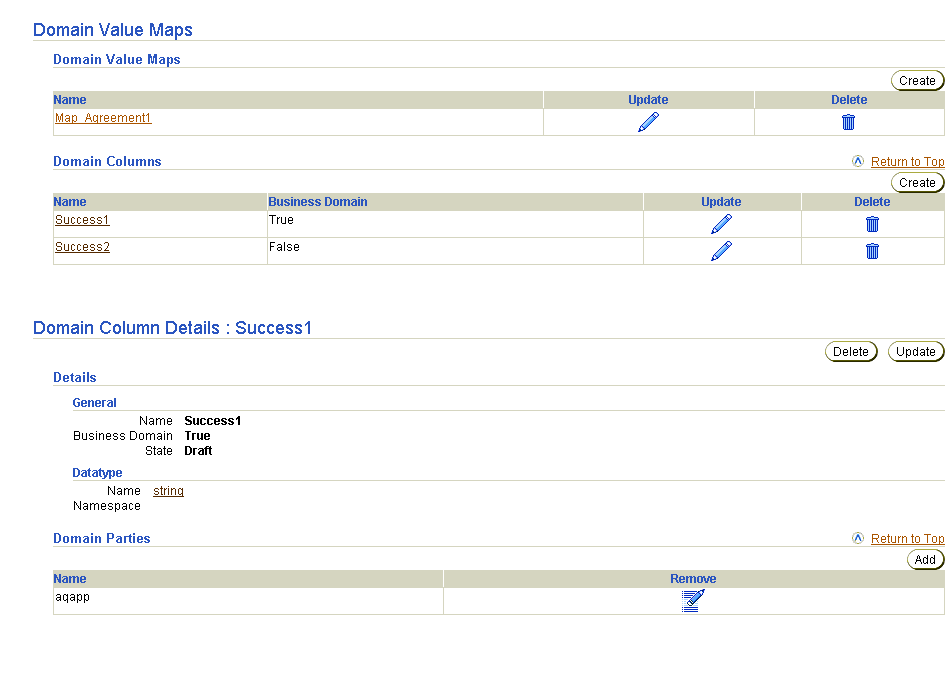
Figure 13-7 Domain Column and Party Management Tasks

Text description of transforms31.gif follows

Text description of the illustration transforms31.gif

Table 13-7 identifies the domain column and party management tasks shown in Figure 13-7 and provides references to procedures for performing these tasks.

Table 13-7  Domain Column and Party Management Tasks
Domain Value Maps Page Elements Management Task First See Section... Then See Section...

Create button in the Domain Columns section of Figure 13-7

Create a domain column

"Accessing Domain Column and Party Management Tasks"

"Creating a Domain Column"

Delete column in the Domain Columns section of Figure 13-7

Delete a domain column


"Deleting a Domain Column"

Update column in the Domain Columns section of Figure 13-7

Update a domain column


"Updating a Domain Column"

Name column in the Domain Columns section of Figure 13-7

(To access the details page shown in the lower page of Figure 13-7)

View details about a domain column


"Viewing a Domain Column"

Add button in the Domain Parties section of Figure 13-7

Add a domain party


"Adding a Domain Party"

Remove column in the Domain Parties section of Figure 13-7

Remove a domain party


"Removing a Domain Party"

Accessing Domain Column and Party Management Tasks

Follow these instructions to access the domain column and party management tasks shown in Figure 13-7:

To access domain column and party management tasks:

  1. Select the Modeling tab.

  2. Select the Transformations tab.

  3. Select Domain Value Maps.

    The Domain Value Maps page appears. (See the upper page of Figure 13-7.)

  4. Go to the Domain Columns section.

  5. Select a task to perform and see the referenced section for instructions:

    To... Then... See Section...

    Create a domain column

    Click Create.

    "Creating a Domain Column"

    Delete a domain column

    Select a specific domain column in the Delete column.

    "Deleting a Domain Column"

    Update a domain column

    Select a specific domain column in the Update column.

    "Updating a Domain Column"

    View details about a domain column

    Select a specific domain column in the Name column.

    "Viewing a Domain Column"

    Add a domain party

    Select a specific domain column in the Name column for which to add a domain party.

    "Adding a Domain Party"

    Remove a domain party

    Select a specific domain column in the Name column for which to remove a domain party.

    "Removing a Domain Party"

Creating a Domain Column

Follow these instructions to create a domain column:

To create a domain column:

  1. Ensure that you followed the instructions in "Accessing Domain Column and Party Management Tasks" to access the page for creating a domain column.

    The Create Domain Column page appears.

  2. Enter the following details to create a domain column. An asterisk (*) indicates a required field.

    Field Description

    Name *

    Enter a unique and recognizable name for the domain column (for this example, Success1 is entered).

    Business Domain

    Select Yes or No.

    A business domain identifies the common vocabulary domain (that is, the domain associated with the business events that is common across different domains and parties).

    Exactly one domain column with Business Domain set to Yes can be associated with a domain value map (through the creation of domain value map columns).

    Domain value map functions used in transformation such as lookupBusinessViewDomain and lookupPartyDomain refer to this business domain column. For example, lookupBusinessViewDomain first finds the domain value map row containing the specified inValue for the domain column associated and returns the value in that row associated to the business domain column.

    Similarly, lookupPartyViewDomain first finds the domain value map row containing the specified inValue associated with a business domain column and then returns the value in that row associated to the domain column for the specified party.


    Note:

    For this Oracle Application Server ProcessConnect release, only the string datatype is available. For this reason, you cannot select a datatype classification, namespace, or name on the Create Domain Column page. Click Modeling > Datatypes > Core Datatypes for details about the string datatype.


  3. Click Apply.

    The domain column is created and the Domain Column Details page for the created domain column appears. (See the lower page of Figure 13-7.)

  4. Repeat the steps in this section to create a second domain column. For this example, a domain column named Success2 is created.

    When complete, you have two domain columns (Success1 and Success2) of datatype string.

    See Also:

    "Adding a Domain Party" for assigning parties in an integration to domain columns

Deleting a Domain Column

Follow these instructions to delete a domain column:

To delete a domain column:

  1. Ensure that you followed the instructions in "Accessing Domain Column and Party Management Tasks" to access the page for deleting a domain column.

  2. Click Yes when prompted to delete a domain column.

    The domain column is deleted and the Domain Value Maps page appears.

Updating a Domain Column

Follow these instructions to update a domain column:

To update a domain column:

  1. Ensure that you followed the instructions in "Accessing Domain Column and Party Management Tasks" to access the page for updating a domain column.

    The Update Domain Column page appears.

  2. Make appropriate changes. (See Step 2 of "Creating a Domain Column" for a list of fields you can update.)

  3. Click Apply.

    The Domain Column Details page for the updated domain column appears.

Viewing a Domain Column

Follow these instructions to view a domain column:

To view a domain column:

  1. Ensure that you followed the instructions in "Accessing Domain Column and Party Management Tasks" to access the page for viewing a domain column.

    The Domain Column Details page for the selected domain column appears.
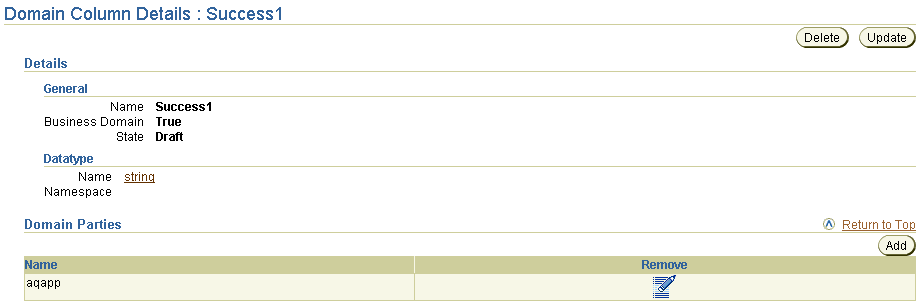
    Text description of details_domain_column.gif follows.

    Text description of the illustration details_domain_column.gif

  2. View specific details, including details about domain parties assigned to the selected domain column.

    This page, as with the Domain Value Maps page shown in the upper page of Figure 13-7, enables you to delete or update the selected domain column.

  3. Click Return to List to return to the Domain Value Maps page.

Adding a Domain Party

Follow these instructions to associate a party with a domain column:

To add a domain party:

  1. Ensure that you followed the instructions in "Accessing Domain Column and Party Management Tasks" to access the page for adding a domain party.

    The Domain Column Details page appears. (See the lower page of Figure 13-7.) For this example, Success1 is the domain column selected.

  2. Go to the Domain Parties section.

  3. Click Add.

    The Create Domain Party page appears.

    Text description of create_dp.gif follows.

    Text description of the illustration create_dp.gif

  4. Select a party name (an application or trading partner) from the Party list. For this example, a party named aqapp is selected.

  5. Click Apply.

    The domain party is added and the Domain Column Details page for the selected domain column appears. (See the lower page of Figure 13-7.)

  6. Repeat the steps in this section to add a second domain party (for this example, Success2 is selected as the domain column in which to add the second domain party, which is named ipdev).

    When complete, you have two domain columns with the following details:

    Domain Column Domain Party

    Success1

    aqapp

    Success2

    ipdev

  7. Click Return to List to return to the Domain Value Maps page.

    See Also:

Removing a Domain Party

Follow these instructions to remove a domain party:

To remove a domain party:

  1. Ensure that you followed the instructions in "Accessing Domain Column and Party Management Tasks" to access the page for removing a domain party.

  2. Go to the Domain Parties section.

  3. Click Remove for the specific party.

  4. Click Yes when prompted to delete a domain party.

    The domain party is deleted and the Domain Column Details page appears.

Managing Domain Value Map Columns and Rows

The Oracle Application Server ProcessConnect user interface tool enables you to perform the domain value map column and row management tasks shown in the lower page of Figure 13-8. These tasks are described in detail in this section. Domain value map columns identify the domain columns (and their domain parties) of a specific domain value map. Domain value map rows identify the vocabulary you assign to domain value map columns.
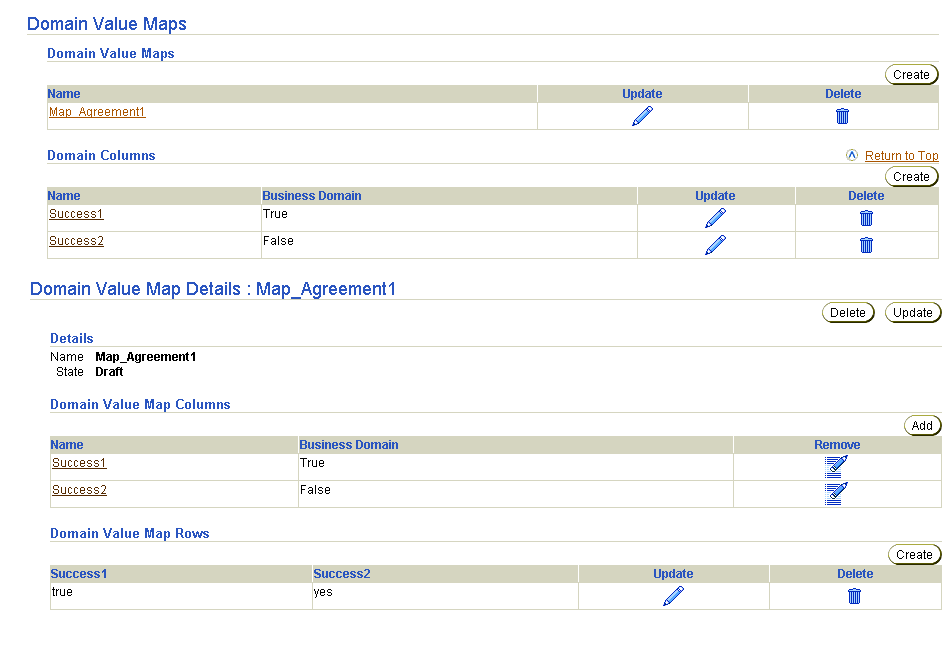
Figure 13-8 Domain Value Map Column and Row Management Tasks

Text description of transforms33.gif follows

Text description of the illustration transforms33.gif

Table 13-8 identifies the domain value map column and row management tasks shown in the lower page of Figure 13-8 and provides references to procedures for performing these tasks.

Table 13-8  Domain Value Map Column and Row Management Tasks
Domain Value Map Details Page Management Task First See Section... Then See Section...

Add button in Domain Value Map Columns section of Figure 13-8

Add a domain value map column

"Accessing Domain Value Map Column and Row Management Tasks"

"Adding a Domain Value Map Column"

Remove column in Domain Value Map Columns section of Figure 13-8

Remove a domain value map column


"Removing a Domain Value Map Column"

Create button in Domain Value Map Rows section of Figure 13-8

Create a domain value map row


"Creating a Domain Value Map Row"

Delete button in Domain Value Map Rows section of Figure 13-8

Delete a domain value map row


"Deleting a Domain Value Map Row"

Update button in Domain Value Map Rows section of Figure 13-8

Update a domain value map row


"Updating a Domain Value Map Row"

See Also:

"Viewing a Domain Column" to view column name details accessible from the Name column of the Domain Value Map Columns section of the lower page of Figure 13-8

Accessing Domain Value Map Column and Row Management Tasks

Follow these instructions to access the domain value map column and party management tasks shown in the lower page of Figure 13-8:

To access domain value map column and row management tasks:

  1. Select the Modeling tab.

  2. Select the Transformations tab.

  3. Select Domain Value Maps.

    The Domain Value Maps page appears. (See the upper page of Figure 13-8.)

  4. Go to the Domain Value Maps section.

  5. Select a specific domain value map in the Name column (for this example, Map_Agreement1 is selected).

    The Domain Value Map Details page for the selected domain value map appears. (See the lower page of Figure 13-8.) For this example, Map_Agreement1 is the domain value map selected.

  6. Select a task to perform and see the referenced section for instructions:

    To... Then... See Section...

    Add a domain value map column

    Click Add in the Domain Value Map Columns section.

    "Adding a Domain Value Map Column"

    Remove a domain value map column

    Select a specific domain value map column in the Remove column of the Domain Value Map Columns section.

    "Removing a Domain Value Map Column"

    Create a domain value map row

    Click Create in the Domain Value Map Rows section.

    "Creating a Domain Value Map Row"

    Delete a domain value map row

    Select a specific domain value map row in the Delete column of the Domain Value Map Rows section.

    "Deleting a Domain Value Map Row"

    Update a domain value map row

    Select a specific domain value map row in the Update column of the Domain Value Map Rows section.

    "Updating a Domain Value Map Row"

Adding a Domain Value Map Column

Follow these instructions to associate a domain column with the domain value map:

To add a domain value map column:

  1. Ensure that you followed the instructions in "Accessing Domain Value Map Column and Row Management Tasks" to access the page for adding a domain value map column.

    The Create Domain Value Map Column page appears.

  2. Select the domain column to be associated with the domain value map from the Domain Column list (for this example, Success1 is selected). You created the domain column in "Creating a Domain Column".

  3. Click Apply.

    The Domain Value Map Details page appears with the added domain value map column. (See the lower page of Figure 13-8.)

  4. Repeat these steps to add a second domain value map column (for this example, domain column Success2 is selected).

    When complete, the domain value map Map_Agreement1 is associated with the two domain columns.

    Domain Value Map Domain Column Domain Party

    Map_Agreement1

    Success1

    aqapp

    Success2

    ipdev

    See Also:

    "Creating a Domain Value Map Row" to define the datatype values to associate between the domain parties

Removing a Domain Value Map Column

Follow these instructions to remove a domain value map column:

To remove a domain value map column:

  1. Ensure that you followed the instructions in "Accessing Domain Value Map Column and Row Management Tasks" to access the page for removing a domain value map column.

  2. Click Yes when prompted to remove a domain value map column.

    The domain value map column is removed and the Domain Value Map Details page appears.

Creating a Domain Value Map Row

Follow these instructions to create a domain value map row:

To create a domain value map row:

  1. Ensure that you followed the instructions in "Accessing Domain Value Map Column and Row Management Tasks" to access the page for creating a domain value map row.

    The Create Domain Value Map Row page appears.

  2. Enter a value in the first domain column (for this example, a string value of true is entered).

  3. Enter a value for the second domain column (for this example, a string value of Yes is entered).

  4. Click Apply.

    The Domain Value Map Details page for the domain value map Map_Agreement1 appears with datatype mapping complete between domain column Success1 (and its party aqapp) and domain column Success2 (and its party ipdev).

    Text description of details_dvm.gif follows.

    Text description of the illustration details_dvm.gif

    Every value in a column or set of columns (key) must be unique. This means that no two rows of a table can have duplicate values in a specified column or set of columns.

  5. Click Return to List to return to the Domain Value Maps page.

    See Also:

    "Creating a Domain Value Map Rule" for instructions on assigning a domain value map to a transformation

Deleting a Domain Value Map Row

Follow these instructions to delete a domain value map row:

To delete a domain value map row:

  1. Ensure that you followed the instructions in "Accessing Domain Value Map Column and Row Management Tasks" to access the page for deleting a domain value map row.

  2. Click Yes when prompted to delete a domain value map row.

    The domain value map row is deleted and the Domain Value Map Details page appears.

Updating a Domain Value Map Row

To update a domain value map row:

  1. Ensure that you followed the instructions in "Accessing Domain Value Map Column and Row Management Tasks" to access the page for updating a domain value map row.

    The Update Domain Value Map Row page appears.

  2. Make appropriate changes. (See Step 2 through Step 3 of "Creating a Domain Value Map Row" for a list of fields you can update.)

  3. Click Apply.

    The Domain Value Map Details page for the updated domain value map appears.

Domain Value Map Rules

After you have created a domain value map, how do you look up its value? As mentioned in "Creating a Domain Column", one column is always defined as the business domain. Values can be mapped between a party and the business domain, and vice versa, but not directly between two parties. For example, given a value and a party using it, you can look up the domain value map to find the corresponding value in the business domain. This happens during the inbound transformation phase. The party is obtained by looking up the fromParty of the event. Alternatively, given the business domain value and a party for which you want the corresponding value, you can look up the domain value map to find the party-specific value. This happens during the outgoing transformation. The party is obtained by looking up the toParty in the event header. The in-built functions for performing domain value map lookups are:

Accessing Domain Value Map Rule Management Tasks

Follow these instructions to access the domain value map rule management tasks shown in Figure 13-4:

To access domain value map rule management tasks:

  1. Select the Modeling tab.

  2. Select Transformations.

    The Event Transformation Maps page appears.

  3. Select a specific event transformation map in the Name column.

    The Transformation Map Details page for the selected event transformation map appears (for this example, event transformation map Transform Payload). (See Figure 13-4.)

  4. Select a task to perform and see the referenced section for instructions:

    To... Then... See Section...

    Create a domain value map rule

    Go to the Statement Type list.

    "Creating a Domain Value Map Rule"

    Delete a domain value map rule

    Select a specific domain value map rule to delete in the Delete column.

    "Deleting a Domain Value Map Rule"

    Update a domain value map rule

    Select a specific domain value map rule to update in the Update column.

    "Updating a Domain Value Map Rule"

    View a domain value map rule

    View a specific domain value map rule in the Statements section.

    "Transformation Statements Overview", Figure 13-4

Creating a Domain Value Map Rule

  1. Ensure that you followed the instructions in "Accessing Domain Value Map Rule Management Tasks" to access the page for creating a domain value map rule.

  2. Select Domain Value Map Rule from the Statement Type list.

  3. Select where to place the new statement in the Statements list.

    1. Click Append to create a statement at the end of the statement list. If the selected statement is part of a block (for example, IF, ELSE IF, or iterator), Append creates a statement at the end of the selected block.

      or

    2. Select a specific statement in the Statements list and click Insert. This inserts the new statement before the selected statement.

    The Create Domain Value Map Rule page appears.
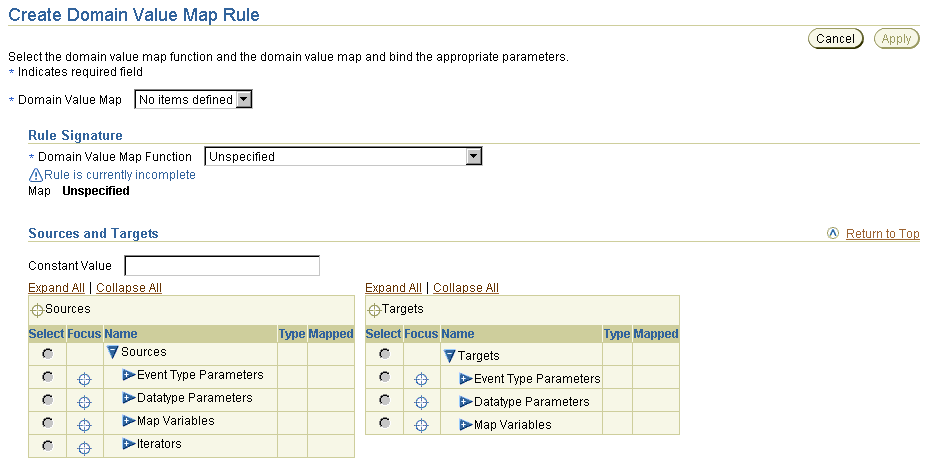
    Text description of create_dvmr.gif follows.

    Text description of the illustration create_dvmr.gif

  4. Select the function from the Domain Value Map Function list. These functions are described in "Domain Value Map Rules".

    • lookupPartyDomainWithDefaultValue

    • lookupPartyDomain

    • lookupBusinessViewDomainWithDefaultValue

    • lookupBusinessViewDomain

    For this example, lookupBusinessViewDomain is selected.

    The page refreshes to display source and target parameters in the Rule Signature section.

  5. Select the domain value map from the Domain Value Map list (for this example, MessageItems). MessageItems defines two domain parties. One party uses the term car for a product. The other party uses the term vehicle for a product.

    Based on your selections in Steps 4 and 5, the page refreshes to display the following details:
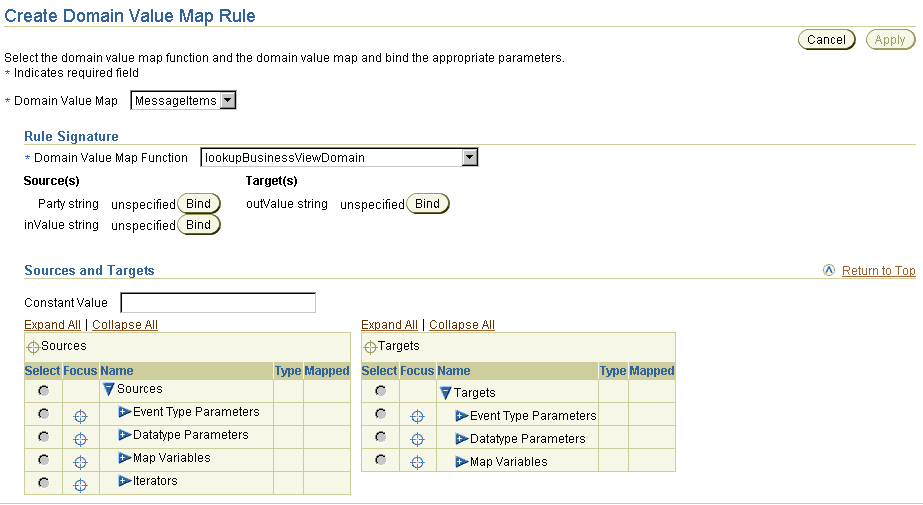
    Text description of create_dvm_rule.gif follows.

    Text description of the illustration create_dvm_rule.gif

  6. Enter AQ_A as the party name in the Constant Value field. The party name you enter is the domain party name you selected in "Adding a Domain Party".

  7. Click Bind for the source Party string.

  8. Click specific source and target items or click Expand All in both the Sources table and Targets table to display all selections.

  9. Select the source items bound to the source parameter of the datatype transformation map invoked from the rule. In this example, the following selections are made:

    1. Navigate within the Sources table to the Event Type Parameters.

    2. Navigate to the event type parameter MessageIn-IN.

    3. Navigate to the event body element MSG.

    4. Select the string ITEM.

    5. Click Bind for the source inValue string.

  10. Select the target item bound to the target parameter of the datatype transformation map invoked from the rule. In this example, the following selection is made:

    1. Navigate within the Targets table to the Event Type Parameters.

    2. Navigate to the event parameter MessageIn-In-OUT.

    3. Navigate to the event body element message.

    4. Select the string ITEM.

    5. Click Bind for the target outValue string.

    The following bindings appear.

    Text description of dvmr.gif follows.

    Text description of the illustration dvmr.gif

  11. Click Apply.

    The Transformation Map Details page displays the domain value map rule.

    Text description of details_dvm_rules.gif follows.

    Text description of the illustration details_dvm_rules.gif

Deleting a Domain Value Map Rule

Follow these instructions to delete a domain value map rule:

To delete a domain value map rule:

  1. Ensure that you followed the instructions in "Accessing Domain Value Map Rule Management Tasks" to access the page for deleting a domain value map rule.

  2. Click Yes when prompted to delete the domain value map rule.

    The domain value map rule is deleted and the Transformation Map Details page appears.

Updating a Domain Value Map Rule

Follow these instructions to update a domain value map rule:

To update a domain value map rule:

  1. Ensure that you followed the instructions in "Accessing Domain Value Map Rule Management Tasks" to access the page for updating a domain value map rule.

    The Update Domain Value Map Rule page appears.

  2. Make appropriate changes based on the domain value map rule selected. (See "Creating a Domain Value Map Rule" for a list of fields you can update.)

  3. Click Apply.

    The domain value map rule is updated and the Transformation Map Details page appears.

Domain Value Map Case Study: Changing Ad Vocabulary

This section provides an example of using domain value map rules, based on modeling metadata you created when using the tutorial in Chapter 7, "Tutorial of an Integration within an Enterprise". The tutorial uses different vocabulary to refer to an advertisement. For example, HR uses Ad, the global newspaper uses Advertisement, and the local newspaper uses Commercial. Domain value maps enable you to manage different vocabularies.

Creating Domain Columns

You first create three domain columns.

  1. Select Modeling > Transformations > Domain Value Maps.

  2. Click Create in the Domain Columns section.

  3. Enter HR Depts in the Name field.

  4. Select No from the Business Domain list.

  5. Click Apply.

  6. Click Add in the Domain Parties section.

  7. Select Human Resources from the list.

  8. Click Apply.

  9. Click Return to List.

  10. Click Create in the Domain Columns section.

  11. Enter NP Type1 in the Name field.

  12. Select No from the Business Domain list.

  13. Click Apply.

  14. Click Add in the Domain Parties section.

  15. Select Global Newspaper from the list.

  16. Click Apply.

  17. Click Return to List.

  18. Click Create in the Domain Columns section.

  19. Enter Common in the Name field.

  20. Select Yes from the Business Domain list.

  21. Click Apply.

Creating a Domain Value Map

  1. Select Modeling > Transformations > Domain Value Maps.

    The Domain Value Maps page appears, and displays the three domain columns you created.

    Text description of tcs_dvm.gif follows.

    Text description of the illustration tcs_dvm.gif

  2. Click Create in the Domain Value Maps section.

  3. Enter Ad Terminology in the Name field.

  4. Click Apply.

  5. Click Add in the Domain Value Map Columns section.

  6. Select HR Depts from the Domain Column list.

  7. Click Apply.

  8. Click Add in the Domain Value Map Columns section.

  9. Select NP Type1 from the Domain Column list.

  10. Click Apply.

  11. Click Add in the Domain Value Map Columns section.

  12. Select Common from the Domain Column list.

  13. Click Apply.

  14. Click Create in the Domain Value Map Rows section.

  15. Enter Ad in the HR Depts field.

  16. Enter Commercial in the Common field.

  17. Enter Advertisement in the NP Type1 field.

  18. Click Apply.

    The Domain Value Map Details page displays your selections.
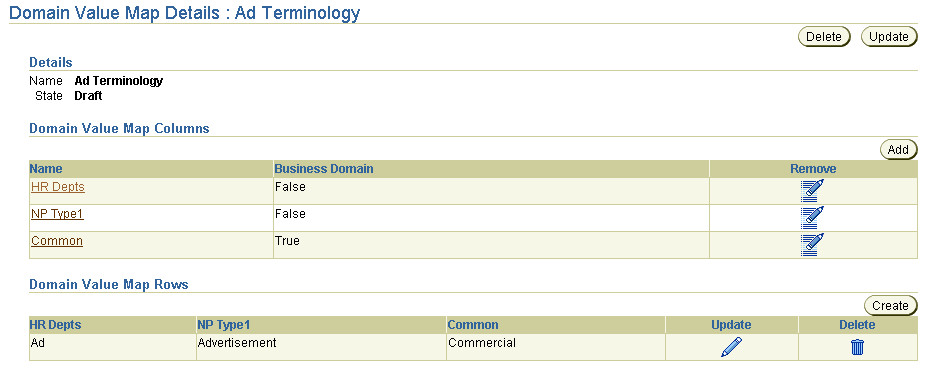
    Text description of tcs_dvm2.gif follows.

    Text description of the illustration tcs_dvm2.gif

Creating an Incoming Domain Value Map Rule

  1. Select Modeling > Transformations.

  2. Select HR Ad to Common View in the Name field.

  3. Select Domain Value Map Rule from the Statement Type list.

  4. Click Append.

  5. Select Ad Terminology from the Domain Value Map list.

  6. Select lookupBusinessViewDomain from the Domain Value Map Function list. The page refreshes.

  7. Click Expand All for both the Sources table and the Targets table.

  8. Select Content_Type in the Sources table.

  9. Click Bind for inValue string.

  10. Select Content_Type in the Targets table.

  11. Click Bind for outValue string.

  12. Enter Human Resources in the Constant Value field.

  13. Click Bind for Party string.

    The Rule Signature section displays your selections.

    Text description of tcs_dvm3.gif follows.

    Text description of the illustration tcs_dvm3.gif

  14. Click Apply.

    The domain value map rule statement displays at the bottom of the Statements list.
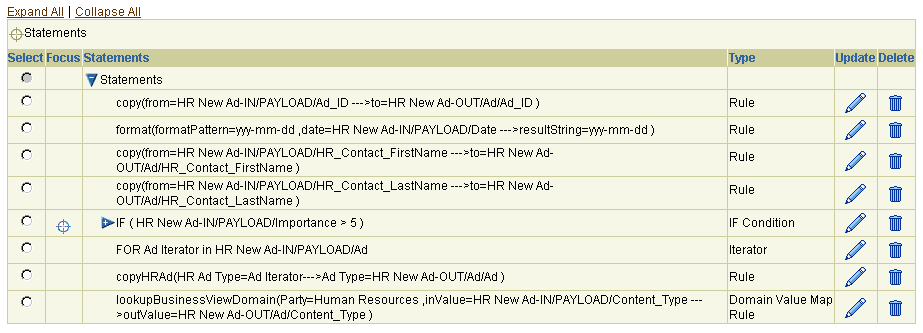
    Text description of tcs_dvm4.gif follows.

    Text description of the illustration tcs_dvm4.gif

Creating an Outgoing Domain Value Map Rule

  1. Select Modeling > Transformations.

  2. Select Common View to Global NP Ad in the Name field.

  3. Select Domain Value Map Rule in the Statement Type list.

  4. Click Append.

  5. Select Ad Terminology from the Domain Value Map list.

  6. Select lookupPartyDomain from the Domain Value Map Function list. The page refreshes.

  7. Click Expand All for both the Sources table and the Targets table.

  8. Select Content_Type in the Sources table.

  9. Click Bind for inValue string.

  10. Select Content_Type in the Targets table.

  11. Click Bind for outValue string.

  12. Enter Global Newspaper in the Constant Value field.

  13. Click Bind for Party string.

    The Rule Signature section displays your selections.

    Text description of tcs_dvm5.gif follows.

    Text description of the illustration tcs_dvm5.gif

  14. Click Apply.

    The domain value map rule statement displays at the bottom of the Statements list.
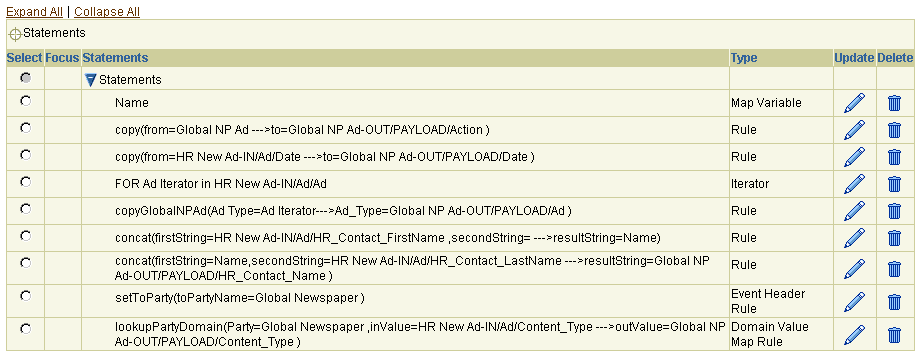
    Text description of tcs_dvm6.gif follows.

    Text description of the illustration tcs_dvm6.gif

Common User Errors

See Chapter 14, "Advanced Transformations Design" for details about user transformation design errors.

Chapter Summary

This chapter describes how you use transformations to reconcile the different structures and vocabularies used by the parties in an integration. Event and datatype transformation maps and domain value maps are defined. Management tasks for these map types are provided. Transformation statements, the logical statements to use when mapping the sources and targets of parties, are defined. Management tasks for transformation statements are also provided.

Case studies on using basic transformation rules, transformation conditions, event header rules, map variables, and domain value map rules are provided.


Go to previous page Go to next page
Oracle
Copyright © 2003 Oracle Corporation.

All Rights Reserved.
Go To Documentation Library
Home
Go To Product List
Solution Area
Go To Table Of Contents
Contents
Go To Index
Index