10g (9.0.4)
Part Number B12121-01
Home |
Solution Area |
Contents |
Index |
| Oracle® Application Server ProcessConnect User's Guide 10g (9.0.4) Part Number B12121-01 |
|
This chapter provides a simple tutorial on how to use the Oracle Application Server ProcessConnect user interface tool to design and deploy an integration within an enterprise.
This chapter contains these topics:
Chapter 3, "Oracle Application Server ProcessConnect Concepts" for details on terms used in this chapter
See Also:
This section provides an overview of this tutorial.
The tutorial describes the initial phase of a hiring process. Human resources must find candidates for a new position that is available within the company. The initial phase of this tutorial describes placing an ad in a newspaper. If there is a problem with placing an ad in the newspaper, a human resources person must be notified. Otherwise, human resources assumes the ad is successfully placed.
The scenario uses the following applications:
The Human Resources application places a file on the file system containing one or more ads. The file contains additional information indicating whether this is a new ad or a change request for an existing ad. In the case of multiple ads, all ads must be placed in the same newspaper.
The Global Newspaper application expects the Human Resources application to place an ad as a file on the file system. The newspaper always places a confirmation file back on the file system. The confirmation indicates whether the placement was successful or if there was a problem. Although this tutorial uses the file system, an alternative method can be used, such as using Web services or secure HTTP with a custom XML file.
If a problem occurs, human resources expects the problem to be placed as a file on the file system. Although this tutorial uses the file system, other methods can be used, such as using SMTP and sending an e-mail.
This tutorial is divided into two phases:
You perform the following tasks in this phase:
HR_Ad.xsd file to be delivered to the global newspaper. In this task, you create one interaction to read the ad placement request from the human resources file system and a second interaction to write the file to the global newspaper file system.
You perform the following tasks in this phase:
Chapter 13, "Managing Transformations" to model additional transformations that use the same example files as this tutorial
See Also:
The following .xsd files are provided in the $ORACLE_HOME/ip/import directory for the different applications used in this tutorial:
The following .xml files are also provided in the $ORACLE_HOME/ip/demo/tutorial directory:
Perform the following tasks:
.xsd files are in the import directory before starting this tutorial. The import directory is configured as a server property and can be modified through Oracle Enterprise Manager. The directory setting defaults to $ORACLE_HOME/ip/import (where $ORACLE_HOME is the middle-tier Oracle Application Server instance).
These files are also located at the back of this chapter.
tutorial anywhere you want (for example, $ORACLE_HOME/ip/tutorial)
tutorial.
.xml instance files in the tutorial directory:
There are several methods for designing the tutorial:
This tutorial does not follow one single method; it is a mix that provides many examples used by the different methods.
This phase of the tutorial describes how to design and deploy an integration (known as a configuration) between the Human Resources and Global Newspaper applications.
This section contains these topics:
This section contains the following tasks:
Create an application named Human Resources to send the inbound ad.
Human Resources in the Name field.
The Human Resources application is created and the Application Details : Human Resources page appears.
Add an adapter to the Human Resources application by selecting from a list of previously-configured adapters provided by Oracle Application Server ProcessConnect. This adapter provides the connectivity that enables the Human Resources application with its unique data formats and interface to communicate with Oracle Application Server ProcessConnect.
The Adapter Type Details page of the adapter appears.
Create a delivery channel for the adapter to use. The delivery channel describes the communication capabilities (such as message exchange and security details) of the specific adapter of the Human Resources application. Each adapter has its own unique delivery channel questions.
| Field | Enter/Select |
|---|---|
|
Name |
|
|
File or FTP mode |
File |
|
Polling interval in milliseconds (inbound) |
|
|
Base directory |
where
Note: Do not use the |
Validate the application to ensure the correctness of the profile data you entered.
If validation is successful, the Validate button name changes to Send for Approval. If validation is unsuccessful, error messages appear. Make corrections based on the error messages.
You can select an approver to approve the profile data of your application (for example, to ensure that the delivery channel details you specified are correct).
Your selection appears in the Approvers section of the Application Details: Human Resources page. The Send For Approval button is replaced with an Approve button and the Validated status that displays in the State field of the Details section is replaced with Pending Approval.
At this point, you can export the application details to an XML file for submittal to a person for approval. For this tutorial, this task is not performed. Instead, the profile data in this application is assumed to be approved by all persons.
You must approve the application.
Create a second application named Global Newspaper to receive the ad request and place a confirmation file back on the file system.
Global Newspaper in the Name field.
The Global Newspaper application is created and the Application Details: Global Newspaper page appears.
Add an adapter to the Global Newspaper application by selecting from a list of previously-configured adapters provided by Oracle Application Server ProcessConnect. This adapter provides the connectivity that enables the Global Newspaper application with its unique data formats and interface to communicate with Oracle Application Server ProcessConnect.
The Adapter Type Details page for the adapter appears.
Create a delivery channel for the adapter to use. The delivery channel describes the communication capabilities (such as message exchange and security details) of the specific adapter of the Global Newspaper application. Each adapter has its own unique delivery channel questions.
| Field | Enter/Select |
|---|---|
|
Name |
|
|
File or FTP mode |
File |
|
Polling interval in milliseconds (inbound) |
|
|
Base directory |
where
Note: Do not use the |
Validate the application to ensure the correctness of the profile data you entered.
If validation is successful, the Validate button name changes to Send for Approval. If validation is unsuccessful, error messages appear. Make corrections based on the error messages.
You can select an approver to approve the profile data of your application (for example, to ensure that the delivery channel details you specified are correct).
Your selection appears in the Approvers section of the Application Details: Global Newspaper page. The Send For Approval button is replaced with an Approve button and the Validated status that displays in the State field of the Details section is replaced with Pending Approval.
At this point, you can export the application profile data to a file for submittal to a person for approval. For this tutorial, this task is not performed. Instead, the profile data in this application is assumed to be approved by all persons.
You must approve the application.
This section contains the following tasks:
The following sections for additional details about tasks covered in this section:
See Also:
For the File/FTP adapter you added in "Adding an Adapter to the Human Resources Application" to read the file from an inbound directory, an inbound interaction must be defined. An interaction provides the adapter with the details to deliver and retrieve events to and from Oracle Application Server ProcessConnect. Interactions represent unique actions that can be performed with a specific adapter.
This task creates the interaction to read files with the extension xml from the human_resources directory (the subdirectory of tutorial that you specified in the delivery channel questions at Step 2). The questions that display onscreen are unique to the File/FTP adapter. The native format must be provided to describe the contents of the body element of the native event (that is, what comes in as an Oracle record from the adapter). Based on the native format, a number of extractors (and later also translators) are available. The extractor is used for event map and correlation.
| Field | Enter/Select |
|---|---|
|
Directory (relative path) for incoming files |
Note: You created this directory in Step 3 of "Preparations before Starting". Note also the relationship to the delivery channel directory you created in Step 2; |
|
Maximum number of files to read for each poll |
|
|
File extension for the incoming files - for example, txt * |
|
|
Note: Recheck your answers in Step 8 to ensure their correctness. Updating an interaction at a later time is difficult. |
"Updating the Interaction, Native Event, and Application Event" to update an interaction used with a business process
See Also:
The inbound ad request of the Human Resources application initially appears in its own unique native format that Oracle Application Server ProcessConnect cannot interpret. This native format can consist of several different parts, including headers, attachments, and payloads. The payload can identify details such as the person submitting the ad request, their phone number, the date, and so on.
The native format received by Oracle Application Server ProcessConnect is represented as an Oracle record on the Oracle Application Server ProcessConnect boundary. A native event is created from the Oracle record. A native event is the Oracle Application Server ProcessConnect internal implementation of the business data contained in an Oracle record. The different parts of the native format (such as the payload) are placed into different parts called body elements in a native event. In addition, the transmission structure of the native format is removed (such as encoding, packaging, signing, or encryption).
When you create a native event, you also specify a translator to translate the contents of the inbound native event into an inbound application event, which represents an interpretable syntactic format understood by Oracle Application Server ProcessConnect.
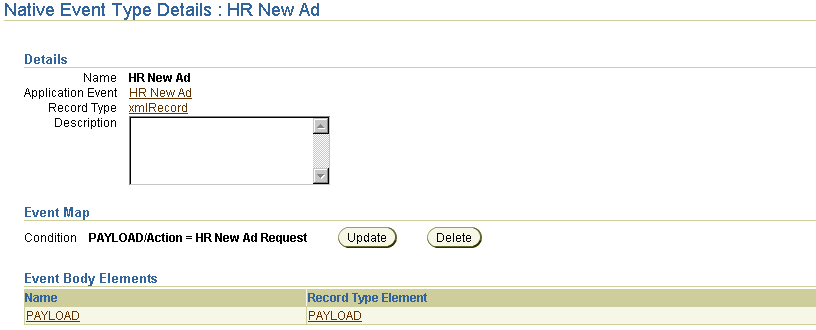
HR New Ad in the Name field of the Create Native Event Type page.
HR Ad in the Name field of the Native Datatype section.
Your selection appears in the Content field.
The native event and application event are created.
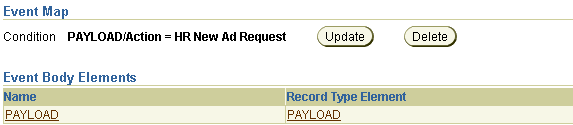
The steps you performed in this section took the inbound ad request in its native format, created a native event named HR New Ad, and placed the payload part of the native format into a native event body element (named PAYLOAD):
The steps you performed in this section translated the inbound native event into an inbound application event named HR New Ad and created an event body element (named PAYLOAD) for the payload part that includes the following application event datatypes. Application events contain no native formats. The particular native format of the Human Resources application cannot be identified, and any specific syntactic properties have been removed.
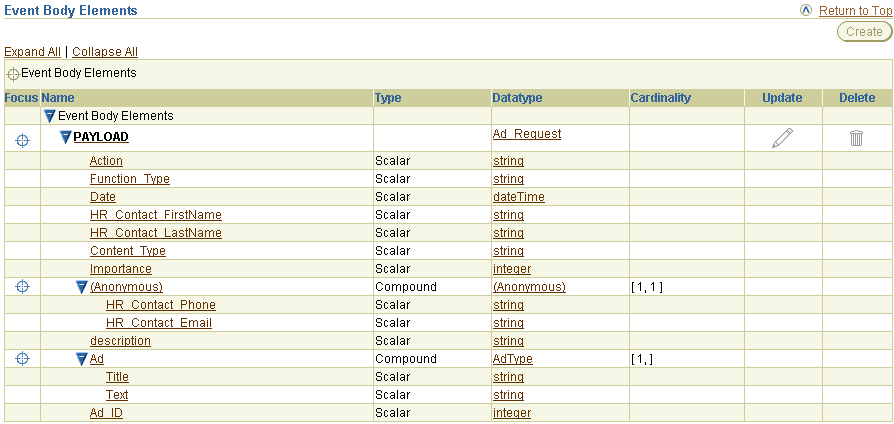
Remember these datatypes. Later in this tutorial in "Creating the Rules for the Inbound Event Transformation Map", you create a transformation rule to transform this source inbound application event and its application datatypes to a target inbound business event and its business datatypes.
Event maps determine the native event type for a specific record type from an interaction. In this tutorial, the File/FTP adapter reads any file with an .xml extension.
HR New Ad Request in the Constant Value field.
For the File/FTP adapter you added in "Adding an Adapter to the Global Newspaper Application" to write the file to an outbound directory, an outbound interaction must also be defined.
This task creates the outbound interaction to write an ad_%TIME%.xml file to the outbound directory.
| Field | Enter/Select |
|---|---|
|
Directory (relative path) for incoming files |
Note: You created this directory in Step 3 of "Preparations before Starting". Note also the relationship to the delivery channel directory you created in Step 2; |
|
Staging directory (relative path) for outgoing files |
Leave this field blank. |
|
File naming convention for outgoing files (without extension) - for example, po_%TIME% |
|
|
File extension for the incoming files - for example, txt * |
|
|
Note: Recheck your answers in Step 8 to ensure their correctness. Updating an interaction at a later time is difficult. |
You must also create a native event and specify a translator to translate the outbound application event to an outbound native event. This is similar to what you did for the Human Resources application in "Creating the Native Event, Translation, and Application Event for the Human Resources Application". The only difference is that it operates in the outbound direction.
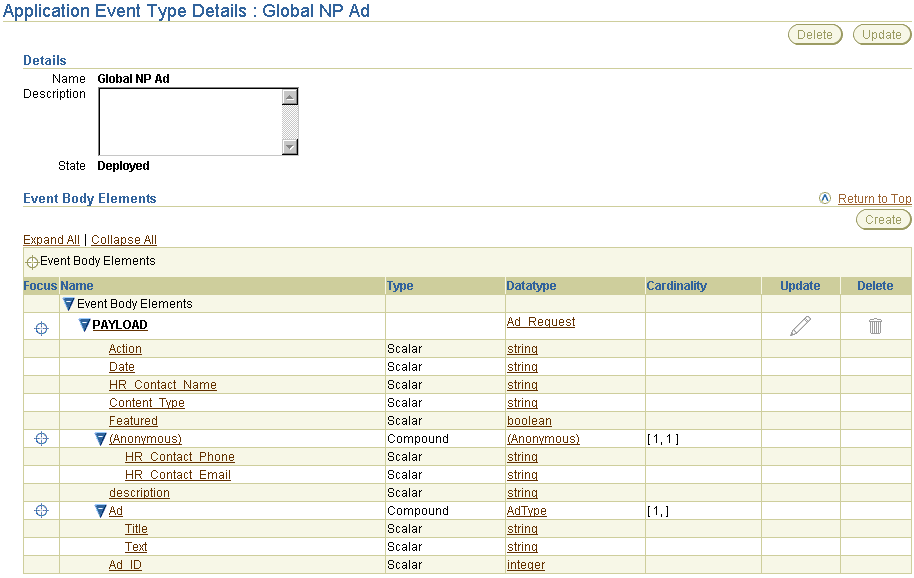
Global NP Ad in the Name field of the Create Native Event Type page.
Global NP Ad in the Name field.
Your selection appears in the Content field.
The native and application events are created.
The Native Event Type Details page appears:
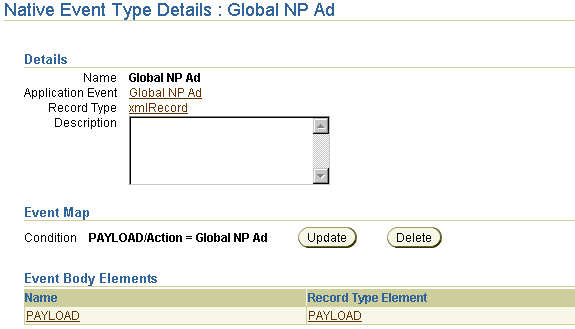
The steps you performed in this section translated the outbound application event and its event body element of application event datatypes into an outbound native event with an event body element for the payload (named PAYLOAD).
Remember these datatypes. Later in this tutorial in "Creating the Rules for the Outbound Event Transformation Map", you create a transformation rule to transform the outbound business event and its business datatypes to an outbound application event and its application datatypes.
At this point the Human Resources application includes its own inbound native event, translator, application event, and event body elements of datatypes. The Global Newspaper application includes its own outbound native event, translator, application event, and event body elements of datatypes.
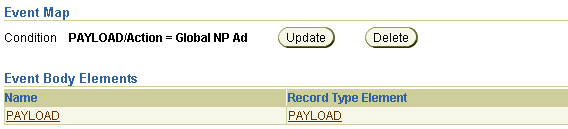
Event maps determine the native event type for a specific record type from an interaction.
Global NP Ad in the Constant Value field.
The event map condition displays in the Event Map section.
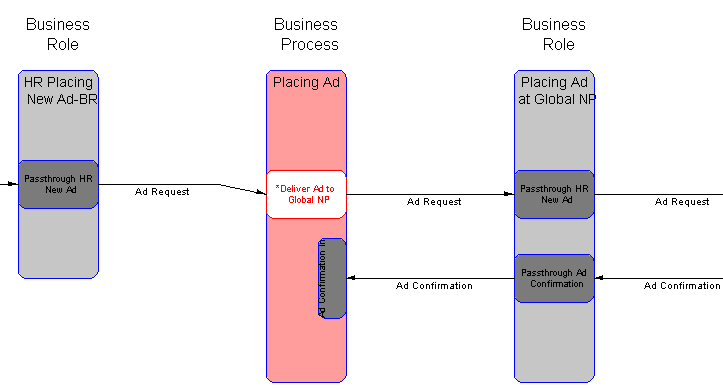
For the events you have created to move through and be executed by Oracle Application Server ProcessConnect, you must create roles, a business process, and other modeling metadata. Roles define how events are executed and implement the behavior of the Human Resources and Global Newspaper applications (known as the parties), and the entire integration. The business process spans both applications to coordinate the sending and receiving of events. This management ensures that the Human Resources and Global Newspaper applications send and receive the correct data. Business processes also hide the unique characteristics of the Human Resources and Global Newspaper applications from the integration.
Use the modeling wizard to create the modeling metadata, including the following:
Follow these procedures to create this modeling metadata:
Placing Ad in the Business Process field.
HR Placing New Ad in the Role Naming Convention field as the naming convention to use for inbound roles.
Placing Ad at Global NP in the Role Naming Convention field as the naming convention to use for outbound roles.
inbound directory of the Human Resources application.
outbound directory.
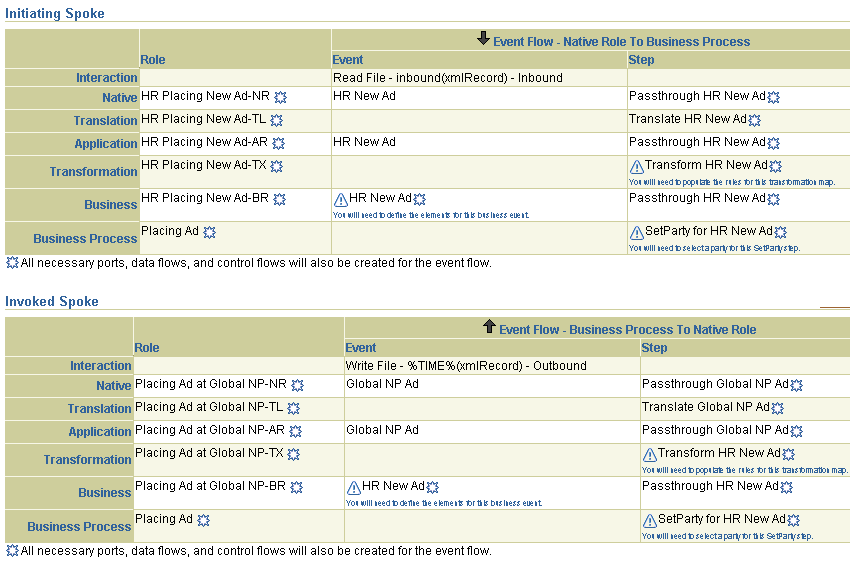
The following messages appear to remind you of tasks to perform after running the modeling wizards.
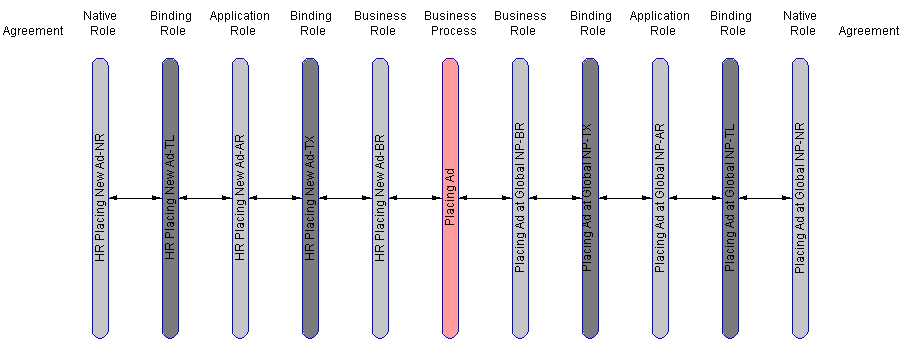
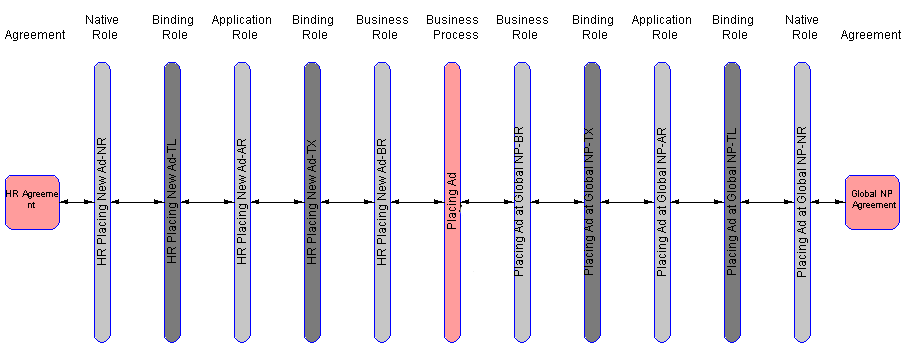
The Event Flow Diagram displays after the modeling wizard has completed. This diagram shows the events moving through the various roles of your integration. (See the following portion of the event flow diagram.) The Event Flow Diagram displays after the modeling wizard has completed. This diagram shows the events moving through the various roles of your integration.
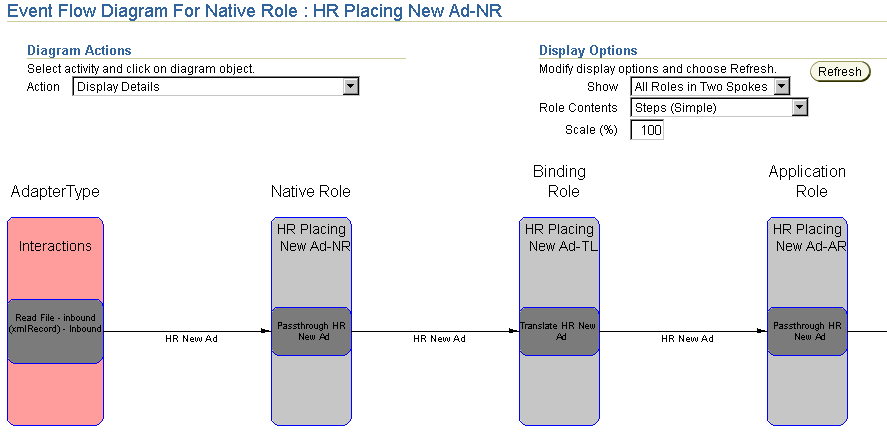
Note that the word Agreement displays in two places. The one on the left is for the Human Resources application and the one on the right is for the Global Newspaper application. After you create agreements for both the Human Resources and Global Newspaper applications (described later in this tutorial), an icon appears beneath each. When you click one of these icons, the details page appears for that application agreement.
The different datatypes of the Human Resources and Global Newspaper applications that you created earlier must be represented as a single, common set of business datatypes to communicate with Oracle Application Server ProcessConnect and participate in integrations. You can manually create business datatypes or import XSD native formats of datatypes into Oracle Application Server ProcessConnect. In this section of the tutorial, you import these datatypes. As an alternative, you can also manually create datatypes by following the instructions in "Manually Creating the Business Datatypes".
You later add these datatypes to the event body element that you create in "Creating the Business Event Body Element".
The Business Datatypes page appears.
Ad_Request in the field to the right.
The Ad_Request business datatype appears in the Name column.
The modeling wizard you ran in "Creating the Modeling Metadata with the Modeling Wizards" created a business event with no event body element. The business event establishes a common event structure and event vocabulary across the Human Resources and Global Newspaper applications. Business events are completely removed from any Human Resources or Global Newspaper application-specific properties, including data structure and vocabulary. All related events from both applications follow the same structure and the same vocabulary once they are translated and transformed into business events.
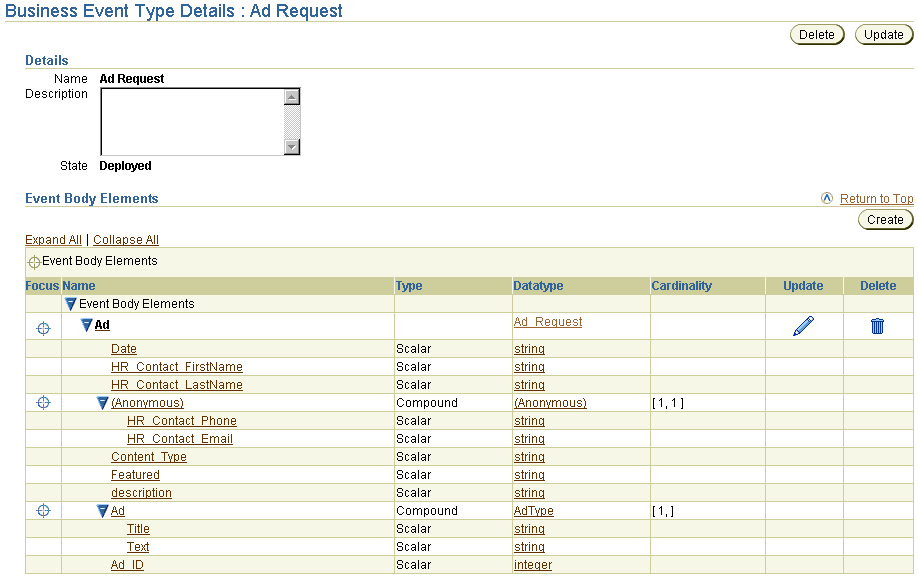
The event body element of the business event must contain a complete set of business data (for this tutorial, the business event datatypes created in "Creating the Business Event Datatypes"). You must create an event body element inside this business event that contains the business event datatypes created in "Creating the Business Event Datatypes".
Ad in the Name field.
Your selection appears in the Name field.
The Ad event body element is created and the datatypes imported in "Creating the Business Event Datatypes" are added to this Ad event body element.
Both the incoming business role and outgoing business role contain this single, common business event and event body element of business datatypes. You use these business datatypes later in this tutorial to create the following transformation rules:
At this point, the Human Resources and Global Newspaper applications include their own native events, translators, application events, business events, and event body elements of datatypes.
The Human Resources and Global Newspaper applications use different vocabulary in their messages. This creates a vocabulary mismatch. Transformation enables you to standardize on the vocabulary used by both applications in an integration and establish a common structure and vocabulary. To establish this common vocabulary, you must create transformation rules. Transformation rules describe how to transform one data item to another (in this section, from the Human Resources application's inbound source application event and its application datatypes to an inbound target business event and its business datatypes).
When you ran the modeling wizard in "Creating the Modeling Metadata with the Modeling Wizards", an inbound event transformation map was created with no defined rules. In this section, you define the transformation rules so that a common vocabulary can be established. First, you rename the event transformation map to a more meaningful name.
The Transformation Map Details page appears as follows with the selections you made in Steps 8 through 9.
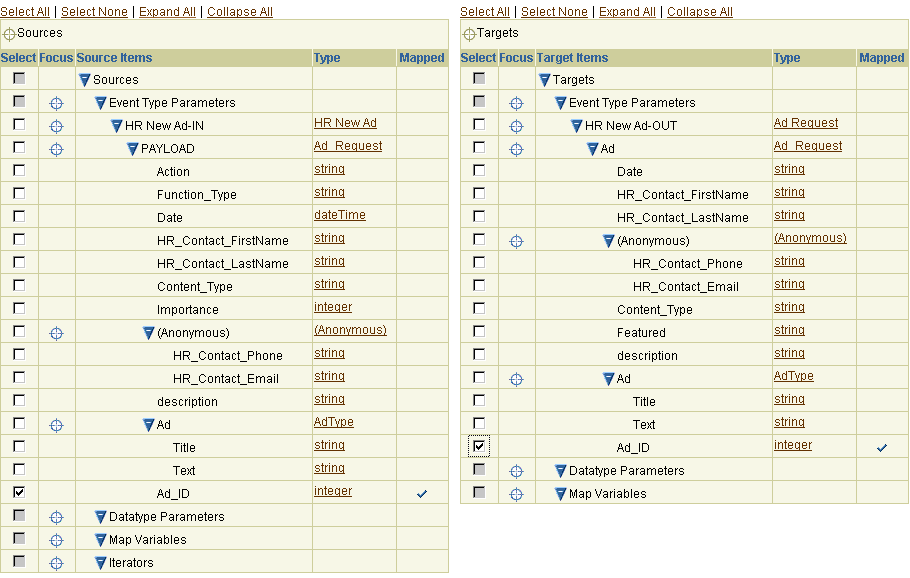
This maps the vocabulary of the source inbound application event to the vocabulary of the target inbound business event. The rule you created displays in the Statements section of this page.

|
See Also:
"Transformation Statements Overview" for additional examples of event transformation mapping |
When you ran the modeling wizard in "Creating the Modeling Metadata with the Modeling Wizards", an outbound event transformation map was also created with no defined rules. In this section, you create transformation rules for the Global Newspaper application's outbound source business event and its business datatypes to the outbound target application event and its application datatypes.
This maps the vocabulary of the outbound source business event to the vocabulary of the outbound target application event. The rule you created displays in the Statements section of this page.

Global NP Ad in the Constant Value field.
Events are sent to and from the Human Resources and Global Newspaper applications. To ensure that events are sent through the correct roles and arrive at the correct party address, you must update the destination party (in this tutorial, the Global Newspaper application) inside the SetParty step. The modeling wizard automatically created a SetParty step in the business process in "Creating the Modeling Metadata with the Modeling Wizards".
This section contains the following tasks:
Chapter 15, "Managing Applications and Application Agreements" for additional details about creating application agreements, adding delivery channels and native roles to application agreements, validating application agreements, and sending agreements for approval
See Also:
To participate in an integration, electronic agreements for the Human Resource and Global Newspaper applications must be created. Create one agreement for each application. You also select a native role and delivery channel to use in each agreement. Approvers representing both the Human Resources and Global Newspaper applications must review the contents of these agreements and approve them before they can be deployed in an integration.
Create the application agreement for the Human Resources application.
| In this Field... | Enter/Select |
|---|---|
|
Name |
|
|
Agreement Id |
|
|
Effective From Date |
Leave this field blank |
|
Effective To Date |
Leave this field blank |
|
Application Participant |
|
Add the delivery channel that describes the communication capabilities (such as message exchange and security details) of the adapter for the Human Resources application. You created this delivery channel in "Creating the Delivery Channel for the Human Resources Application Adapter".
Add the native role of the Human Resources application to the agreement. The native role implements the behavior of the Human Resources application agreement. You created this native role with the modeling wizard in Step 7 of "Creating the Modeling Metadata with the Modeling Wizards".
If validation is successful, the Validate button is replaced with a Send For Approval button and the Draft status that displays in the State field of the Details section is replaced with Validated.
The agreement can be approved by specific persons before it can be deployed in an integration. Approval typically involves assigning these persons as approvers in the Oracle Application Server ProcessConnect user interface tool and exporting the contents of the agreement to an XML file for submittal to these approvers for review. For this tutorial, you do not perform Steps 5 and 6 in this section, during which the XML file is submitted for approval.
Your selection appears in the Approvers section of the Application Details: Human Resources page. The Send For Approval button is replaced with an Approve button and the Validated status that displays in the State field of the Details section is replaced with Pending Approval.
Create the application agreement for the Global Newspaper application.
| In this Field... | Enter... |
|---|---|
|
Name |
|
|
Agreement Id |
|
|
Effective From Date |
Leave this field blank |
|
Effective To Date |
Leave this field blank |
|
Application Participant |
|
Add the delivery channel that describes the communication capabilities (such as message exchange and security details) of the adapter for the Global Newspaper application. You created this delivery channel in "Creating the Delivery Channel for the Global Newspaper Application Adapter".
Add the native role of the Global Newspaper application to the agreement. You created this native role with the modeling wizard in Step 10 of "Creating the Modeling Metadata with the Modeling Wizards".
If validation is successful, the Validate button is replaced with a Send For Approval button and the Draft status that displays in the State field of the Details section is replaced with Validated.
You can select an approver to approve the profile data of your agreement. For this tutorial, you do not perform Steps 5 and 6 in this section, during which the XML file is submitted for approval.
Your selection appears in the Approvers section of the Application Details: Global Newspaper page. The Send For Approval button is replaced with an Approve button and the Validated status that displays in the State field of the Details section is replaced with Pending Approval.
Note that both agreements now display as icons in the Integration Diagram. You can click either agreement to display the agreement details page for that application.
You are now ready to deploy your integration between the Human Resources and Global Newspaper applications. Deployment first involves creating a feature known as a configuration that includes the integration you designed in this tutorial. This configuration is then validated to ensure that your integration is correct and consistent. If validation is successful, the configuration is created. You can then deploy the configuration from the design-time repository to the runtime repository. If validation is unsuccessful, error messages appear that describe what must be corrected.
Placing Ad Phase A as the configuration name.
Creation and validation of configuration Placing Ad successful
The Deploy button is now enabled.
If validation is not successful, correct the errors and click Return To Deployment to retry configuration creation.
The business intelligence (BI) level indicates how much the deployment tries to optimize the runtime configuration for performance. Low BI provides the fastest possible performance, but does not log complete information during runtime. This impacts the reports you can later create. High BI provides the most details for reports and troubleshooting.
If deployment is successful, the configuration is deployed from the design-time repository to the runtime repository and the following message appears:
Deployment finished successfully for configuration Placing Ad Phase A
It is now time to test the results of the integration.
HR_Ad.xml file to the /start_at_root/ip/tutorial/human_resources/inbound directory. Note that this directory is a combination of the answers you provided to the Human Resources application delivery channel and interaction questions earlier in this tutorial.
This directory is polled by the File/FTP adapter every 10 seconds, as you specified in Step 2. The file is read and deleted from the directory, but only when the native event instance is successfully created. The result file %TIME%.xml is found in the /start_at_root/ip/tutorial/global_newspaper/outbound directory. Note that this directory is a combination of the answers you provided to the Global Newspaper application delivery channel and interaction questions earlier in this tutorial.
If the HR_Ad.xml file is not deleted, perform the following troubleshooting tasks:
HR_Ad.xml file. In this tutorial, the directories are as follows:
AIP (the prefix for error message codes).
If the file is deleted, but no results file appears:
%TIME%.xml file. In this tutorial, the directories are as follows:
Create a report to determine if the event is stuck in the integration manager or the adapter framework:
completed (you must do this for each event type). The future plan is for coordination reports to show this end-to-end.
After installation, the adapter framework and integration manager are automatically started with default logging. To view errors in, for example, translation or transformation, the logging must be set to debug. This can be done in Oracle Enterprise Manager as follows:
error to debug. You typically do not need to restart the adapter framework and integration manger (but do it anyhow).
AIP.
AIP.
Verify that all agreements and applications are approved. You do this by looking at the details of each application and agreement and verifying that none of the following buttons are present:
If any of these buttons are present, click it and follow the steps in "Task 3: Creating the Agreements" to approve the application or agreement.
Verify that all agreements have a native role defined. Do this by looking at the details of each agreement and verifying that the correct native role is listed for that particular agreement.
If you created the business datatypes by hand, verify that you did not use the space (" ") character. To view the business datatypes of your configuration, select each business event and click Expand All in the Event Body Elements section.
Verify that data flow groups are created only between roles that can have data flows between them. For example, a translation binding role can only have data flows to either native roles or application roles. Verify this by clicking the integration diagram for each modeled business process.
|
See Also:
"Updating the Interaction, Native Event, and Application Event" if you must update an application event with a different XSD |
You can also manually model portions of an integration. Up to this point, the tutorial has only used the wizard to generate the metadata for data flow and control flow. Data flows connect step ports and role ports of native, application, and business roles. Control flows between steps indicate the execution order of steps. Control flows connect directly to steps and do not use step ports.
The Create End-to-End Basic Integration wizard generated all the roles, the business process, the ports, the data flows, the control flows, the event types (without the body elements), and the transformation maps (without the rules). In this task, you enhance the existing business process by adding a conditional step and a transformation step. The scenario is as follows: a confirmation comes back from a newspaper. If the confirmation is positive, the business process can finish. If there is an error, human resources must be notified. The transformation step is chosen here simply to show that transformations can also be used in the business process and not only in transformation binding roles. All of the following phases must be completed before a new configuration can be created, deployed, and tested.
This section contains these topics:
Before beginning, it is helpful to create the business event(s) you want to model in the business process. It is possible to model the data flows in the business process without the business events, but it becomes harder to read because no event names can be displayed. The business event(s) can be created without any body element and thus without importing or creating any datatypes at this time.
You use the same XSD file in this example to define the business datatypes for the business event body element as you use to define the application datatypes.
Ad Confirmation in the Name field.
Confirmation in the Name field.
This creates the body element and its datatypes for the Ad Confirmation business event. This business event is sent if the ad request placement is successful.
Ad Problem in the Name field.
Problem in the Name field.
This creates the body element and its datatypes for the Ad Problem business event. This business event is sent if there is a problem with the ad request placement.
In this tutorial, you notify human resources only if there is a problem with the ad placement. If there is no problem, human resources assumes that everything is well. To satisfy these two conditions, you must insert a condition step. A condition step evaluates a specific condition on an event type or datatype. This step is associated with a condition expression. After the condition expression is evaluated, one of the outgoing control flows (either true or false) is executed. In this tutorial, the condition step checks the confirmation event from the newspaper and either ends the process (if placement is successful) or notifies human resources (if a problem occurs).
Condition expressions enable you to define that a specific action be performed in a condition step based on the result of an expression. The conditional expression can either be created after the step is modeled or before as preparation for later use. In this tutorial, you create the expression now so that it is available for selection when you create the conditional step.
Ad Placement Confirmed? in the Name field.
Ad Confirmation in the Name field.
yes in the Constant field.
Ad Placement Confirmed? in the Name field.
This task creates the notification event for human resources in case there is a problem. Again, the transformation step is used mainly to demonstrate that transformation steps can be used in the business process to generate new event types (that is, not only in the transformation binding roles). As an alternative, you can also use a pass-through step and perform the transformation in one of the transformation steps in the roles.
As with the conditional step, the event transformation map can either be created before creating the step in the business process or at a later time. In this tutorial, you create the map first, because you must define it in the step.
Ad Confirmation to Ad Problem in the Name field.
Ad Confirmation in the Name field of the Source section.
Ad Problem in the Name field of the Target section.
The rule is added to the Statements section.
The rule is added to the Statements section.
Notify HR Person in the Name field.
Each step is executed when all control flows and data flows reach it. In this example, the End step is only executed when both control flows reach it. Since this is not the behavior you want, you must create an Or step. An Or step waits for at least one incoming control flow. The step is executed as soon as one of the incoming control flows is executed.
OR in the Name field.
The Or step waits for at least one incoming control flow. The step is executed as soon as one of the incoming control flows is executed.
The Ad Problem business event must be delivered from the Notify HR Person transformation step out of the business process. To do this, a role port must be created. Role ports define the interfaces for a business process (or role), allowing for re-use.
Ad Problem Out in the Name field.
Two of the steps you created require the same business event. The Ad Placement Confirmed? conditional step and the Notify HR Person transformation step each require the Ad Confirmation business event. The way to model both steps that require the same event type is to use a split step. A split step makes multiple copies of the same event type and passes them to each step with which it is linked.
SPLIT in the Name field.
Ad Confirmation In in the Name field.
When there is a data flow between two steps, the control flow is implicit. This makes the control flow between the SPLIT step and the Ad Placement Confirmed? step redundant.
This section describes how to use the Add Event Flow wizard to add an additional event flow to one of the existing spokes you initially created with the End-to-End Basic Integration wizard in "Task 2: Creating the Modeling Metadata". An event flow is the complete path a single event takes through a spoke. A spoke consists of a role set extending from the native role to the business process. Role ports and data flow connect the role set together.
This section contains these topics:
This task creates the third native event for the integration scenario. The global newspaper delivers a confirmation to Oracle Application Server ProcessConnect. The confirmation tells whether or not the ad is placed.
Global NP Confirmation in the Name field.
Global NP Confirmation in the Name field.
The native event you created is the second one to use the Read File - inbound(xmlRecord - Inbound) interaction (HR New Ad was the first one). Therefore, you must specify a condition expression to determine which native event to create for the different records passed.
Global NP Ad Confirmation in the Constant Value field.
When the global newspaper confirmations are received back from the newspaper, each one must be correlated to the correct ad placement request for which it is a confirmation. Events are correlated either on the presence of a certain datatype or on the content of a datatype. In this case, you correlate the confirmation to the ad based on the Ad_ID datatype.
The Add Event Flow wizard adds an additional event flow to a single, existing spoke. In this case, you add the event flow to the spoke extending from the Placing Ad at Global NP-NR native role to the Placing Ad business process. This is one of the two spokes you initially created with the End-to-End Basic Integration wizard in "Creating the Modeling Metadata with the Modeling Wizards".
Global NP Confirmation to CV.
The Event Flow Diagram appears with the second event flow added to the existing spoke. The following portion of this diagram is shown.
The statement appears in the Statements section.
The statement appears in the Statements section.
The statement appears in the Statements section.
In this phase, you deliver the Ad Problem business event to human resources. You can use the same spoke to model the problem event back to the human resources system. In this tutorial, however, you create a separate spoke (just imagine that you received the request for an ad placement from a human resources application, but want to send the confirmation using e-mail). The spokes are different, because the human resources application behaves differently from the e-mail system. Again, just imagine, because in this tutorial you only use the File/FTP adapter.
You must also create a native event and specify a translator to translate the outbound application event to an outbound native event.
HR Problem in the Name field.
HR Problem in the Name field.
Because this is the second native event to use the Write File %TIME%(xmlRecord) - Outbound interaction, you must create an event map.
HR Problem in the Constant Value field.
In this section, you use the Create Spoke wizard to add a spoke to the existing set of roles, business process, transformation maps, and business event you initially created with the End-to-End Basic Integration wizard in "Creating the Modeling Metadata with the Modeling Wizards".
Delivering E-Mail in the Role Naming Convention field.
CV to HR Ad Problem.
The statement appears in the Statements section.
HR Problem in the Constant Value field.
The statement appears in the Statements section.
The statement appears in the Statements section.
In "Selecting the Destination Party in the SetParty Step", you selected the destination party with whom to integrate in the SetParty step of the business process. In this task, you specify the destination party through an alternative method. You set the destination party as part of the event transformation map by using the setToParty event header rule.
HR Person in the Constant Value field.
This section describes how to create the HR Person application and agreement.
This section contains these topics:
This task creates a third application, also using the File/FTP adapter and using a directory called hr_person.
HR Person in the Name field.
Create a delivery channel for the adapter to use.
In this task, you create an application agreement that enables the Human Resource Person application to participate in an integration.
| In this Field... | Enter... |
|---|---|
|
Name |
|
|
Agreement Id |
|
|
Effective From Date |
Leave this field blank |
|
Effective To Date |
Leave this field blank |
|
Application Participant |
|
Placing Ad Phase B as the configuration name.
Perform the following steps:
HR_Ad.xml file in the /start_at_root/ip/tutorial/human_resources/inbound directory.
ad_%TIME%.xml is in the /start_at_root/ip/tutorial/global_newspaper/outbound directory.
Global_NP_AdConfirmation.xml in the /start_at_root/ip/tutorial/global_newspaper/inbound directory. This directory is polled by the File/FTP adapter every 10 seconds. The file is read and deleted from the directory, but only when the native event is successfully created.
The ad%TIME%.xml results file is found in the /start_at_root/ip/tutorial/hr_person/outbound directory.
This section demonstrates how business datatypes can be manually created instead of through import of an XSD file.
This section contains these topics:
AdType in the Name field.
Title in the Name field.
Text in the Name field.
The new datatype members for the AdType complex datatype appear.

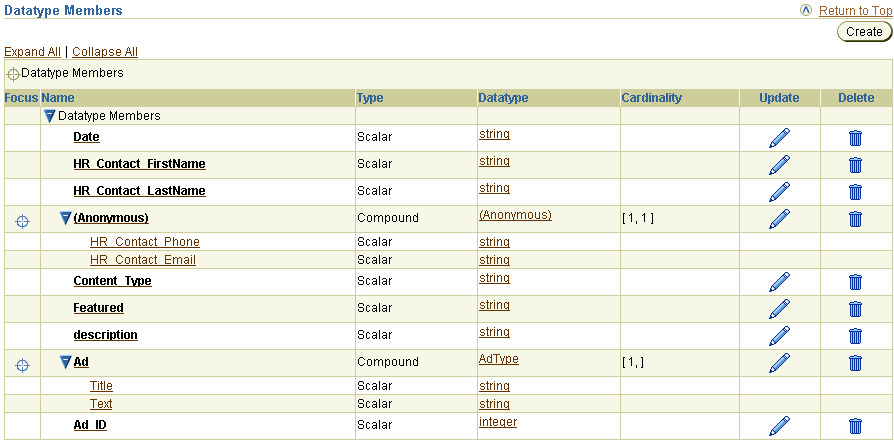
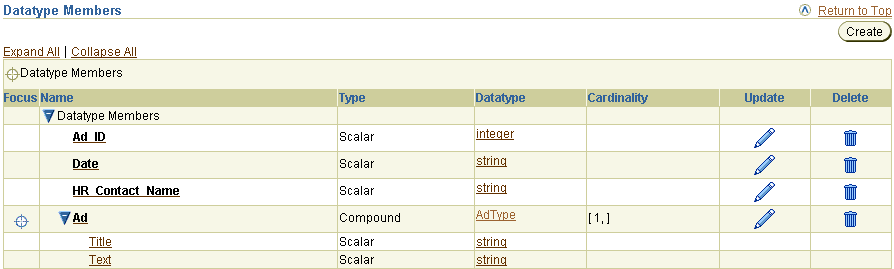
Ad_Request in the Name field.
Ad_ID in the Name field.
Date in the Name field.
HR_Contact_Name in the Name field.
Ad in the Name field.
1 in the Minimum field of the Cardinality section.
The new datatype members for the Ad_Request complex datatype appear.
You can then include these datatypes in a body element of a business event and in event transformation map statements.
To update an application event (and its corresponding native event), it must first be deleted and then created again. The translator creates the application event based on the record type of a native event. If you use the XSD translator, the application event datatypes are created based on the XSD file provided during the creation of the native event. Before an application event can be deleted, all integration metadata referring to it must no longer do so. For example, when the application event is used in an application role port, the role port must be updated to no longer use that application event. Another example is the transformation. When the application event is used in an event transformation map as a source or target, it must be removed first. The easiest method is to delete the complete spoke before deleting the application event. This works best if the spoke only has a few pass-through steps for handling event flows.
This task demonstrates how to update the HR New Ad application event and delete the HR Placing New Ad spoke after completing phase A of the tutorial (that is, the HR Problem event is not yet modeled).
HR New Ad in the Name field.
HR Ad in the Name field.
HR Placing New Ad in the Role Naming Convention field.
HR Ad to Common View.
This tutorial uses the following files:
This is the file you selected in Step 6 of "Creating the Native Event, Translation, and Application Event for the Human Resources Application" and in Step 13 of "Task 4: Creating a Native Event".
<?xml version="1.0"?>
<xs:schema targetNamespace="http://www.oracle.com/human_resources"
xmlns:xs="http://www.w3.org/2001/XMLSchema" xmlns="http://www.oracle.com/human_
resources" elementFormDefault="unqualified" attributeFormDefault="unqualified">
   <xs:element name="Ad_Request">
      <xs:annotation>
         <xs:documentation>Comment describing your root element</xs:documentation>
      </xs:annotation>
      <xs:complexType>
         <xs:sequence>
            <xs:element name="Action" type="xs:string"/>
            <xs:element name="Function_Type" type="xs:string"/>
            <xs:element name="Date" type="xs:dateTime"/>
            <xs:element name="HR_Contact_FirstName" type="xs:string"/>
            <xs:element name="HR_Contact_LastName" type="xs:string"/>
            <xs:choice>
               <xs:element name="phone" type="xs:string"/>
               <xs:element name="email" type="xs:string"/>
            </xs:choice>
            <xs:element name="description" type="xs:string" minOccurs="0"/>
            <xs:element name="Ad" type="AdType" maxOccurs="unbounded"/>
         </xs:sequence>
         <xs:attribute name="Ad_ID" type="xs:integer"/>
      </xs:complexType>
   </xs:element>
   <xs:complexType name="AdType">
      <xs:sequence>
         <xs:element name="Title" type="xs:string"/>
         <xs:element name="Text" type="xs:string"/>
      </xs:sequence>
   </xs:complexType>
</xs:schema>
This is the file you selected in Step 7 of "Creating the Native Event, Translation, and Application Event for the Global Newspaper Application".
<?xml version="1.0"?>
<xs:schema targetNamespace="http://www.oracle.com/global_newspaper"
xmlns:xs="http://www.w3.org/2001/XMLSchema" xmlns="http://www.oracle.com/global_
newspaper" elementFormDefault="unqualified" attributeFormDefault="unqualified">
   <xs:element name="Ad_Request">
      <xs:annotation>
         <xs:documentation>Ad placement request definition required by global
newspaper</xs:documentation>
      </xs:annotation>
      <xs:complexType>
         <xs:sequence>
            <xs:element name="Action" type="xs:string"/>
            <xs:element name="Date" type="xs:string"/>
            <xs:element name="HR_Contact_Name" type="xs:string"/>
            <xs:element name="Content_Type" type="xs:string"/>
            <xs:element name="Featured" type="xs:boolean"/>
            <xs:choice>
               <xs:element name=" HR_Contact_Phone" type="xs:string"/>
               <xs:element name=" HR_Contact_Email" type="xs:string"/>
            </xs:choice>
            <xs:element name="description" type="xs:string" minOccurs="0"/>
            <xs:element name="Ad" type="AdType" maxOccurs="unbounded"/>
         </xs:sequence>
         <xs:attribute name="Ad_ID" type="xs:integer"/>
      </xs:complexType>
   </xs:element>
   <xs:complexType name="AdType">
      <xs:sequence>
         <xs:element name="Title" type="xs:string"/>
         <xs:element name="Text" type="xs:string"/>
      </xs:sequence>
   </xs:complexType>
</xs:schema>
This is the file you selected in Step 4 of "Creating the Business Event Datatypes".
<?xml version="1.0"?>
<xs:schema xmlns:xs="http://www.w3.org/2001/XMLSchema"
elementFormDefault="unqualified" attributeFormDefault="unqualified">
   <xs:element name="Ad_Request">
      <xs:annotation>
         <xs:documentation>Comment describing your root element</xs:documentation>
      </xs:annotation>
      <xs:complexType>
         <xs:sequence>
            <xs:element name="Ad_ID" type="xs:integer"/>
            <xs:element name="Date" type="xs:string"/>
            <xs:element name="HR_Contact_Name" type="xs:string"/>
            <xs:element name="Ad" type="AdType" maxOccurs="unbounded"/>
         </xs:sequence>
      </xs:complexType>
   </xs:element>
   <xs:complexType name="AdType">
      <xs:sequence>
         <xs:element name="Title" type="xs:string"/>
         <xs:element name="Text" type="xs:string"/>
      </xs:sequence>
   </xs:complexType>
</xs:schema>
This is the file you selected in Step 4 of "Importing the Business Event Datatypes from an XSD File" and in Step 13 of "Task 1: Creating a Native Event for an Existing Interaction".
<?xml version="1.0"?>
<xs:schema targetNamespace="http://www.oracle.com/global_newspaper"
xmlns:xs="http://www.w3.org/2001/XMLSchema" xmlns="http://www.oracle.com/global_
newspaper" elementFormDefault="unqualified" attributeFormDefault="unqualified">
   <xs:element name="Confirmation">
      <xs:annotation>
         <xs:documentation>Comment describing your root element</xs:documentation>
      </xs:annotation>
      <xs:complexType>
         <xs:sequence>
            <xs:element name="Ad_ID" type="xs:integer"/>
            <xs:element name="Action" type="xs:string"/>
            <xs:element name="Confirmed" type="xs:string"/>
            <xs:element name="Problem_Details" type="xs:string"/>
         </xs:sequence>
      </xs:complexType>
   </xs:element>
</xs:schema>
This is the file you selected in Step 4 of "Importing the Business Event Datatypes from an XSD File".
<?xml version="1.0"?>
<xs:schema targetNamespace="http://www.oracle.com/human_resources"
xmlns:xs="http://www.w3.org/2001/XMLSchema"
xmlns:hr="http://www.oracle.com/human_resources"
elementFormDefault="unqualified" attributeFormDefault="unqualified">
   <xs:element name="Problem">
      <xs:annotation>
         <xs:documentation>Comment describing your root element</xs:documentation>
      </xs:annotation>
      <xs:complexType>
         <xs:sequence>
            <xs:element name="Ad_ID" type="xs:integer"/>
            <xs:element name="Action" type="xs:string"/>
            <xs:element name="Problem_Description" type="xs:string"/>
         </xs:sequence>
      </xs:complexType>
   </xs:element>
   <xs:complexType name="AdType">
      <xs:sequence>
         <xs:element name="Title" type="xs:string"/>
         <xs:element name="Text" type="xs:string"/>
      </xs:sequence>
   </xs:complexType>
</xs:schema>
This is the file you specified in Step 2 of "Task 5: Testing the Results" and in Step 1 of "Task 4: Testing the Results".
<?xml version="1.0" encoding="UTF-8"?>
<n:Ad_Request xmlns:n="http://www.oracle.com/human_resources"
xmlns:xsi="http://www.w3.org/2001/XMLSchema-instance" Ad_ID="12345">
   <Action>HR New Ad Request</Action>
   <Function_Type>Executive</Function_Type>
   <Date>1999-05-31T13:20:00-05:00</Date>
   <HR_Contact_FirstName>John</HR_Contact_FirstName>
   <HR_Contact_LastName>Do</HR_Contact_LastName>
   <Content_Type>Ad</Content_Type>
   <Importance>6</Importance>
   <HR_Contact_Email>john.do@oracle.com</HR_Contact_Email>
   <Ad>
      <Title>Sales</Title>
      <Text>Position available, please write us.</Text>
   </Ad>
</n:Ad_Request>
This is the file you specified in Step 4 of "Task 4: Testing the Results".
<?xml version="1.0"?>
<n:Confirmation xmlns:n="http://www.oracle.com/global_newspaper"
xmlns:xsi="http://www.w3.org/2001/XMLSchema-instance">
   <Ad_ID>12345</Ad_ID>
   <Action>Global NP Ad Confirmation</Action>
   <Confirmed>no</Confirmed>
   <Problem_Details>Credit check not ok</Problem_Details>
</n:Confirmation>
This chapter provides a tutorial that takes you through the tasks of designing and deploying an integration. The tasks for Phase A include creating application details, creating modeling metadata, creating agreements, creating and deploying the configuration, and testing the results. Phase B covers more advanced topics, such as creating and integrating an additional application, manually creating business datatypes, and updating the interaction, native event, and application event.
|
|
 Copyright © 2003 Oracle Corporation. All Rights Reserved. |
|