10g (9.0.4)
Part Number B12121-01
Home |
Solution Area |
Contents |
Index |
| Oracle® Application Server ProcessConnect User's Guide 10g (9.0.4) Part Number B12121-01 |
|
This chapter describes how to administer Oracle Application Server ProcessConnect with the Oracle Application Server ProcessConnect user interface tool.
This chapter contains these topics:
Within Oracle Application Server ProcessConnect, there are two types of administration tasks that you perform:
There are broadly five classes of tasks to perform when defining an integration from within the administration facilities of Oracle Application Server ProcessConnect. These tasks are classified as follows:
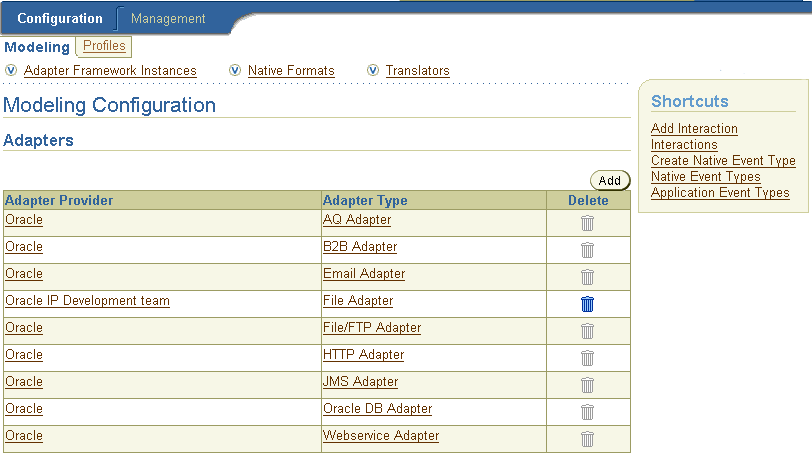
The Oracle Application Server ProcessConnect user interface tool enables you to perform the administration tasks shown in Figure 17-1 and Figure 17-2. References to instructions for performing these tasks are listed in Table 17-1 and Table 17-2:
| Modeling Configuration Page Section | See Section... |
|---|---|
|
Adapters |
|
|
Adapter Framework Instances |
|
|
Native Formats |
|
|
Translators |
The Oracle Application Server ProcessConnect user interface tool enables you to perform the adapter administration tasks shown in Figure 17-3. These tasks are described in detail in this section. Adapters provide the connectivity that enables applications and their different interfaces to be included in an integration. Oracle Application Server ProcessConnect includes a prepackaged set of adapters that cannot be updated or deleted. You can also create and delete your own custom adapters.
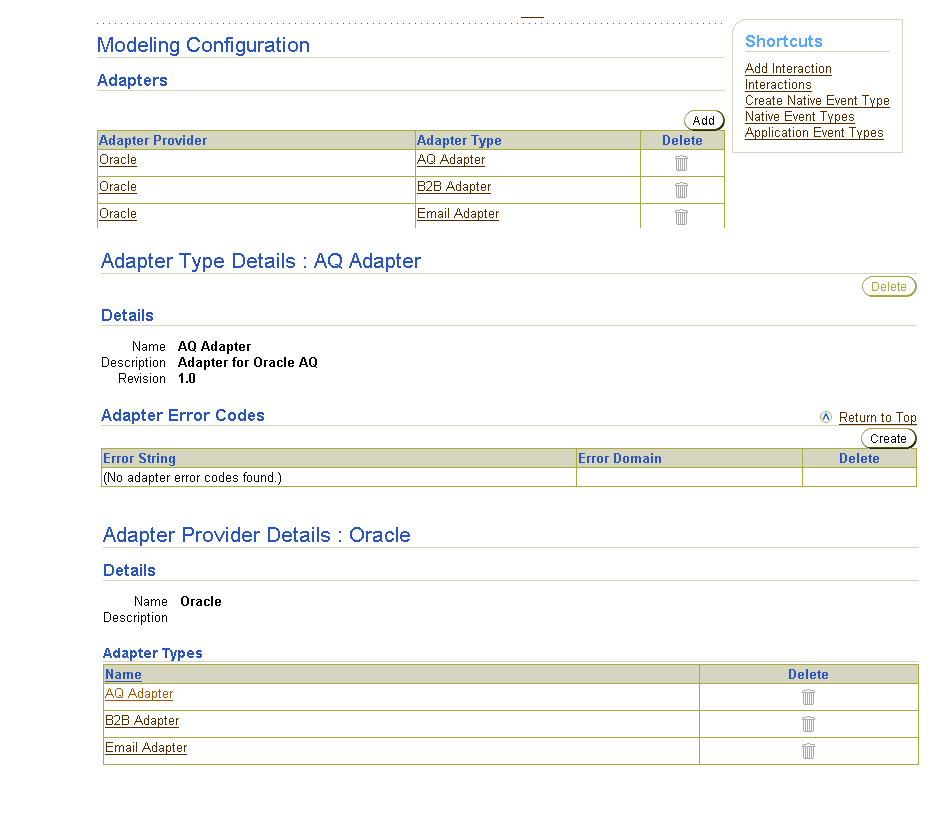
Table 17-3 identifies the adapter administration tasks shown in Figure 17-3 and provides references to procedures for performing these tasks.
| Page Elements | Administration Task | First See Section... | Then See Section... |
|---|---|---|---|
|
Shortcuts section of Adapters section of Figure 17-3 |
Take shortcuts to add an interaction to an adapter, create a native event, or view application events |
N/A |
|
|
Add button of Adapters section of Figure 17-3 |
Add an adapter |
||
|
Delete column of Adapters section of Figure 17-3 |
Delete an adapter |
|
|
|
Adapter Type column of Adapters section of Figure 17-3 (To access the Adapter Type Details page shown in the middle page of Figure 17-3) |
View details about an adapter |
|
|
|
Adapter Provider column of Adapters section of Figure 17-3 (To access the Adapter Provider Details page shown in the lower page of Figure 17-3) |
View details about an adapter provider |
|
|
|
Create button of Adapter Error Codes section of Figure 17-3 |
Create an adapter error message code |
|
Follow these instructions to access the adapter administration tasks shown in Figure 17-3:
To access adapter administration tasks:
The Adapters section appears at the top of the page. (See the upper page of Figure 17-3.) The adapters that appear include the following:
You can also add an adapter to Oracle Application Server ProcessConnect. If this is a custom adapter that you manually built, you must add the adapter to the Oracle Application Server ProcessConnect instance. Follow these instructions to add an adapter:
To add an adapter:
The Add Adapter page appears.
oracle.tip.adapter.file.myadapter). You must include the package to which the class belongs. Ensure also that the adapter class file is included in the system CLASSPATH.
The adapter is added. The adapter can now be selected in the following locations in the Oracle Application Server ProcessConnect user interface tool:
The following sections for instructions on managing adapters:
See Also:
Follow these instructions to delete an adapter:
To delete an adapter:
The adapter is deleted and the Modeling Configuration page appears. This deletes the adapter from Oracle Application Server ProcessConnect.
Follow these instructions to view an adapter:
To view an adapter:
The Adapter Type Details page for the selected adapter appears (for example, the Advanced Queuing adapter).
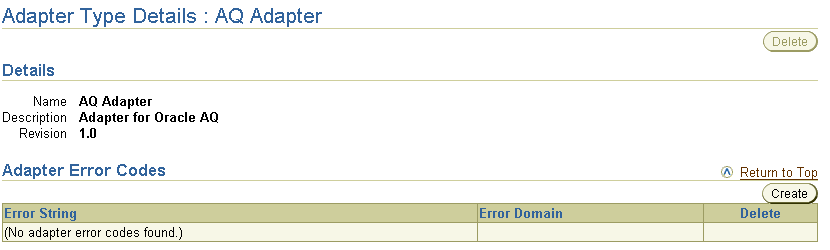
Text description of the illustration admin_adapter_types.gif
This page, as with the Adapters section shown in the upper page of Figure 17-3, enables you to delete the selected adapter.
Each adapter belongs to a specific adapter provider. For example, the Advanced Queuing adapter belongs to Oracle. Follow these instructions to view an adapter provider:
To view an adapter provider:
The Adapter Provider Details page for the selected adapter provider appears (for example, for Oracle). All the adapters associated with this provider appear.
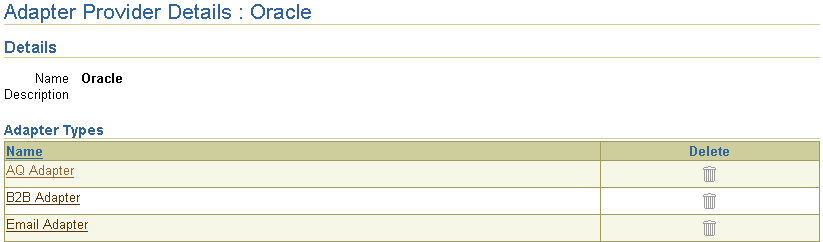
Text description of the illustration admin_adapter_providers.gif
This page, as with the Adapters section shown in the upper page of Figure 17-3, enables you to delete the adapter (if you created it).
Follow these instructions to create an adapter error message code for an adapter:
To create an adapter error message code:
The Adapter Type Details page appears.
The Create Adapter Error Code page appears.
The adapter error message code is created and the Adapter Type Details page with the new adapter error message code appears.
The Oracle Application Server ProcessConnect user interface tool enables you to either specify that all applications or a specific group of applications use the adapter framework instance. The adapter framework communicates between the runtime system and various adapters to send and receive data in the form of native events. This feature is useful for load balancing. For example, single integration manager and adapter framework instances can be used to communicate with multiple Oracle Database adapters. Each adapter also communicates with a specific database. By separating the adapter framework from the integration manager and the adapters, Oracle Application Server ProcessConnect enables you to load balance requests across the different adapter instances and integration manager instances for scalability.
To update the adapter framework instance:
The Adapter Framework Instances section appears.

Follow these instructions to update an adapter framework instance:
To update an adapter framework instance:
The Adapter Framework Instance Update page appears.
If you deselected Application Override, the page refreshes to display a list of available applications. If Application Override is already deselected, the lists described in the following steps already appear.
The adapter framework instance is updated and the Adapter Framework Instances Details page appears.
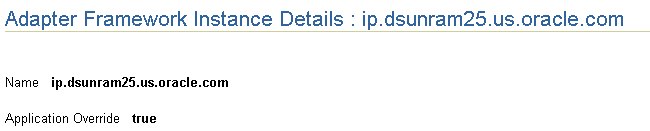
Follow these instructions to view an adapter framework instance:
To view an adapter framework instance:
The Adapter Framework Instance Details page for the selected adapter framework instance appears.
The Oracle Application Server ProcessConnect user interface tool enables you to perform the native format administration tasks shown in Figure 17-4. These tasks are described in detail in this section. The native format messages must be converted to or translated into a format understood by Oracle Application Server ProcessConnect. Translation involves a syntactic conversion of the message from the native format into an XML format understood by Oracle Application Server ProcessConnect. A native format is therefore associated with a translator that translates the native event to an application event, and vice versa. Oracle Application Server ProcessConnect includes a prepackaged set of native formats that cannot be updated or deleted:
For native message formats that use XML
For specifying the subject and body of alert e-mail messages
For native message formats that are not XML, but are instead a format of structured records of bytes, characters, or both
You can also create your own custom native formats. Associated with the custom native format, you also must create a custom translator or select an existing translator. These tasks are described in this section.
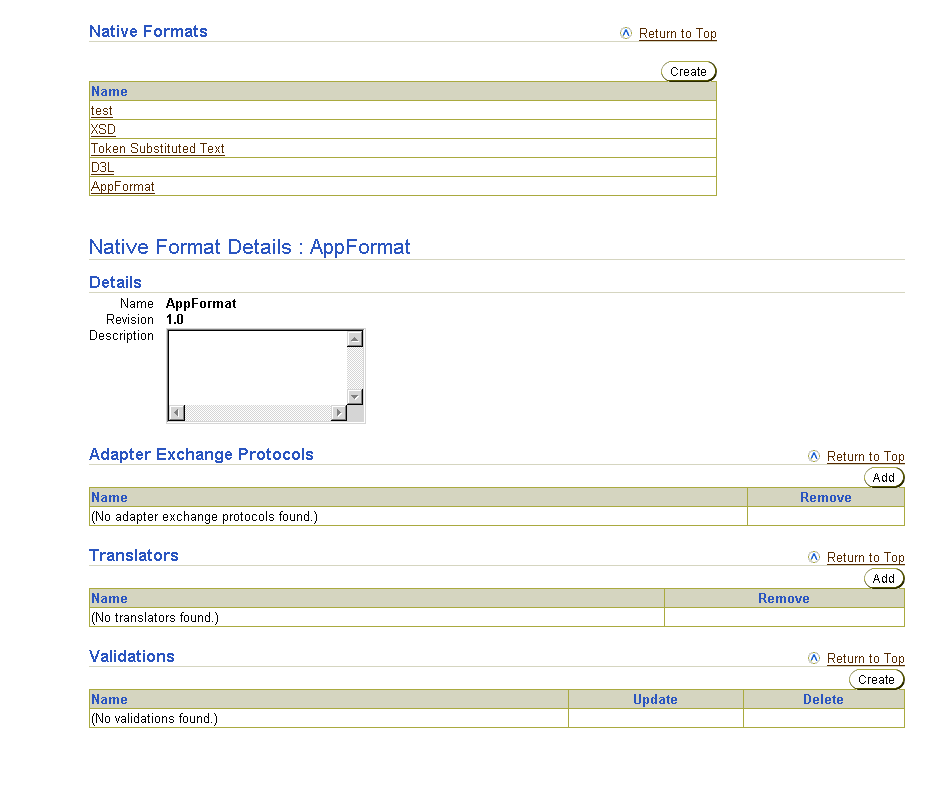
Table 17-4 identifies the native format administration tasks shown in Figure 17-4 and provides references to procedures for performing these tasks.
| Page Elements | Administration Task | First See Section... | Then See Section... |
|---|---|---|---|
|
Create button of Native Formats section of Figure 17-4 |
Create a native format |
||
|
Name column of Native Formats section of Figure 17-4 (To access the Native Format Details page shown in the lower page of Figure 17-4) |
View details about a native format |
|
|
|
Add button of Adapter Exchange Protocols section of Figure 17-4 |
Add an adapter exchange protocol to a native format |
|
|
|
Remove column of Adapter Exchange Protocols section of Figure 17-4 |
Remove an adapter exchange protocol from a native format |
|
"Removing an Adapter Exchange Protocol from a Native Format" |
|
Add button of Translators section of Figure 17-4 |
Add a translator to a native format |
|
|
|
Remove column of Translators section of Figure 17-4 |
Remove a translator from a native format |
|
|
|
Create button of Validations section of Figure 17-4 |
Create validation for a native format |
|
|
|
Delete column of Validations section of Figure 17-4 |
Delete validation from a native format |
|
|
|
Update column of Validations section of Figure 17-4 |
Update validation of a native format |
|
|
|
Name column of Validations section of Figure 17-4 |
View details about validation of a native format |
|
|
|
Name column of Translators section of Figure 17-4 |
View details about a translator of a native format |
|
|
See Also:
Appendix A, "Native Formats and Translators" for descriptions of the XSD, D3L, and token substituted text native formats included with Oracle Application Server ProcessConnect |
Follow these instructions to access the native format administration tasks shown in Figure 17-4:
To access native format administration tasks:
The Native Formats section appears. (See the upper page of Figure 17-4.)
| To... | Then... | See Section... |
|---|---|---|
|
Create a native format |
Click Create. |
|
|
View details about a native format |
Select a specific native format in the Name column. |
|
|
Add an adapter exchange protocol to a native format |
Select a specific native format in the Name column to which to add an adapter exchange protocol. |
|
|
Remove an adapter exchange protocol from a native format |
Select a specific native format in the Name column from which to remove an adapter exchange protocol. |
"Removing an Adapter Exchange Protocol from a Native Format" |
|
Add a translator to a native format |
Select a specific native format in the Name column to which to add a translator. |
|
|
Remove a translator from a native format |
Select a specific native format in the Name column from which to remove a translator. |
|
|
Create validation for a native format |
Select a specific native format in the Name column for which to create validation. |
|
|
Delete validation from a native format |
Select a specific native format in the Name column from which to delete validation. |
|
|
Update validation of a native format |
Select a specific native format in the Name column to which to update validation. |
|
|
View details about validation of a native format |
Select a specific native format in the Name column for which to view validation. |
|
|
View details about a translator of a native format |
Select a specific native format in the Name column for which to view a translator. |
Follow these instructions to create a native format:
To create a native format:
The Create Native Format page appears.
The native format is created and the Native Format Details page for the new native format appears. The native format now appears as a selectable native format when you create a native event type.
|
See Also:
|
Follow these instructions to view details about a native format:
To view a native format:
The Native Format Details page for the selected native format appears (for example, a custom native format called AppFormat).
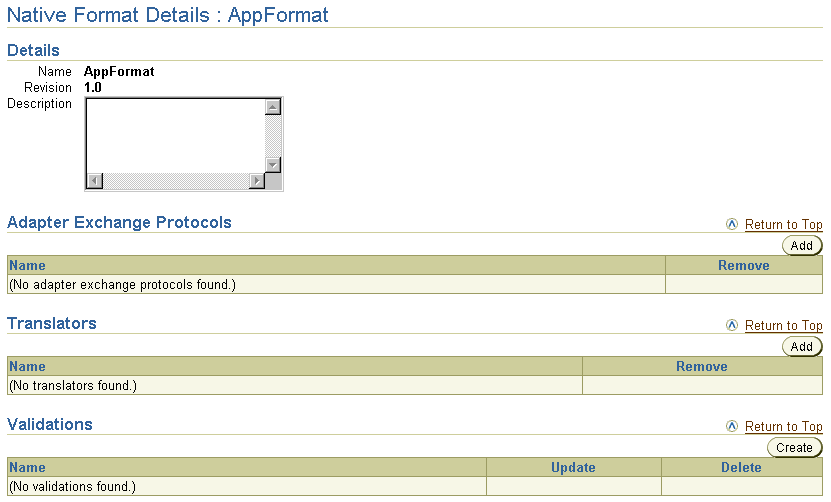
Text description of the illustration admin_native_format.gif
The adapter exchange protocol is the logical grouping of interactions (its capabilities) for an adapter. For example, an Oracle Database adapter may have three adapter exchange protocols. The adapter exchange protocol determines the questions you are prompted to answer. You select an adapter exchange protocol when adding an interaction. Follow these instructions to add an adapter exchange protocol to a native format:
To add an adapter exchange protocol to a native format:
The Native Format Details page for the selected native format appears.
The Add Adapter Exchange Protocol to Native Format page appears.
The adapter exchange protocol is added and the Native Format Details page appears.
Follow these instructions to remove an adapter exchange protocol from a native format:
To remove an adapter exchange protocol from a native format:
The Native Format Details page for the selected native format appears.
The adapter exchange protocol is removed and the Native Format Details page appears. Removed adapter exchange protocols can be added again at a later time.
A native format is associated with a translator. A translator translates a native event into an application event, and vice versa. The translator that you use is based on the native format of your message (known as the wire message). Follow these instructions to add a translator to a native format:
To add a translator to a native format:
The Native Format Details page for the selected native format appears.
The Add Translator to Native Format page appears.
The translator is added and the Native Format Details page appears.
Follow these instructions to remove a translator from a native format:
To remove a translator from a native format:
The Native Format Details page for the selected native format appears.
The translator is removed and the Native Format Details page appears. Removed translators can be added again at a later time.
Follow these instructions to create native event validation for a native format:
To create validation for a native format:
The Native Format Details page for the selected native format appears.
The Create Validation For Native Format page appears.
The validation is added to the native format and the Native Format Details page appears.
Follow these instructions to delete validation from a native format:
To delete validation of a native format:
The Native Format Details page for the selected native format appears.
The validation is deleted and the Native Format Details page appears.
To update validation of a native format:
The Native Format Details page for the selected native format appears.
The Update Validation page appears.
The validation is updated and the Native Format Details page for the updated native format appears.
To view validation of a native format:
The Native Format Details page for the selected native format appears.
The Validation Details page appears.

This page, as with the Native Format Details page shown in the lower page of Figure 17-4, enables you to delete or update the selected validation of the native format.
To view a translator of a native format:
The Native Format Details page for the selected native format appears.
The Translator Details page appears.
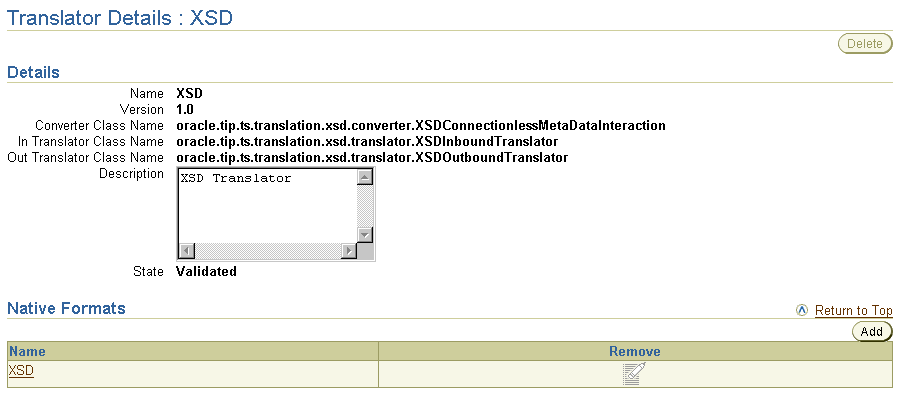
Text description of the illustration details_translators.gif
This page, as with the Native Format Details page shown in the lower page of Figure 17-4, enables you to delete the selected native format translator.
A translator translates a native event into an application event, and vice versa. The translator that you select to use is based on the native format of your message (known as the wire message). The Oracle Application Server ProcessConnect user interface tool enables you to perform the translator administration tasks shown in Figure 17-5. These tasks are described in detail in this section. Oracle Application Server ProcessConnect includes a prepackaged set of translators that cannot be deleted. However, you can create and delete your own custom translators.
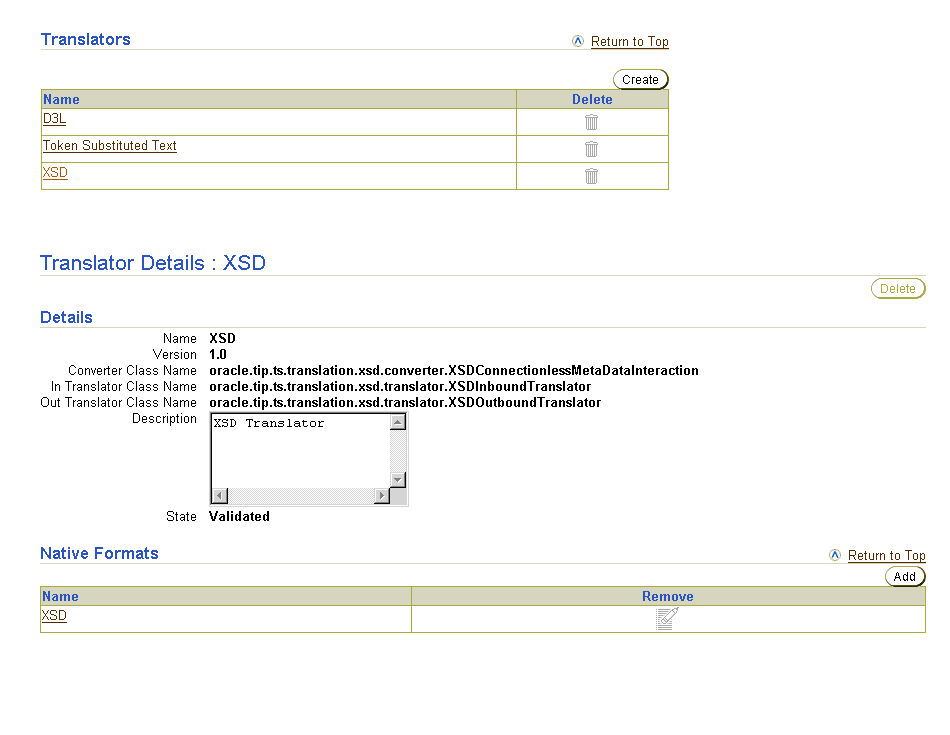
Table 17-5 identifies the translator administration tasks shown in Figure 17-5 and provides references to procedures for performing these tasks.
| Page Elements | Administration Task | First See Section... | Then See Section... |
|---|---|---|---|
|
Create button of Translators section of Figure 17-5 |
Create a translator |
||
|
Delete column of Translators section of Figure 17-5 |
Delete a translator |
|
|
|
Name column of Translators section of Figure 17-5 (To access the Translator Details page shown in the lower page of Figure 17-5) |
View details about a translator |
|
|
|
Add button of Native Formats section of Figure 17-5 |
Add a native format to a translator |
|
|
|
Remove column of Native Formats section of Figure 17-5 |
Remove a native format from a translator |
|
|
See Also:
"Administering Native Formats" for instructions on performing the administration tasks available under the Name column of the Native Formats section of the Translation Details page shown in the lower page of Figure 17-5 |
Follow these instructions to access the translator administration tasks shown in Figure 17-5:
To access translator administration tasks:
The Translators section appears. (See the upper page of Figure 17-5.)
A translator is associated with a converter, an inbound translator, and an outbound translator. Follow these instructions to add a translator and its associated converter, inbound translator, and outbound translator:
To create a translator:
The Create Translator page appears.
The translator is created and the Translator Details page for the new translator appears. The translator now appears as a selectable type when you create a native event type.
|
See Also:
|
Follow these instructions to delete a translator:
To delete a translator:
The translator is deleted and the Modeling Configuration page appears.
The Translator Details page appears.
Text description of the illustration details_translators.gif
This page, as with the Translators section of the Modeling Configuration page shown in the upper page of Figure 17-5, enables you to delete the selected translator.
The Name column of the Native Formats section of the Translator Details page provides you with an additional access method for performing native format administration tasks.
|
See Also:
"Administering Native Formats" for instructions on performing native format administration tasks |
A translator is associated with a native format. Native format support enables you to import messages in their native (wire message) format into Oracle Application Server ProcessConnect event body elements. Follow these instructions to add a native format to a translator:
To add a native format to a translator:
The Translator Details page for the selected translator appears.
The Add Native Format to Translator page appears.
The native format is added and the Translator Details page appears.
Follow these instructions to remove a native format from a translator:
To remove a native format from a translator:
The Translator Details page for the selected translator appears.
The native format is removed and the Translator Details page appears. Removed native formats can be added again at a later time.
The Oracle Application Server ProcessConnect user interface tool enables you to perform the application type administration tasks shown in Figure 17-6. These tasks are described in detail in this section. An application type is a method of grouping applications into an entity that can be used for reporting purposes. When you create an application, you select an application type in which to group the application. Oracle Application Server ProcessConnect includes a prepackaged set of application types that cannot be updated or deleted. However, you can create your own custom application types.
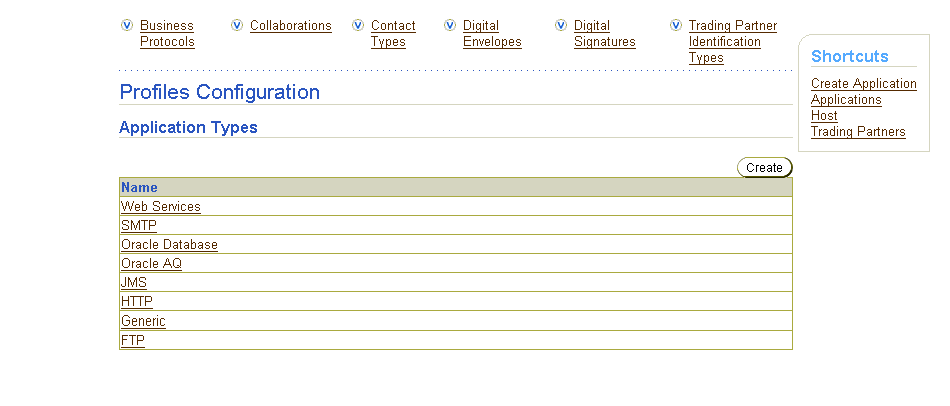
Table 17-6 identifies the application type administration tasks shown in Figure 17-6 and provides references to procedures for performing these tasks.
| Page Elements | Administration Task | First See Section... | Then See Section... |
|---|---|---|---|
|
Shortcuts section of Figure 17-6 |
Take shortcuts to manage applications, host trading partners, and remote trading partners |
N/A |
|
|
Create button of Application Types section of Figure 17-6 |
Create an application type |
||
|
Name column of Application Types section of Figure 17-6 |
View details about an application type |
|
Follow these instructions to access the application type administration tasks shown in Figure 17-6:
To access application type administration tasks:
The Application Types section displays at the top of the page. (See Figure 17-6.)
| To... | Then... | See Section... |
|---|---|---|
|
Create an application type |
Click Create. |
|
|
View details about an application type |
Select a specific application type in the Name column. |
Follow these instructions to create an application type:
To create an application type:
The Create Application Type page appears.
The application type is created and the Profiles Configuration page appears. The application type now appears as a selectable application type in the Create Application page.
|
See Also:
"Creating an Application" for instructions on selecting an application type when creating an application |
Follow these instructions to view details about an application type:
To view an application type:
The Application Type Details page for the selected application type appears.

Text description of the illustration details_application_types.gif
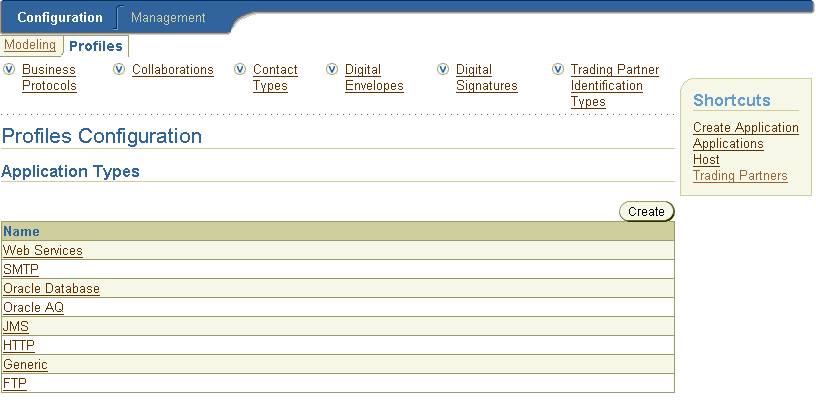
The Oracle Application Server ProcessConnect user interface tool enables you to view details about the available business protocols. The business protocol identifies the implementation guidelines to use for the reliable transport of business document messages between trading partners (essentially the capabilities of the trading partner). One such example is RosettaNet Implementation Framework (RNIF), version 1.1 using the RosettaNet Document Protocol. You select a business protocol to use in the Add Business Protocol page (accessible by clicking Profiles > Host > Cooperations > Business Protocols for the host trading partner and Profiles > Trading Partners > trading_partner_name > Cooperations > Business Protocols for remote trading partners). Follow these instructions to view business protocols.
To view business protocols:
The Business Protocols section appears.

The Business Protocol Details page for the selected business protocol appears.
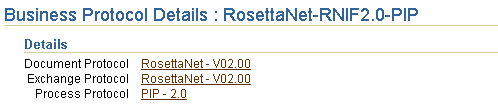
The Document Protocol Details page for the selected document protocol appears (for example, RosettaNet).
The Exchange Protocol Details page for the selected exchange protocol appears.
The Process Protocol Details page appears.
See Also:
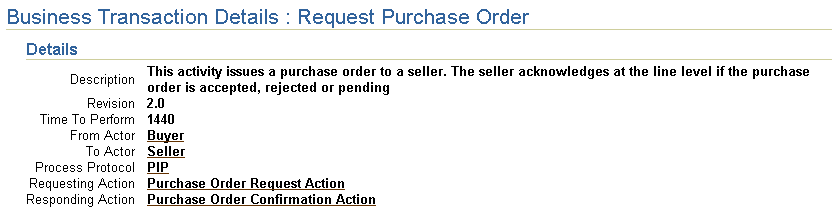
The Oracle Application Server ProcessConnect user interface tool enables you to view available collaborations. Follow these instructions to view collaborations. Collaborations identify the actors (roles played in a business collaborations, such as buyer or seller) and business transactions available with each partner interface process (PIP).
To view collaborations:
The Collaborations section appears.

The Collaboration Details page for the selected business collaboration appears.
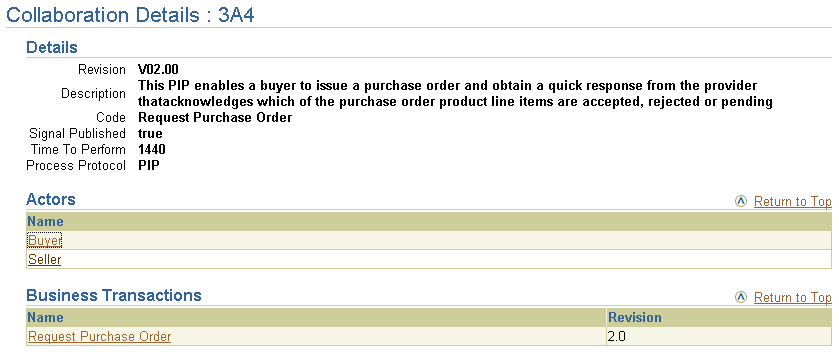
Text description of the illustration admin_collabs_details.gif
Text description of the illustration admin_actor_details.gif
"Creating a Supported Actor" for instructions on assigning an actor (role) to a trading partner
See Also:
The Oracle Application Server ProcessConnect user interface tool enables you to perform the contact type administration tasks shown in Figure 17-7. These tasks are described in detail in this section. The contact type is the method for contacting persons (such as a phone number or e-mail address) when specific activity within Oracle Application Server ProcessConnect occurs, such as a person needs to approve an agreement. Oracle Application Server ProcessConnect includes a prepackaged set of contact types that cannot be updated or deleted. You can also create and update your own custom contact types.
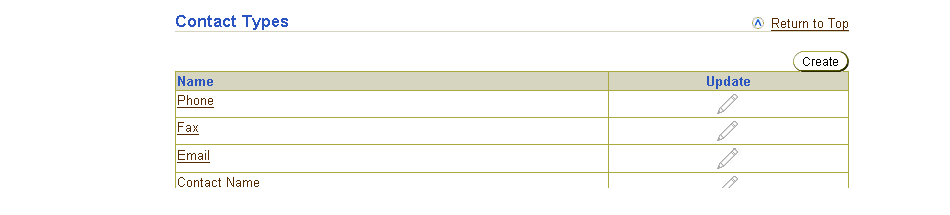
Table 17-7 identifies the contact type administration tasks shown in Figure 17-7 and provides references to procedures for performing these tasks.
| Page Elements | Administration Task | First See Section... | Then See Section... |
|---|---|---|---|
|
Create button of Contact Types section of Figure 17-7 |
Create a contact type |
||
|
Update column of Contact Types section of Figure 17-7 |
Update a contact type |
|
|
|
Name column of Contact Types section of Figure 17-7 |
View details about a contact type |
|
Follow these instructions to access the contact type administration tasks shown in Figure 17-7:
To access contact type administration tasks:
The Contact Types section appears. (See Figure 17-7.)
Follow these instructions to create a contact type:
To create a contact type:
The Create Contact Type page appears.
| Field | Description |
|---|---|
|
Name * |
Enter a unique and recognizable contact type name. |
|
Description |
Enter a description. |
The contact type is created and the Contact Type Details page for the new contact type appears. The contact type now appears as a selectable contact type in the Create Contact Information page (accessible through Profiles > Host > Organization > Contact Information for the host trading partner and Profiles > Trading Partners > trading_partner_name > Organization > Contact Information for remote trading partners).
|
See Also:
|
Follow these instructions to update a contact type:
To update a contact type:
The Update Contact Type page appears.
The contact type is updated and the Contact Type Details page for the updated contact type appears.
Follow these instructions to view details about a contact type:
To view a contact type:
The Contact Type Details page for the selected contact type appears (for example, for e-mail):
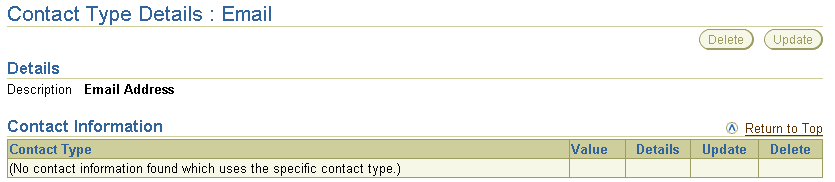
This page, as with the Contact Types section of the Profiles Configuration page shown in Figure 17-7, enables you to delete or update the selected contact type.
"Creating Person Contact Details" to assign a value, such as an e-mail address or phone number, to this contact type
See Also:
The Oracle Application Server ProcessConnect user interface tool enables you to view digital envelopes. Digital envelopes are the packaging method for a digital signature. Follow these instructions to view digital envelopes.
To view digital envelopes:
The Digital Envelopes section appears.
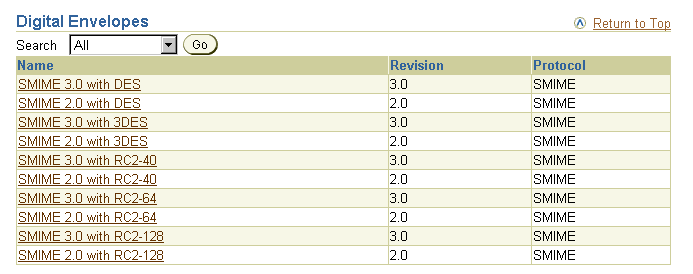
The Digital Envelope Details page for the selected digital envelope appears (for example, for SMIME 3.0 with DES):

Text description of the illustration admin_dig_envelopes.gif
"Creating a Document Exchange" for instructions on selecting a digital envelope to use in a document exchange of a trading partner
See Also:
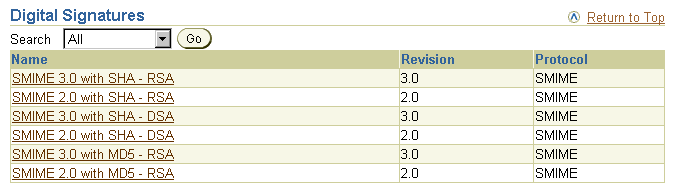
The Oracle Application Server ProcessConnect user interface tool enables you to view digital signatures. Follow these instructions to view digital signatures. A digital signature is created when a public key algorithm signs the sender's message with the sender's private key. The digital signature ensures that the document is authentic, has not been forged by another party, has not been altered, and cannot be repudiated by the sender.
To view digital signatures:
The Digital Signatures section appears.
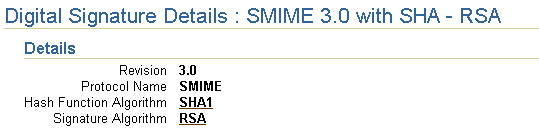
The Digital Signature Details page for the selected digital signature appears (for example, for SMIME 3.0 with SHA - RSA):
"Creating a Document Exchange" for instructions on selecting a digital signature to use in a document exchange of a trading partner
See Also:
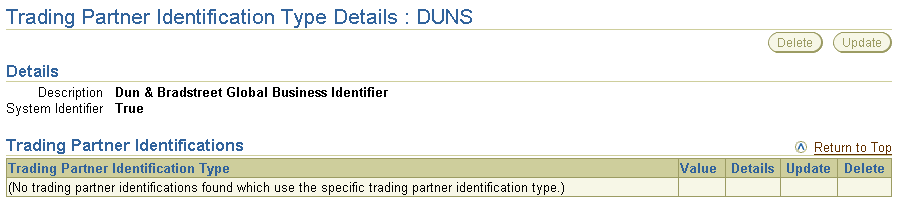
The Oracle Application Server ProcessConnect user interface tool enables you to perform the trading partner identification type administration tasks shown in Figure 17-8. These tasks are described in detail in this section. The trading partner identification type is a value that uniquely identifies a trading partner, such as a data universal numbering system (DUNS) number. You can define other types of trading partner identification types. Oracle Application Server ProcessConnect includes a prepackaged set of trading partner identification types that cannot be updated or deleted. You can also create your own custom trading partner identification types.

Table 17-8 identifies the trading partner identification type administration tasks shown in Figure 17-8 and provides references to procedures for performing these tasks.
| Page Elements | Administration Task | First See Section... | Then See Section... |
|---|---|---|---|
|
Create button of Trading Partner Identification Types section of Figure 17-8 |
Create a trading partner identification type |
"Accessing Trading Partner Identification Type Administration Tasks" |
|
|
Name column of Trading Partner Identification Types section of Figure 17-8 |
View details about a trading partner identification type |
|
Follow these instructions to access the trading partner identification type administration tasks shown in Figure 17-8:
To access trading partner identification type administration tasks:
The Trading Partner Identification Types section appears. (See Figure 17-8.)
Follow these instructions to create a trading partner identification type:
To create a trading partner identification type:
The Create Trading Partner Identification Type page appears.
Enter the following details to create a trading partner identification type. An asterisk (*) indicates a required field.
The trading partner identification type is created and the Trading Partner Identification Type Details page appears. The trading partner identification type appears as a selection on the Create Trading Partner Identification page (accessible through Profiles > Host > Create for the host trading partner and Profiles > Trading Partners > trading_partner_name > Create for remote trading partners).
|
See Also:
"Creating Trading Partner Identification" for instructions on selecting a trading partner identification type |
Follow these instructions to view details about a trading partner identification type:
To view a trading partner identification type:
The Trading Partner Identification Type Details page for the selected trading partner identification type appears.
The Oracle Application Server ProcessConnect user interface tool enables you to create integrations that consist of modeling metadata and profile data. An integration created with the Oracle Application Server ProcessConnect user interface tool is stored in the design-time repository. You can export and import the contents of an integration to and from a file. This enables you to export an integration from one repository and import it into another repository.
There are several methods for using export and import:
Oracle Application Server ProcessConnect supports three types of export:
Note the following details about importing and exporting the latest versions of all the profile data and modeling metadata to a file (first and second bullet points):
If a specific person existed when the export file was created, but does not exist in the repository into which the profile data and modeling metadata are being imported, the person and password are imported into the new repository. However, if a specific person and password exist in both the repository and the file to be imported, the password is not imported; it remains the same as before import.
Only person passwords are not imported; passwords for any delivery channels or connections are imported.
ip and owf_mgr. Both schemas have additional metadata and runtime state not included in the Oracle Application Server ProcessConnect export file. Use the Oracle database import and export utilities to back up these schemas.
See Also:
Follow these instructions to export and import integrations:
To export and import integrations:
| To... | Then... | See Section... |
|---|---|---|
|
Export integrations to a file |
Click Export. |
|
|
Import integrations from a file |
Click Browse. |
The entire and most recent contents of the integration are copied to a file named export.xml that you are prompted to open or download to a directory location.
|
See Also:
|
The File Upload page appears.
Your selection appears in the Input File field.
The Import Status page appears. A clock displays onscreen saying that the import is being processed.
The entire contents of the file are loaded into their previous locations in the design-time repository and display in the Oracle Application Server ProcessConnect user interface tool. You cannot import parts of the file. A message appears indicating that the import completed successfully.
If an import fails, then the changes are rolled back and the design-time repository remains unchanged. A message appears indicating that the import was unsuccessful.
This chapter describes how to use the user interface tool for the following tasks:
|
|
 Copyright © 2003 Oracle Corporation. All Rights Reserved. |
|