|
|
|
|
|
|
Portal Management
WebLogic Portal 4.0 provides specific sets of tools for the development, deployment, and administration of an enterprise's sites. Theses tools are contained in the BEA E-Business Control Center and the WebLogic Portal Administration Tools. This topic includes the following:
Overview of Portal Management
The E-Business Control Center provides a Java-based GUI interface for the corporate developer. It contains tools for managing tasks that require change management. The rich graphical interfaces of the E-Business Control Center simplify complex tasks such as rule definition, Webflow editing, and portal creation and management.
The browser-based WebLogic Portal Administration Tools can be easily accessed by and delegated to authorized users. Tasks performed through these tools typically take effect immediately on the running portal instance, and do not undergo a change management process. The user interface of the WebLogic Portal Administration Tools is implemented using JSPs.
This section of the Tour of the Stock Portal focuses on the WebLogic Portal Administration Tools. E-Business Control Center tools are not part of this tour.
In this part of the tour, you will be accessing the WebLogic Portal Administration Tools as a System Administrator. As such you will have access to all administrative functionality.
WebLogic Portal has delegated administrative capabilities, which is sometimes called decentralized administration. Delegating authority takes the load off the central administrator and enables other users to perform tasks related to their responsibilities. Delegated administrators have limited access based on their delegated administrative settings. For example, an R&D manager would have control of an engineering portal while a QA manager would have control of the QA portal. For more information about delegated administration, see "Overview of Portal Administration" in Getting Started with Portals and Portlets.
About This Part of the Tour
This part of the tour is an overview of the portal management features. Although numbered steps are provided, it is not a strict step-by-step set of instructions as are the steps in the Visitor Options section. Feel free to explore and make changes not specified in this tour.
Access WebLogic Portal Administration Tools from UNIX
To access the WebLogic Portal Administration Tools from UNIX, do the following:
PORTAL_HOME/StartPortal.sh
http://Portal-host:7501/portalTools/index.jsp
For example, if the WebLogic Portal host is a workstation named niwot, enter the following URL in your Web browser:
http://niwot:7501/portalTools/index.jsp
Note: By default, the WebLogic Portal host name is sufficient for the Portal-host:7501 parameter of the URL. However, if your system administrator changes the server configuration to require fully qualified domain names, you must supply one. In this case, the URL in step 2 would change to http://Portal-host.domain-name:7501/portalTools/index.jsp. For example, if the WebLogic Portal host is a workstation named niwot and the domain name is mallory.com, enter the following URL in your Web browser:
http://niwot.mallory.com:7501/portalTools/index.jsp
Username: administrator
Password: password
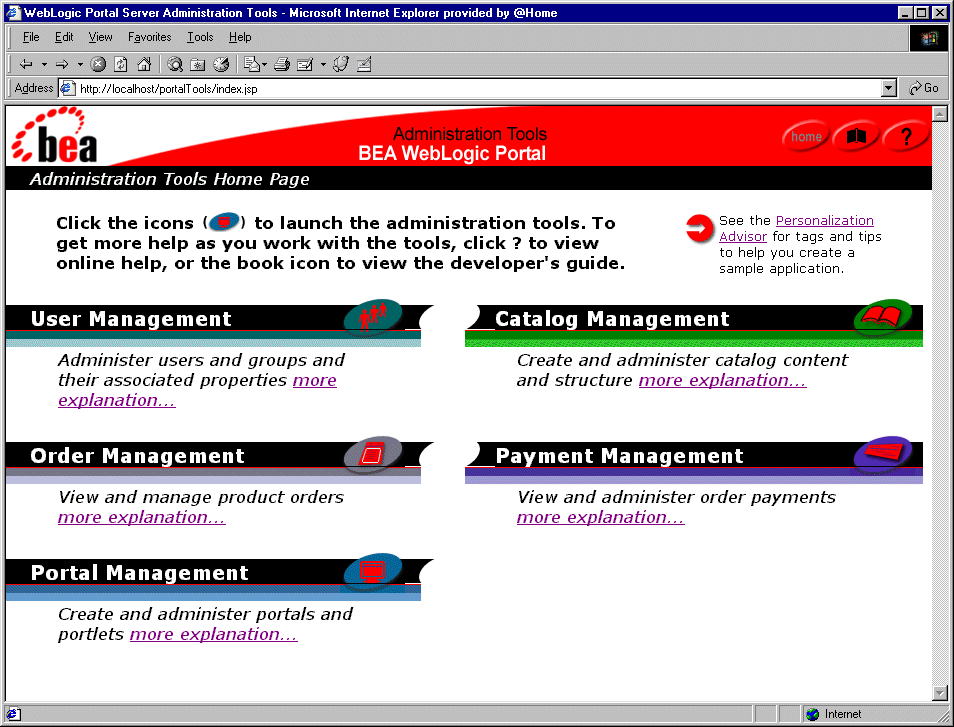
The WebLogic Portal Administration Tools page appears, as shown in Figure 3-1.
Access WebLogic Portal Administration Tools from Windows
To access the Home page from Windows, do the following:
PORTAL_HOME\StartPortal.bat
http://Portal-host:7501/portalTools/index.jsp
For example, if the WebLogic Portal host is a workstation named niwot, enter the following URL in your Web browser:
http://niwot:7501/portaltools
Note: By default, the WebLogic Portal host name is sufficient for the Portal-host:7501 parameter of the URL. However, if your system administrator changes the configuration to require fully qualified domain names, you must supply one. In this case, the URL in step 2 would change to http://Portal-host.domain-name:7501/portalTools. For example, if the WebLogic Portal host is a workstation named niwot and the domain name is mallory.com, enter the following URL in your Web browser:
http://niwot.mallory.com:7501/portalTools/index.jsp
Username: administrator
Password: password
The WebLogic Portal Administration Tools page appears, as shown in Figure 3-1.
Figure 3-1 WebLogic Portal Administration Tools
Portal Management Home
The Portal Management Home page allows you to edit existing group portals, create new group portals, delete group portals, and delegate portal administrators. Groups are a set of permissions and attributes that define what users see on a portal and what they can change. For example, an employee might see a portal with a Home page that contains portlets such as Employee Newsletter, Human Resources, and the Company Store, while a manager might see portlets such as Corporate Meetings, Administration, and Expense Reporting. Each Home page could contain different page tabs and skins. Groups allow you to configure different portals for different users and delegate privileges to other administrators.
Two groups are provided with the Stock Portal. These two groups highlight some of the features available with groups, such as different skins and different content.
Figure 3-2 Portal Management Home—Initial
Figure 3-3 Portal Management Home—GroupPortal1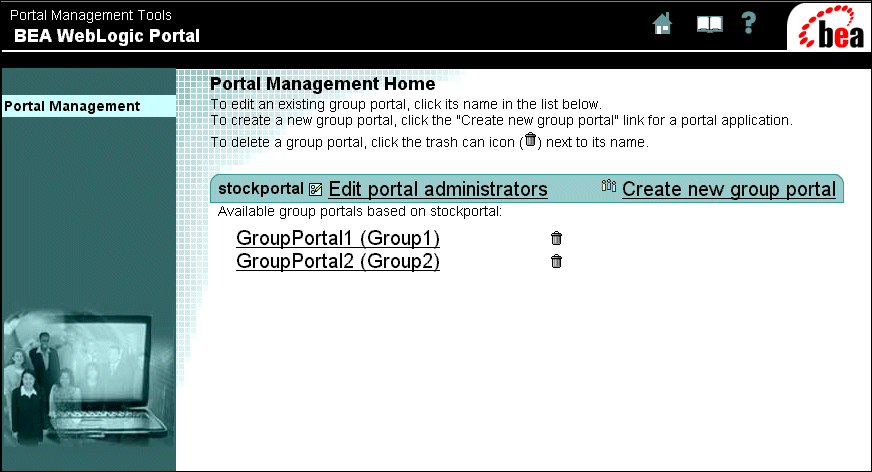
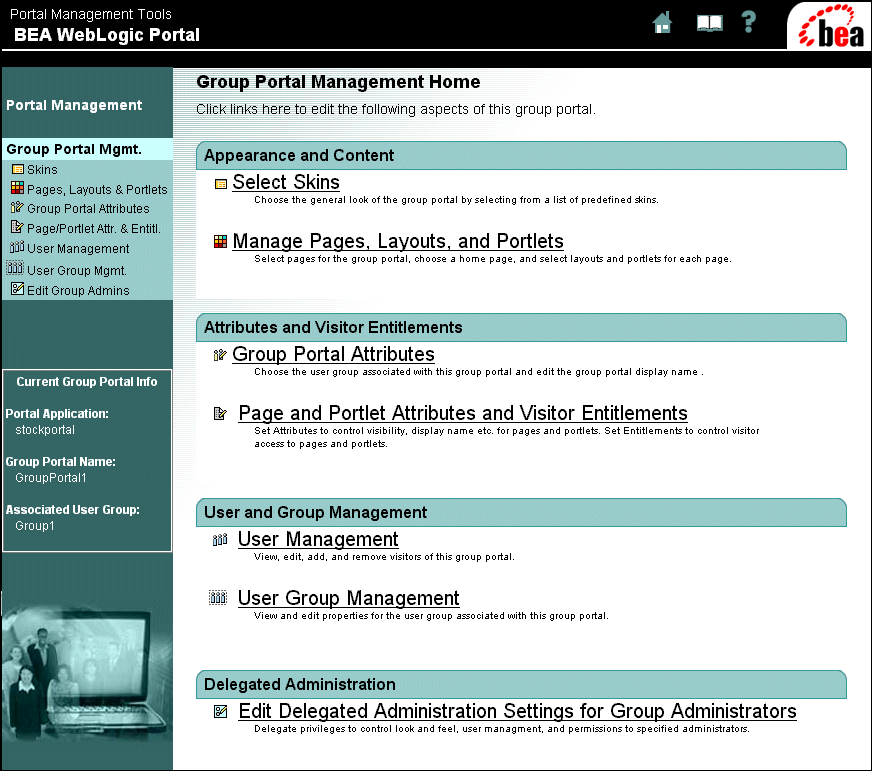
As you can see from Figure 3-3, the Portal Management Home page provides a number of portal group functions. The left menu column provides direct access to each of the Portal Management Home capabilities. These links access the same pages as those listed under each category in the right column.
The right column on this page is essentially a Table of Contents that provides a brief description of each aspect of portal capability. Generally, the right column contains the controls for defining the various group-related tasks. As a system administrator, you can see all available tasks. Delegated administrators will see a subset of these tasks based on their delegated privileges. A description of each category is presented in the sections that follow.
Note: In the WebLogic Portal Administration Tools, page tabs are just called pages. This terminology is used from this point on in the tour.
Appearance and Content
In this category you can do the following:
Select Skins
To learn about the group skins functionality, do the following:
Figure 3-4 Portal Management Home—Select Skins
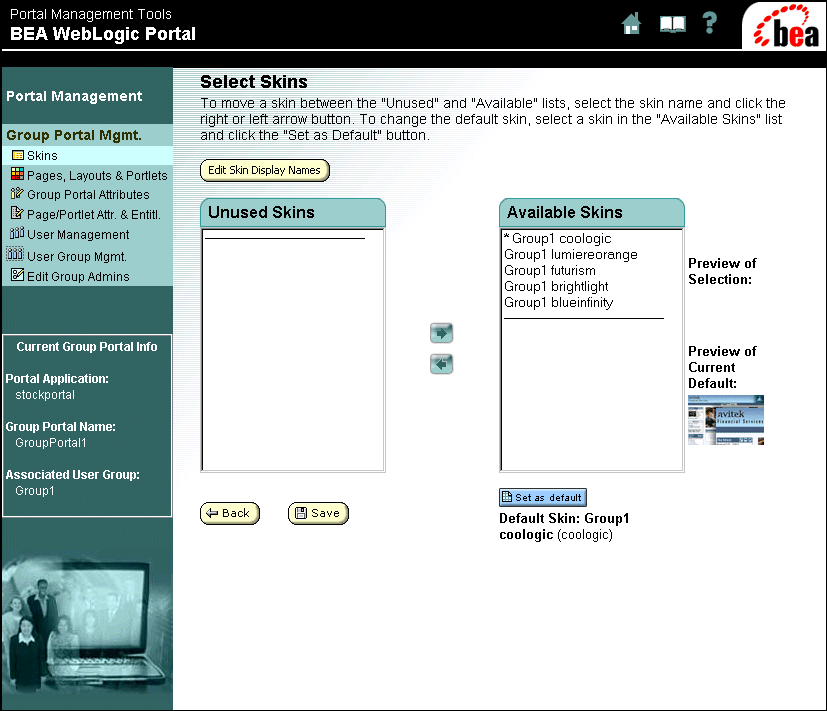
On this page, you can define which skins are available to the group and which skin is the default skin. You can also change the names of the skins. Unused skins are not visible to the group. Notice that the left menu column displays the current group portal parameters. Selecting skins in Portal Management works just like it does in the Visitors Options section Changing the Color Theme of Your Portal.
Manage Pages, Layouts, and Portlets
To learn about managing pages, layouts, and portlets, do the following:
Figure 3-5 Portal Management Home—Pages, Layouts and Portlets
Figure 3-6 Portal Management Home—Select Layouts for this Page: web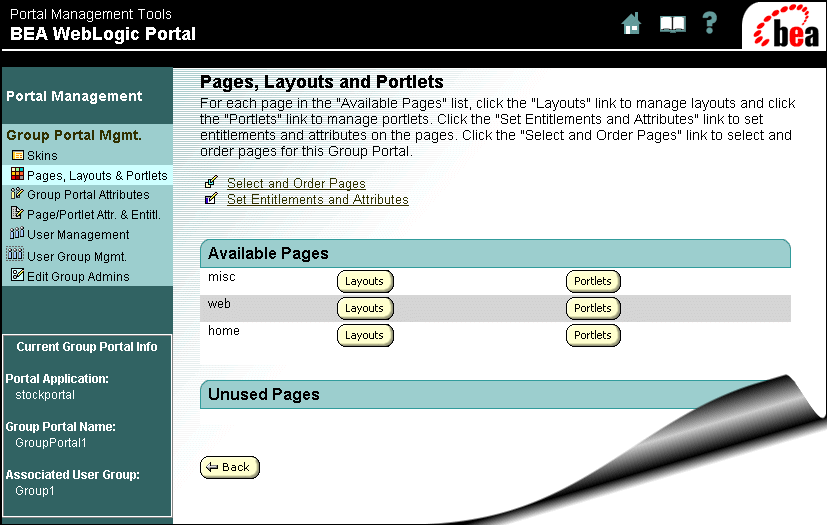
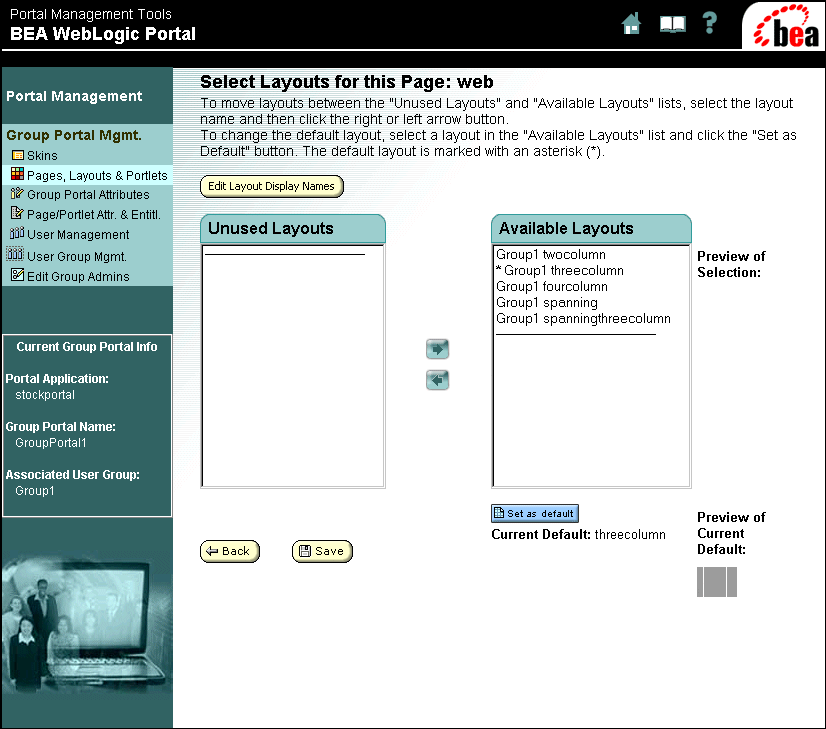
Layouts on this page work just like they do in the Visitor Options section Changing the Layout of a Page. Notice the Edit Layout Display Names button. Clicking this button allows you to change the names of the layouts.
Figure 3-7 Portal Management Home—Order Portlets for this Page: home
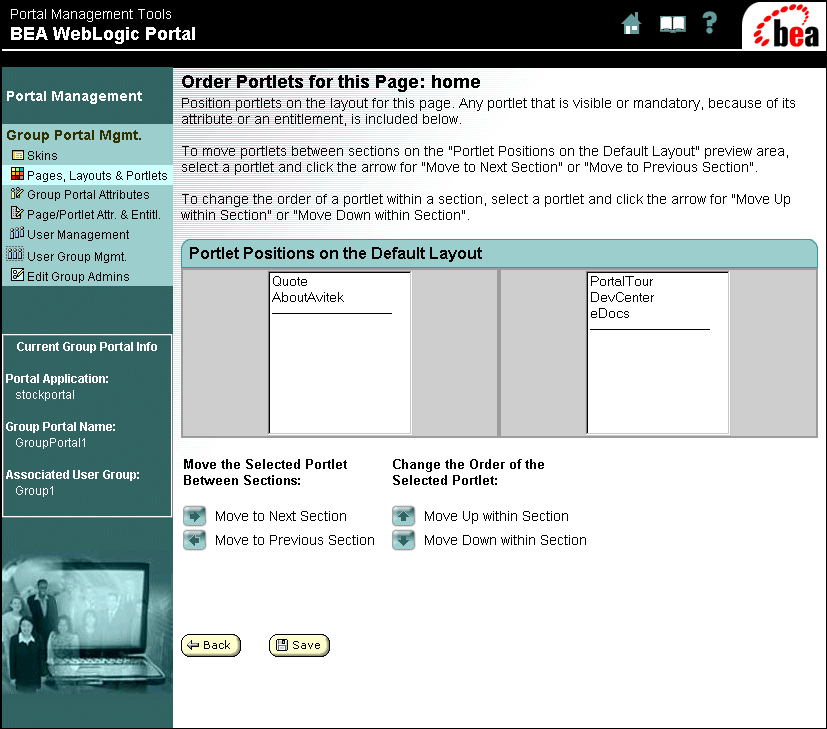
Notice that the Portlets Placed on Layout section contains two groups of portlets. This reflects the two column layout for the page, which is its current default.
Note: If you receive a message about portlet positions, click OK.
Figure 3-8 Portal Management Home—Order Portlets for this Page: web
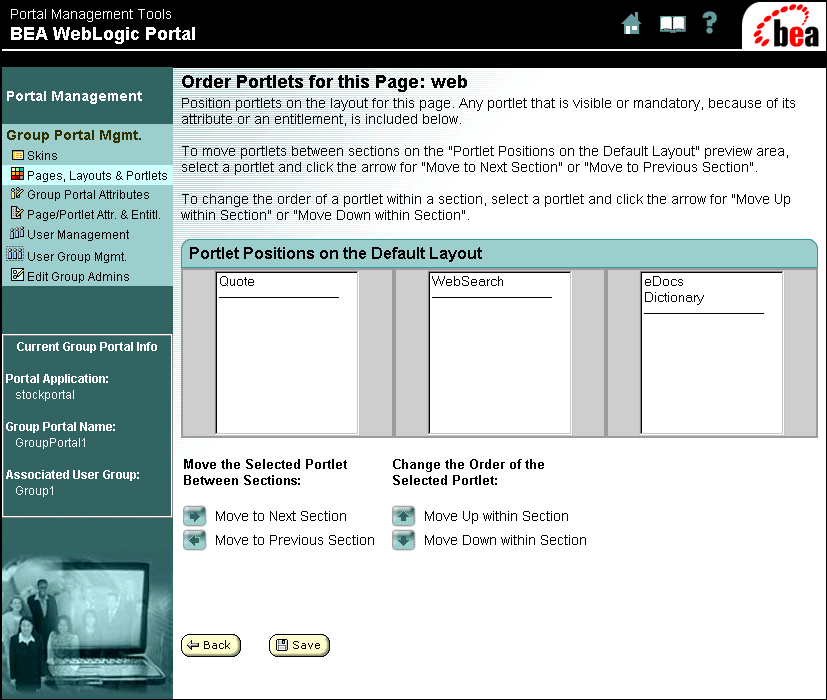
Notice that Portlets Positions on the Default Layout section now contains three groups of portlets. This reflects the default three column layout for the web page. (If you have changed the layout for this page, it will reflect the layout that you selected.)
Note: Unplaced Portlets are automatically placed when the page is rendered.
This page works the same way as changing the visible portlets and their arrangement in the Visitor Options section Changing Which Portlets You Can See.
Two more options are available on this page. The Select and Order Pages link opens a page where you can choose which pages are available to the group and the groups default home page. The selection process is the same as it was in Changing Which Pages Are Visible.
The Set Entitlements and Attributes option is discussed in Attributes and Visitor Entitlements.
Attributes and Visitor Entitlements
In this category, you can do the following:
Group Portal Attributes
To learn about the Group Portal Attributes, do the following:
Figure 3-9 Portal Management Home—Group Portal Attributes
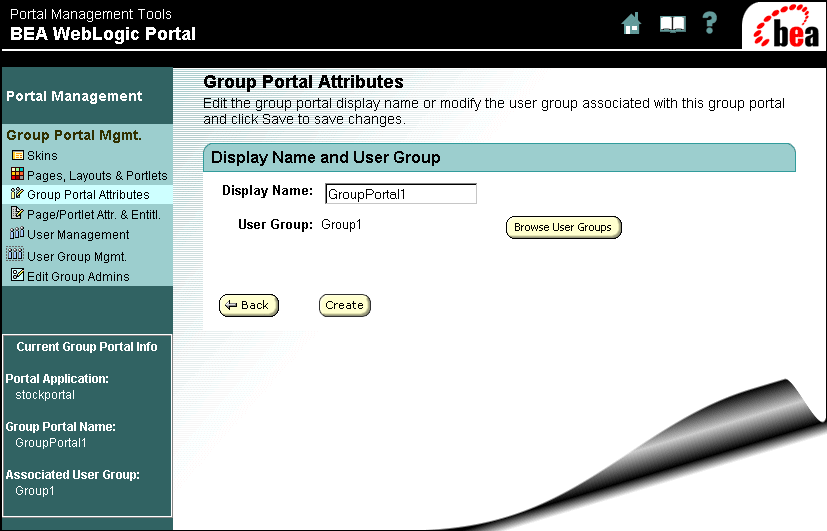
On this page, you can change the name that is displayed for the group.
Figure 3-10 Portal Management Home—Browse User Groups: stockportal
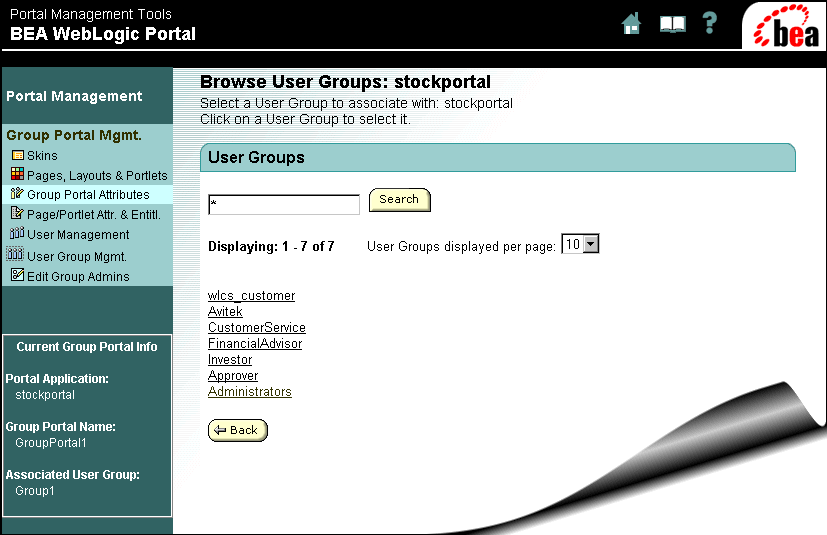
On this page, you can assign a user group to a portal group. A user group is a list of users that have been defined in the User Management Administration Tools. For more information, see "Creating and Managing Users" in the Guide to Building Personalized Applications.
Page and Portlet Attributes and Visitor Entitlements
To learn about setting entitlements and attributes, do the following:
Figure 3-11 Portal Management Home—Set Entitlements and Attributes
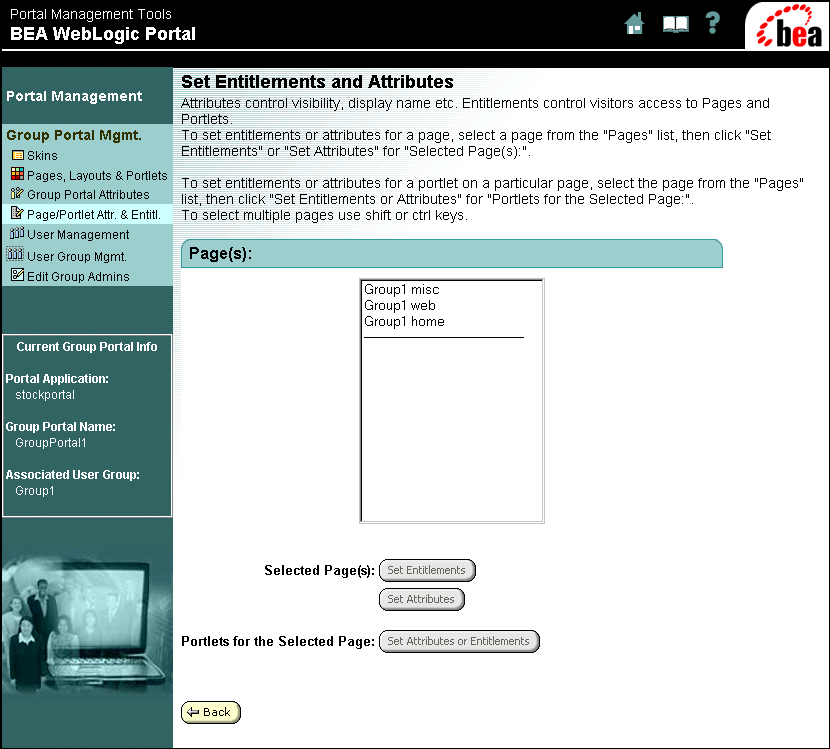
Attributes control which pages and portlets a user can see and which pages they can remove.
Entitlements control visitor access to pages and portlets. Additionally, they define what a visitor can and cannot change. When you specify entitlements, you are specifying a set of privileges for a visitor group. This type of visitor group is called an entitlement segment. Entitlements use a rules framework that match groups (based on common characteristics) with content. For more information about rules, see "Introducing the Rules Framework" in the Guide to Building Personalized Applications.
Figure 3-12 Portal Management Home—Set Page Entitlements
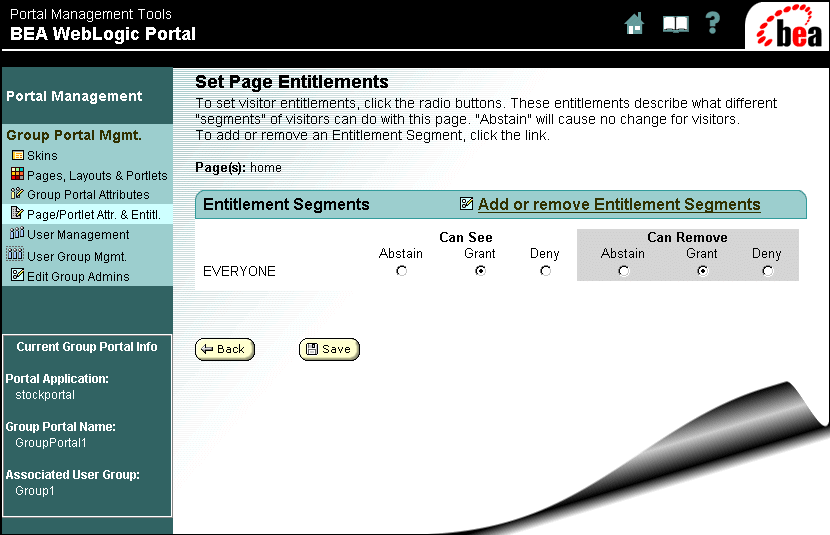
The right column of this page shows one group (Everyone) under Entitlement Segments and its corresponding row of radio buttons, which define the entitlements for the group. Entitlement segments are based on a set of conditions and defined in the E-Business Control Center. For more information, see "Entitlement Segments" in Getting Started with Portals and Portlets.
Two types of entitlement capabilities are shown in Figure 3-12. They determine which pages the members of the group can see and which pages they can remove.
Note: Another entitlement type is available for portlets; this type allows editing of a portlet.
The following list defines the meaning of each radio button:
Note: Entitlements are defined in the E-Business Control Center. Subsequently, if you select Abstain, the visibility, the editing capabilities, and the ability to remove pages will be determined by the default entitlement resource type property set in the E-Business Control Center and not by portal management.
Figure 3-13 Portal Management Home—Select Entitlement Segments for Page: home
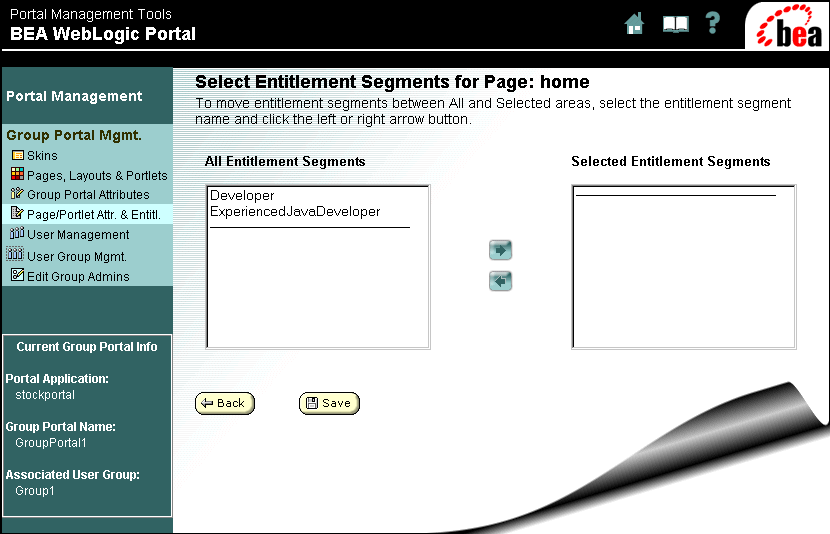
This page allows you to specify the entitlement segments for a page. The All Entitlement Segments list box contains any segments that are available for selection. The Selected Entitlement Segments list box contains any selected segments.
Figure 3-14 Set Portlet Attributes
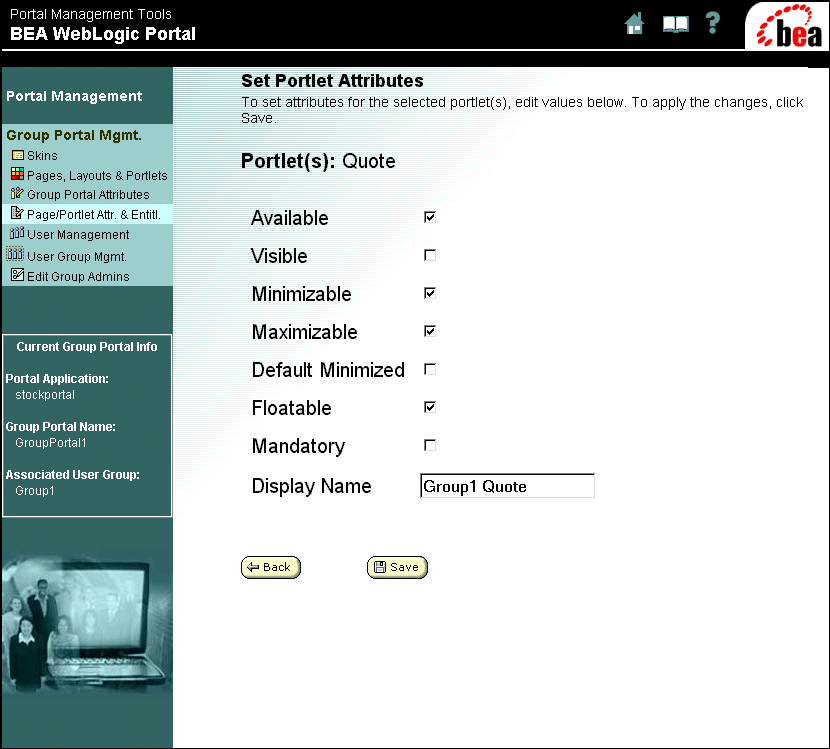
The following list defines the meaning of each checkbox:
User and Group Management
In this category, you can do the following:
User Management
To learn about user management, do the following:
Figure 3-15 Portal Management Home—Edit Users in User Group: Group1
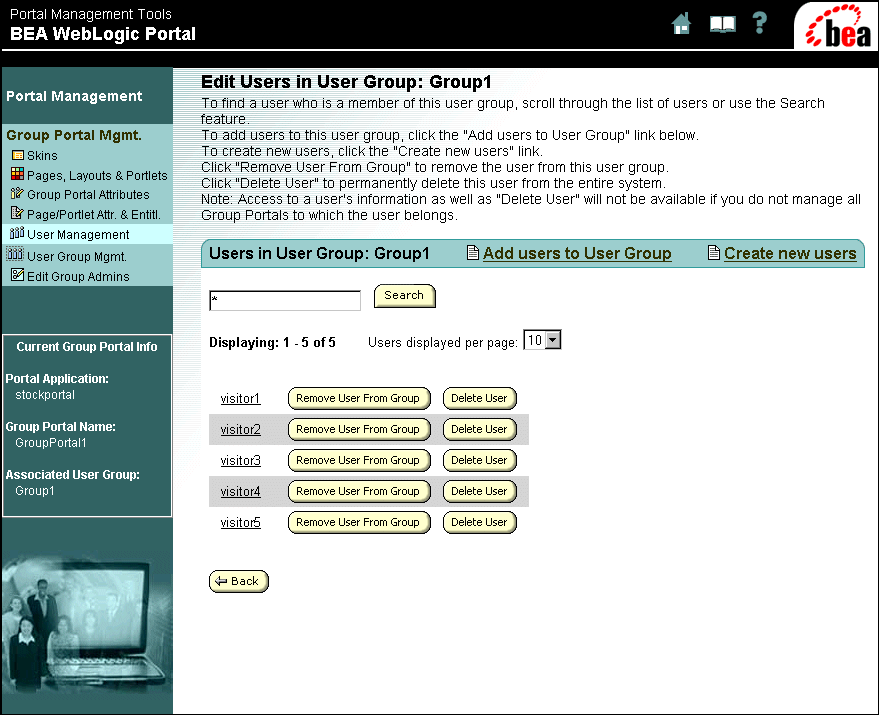
On this page, you can add and remove users from a group, create new users, and delete users from a user group. The buttons and links on this page have the following functions:
Figure 3-16 Portal Management Home—Create New Users
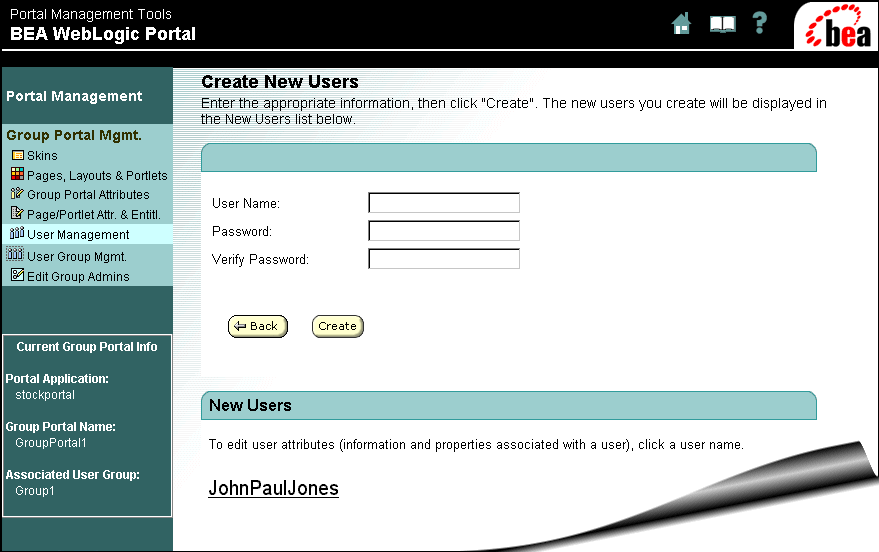
After the name and password for a new user is created, the name of the user appears under the New Users section.
User Group Management
To learn about user management, do the following:
Figure 3-17 Portal Management Home—Edit User Group: Group1
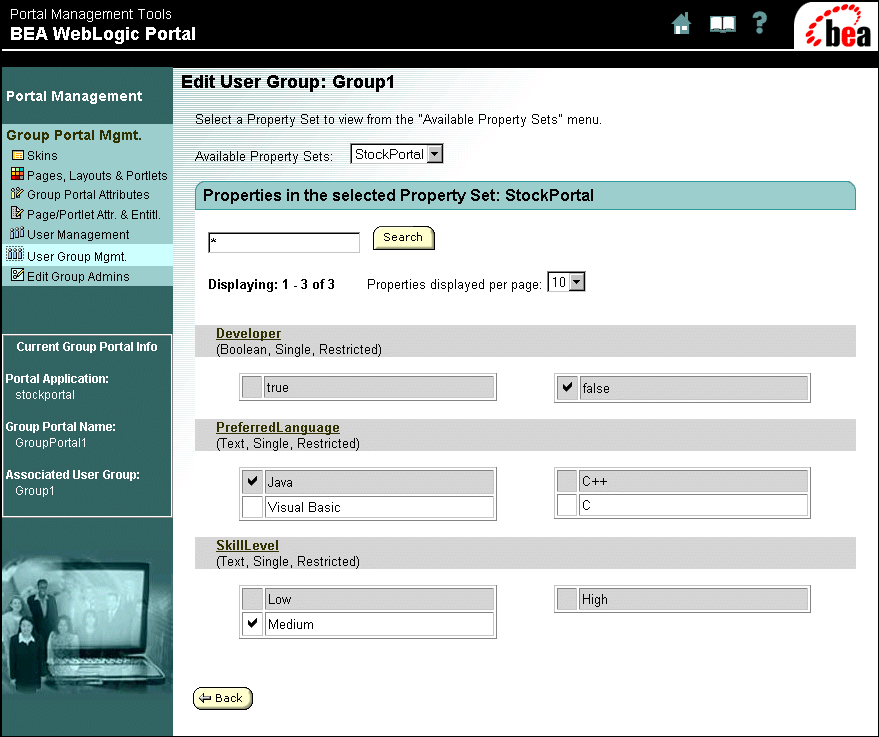
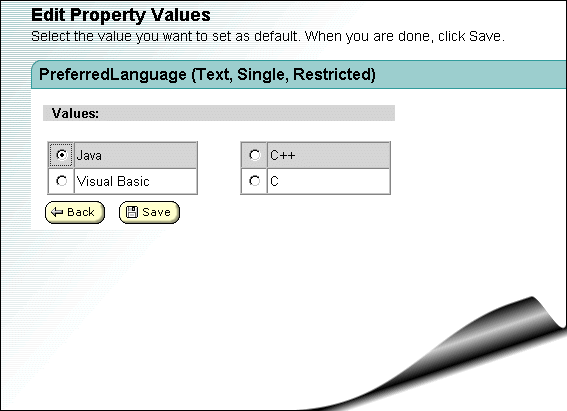
This page shows the properties for a user group, where you can enter the values for the properties. These properties themselves are defined in the E-Business Control Center. For more information, see "Creating and Managing Property Sets" in the Guide to Building Personalized Applications.
Figure 3-18 Portal Management Home—Edit Property Values
Delegated Administration
In this category, you can do the following:
To learn about delegated administration, do the following:
Figure 3-19 Portal Management Home—Choose Administrator
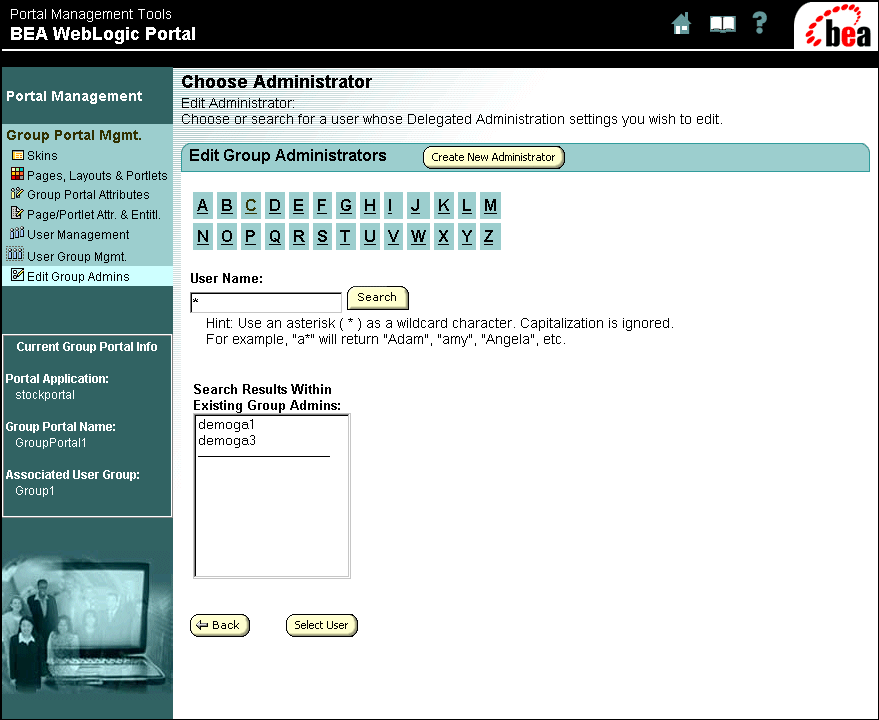
This page allows you to create a new administrator and choose the administrator whose delegation setting you want to change. You can use the alphabetical buttons to quickly display the list of users names that begin with the selected letter.
Figure 3-20 Portal Management Home—Delegate Administration
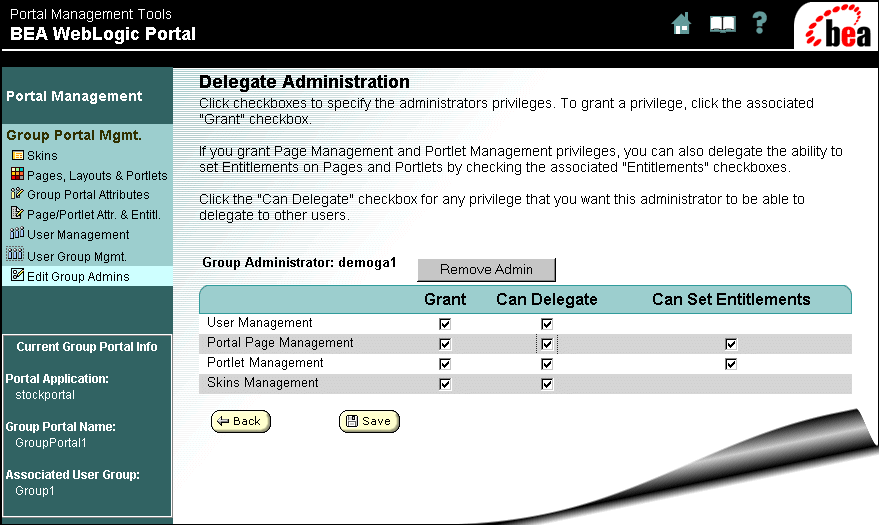
On this page, you can select checkboxes to specify administrators privileges. If you grant privileges for Page Management or Portlet Management, you can also delegate the ability to set entitlements on pages and portlets by selecting the associated Entitlements checkboxes.
The Create New Administrator button opens a window just like displayed in Figure 3-19, where you can choose from a list of existing administrators. If the person you want to set administrative privileges for is not on the list, you must first designate them as an administrator. For more information on designating a user as an administrator, see "Portal Administration Tools" in Getting Started with Portals and Portlets.
What's Next
This concludes the Tour of the Stock Portal. To learn more about the portal features of WebLogic Portal, see the other chapters in the Getting Started with Portals and Portlets.
To learn more about WebLogic Portal documentation in general, start with the "Documentation Roadmap for WebLogic Portal" in Strategies for Developing E-Business Web Sites.

|

|
|
|
|
Copyright © 2002 BEA Systems, Inc. All rights reserved.
|