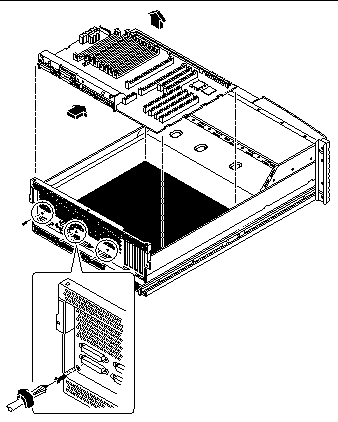
3.13 How to Remove the Main Logic Board
3.13.1 Before You Begin
Use an antistatic mat when working with the main logic board. An antistatic mat provides the cushioning required to protect under the board, to prevent the main logic board from flexing, and to provide antistatic protection.
Perform this procedure on a workbench. Sun Microsystems does not support changing the main logic board while the system is installed in a rack.
The NVRAM/TOD module contains the system host identification (ID) and Ethernet address. You can migrate your NVRAM/TOD module from your old board to preserve your host ID and Ethernet address. However, if you are replacing the NVRAM/TOD module and want to retain the same host ID and Ethernet address on the new main logic board, consult your authorized Sun sales representative or service provider.
Before you remove the main logic board, you must remove all removable components from it. You can then transfer the components to the new main logic board after you install it. Complete these tasks to remove the necessary components:
Do not attempt to remove components from the board after it has been removed from the system. Doing so can damage the main logic board.
3.13.2 What to Do
-
Disconnect the following internal cables from the main logic board.
Press the tab on the cable connector to detach each cable. For information about cable connector locations, see "5.5 How to Connect the System Cables"
-
Remove the three screws securing the main logic board to the back panel.
Small arrows on the back panel point to the screws you must loosen.
-
Slide the main logic board away from the back panel until it clears the notched hold-down tabs.

-
Lift the main logic board out of the system.
-
Place the main logic board on an antistatic mat.
-
If you are replacing this main logic board, note the serial port and flash PROM jumper settings.
See "3.15 How to Set the Serial Port Jumpers" and "3.16 How to Set the Flash PROM Jumpers".
3.13.3 What Next
To replace the main logic board, complete this task:
- © 2010, Oracle Corporation and/or its affiliates
