SWIFT Integration Projects
The following sections provide installation, library, and validation features for SWIFT messages. The following topics are covered:
Overview of SWIFT Message Libraries
This topic provides information on installing the SWIFT message library as well as instructions on using the library message validation features and some associated sample projects.
The Society for Worldwide Interbank Financial Telecommunication (SWIFT) Message Library contains template messages for use with the Sun Java Composite Application Platform Suite. These messages correspond to the SWIFT user-to-user message types employed by its SWIFT network. The library provides an individual object type definition for each SWIFT message type, as defined in the SWIFT standards documentation.
Each SWIFT message library represents a corresponding SWIFT message type. See the complete list of these libraries below. You can use these libraries to transport SWIFT message data with the Sun Java Composite Application Platform Suite.
This topic explains how to use these libraries with the Sun Java Composite Application Platform Suite, as well as the features available with them.
2008 Library Features
The new SWIFT Message Libraries (2008 version) allow you to use the following features:
Library Versions and Access
SWIFT periodically revises their message types, adding to or subtracting from the total set of Message Types, and modifying the definitions of individual message types. New sets are identified with the year they are issued, such as 2001, 2002, 2003, 2005, 2006, 2007 or 2008.
Sun releases a new SWIFT Message Library corresponding to each revised set of SWIFT message types. The current release includes templates supporting the 2001 through 2008 message type sets.
You must install each year’s version via a separate sar file. However, the MT Funds, Validation, and BICDirService (see SWIFT Message Library JAR Files) features can only be used with the 2003, 2005, 2006, 2007, and 2008 Libraries.
What’s New in Java CAPS 6 Update 1
The Sun SeeBeyond SWIFT OTD Library for this release includes the following changes and new features:
-
Includes three new sample projects – prjSWIFT_JCD_MFVROnly, prjSwift_JCD_BICPlusIBANOnly, and prjSwift_JCD_MFVRAndBICPlusIBAN –to replace the prjSwift_JCD sample project.
-
Includes new BICPlusIBAN Validation Sample files.
-
Includes new validation collaborations.
-
Includes the SWIFT MX Validation Sample which demonstrates how different types of ”Generic Validations” are done on MX messages.
-
Includes the SWIFT Correlation Repository (SCR) Sample which is used to visualize SWIFT workflows.
-
Includes Sample BIC files.
-
MPR methods are no longer supported or deprecated.
Installing the SWIFT Message Library
This section lists supported operating systems and system requirements, and explains how to install the SWIFT OTD Library.
-
Note –See the Sun Java Composite Application Platform Suite Installation Guide for complete eGate installation instructions.
SWIFT OTD Library System Requirements
The SWIFT OTD Library Readme contains the latest information on:
-
Supported Operating Systems
-
System Requirements
-
External System Requirements
The SWIFT OTD Library Readme is uploaded with the product’s documentation file (SwiftOTDLibraryDocs.sar) and can be accessed from the Documentation tab of the Sun Java Composite Application Platform Suite Installer. Refer to the SWIFT OTD Library Readme for the latest requirements before installing the SWIFT OTD Library.
Installing the SWIFT OTD Libraries
The Sun Java Composite Application Platform Suite Installer, a web-based application, is used to select and upload eWays and add-on files during the installation process. The following section describes how to install the SWIFT OTD Libraries.
Note –
When the Repository is running on a UNIX operating system, the eWays are loaded from the Suite Installer, running on a Windows platform, connected to the Repository server using Internet Explorer.
Installing the eWay on a Java CAPS Supported System
Follow the directions for installing the Sun Java Composite Application Platform Suite in the Sun Java Composite Application Platform Suite Installation Guide. After you have installed eGate™ or eInsight™, do the following:
-
From the Sun Java Composite Application Platform Suite Installer’s Select Sun Java Composite Application Platform Suite Products to Install table (Administration tab), expand the eWay and OTD options.
-
Select the products you require for your Sun Java Composite Application Platform Suite and include the following:
-
FileeWay (the File eWay is used by most sample Projects)
-
BatcheWay (the Batch eWay is required to run the MX validation sample project)
-
SwiftOTDLibrary: Common file used by all of the SWIFT OTD Libraries. Always install this file. Each of the OTD Libraries is dependent on this file.
-
SwiftOTDLibrary2008: Installs the 2008 SWIFT OTD Library.
-
SwiftOTDLibrary2007: Installs the 2007 SWIFT OTD Library.
-
SwiftOTDLibrary2006: Installs the 2006 SWIFT OTD Library.
-
SwiftOTDLibrary2005: Installs the 2005 SWIFT OTD Library.
-
SwiftOTDLibrary2003: Install the 2003 SWIFT OTD Library.
-
SwiftOTDLibrary2002: Install the 2002 SWIFT OTD Library.
-
SwiftOTDLibrary2001: Install the 2001 SWIFT OTD Library.
-
-
To upload the SWIFT OTD Library User’s Guide, Help file, Javadoc, Readme, and sample Projects, select the following:
-
SwiftOTDLibraryDocs
-
From the Selecting Files to Install box, locate and select your first product’s SAR file. Once you have selected the SAR file, click Next. Your next selected product appears. Follow this procedure for each of your selected products. The Installation Status window appears and installation begins after the last SAR file has been selected.
-
Once your product’s installation is finished, continue installing the Sun Java Composite Application Platform Suite as instructed in the Sun Java Composite Application Platform Suite Installation Guide.
Note –The MT Funds and Validation features can only be used with the 2003 and 2005 OTD libraries (see Using Message Validation Features).
Adding a Product to an Existing Suite Installation
If you are adding a library to an existing Sun Java Composite Application Platform Suite installation, do the following:
-
Complete steps 1 through 4 above.
-
Open the Enterprise Designer and select Update Center from the Tools menu. The Update Center Wizard appears.
-
For Step 1 of the wizard, simply click Next.
-
For Step 2 of the wizard, click the Add All button to move all installable files to the Include in Install field, then click Next.
-
For Step 3 of the wizard, wait for the modules to download, then click Next.
-
The wizard’s Step 4 window displays the installed modules. Review the installed modules and click Finish.
-
When prompted, restart the IDE (Integrated Development Environment) to complete the installation.
After Installation
Once you install the eWay, it must then be incorporated into a Project before it can perform its intended functions. See the eGate Integrator User’s Guide for more information on incorporating the eWay into an eGate Project.
Increasing the Heap Size
Because of the size of the SWIFT OTD Library, the Heap Size may need to be increased before using the library. If the heap size is not increased, you may receive an OutOfMemoryError message, when you try to activate a SWIFT OTD Project.
If you receive this message during Project activation, you must increase the heap size before you can activate any SWIFT OTD Projects. This action resets the Enterprise Designer’s maximum memory size.
Increasing the heap size from the Enterprise Designer
-
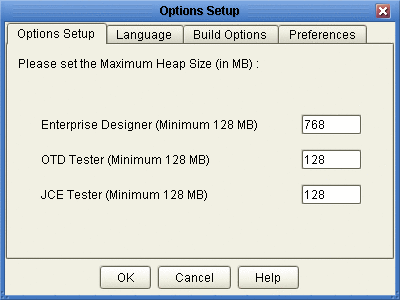
From the Enterprise Designer’s Tools menu select Options. The Options Setup dialog box appears (see Increasing the heap size from the Enterprise Designer).
-
Increase the configured heap size for the Enterprise Designer to 768 MB as displayed in Increasing the heap size from the Enterprise Designer. Click OK.
-
Close and restart the Enterprise Designer to allow your changes to take effect.
Increasing the heap size from the heapSize.bat file
If an OutOfMemoryError message occurs while you are trying to open the Enterprise Designer, the heap size settings may be changed before starting the Enterprise Designer. You can increase the heap size values found in the heapSize.bat file.
-
Go to the following directory and file:
<eGate Install Directory>/edesigner/bin/heapSize.bat
-
From the BAT file code, change the following heap size value to read as follows:
-
set eDesigner_heap_size=768
-
-
Save the file and start the Enterprise Designer.
Increasing the heap size from the Logical Host
-
Start the Logical Host.
-
Go to the Logical Host directory and double-click the start_domain1.bat file.
-
Open an internet browser and enter http://<host_name>:18000. The Integration Server Administration window will open.
-
Login to the Integration Server Administration application.
-
On the right side of the window, select the JVM Settings tab.
-
Select the JVM Options link.
-
Change the default Heap Size from —Xmx512m to —Xmx768m.
-
Save the new settings and restart the Logical Host.
Using the SWIFT OTD Library
This section explains, lists, and provides a cross-reference for, the SWIFT OTD Library message types.
SWIFT Message Type OTDs
This section provides a general overview of the SWIFT message types and their OTDs.
SWIFT Message Structure
Messages used by the SWIFT network have a maximum of five components (see SWIFT Message Structure), as follows:
Each field component in the text block is preceded by a field tag. There are no field tags in the header and trailer blocks. The one exception to this format is MT 121, EDIFACT FINPAY, which has a single text field with no field tag identifier.
Information about a field common to all message types in which that field is used is found in the Standards - General Field Definitions volume of the SWIFT User Handbook. Information about a field specific to its use with a particular message type is found in the field specifications section of the Standards volume of the SWIFT User Handbook for that message type.
OTD and Collaboration Locations in Enterprise Designer
You can find the SWIFT OTDs, including the MT Fund OTDs and Generic OTD, in the Enterprise Designer’s Project Explorer tree. This figure also shows the location of the Java-based Validation Collaboration Definitions.
The Validation Collaborations directory contains the Collaboration Definitions that enable the validation features of the SWIFT OTD Library. See SWIFT Message Library JAR Files for details.
The Category 5 directory contains the SWIFT MT Funds message template OTDs in the library. See Parse Debug Level Message Example for details.
The bic.jar file allows you to update the BICDirService feature. See SWIFT Message Library JAR Files for details.
SWIFT Message Type Reference
SWIFT groups message types into the following categories:
Customer Payments and Cheques
-
See Category 1 Messages.
Financial Institution Transfers
-
See Category 2 Messages.
Treasury Markets: Foreign Exchange and Derivatives
-
See Category 3 Messages.
Collections and Cash Letters
-
See Category 4 Messages.
Securities Markets
-
See Category 5 Messages.
Treasury Markets: Precious Metals and Syndications
-
See Category 6 Messages.
Documentary Credits and Guarantees
-
See Category 7 Messages.
Travellers Cheques
-
See Category 8 Messages.
Cash Management and Customer Status
-
See Category 9 Messages.
The remainder of this section discusses these categories and the message types within each category.
The 2001, 2002, 2003, 2005, 2006, 2007 and 2008 versions of the SWIFT OTD Library are provided with the SWIFT OTD Library. You must install each version via a separate sar file. However, the MT Funds, Validation, and BICDirService features can only be used with 2003, 2005, 2006, 2007, and 2008 OTDs (see SWIFT Message Library JAR Files).
For explanations of the 2001, 2002, 2003, 2004, 2006, 2007, and 2008 versions, see the SWIFT Web site at http://www.swift.com.
Category 1 Messages
The table below lists the Category 1 message types, Customer Payments and Cheques, with the type designation MT 1xx.
Table 1 Customer Payments and Cheques|
SWIFT Message Type |
Description |
|---|---|
|
MT 101 | |
|
MT 102 | |
|
MT 102+(STP) | |
|
MT 103 | |
|
MT 103+ (REMIT) | |
|
MT 103+ (STP) | |
|
MT 104 | |
|
MT 105 | |
|
MT 106 | |
|
MT 107 | |
|
MT 110 | |
|
MT 111 | |
|
MT 112 | |
|
MT 121 | |
|
MT 190 | |
|
MT 191 | |
|
MT 192 | |
|
MT 195 | |
|
MT 196 | |
|
MT 198 | |
|
MT 199 |
Category 2 Messages
The table below lists the Category 2 message types, Financial Institution Transfers, with the type designation MT 2xx.
Table 2 Financial Institution Transfers|
SWIFT Message Type |
Description |
|---|---|
|
MT 200 | |
|
MT 201 | |
|
MT 202 | |
|
MT 203 | |
|
MT 204 | |
|
MT 205 | |
|
MT 206 | |
|
MT 207 | |
|
MT 210 | |
|
MT 256 | |
|
MT 290 | |
|
MT 291 | |
|
MT 292 | |
|
MT 295 | |
|
MT 296 | |
|
MT 298 | |
|
MT 299 |
Category 3 Messages
The table below lists the Category 3 message types, Treasury Markets, Foreign Exchange, Money Markets, and Derivatives, with the type designation MT 3xx.
Table 3 Treasury Markets, Foreign Exchange, Money Markets, and Derivatives
Category 4 Messages
The table below lists the Category 4 message types, Collections and Cash Letters, with the type designation MT 4xx.
Table 4 Collections and Cash Letters|
SWIFT Message Type |
Description |
|---|---|
|
MT 400 | |
|
MT 405 | |
|
MT 410 | |
|
MT 412 | |
|
MT 416 | |
|
MT 420 | |
|
MT 422 | |
|
MT 430 | |
|
MT 450 | |
|
MT 455 | |
|
MT 456 | |
|
MT 490 | |
|
MT 491 | |
|
MT 492 | |
|
MT 495 | |
|
MT 496 | |
|
MT 498 | |
|
MT 499 |
Category 5 Messages
The table below lists the Category 5 message types, Securities Markets, with the type designation MT 5xx.
Table 5 Securities Markets|
SWIFT Message Type |
Description |
|---|---|
|
MT 500 | |
|
MT 501 | |
|
MT 502 | |
|
MT 502 (FUNDS) | |
|
MT 503 | |
|
MT 504 | |
|
MT 505 | |
|
MT 506 | |
|
MT 507 | |
|
MT 508 | |
|
MT 509 | |
|
MT 509 (FUNDS) | |
|
MT 510 | |
|
MT 513 | |
|
MT 514 | |
|
MT 515 | |
|
MT 515 (FUNDS) | |
|
MT 516 | |
|
MT 517 | |
|
MT 518 | |
|
MT 519 | |
|
MT 524 | |
|
MT 526 | |
|
MT 527 | |
|
MT 528 | |
|
MT 529 | |
|
MT 530 | |
|
MT 535 | |
|
MT 535 (FUNDS) | |
|
MT 536 | |
|
MT 537 | |
|
MT 538 | |
|
MT 540 | |
|
MT 541 | |
|
MT 542 | |
|
MT 543 | |
|
MT 544 | |
|
MT 545 | |
|
MT 546 | |
|
MT 547 | |
|
MT 548 | |
|
MT 549 | |
|
MT 558 | |
|
MT 559 | |
|
MT 564 | |
|
MT 565 | |
|
MT 566 | |
|
MT 567 | |
|
MT 568 | |
|
MT 569 | |
|
MT 574 (IRSLST) | |
|
MT 574 (W8BENO) | |
|
MT 575 | |
|
MT 576 | |
|
MT 577 | |
|
MT 578 | |
|
MT 579 | |
|
MT 581 | |
|
MT 582 | |
|
MT 584 | |
|
MT 586 | |
|
MT 587 | |
|
MT 588 | |
|
MT 589 | |
|
MT 590 | |
|
MT 591 | |
|
MT 592 | |
|
MT 595 | |
|
MT 596 | |
|
MT 598 | |
|
MT 599 |
Category 6 Messages
The table below lists the Category 6 message types, Treasury Markets, Precious Metals, with the type designation MT 6xx.
Table 6 Treasury Markets, Precious Metals|
SWIFT Message Type |
Description |
|---|---|
|
MT 600 | |
|
MT 601 | |
|
MT 604 | |
|
MT 605 | |
|
MT 606 | |
|
MT 607 | |
|
MT 608 | |
|
MT 609 | |
|
MT 620 | |
|
MT 643 | |
|
MT 644 | |
|
MT 645 | |
|
MT 646 | |
|
MT 649 | |
|
MT 690 | |
|
MT 691 | |
|
MT 692 | |
|
MT 695 | |
|
MT 696 | |
|
MT 698 | |
|
MT 699 |
Category 7 Messages
The table below lists the Category 7 message types, Treasury Markets, Syndication, with the type designation MT 7xx.
Table 7 Treasury Markets, Syndication|
SWIFT Message Type |
Description |
|---|---|
|
MT 700 | |
|
MT 701 | |
|
MT 705 | |
|
MT 707 | |
|
MT 710 | |
|
MT 711 | |
|
MT 720 | |
|
MT 721 | |
|
MT 730 | |
|
MT 732 | |
|
MT 734 | |
|
MT 740 | |
|
MT 742 | |
|
MT 747 | |
|
MT 750 | |
|
MT 752 | |
|
MT 754 | |
|
MT 756 | |
|
MT 760 | |
|
MT 767 | |
|
MT 768 | |
|
MT 769 | |
|
MT 790 | |
|
MT 791 | |
|
MT 792 | |
|
MT 795 | |
|
MT 796 | |
|
MT 798 | |
|
MT 799 |
Category 8 Messages
The table below lists the Category 8 message types, Travellers Cheques, with the type designation MT 8xx.
Table 8 Travellers Cheques|
SWIFT Message Type |
Description |
|---|---|
|
MT 800 | |
|
MT 801 | |
|
MT 802 | |
|
MT 810 | |
|
MT 812 | |
|
MT 813 | |
|
MT 820 | |
|
MT 821 | |
|
MT 822 | |
|
MT 823 | |
|
MT 824 | |
|
MT 890 | |
|
MT 891 | |
|
MT 892 | |
|
MT 895 | |
|
MT 896 | |
|
MT 898 | |
|
MT 899 |
Category 9 Messages
The table below lists the Category 9 message types, Cash Management and Customer Status, with the type designation MT 9xx.
Table 9 Cash Management and Customer Status|
SWIFT Message Type |
Description |
|---|---|
|
MT 900 | |
|
MT 910 | |
|
MT 920 | |
|
MT 935 | |
|
MT 940 | |
|
MT 941 | |
|
MT 942 | |
|
MT 950 | |
|
MT 970 | |
|
MT 971 | |
|
MT 972 | |
|
MT 973 | |
|
MT 985 | |
|
MT 986 | |
|
MT 990 | |
|
MT 991 | |
|
MT 992 | |
|
MT 995 | |
|
MT 996 | |
|
MT 998 | |
|
MT 999 |
Validation Collaborations
The table below lists the Validation Collaboration. Validation Collaboration Definitions are provided for many key SWIFT message types.
Table 10 Common Group Messages|
Validation Collaborations |
Validates OTD/Message Type |
|---|---|
|
ValidateMt_101 |
MT_101 - Request for Transfer |
|
ValidateMt_103_STP |
MT_103_STP - Single Customer Credit Transfer |
|
ValidateMt_202 |
MT_202 - General Financial Institution Transfer |
|
ValidateMt_300 |
MT_300 - Foreign Exchange Confirmation |
|
ValidateMt_500 |
MT_500 — Instruction to Register |
|
ValidateMT_502 |
MT_502 — Order to Buy or Sell |
|
ValidateMt_502_FUNDS |
MT_502_FUNDS - Order to Buy or Sell (FUNDS) |
|
ValidateMt_508 |
MT_508 — Intra-Position Advice |
|
ValidateMt_509 |
MT_509 — Trade Status Mesage |
|
ValidateMt_513 |
MT_513 — Client Advice Execution |
|
ValidateMt_515 |
MT_515 — Client Confirmation of Purchase or Sell |
|
ValidateMt_515_FUNDS |
MT_515_FUNDS - Client Confirmation of Purchase or Sale (FUNDS) |
|
ValidateMt_517 |
MT_517 — Trade Confirmation Affirmation |
|
ValidateMt_518 |
MT_518 — Market Side Security Trade |
|
ValidateMt_527 |
MT_527 — Tri-party Collateral Instruction |
|
ValidateMt_535 |
MT_535 - Statement of Holdings |
|
ValidateMt_536 |
MT_536 - Statement of Transactions |
|
ValidateMt_537 |
MT_537 - Statement of Pending Transactions |
|
ValidateMt_538 |
MT_538 — Statement of Intra-Position Advices |
|
ValidateMt_540 |
MT_540 - Receive Free |
|
ValidateMt_541 |
MT_541 - Receive Against Payment |
|
ValidateMt_542 |
MT_542 - Deliver Free |
|
ValidateMt_543 |
MT_543 - Deliver Against Payment |
|
ValidateMt_544 |
MT_544 - Receive Free Confirmation |
|
ValidateMt_545 |
MT_545 - Receive Against Payment Confirmation |
|
ValidateMt_546 |
MT_546 - Deliver Free Confirmation |
|
ValidateMt_547 |
MT_547 - Deliver Against Payment Confirmation |
|
ValidateMt_548 |
MT_548 - Statement Status and Processing Advice |
|
ValidateMt_558 |
MT_558 — Tri-party Collateral Status and Processing Advice |
|
ValidateMt_559 |
MT_559 — Paying Agent's Claim |
|
ValidateMt_564 |
MT_564 — Corporate Action Notification |
|
ValidateMt_565 |
MT_565 — Corporate Action Instruction |
|
ValidateMt_566 |
MT_566 — Corporate Action Confirmation |
|
ValidateMt_567 |
MT_567 — Corporate Action Status and Processing Advice |
|
ValidateMt_568 |
MT_568 — Corporate Action Narrative |
|
ValidateMt_576 |
MT_576 — Tri-party Collateral and Exposure Statement |
|
ValidateMt_578 |
MT_578 — Statement Allegement |
|
ValidateMt_586 |
MT_586 — Statement of Settlement Allegement |
|
ValidateMt_590 |
MT_590 — Advice of Charges, Interest and Other Adjustment |
|
ValidateMt_595 |
MT_595 — Queries |
|
ValidateMt_596 |
MT_596 — Answers |
|
ValidateMt_598 |
MT_598 — Property Message |
|
ValidateMt_900 |
MT_900 - Confirmation of Debit |
|
ValidateMt_910 |
MT_910 - Confirmation of Credit |
|
ValidateMt_940 |
MT_940 - Customer Statement Message |
|
ValidateMt_950 |
MT_950 - Statement Message |
For information about the Validation Collaborations, see Using Message Validation Features
SWIFT Generic Library
The SWIFT OTD Libraries for 2008 include a Generic OTD used to route SWIFT messages. The Generic OTD can be used to parse any valid SWIFT message, allowing you to unmarshal and read the message headers to determine the message type, while leaving the message data as a String. Messages can then be routed to the appropriate OTD for that message type.
SWIFT Message Library JAR Files
The SWIFT Message Library include two JAR files, bic.jar, and SwiftOTDLibrary.jar, that are visible from the Project Explorer’s Swift directory. These JAR files provide the classes and methods that support the Validation Collaborations.
Using Message Validation Features
This section explains how to use specialized message validation features and Projects available with the SWIFT OTD Library.
Basic Validation Features
The SWIFT OTD Library accomplishes validation operations via Java-based Collaboration Definitions packaged with the library. These Collaboration Definitions have the following validation features provided to enhance their use:
-
Message Format Validation Rules (MFVRs): Set of functions that accurately test the semantic validity of a given subset of the SWIFT messages.
-
BICDirService (Bank Identifier Code Directory Service) Lookup: A set of methods that provide search and validation functionality for SWIFT”s BIC codes and ISO currency and country codes. The information used to look up and validate is provided by SWIFT.
-
BICPlusIBAN Validation: A set of methods that provide search and validation functionality for SWIFT”s BIC and IBAN codes. The SWIFT OTD Library implements the suggested validation rules provided by SWIFT. Please see BICPlusIBAN Directory Technical Specifications from SWIFT for more information.
These validation features share the following use characteristics:
-
Each available method and function is fully incorporated into and used by the appropriate SWIFT message OTD.
-
You can modify the validation rules for your system if desired. Customize the Collaboration’s validation rules by checking the Collaboration out (from Version Control) and modify the Validation Collaboration code. The sample implementation and instructions are provided in the Validation Collaboration as Java comments.
-
Validation methods and functions have no dependencies outside SWIFT data files and the individual OTD.
Installing the OTD library allows eGate and any eWay you use with the library to provide full support for these features. The rest of this section provides a summary of how these features operate with the SWIFT OTD Library.
Validation Components
In addition to components described under Basic Validation Features, the SWIFT OTD Library also contains the following basic components:
-
SWIFT OTDs (2001, 2002, 2003, 2005, 2006, 2007, and 2008): OTDs in the SWIFT OTD Library that represent standard SWIFT message types. See Increasing the heap size from the heapSize.bat file for details. The validation features are only available with the 2003, 2005, 2006, 2007, and 2008 OTD libraries.
-
MT Funds OTDs: Specialized OTDs that allow you to automate the specialized funds operations. This category contains FIN-based OTDs.
-
Validation Collaboration Definitions: Validation eGate components provided for each SWIFT message type. See Validation Collaboration Definitions for details.
-
Sample Projects: Sample Projects have been provided as examples of validation implementation. See SWIFT Projects for details.
Validation Methods
The SWIFT OTD Library now provides two additional OTD API methods, validate() and validateMFVR(), that can be invoked by a Collaboration to validate SWIFT 2003, 2005, 2006, 2007 and 2008 OTDs directly in the Collaboration. (see In Collaboration Validation Methods). This is an alternative to using the Validation Collaboration Definitions.
Validation Collaboration Definitions
Validation Collaboration Definitions are provided for many key SWIFT message types. These Collaboration Definitions, when combined with eGate Services, become Java-based Collaborations that verify the syntax of the SWIFT messages.
This verification is done by parsing the data into a structure that conforms to the SWIFT standard specifications. The validation functions use these Collaborations to access specific data that is then verified according the algorithms of the MFVR specifications.
For lists of these Collaboration Definitions, see Message Validation Rules.
Validation Operation
You can combine the library’s validation features in any way desired, to meet your specific needs. The SWIFT OTD Library packages a prebuilt implementation that takes SWIFT messages from a JMS Queue or Topic and validates them individually, then writes the results to a specified JMS Queue or Topic. One set contains valid messages, and the other contains the invalid ones, along with messages indicating the errors generated.
Validation Project examples
The validation Collaboration Definitions are part of the OTD Library and packaged with validation Project examples you can import into eGate.
Basic validation steps
Each validation Collaboration Definition has only the applicable tests for a specific OTD/message type, but they all operate according to the same general format, as follows:
-
The Service first tests a message to make sure it is syntactically correct, by parsing it into the OTD.
-
If the message fails, the message and its parser error are sent to an error Queue. If the message is valid, all applicable MFVR functions are applied to the message.
-
Any and all errors produced from these tests are accumulated, and the combined errors, as well as the message, are written to an error Queue for later processing. As long as no error is fatal, all applicable tests are applied.
-
Again any and all errors produced from these tests are accumulated, and the combined errors and message are written to the error Queue for later processing.
-
If no errors are found in a message, it is sent to a Queue for valid messages.
For an explanation of using these Collaboration Definitions and the validation Project examples, see SWIFT Projects.
Library Methods
The SWIFT OTD Library provides a set of run-time methods that allow you to manipulate OTD data in a variety of ways. The following methods are the most frequently used with validation operations:
-
set(): Allows you to set data on a parent node using a byte array or a string as a parameter.
-
value(): Lets you get the string value of data in a node at any tree level.
-
getLastSuccessInfo(): Returns a string that represents information about the last node in the tree that was successfully parsed.
-
command(): Allows you to pass flags as parameters, which set levels that determine the quantity of debug information you receive (see Setting the Debug Level for details).
-
marshalToString() and unmarshalFromString(): Returns string data from or accepts string data to a desired node.
In addition, the library has methods that allow you to perform basic but necessary operations with the OTDs. See Table 11.
Table 11 Basic OTD Methods|
Method |
Description |
|---|---|
|
add() |
Adds a repetition to a given child node. |
|
append() |
Adds given data at the end of existing data. |
|
copy() |
Copies given data at a specified point. |
|
count() |
Gives the count of node repetitions. |
|
delete() |
Erases data at a specified point. |
|
get() |
Retrieves data from a node. |
|
has() |
Checks whether a specified child node is present. |
|
insert() |
Inserts given data at a specified point. |
|
length() |
Returns the length of data contained in an object. |
|
marshal() |
Serializes internal data into an output stream. |
|
remove() |
Removes a given child node repetition. |
|
reset() |
Clears out any data held by an OTD. |
|
size() |
Returns the current number of repetitions for the current child node. |
|
unmarshal() |
Parses given input data into an internal data tree. |
To help in your use of the SWIFT OTD Library and its features, the library includes a Javadoc. You can see this document for complete details on all of these methods. See Table 13 for more information on this document and how to use it.
Message Validation Rules
Validation Collaborations are provided for the following SWIFT Message types and their corresponding OTDs in the library:
MFVR
-
MT 101: Request for Transfer
-
MT 103+ (STP): Single Customer Credit Transfer
-
MT 202: General Financial Institution Transfer
-
MT 300: Foreign Exchange Confirmation
-
MT 500: Instruction to Register
-
MT 502: Order to Buy or Sell
-
MT 502 (FUNDS): Order to Buy or Sell
-
MT 508: Intra-Position Advice
-
MT 509; Trade Status Message
-
MT 513: Client Advice Execution
-
MT 515: Client Confirmation of Purchase or Sell
-
MT 515 (FUNDS): Client Confirmation of Purchase or Sale
-
MT 517: Trade Confirmation Affirmation
-
MT 518: Market Side Security Trade
-
MT 527: Tri-party Collateral Instruction
-
MT 535: Statement of Holdings
-
MT 536: Statement of Transactions
-
MT 537: Statement of Pending Transactions
-
MT 538: Statement of Intra-Position Advices
-
MT 540: Receive Free
-
MT 541: Receive Against Payment Instruction
-
MT 542: Deliver Free
-
MT 543: Deliver Against Payment Instruction
-
MT 544: Receive Free Confirmation
-
MT 545: Receive Against Payment Confirmation
-
MT 546: Deliver Free Confirmation
-
MT 547: Deliver Against Payment Confirmation
-
MT 548: Settlement Status and Processing Advice
-
MT 558: Tri-party Collateral Status and Processing Advice
-
MT 559: Paying Agent's Claim
-
MT 564: Corporate Action Notification
-
MT 565: Corporate Action Instruction
-
MT 566: Corporate Action Confirmation
-
MT 567: Corporate Action Status and Processing Advice
-
MT 568: Corporate Action Narrative
-
MT 576: Tri-party Collateral and Exposure Statement
-
MT 578: Statement Allegement
-
MT 586: Statement of Settlement Allegement
-
MT 590: Advice of Charges, Interest and Other Adjustment
-
MT 595: Queries
-
MT 596: Answers
-
MT 598: Property Message
-
MT 900: Confirmation of Debit
-
MT 910: Confirmation of Credit
-
MT 940: Customer Statement Message
-
MT 950: Statement Message
Message Format Validation Rules (MFVR)
The MFVR support for the SWIFT OTD Library is a set of functions collectively known as the message format validation rules methods. These functions accurately test the semantic validity of a given subset of the SWIFT messages. Validation is performed according to standards provided in SWIFT’s publication, the Message Format Validation Rules Guide (current version).
There is one validation method for each MFVR message type and its corresponding OTD. Each method is called on a particular OTD and is used to validate the data of a given instance of that message type. Because business practices vary greatly between organizations, these functions can be modified as needed.
For examples of how the MFVR validation process works, you can import the sample validation Projects. For details, see SWIFT Projects.
SWIFT’s MFVR validation rules are known as semantic verification rules (SVRs) or semantic rules, as opposed to the syntactic rules, which verify the syntax of the fields only. Syntactic verification is built into each OTD.
SWIFT defines a total of 299 SVRs that are validated by the FIN network engine. SWIFT Alliance Access or IBM’s Merva products do not implement these rules, mainly because there is no functional model, and the implementation work is mostly manual. Each message type has to be validated against a subset of these rules.
In addition this set of 299 SVRs, SWIFT has defined a new series of rules to help enable straight-through processing (STP) in the securities industry. The OTD methods that validate for MFVR compliance also validate for compliance with STP rules.
MFVR Validation Methods
The MFVR methods adhere to SWIFT’s current Message Format Validation Rules Guide, including those in any updates section in the back of the manual. The methods implement all of the “special functions” as defined in the guide, which are required by the validation rules.
The SVR methods also implement the semantic validation “rules” or functionality used in the validation functions, as defined by the current Message Format Validation Rules Guide.
Using this semantic validation, eGate can verify the contents of each message before it is sent into the FIN network, saving time and usage fees.
MFVR Errors
These errors result from the application of the Semantic Validation Rules. Multiple errors are possible, and they are given in the order in which they occurred and with the sequences, fields, or subfields used to determine them.
For example, an MFVR failure on a 535 Collaboration OTD appears as follows:
MFVR MT535 Error
SVR Rule 103 - Error code: D031001 = Since field :94a:: is present
in Sequence B, then   fields :93B::AGGR and :94a::SAFE are not
allowed in any occurrence of Subsequence B1a.mt_535.Mt_535.Data[1].
SubSafekeepingAccount mt_535.Mt_535.Data[1].SubSafekeepingAccount[0].
SubSeqB1[0].SubSeqB1a.Balance

SVR Rule 104 - Error code: D04-1001 = Since field :93B::
AGGR is present in Subsequence B1a,then
:field 94a::SAFE must be present in the same Subsequence B1a.
mt_535.Mt_535.Data[1].SubSafekeepingAccount[0].SubSeqB1[0].
SubSeqB1a.Balance
|
For more information on error messages, see Error Message Information.
In Collaboration Validation Methods
As an alternative to using the Validation Collaborations, the 5.1 version of the SWIFT OTD Library offers two validation methods, validate(), and validateMFVR(), that can be invoked by a Collaboration to validate SWIFT 2003, 2005, 2006, 2007, and 2008 OTDs directly in the Collaboration.
For example, if you have an OTD for message MT 541, you can call the OTD’s validateMFVR() method from the Collaboration, and the Collaboration validates the message’s MFVRs.
The validation methods are available for the same SWIFT message OTDs listed under Message Validation Rules. You can see (or select) these validation methods by right-clicking the SWIFT message OTD from the Collaboration Editor’s Business Rules Designer and clicking Select method to call on the shortcut menu.
These methods are described in detail as follows:
validate()
Description
Validates applicable MFVR rules against the OTD instance. Throws a MessageValidationException if the OTD is invalid in regard to applicable MFVR rules. Error message detail can be obtained by calling MessageValidationException.getErrorMessage().
If the OTD does not have applicable MFVR rules, the method call returns without throwing a MessageValidationException.
Syntax
public void validate() |
Parameters
None.
Return Values
None.
Throws
com.stc.swift.validation.MessageValidationException: A MessageValidationException is thrown when the OTD is invalid in regard to applicable MFVR rules. |
validateMFVR()
Description
Validate applicable MFVR rules against the OTD instance. Throws MFVRException if the OTD is invalid in regard to applicable MFVR rules. Error message detail can be obtained by calling MFVRException.getErrorMessage().
If the OTD does not have applicable MFVR rules the method call always returns without throwing an MFVRException.
Syntax
public void validateMFVR() |
Parameters
None. |
Return Values
None.
Throws
com.stc.swift.validation.MFVRException : The MFVRException is thrown when the OTD is invalid in regard to applicable MFVR rules. |
Calling the Validation Methods in your Collaboration
The validation methods are available at the OTD level, and can be called after the OTD is populated with it’s values. This usually occurs after a message is unmarshaled in the OTD.
The following fragment of code demonstrates the use of the validate method within a Collaboration. In this example, validate() is called and either “message OK’ or the exception error String is written to the log.
import com.stc.swift.validation.MFVRException;
import com.stc.swift.validation.SVRException;
import com.stc.swift.validation.ValidatingSWIFTMTOTD;
import com.stc.swift.validation.bic.BICDir;
import com.stc.swift.validation.BICPlusIBAN.*;
import com.stc.swift.validation.MessageValidationException;
import com.stc.swift.otd.v2008.std.mt_541.Mt_541;
import java.util.*;


public class ValidateMt_541_Modified
{

    public boolean receive( com.stc.connectors.jms.Message input,
xsd.ValidationReplyMessage.Result output, com.stc.connectors.jms.JMS
 invalidMessages, com.stc.connectors.jms.JMS validMessages,
 com.stc.swift.otd.v2008.std.mt_541.Mt_541 mt_541_1 )
        throws Throwable
    {
        com.stc.connectors.jms.Message result = validMessages.createMessage();
        result.setTextMessage( input.getTextMessage() );
        String errors = null;
        String msg = "";
        try {
            mt_541_1.unmarshal( (com.stc.otd.runtime.OtdInputStream)
 new com.stc.otd.runtime.provider.SimpleOtdInputStreamImpl(
 new java.io.ByteArrayInputStream( input.getTextMessage().getBytes() ) ) );
        } catch ( Exception ex ) {
            errors = ex.getMessage();
            errors += "\r\n";
            errors += "Last successful parse: " + mt_541_1.getLastSuccessInfo();
            result.storeUserProperty( "ValidationErrors", errors );
            invalidMessages.send( result );
            output.setErrorMessages( errors );
            output.setIsError( true );
            output.setSwiftMessage( input.getTextMessage() );
            return false;
        }
        logger.info( "Unmarshalled MT541 message." );
        logger.info( "MFVR validation to follow ....." );
        // Call Default Validation logic for validation against applicable MFVRs
        try {
            mt_541_1.validate();
        } catch ( MessageValidationException mve ) {
            errors = mve.getErrorMessage();
            msg = mve.getMessage();
        }
        logger.info( "Completed MFVR validation" );
        logger.info( "BICPlusIBAN validation to follow ....." );
        if (errors == null) {
            logger.info( "No MFVR Exception" );
        } else {
            logger.info( "Found MFVR Exception" );
            logger.info( "Errors: " + errors );
            logger.info( "msg: " + msg );
        }
        // End of "Default Validation" invoking
        //
        // Call BICPlusIBAN validation
        String BICPlusIBANresult = "";
        String bicCode = mt_541_1.getBasicHeader().getLTAddress().substring( 0, 8 );
        String ibanCode = "DE615088005034573201";
        BICPlusIBANDir.setBIC_Code( bicCode );
        BICPlusIBANDir.setIBAN_Code( ibanCode );
        BICPlusIBANresult = "\n\n\n*** Validating BICPlusIBAN ***\n";
        BICPlusIBANresult = BICPlusIBANresult +
"    BIC - " + BICPlusIBANDir.getBIC_code() + "\n";
        BICPlusIBANresult = BICPlusIBANresult +
"    IBAN - " + BICPlusIBANDir.getIBAN_code() + "\n";
        BICPlusIBANresult = BICPlusIBANresult +
"\n   a) Deriving the BIC from the IBAN...\n";
        ArrayList bicList = BICPlusIBANDir.deriveBICfromIBAN();
        if (bicList == null) {
            BICPlusIBANresult = BICPlusIBANresult +
"      ==> Unable to derive BIC data from given IBAN.\n";
            if (errors != null) {
                errors = errors + "\n\nUnable to derive BIC data from given IBAN.\n";
            } else {
                errors = errors + "\n\nUnable to derive BIC data from given IBAN.\n";
            }
        } else {
            BICPlusIBANresult = BICPlusIBANresult +
"      ==> BIC CODE and BRANCH CODE = " + (String) bicList.get( 0 ) + ".\n";
            BICPlusIBANresult = BICPlusIBANresult +
"      ==> IBAN BIC CODE and BRANCH CODE = " + (String) bicList.get( 1 ) + ".\n";
            BICPlusIBANresult = BICPlusIBANresult +
"      ==> ROUTING BIC CODE and BRANCH CODE = " + (String) bicList.get( 2 ) + ".\n";
        }
        BICPlusIBANresult = BICPlusIBANresult + "\n   b) Validating the Bank ID...\n";
        if (BICPlusIBANDir.validateBankID()) {
            BICPlusIBANresult = BICPlusIBANresult +
"      ==> Valid Bank ID found in BI file.\n";
        } else {
            BICPlusIBANresult = BICPlusIBANresult +
"      ==> No valid Bank ID found in BI file.\n";
            if (errors != null) {
                errors = errors + "No valid Bank ID found in BI file.\n";
            } else {
                errors = errors + "No valid Bank ID found in BI file.\n";
            }
        }
        BICPlusIBANresult = BICPlusIBANresult + "\n   c) Validating the BIC...\n";
        if (BICPlusIBANDir.validateBIC()) {
            BICPlusIBANresult = BICPlusIBANresult +
"      ==> Valid BIC data found in BI file.\n";
        } else {
            BICPlusIBANresult = BICPlusIBANresult +
"      ==> No valid BIC data found in BI file.\n";
            if (errors != null) {
                errors = errors + "No valid BIC data found in BI file.\n";
            } else {
                errors = errors + "No valid BIC data found in BI file.\n";
            }
        }
        BICPlusIBANresult = BICPlusIBANresult +
"\n   d) Validating the BIC/IBAN Combination...\n";
        if (BICPlusIBANDir.validateBICIBANCombo()) {
            BICPlusIBANresult = BICPlusIBANresult +
"      ==> BIC and IBAN codes are belong to the same institution.\n\n\n";
        } else {
            BICPlusIBANresult = BICPlusIBANresult +
"      ==> BIC and IBAN codes are NOT belong to the same institution.\n\n\n";
            if (errors != null) {
                errors = errors + "BIC and IBAN codes are NOT belong
 to the same institution.\n\n\n";
            } else {
                errors = errors + "BIC and IBAN codes are NOT belong
 to the same institution.\n\n\n";
            }
        }
        logger.info( BICPlusIBANresult );
        //
        if (errors != null) {
            // errors = errors + BICPlusIBANresult;
            result.storeUserProperty( "ValidationErrors", errors );
            invalidMessages.send( result );
            output.setErrorMessages( errors );
            output.setIsError( true );
            output.setSwiftMessage( input.getTextMessage() );
            return false;
        }
        // passed validation
        String currMsg = result.getTextMessage();
        currMsg = currMsg + BICPlusIBANresult;
        result.setTextMessage( currMsg );
        validMessages.send( result );
        output.setErrorMessages( "" );
        output.setIsError( false );
        output.setSwiftMessage( input.getTextMessage() );
        return true;
    }
|
To select a validation method from the Collaboration Editor’s Business Rules Designer, right-click the SWIFT message OTD and select Select method to call from the shortcut menu.
SWIFT Projects
Four sample Projects are packaged with the 2008 SWIFT OTD Library:
-
prjSwift_JCD_MFVROnly: Demonstrates how to use the SWIFT OTDs using a Java-based Collaboration for the MFVR validation.
-
prjSwift_JCD_BICPlusIBANOnly: Demonstrates how to use the SWIFT OTDs using a Java-based Collaboration for the BICPlusIBAN validation.
-
prjSwift_JCD_MFVRAndBICPlusIBAN: Demonstrates how to use the SWIFT OTDs using a Java-based Collaboration for the MFVR and BICPlusIBAN validations.
-
prjSwift_MXValidations_Sample: Demonstrates what types of ”Generic Validations” are done on MX messages and how the sample is run.
-
SCRProject_Sample: Used to visualize SWIFT workflows.
-
prjSwift_BP_Sample: Demonstrates how to use the SWIFT OTDs with an eInsight Business Process for the business logic.
These sample Projects are uploaded with the SWIFT OTD Library documentation SAR file, and downloaded from the Sun Composite Application Platform Suite Installer. They demonstrate the MFVR validation operation.
In addition to the sample Projects, the sample Project file also includes sample data files for both the JCD and eInsight™ sample Projects.
Note –
You must update the BICDir files before the sample Projects can be run. The BICDir files are required for the BIC validations in the sample projects java collaborations. For more information, refer to Updating BICDirService.
Importing a Sample Project
The SWIFT sample Projects are bundled into a single zip file named SWIFT_OTD_Library_Sample.zip. This file is uploaded with the eWay’s documentation SAR file, SwiftOTDLibraryDocs.sar, and is available for download from the Sun Java Composite Application Platform Suite Installer’s Documentation tab. See Installing the SWIFT OTD Libraries for directions on uploading the SwiftOTDLibraryDocs.sar file.
To import a sample eWay Project to the Enterprise Designer do the following:
-
The sample files are uploaded with the eWay’s documentation SAR file and downloaded from the Sun Java Composite Application Platform Suite Installer’s Documentation tab. The SWIFT_OTD_Library_Sample.zip file contains the various sample Project ZIP files. Extract the samples to a local file.
-
Save all unsaved work before importing a Project.
-
From the Enterprise Designer’s Project Explorer pane, right-click the Repository and select Import from the shortcut menu. The Import Manager appears.
-
Browse to the directory that contains the sample Project zip file. Select the sample file and click Import. After the sample Project is successfully imported, click Close.
-
Before an imported sample Project can be run you must do the following:
-
-
Create an Environment (see Creating an Environment)
-
Create a Deployment Profile (see Creating the Deployment Profile)
-
Create and start a domain (see Creating and Starting the Domain)
-
Build and deploy the Project (see Building and Deploying the Project)
-
SWIFT Projects and the Enterprise Designer
A Project contains all of the eGate components that you designate to perform one or more desired processes in eGate.
-
Connectivity Map Editor: contains the eGate business logic components, such as Collaborations, Topics, Queues, and eWays, that you include in the structure of the Project.
-
OTD Editor: contains the source files used to create Object Type Definitions (OTDs) to use with a Project.
-
Business Process Designer and Editor: allows you to create and/or modify Business Rules to implement the business logic of your Project’s eInsight Business Processes.
-
Java Collaboration Editor: allows you to create and/or modify Business Rules to implement the business logic of your Project’s Java Collaboration Definitions.
SWIFT Sample prjSwift_JCD_MFVROnly Project
The SWIFT Sample Project (prjSwift_JCD_MFVROnly) demonstrates the validation features of the SWIFT OTD Library for MFVR only. Specifically, this Project employs the Java-based Validation Collaborations and their definitions.
The Project uses a common process infrastructure to identify and isolate invalid messages. The process keeps these messages readily available for further use. It also passes valid messages on to their destinations. .
Project Walkthrough
The flow of the Project is as follows:
-
The inbound File eWay subscribes to an external ”input” directory. The eWay accepts an MT_541 message and publishes it to the Service1 Collaboration.
-
The CopyCollab1 service (CopyCollaboration) unmarshals the message, copies all of the data fields (to demonstrate how to copy the data fields), marshals the message to a String and publishes the message to a JMS Queue.
-
The ValidateMT_541 Collaboration accepts the message from the JMS Queue, validates the message, and publishes it to the ValidMessage Queue if the message is valid, or to the InvalidMessages if the message is not valid.
-
The PrintValidMessages Collaboration accepts the valid messages, prints out the message and sends the message to the outbound File eWay.
-
The PrintInvalidMessages Collaboration accepts the invalid messages, prints that the message is invalid and lists any errors. It then sends that message to the outbound File eWay.
-
The outbound File eWay publishes the messages to an external folder as either Swift2008_JCD_MFVROnly_Valid_output1.dat or Swift2008_JCD_MFVROnly_Invalid_output1.dat.
You must name the source (input) and destination (output) file directories in the setting property settings for the Project’s File eWays. See the File eWay Intelligent Adapter User’s Guide for details.
SWIFT Sample prjSwift_JCD_MFVROnly Project Data
Sample valid and invalid input messages are provided with the downloaded sample, as well as examples of valid and invalid output messages. These are located in the SWIFT sample project folder as follows:
-
input_Swift2008JCD_MFVROnly_Validmt541.txt.~in: sample valid message input file
-
input_Swift2008JCD_MFVROnly_Invalidmt541.txt.~in: sample invalid message input file
-
Swift2008_JCD_MFVROnly_Valid_output1.dat: example of sample valid message output
-
Swift2008_JCD_MFVROnly_Invalid_output1.dat: example of sample invalid message output
Also, see Validation Operation for a more detailed explanation of the validation operation.
SWIFT Sample prjSwift_JCD_MFVRAndBICPlusIBAN Project
The SWIFT Sample Project (prjSwift_JCD_MFVRAndBICPlusIBAN) demonstrates the validation features of the SWIFT OTD Library for the combination of MFVR and BIC/IBAN. Specifically, this Project employs the Java-based Validation Collaborations and their definitions.
The Project uses a common process infrastructure to identify and isolate invalid messages. The process keeps these messages readily available for further use. It also passes valid messages on to their destinations. .
Project Walkthrough
The flow of the Project is as follows:
-
The inbound File eWay subscribes to an external ”input” directory. The eWay accepts an MT_541 message and publishes it to the Service1 Collaboration.
-
The CopyCollab1 service (CopyCollaboration) unmarshals the message, copies all of the data fields (to demonstrate how to copy the data fields), marshals the message to a String and publishes the message to a JMS Queue.
-
The ValidateMT_541_Modified Collaboration accepts the message from the JMS Queue, validates the messages for MFVR and then for BICPlusIBAN, and publishes it to the ValidMessage Queue if the message is valid, or to the InvalidMessages if the message is not valid.
-
The PrintValidMessages Collaboration accepts the valid messages, prints out the message and sends the message to the outbound File eWay.
-
The PrintInvalidMessages Collaboration accepts the invalid messages, prints that the message is invalid and lists any errors. It then sends that message to the outbound File eWay.
-
The outbound File eWay publishes the messages to an external folder as either Swift2008_JCD_MFVRAndBICPlusIBAN_Valid_output1.dat or Swift2008_JCD_MFVRAndBICPlusIBAN_Invalid_output1.dat.
You must name the source (input) and destination (output) file directories in the setting property settings for the Project’s File eWays. See the File eWay Intelligent Adapter User’s Guide for details.
SWIFT Sample prjSwift_JCD_MFVRAndBICPlusIBAN Project Data
Sample valid and invalid input messages are provided with the downloaded sample, as well as examples of valid and invalid output messages. These are located in the SWIFT sample project folder as follows:
-
input_Swift2008JCD_MFVR_BICPlusIBAN_Validmt541.txt.~in: sample valid message input file
-
input_Swift2008JCD_MFVR_BICPlusIBAN_Invalidmt541.txt.~in: sample invalid message input file
-
Swift2008_JCD_MFVRAndBICPlusIBAN_Valid_output1.dat: example of sample valid message output
-
Swift2008_JCD_MFVRAndBICPlusIBAN_Invalid_output1.dat: example of sample invalid message output
Also, see Validation Operation for a more detailed explanation of the validation operation.
SWIFT Sample prjSwift_JCD_BICPlusIBANOnly Project
The SWIFT Sample Project (prjSwift_JCD_BICPlusIBANOnly) demonstrates the validation features of the SWIFT OTD Library for BIC and IBAN only. Specifically, this Project employs the Java-based Validation Collaborations and their definitions.
The Project uses a common process infrastructure to identify and isolate invalid messages. The process keeps these messages readily available for further use. It also passes valid messages on to their destinations. .
Project Walkthrough
The flow of the Project is as follows:
-
The inbound File eWay subscribes to an external ”input” directory. The eWay accepts an MT_541 message and publishes it to the Service1 Collaboration.
-
The CopyCollab1 service (CopyCollaboration) unmarshals the message, copies all of the data fields (to demonstrate how to copy the data fields), marshals the message to a String and publishes the message to a JMS Queue.
-
The ValidateMT_541_Modified Collaboration accepts the message from the JMS Queue, validates the messages for BICPlusIBAN only, and publishes it to the ValidMessage Queue if the message is valid, or to the InvalidMessages if the message is not valid.
-
The PrintValidMessages Collaboration accepts the valid messages, prints out the message and sends the message to the outbound File eWay.
-
The PrintInvalidMessages Collaboration accepts the invalid messages, prints that the message is invalid and lists any errors. It then sends that message to the outbound File eWay.
-
The outbound File eWay publishes the messages to an external folder as either Swift2008_JCD_BICPlusIBANOnly_Valid_output1.dat or Swift2008_JCD_BICPlusIBANOnly_Invalid_output1.dat.
You must name the source (input) and destination (output) file directories in the setting property settings for the Project’s File eWays. See the File eWay Intelligent Adapter User’s Guide for details.
SWIFT Sample prjSwift_JCD_MFVRAndBICPlusIBAN Project Data
Sample valid and invalid input messages are provided with the downloaded sample, as well as examples of valid and invalid output messages. These are located in the SWIFT sample project folder as follows:
-
input_Swift2008JCD_BICPlusIBANOnly_Validmt541.txt.~in: sample valid message input file
-
input_Swift2008JCD_BICPlusIBANOnly_Invalidmt541.txt.~in: sample invalid message input file
-
Swift2008_JCD_BICPlusIBANOnly_Valid_output1.dat: example of sample valid message output
-
Swift2008_JCD_BICPlusIBANOnly_Invalid_output1.dat: example of sample invalid message output
Also, see Validation Operation for a more detailed explanation of the validation operation.
SWIFT MX Validation Sample
The SWIFT MX Validation sample demonstrates what types of ”Generic Validations” are done on MX messages and how they are applicable. The sample zip file contains the following directory structure:
-
Input Data — MXSample_input.xml.fin – Sample MX message to be read by inbound File eWay.
-
jcdSchemaValidation.java – Java collaboration to validate MX messages against relevant XSD schema.
-
jcdGenericValidation.java – Java collaboration to validate MX messages against Extended Validation Rules.
-
Output Data – MX_GenericValidationLog_output1.dat – This is a log file for validation results from the jcdGenericValidation java collaboration.
-
Sample Project – SwiftMXSample.zip: This is the sample project.
-
XSD Data — XSD Schema file () to be validated against the MX input message: RedepmptionBuldOrderV02.xsd and swift.if.ia_setr.001.001.02.xsd.
Note –
The Batch eWay is required when running the SWIFt MX Validation sample.
Sample Project
The Project's flow is represented in the Connectivity Map as follows:
Inbound File eWay –> Schema Validation —> JMS Queue —> Generic Validation —> Batch eWay, Outbound File eWay. These are explained further below.
Descriptions of components
-
Inbound File eWay – The File eWay is used to read MX messages to be validated.
-
Schema Validation – Each MX message has a corresponding XSD Schema file. You must use the XSD OTD Wizard to build an XSD OTD based on the schema file. In this collaboration, the logic is to unmarshal the inbound message to the XSD OTD and then to marshal the OTD to String and send the payload to JMS Queue. This process is to ensure the MX message is well-formed and is validated against the XSD schema. For a different MX message type, build the XSD OTD and create this simple collaboration.
Note –The sample project chooses the ”RedemptionBulkOrderV02”message and schema to demo the usage. The RedemptionBulkOrderV02 schema is obtained from the SWIFTNet Funds ver3.0 CD, which also contains all element types to be validated in the Generic Validation collaboration.
-
JMS Queue – JMS Queue to hold schema validated messages.
-
Generic Validation Collaboration – This collaboration contains a set of generic validatio rules, which SWIFt recommends must be applied to an MX message. You can reuse this collaboration to validate all MX Message types. The generic validation rules validate the following identifiers and codes in a MX message:
-
Verifying BIC (datatype: BICIdentifier), against existence in the BIC directory (ISO 9362)
-
Verifying BEI (datatype: BEIIdentifier), against existence in the BEI list on SWIFTNet
-
Verifying ActiveCurrencyAndAmount (datatype: ActiveCurrencyAndAmount), against existence in Currency Code and number of valid decimal digits (ISO 4217)
-
Verifying Country Code (datatype: CountryCode), against existence in Country Code list (ISO 3166)
-
Verifying IBAN Identifier (datatype: IBANIdentifier), against IBAN structure as provided by ISO 13616
-
Verifying BICOrBEI (datatype: AnyBICIdentifier), against existence in the BIC list on SWIFTNet
-
Verifying ActiveCurrency (datatype: ActiveCurrencyCode), against existence in Currency Code list on SWIFTNet
-
Verifying ActiveOrHistoricCurrency (datatype: ActiveOrHistoricCurrencyCode), against existence in Currency Code list on SWIFTNet
-
Batch eWay – The Batch (Local File) eWay is used to read XSD files for Generic Validation. Place all XSD schema files in one directory and make sure the name of the XSD file matches the target namespace specified in the MX message. For example, in the sample input file, there is:
xmlns:Doc=”urn:swift:xsd:swift.if.ia$setr.001.001.02
Therefore the matching schema file name must be swift.if.ia_setr.001.001.02. Please rename the $ character to _, because the $ character is not considered a valid file name pattern in Java.
In Java CAPS, you must open the BAtch eWay configuration in the connectivity map (and under the Target Location node) and make sure the directory name for the XSD files are set to Target Directory Name field.
-
Outbound File eWay – The File eWay is used to log validatino results and error messages in Generic Validation.
Note –You can place all XSD schema files in one directory. In Connectivity Map, set the directory name in the Target Directory Name, under Target Location section in Batch Local File configuration window. In Generic Validation, the collaboration will read the input message and locate the associated schema file name, in the directory name specified in Batch eWay. Make sure the schema file name does not contain any illegal character $. This $ character should be replaced with _ character in file name. For example, schema file name swift.if.ia$setr.001.001.02 should be renamed to swift.if.ia_setr.001.001.02and placed in the target directory.
-
Running the MX Sample Project
To run the MX Sample Project, complete the following steps.
-
Import the SWIFT OTD Library SAR file.
-
Import the sample project.
-
In eDesigner, under Sun SeeBeyond > OTD Library > Swift, right-click on bic.jar and update CT, CU, and FI bic data files.
-
In the Connectivity Map, make sure the directory name and the file name in both the File eWay and Batch eWay are valid.
-
In the Environment, make sure the directory name for the File eWay is valid.
-
Under the project, create a new Deployment Profile and map all components.
-
Build and Deploy the project.
-
Send the input file to the inbound File eWay and watch for the outbound file.
Note –You must build your own XSD OTD and Schema Validation collaboration, based on different MX message types to be validated. You can always reuse the Generic Validation collaboration for all MX messages.
SWIFT Correlation Repository Sample
The SWIFT Correlation Repository (SCR) is a Java CAPS utility used to visualize SWIFT workflows. In addition, the SCR:
-
Reconciles Messages into Transaction Processes
-
Provides Message Browsing and Message Monitoring
-
Offers services for Duplicate Checking and validation of MX and MT messages
-
Allows for Message Repair and Resubmit
Prerequisites
The following prerequisites are needed in order to run the SRC project:
-
Windows Operating System
-
Java CAPS 5.1.3, with the following modules:
-
eGate
-
eVision
-
Oracle eWay
-
File eWay
-
-
SWIFTOTDLibrary.sar
-
Oracle 9.2
-
Internet Explorer
Installation steps
-
Ensure all prerequisites are installed.
-
Install Hotfix 109645 for the Enterprise Designer.
-
Install the database schema from the SCR_CreateUser.sql and SCR_CreateTable.sql files (located in the SCR_Create_Cleanup zip file).
-
Extract the contents of the SampleSCR.zip file into your local drive.
-
Import the SampleSCR.zip file into Enterprise Designer.
-
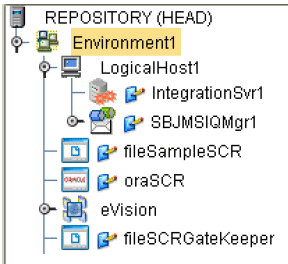
Set the environment variables (as shown in the figure below).
-
Create a deployment profile in the SCR project.
-
Create a deployment profile in the TesterGatekeeper project.
-
Deploy both the SCR and TesterGatekeeper deployment profiles.
Preparing an SCR flow
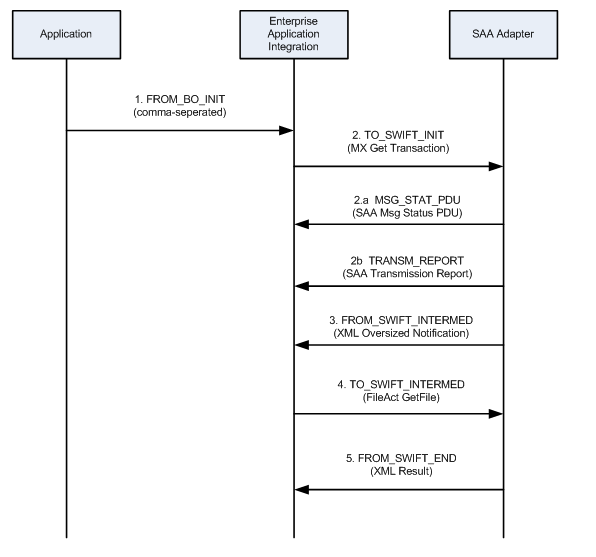
The SCR Workflow follows the tasks, procedural steps, required input and output information, for each step in the business process. The SCR workflow is used to view, manage, and enforce the consistent handling of work. The following figure is an example of a design of an SCR flow.
Designing an SCR flow
-
Start the Enterprise Designer.
-
Open the imported SCR project.
-
Choose both a short name and a long name for the flow (example: t2 :: Target2).
-
Choose a string name for each event / message / direction (as shown in the SCR flow example above: TO_SWIFT_INIT).
-
Add the flow name as a new choice in the viewer by navigating to the Viewer on the SCR page, then to the 1TrxList, and then to the pgTrxList.
-
On the Properties tab, select SelDomain.
-
Right-click the highlighted area on the design canvas, and select Edit Options. The Edit Options window opens.
-
Add new flow elements to the properties of the control SelDomain. This project already ahs defualted values entered (t2 :: Target2).
-
Linking the Domain Name and Direction to a Color
You can link the name of a Domain to specific pointer directions and colors within the monitoring application.
-
Link the domain name and the direction to a color by opening the SCR.properties file located in c:\SampleSCR\properties.
-
A list of available directions and colors are listed in the SCR properties file. Possible Colored Directions (CD) for message lists include:
-
DEFAULT
-
LGREY, RGREY
-
LBLUE, RBLUE
-
LGREEN, RGREEN
-
LORANGE, RORANGE
-
LRED, RRED
-
-
Link the Domain to a specific pointer directin and color by using the following Syntax: CD_<Direction String> = <Colored Directions>.
Using the SCR for Monitoring Flows
Applications that send events to the SCR must do two things:
-
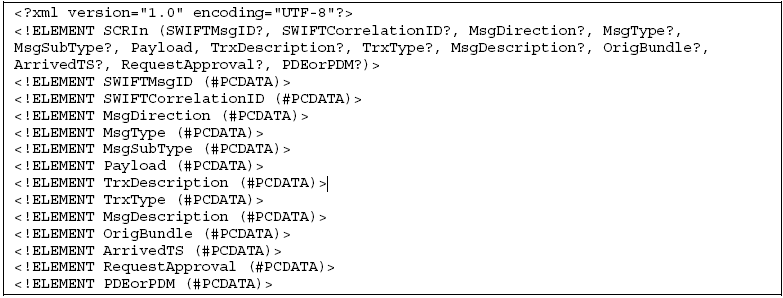
Create a message following the input format shown below. Do not use the field whose usage is indicated as “Gatekeeper only”.
-
Send the message to either:
-
A file in the c:\SampleSCR\In location, with a .txt extension and a name starting with Loader.
-
A JMS message to the JMS queue, qSCRInEnv, in SCR/Loader.
-
Using the Viewer for Monitoring Transactions
-
Use an Internet browser and navigate to the URL http://localhost:18001/scr. The Select Transaction window opens.
-
Use one of the following criteria for monitoring transactions:
-
Select the 10 most recently updated transactions from the drop-down list.
-
Use the domain selector to restrict the transaction list.
-
Search for a transaction with a specific ID.
-
Search for a transaction that contains a message with a specific ID.
-
-
Click the Search button.
Using the SCR as Gatekeeper
Applications sending events to the SCR as Gatekeeper must do two things:
-
Create a message following the input format (as shown in the previous section)
-
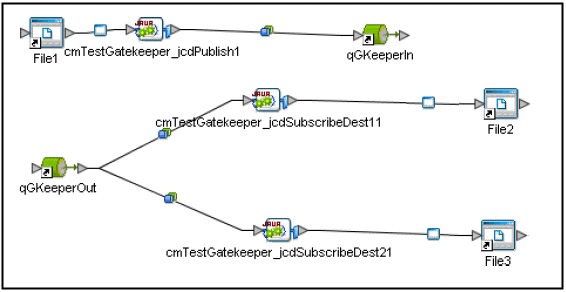
Send the message to the JMS queue “qGKeeperIn” in SCR/Gatekeeper. Make sure to add a JMS topic to the message. A code sample is shown below.
com.stc.connectors.jms.Message outMsg =
jmsPublish.createTextMessage();
outMsg.storeUserProperty( "SCRDestination", "DEST1" );
outMsg.setTextMessage( input.getText() );
jmsPublish.send( outMsg );
-
Subscribe to the JMS queue ”qGKeeperOut” in SCR/Gatekeeper.
-
Subscribe to the JMS topic that you used to publish the message.
Note –
A complete test setup is located in the project TesterGatekeeper.
Using the Viewer to Repair Messages
-
Use an Internet browser and navigate to the URL http://localhost:18001/scr. The Select Transaction window opens.
-
Select the 10 most recently updated transactions from the drop-down list. Messages that have been held for review and resubmittion (e.g. messages that are duplicates, incorrect, or awaiting approval) are displayed.
-
Select the message you wish to examine and click the Repair button. The Message Repair window opens, displaying detailed information regarding the message.
-
You can resolve the message in the following ways:
-
Correct the message error and click the Resubmit button.
-
Examine a message that requires approval and click the Approve button.
-
Delete the message by clicking the Delete button
-
SWIFT Sample eInsight™ Project
The SWIFT eInsight Sample Project (prjSwift_BP_Sample), an eInsight Project, uses an eInsight Business Process Service instead of the Java-based Collaborations used in the JCD sample. Before using this Project, you must first import it into eGate. See Importing a Sample Project for details on how to import a Project.
The SWIFT eInsight Sample project demonstrates the use of SWIFT OTDs in a Business Process, and provides an example of how to use the marshal() and unmarshal() operations included as part of every SWIFT OTD. This Project contains one Business Process.
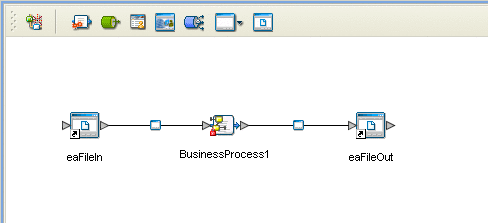
Figure 1 SWIFT eInsight Sample Project - Connectivity Map
Project Walkthrough
Figure 1 displays the Project’s Connectivity Map, which represents the flow of the Project as follows:
-
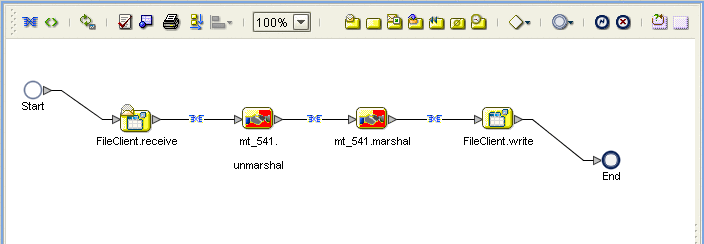
The Business Process (see Figure 2) begins with a File.read() operation. This operation subscribes to an external “input” directory and picks up a file that contains a valid SWIFT MT 541 message.
-
The File.read() operation publishes the message to the input of the mt_541.unmarshal() operation. This operation basically unmarshals the MT 541 message into a Java data structure that represents the message. This structure is the output of the mt_541.unmarshal() operation.
-
The Business Process continues by publishing this output to the input of the mt_541.marshal() operation. The mt_541.marshal() operation transforms the OTD data structure back into a String.
-
Finally, this String is published as input to the File.write() operation, which writes out the String to an external directory.
The Business Process itself is relatively simple, but it identifies how the operations of the SWIFT OTDs can be used in a Business Process.
Configuration of the Connectivity Map is simply the configuration of the Inbound and Outbound File eWay (see Figure 1). The configuration of the Inbound File eWay determines where the SWIFT MT 541 message is located. The configuration of the Outbound File eWay states where the output of the Business Process goes.
Note –
You must have the eInsight.sar file installed to use the features available with this Project. See the Sun Java Composite Application Platform Suite Installation Guide for complete installation procedures.
SWIFT eInsight Sample Project Data
A sample messages, as well as an example of a valid output message are located in the Swift_eInsight_Sample_Data folder (downloaded with the sample) as:
-
input_BP_Validmt541.txt.~in: sample valid message input file
-
Swift_Valid_BP_Output1.dat: example of sample valid message output
Using eGate With eInsight
You can set up and deploy eGate components using eInsight. Once you have associated the desired component (for example, a Service in this Project) with a Business Process, the eInsight engine can automatically invoke that component during run time, using a Business Process Execution Language (BPEL) interface.
The following eGate components are able to interface with eInsight:
-
Java Messaging Service (JMS)
-
Object Type Definitions (OTDs)
-
eWays
-
eGate Services
Using the eGate Enterprise Designer and its eInsight Editor, you can add an operation to a Business Process, then associate that process with an eGate component, for example, a Service. In the Enterprise Designer, associate the Business Process and the Service icons using drag-and-drop procedures.
See the eInsight Business Process Manager User’s Guide for details.
SWIFT OTD Library With eInsight
You can add SWIFT OTD Library objects to an eInsight Business Process during the system design phase. To create this association, select the desired operation, for example marshal or unmarshal, under the OTD in the Project Explorer, and drag it onto the eInsight Business Process Editor.
At run time, the eInsight Engine is able to invoke each of the steps in order of set up in the Business Process. Using the engine’s BPEL interface, eInsight in turn invokes the SWIFT OTD Library operations, as well as any eWays in the Business Process.
Table 12 shows the eInsight Business Process operations available to the SWIFT OTD Library, as well as a description of these operations.
Table 12 Available eInsight SWIFT OTD Business Process Operations|
eInsight Business Process Operation |
Description |
|---|---|
|
unmarshal |
Parses the SWIFT message/OTD for validation. |
|
marshal |
Readies the SWIFT message for writing, along with any errors. |
The Enterprise Designer’s Project Explorer should have the SWIFT OTD Library Business Process operations exposed under the OTD icon.
Using a Business Process
Once you have designed your Business Process for this sample, you can use the eInsight Business Process Designer and Editor to create it. Figure 2 displays the Business Process operations as created by the Business Process Editor.
Figure 2 Sample Project Business Process
Configuring the Modeling Elements
Business Rules are defined and configured between the Business Process Activities located on the modeling canvas. The sample Project contains the Business Rules that govern each of the Activities listed in a Business Process flow.
Each of the icons located on the links between Activities represent a Business Rule. The Business Rules found in the sample Project include:
Double-click one of the icons to open the Business Rule Designer pane.
Note –
A detailed description of the steps required to configure modeling elements is found in the Sun SeeBeyond eInsight Business Process Manager User’s Guide.
Copying the Output File
The FileClient.receive.Output container copies the output file containing the message to be used. The Business Process copies the message content to the input container, mt_541.unmarshal.Input, to be unmarshaled. See Figure 3.
Figure 3 Copying the Output File
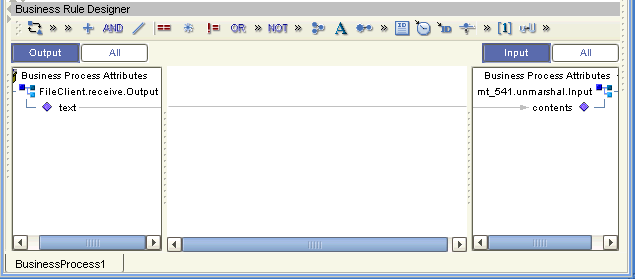
Unmarshaling and Marshaling the Data
The Business Process unmarshals the data and marshals the data, using the mt_541.unmarshal and mt_541.marshal operations. The Business Process then writes the results to the FileClient.write.Output container. See Figure 4.
Figure 4 Unmarshaling and Marshaling the Data
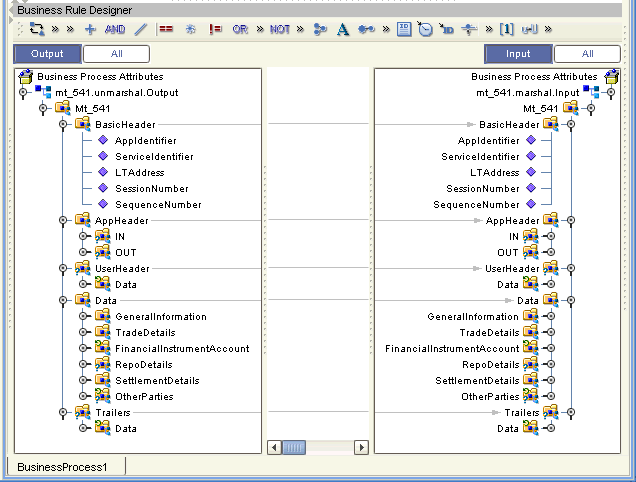
Returning the Value
The OTD output container writes the resulting value to a text file using the FileClient.write.Input container. See Figure 5.
Figure 5 Returning the Requested Value
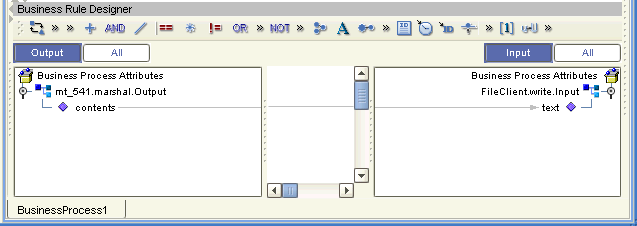
Creating a Connectivity Map
The Enterprise Designer’s Connectivity Map Editor provides a canvas for assembling and configuring a Project’s components. Connectivity Maps are used with both Java Collaboration (JCD) and eInsight (BP) Project implementations. The following sample demonstrates how the prjSwift_BP_Sample is created.
-
From the Enterprise Designer’s Project Explorer, right-click the prjSwift_BP_Sample Project and select New > Connectivity Map from the shortcut menu.
-
The New Connectivity Map appears and a node for the Connectivity Map is added under the Project on the Project Explorer tree labeled CMap1. Rename the Connectivity Map cmSwift_BP.
Selecting the External Applications
In the Connectivity Map, the eWays are associated with External Systems. For example, to establish a connection to an external file, you must first select File as an External System to use in your Connectivity Map (see Figure 6).
Figure 6 Connectivity Map - External Applications
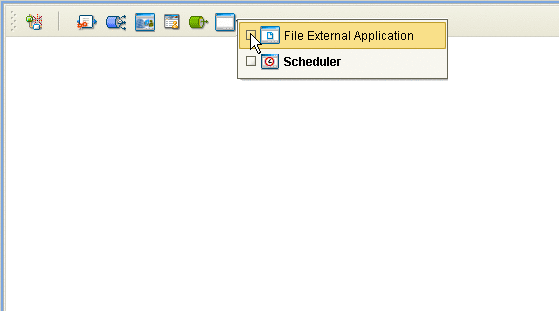
-
Click the External Application icon on the Connectivity Map toolbar,
-
Select the external systems necessary to create your Project (for this sample, File. Icons representing the selected external systems are added to the Connectivity Map toolbar.
Populating the Connectivity Map
The icons in the toolbar represent the available components used to populate the Connectivity Map canvas. Add the Project components to the Connectivity Map by dragging the icons from the toolbar to the canvas.
-
For this sample, drag the following components onto the Connectivity Map canvas as displayed in Populating the Connectivity Map:
-
File External System (2)
-
Service (A service is a container for Collaborations, Business Processes, eTL processes, and so forth)
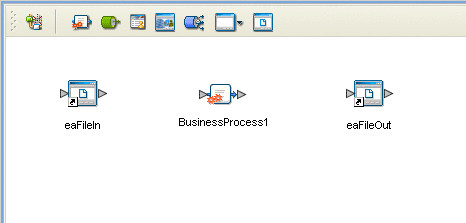
-
Rename the File1 External Application to eaFileIn by right-clicking the object, selecting Rename from the shortcut menu, and typing in the new name. In the same way, rename the other Connectivity Map components as follows:
-
File2 to eaFileOut
-
cm_Swift_BP_Service1 to BusinessProcess1.
-
Save your current changes to the Repository.
Binding the eWay Components
Once the Connectivity Map has been populated, components are associated and bindings are created in the Connectivity Map.
-
Drag and drop the BP1 Business Process, under prjSwift_BP_Sample, from the Project Explorer tree to the Service (BusinessProcess1). If the Business Process was successfully associated, the Service’s icon changes to a Business Process icon (see Binding the eWay Components).
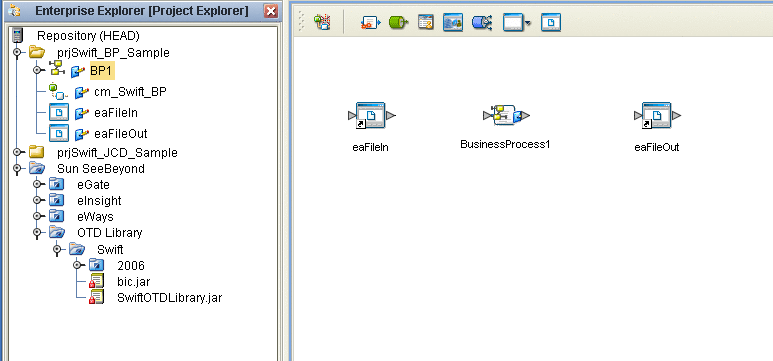
-
Double-click the BusinessProcess1 Service. The BusinessProcess1 binding dialog box appears using the BP1 Rule.
-
From the BusinessProcess1 binding dialog box, map FileSender (under Implemented Services) to the eaFileIn (File) External Application. To do this, click on FileSender in the BusinessProcess1 binding dialog box, and drag the cursor to the output node of the eaFileIn External Application in the Connectivity Map. A link named eaFileIn|eaFileIn_BusinessProcess1 is now visible.
-
From the BusinessProcess1 binding dialog box, map FileReceiver (under Invoked Services) to the input node of the eaFileOut External Application (see Binding the eWay Components).
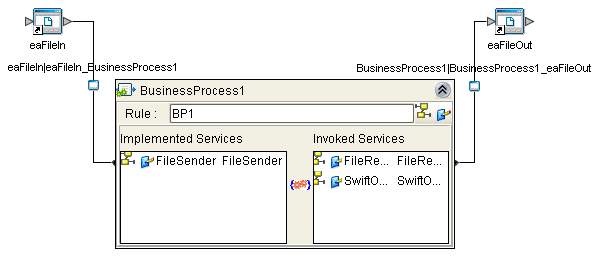
-
Minimize the BusinessProcess1 binding dialog box and save your current changes to the Repository.
Creating an Environment
Environments include the external systems, Logical Hosts, integration servers and message servers used by a Project and contain the configuration information for these components. Environments are created using the Enterprise Designer’s Environment Editor. The following example uses the prjSwift_BP_Sample Project.
-
From the Enterprise Designer’s Enterprise Explorer, click the Environment Explorer tab.
-
Right-click the Repository and select New Environment. A new Environment is added to the Environment Explorer tree.
-
Rename the new Environment to envSwift_BP_Sample.
-
Right-click envSwift_BP_Sample and select New File External System. Name the External System esFile. Click OK. esFile is added to the Environment Editor.
-
Right-click envSwift_BP_Sample and select New Logical Host. The LogicalHost1 box is added to the Environment and LogicalHost1 is added to the Environment Editor tree.
-
Right-click LogicalHost1 and select New > Sun SeeBeyond Integration Server. A new Integration Server (IntegrationSvr1) is added to the Environment Explorer tree under LogicalHost1 (see Creating an Environment).
-
For the prjSwift_JCD_Sample only, the Environment must also include a JMS IQManager. To add an IQ Manager, right-click LogicalHost1 and select New > SeeBeyond JMS IQManager. A new JMS IQ Manager (SBJmsIQMgr1) is added to the Environment Explorer tree under LogicalHost1.
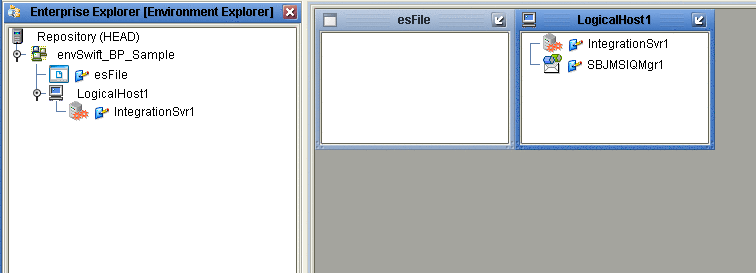
-
Save your current changes to the Repository.
Configuring the eWays
The sample Projects contains two component File eWays (inbound and outbound) represented in the Connectivity Map as a node between an File External Application and a Collaboration. The existing Connectivity Map property settings are sufficient for the sample, but the Environment property settings must be configured for your system as follows:
-
From the Environment Explorer tree, right-click the File External System (esFile in this sample), and select Properties. The Properties Editor opens to the File eWay Environment configuration.
-
From the Properties Editor, modify the Directory settings (Parameter Settings > Directory) for both the Inbound and Outbound File eWays, to correspond with inbound and outbound directories you created on your system. Click OK to accept the settings.
For more information on configuring the File eWay properties for your system, see the Sun SeeBeyond eWay™ File Adapter User’s Guide.
Configuring the Integration Server
You must set your Sun SeeBeyond Integration Server Password property before deploying your Project.
-
From the Environment Explorer, right-click IntegrationSvr1 under your Logical Host, and select Properties from the shortcut menu. The Integration Server Properties Editor appears.
-
Click the Password property field under Sun SeeBeyond Integration Server Configuration. An ellipsis appears in the property field.
-
Click the ellipsis. The Password Settings dialog box appears. Enter STC as the Specific Value and as the Confirm Password, and click OK.
-
Click OK to accept the new property and close the Properties Editor.
For more information on deploying a Project see the Sun SeeBeyond Java™ Composite Application Platform Suite Deployment Guide.
Creating the Deployment Profile
A Deployment Profile is used to assign Business Processes, Collaborations, and message destinations to the integration server and message server. Deployment Profiles are created using the Deployment Editor.
-
From the Project Explorer, right-click the Project (prjSwift_BP_Sample) and select New > Deployment Profile.
-
Enter a name for the Deployment Profile (for example, dpSwift_BP_Sample). Make sure that the selected Environment is envSwift_BP_Sample. Click OK.
-
Click the Automap icon as displayed in Creating the Deployment Profile.

The Project’s components are automatically mapped to their system window as seen in Creating the Deployment Profile.
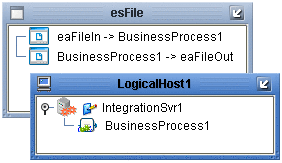
-
Save your changes to the Repository.
Creating and Starting the Domain
To deploy your Project, you must first create a domain. A domain is an instance of a Logical Host.
Create and Start the Domain
-
Navigate to your <JavaCAPS51>\logicalhost directory (where <JavaCAPS51> is the location of your Sun Java Composite Application Platform Suite installation.
-
Double-click the domainmgr.bat file. The Domain Manager appears.
-
If you have already created a domain, select your domain in the Domain Manager and click the Start an Existing Domain button. Once your domain is started, a green check mark indicates that the domain is running.
-
If there are no existing domains, a dialog box indicates that you can create a domain now. Click Yes. The Create Domain dialog box appears.
-
Make any necessary changes to the Create Domain dialog box and click Create. The new domain is added to the Domain Manager. Select the domain and click the Start an Existing Domain button. Once your domain is started, a green check mark indicates that the domain is running.
-
For more information about creating and managing domains see the Sun SeeBeyond eGate Integrator System Administration Guide.
Building and Deploying the Project
The Build process compiles and validates the Project’s Java files and creates the Project EAR file.
Build the Project
-
From the Deployment Editor toolbar, click the Build icon.
-
If there are any validation errors, a Validation Errors pane will appear at the bottom of the Deployment Editor and displays information regarding the errors. Make any necessary corrections and click Build again.
-
After the Build has succeeded you are ready to deploy your Project.
Deploy the Project
-
From the Deployment Editor toolbar, click the Deploy icon. Click Yes when the Deploy prompt appears.
-
A message appears when the project is successfully deployed.
Note –Projects can also be deployed from the Enterprise Manager. For more information about using the Enterprise Manager to deploy, monitor, and manage your projects, see the Sun SeeBeyond eGate™ Integrator System Administration Guide.
Running the Sample
To run your deployed sample Project do the following
-
From your configured input directory, paste (or rename) the sample input file to trigger the eWay.
-
From your output directory, verify the output data.
Updating BICDirService
The BICDirService feature is a database service. The data files used to populate BICDirService must be updated periodically from SWIFT’s source CD-ROM issued once every four months.
Source of Information
The Java constructor for the BICDir class loads the required data from the following SWIFT-supplied files:
-
FI.dat
-
CU.dat
-
CT.dat
The constructor takes an argument from the directory that contains these two files. It then opens each file and loads the appropriate fields into a searchable structure. For more details on these files, see the current SWIFT BIC Database Plus Technical Specifications document for actual file layout and positioning information.
The data used to look up and validate comes from SWIFT’s own BIC bank files containing its BIC codes and its currency and country codes. When necessary, SWIFT updates these files with a new version of its lookup tables, to keep them current. You can upload these files to eGate and control when updates to the system occur and access these files via SWIFT’s update CD-ROM.
Update Operation
The BICDirService feature allows multiple simultaneous objects to access its methods with near-local object response times.
The SWIFT standards are not always sufficiently complete to enable STP. Currently a message can pass network validation but fail at the receiving end because of incompatible definitions or codes, or missing data. The result is expense to manually repair or follow up on these messages and possible retransmission of the message.
The SWIFT OTD Library’s BICDirService ensures that valid, up-to-date BIC, country, and currency codes are present in eGate-processed messages. This feature increases the likelihood that a given message can flow “straight through”.
You must update the BICDirService information before running components that utilize this feature.
-
Go to the bic.jar file in the Enterprise Designer’s Project Explorer. The file is located under Sun SeeBeyond > OTD Library > Swift.
-
Select the Update BIC Files option from the shortcut menu.
-
In the resulting Open dialog box, navigate to the location of the CU.dat file on the SWIFT update CD-ROM.
-
Select the file and upload it.
-
Select Update BIC Files again.
-
Navigate to the location of the FI.dat file.
-
Select the file and upload it.
This procedure updates the BICDirService feature.
BICDirService Method Operation
The BICDirService methods are static methods of a single Java class, the BICDir class. There is one method per each required lookup and validation. The BICDir methods are not dependent on any module other than SWIFT data files.
Lookup Method Definitions
The BICDir class has the following lookup methods:
-
Look up BIC by Institution Name: Takes a string and returns a byte array of BICs (one element is possible). The signature is:
BIC[] getBIC(institutionName*);
-
Look up BIC by Institution Name, City and Country: Takes three strings, an institution name, city, and country, and returns a byte array of BICs (one element is possible). The signature is:
BIC[] getBIC(institutionName*, city*, country*);
-
Look up Institution Name by BIC: Takes a BIC string, either a BIC 8 or BIC11, and returns a byte array of institution names (one element is possible). The signature is:
institutionName[] getInstitutionName(BIC);
-
Look up Currency Code by Country Code: Takes a string, a country code, and returns the currency code. The signature is:
currencyCode getCurrencyCode(countryCode);
-
Look up Country Code by Currency Code: Takes a string, a currency code, and returns the country code. The signature is:
countryCode getCountryCode(currencyCode);
Validation Method Definitions
The BICDir class has the following validation methods:
-
Validate BIC: Takes a string, either a BIC 8 or BIC11, and returns true or false. The signature is:
boolean validateBIC(BIC);
-
Validate Currency Code: Takes a string, a currency code, and returns true or false. The signature is:
boolean validateCurrencyCode(currencyCode);
-
Validate Country Code: Takes a string, a country code, and returns true or false. The signature is:
boolean validateCountryCode(countryCode);
BICDir Exceptions
The purpose of the exceptions is to give you some indication of what error has occurred and how to rectify it.
Error message framework
These error messages are implemented using the log4j framework. STC.OTD.SWIFT.BICDirService is used as the logging category.
Error message general form
The message of BICDir exception takes the following general form:
“BICDirService Error [”XX“]– “ error-message
Where:
-
“”: Marks static text.
-
XX: Stands for a unique number assigned to each error message.
-
error-message: A descriptive narrative derived from the condition that caused the error, and a possible solution to rectify it.
Updating BICPlusIBAN
The data files used to populate BICPlusIBAN directory must be obtained from SWIFT directly. The sample BICPlusIBAN directory from SWIFT OTD Library is only the test data files to be used with the sample project. They are not intended to be used in a production environment.
The Java constructor for the BICPlusIBAN class loads the required data from the following SWIFT-supplied files:
-
BI.TXT
-
IS.TXT
The constructor takes an argument from the directory that contains these two files. It then opens each file and loads the appropriate fields into a searchable structure. For more details on these files, see the current SWIFT BICPlusIBAN Directory Technical Specifications document for actual file layout and positioning information.
The BI data contains the BICPlusIBAN information. The IS data provides IBAN structure information. The SWIFT OTD Library takes these data together to execute the validation rules. These base files and update delta files should be obtained directly from SWIFT.
To update BICPlusIBAN information:
-
Go to the BICPlusIBAN.jar file in the Enterprise Designer’s Project Explorer. The file is located under Sun SeeBeyond > OTD Library > Swift.
-
Select the Update BICPlusIBAN Files option from the shortcut menu.
-
In the resulting Open dialog box, navigate to the location of the BI.TXT file on the SWIFT update CD-ROM.
-
Select the file and upload it.
-
Select Update BICPlusIBAN Files again.
-
Navigate to the location of the IS.TXT file.
-
Select the file and upload it.
This procedure updates the BICPlusIBAN directory feature.
BICPlusIBAN Validation Method Definitions
The SWIFT OTD Library provides the following validation methods for BICPlusIBAN:
-
Deriving the BIC from the IBAN: This validation method is used to derive the BIC from the IBAN. This can be useful in situations where the IBAN is present but the BIC is missing in a SEPA payment instruction. The method takes no arguments, and will return an array list of BIC code and BRANCH code. The signature is:
ArrayList deriveBICfromIBAN()
-
Validating the Bank ID: This validation method is used to validate that the Bank ID contained in an IBAN is a valid Bank ID. This can be useful in situations where the ordering customer has constructed the IBAN. However, the validation does not guarantee that the IBAN itself is valid. The method takes no arguments, and will return a boolean result. The signature is:
boolean validateBankID()
-
Validating the BIC: This validation method is used to validate that the BIC is a valid BIC. This can for example be useful in situations when the ordering customer attempted to derive the BIC itself from financial institution's name and address. The method takes no arguments, and will return a boolean result. The signature is:
boolean validateBIC()
-
Validating the BIC/IBAN combination: This validation method is used to validate that the BIC and the IBAN belong to one and the same institution. The method takes no arguments, and will return a boolean result. The signature is:
boolean validateBICIBANCombo()
Error Message Information
This section explains the SWIFT OTD Library validation error files and messages.
Error Messages
There are separate error messages and reporting mechanisms for each type of validation performed by a Service. You can control the amount of debugging information in the error messages you receive by using the debug flags as parameters when you call the command() method. The library’s error parser provides the following debug levels:
-
Regular Information: Gives general information, and if an error occurs, the path to the node or piece of data that caused the error.
-
Debug: Gives all of the node information generated by the parse, that is, each field and subfield.
-
Parser Debug: Combines the debug level with information regarding just what the parser is matching, and the data being used. In general, you only need to use this level for situations where the error cannot be determined using the other levels because of the quantity of data. This level gives the exact location and nature of the failure.
Error message file output appears at the end of any message that generates an error.
Setting the Debug Level
The available debug level flags are:
-
A or a: Enables the abbreviation of path names. This reduces the path output when you are printing to a Regular Information set.
-
D or d: Enables Debug (mid-level) debugging. If enabled, this generates more debug data than the Regular Information level, but less than the Parser Debug level.
-
I or i: Enables Regular Information level debugging.
-
L or l: Enables saving and display of the last successfully parsed node. When a parse has failed, this information is the last item printed by the current root node.
-
P or p: Enables the Parser Debug-level information. If enabled, this generates the maximum information about what the internal parser is doing.
Using the Debug Level flags, you can configure the debugging information you receive by setting the appropriate debug parameter in the OTD’s command() method. For example, to set the error message level to the Regular Information level (I flag), with abbreviations turned on (A flag), you would set command() with the parameters A and I. You can do this from the Collaboration Editor’s Business Rules Designer as displayed below.
Figure 7 Setting the debug level using the Business Rules Designer
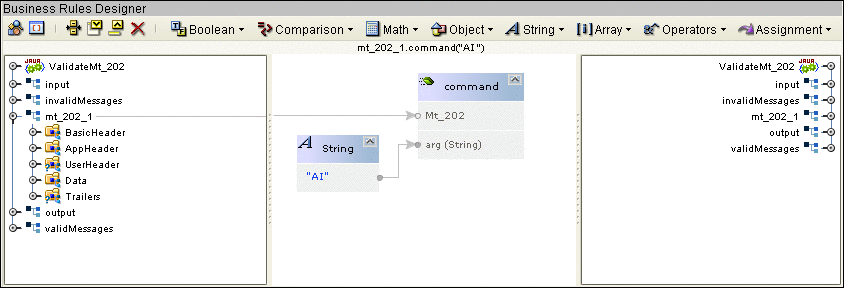
This produces the following Java code (this example uses the mt_202 Validation Collaboration:
mt_202_1.command( "AI" ); |
Calling command() enables any of the debug functions presented as a parameter. For more information, see the SWIFT OTD Library Javadoc.
Message Examples
An example of a regular information-level parse error (cannot find a required field) is:
at 0: com.stc.swift.runtime.SwiftUnmarshalException: mt_103.Mt_103: 0: Failed to parse required child(Data). |
An example of a parse error with the debug level enabled (cannot find a required field) is:
at 146: null: com.stc.swift.runtime.SwiftUnmarshalException: mt_543.Mt_543.Data.GeneralInformation.FunctionOfTheMessage: 146: Failed to parse required child(String2). |
Given this path to the data, you can determine where in the message the parser failed by looking at:
-
The SWIFT User Handbook
-
Structure of the OTD in the Enterprise Designer’s OTD Editor
-
Javadoc for the OTD
See MFVR Errors for MFVR-specific error information. For more detailed error information, see Error Message Information.
Parse Debug Level Message Example
The following example shows error message output at the parse debug level:
[main] PARSE - Swift: matchDelimSkip("{1:") --> true.
[main] PARSE - Swift: getData("F|A|L") --> "F".
[main] DEBUG - Swift: mt_502.Mt_502.BasicHeader.AppIdentifier: 3: Mapped data("F").
[main] DEBUG - Swift: mt_502.Mt_502.BasicHeader.AppIdentifier: 3: Mapped rep[0].
[main] PARSE - Swift: getData(charSet, 2, 2) --> "01".
[main] DEBUG - Swift: mt_502.Mt_502.BasicHeader.ServiceIdentifier: 4:
 The following is the last field successfully parsed the 4th 22a:
[main] PARSE - Swift: matchDelimSkip("22H::") --> true.
[main] PARSE - Swift: getData(charSet, 4, 4) --> "PAYM".
[main] DEBUG - Swift: mt_502.Mt_502.Data.OrderDetails.Indicator.IndicatorH.String3:
 218: Mapped data("PAYM").
[main] PARSE - Swift: matchDelimSkip("//") --> true.
[main] DEBUG - Swift: mt_502.Mt_502.Data.OrderDetails.Indicator.IndicatorH.String3:
 218: Mapped rep[0].
[main] PARSE - Swift: getData(charSet, 4, 4) --> "APMT".
[main] DEBUG - Swift: mt_502.Mt_502.Data.OrderDetails.Indicator.IndicatorH.String5:
 224: Mapped data("APMT").
[main] DEBUG - Swift: mt_502.Mt_502.Data.OrderDetails.Indicator.IndicatorH.String5:
 224: Mapped rep[0].
[main] PARSE - Swift: matchDelimSkip("
:") --> true.
[main] DEBUG - Swift: mt_502.Mt_502.Data.OrderDetails.Indicator.IndicatorH: 213:
 Mapped rep[0].
|
The message goes on for several more lines, not indicating any error. Then the parser is looking for any more 22a’s, F or H, and does not find one. See the following example:
[main] DEBUG - Swift: mt_502.Mt_502.Data.OrderDetails.Indicator[3]: 159: Mapped rep[3].
[main] PARSE - Swift: matchDelimSkip("22F::") --> false.
[main] PARSE - Swift: mt_502.Mt_502.Data.OrderDetails.Indicator.IndicatorF: 231:
 Failed to find BeginDelimiter("22F::").
[main] PARSE - Swift: matchDelimSkip("22H::") --> false.
[main] PARSE - Swift: mt_502.Mt_502.Data.OrderDetails.Indicator.IndicatorH: 231:
 Failed to find BeginDelimiter("22H::").
|
The parser then looks for a 98a either option A|B|C as follows:
[main] PARSE - Swift: matchDelimSkip("98A::") --> false.
[main] PARSE - Swift: mt_502.Mt_502.Data.OrderDetails.DateTime[0].DateTimeA: 231:
 Failed to find BeginDelimiter("98A::").
[main] PARSE - Swift: matchDelimSkip("98B::") --> false.
[main] PARSE - Swift: mt_502.Mt_502.Data.OrderDetails.DateTime[0].DateTimeB: 231:
 Failed to find BeginDelimiter("98B::").
[main] PARSE - Swift: matchDelimSkip("98C::") --> false.
[main] PARSE - Swift: mt_502.Mt_502.Data.OrderDetails.DateTime[0].DateTimeC: 231:
 Failed to find BeginDelimiter("98C::").
|
The parser finds no repetitions, which does not fit in the required range of 1 to 3 as described in the following example, so at this point, the parser fails, because no expected repetitions were found:
[main] PARSE - Swift: mt_502.Mt_502.Data.OrderDetails: 231:
 Failed to match minimum repititions[ 1 < 0 <= 3 ].

[main] PARSE - Swift: mt_502.Mt_502.Data.OrderDetails:
145: Failed to parse
 required child(DateTime).
[main] PARSE - Swift: mt_502.Mt_502.Data:
145: Failed to match minimum
 repititions[ 1 < 0 <= 1 ].
[main] PARSE - Swift: mt_502.Mt_502.Data:
73: Failed to parse required
 child(OrderDetails).
[main] PARSE - Swift: mt_502.Mt_502:
67: Failed to match minimum repititions[ 1 < 0 <= 1 ].
[main] PARSE - Swift: mt_502.Mt_502:
0: Failed to parse required child(Data).
 [main] LAST  - Swift: Last match: mt_502.Mt_502.
Exception in thread "main" at 0: null: com.stc.
swift.runtime.SwiftUnmarshalException:
 mt_502.Mt_502: 0: Failed to parse required child(Data).
    at com.stc.swift.runtime.SwiftOtdRep.
throwExcept(SwiftOtdRep.java:1977)
    at com.stc.swift.runtime.SwiftOtdRep.
parseChildren(SwiftOtdRep.java:1577)
    at com.stc.swift.runtime.SwiftOtdRep.
parse(SwiftOtdRep.java:1486)
    at com.stc.swift.runtime.SwiftOtdRep.
unmarshal(SwiftOtdRep.java:1339)
|
Using SWIFT FIN-Based Funds OTDs
This section explains how to use specialized funds features available with the SWIFT OTD Library and Java CAPS.
SWIFT OTD Library Funds Features
The SWIFT OTD Library Object Type Definitions (OTDs) contain specialized OTDs that allow you to automate the following funds operations:
-
Orders to buy and sell
-
Client confirmations
-
Checking order status
-
Statement of holdings, for fund balances reconciliation
In the past, many funds industry players have asked SWIFT to help automate these operations by providing standards and connectivity between funds distributors, transfer agents, funds management companies, and other intermediaries like funds processing hubs. To meet these needs, SWIFT has developed standards and message templates based on these standards.
The SWIFT OTD Library contains the following FIN-based MT Fund OTDs (see Table 13) specialized for the associated SWIFT message types and fund operations:
Table 13 FIN-based Funds OTDs|
OTD Name |
Base |
Description |
|---|---|---|
|
mt_502_FUNDS |
FIN |
Order to buy and sell: for funds subscription, redemption, switch, and cancellation. |
|
mt_509_FUNDS |
FIN |
Order status: for status update on orders (for example, a rejection or acknowledgement of a receipt). |
|
mt_515_FUNDS |
FIN |
Client confirmation: for confirmation of the funds subscription, redemption, switch and cancellation. |
|
mt_535_FUNDS |
FIN |
Statement of holdings: for funds balance reconciliation. |
|
mt_574_IRSLST |
FIN |
IRS 1441 NRA: IRS Beneficial Owners’ List |
|
mt_574_W8BENO |
FIN |
IRS 1441 NRA): Form W8-BEN |
These MT Fund OTDs apply to the funds message types in the ISO 15022 FIN Standard. The Category 5 directory contains the SWIFT MT Funds message OTDs.
Using SWIFT OTD Library Java Classes
This section provides an overview of the Java classes/interfaces and methods contained in the SWIFT OTD Library. These methods are used to extend the functionality of the library.
The SWIFT OTD Library exposes various Java classes to add extra functionality to the library and its Object Type Definitions (OTDs). Some of these classes contain methods that allow you to set data in the library OTDs, as well as get data from them.
Relation to OTD Message Types
The nature of this data transfer depends on the available nodes and features in each of the individual SWIFT OTD message types. For more information on the SWIFT OTD Library’s messages and message types, see Increasing the heap size from the heapSize.bat file.
SWIFT OTD Library Javadoc
The SWIFT OTD Library Javadoc is an API document in HTML format that provides information on the various classes and methods available with the SWIFT OTD Library.
You can access the Javadoc by selecting and uploading the SwiftOTDLibraryDocs.sar from the Documentation tab of the Sun Java Composite Application Platform Suite Installer (see Installing the SWIFT OTD Libraries). The Javadoc can then be downloaded from the Documentation tab of the Suite Installer.
A SWIFT OTD Library Javadoc is provided for the 2008 OTD Library. It is bundled in the initial .zip file uploaded to the Suite Installer.
To access the appropriate ZIP file, do the following operations:
-
Extract the Javadoc.zip file from the Suite Installer to a temporary folder. This extracts the following two files:
-
Swift2008Javadoc.zip: Contains the SWIFT 2008 OTD Library Javadoc.
-
-
Delete the Javadoc that does not apply to your installation.
-
Extract the appropriate Javadoc files to an easily accessible folder.
-
After you extract the SWIFT_OTD_Library_Javadoc.zip file, double-click the JavadocOverview.html file to begin using the Javadoc. This file contains complete instructions on how to use this document, as well a link that takes you to the additional Javadoc files.
Note –
The Javadoc for the SWIFT OTD Library is very large and may operate slowly in your browser.
OTD Library Java Classes
The Javadoc shows a Java class for each OTD in the SWIFT OTD Library. For example, the class Mt_101 includes the OTD for the MT 101 SWIFT message type. See Increasing the heap size from the heapSize.bat file for a complete list of the SWIFT message types/OTDs in the library.
In addition to the classes for OTDs, there are the following Java classes with methods for run-time operation:
-
SwiftMarshalException
-
SwiftOtdChild
-
SwiftOtdInputStream
-
SwiftOtdLocation
-
SwiftOtdRep
-
SwiftParseUtils
-
SwiftUnmarshalException
- © 2010, Oracle Corporation and/or its affiliates

