Using the Scheduler Binding Component
The Scheduler Binding Component provides scheduling capabilities for initiating JBI services.
What You Need to Know
About the Scheduler Binding Component
The Scheduler Binding Component provides scheduling capabilities for initiating JBI services. The binding component is powered by OpenSymphony Quartz, and allows you to schedule triggers to launch (consume) other JBI components, such as the File Binding Component. You can set these actions or processes to occur at specific times or break up activities to fit any schedule.
The Scheduler Binding Component lets you choose from three types of triggers:
-
Simple: The Simple trigger is a time-interval trigger, which means it can be programmed to trigger something every so-many units of time. For example, you can schedule an activity to start, and then repeat every hour, until the scheduled end.
-
Cron: The Cron trigger is a time specific trigger. Using the Cron trigger, you can schedule an action using seconds, minutes, hours, days, day-of-week, months, and years. For example, you can schedule an action to occur on the third Monday of each month at 12:00 AM.
-
Hybrid: The Hybrid trigger is a Cron trigger that starts a Simple trigger. This allows you to schedule an action to occur repeatedly within a specific time frame. For example, you can schedule a task to occur 30 times, every hour, Monday through Friday, from 9:00 AM to 6:00 PM.
The Scheduler Wizard allows you to easily configure triggers for your project in just a few steps.
Scheduler Binding Component Features
The Scheduler Binding Component includes the following features:
-
Triggers are created using a binding component powered by OpenSymphony Quartz, providing extensive configuration options.
-
The Scheduler wizard provides three trigger options: Simple, Cron, and Hybrid, which allow you to easily configure the date and time that a trigger fires, as well as the duration and interval.
-
Application configuration parameters allow you to easily reconfigure existing projects at runtime.
-
The Scheduler allows you to monitor statistics for the component and provides logging and alerts for key processes.
Using the Scheduler Binding Component in a Project
This section allows you to “get your hands dirty,” creating a sample Scheduler Binding Component project that contains all three different trigger types, Simple, Cron, and Hybrid. In this sample you create a schedule file to trigger a BPEL provider endpoint with a message and begin a business process instance that performs a task.
These directions assume that you are generally familiar with GlassFish ESB and the NetBeans IDE, and that GlassFish ESB is installed and running.
Steps to Create the BPEL Project
The following procedures are used to create the sample Scheduler Project:
 Create a New BPEL Project
-
Choose File -> New Project (Ctrl-Shift-N).
The New Project Wizard appears.
-
Select SOA in the Categories list, and BPEL Module in the Projects list. Click Next.
-
Name the project SayHello, and click Finish.
The SayHello Project is added to the Projects tree.
 Create a Scheduler Binding Component
-
From the Project tree, right-click the SayHello node and select New -> WSDL Document.
The WSDL Document Wizard appears.
-
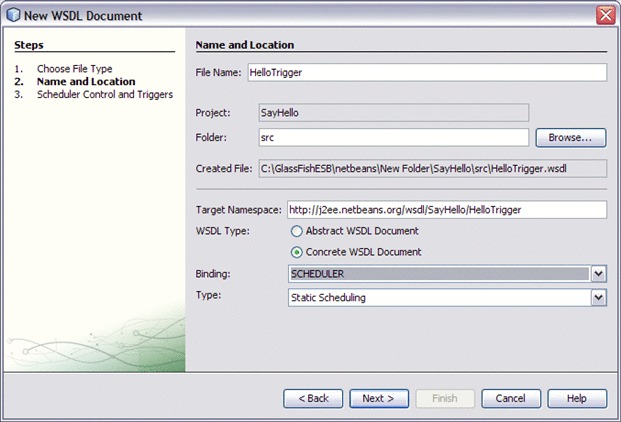
Enter HelloTriggers as the file name.
-
Select Concrete WSDL Document as the WSDL type, and select SCHEDULER as the binding.
-
Click Next.
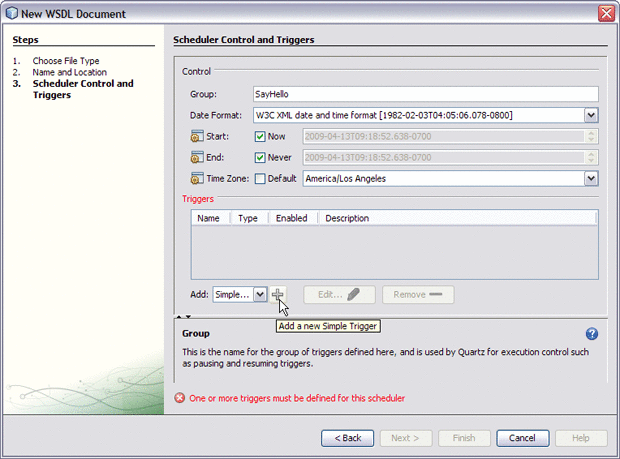
The Scheduler Control and Triggers Wizard appears.
-
From the Scheduler wizard's Add field, select Simple. Click the plus sign next to the Add field to open the Add New Simple Trigger dialog box.
-
From the Add New Simple Trigger dialog box, add the following values:
-
Name: SimpleTrigger1
-
Description: Say Hello first 20 seconds
-
Repeat: 4
-
Interval: 5
-
Message: Hello first 20 seconds
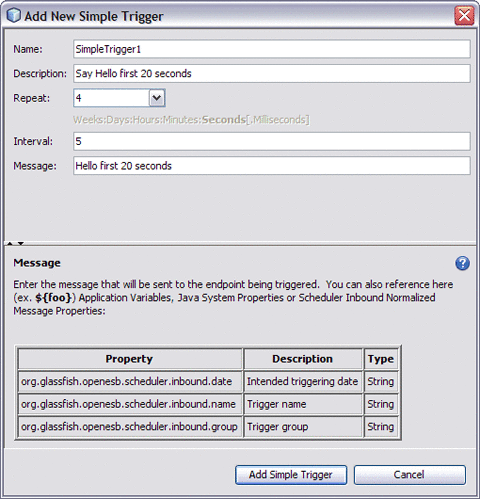
This creates a trigger that sends the message “Hello first 20 seconds” and repeats it four times in five second intervals for a total of five messages.
-
-
Click Add Simple Trigger.
SimpleTrigger1 is added to the Triggers field.
-
Now create a Cron trigger. Change the Add field value to Cron and click the plus sign next to the Add field.
The Add New Cron Trigger dialog box appears.
-
From the Add New Cron Trigger dialog box, add the following values:
-
Name: CronTrigger1
-
Description: Say Hello at the bottom of each minute
-
From the Second (1) tab, select Just on Second: and select 30 as the value. Leave remaining tabs at their default values.
-
Message: Hello at the bottom of each minute
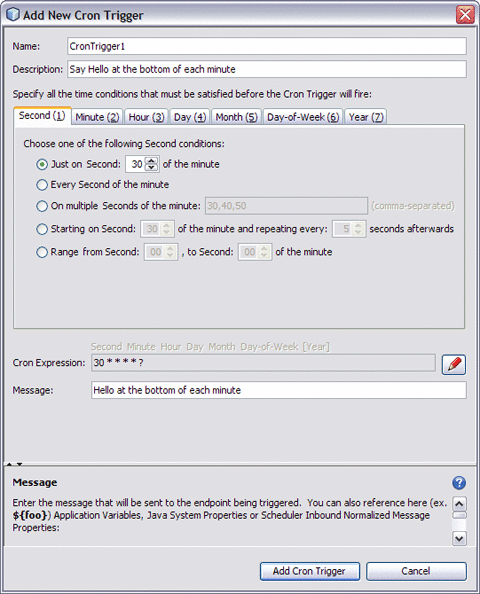
This creates a trigger that sends the message “Hello at the bottom of each minute” every minute at second 30, indefinitely.
-
-
Click Add Cron Trigger.
CronTrigger1 is added to the Triggers field.
-
Now create a Hybrid trigger. Change the Add field value to Hybrid and click the plus sign next to the Add field.
The Add New Hybrid Trigger dialog box appears.
-
From the Add New Hybrid Trigger dialog box, add the following values:
-
Name: HybridTrigger1
-
Description: Say Hello for the last 20 seconds of each minute
-
From the Second (1) tab, select Just on Second: and select 40 as the value. Leave remaining tabs at their default values.
-
Duration: 20 Seconds
-
Repeat: Indefinite
-
Interval: 5
-
Message: Hello for the last 20 seconds of each minute
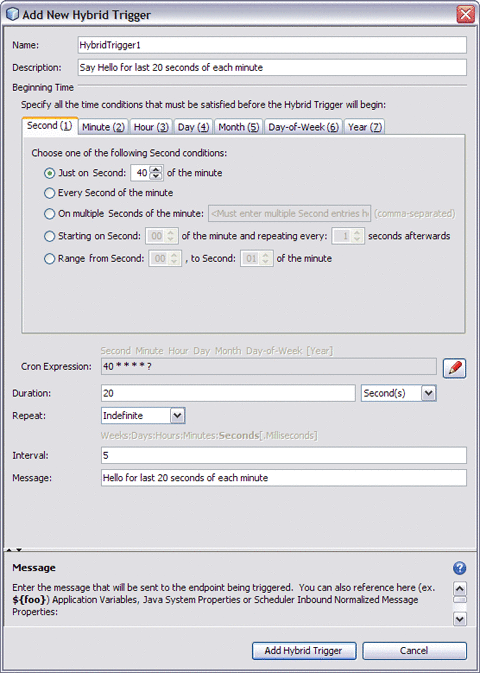
This creates a trigger that sends the message “Hello for the last 20 seconds of each minute” every five seconds, from second 40 through 59 of each minute, indefinitely.
-
-
Click Add Hybrid Trigger.
HybridTrigger1 is added to the Triggers field.
-
Click Finish to create the new WSDL document.
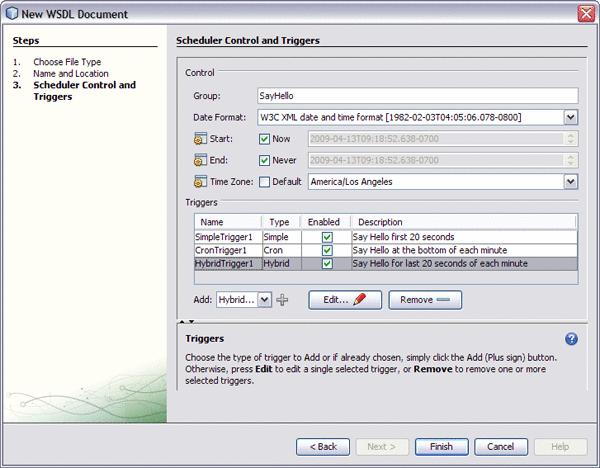
The HelloTriggers WSDL document is added to the SayHello Project's process files.
 Create a File Binding Component
-
From the Project tree, right-click the SayHello Project and select New -> WSDL Document.
The WSDL Document Wizard appears.
-
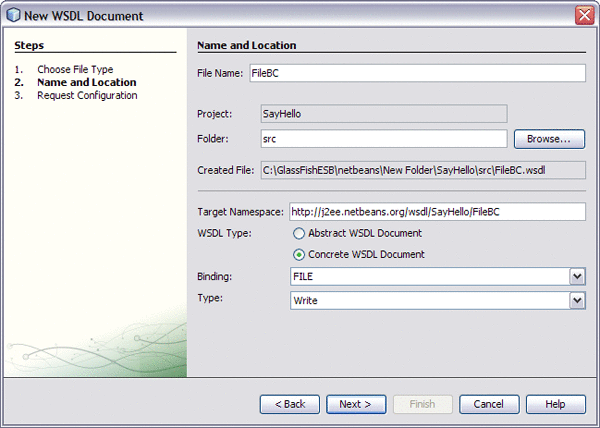
Enter the following values:
-
Name: FileBC
-
WSDL Type: Concrete
-
Binding: FILE
-
Type: Write
-
-
Click Next
-
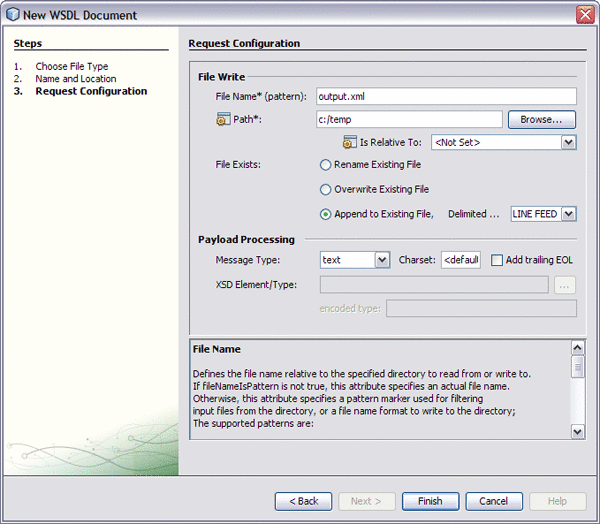
On the Request Configuration page of the New WSDL Document wizard, enter the following values.
-
File Exists: Append to Existing File
-
Payload Processing: Text
-
-
Click Finish.
The new WSDL file is added to the SayHello Project's process files.
 Create a BPEL Process
-
From the Projects window, double-click newProcess.bpel under your projects Process Files.
The BPEL Designer opens to the new file.
-
From the projects tree, drag and drop HelloTriggers.wsdl to the middle of the Ports column on the left side of the BPEL Designer. A “drop-zone” appears, as a prompt.
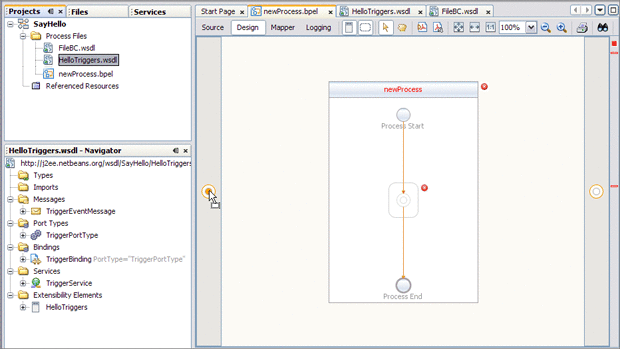
A Partner Link is created.
-
In the same way, drag and drop the FileBC.wsdl file to the drop-zone in the right column of the BPEL Designer.
Another Partner Link is created.
-
Create a Receive web service.
-
From the BPEL Designer Palette, drag and drop a Receive web service to the drop-zone between Process Start and Process End in the middle of the BPEL Designer.
-
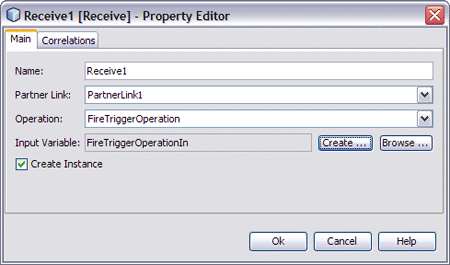
Click the Receive activity's Edit icon.
The Receive1 Property Editor appears.
-
Select PartnerLink1 as the Partner Link value.
-
For Input Variable, click the create button. The New Input Variable dialog box appears. Click OK to accept the current values.
-
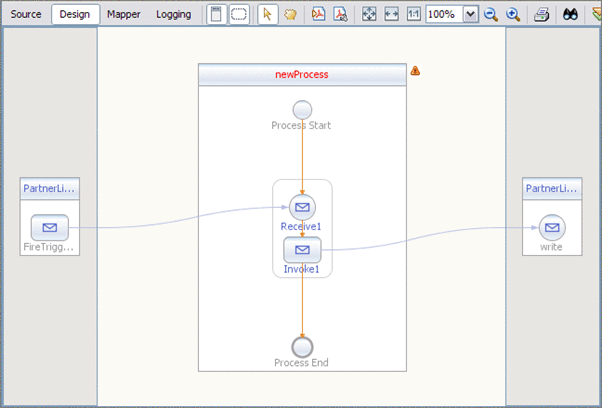
Click OK. The BPEL Designer now displays the Receive activity associated with PartnerLink1
-
-
Create an Invoke web service.
-
From the BPEL Designer Palette, drag and drop an Invoke web service to the drop-zone just below the Receive Activity in the middle of the BPEL Designer.
-
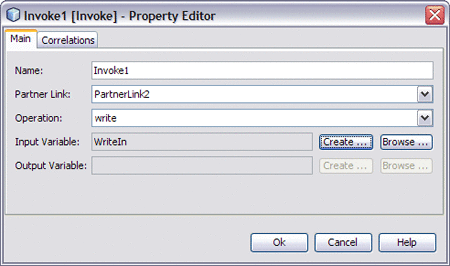
Click the Invoke activity's Edit icon.
The Invoke1 Property Editor appears.
-
Select PartnerLink2 as the Partner Link value.
-
For Input Variable, click the create button. The New Input Variable dialog box appears. Click OK to accept the current values.
-
Click OK. The BPEL Designer now displays the Invoke activity associated with PartnerLink2
-
-
Drag and drop an Assign activity to the drop-zone between the Receive activity and Invoke activity.
-
Double-click the Assign activity to open the BPEL Mapper.
-
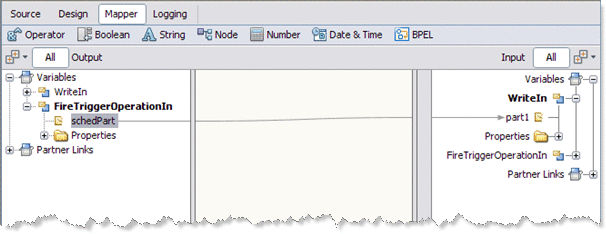
Map SchedPart, under FireTriggerOperationIn in the Output pane of the Mapper, to part1, under WriteIn in the Input pane of the Mapper. To do this, click the SchedPart node in the left pane of the Mapper, and drag it to WriteIn in the right pane of the Mapper. A line now associates the two nodes.
-
Click Save All.
 Create a Composite Application
-
To create the new Composite Application, choose File -> New Project.
The New Project Wizard appears.
-
Select SOA as the Category, and Composite Application as the Project, and click Next.
-
Name the project SayHelloCA, and click Finish.
The SayHelloCA Composite Application is added to the Projects tree, and the Composite Application Service Assembly (CASA) Editor opens to the SayHelloCA.casa file.
-
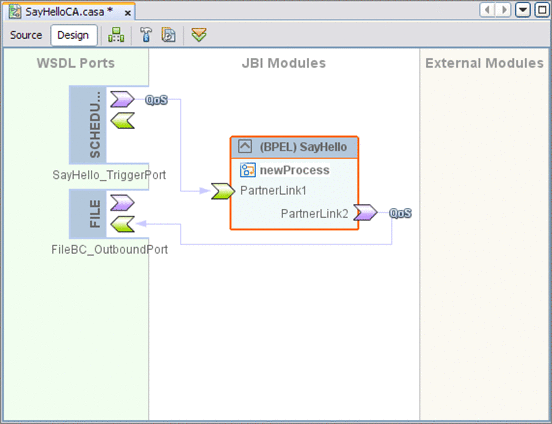
Drag and drop the SayHello BPEL Project from the Projects tree to the JBI Modules column of the CASA Editor.
-
Build the Composite Application project. To do this, click the Build (hammer) icon in the CASA toolbar.
-
Click Save All
 Build and Deploy the Project
-
From the Projects window, right-click the SayHelloCA Composite Application Project and choose Clean and Build from the popup menu.
The NetBeans IDE Output window message reports Build Successful when complete.
-
Right-click SayHelloCA again and select Deploy from the popup menu.
Again, the NetBeans IDE Output window message reports Build Successful when complete.
-
Open your project's output file, for this example C:\TEMP\output.xml. The output appears similar to the image below, depending on when the project is started.
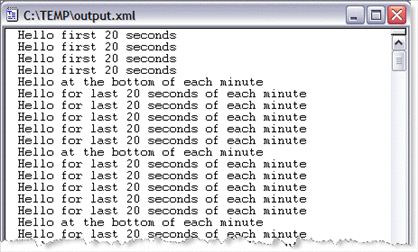
As you can see from the output, the Simple trigger fired for 20 seconds only, producing the first messages, the Cron trigger fires once at the bottom of each minute, and the Hybrid trigger fires the last 20 seconds of each minute.
-
To stop your project, right-click the SayHelloCA Project in the Projects window, and choose Undeploy from the popup menu.
Using the Scheduler Control and Triggers Wizard
The Scheduler Binding Component is similar to other binding components in that you use a binding wizard that steps you through creating the binding.
Accessing the Scheduler Control and Triggers Wizard
You can access the The Scheduler Control and Triggers Wizard and create a Schedule Binding by doing any of the following:
-
Create a New File:
-
Selected your project in the NetBeans IDE Projects window, then click the New File icon, or select File -> New File from the NetBeans menu, or type Ctrl+N. Each of these open the New File Wizard.
-
From the New File Wizard select ESB as the category, and Binding as the File Type. Click Next.
-
The New Binding Wizard opens. Select Scheduler as the Binding and enter a name and any other necessary values. Click Next.
-
-
Create a New Binding:
-
Right-click your project in the Projects tree, and select New -> Binding.
-
The New Binding Wizard opens. Select Scheduler as the Binding and enter a name and any other necessary values. Click Next.
-
-
Create a New WSDL Document:
-
Right-click your project in the Projects tree, and select New -> WSDL Document.
-
The New WSDL Document Wizard opens. Enter a File Name, and select Concrete WSDL Document as the WSDL Type. This adds additional options to the wizard.
-
Select Scheduler as the Binding, and click Next.
-
Each of these processes bring you to the Scheduler Control and Triggers Wizard
Understanding the Scheduler Wizard
From the Scheduler Control and Triggers Wizard you can configure multiple triggers for your project.
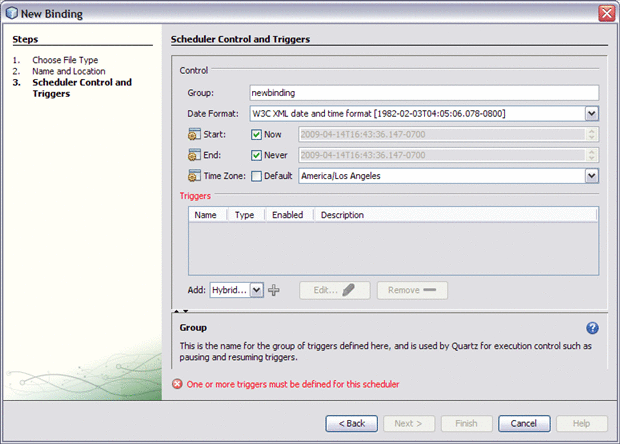
The wizard allows you to specify the following:
Group
The Group field specifies the name for the group of triggers defined here. This group name is used by Quartz to control actions such as pausing and resuming triggers. At this time, triggers are controlled through the service unit lifecycle management. They are not controlled individually. Typically the group name defaults to the name of your binding, but can be changed as needed.
Date Format
The Date Format field specifies a date and time format based on java.text.SimpleDateFormat patterns. The selected format is used to interpret and display date and time values for all of the defined triggers in this group.
The choices are:
-
Define Custom: Allows you to define and save your own custom date and time format. When you select the define custom option, the Define Custom Date and Time dialog box appears.
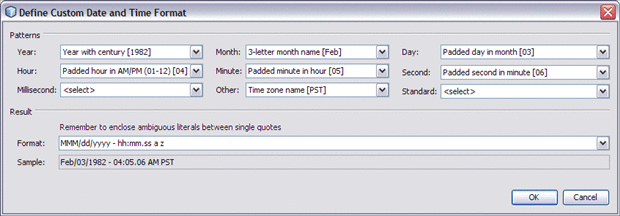
From the dialog box you can select the order and format for the year, month, day, hour, minute, second, and millisecond, as well as more abstract options such as week of the year, week of the month, time zone and so fourth.
Choose your options in the order you would like them to appear in your custom format. For example, If you wanted the date and time to appear in this format: MM/dd/yyyy - hh:mm.ss a z which translates to Feb/03/1982 — 04:05.06 AM PST, you would select these options in the following order:
-
Month: Three letter month name [Feb]
-
Day: Padded day in month [03]
-
Year: Year with century [1982]
-
Hour: Padded hour in AM/PM (01–12) [04]
-
Minute: Padded minute in hour [05]
-
Second: Padded second in minute [06]
-
Other: AM/PM marker [AM]
-
Other: Time zone name [PST]
As you select your different values they are displayed in the Format field. An example of the created format is also displayed in the Sample field. You can then add separators and text as desired. Any ambiguous literals you add to the format need to be placed between single quotes.
The Standard option allows you to select complete standard time formats for date and time. Default Local Date and Time Format adds a standard time for the location of the computer. Once a format is selected, you may edit the format from the Format field.
-
Default Local Date and Time Format: Adds the standard date and time for the configured location of the computer.
-
W3C XML Date and Time Format: Defines the date and time as follows: year, month, day, hour, minute, second, and time zone in the following format: YYYY-MM-DDThh:mm:ss.sssssszzzzzz.
-
-
Default Local Date and Time Format [2/3/82 4:05 AM]: Adds the standard date and time for the configured location of the computer.
-
W3C XML Date and Time Format [1982–02–03T04:05:06.078–0800]: Defines the date and time as follows: year, month, day, hour, minute, second, and time zone in the following format: YYYY-MM-DDThh:mm:ss.sssssszzzzzz.
Date and time are separated by a “T”. A value of 24 is allowed for the hour if minutes and seconds are set to zero, and is treated as 00:00:00 of the following day. Seconds can optionally include a decimal value of up to 6 digits, preceded by a period. The time zone is represented as a plus or minus, for earlier or later than UTC, followed by hh:mm for hours and minutes. For example, Los Angeles could have a time zone of -0800 or -0700, depending on Daylight Savings Time. Example: 1982-02-03T04:05:06.078-0800 equals 4:05 and 6.078 seconds AM US Pacific time on February 3, 1982.
Start, End, and Time Zone
The symbols that appear before Start, End and Time Zone, indicate that these parameters can be overwritten by application configuration at the time of deployment. This allows administrators to override these parameters without affecting the business logic of the project.
Start and End values are configured using your arrow keys:
-
The left and right arrows let you select the portion of the value to edit.
-
The up and down arrows allow you to edit the selected portion.
You can also edit the value by clicking on the Start and End value portion you want to edit and use the up and down arrows at the end of the field.
Start, End, and Time Zone are used to control the triggers as follows:
-
Start: Specifies the date and time when the triggers defined is this group start, once the respective service assembly has been deployed and started. The date and time format is defined by the Date Format field. The Now option specifies that triggers are active immediately after deployment.
-
End: Specifies the date and time when the triggers defined is this group end, once the respective service assembly is running. The date and time format is defined by the Date Format field. The Never option specifies that triggers are never always remain active after deployment.
-
Time Zone: Specifies the appropriate time zone for the environment where the deployed scheduler runs. This value overrides any time zones specified in the Start and End fields. The Default option specifies the configured time zone for the computer as the selected value.
Triggers
The Triggers section of the wizard allows you to add, enable or disable, and delete triggers, using the following tools:
Triggers table
The Triggers table displays the configured triggers for this group.
The table specifies the following:
-
Name: Specifies the name of the configured trigger.
-
Type: Specifies the type of trigger: Simple, Cron, or Hybrid.
-
Enabled: Specifies whether the trigger is enabled or disabled.
-
Description: Displays the user defined description for the configured trigger.
Add
The Add field lets you select the a trigger type: Using the Add New Simple Trigger Editor, Using the Add New Cron Trigger Editor, or Using the Add New Hybrid Trigger Editor. Once the type is selected, click the Plus icon next to field to open an editor window for that specific type.
Edit
The Edit button opens the editor window for the trigger that is selected in the Triggers table.
Remove
The Remove button deletes the trigger selected in the Triggers table, from the group.
Creating Simple Triggers
A Simple trigger is basically a time interval trigger, which means it can be programmed to do something every so many units of time. The Simple trigger specifies the trigger duration, or how long and how often the trigger fires.
Using the Add New Simple Trigger Editor
The Add New Simple Trigger Editor is accessed from the Scheduler Control and Triggers Wizard.
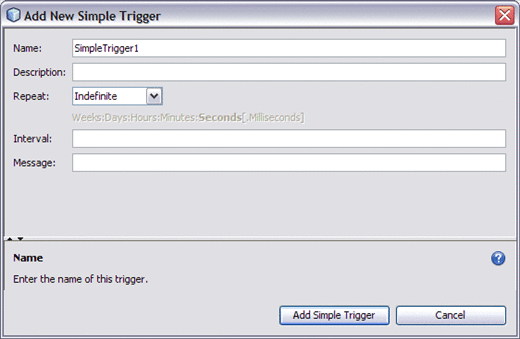
To configure a simple trigger, complete the following fields:
-
Name: Specifies a user defined name. (This is different than the Group name for the trigger).
-
Description: The description is optional, and can be used to note the action or purpose of the trigger.
-
Repeat: Specifies a number of times the operation fires. Enter any number in the field, or use the default value, Indefinite, indicating that the trigger repeats indefinitely until stopped.
-
Interval: Specifies the time interval between consecutive repeats of the trigger.
Units of time, from seconds to weeks, are specified in increasing magnitude from right to left. Each unit of time is delimited in between by a colon (:). Milliseconds are expressed as the decimal portion of seconds.
For example:
-
2:5:30:40 — indicates an interval of 2 days, 5 hours, 30 minutes, and 40 seconds.
-
30 — indicates an interval of 30 seconds.
-
0.400 — indicates 400 Milliseconds. Trailing zeros can be omitted.
-
12:0:0:0:0 — indicates 12 weeks.
Everything to the left of Milliseconds is increasingly optional.
Note –Months and years are not included because the number of days in a month or year are not constant. To specify longer units of time, increase your configured weeks and day.
-
-
Message: Specifies the message that is sent to the triggered endpoint. In other words, this is the message that you send to the component that is providing the service.
You can also reference here (ex. ${foo}) Application Variables, Java System Properties, or Scheduler Inbound Normalized Message Properties (see table below).
|
Property |
Description |
Type |
|---|---|---|
|
org.glassfish.openesb.scheduler.inbound.date |
Intended triggering date |
String |
|
org.glassfish.openesb.scheduler.inbound.name |
Trigger name |
String |
|
org.glassfish.openesb.scheduler.inbound.group |
Trigger group |
String |
Creating Cron Triggers
A Cron trigger is a “search-and-select” trigger, meaning that as soon as the time and date pattern match whatever was selected, it fires. The nature of a Cron trigger is to fire when all of the time conditions have been satisfied. A Cron trigger starts a job, but is not designed to end it. It is not designed to specify the duration of a job.
Using the Add New Cron Trigger Editor
The Add New Cron Trigger Editor is accessed from the Scheduler Control and Triggers Wizard.
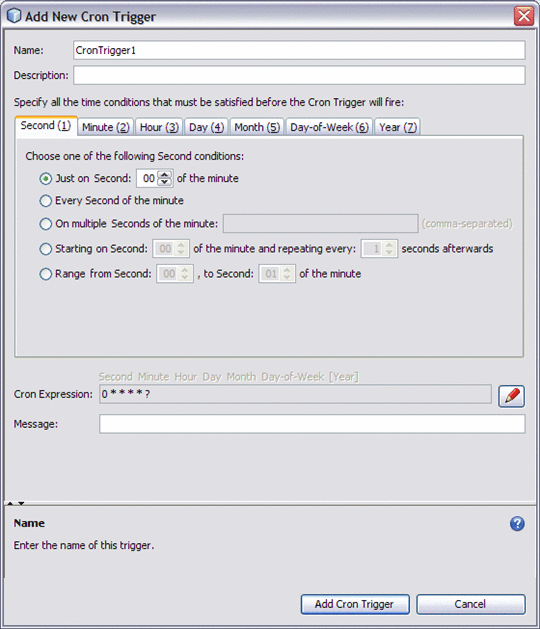
To configure a Cron trigger, complete the following fields:
-
Name: Specifies a user defined name. (This is different than the Group name for the trigger).
-
Description: The description is optional, and can be used to note the action or purpose of the trigger.
Time Condition Tabs
The time condition tabs are used to generate the Cron expression. The Cron expression specifies all of the time conditions that must be satisfied before the Cron trigger will fire. As time conditions are selected, the Cron expression displayed in the editor's Cron Expression field reflect the changes.
-
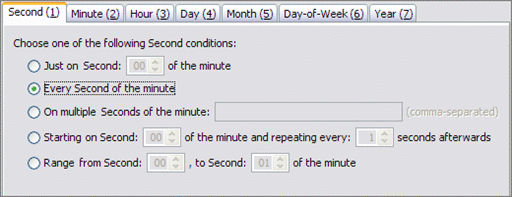
Second (1) Tab: Specifies the second conditions of the Cron expression. You can choose one of the following second conditions for a trigger.
-
Just on Second [second number] of the minute: The trigger fires only on the specified second of the minute.
-
Every Second of the minute: The trigger fires every second of the minute.
-
On multiple Seconds of the minute: The trigger fires on the selected seconds of each minute. Enter a comma separated list of seconds (values from 0 to 59 inclusive). For example, 10,20,30.
-
Starting on Second [second number] of the minute and repeating every [number] seconds afterwards: The trigger fires on the specified second of the minute and repeats every so many seconds, as specified. If the first number is set to 15 and the second number is set to 30 then the trigger fires at 15 seconds and repeats every 30 seconds until stopped.
-
Range from Second [second number] to Second [second number] of the minute: The trigger fires over a range of seconds. If the first value is set to 10 and the second value is set to 25, the trigger starts firing on second 10 of the minute and continues to fire for 15 seconds.
-
-
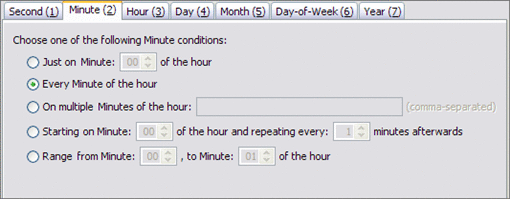
Minute (2) Tab: Specifies the minute conditions of the Cron expression. You can choose one of the following minute conditions for a trigger.
-
Just on Minute [minute number] of the hour: The trigger fires only on the specified minute of the hour.
-
Every Minute of the hour: The trigger fires every minute of the hour.
-
On multiple Minutes of the hour: The trigger fires on the selected minutes of each hour. Enter a comma separated list of minutes (values from 0 to 59 inclusive). For example, 10,20,30.
-
Starting on Minute [minute number] of the hour and repeating every [number] Minutes afterwards: The trigger fires on the specified minute of the hour and repeats every so many minutes, as specified. If the first number is set to 15 and the second number is set to 30 then the trigger fires on minute 15 of the hour and repeats every 30 minutes until stopped.
-
Range from Minute [minute number] to Minute [minute number] of the hour: The trigger fires over a range of minutes. If the first value is set to 10 and the second value is set to 25, the trigger starts firing on minute 10 of the hour and continues to fire for 15 minutes.
-
-
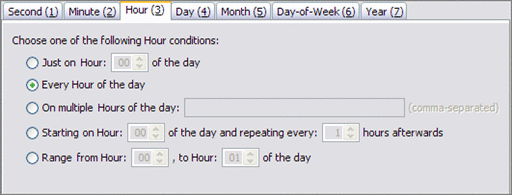
Hour (3) Tab: Specifies the hour conditions of the Cron expression. You can choose one of the following hour conditions for a trigger.
-
Just on Hour [hour number] of the day: The trigger fires only on the specified hour of the day.
-
Every Hour of the day: The trigger fires every hour of the day.
-
On multiple Hours of the day: The trigger fires on the selected hour of each day. Enter a comma separated list of hours (values from 0 to 23 inclusive). For example, 6,12,18.
-
Starting on Hour [hour number] of the day and repeating every [number] Hours afterwards: The trigger fires on the specified hour of the day and repeats every so many hours, as specified. If the first number is set to 6 and the second number is set to 3 then the trigger fires on hour 6 of the day and repeats every 3 hours until stopped.
-
Range from Hour [hour number] to Hour [hour number] of the day: The trigger fires over a range of hours. If the first value is set to 8 and the second value is set to 17, the trigger starts firing on hour 8 of the day and continues to fire for 9 hours.
-
-
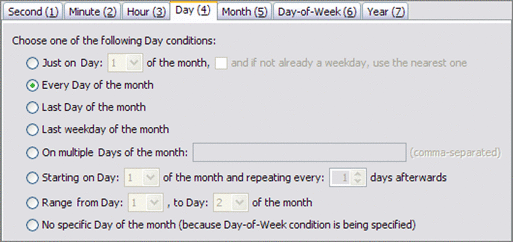
Day (4) Tab: Specifies the day conditions of the Cron expression. You can choose one of the following day conditions for a trigger.
-
Just on Day [day number] of the month: The trigger fires only on the specified day of the month. The checkbox option: and if not already a weekday, use the nearest one, indicates that if the selected day falls on a weekend, the trigger will fire on the next weekday. For example, if day 15 is specified, but the 15th happens to be a Saturday, then the following Monday, the 17th, will be used instead.
-
Every Day of the month: The trigger fires every day of the month.
-
Last Day of the month: The trigger fires on the last day of the month.
-
Last weekday of the month: The trigger fires on the last weekday of the month.
-
On multiple Days of the month: The trigger fires on the selected days of each month. Enter a comma separated list of days (values from 0 to 30 inclusive). For example, 5,12,19.
-
Starting on Day [day number] of the month and repeating every [number] Days afterwards: The trigger fires on the specified day of the month and repeats every so many days, as specified. If the first number is set to 14 and the second number is set to 7 then the trigger fires on day 14 of the month and repeats every 7 days until stopped.
-
Range from Day [day number] to Day [day number] of the month: The trigger fires over a range of days. If the first value is set to 14 and the second value is set to 21, the trigger starts firing on day 14 of the month and continues to fire for 7 days.
-
No specific Day of the month (because Day-of-Week condition is being specified): Indicates that the Day-of-Week (6) condition is specified, and that the conditions specified from the Day (4) tab are not used. If this condition is selected, the Cron expression displays a question mark in the fourth position (***?**). If a condition from the Day-of-Week (6) tab is selected, this condition is specified by default.
-
-
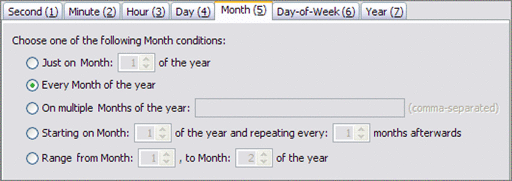
Month (5) Tab: Specifies the month conditions of the Cron expression. You can choose one of the following month conditions for a trigger.
-
Just on Month [month number] of the year: The trigger fires only on the specified month of the year.
-
Every Month of the year: The trigger fires every month of the year.
-
On multiple Months of the year: The trigger fires on the selected month of each year. Enter a comma separated list of months (values from 0 to 11 inclusive). For example, 1,4,7,10.
-
Starting on Month [month number] of the year and repeating every [number] Months afterwards: The trigger fires on the specified month of the year and repeats every so many months, as specified. If the first number is set to 6 and the second number is set to 2 then the trigger fires on month 6 of the year and repeats every 2 months until stopped.
-
Range from Month [month number] to Month [month number] of the year: The trigger fires over a range of months. If the first value is set to 4 and the second value is set to 7, the trigger starts firing on month 4 of the year and continues to fire for 3 months.
-
-
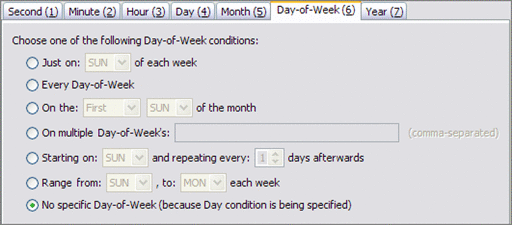
Day-of-Week (6) Tab: Specifies the day of the week conditions of the Cron expression, with SUN (Sunday) being 1 and SAT (Saturday) being 7. You can choose one of the following day-of-week conditions for a trigger.
-
Just on [day] of each week: The trigger fires only on the specified day of the month. The checkbox option: and if not already a weekday, use the nearest one, indicates that if the selected day falls on a weekend, the trigger will fire on the next weekday. For example, if day 15 is specified, but the 15th happens to be a Saturday, then the following Monday, the 17th, will be used instead.
-
Every Day-of-Week: The trigger fires every day of the month.
-
On the [number] [day] of the month: The trigger fires on the specified day of the week, in the specified order is series that it appears in the month: first, second, third, fourth, fifth, or last. For example, if the value is set as On the Fourth TUE of the month, then the trigger fires on the Tuesday that falls fourth in series for the month.
-
Last weekday of the month: The trigger fires on the last weekday of the month.
-
On multiple Days-of-Week's: The trigger fires on the specified days of the week. Enter comma separated list of Day-of-Week's. Values are from 1 to 7 inclusive or their corresponding 3–letter names such as: MON, Tue, wed). For example, Tue,Thu,Sat or 3,5,7 both indicate that the trigger fires on Tuesday, Thursday, and Saturday.
-
Starting on [day] and repeating every [number] days afterwards: The trigger fires on the specified day of the week and repeats every so many days, as specified. The first value is set to the day of the week, and the second value is set from 1 to 6, indicating the number of days between subsequent firings until stopped.
-
Range from [day] to [day] each week: The trigger fires over a specified range of days each week. If the first value is set to MON and the second value is set to THU, the trigger starts firing on Monday and continues to fire through Thursday each week.
-
No specific Day-of-Week (because Day condition is being specified): Indicates that the Day (4) condition is specified and the conditions specified from the Day-of-Week (6) tab are not used. If this condition is selected, the Cron expression displays a question mark in the sixth position (*****?). If a condition from the Day (4) tab is selected, this condition is specified by default.
-
-
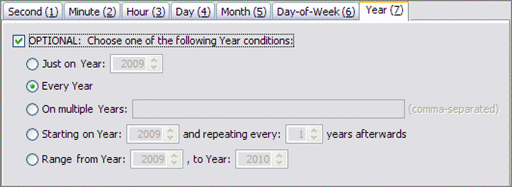
Year (7) Tab: Specifies the year conditions of the Cron expression. You can choose one of the following hour conditions for a trigger. The Year condition is optional and only appears in the Cron expression when the year condition option is selected.
-
OPTIONAL: Choose one of the following Year conditions: The Year expression is optional and only appears in the Cron expression when this option is selected (*****?*). Select OPTIONAL to define a Year condition. When selected, all related fields are enabled.
-
Just on Year [year number]: The trigger fires only on a single specified year.
-
Every Year: The trigger fires every year.
-
On multiple Years: The trigger fires on the selected years. Enter a comma separated list of years (values from 1970 to 2099 inclusive). For example, 2011,2014,2017.
-
Starting on Year [year number] and repeating every [number] Years afterwards: The trigger fires on the specified year and repeats every so many years, as specified. If the first number is set to 2010 and the second number is set to 2 then the trigger fires on year 2010 and repeats every 2 years until stopped.
-
Range from Year [year number] to Year [year number]: The trigger fires over a range of years. If the first value is set to 2012 and the second value is set to 2015, the trigger starts firing on year 2012 and continues to fire for 3 years.
-
-
Cron Expression: The Cron Expression field displays the Quartz-style Cron expression generated by the options selected from the condition tabs. Each asterisk is positional, representing the "Every" option for that particular field in the same order as presented by the tabs: Second, Minute, Hour, Day, Month, Day-of-Week, and Year. The asterisk is replaced by a question mark in the fourth (Day) or sixth (Day-of-Week) position, depending on whether the Day condition or Day-of-Week condition is used. Only one of these two options can be used per trigger and the question mark indicates that which option is disabled. The seventh (Year) value is optional, and is only displayed if that option has been selected.
The Cron expression can also be entered or edited directly by clicking the edit (pencil) button. Once your values are entered, click the view-only (eye) button to validate the expression and parse the specified expression back into the condition tabs.
-
Message: The message field specifies the message that is sent to the triggered endpoint. You can type a message or reference Application Variables, Java System Properties, or Scheduler Inbound Message Properties in this field.
Creating Hybrid Triggers
The Hybrid trigger merges the Cron expression with the simple trigger. The Cron values specify when the trigger will fire, and the simple values specify the duration and interval for the trigger.
Using the Add New Hybrid Trigger Editor
The Add New Hybrid Trigger Editor is accessed from the Scheduler Control and Triggers Wizard.
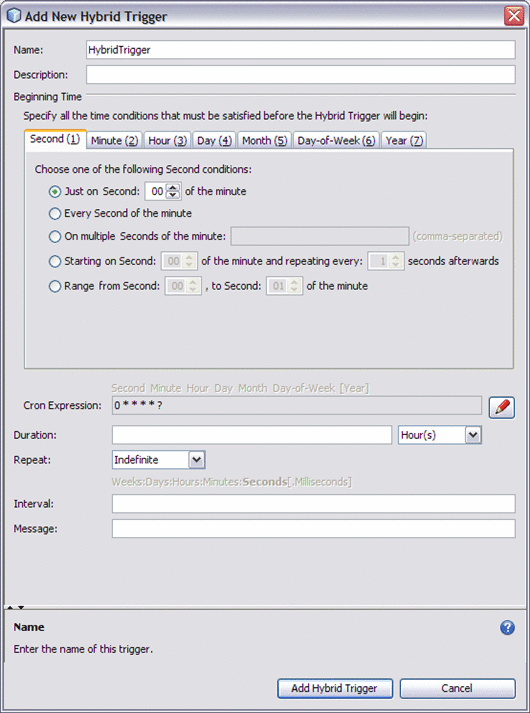
To configure a hybrid trigger, complete the following fields:
-
Name: Specifies a user defined name. (This is different than the Group name for the trigger).
-
Description: The description is optional, and can be used to note the action or purpose of the trigger.
-
Beginning Time: Specify all of the time conditions that must be satisfied before the Hybrid trigger begins. The Hybrid trigger beginning time is set using the Cron condition tabs, in the same way that a Cron trigger is configured. For information about the Cron condition tab settings see Creating Cron Triggers.
-
Cron Expression: The Cron Expression field displays the Quartz-style Cron expression generated by the options selected from the condition tabs. Each asterisk is positional, representing the "Every" option for that particular field in the same order as presented by the tabs: Second, Minute, Hour, Day, Month, Day-of-Week, and Year. The asterisk is replaced by a question mark in the fourth (Day) or sixth (Day-of-Week) position, depending on whether the Day condition or Day-of-Week condition is used. The seventh (Year) value is optional, and is only displayed if that option has been selected.
The Cron expression can also be entered or edited directly by clicking the edit (pencil) button. Once your values are entered, click the view-only (eye) button to validate the expression and parse the specified expression back into the condition tabs.
-
Duration: Specifies the length of time that the trigger repeatedly fires, that is the duration of time between the configured Beginning Time and the end time. Select the time units to use to define the duration. The options are: milliseconds, seconds, minutes, hours, days, weeks.
-
Repeat: Specifies a number of times the operation fires. Enter any number in the field, or use the default value, Indefinite, indicating that the trigger repeats indefinitely until stopped.
-
Interval: Specifies the time interval between consecutive repeats of the trigger.
Units of time, from seconds to weeks, are specified in increasing magnitude from right to left. Each unit of time is delimited in between by a colon (:). Milliseconds are expressed as the decimal portion of seconds.
For example:
-
2:5:30:40 — indicates an interval of 2 days, 5 hours, 30 minutes, and 40 seconds.
-
30 — indicates an interval of 30 seconds.
-
0.400 — indicates 400 Milliseconds. Trailing zeros can be omitted.
-
12:0:0:0:0 — indicates 12 weeks.
Everything to the left of Milliseconds is increasingly optional.
Note –Months and years are not included because the number of days in a month or year are not constant. To specify longer units of time, increase your configured weeks and day.
-
-
Message: Specifies the message that is sent to the triggered endpoint. In other words, this is the message that you send to the component that is providing the service.
You can also reference here (ex. ${foo}) Application Variables, Java System Properties, or Scheduler Inbound Normalized Message Properties (see table below).
|
Property |
Description |
Type |
|---|---|---|
|
org.glassfish.openesb.scheduler.inbound.date |
Intended triggering date |
String |
|
org.glassfish.openesb.scheduler.inbound.name |
Trigger name |
String |
|
org.glassfish.openesb.scheduler.inbound.group |
Trigger group |
String |
Example Hybrid Trigger Configuration
As an example of configuring a Hybrid trigger, say you wanted to set a trigger to send a message throughout the months of July and August, Monday through Thursday, from 9:00 AM to 3:00 PM, at 30 minute intervals, every 2.5 seconds for 10 seconds. In English, we communicate this time from the largest unit of time (days) to the smallest (seconds), but when you create a trigger in the Scheduler Binding Component, it is often configured from the smallest setting to the largest.
Configure the Hybrid trigger as follows:
-
From the Minute tab, select and set “Starting on Minute: 00 of the hour and repeating every: 30 Minutes afterwards”.
-
From the Hour tab, select and set “Range from Hour: 09, to Hour: 15 of the day”.
-
From the Day-of-Week tab, select and set “Range from: MON, to: THU each week”.
-
From the Month tab, select and set “On multiple Months of the year: 7,8”.
This creates the Cron expression: * 0/30 9–15 ? 7,8 2–5.
-
For Duration, enter 10 Second(s).
-
For Interval, enter 2.5.
-
For Message, enter “Use Sunscreen”.
Adding Triggers and Editing an Existing Scheduler Project
You can edit an existing Scheduler Binding Component Project or add additional triggers to a group using the Configure Scheduler Binding Wizard accessed in CASA Editor.
 Accessing the Configure Scheduler Binding Wizard
-
Open your Composite Application in the CASA Editor: From the NetBeans Projects window, right-click your project's Service Assembly and choose Edit from the pop-up menu.
The CASA Editor opens to your project.
-
If the project has not yet been built, click the Build icon located on the CASA Editor toolbar.
The CASA Design view now shows the project's JBI Modules and WSDL Ports.
-
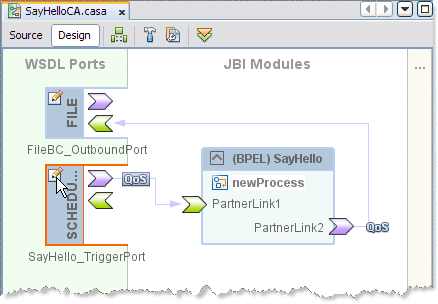
If your Scheduler Port has not been cloned, right-click the Scheduler WSDL Port and choose Clone WSDL Port to edit from the pop-up menu. This creates a copy of the WSDL file in the Composite Application Project source directory to allow editing.
An edit icon appears in the corner of the Scheduler Port.
-
Click the edit icon on the Scheduler Port.
The Configure Scheduler Binding Wizard appears.
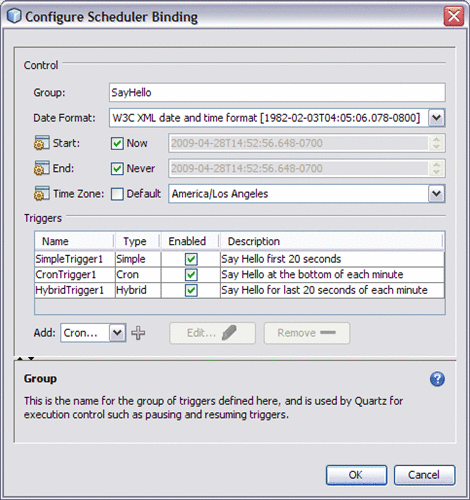
The Configure Scheduler Binding Wizard is a twin to the Scheduler Binding Component Wizard, and can be configured in the same way. See Understanding the Scheduler Wizard more information.
-
Once you have completed your changes, redeploy your project for the updates to take affect.
Scheduler Binding Component Properties
This section contains the following topics:
Runtime Properties for the Scheduler Binding Component
The runtime properties allow you to make changes to a project after the project's design time is completed, without touching the business logic.
-
From the Services window of the NetBeans IDE, expand the Servers node.
-
If GlassFish is not started, start GlassFish. To do this, right-click GlassFish V2 and select Start from the pop-up menu.
-
Under the application server, expand the JBI -> Binding Components nodes and select the Scheduler Binding Component (sun-scheduler-binding). If sun-scheduler-binding is not started, start it now.
-
Double-click the sun-scheduler-binding to open the properties editor.
-
Edit the properties as needed. Once you are finished editing your properties, click the NetBeans IDE Save button, and redeploy your project to make your changes take affect.
To access and edit the Scheduler runtime properties, do the following:
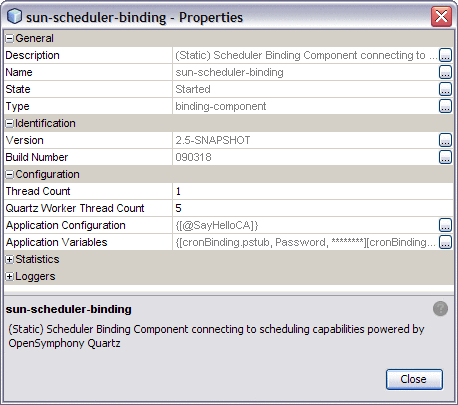
Runtime Properties
The Scheduler Binding Component properties specify Thread Count, Application Configuration, Application Variables, Statistics, Loggers, and reference the Binding Component's description, name, type, and state.
- Description
-
Displays the description of the binding component.
- Name
-
Displays the name of the binding component.
- State
-
Indicates the state of the binding component as Started, or Stopped.
- Type
-
Displays the component type.
- Version
-
Displays the components specification version.
- Build Number
-
Displays the build version for the current component.
- Thread Count
-
Specifies the number of threads listening on the message bus.
- Quartz Worker Thread Count
-
Specifies the number of threads that the Quartz Scheduler can use.
- Application Configuration
-
Specifies the configured triggers name, starting date and time, ending date and time, and time zone. For more information on using the Application Configuration property see Scheduler Application Configuration.
- Application Variable
-
Specifies the Application Variables configured for the binding component. Application Variables allow you to define a list of name:value pairs for a given stated type. The application variable name can be used as a token for a WSDL extensibility element attribute in a corresponding binding.
The Application Variables configuration property offers four variable types:
-
String: Specifies a string value, such as a path or directory.
-
Number: Specifies a number value.
-
Boolean: Specifies a Boolean value. The VALUE field provides a checkbox (checked = true).
-
Password: Specifies a password value. The password is masked and displays only asterisks.
For more information about using Application Variables, see Scheduler Binding Component Application Variables.
-
Statistics Properties
The Statistics properties provide a record of key statistics for the Scheduler Binding Component.
- Activated Endpoints
-
Tracks the number of activated endpoints.
- Active Exchanges
-
Tracks the number of active exchanges.
- Avg. Component Time
-
Tracks the average message exchange component time in milliseconds.
- Avg. D.C. Time
-
Tracks the average message exchange delivery channel time in milliseconds.
- Avg. Msg. Service Time
-
Tracks the average message exchange message service time in milliseconds.
- Avg. Response Time
-
Tracks the average message exchange response time in milliseconds.
- Completed Exchanges
-
Tracks the total number of completed exchanges.
- Error Exchanges
-
Tracks the total number of error exchanges.
- Received Dones
-
Tracks the number of received dones.
- Received Errors
-
Tracks the number of received errors.
- Received Faults
-
Tracks the number of received faults.
- Received Replies
-
Tracks the number of received replies.
- Received Requests
-
Tracks the number of received requests.
- Sent Dones
-
Tracks the number of sent dones.
- Sent Errors
-
Tracks the number of sent errors.
- Sent Faults
-
Tracks the number of sent faults.
- Sent Replies
-
Tracks the number of sent replies.
- Sent Requests
-
Tracks the number of sent requests.
- Up Time
-
Tracks the up time of this component in milliseconds.
Logger Properties
The Scheduler Binding Component runtime Logger properties include 13 different component activities that can be monitored and recorded at user-designated levels.
Each logger can be set to record information at any of the following levels:
-
FINEST: messages provide highly detailed tracing
-
FINER: messages provide reasonably detailed tracing
-
FINE: messages provide basic tracing
-
CONFIG: provides static configuration messages
-
INFO: provides informative messages
-
WARNING: messages indicate a warning
-
SEVERE: messages indicate a severe failure
-
OFF: no logging messages
Scheduler Binding Component Loggers
The values for the Scheduler Binding Component Loggers start with the location: sun-scheduler-binding. The value text has been wrapped for display purposes.
- sun-scheduler-binding
-
Specifies the logging level for the entire group of component loggers. Individual logger levels can then be changed as desired.
- RuntimeConfigurationMBean
-
.com.sun.jbi.common.qos.config.RuntimeConfigurationMBean
- Deployment Lookup (QoS)
-
.com.sun.jbi.common.qos.discriptor.DeploymentLookup
- Messaging Channel (QoS)
-
.com.sun.jbi.common.qos.messaging.MessagingChannel
- MBeanHelper
-
.com.sun.jbi.common.util.MBeanHelper
- EndpointLifeCycle
-
.com.sun.jbi.component.toolkit.endpoint.EndpointLifeCycle
- Accept Poller Thread (Comp TK)
-
.com.sun.jbi.component.toolkit.lifecycle.impl.AcceptPoller
- SchedulerBC Component Manager
-
org.glassfish.openesb.schedulerbc.SchedulerComponentManager
- SchedulerBC Configuration Manager
-
org.glassfish.openesb.schedulerbc.SchedulerConfiguration
- SchedulerBC Endpoint Manager
-
org.glassfish.openesb.schedulerbc.SchedulerEndpointManager
- SchedulerBC Exchange Handler
-
org.glassfish.openesb.schedulerbc.SchedulerExchangeHandler
- SchedulerBC Service Unit Manager
-
org.glassfish.openesb.schedulerbc.SchedulerServiceUnitManager
- SchedulerBC Hybrid Trigger
-
org.glassfish.openesb.schedulerbc.domain.HybridTrigger
- SchedulerBC Endpoint Handler
-
org.glassfish.openesb.schedulerbc.domain.SchedulerEndPoint
Exception messages start with a unique identifier. The Scheduler Binding Component exception message starts with SCHEDBC. For example:
SCHEDBC-3005: Quartz Cron trigger cronBinding.CronTrigger1 will fire next at: 2008-12-08T12:45:00.000-0800 COMPTK-3001: Message exchange accepted from NMR: id=40556676730368-18686-134480792400230253,role=CONSUMER,status=Done COMPTK-3009: Stopping SU-QosDemoCA-sun-scheduler-binding |
For more information about the Scheduler Binding Component Logging Codes, see Logging Codes By Component.
Trigger Properties
The Scheduler Binding Component Trigger Properties allow you to make changes to the settings for a specific trigger in a group. You can also make these edits for a specific trigger using the Configure Scheduler Binding Wizard, accessed from the CASA Editor.
 Using the Trigger Properties Editor
-
To access the Properties Editor for a specific trigger, open the WSDL file that your project uses for the Scheduler Binding Component trigger from the Composite Application.
Note –Be aware that your completed project uses the WSDL file located under the Composite Application's Process Files directory, not the WSDL file located under the BPEL or XSLT project.
-
From the WSDL Editor's WSDL view, expand Bindings -> TriggerBinding -> FireTriggerOperation -> inMsg.
-
Triggers in the tree appear in the order in which they were created. Right-click the trigger you wish to edit and select Properties from the pop-up menu.
The sched:trigger Properties Editor appears.
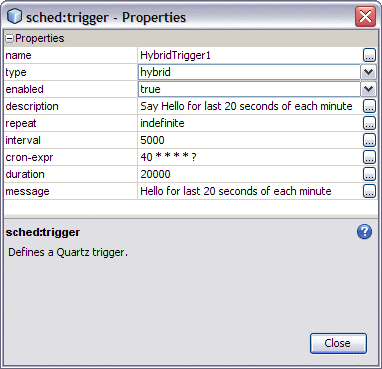
-
Edit your properties as needed. Once you have finished editing your project's triggers, redeploy the project to enable your changes.
Trigger Configuration Properties
The Scheduler Binding Component trigger properties are:
- Name
-
Specifies the name of the Quartz trigger.
- Type
-
Specifies the type of Quartz trigger: Simple, Cron, or Hybrid.
- Enabled
-
Specifies whether the Quartz trigger is enabled (true) or disabled (false).
- Repeat
-
Specifies how many times the trigger repeats, indicated by a number or the keyword "indefinite" meaning indefinitely. This property only applies to Simple and Hybrid types.
- Interval
-
Specifies the interval between trigger firings, in milliseconds. This property only applies to Simple and Hybrid types.
- Cron-expr
-
Specifies the Quartz Cron Expression that governs when a Cron or Hybrid trigger fires or begins, respectively. This property only applies to Cron and Hybrid types.
- Duration
-
Specifies the duration period, from the start time determined by the Cron Expression attribute, that the trigger repeatedly fires. That is, the specified length of time in which the trigger fires once it begins. This property only applies to Hybrid types.
- Message
-
Specifies the message that is sent to the endpoint that is triggered. This message can also reference Application Variables, Java System Properties, or Scheduler Inbound Normalized Message Properties.
Once you have finished editing your project's triggers, redeploy the project to enable your changes.
Scheduler BC Normalized Message Properties
Normalized Message properties are commonly used to specify metadata that is associated with message content.
The Scheduler Binding Component uses three inbound Normalized Message Properties:
-
Trigger Name
-
Trigger Group
-
Trigger Date
For information on using Normalized Message Properties in a BPEL process, see Using Normalized Message Properties.
Scheduler Application Configuration
The Scheduler Application Configuration property allows you to change the settings for a trigger, such as start date and time, end date and time, without changing a projects business logic. The Scheduler Binding Component is designed to be configured at deployment.
Using Scheduler Binding Component Application Configuration
To configure your projects Scheduler Binding Components for application configuration, do the following:
 Defining the Scheduler Application Configuration for
a Project
-
To associate a Configuration Extension profile with the Scheduler endpoint, Open your project service assembly in the CASA Editor. To do this, from the Project window, right-click your composite application's Service Assembly node, and choose Edit from the pop-up menu.
The CASA Editor opens.
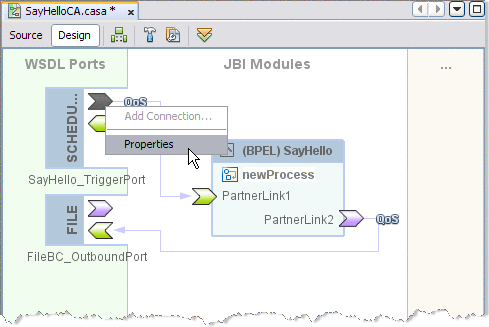
-
Right-click the Scheduler consumer port icon, and choose Properties from the pop-up menu.
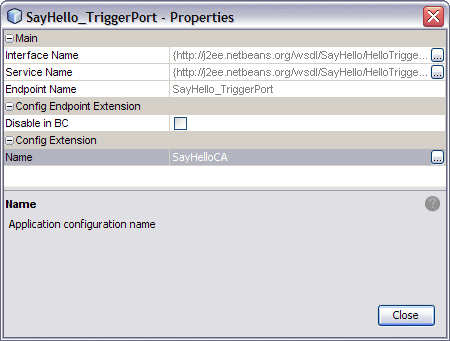
The Scheduler TriggerPort Properties Editor appears.
-
From the Properties Editor, under Config Extension, enter a name for your profile, such as the name of the Scheduler WSDL. Click Close.
-
From the NetBeans Services window, make sure that GlassFish V2 server is started. If the GlassFish server is not started, right-click GlassFish V2 and choose Start from the pop-up menu. In the same way, make sure that the Scheduler Binding Component (sun-scheduler-binding) is also started.
-
Right-click the sun-scheduler-binding and select Properties from the pop-up menu.
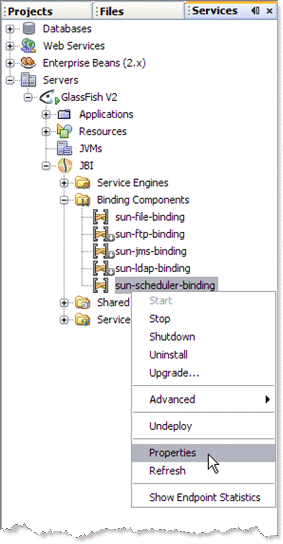
The sun-scheduler-binding Properties Editor appears.
-
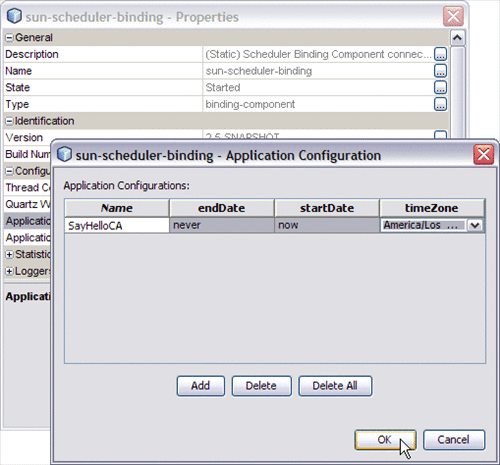
From the sun-scheduler-binding Properties Editor, click the edit button for the Application Configuration property.
The sun-scheduler-binding Application Configuration Editor appears.
-
Click Add to add a new row to the Application Configuration Editor, representing all of the application configurable parameters for the Scheduler Binding Component.
-
Enter the parameters for your binding
-
Name: Specifies the name of your binding profile
-
endDate: Specifies the trigger end date as a String literal, either never, or the date, conforming to the format specified in the Scheduler Control and Triggers Wizard.
-
startDate: Specifies the trigger start date as a String literal, either now, or the date, conforming to the format specified in the Scheduler Control and Triggers Wizard.
-
timeZone: Specifies the appropriate time zone for the environment where the deployed scheduler runs.
-
-
Click OK and Close to save properties.
When the composite application is deployed, the Scheduler Binding Component will use the new application configuration that has been defined for the respective endpoint.
Other Tools Used to Edit the Application Configuration
In addition to the NetBeans IDE, you can also use these other tools to edit the Scheduler Binding Component Application Configuration.
-
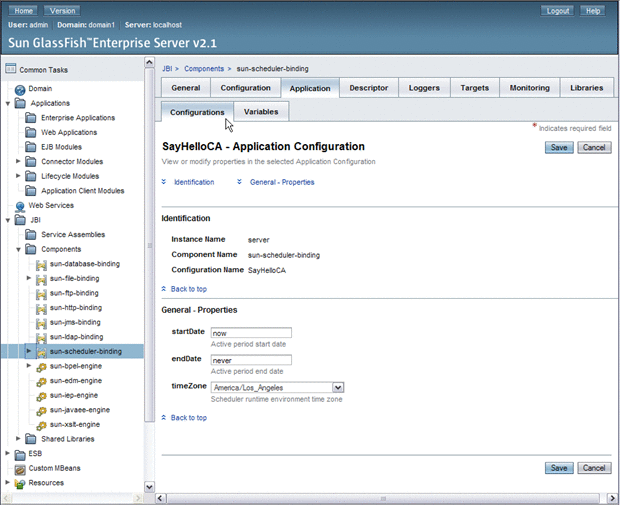
GlassFish Admin Console: To access the Admin Console, from the NetBeans Services window, right-click GlassFish V2 under Servers and choose View Admin Console from the pop-up menu. You can also access the Admin Console at http://localhost:4848/login.jsf, if this setting was retained during installation.
To open the Application Configuration window from the Admin Console, select the sun-scheduler-binding, under Common Tasks -> JBI -> Components. Select the Application tab and the Configuration sub-tab.
-
asadmin Command Line Interface: For information on using the Command Line Interface (CLI) to create, edit, or delete and application, see create-jbi-application-configuration, update-jbi-application-configuration, or delete-jbi-application-configuration.
Scheduler Binding Component Application Variables
The binding component Application Variables property allows you to define a list of name:value pairs for a given stated type. The application variable name can be used as a token for a WSDL extensibility element attribute in a corresponding binding. For example, if you were defining an application variable for the hostname as FOO, then the WSDL attribute would be ${FOO}. In the Application Variables property you would enter a String value of FOO for the name, and the desired attribute as the value.
When you deploy an application that uses application variables, any variable that is referenced in the application's WSDL is loaded automatically.
The message sent by the Scheduler Bonding Component when a trigger is fired can reference Application Variables. These Application Variables are set at the time of deployment and are appraised each and every time a message is sent. This allows that variables to be changed dynamically, on the fly.
This feature allows the administrator to control confidential information in a message, such as passwords, by allowing them to add this information after a project's design time, and allowing changes to this information without changing a project's business logic.
Using Application Variables in a Trigger Message
Application Variables are created using the Scheduler Binding Component runtime properties editor. They can also be created using the GlassFish Admin Console and the asadmin Command Line Interface (CLI).
 Creating and Using Application Variables
-
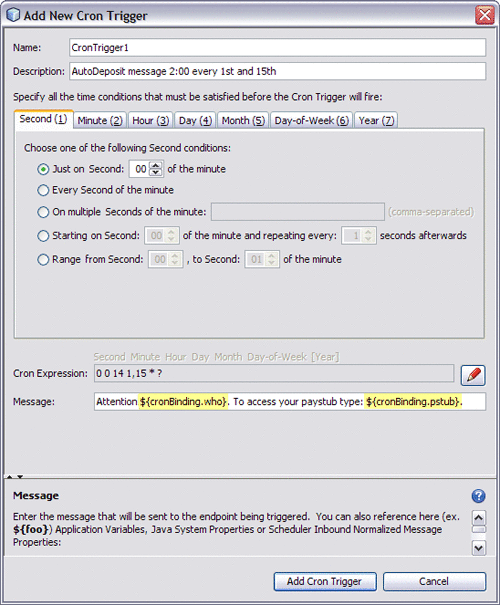
Reference the Application Variable in the Message field of the trigger editor, using the dollar-sign curly braces format, as highlighted in the figure below.
 Caution –
 Any defined Application Variable is available to all JBI applications deployed in a GlassFish server, therefore care must be taken to qualify Application Variables for different deployments. Typically, you can do this by adding a unique prefix to the Application Variable name, such as the name of the WSDL binding. For example, in the image above, the prefix “cronBinding.” is used to differentiate the variables.
-
Next, prior to deployment time, set the referenced Application Variables. To do this
-
From the Services window, right-click the sun-scheduler-binding, under GlassFish V2 -> JBI -> Binding Components, and choose Properties from the pop-up menu.
The sun-scheduler-binding Properties editor appears.
-
Click the edit button for the Application Variables property.
The Application Variables dialog box appears.
-
Click Add, and select the type of variable type for your Application Variable: String, Number, Boolean, or Password. Click OK
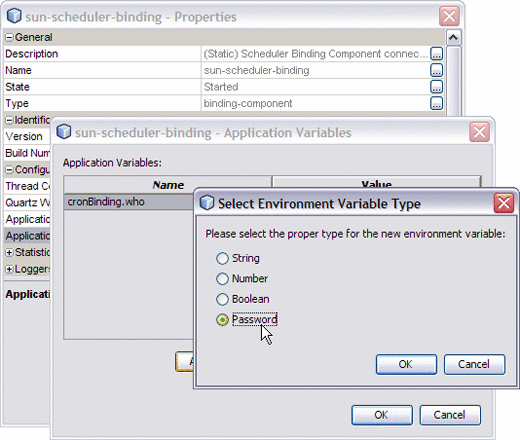
A new row is added to the Application Variables dialog box.
-
For each Application Variable, enter the name, exactly as referenced in the Message field of the trigger editor, omitting the dollar sign and curly braces.
-
Enter the Application Variable's corresponding value in the Value field. Password values are masked for confidentiality.
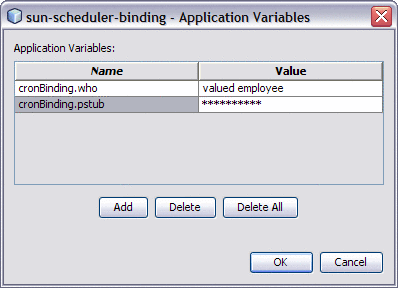
Note –The value field cannot reference another Application Variable.
-
Once you have completed all of your Application Variables, Click OK.
The Application Variables are added to the sun-scheduler-binding Properties Editor's Application Variables field, and are ready to use.
-
Using Admin Console and asadmin to Create Application Variables
In addition to the NetBeans IDE, you can also use these other tools to create Application Variables for the Scheduler Binding Component.
-
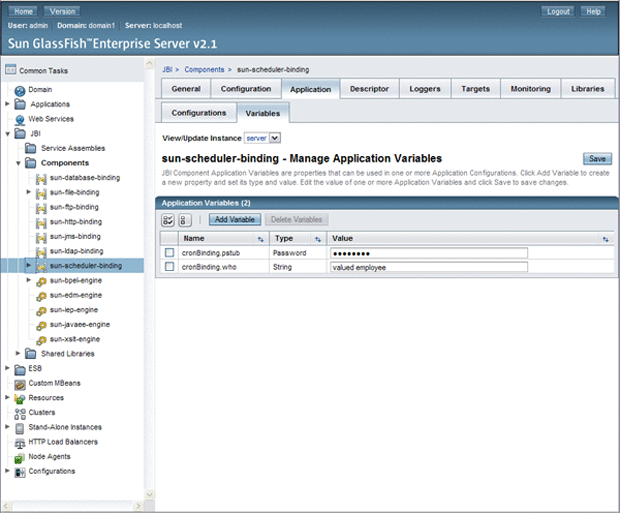
GlassFish Admin Console: To access the Admin Console, from the NetBeans Services window, right-click GlassFish V2 under Servers and choose View Admin Console from the pop-up menu. You can also access the Admin Console at http://localhost:4848/login.jsf.
To open the Manage Application Variables window in the Admin Console, select the sun-scheduler-binding, under Common Tasks -> JBI -> Components. Select the Application tab and the Variables sub-tab.
-
asadmin Command Line Interface: For information on using the Command Line Interface (CLI) to create, update, and delete Application Variables, see create-jbi-application-variable, update-jbi-application-variable, or delete-jbi-application-variable.
Configuring Redelivery and Throttling for the Scheduler Binding Component
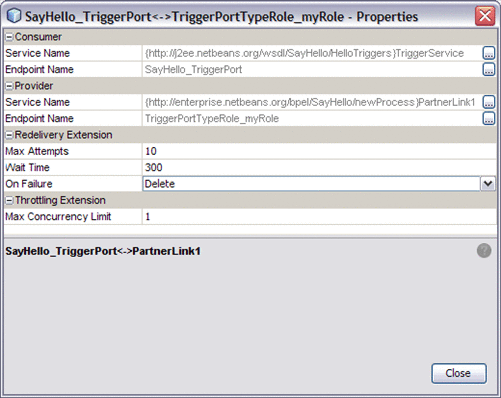
Redelivery and Throttling are Quality of Service (QoS) features that are configured from the Composite Application Service Assembly (CASA) Editor. To access the QoS Properties Editor for a Scheduler Binding Component endpoint, open your Composite Application in the CASA Editor, and click the QoS icon for the endpoint you want to configure. The QoS Properties Editor for that endpoint appears.
Redelivery
Redelivery is a QoS mechanism that handles message delivery when first-time delivery fails. Redelivery allows you to define the number of attempts that the system makes to deliver a message, the time between attempts, and the final result for an undeliverable message or nonresponsive endpoint.
Configuring Redelivery for an Endpoint
To configure Redelivery for a specific endpoint, open the QoS Properties Editor for that endpoint connection. From the Redelivery Extension section of the editor, configure the Redelivery properties.
The Redelivery configuration parameters are:
-
Max Attempts: Specifies the number of times that the project attempts to redeliver a message. An error status is returned to the JBI component for each failed attempt.
-
Wait Time: Specifies the time, in milliseconds, that the project waits between redelivery attempts.
-
On Failure: Specifies the actions taken and the message destination when the specified redelivery attempts have been exhausted.
This parameter has four options:
-
Delete: QoS utility deletes the message and returns a Done status to the JBI component, at which time the component proceeds to its next process. The delete option only supports In-Only message exchanges.
-
Redirect: QoS utility redirects the message to a user-defined endpoint, such as a ?dead-message? folder. Upon successful delivery to the redirect endpoint, the QoS utility returns a Done status to the JBI component, at which time the component proceeds to its next process. The redirect option only supports In-Only message exchanges.
-
Suspend: The JBI component suspends the process instance . This option is only supported if monitoring is enabled in the JBI Component, since the user must use the monitoring tool to resume a suspended instance. This option is supported for both In-Only and In-Out message exchanges.
Note –The Suspend option is not supported for the Scheduler Binding Component.
-
Error: The error option specifies that when the final attempt to redeliver the message is exhausted, the JBI component throws an exception. This option is only supported if monitoring is enabled in the JBI Component, since the user must use the monitoring tool to resume a suspended instance. This option is supported for both In-Only and In-Out message exchanges.
Note –The On Failure property options, delete and redirect, cannot be applied to In-Out message exchanges because the return value for these options does not suffice. A specific response is required from the process instance to proceed further. For more information, see Redelivery.
-
Throttling
Throttling is used to set the maximum number of concurrent messages that are processed by a particular endpoint. Increased message load and large message payloads can cause memory usage spikes that can decrease performance. Throttling limits resource consumption so that consistent performance is maintained. In most cases, the trigger message from the Scheduler Binding Component is small, and limiting resource consumption is not an issue.
Throttling can also be used to configure serialization, or the order in which messages are processed. When set to a value of 1, then only one trigger message can be processed at a time, guaranteeing that regardless of size, messages are processed in the order in which they fire.
Configuring Throttling for an Endpoint
To configure Throttling for a specific endpoint, open the QoS Properties Editor for that endpoint. From the Throttling Extension section of the editor, configure the Maximum Concurrency Limit property. Specify the maximum number of concurrent messages to be processed for this connection, or enter a value of 1 to guarantee serial message processing.
Monitoring a Scheduler Binding Component Project
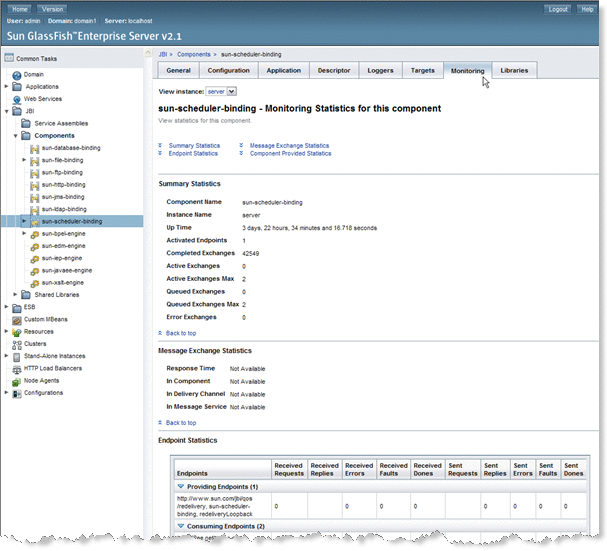
You can monitor your deployed Scheduler project from the GlassFish Admin Console.
The Admin Console monitors the following statistics for your component:
-
Summary Statistics, such as up time, activated endpoints, completed exchanges, error exchanges, and so fourth.
-
Message Exchange Statistics, such as response times.
-
Endpoint Statistics, such as received and sent requests, replies, errors, and so fourth.
-
Component Provided Statistics, such as Last Update, Next Trigger, Number of executed jobs, and active triggers.
 Open the Admin Console Monitoring Window
-
From the NetBeans Services window, right-click GlassFish V2 under Servers and choose View Admin Console from the pop-up menu. You can also access the Admin Console at http://localhost:4848/login.jsf.
-
In the Admin Console's Common Tasks tree, select sun-scheduler-binding under JBI -> Components.
-
Select the Monitoring tab.
-
To see the latest statistics, refresh your screen regularly.
- © 2010, Oracle Corporation and/or its affiliates
