Chapter 4 SunVTS User Interfaces
Refer to one of the following sections based on the SunVTS user interface that you are using:
Overview of SunVTS User Interfaces
SunVTS is designed to run with one of the following user interfaces:
-
Window interfaces--either CDE or OPEN LOOK environments.
-
Solstice(TM)TM SyMON(TM)TM--a system monitoring tool with the ability to run SunVTS.
-
TTY interface--an ASCII menu based interface used to operate SunVTS without a graphical user interface. You can run SunVTS from a terminal, a shelltool, or a modem attached to a serial port using the TTY interface.
-
Command-line execution--run individual tests from the command line.
CDE User Interface
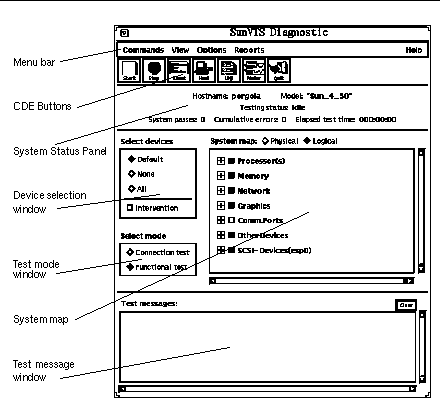
The SunVTS CDE interface is an easy-to-use graphical user interface (GUI) that provides a consistent look and feel across UNIX environments. For an example of the SunVTS display in the CDE environment refer to the following figure.
Note -
To start SunVTS in the CDE environment refer to Chapter 3, Starting SunVTS .
Note -
For step by step instructions refer to "Running SunVTS With CDE (Tutorial)".
Figure 4-1 Common Desktop Environment (CDE) SunVTS Display
CDE Menu Bar
The menu bar is located the top of the main SunVTS display. (Refer to Figure 4-1 and Figure 4-2)
Figure 4-2 CDE Menu Bar
The menu bar provides access to a variety of SunVTS commands:
-
Commands menu--contains a list of SunVTS control commands
-
View menu--expands or contracts the system map hierarchy
-
Options menu--contains a list of the system option categories.
-
Reports menu--lists the two types of viewable reports
-
Help menu--provides SunVTS revision information
Detailed information about each Menu Bar function follows.
Commands Menu
From the Commands menu, you can set a variety of test parameters and functions (Figure 4-3).
Table 4-1 describes each item in the Commands menu.
Figure 4-3 CDE Commands Menu
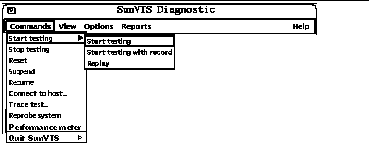 Table 4-1 CDE Commands Pop-up Menu
|
Menu Item |
Description |
|---|---|
|
Start Testing Start Testing with record
Replay |
Starts all enabled tests Starts testing and records SunVTS kernel events Replays the previous recorded test session |
|
Stop testing |
Stops all tests |
|
Reset |
Resets all pass and error counts |
|
Suspend |
Suspends all tests |
|
Resume |
Resumes testing |
|
Connect to host |
Connects user interface to the SunVTS kernel on another machine |
|
Trace test |
Uses the truss command to create a log of every system call made by a specific test. The messages logged by this feature give you a powerful debugging tool when isolating the specific cause of an error. |
|
Reprobe system |
vtsk reprobes the system. Refer to the note below. |
| Performance meter | Display the Perfmeter window for statistical information. |
|
Quit SunVTS UI and kernel UI only Kernel only |
Terminates the SunVTS user interface, the SunVTS kernel, or both. |
Note -
Reprobing the system is necessary when test media (CD-ROM or tape cartridges) are installed after SunVTS is started. The reprobe function does not replace a reconfiguration boot for devices that are added to a system.
View Menu
Use the View menu (Figure 4-4) to choose the level of detail that you want to view in the system map.
Figure 4-4 CDE View Menu
 Table 4-2 CDE View Menu
| Menu Item | Description |
|---|---|
| Open System Map | Expands and shows all the devices in the System Map |
| Close System Map | Collapses the view so that only major categories are displayed |
Options Menu
The Options menu is where you set global SunVTS kernel and test options. See Figure 4-5 for the various option categories available for SunVTS.
Figure 4-5 CDE Options Menu
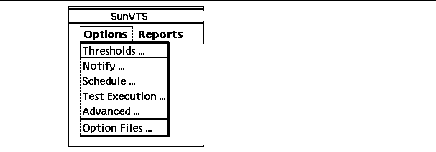
To display the SunVTS Options pull-down menu, select Options. Each item in this list opens a pop-up window for configuring various test options (Figure 4-6). Each option is applied globally to subsequent test sessions.
After you select and change any options, click the Apply button.
To reset the options to their default settings, click the Reset button.
Figure 4-6 shows the sub-menus and Table 4-3 describes the SunVTS global options.
Figure 4-6 CDE Options Pop-up Windows
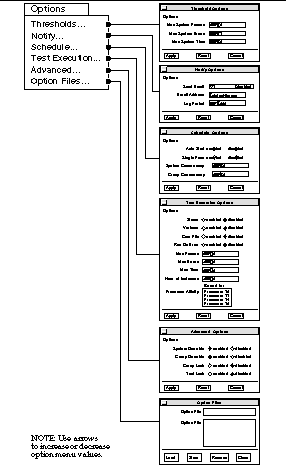 Table 4-3 Options Menus
|
Option Menu |
Option |
Description |
|---|---|---|
|
Thresholds |
Max System Passes |
States the maximum number of system passes before stopping all tests (0 causes the SunVTS kernel to run the tests until you click the Stop button) |
|
|
Max System Errors |
States the maximum number of system errors before SunVTS stops all tests (0 causes the SunVTS kernel to continue testing regardless of errors) |
|
|
Max System Time |
Specifies the maximum number of minutes that SunVTS continues testing (0 makes the SunVTS kernel run the selected tests until you click the Stop button) |
|
Notify |
Send Email |
Determines when and if you want the test status messages sent to you by email. From this menu, you can choose: - Disabled (never send email) - Now (send email immediately) - On Error (send email when an error occurs) - Periodically (send email with a time period set in the Log Period option) - On Error & Periodically (send email periodically as well as when an error occurs) |
|
|
Email Address |
Indicates the email address where the test status messages are sent (the address is root by default) |
|
|
Log Period |
Specifies the time, in minutes, between sending test status email messages |
|
Schedule |
Auto Start |
Eliminates the need to use the Start button to start a SunVTS testing session. To use this option: 1. Enable the Auto Start setting. 2. Save the System options and Test options to an option file (see "To Use the Option Files Button" for more information). 3. Starts SunVTS from the command line, specifying the option file. SunVTS begins testing soon after the main window is displayed. |
|
|
Single Pass |
Runs only one pass of each selected test |
|
|
System Concurrency |
Sets the maximum number of test instances that can be run concurrently in the machine being tested |
|
|
Group Concurrency |
Sets the number of tests you want to run at the same time in the same group |
|
Test Execution |
Stress |
Runs certain tests in stress mode, working the system harder than normal |
|
|
Verbose |
Displays verbose messages in the SunVTS Console window |
|
|
Core File |
Creates a core file. If the <SunVTS bin> directory is writable; core.<testname>.xxxxxx is the core file name, where <testname> is the test that dumped core, and where xxxxxx is a character string generated by the system in order to make the file name unique. When Core File is disabled, a message is displayed and logged, indicating the signal that caused the failure; see "The Log Files Button" for more information |
|
|
Run On Error | Use the Max Errors option (described below) |
|
|
Max Passes |
Specifies the maximum number of passes a test can run. 0=no limit |
|
|
Max Errors |
States the maximum number of allowable errors before stopping the test (0 makes the SunVTS kernel continue testing regardless of errors) |
|
|
Max Time |
States the time limit (in minutes) a test can run (0 = no limit) |
|
|
Number of Instances |
Specifies the number of instances to run each scaleable test |
|
Advanced
|
System Override |
Supersedes the specific group and test options in favor of the options set in a global options window; sets all options on all test group and test option menus Note: To save a set of options, use the Option Files window described in "To Use the Option Files Button" |
|
|
Group Override |
Supersedes the specific test options in favor of the group options set in a group options window. the System override option supersedes this option |
|
|
Group Lock |
Protects specific group options from being changed from the options set at the system level (the System Override option supersedes this option) |
|
|
Test Lock |
Protects specific test options from being changed from options set at the group or system level (the System Override and Group Override options supersede this option) |
|
|
Processor Affinity |
Only available on multiprocessor systems; use to specify on which processor you want to run all tests. To select the specific processor, click the number. If no processor is specified, the operating system randomly distributes testing among all the processors. Note that when you use random distribution, you cannot verify that all processors have been tested |
|
Option Files |
Option Files |
Creates an option file or selects a file from the Option File List, which can then be loaded, stored, or removed; For more information on option files see "Saving a Test Configuration" |
Reports Menu
From the Reports pull-down menu, you can choose to view system configuration or log file reports (Figure 4-7).
Figure 4-7 CDE Reports Menu
 Table 4-4 Reports Menu
| Sub Menu | Description |
|---|---|
| System configuration | Display and print the system configuration |
| Log files |
Provides quick access to three test-related log files: /var/opt/SUNWvts/logs/sunvts.err /var/opt/SUNWvts/logs/sunvts.info /var/adm/messages For more information on log files refer "Reviewing Log Files". |
Help Menu
The Help menu is located at the far right side of the menu bar (Figure 4-2). Currently, the only information provided is the version of SunVTS.
CDE Buttons
The buttons are located below the menu bar (Figure 4-8). The buttons provide quick access to the most commonly used functions from the menu bar.
Each button is described below.
Figure 4-8 CDE Buttons

Start Button

Click the start button to begin testing. The tests that run depend on the configuration of SunVTS in the System map. When testing begins, the Start button dims and the System Status changes from idle to testing. The system map also displays the status for all active tests.
Stop Button

Click the Stop button to halt all active tests. The test results remain in the SunVTS display.
Note -
Click the Stop button only once. Some tests do not stop immediately, so the System Status may take time to change from stopping to idle.
Note -
If you click the Stop button when a test is hung, and the user interface appears frozen, you can override this by deselecting the hung test from the System map.
Reset Button

The Reset button sets the pass and error counts to zero, and reverts the test colors to black for each test in the System map. It also resets the system passes, total errors, and elapsed time to zero. This button only works when all testing has stopped.
Host (Connect to) Button

Use the Host button to display the Connect to Host window.
From this window (Figure 4-9) you can connect your SunVTS interface to another machine on the network that is running the SunVTS kernel. Once you are connected to the SunVTS kernel on the test machine, your display controls the SunVTS kernel on the remote system and all the test results are for tests run on the remote system.
Figure 4-9 CDE Connect to Host Window
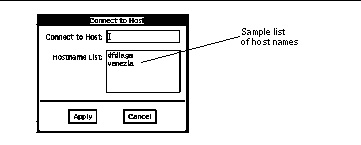
As you connect to various remote systems, SunVTS keeps track of those systems and displays them in the Hostname List. You can reconnect to one of those hosts by double clicking on the host name in this list, shown in Figure 4-9. The list is only maintained during your current SunVTS session (if you quit SunVTS, and start it again, the hostname list is reset).
Log Button

Use the Log button to display the log files pop-up window. From this pop-up window, you can view information about error log files, information log files, or UNIX message log files. You can either delete or print the displayed information, or you can close the pop-up window.
Meter Button

The Meter button displays the Perfmeter window which contains statistical information about the system. By clicking within the Perfmeter window, you can bring up the properties and modify which components are being monitored, how the Perfmeter window displays the information, the duration, or you can log the information. For more information on Perfmeter window, see the Solaris User's Guide or the perfmeter(1) man page in the Reference Manual.
Quit Button

Use the Quit button to quickly terminate the SunVTS user interface. The SunVTS kernel remains running. To quit the SunVTS kernel and user interface, use the Commands pull-down menu and select Quit SunVTS Kernel and UI.
CDE System Status Panel
The System Status panel (Figure 4-10) is located below the buttons and provides the following status information:
-
Testing status--provides the following status of SunVTS:
-
Idle indicates that no testing is taking place
-
Testing indicates that SunVTS is running
-
Suspend indicates that testing is suspended
-
Replay indicates that a previously recorded session is displayed
-
Stopping is momentarily displayed as SunVTS stops testing
-
-
System passes--displays the total number of successful system passes (a system pass is when all tests have been run once)
-
Cumulative errors--reports the total number of errors from all tests
-
Elapsed test time--indicates the total number of hours, minutes, and seconds that elapsed during testing
In addition, it includes the name and model number of the system under test.
Figure 4-10 CDE System Status Panel

CDE System Map
The System map (Figure 4-11 and Figure 4-12) is used to display detailed information about the system under test. Scrollbars provide access to information that is beyond the window size. Such information includes:
-
The devices that were identified by the SunVTS kernel probing. These devices are displayed in one of two ways:
-
Logical mapping (Figure 4-11)--organizes the list of devices, according to their function, into groups. For example, disk, tape, and CD-ROM drives are placed in the SCSI-Devices group. You can focus your testing on a specific group or on all of the groups on the system.
-
Physical mapping (Figure 4-12)--shows the exact location of each device on the system for Field Replaceable Unit (FRU) identification. From Physical mapping, you can determine the actual location of each device. When possible, the board number and controller type for the device are also displayed. This view is only supported on systems that have the configd program. See "To Install SunVTS With the pkgadd Command" for more information.
-
-
Each testable device and the name of the test used to test that device (when device groups are expanded), and access to device specific option menus.
-
A "+" (plus) indicates that the device group is collapsed, meaning individual devices are grouped together and hidden from view under a device category.
-
A "-" (minus) indicates that the device group is expanded so you see each individual testable device for a given category.
-
-
Current state of the devices under test where:
-
Black indicates that the device is not tested
-
Green indicates that at least one test pass completed with no errors detected
-
Red indicates that at least one error has been detected
-
Figure 4-11 CDE System Map (Logical View)
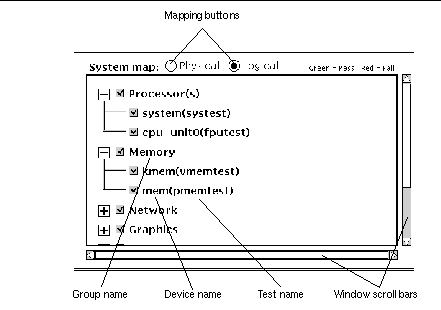
Figure 4-12 CDE System Map (Physical View)
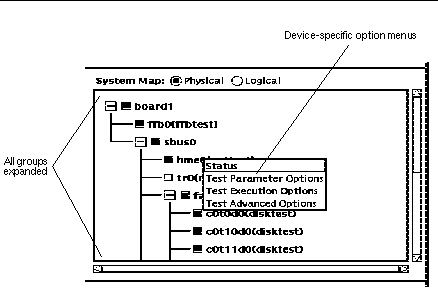
To Access the Device-Specific Option Menus
-
Place the CDE pointer on the name of device that you want to access options for, hold the mouse menu button down, and click the menu you want to set up.
The option menus are described in Table 4-5 below.
-
Set up the menu with the options you need and click Apply.
The Device-specific option menu provides access to test status information and three test option pop-up menus:
Table 4-5 Device-Specific Option Menu| Menu | Description |
|---|---|
| Status | Lists each test instance and a test pass and fail value for each instance |
| Test Parameter Options | Shows device configuration information and specifies test specific settings. This menu is different for each device |
| Test Execution Options |
Provides access to the same test execution options that can be set at the system level (See "Options Menu") but these settings configure test execution for a specific device. The parameters are:
|
| Test Advanced Options | Provides a setting to "lock" the option settings for an individual device so that the system level setting will not affect the option setting for this test |
To Select Devices for Testing
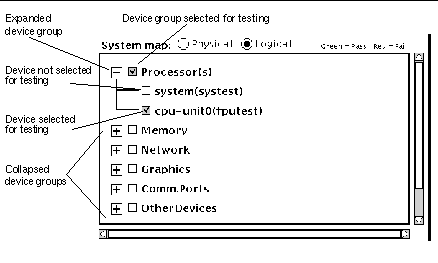
Each device group and device has a checkbox. Refer to Figure 4-13.
-
Perform one of the following:
-
Click the checkbox to place a checkmark in the checkbox. The checkmark indicates that the device or group is selected for testing. A blank box indicates that the device or group is not selected for testing.
-
Choose Default, None, or All in the Test mode selection window.
Note -Certain tests are not selectable until intervention mode is enabled. Refer to "Intervention".
Figure 4-13 Viewing Devices in the System Map
-
Test Status in the System Map
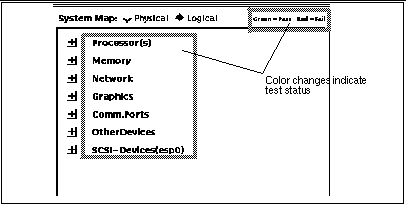
The primary method of displaying pass and fail status uses color within the System Map window (see the outlined areas in Figure 4-14). During testing, the name of any device changes from black to green if it has at least one pass and no failures. The moment a device has at least one failure, it changes to red. This color information is propagated up an entire branch of the hierarchy, but keeps the System Map hierarchy closed.
A secondary level of status is the individual device pop-up window that displays the testing Pass and Fail counts for the device and its immediate subdevices. For the lowest level device, it displays the test status for that device and all of the test instances below it. You can choose devices that you want to monitor during testing, and you can display the corresponding status windows, which are dynamically updated during testing.
Note -
The boxed regions in Figure 4-14 show areas that change color to indicate test status on color monitors. If you have a monochrome monitor, these changes cannot be detected; in this case, rely on the status pop-up windows.
-
View the System map any time during or after testing to identify pass/fail conditions.
Figure 4-14 CDE System Map View for Test Status
CDE Device Selection Region
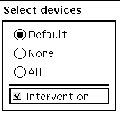
The Device Selection region (shown in Figure 4-15) has buttons that control device selection. You can select a set of tests from the default, none, or all categories. The tests selected for the default category vary depending on the test mode (Functional or Connection), as well as the intervention mode (described below).
The intervention checkbox is used to enable the selection of certain tests. Devices like the comm-port, tape drive, CD_ROM, and diskette device tests require that you intervene before such devices can be selected for testing. These devices require the installation of media or loopback connectors (in Functional mode only).
Once the proper test media or loopback connector is in place, place a mark in the Intervention checkbox. These tests are now selectable.
Figure 4-15 CDE Device Selection Region
CDE Test Mode Region
The buttons in this region control the SunVTS test mode (Figure 4-16):
-
Connection test mode--provides a low-stress, quick testing of the availability and connectivity of selected devices. These tests are non-intrusive, meaning that they will release the devices after a quick test, and they will not place a heavy load on system activity.
-
Functional test mode--provides more robust testing of your system and devices. It will use your system resources for thorough testing and it assumes that there are no other applications running.
Note -
Functional mode, when executed from SyMON, invokes non-intrusive tests that do not significantly affect other applications.
For more information about test modes refer to "Test Modes".
Figure 4-16 CDE Test Mode Selection Region

CDE Test Message Region
The Test Message Region contains test results and information. This panel is located at the bottom of the main window (Figure 4-17). Use the Clear button to clear this window.
Figure 4-17 CDE Test Message Console

OPEN LOOK User Interface
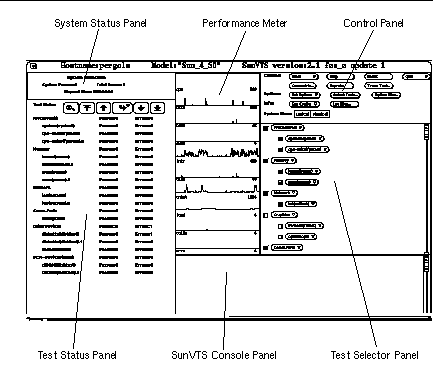
The SunVTS OPEN LOOK user interface main window is shown below (Figure 4-18).
Note -
To start SunVTS in the OPEN LOOK environment refer to Chapter 3, Starting SunVTS ".
Figure 4-18 OPEN LOOK Main Window
OPEN LOOK System and Test Status Panel
The System and Test Status panel displays the test information. Figure 4-19 shows a typical System Status panel.
Figure 4-19 OPEN LOOK System Status Panel

Test Status Buttons
You can run more tests than can be displayed on the test status panel. For example, there may be as many as 100 disk drive tests running on a SPARCcenter(TM) 2000 system at one time. Figure 4-20 shows the Test Status buttons that you can use to view these tests.
Figure 4-20 OPEN LOOK Test Status Buttons

Figure 4-21 shows how to go directly to a specific test or test group by clicking the curved arrow button and dragging right to display the pop-up menu.
Figure 4-21 OPEN LOOK Test Status Button Menu

OPEN LOOK Performance Meter
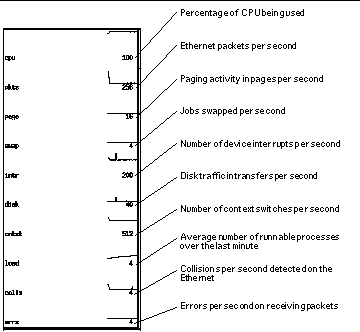
The Performance Meter panel (Figure 4-22) shows a graphic display of the test system's performance statistics. This panel provides the same statistics as the UNIX perfmeter utility.
Figure 4-22 OPEN LOOK Performance Meter
OPEN LOOK Control Panel
You configure and control SunVTS by using the Control panel menus and buttons (Figure 4-23 and Table 4-6). Each control panel item is covered in detail below.
Figure 4-23 OPEN LOOK Control Panel

Table 4-6 explains each of the Control Panel selections.
Table 4-6 OPEN LOOK Control Panel|
Selection |
Button |
Description |
|---|---|---|
|
Control |
Start |
Starts all enabled tests |
|
|
Stop |
Stops all tests |
|
|
Reset |
Resets all pass and error counts and elapsed time |
|
|
Quit |
Terminates the SunVTS user interface and/or the SunVTS kernel |
|
|
Connect to |
Connects to another machine |
|
|
Reprobe |
Reprobes the system |
|
|
Trace Test |
Creates a log of every system call |
|
Options |
Set Options |
Sets the global SunVTS kernel and test options |
|
|
Select Tests |
Sets global test options |
|
|
Option Files |
Saves the current settings from the global test options and specific test settings |
|
Info |
Sys Config |
Displays or prints system configuration information |
|
|
Log Files |
Displays the Log Files window |
|
System View |
|
Determines whether the view is logical or physical |
The Start Button
From the Start button you can:
-
Start all selected tests
-
Start all selected tests with Record on
-
Replay the previous test session
When testing begins, the Start button dims and the System Status changes from idle to testing. The test status panel displays the status for all active tests (see "CDE System Status Panel".
If Start with Record is selected, the sequence of events that the SunVTS kernel goes through will be recorded. This lets you duplicate the same sequence of events again by selecting Replay the next time testing begins. This is helpful when trying to duplicate an error condition that is dependent upon the SunVTS kernel's sequence of events during testing.
The Stop Button
Click the Stop button to halt all active tests. The test results remain in the test status panel after testing is completed.
Note -
Click the Stop button only once. Some tests do not stop immediately, so the System Status display may take time to change from stopping to idle.
If you click the Stop button when a test is hung, the user interface appears frozen. You can override this by deselecting these tests from the Test Option panel.
The Reset Button
The Reset button (Figure 4-24) resets the pass and error counts to zero for each test in the Test Status panel. It also resets the system passes, total errors, and elapsed time to zero. This button only works when all testing has stopped.
Figure 4-24 OPEN LOOK Reset Button

The Quit Button
You can use the Quit button to terminate SunVTS in any of the following ways:
-
Both the user interface and the SunVTS kernel
-
Only the SunVTS kernel on the test system
-
The user interface only
Terminating only the SunVTS kernel is helpful if you want to restart the kernel from the command line, or if you want to connect to another machine on the network.
If you select Terminate Kernel Only, the SunVTS user interface displays a message (Figure 4-25).
Figure 4-25 OPEN LOOK Terminate Kernel Only Window

The message notifies you that the connection to the host machine has been broken. The host name (shown in parentheses in Figure 4-25) is the name of the system where the SunVTS kernel terminated.
The Connect to Button
Use the Connect to button to connect your SunVTS user interface to the SunVTS kernel on another system.
To Use the Connect to Button
-
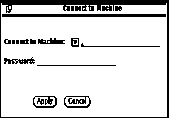
Click the Connect to button to display the Connect to Machine pop-up window.
Figure 4-26 OPEN LOOK Session Connection Window
-
Type the host name of the machine you want to connect to and click Apply.
If a password is not required to connect to another machine the password field is disabled.
If you are setting up a machine with security restrictions that require a password, the password field will reappear after you click Apply. You can then type the password and click Apply again to make the connection.
Once you are connected to the SunVTS kernel on the test machine, you can view and control that system's testing status.
After you successfully connect to another system, you can use the Connect to Machine abbreviated pull-down menu button to display and select other machines.
The Reprobe Button
Use the Reprobe button to reprobe the hardware devices on the test system. This is usually only necessary if you intend to test your tape or CD-ROM drives and you have not install test media in them yet. In this case, install the test media and use the Reprobe button so the SunVTS kernel will establish the correct interfaces for those devices.
Note -
When you click the Reprobe button, a window is displayed where you confirm this action.
Note -
For devices that are newly added to your system, you must perform a reconfiguration boot so the Solaris kernel recognizes the new devices before the SunVTS kernel can recognize them.
The Trace Test Button
Use the System Call Tracing function to create a log of every system call made when a test is running. This feature logs the system calls using the standard truss UNIX command. The trace messages logged by this feature give you a powerful debugging tool when isolating the specific cause of an error. (See the truss(1) man page for more information.)
To Use the Trace Test Button
-
Choose one or more tests to be traced by selecting the test name from within the scrolling list (Figure 4-27).
Figure 4-27 OPEN LOOK Trace Test Pop-up Window
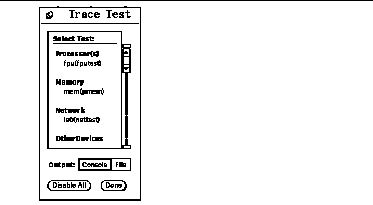
You can only select test names; you cannot select test group names. Once a test is selected, system call tracing is immediately enabled. Therefore, if the test is already running when you select it, tracing begins immediately.
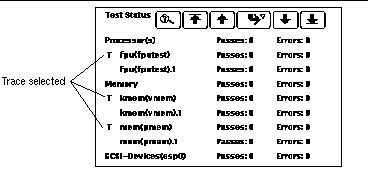
When a test is selected, the test name is highlighted in the list. In addition, a capital letter "T" appears next to the test name in the SunVTS Status panel (Figure 4-28). This "T" lets you see which tests are being traced.
Figure 4-28 OPEN LOOK Selected Trace Tests
-
Click either Console or File at the Output selection switch in the Trace Test window.
Trace messages that are sent to a log file are placed in /var/opt/SUNWvts/logs.
The system call trace messages are immediately redirected to either the console window or the log file.
Note -Although you can select multiple tests, each traced test degrades system performance due to the large overhead involved when tracing a process. Consequently, select no more than three tests at one time. Be aware that if you decide to send the messages to the sunvts.trace log file, the log file size increases in size rapidly (approximately 1 Mbyte for each minute and a half of run time).
-
Click the highlighted test name in the list displayed by the Trace Test window (Figure 4-28) to deselect a test to trace.
When a test is deselected, system call tracing stops immediately. However, several trace messages may continue to be displayed until the message buffer has been emptied.
The Set Options Button
From the Set Options window, you can set the global SunVTS kernel and test options for Thresholds, Notify, Schedule, Test execution, and Advanced. See Figure 4-29 for an overview of these options.
To Use the Set Options Button
-
Click the Set Options button to display the SunVTS Options window.
-
Drag to highlight and select from the various options, and click Apply. (See Figure 4-29 and Table 4-7 for a complete list and description of each available option)
Figure 4-29 OPEN LOOK Options Windows
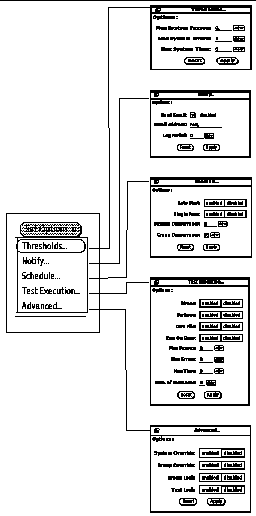 Table 4-7 OPEN LOOK Global Options Menu
Global Options
System Option
Description
Thresholds
Max System Passes
States the maximum number of system passes before stopping all tests (0 causes the SunVTS kernel to run the tests until you click the Stop button)
Max System Errors
States the maximum number of system errors before SunVTS stops all tests (0 causes the SunVTS kernel to continue testing regardless of errors)
Max System Time
Specifies the maximum number of minutes that SunVTS continues testing (0 makes the SunVTS kernel run the selected tests until you click the Stop button)
Notify
Send Email
Determines when and if you want the test status messages sent to you by email. From this menu, you can choose:
- Disabled (never send email)
- Now (send email immediately)
- On Error (send email when an error occurs)
- Periodically (send email with a time period set in the Log Period option)
- On Error & Periodically (send email periodically as well as when an error occurs)
Email Address
Indicates the email address where the test status messages are sent (the address is root by default)
Log Period
Specifies the time in minutes, between sending test status email messages
Schedule
Auto Start
Eliminates the need to use the Start button to start a SunVTS testing session. To use this option:
1. Enable the Auto Start setting.
2. Save the System options and Test options to an option file (see "To Use the Option Files Button" for more information).
3. Starts SunVTS from the command line, specifying the option file. SunVTS begins testing soon after the main window is displayed.
Single Pass
Runs only one pass of each selected test
System Concurrency
Sets the maximum number of test instances that can be run concurrently in the machine being tested
Group Concurrency
Sets the number of tests you want to run at the same time in the same group
Test Execution
Stress
The amount of stress can be tuned by the number of test instances you select
Verbose
Displays verbose messages in the SunVTS Console window
Core File
Creates a core file. If the <SunVTS bin> directory is writable; core.<testname>.xxxxxx is the core file name, where <testname> is the test that dumped core, and where xxxxxx is a character string generated by the system in order to make the file name unique. When Core File is disabled, a message is displayed and logged, indicating the signal that caused the failure; see "The Log Files Button" for more information
Run On Error
Continues testing until the Max Errors number is reached
Max Passes
Specifies the maximum number of passes a test can run
Max Errors
States the maximum number of allowable errors before stopping the test (0 makes the SunVTS kernel continue testing regardless of errors)
Max Time
States the time limit (in minutes), a test can run (0 = no limit)
Number of Instances
Specifies the number of instances to run each scalable test
Processor Affinity
Only available on multiprocessor systems; use to specify on which processor you want to run all tests. To select the specific processor, click the number. If no processor is specified, the operating system randomly distributes testing among all the processors. Note that when you use random distribution, you cannot verify that all processors have been tested.
Advanced
System Override
Supersedes the specific group and test options in favor of the options in this window; sets the options on the test group and test option menus
Note: To save a set of options, use the Option Files window described in "To Use the Option Files Button"
Group Override
Supersedes the specific test options in favor of the group options in this window
Group Lock
Protects the specific group options from being changed in this window from the options set at the system level (the System Override option supersedes this option)
Test Lock
Protects the specific test options from being changed in this window from options set at the group or system level (the System Override and Group Override options supersede this option)
The Select Tests Button
Use the Select Tests button to display the Select Tests window. This window provides access to global testing options such as the Test Mode (Connection Test Mode or Functional Test Mode), as well as test set selection and Intervention mode.
To Use the Select Tests Button
-
Click the Select Tests button to display the Select Tests window (Figure 4-30).
Figure 4-30 OPEN LOOK Select Tests Window

-
Select and pull down the Test Mode arrow so that your choice (Functional or Connection test mode) is displayed.
-
Select groups of tests (Default, None or All) from Test Set.
Note -Selecting None while tests are running stops the tests, but the System Status panel still displays the word testing, and the elapsed time indicator continues to increment. Click the Stop button to halt testing.
-
Select Disabled or Enabled for Intervention mode.
The following test categories require the enabling of Intervention mode:
-
Tests of drives that require scratch media (tapes, CDs, and diskettes)
-
Tests that require loopback connectors
-
Tests for printers that require a printer to be connected
-
Tests for communication ports that require loopback connectors
SunVTS cannot run these tests until you enable Intervention mode. This setting does not change the test function; it enables the selection of certain tests.
-
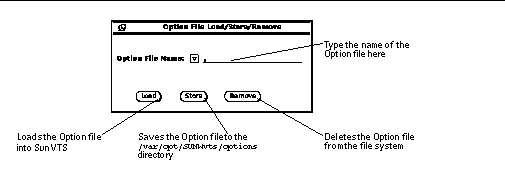
The Option Files Button
You can load, store or remove option files. Storing an Option file saves the current test settings to a file in the /var/opt/SUNWvts/options directory.
To Use the Option Files Button
-
Click the Option Files button to display the Option Files pop-up window (Figure 4-31).
Figure 4-31 OPEN LOOK Option File Window
-
Type the file name or select a file from the pull-down menu.
-
Load, store or remove the specified option file.
The Sys Config Button
From the Sys Config menu, you can either display or print test system configuration information.
To Display the Hardware Configuration of the Test System
-
Click the Sys Config button to display the sys Config window.
-
Select Display.
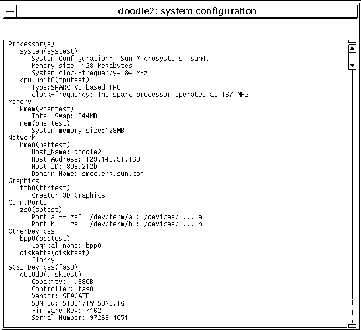
The Configuration window is displayed (Figure 4-32) listing all of the hardware on the test system and the corresponding hardware tests.
Figure 4-32 OPEN LOOK System Configuration Window
-
Select the Print option from the Sys Config menu.
The Print System Configuration window is displayed with your default printer (Figure 4-33).
Figure 4-33 OPEN LOOK Print System Configuration

The Log Files Button
SunVTS saves the status of its progress in three log files:
-
/var/opt/SUNWvts/logs/sunvts.err (SunVTS error status log)
-
/var/opt/SUNWvts/logs/sunvts.info (SunVTS information log)
-
/var/adm/messages (Solaris system message log)
The log file button provides easy access to each log file.
To Access Log Files
-
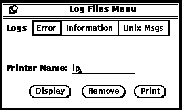
Click the Log Files button (Figure 4-34).
Refer to "Reviewing Log Files" for more details.
Figure 4-34 OPEN LOOK Log Files Menu
-
Click to select one category of the log files; Error, Information, or UNIX Msgs.
-
Type the name of the printer if you want to print a log file.
-
Select Display, Remove, or Print.
Choosing the System View
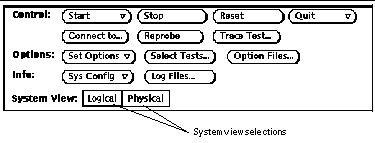
The System View is where you choose to display either the Logical or Physical view in the Test Status panel.
Figure 4-35 OPEN LOOK System View Selections
Using the OPEN LOOK Test Selection Panel
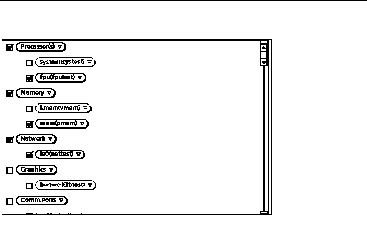
From the Test Selection Panel (Figure 4-36), you can select and deselect the tests you want to run. You can also change individual test options.
Figure 4-36 OPEN LOOK Test Selection Panel
Note -
Some tests can only be selected if you are running SunVTS in Intervention mode. See "Intervention" for more information.
If you click on a test group [(Processor(s), Memory, Network, and so on], the test group's system option window is displayed and you are given three choices for viewing and setting test group options:
-
Scheduling
-
Test Execution
-
Advanced
See Table 4-7 for descriptions of these options.
If you click an individual test [pmem0 (pmem), cpu-unit (fputest), and so on], the test system option window is displayed and you are given three choices for viewing and setting individual test options:
-
Test Options
-
Test Execution Options
-
Test Advance Options
Each of these windows is test-dependent and is described in the SunVTS 3.0 Test Reference Manual.
OPEN LOOK Console Panel
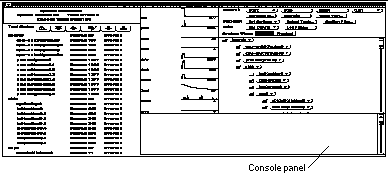
SunVTS error messages are displayed in the Console panel. This panel is located in the lower right part of the SunVTS main window (Figure 4-37).
Figure 4-37 OPEN LOOK Console Panel
-
To display verbose messages from either the SunVTS kernel or the tests, enable the Verbose option in the Set Options window in the Test Execution selection.
See "Saving a Test Configuration" for more information about setting up option files.
TTY Interface
A screen-oriented TTY interface is also available to use with SunVTS. You can use it in a CDE or OPEN LOOK window, from a telnet, rlogin, or tip session, or from a terminal attached to a serial port or connected to the system being tested through a modem. Most of the control and monitoring options available through the GUI are also available through the TTY interface.
Note -
To start SunVTS with the TTY interface see Chapter 3, Starting SunVTS ".
Note -
For step by step instructions refer to "Running SunVTS With the TTY Interface (Tutorial)".
TTY Main Window
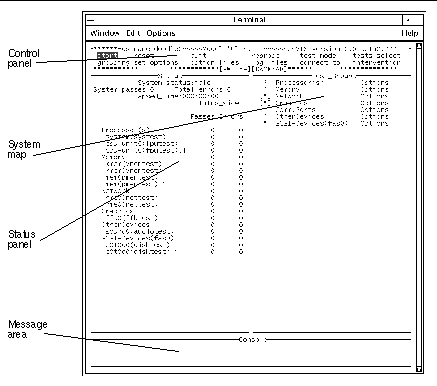
The TTY main window is divided into four areas (Figure 4-38):
-
Control panel--access to SunVTS commands and options
-
System map--shows the testable devices and provides access to test options
-
Status panel--displays the SunVTS test status information
-
Message area--test and error messages are displayed; no user input is accepted in this area
Figure 4-38 TTY Main Window
Navigating the TTY Interface
Keyboard commands are used for navigating and controlling the TTY interface. Table 4-8 summarizes these commands.
Table 4-8 TTY Keyboard Commands|
Key |
Description of Action |
|---|---|
|
Tab |
Moves the highlight or shifts the focus to another window. For example, if you are working in the Control panel and press the Tab key, the focus (or highlight) shifts to the Status panel. Highlighted panels are bordered by asterisks (*). Before you can change an option, you must first highlight that panel. |
|
Return |
- Displays a menu - Selects and applies a choice or a command in a menu |
|
Spacebar |
Selects or deselects an option checkbox; [ ]= select; [*]= deselect |
|
Arrow keys |
Moves between options in a highlighted panel |
|
Backspace key |
Deletes text in a text field |
|
Escape |
Discards a pop-up menu or window |
|
Control-F |
Scrolls forward in a scrollable window |
|
Control-B |
Scrolls backward in a scrollable window |
|
Control-X |
Quits the TTY user interface but leaves the SunVTS kernel running |
|
Control-L |
Refreshes the TTY window |
The following sections lead you through some common testing procedures. In all cases, use these keyboard commands to select and apply your test options.
Setting TTY Options
To Select and Change System Options
-
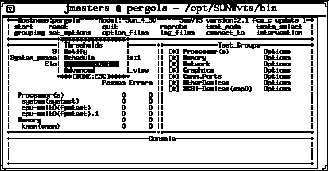
Highlight the Control panel with the Tab key (Figure 4-39).
Asterisks (*) appear around the Control panel when it is highlighted.
-
Select set_options with the arrow keys.
-
Display the SunVTS System options with the Return key.
Figure 4-39 System Option Categories (TTY Interface)
-
Highlight Test_Execution using the arrow keys and press Enter.
When an option is highlighted, it can be changed. There are two ways to change the system options: from the menu and by typing in the text field.
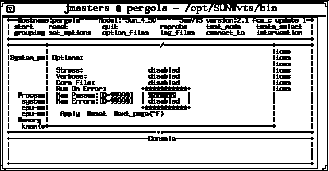
-
Select the Core File option with the Return key.
-
Select this option.
A menu is displayed listing the choices of the Core File option (Figure 4-40).
-
Highlight enabled.
Figure 4-40 Selecting a Menu Option (TTY Interface)
-
Select this choice with the Return key.
This option changes from disabled to enabled.
-
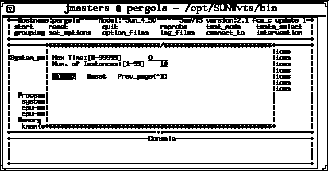
View the second page of the Options menu by pressing Control-F (Figure 4-41).
-
Select the num_instances text field.
-
Change the value to the number of test instances that you want to run.
Use the up or down arrow keys to move the cursor out of the text field.
Figure 4-41 Changing a Text Field Option in TTY
-
-
Highlight Apply after you finish changing the options.
-
Apply the changes and close the Options window by pressing the Return key.
Note -If you want to remove the Option window without changing any options, press the Escape key.
Selecting Tests and Test Groups
To Select and Deselect Tests and Test Groups
-
Select the Tests panel with the Tab key.
When selected, the panel is bordered by asterisks.
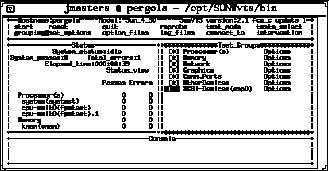
-
Highlight the checkbox by the test group name.
In this example (Figure 4-42) the checkbox associated with SCSI-Devices (esp0) group is selected, so it is highlighted.
-
Deselect the test group with the spacebar.
Notice that the asterisk no longer appears between the brackets, and that the test names are removed from the Status panel.
Figure 4-42 Deselecting a Test Group (TTY Interface)
-
Highlight the test group name using the right arrow key.
-
Display the tests within the test group by pressing the Return key.
-
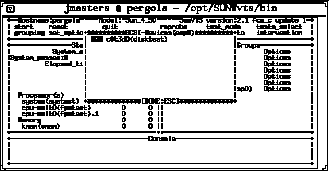
Highlight the brackets in front of the test you want to enable, using the up and down arrow keys.
-
Select the test with the Spacebar.
An asterisk displays between the two brackets, and the test group and test name appears on the Status panel (Figure 4-43).
Figure 4-43 Selecting a Test (TTY Interface)
Note -If you want to change the test options, highlight the test name and press the Return key to display the test option menus.
-
Close the test group window by pressing the Escape key.
Using the TTY Status_view Menu
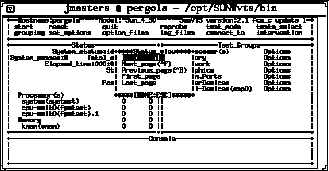
The Status_view menu has a scrollable area. It is possible to select more tests than the status panel can display at one time. Use the Control-F and Control-B keys to scroll forward and backward to view additional selections. You can also display only those tests with errors by highlighting the Errors Only in the Status_view menu (see Figure 4-44 and Table 4-9).
To Scroll Through Tests Using the Status_view Menu
-
Highlight the Status panel with the Tab key.
When selected, the panel has asterisks around the border. Notice that the Status_view option is also highlighted.
-
Display the Status_view menu with the Return key (Figure 4-44).
Figure 4-44 TTY Status_view Menu
-
Move to the option you want with the arrow keys (Table 4-9).
Choose one of the following options:
Table 4-9 Status_view Menu OptionsOption
Description
Errors_only
Displays only the tests that produce errors
Next_page
Skips to the next page of tests
Previous_page
Goes back to the previous page of tests
First_page
Goes to the first page of tests
Last_page
Goes to the last page of tests
-
Select your choice with the Return key.
The Status panel changes to reflect your choice.
Using the TTY Log_Files Menu
The following paragraphs describe how to display, print, and remove log files.
To Display, Print, or Remove Log Files
-
Highlight the Control panel with the Tab key.
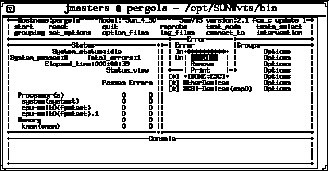
When selected, the panel has asterisks around the border (Figure 4-45).
Figure 4-45 Log Files Menu (TTY Interface)
-
Highlight the log_files option with the arrow keys.
-
Display the log_files menu with the Return key.
-
Select the option you want with the arrow keys (Table 4-10).
Choose one of the following options:
Table 4-10 TTY Log_files Menu OptionsOption
Description
Error
Selects the Error log file
Information
Selects the Information log file
Unix Msgs
Selects the UNIX messages log file
Note -If you do not want to select a log file, press the Escape key to close the Log_files menu.
-
Select the log file and display another menu by pressing Return.
From this menu, you can either display, remove, or print the selected log file. See Table 4-10, for a description of these options.
-
Confirm your choice by pressing Return.
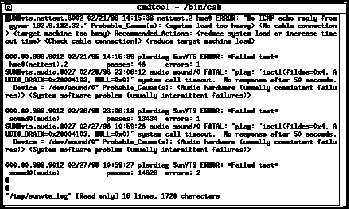
Figure 4-46 is a sample SunVTS log file displayed in TTY mode. You can use the commands Control-F and Control-B to page forward and backward through the log file.
Figure 4-46 Sample Log File (TTY Interface)
-
Return to the main window by typing :q.
Note -If you try to run a graphics test on a test machine that is not running OPEN LOOK, and you are running the SunVTS TTY interface on the test machine monitor, the graphics test may fail. You can avoid this failure by either running the SunVTS TTY interface on a terminal attached to a serial port on the test machine, or you can run the TTY interface from a remote machine.
Running a Test From the Command Line
In some cases it may be more convenient to run a single SunVTS test from the command line. The test runs without the SunVTS kernel (vtsk). All events and errors are sent to stdout or stderr, and are not logged in the log files.
There are two directories where tests reside:
-
32-bit tests- /opt/SUNWvts/bin/testname
-
64-bit tests- /opt/SUNWvts/bin/sparcv9/testname
Use the test pathname based on the type (32-bit or 64-bit) of operating system that is running. The SUNWvtsx package must be installed for 64-bit SunVTS support. If a test is not present in this directory, then it may only be available as a 32-bit test.
When you run a test from the command line, you must specify all test options in the form of command-line arguments.
There are two types of command-line arguments:
-
Standard arguments--common to all tests. Refer to Figure 4-10 below for details.
-
Test specific arguments--unique to a specific test. Refer to the SunVTS 3.0 Test Reference Manual for details.
The standard syntax for command-line execution is:
| testname [-scruvdtelnf] [-p number] [-i number] [-w number] [-o test_specific_arguments] |
The standard command-line argument usage for all SunVTS tests is:
Table 4-11 Standard Command-line Arguments| Argument | Definition |
|---|---|
| -s | Run a test as though it were invoked from the SunVTS kernel (vtsk). This causes the test to send output to an RPC port that the SunVTS kernel is using. The default is to send the output to stdout or stderr |
| -c | Enables a core image of the test process to be created in the current working directory upon receipt of certain signals, otherwise those signals are caught and handled to prevent a core from being generated. The default is to disable the creation of a core image |
| -r | Enables run on error so that when an error occurs, the test continues with the next test sequence instead of exiting. The default is false |
| -u | Displays command line usage information |
| -v | Runs the test in Verbose mode and displays messages with more detailed information about the testing process. The default is false |
| -d | Runs the test in debug mode and displays messages to help programmers debug their test code. The default is false |
| -t | Runs the test in test function Trace mode and displays messages that track function calls and sequences currently in use by the test code. The default is false |
| -e | Runs the test in Stress Mode by increasing the system load. The default is false |
| -l | Runs the test in Online Functional mode. This is the same mode that tests run in when executed through SyMON. It is a non-intrusive version that will not significantly affect other applications. See the note below. The default is true |
| -n | Runs the test in Connection Mode. See the note below.The default is false |
| -f | Runs the test in full Functional test mode. This mode assumes that the test has complete control of the device under test. See the note below. The default is false |
| -i number | Defines the number of instances for scalable tests |
| -p number | Defines the number of passes |
| -w number | For scalable tests, defines to which instance the test is assigned |
| -o | Used to indicate that the options and arguments that follow are test specific. Note - separate each test specific argument by commas, with no space after each comma |
Note -
If you choose to specify a test mode with the l, n, or f option, specify only one option at a time because only one test mode can be selected at a time.
Command Line Test Example
The following example shows the audiotest running from the command line with a combination of standard command-line arguments (-vf) and test specific options (-o M,X)
# /opt/SUNWvts/bin/audiotest -vf -p1 -o M,X
"Test Options: M,X"
"audiotest: Started."
"rec_play: read/write 8000 bytes"
"Audio music test"
"Audio crystal test, rate = 8000 Hz, time = 998289 usecs"
"Audio crystal test, rate = 48000 Hz, time = 999974 usecs"
"Starting loopback test: internal_codec"
"Play Gain = 230, Record Gain = 0"
"Sample Rate =  8000 Hz, Freq = 1000 Hz  MONO u-law"
"	snr = 40.59 dB"
"Sample Rate =  8000 Hz, Freq = 1000 Hz  MONO a-law"
"	snr = 44.79 dB"
"Sample Rate =  8000 Hz, left = 1000 Hz,  right = 1000
Hz"
"left  : snr = 68.25 dB, gain = -4.99 dB"
"right : snr = 68.32 dB, gain = -5.07 dB"
"audiotest: Stopped successfully."
Note -
Refer to "Running a Test From the Command Line (Tutorial)" and to the SunVTS 3.0 Test Reference Manual for more command line details.
- © 2010, Oracle Corporation and/or its affiliates
