| Skip Navigation Links | |
| Exit Print View | |

|
Working With the EDM for Oracle Java CAPS Master Patient Index Java CAPS Documentation |
| Skip Navigation Links | |
| Exit Print View | |

|
Working With the EDM for Oracle Java CAPS Master Patient Index Java CAPS Documentation |
Working With the EDM for Oracle Java CAPS Master Patient Index
About Oracle Java CAPS Master Patient Index
Features of Oracle Java CAPS Master Patient Index
Learning about Patient Profiles
System Record and SBR Components for Oracle Java CAPS Master Patient Index
Identification Numbers for each Patient
Security Permissions for the Patient EDM
Navigation Tips for the Patient EDM
Navigating the Patient EDM Functions
Logging Out of the Patient EDM
Learning About Patient Queries
About the Patient EDM Search Function
The Advanced Person Lookup (Alpha) Page
The Advanced Person Lookup (Phonetic) Page
Types of Searches on the Patient EDM
Advanced Person Lookup (Alpha)
Advanced Person Lookup (Phonetic)
Searching by Ranges on the Patient EDM
Required Fields on the Patient EDM
Searching for Patient Profiles
Performing an EUID Lookup on the Patient EDM
Performing a Social Security Number Lookup on the Patient EDM
To Perform a Social Security Number Lookup
Performing a Local ID Lookup on the Patient EDM
Performing an Advanced Alphanumeric Lookup on the Patient EDM
To Perform an Advanced Alphanumeric Lookup
About Alphanumeric Search Fields on the Patient EDM
Performing an Advanced Phonetic Lookup on the Patient EDM
To Perform an Advanced Phonetic Lookup
About Phonetic Search Fields on the Patient EDM
Performing an EUID Comparison Lookup on the Patient EDM
To Perform an EUID Comparison Lookup
Working with Search Results on the Patient EDM
Viewing the Results of a Search
Selecting a Profile from the Results List
Creating and Printing a Search Result Report
Patient Profile Transaction Histories
Patient Profile Merge Histories
Viewing a Patient's Demographic Information
To View Demographic Information
About Demographic Fields on the Patient EDM
About Address Fields on the Patient EDM
Viewing a Patient's Telephone Numbers
About Telephone Fields on the Patient EDM
About Alias Fields on the Patient EDM
Viewing a Patient's Auxiliary IDs
About Auxiliary ID Fields on the Patient EDM
Viewing Comments Associated with a Patient
About Comment Fields on the Patient EDM
Viewing a Patient's Transaction History
About Transaction History Search Fields on the Patient EDM
About Transaction History Results Fields on the Patient EDM
Transaction History Transaction Types on the Patient EDM
Comparing two Patient Profiles
To Compare twoPatient Profiles
Comparing Records in one Patient Profile
To Compare Records in one Patient Profile
Viewing a Patient Profile's Merge History
Viewing a Merge History Tree on the Patient EDM
To View a Patient's Merge History
Viewing a Patient Profile From a Merge History Tree
To View a Patient Profile From a Merge History Tree
Viewing the Patient EDM Audit Log
About Audit Log Search Fields on the Patient EDM
About Audit Log Search Results Fields on the Patient EDM
Audit Log Functions on the Patient EDM
Adding a Patient Profile on the Patient EDM
Step 1: Obtain Information about the Patient
Step 2: Specify a System and Local ID
To Specify a System and Local ID
Step 3: Specify Demographic Information
To Specify Demographic Information
Step 4: Specify Alias Information
Step 5: Specify Address Information
To Specify Address Information
Step 6: Specify Telephone Information
To Specify Telephone Information
Step 8: Add Comments to the Patient Profile
Learning About Patient EDM Maintenance Tasks
Merging Profiles on the Patient EDM
Surviving and Non-surviving Profiles
Updating the SBR and Updating System Records
Maintaining Patient Information
Modifying Demographic Information in a Patient Profile
To Modify Demographic Information
Maintaining Address Information in a Patient Profile
Adding Addresses to a Patient Profile
Deleting Addresses from a Patient Profile
Maintaining Telephone Information in a Patient Profile
Adding Telephone Numbers to a Patient Profile
Modifying Telephone Information
Deleting Telephone Numbers from a Patient Profile
Maintaining Alias Information in a Patient Profile
Adding an Alias to a Patient Profile
Modifying a Patient's Alias Information
Deleting an Alias from a Patient Profile
Maintaining Auxiliary ID Information in a Patient Profile
Adding an Auxiliary ID to a Patient Profile
Modifying Auxiliary ID Information
Deleting an Auxiliary ID from a Patient Profile
Maintaining Comment Information in a Patient Profile
Adding a Comment to a Patient Profile
Modifying a Comment in a Patient Profile
Deleting a Comment from a Patient Profile
Updating the Single Best Record Directly
Locking an SBR Field on the Patient EDM
Unlocking an SBR Field on the Patient EDM
Maintaining System Records on the Patient EDM
Adding a System Record to a Patient Profile
To Add a System Record to a Patient Profile
Deactivating a System Record in a Patient Profile
Reactivating a System Record in a Patient Profile
Changing Patient Profile Status
Deactivating a Patient Profile
To Deactivate a Patient Profile
Reactivating a Patient Profile
To Reactivate a Patient Profile
Working with Potential Duplicate Patient Profiles
Finding Potential Duplicate Patient Profiles
About Matching Review Search Fields on the Patient EDM
About Potential Duplicate Results Fields on the Patient EDM
Merging Potential Duplicate Patient Profiles
Resolving Potential Duplicate Patient Profiles
To Resolve two Potential Duplicate Profiles
Working with Assumed Matches on the Patient EDM
Finding Assumed Matches on the Patient EDM
About Assumed Match Results Fields on the Patient EDM
Reversing an Assumed Match on the Patient EDM
Merging System Records on the Patient EDM
To Unmerge two Merged Patient Profiles
Unmerging System Records on the Patient EDM
To Unmerge two Merged System Records
Learning About Patient EDM Reports
Patient EDM Production Reports
Patient EDM Search Result Reports
Configuring Patient EDM Reports
Masked Data and Patient EDM Reports
This section provides the step-by-step instructions you need in order to add patientprofiles to the master index database. When you add a patient profile, you are actually creating a system record. The master index application calculates the SBR portion of the patient profile when you commit the system record to the database.
Adding a patient profile includes the following steps:
Steps 1, 2, and 3 must be performed in the order given. Steps 4 through 8 can be performed in any order.
Before you begin to add a new patient to the master index application, you should obtain certain information about the patient. For example, by default you must enter the patient’s first and last names, SSN, date of birth in order to save the patient profile. You should provide as much information as is available for each patient. If necessary, review the descriptions of the fields you encounter while adding a new patient. These descriptions, provided throughout this section, will help you to determine the information you need to specify for each new patient. Once you have the information, continue to Step 2: Specify a System and Local ID.
Each patient profile is associated with at least one system record. Before you add demographic data to a patient profile, you must specify the patient’s local ID in a specific system. This creates the system record component of the patient profile.
Figure 35 Create System Record - System and Local ID
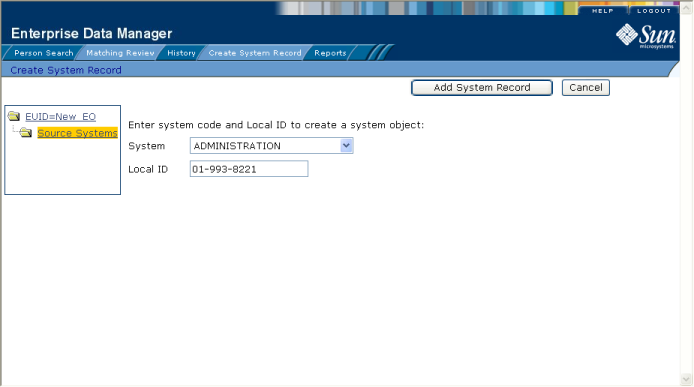
The Create System Record page appears.
Note - By default the name of this field is Local ID, but it might have been customized for your implementation.
The page changes to display demographic fields.
When you add a new patient to the master index application, you need to enter certain information such as the patient’s name, social security number, and certain demographic information.
Figure 36 Create System Record - Demographic Information
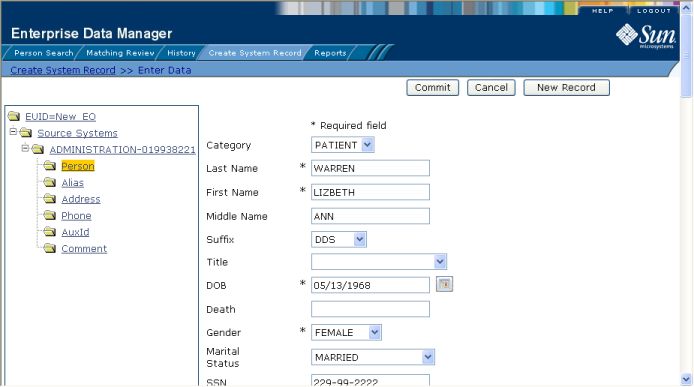
After you specify the required demographic information for a patient, you can specify any alias names for that patient. Once you add an alias, it appears in the patient profile tree on the left side of the Create System Record page.
Figure 37 Create System Record - Alias Information
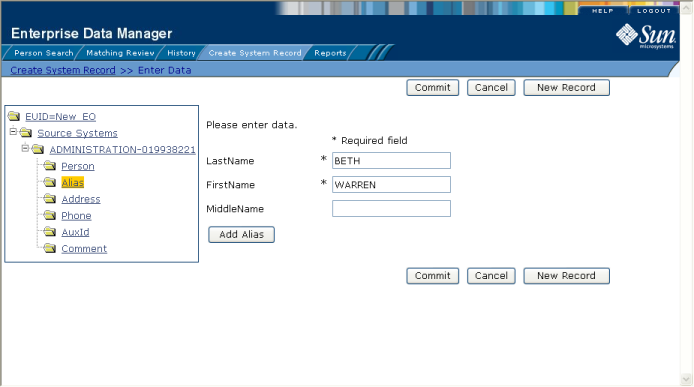
The page changes to display alias fields.
The alias name is removed from the tree.
When you add a new patient to the master index application, you can specify information about the various addresses associated with a patient, such as their home and business addresses.
Figure 38 Create System Record - Address Information
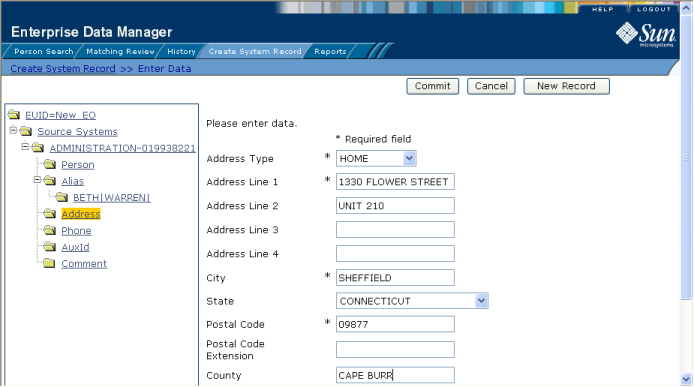
The page changes to display address fields.
The address is removed from the EUID tree.
When you add a new patient to the master index application, you can specify information about the various telephone numbers associated with a patient, such as their home, cellular, and business telephone numbers.
Figure 39 Create System Record - Telephone Information
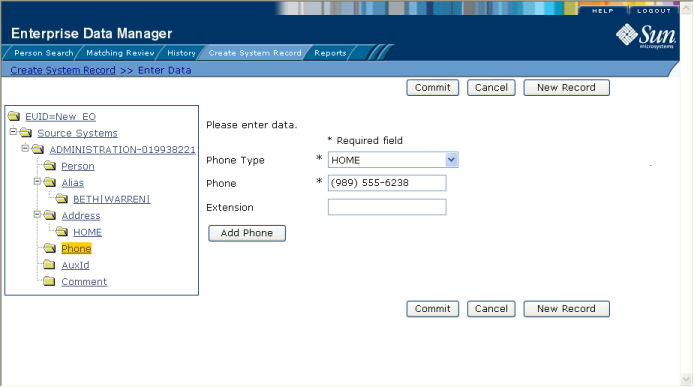
The page changes to display telephone fields.
The number is removed from the tree.
When you add a new patient to the database, you can specify auxiliary IDs for the patient. These IDs do not necessarily uniquely identify the patient profile, and several profiles might have the same ID.
Figure 40 Create System Record - Auxiliary IDs
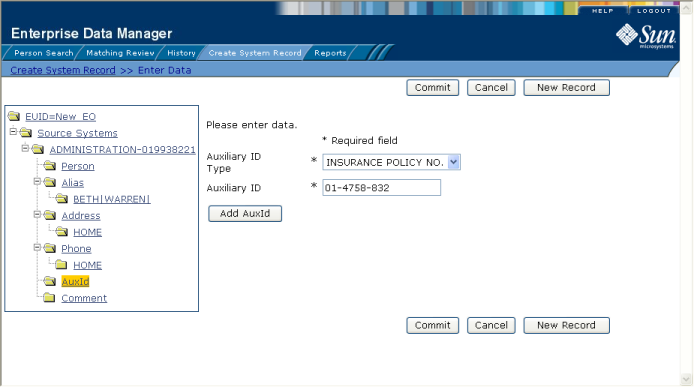
The page changes to display auxiliary ID fields.
The auxiliary ID is removed from the tree.
When you add a new patient to the master index application, you can specify miscellaneous information about the patient or patient profile in the form of free-text comments.
Figure 41 Create System Record - Comment Information
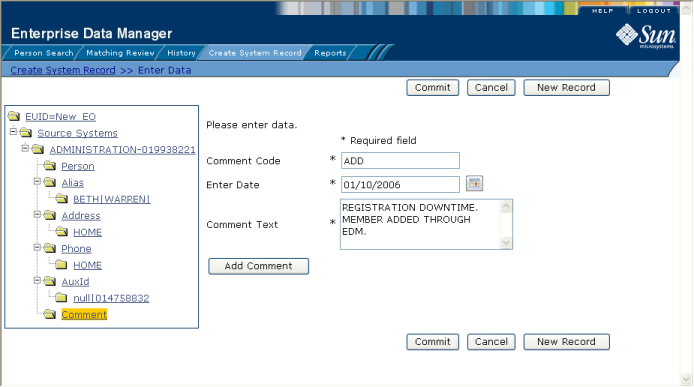
The page changes to display comment fields.
The comment is removed from the tree.
After you specify all the required information for a patient profile, save the profile to the database or the information you entered will be lost.
A confirmation dialog box appears.
Note - The confirmation dialog box informs you whether a new profile was added to the database, a new profile was added and it has potential duplicates, or an existing profile was updated with the information you entered.
The new patient profile is saved to the database.