Use Case: Managing Network Resources by Setting Datalink and Flow Properties
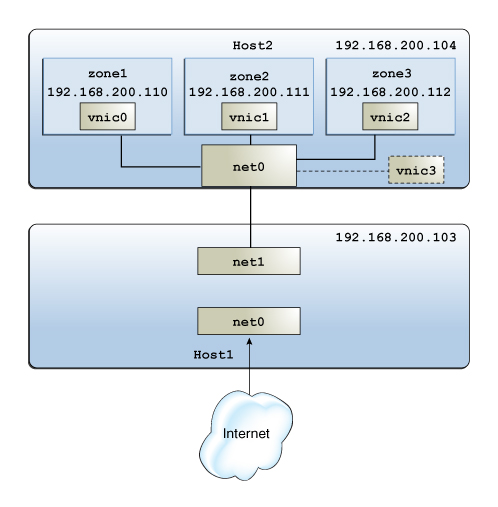
The following use case is based on a scenario in which you increase a system's efficiency by setting both datalink and flow properties. This use case is based on the configuration shown in the following figure.
Figure 7-3 System Configuration for Managing Resources on Datalinks and Flows

The figure shows the following two physical hosts that are connected to each other:
-
Host1 has the following configuration:
-
One non-global zone that functions as a server and router. Two interfaces are assigned to the zone: the net0 interface connects to the Internet and the net1 interface connects to the internal network including the Host2.
-
Flows are configured over net1 to isolate the traffic and implement control over how packets belonging to the flows use resources. For information about configuring flows, see Managing Network Resources by Using Flows.
-
-
Host2 has the following configuration:
-
Three non-global zones and their respective VNICs. The VNICs are configured over net0, whose NIC card supports ring allocation. For more information about ring allocation, see Managing NIC Rings.
-
Each zone's network processing load is different. In this example, zone1 functions as the HTTP client. The remaining zones, zone2 and zone3, function as the SSH client that tries to access Host1 through secure shell (SSH) protocol. The network traffic for zone1 is higher than zone2 and zone3 and is not time sensitive. However, the network traffic for zone2 and zone3 is low and time sensitive. Therefore, to process the network traffic faster for zone2 and zone3, you need to limit the bandwidth allocated to the network traffic for zone1. If the bandwidth allocated for zone1 is not limited, it will use all the available bandwidth. This leads to the denial of bandwidth to the remaining zones: zone2 and zone3.
-
A separate VNIC is configured as a software-based client. For an overview of MAC clients, see Allocating Rings in MAC Clients.
-
The tasks in this use case involve the following actions:
-
Creating a flow and configuring flow control – Flows are created over net1 to create a separate resource control over packets belonging to the flows that are received by net1 of Host1.
-
Configuring network resource properties for the VNICs on Host2 – Based on the processing load, each zone's VNIC is configured with a set of dedicated rings. A separate VNIC is also configured without dedicated rings as an example of a software-based client.
Note - The use case does not include any procedures for zone configuration. To configure zones, see Chapter 1, How to Plan and Configure Non-Global Zones, in Creating and Using Oracle Solaris Zones .
-
View information about links and IP interfaces on Host1.
# ipadm
NAME              CLASS/TYPE       STATE        UNDER      ADDR
lo0               loopback   ok           --         --
   lo0/v4         static     ok           --         127.0.0.1/8
   lo0/v6         static     ok           --         ::1/128
net1              ip         ok           --         --
   net1/v4        static     ok           --         192.168.200.103/24
net0              ip         ok           --         --
   net0/v4        static     ok           --         10.134.76.129/24
-
Create the following flows over net1 on Host1:
-
httpflow – Contains all the HTTP traffic between zone1 and net1.
# flowadm add-flow -l net1 -a transport=tcp,local_ip=192.168.200.103,\
local_port=80,remote_ip=192.168.200.110 httpflow
-
sshflow – Contains all the SSH traffic coming in to and going out of net1.
# flowadm add-flow -l net1 -a transport=tcp,local_ip=192.168.200.103,\
local_port=22 sshflow
-
-
Implement resource control on the flows.
-
Verify the information about the created flows.
# flowadm
FLOW        LINK     PROTO LADDR             LPORT  RADDR             RPORT DSFLD
httpflow    net1     tcp   192.168.200.103   80     192.168.200.110   --    --
sshflow     net1     tcp   192.168.200.103   22     --                --    --

# flowadm show-flowprop
FLOW         PROPERTY        PERM    VALUE        DEFAULT        POSSIBLE
httpflow     maxbw           rw      500          --             --
httpflow     priority        rw      medium       medium         low,medium,high
httpflow     hwflow          r-      off          --             on,off
sshflow      maxbw           rw      --           --             --
sshflow      priority        rw      high         medium         low,medium,high
sshflow      hwflow          r-      off          --             on,off
For more information about the output, see the flowadm (1M) man page.
-
On Host2, configure VNICs over net0 for each zone.
# dladm create-vnic -l net0 vnic0
# dladm create-vnic -l net0 vnic1
# dladm create-vnic -l net0 vnic2
-
Implement resource controls on each VNIC.
# dladm set-linkprop -p rxrings=4,txrings=4 vnic0
# dladm set-linkprop -p rxrings=2,txrings=2 vnic1
# dladm set-linkprop -p rxrings=1,txrings=1 vnic2
-
Assign the VNICs to their respective zones.
# zonecfg -z zone1
# zonecfg:zone1> add net
# zonecfg:zone1:net> set physical=vnic0
# zonecfg:zone1:net> end
# zonecfg:zone1> commit
# zonecfg:zone1> exit
# zoneadm -z zone1 reboot

# zonecfg -z zone2
# zonecfg:zone2> add net
# zonecfg:zone2:net> set physical=vnic1
# zonecfg:zone2:net> end
# zonecfg:zone2> commit
# zonecfg:zone2> exit
# zoneadm -z zone2 reboot

# zonecfg -z zone3
# zonecfg:zone3> add net
# zonecfg:zone3:net> set physical=vnic2
# zonecfg:zone3:net> end
# zonecfg:zone3> commit
# zonecfg:zone3> exit
# zoneadm -z zone3 reboot
-
Create a software-based client that shares rings with the primary interface net0.
# dladm create-vnic -p rxrings=sw,txrings=sw -l net0 vnic3
-
Assume pool1, a set of CPUs in Host2, is assigned to zone1. Assign the same pool1 of CPUs to also manage network processes for zone1.
# dladm set-linkprop -p pool=pool1 vnic0