JavaScript is required to for searching.
Skip Navigation Links
Exit Print View
Sun Blade X4-2B Service Manual
Oracle Technology Network
Library
PDF
Print View
Feedback
search filter icon
search icon

Document Information

Using This Documentation

Service Manual Overview

About the Sun Blade X4-2B

Troubleshooting the Server Module

Preparing for Service

Servicing Server Module Components

Servicing a Storage Drive (CRU)

Identifying Storage Drives

Identifying Storage Drive Indicators and Mechanical Components

Ready to Remove Indicator

Service Action Required Indicator

Power/OK Indicator

Lever and Lever Release Button

Storage Drive Failure and RAID

About Disk Backplane Cabling

Remove a Storage Drive

Install a New Storage Drive

Replace a Storage Drive

Remove Storage Drive Filler Panels

Insert Storage Drive Filler Panels

Servicing DIMMs (CRU)

DIMM Fault Remind Circuit and ECC Errors

Fault Remind Button and Charge Status Indicator

DIMM Fault Indicators

Inconsistencies Between DIMM Fault LEDs and the BIOS Isolation of Faulty DIMMs

Error Correction and Parity

Identify Faulty DIMMs

DIMM Population Rules and Guidelines

Basic Memory Guidelines

Detailed Memory Population Rules

Remove DIMMs

Install DIMMs

Servicing USB Flash Sticks (CRU)

Remove USB Flash Sticks

Install USB Flash Sticks

Servicing a Fabric Expansion Module (CRU)

Remove a FEM

Install a FEM

Servicing a RAID Expansion Module (CRU)

Remove a REM Card

Install a REM Card

Replace a REM Battery on the REM Card

Servicing Processors (FRU)

Selecting the Correct Processor Removal/Replacement Tool

Processor Fault Remind Circuit

Fault Remind Button and Charge Status Indicator

Processor Fault Indicators

Identify a Faulty Processor

Remove a Processor Heat Sink (FRU)

Remove a Processor (FRU)

Install a Processor (FRU)

Install a Processor Heat Sink (FRU)

Servicing the Motherboard Assembly (FRU)

Remove Motherboard Assembly Components (FRU)

Install Motherboard Assembly Components (FRU)

Update FRUID (Service Only)

Servicing the System Battery (CRU)

Returning the Server Module to Operation

BIOS Power-On Self-Test (POST) Checkpoints

BIOS Setup Utility Menu Options

Index

Install a Processor (FRU)

Before You Begin

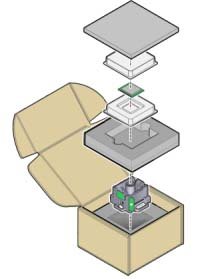
  1. Unpack the replacement processor and place it on an anti-static mat.
    image:An illustration showing how to remove a processor from anti-static packaging.
  2. Ensure that the two processor socket release levers and the processor pressure frame are in the fully open position.
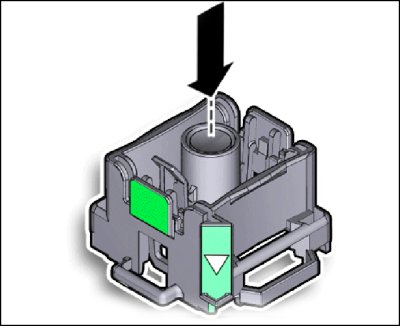
  3. Push the removal/insertion tool button on the top of the tool.
    image:An illustration showing the workings of the CPU replacement tool.
  4. Turn the tool upside down, lift the processor by its edges, and place it (circuit side up) in the tool.

    Ensure that the triangle on the corner of the processor aligns with the triangle on the side of the processor removal/replacement tool.
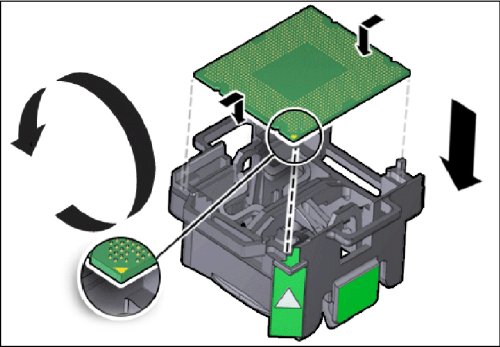

    image:An illustration showing how to use the CPU replacement tool.
  5. While still holding the tool in the upside down position, press the release lever (which is now facing downward) to secure the processor in the tool.

    When the lever is pressed, the center button releases. An audible click indicates that the processor is locked in place.
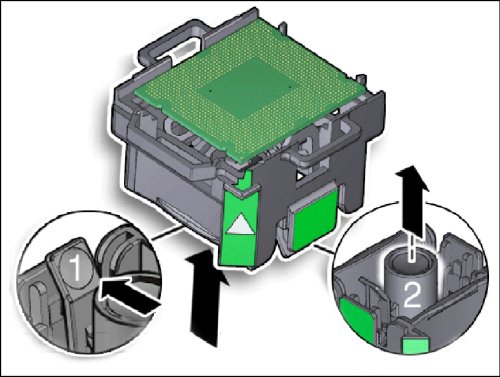

    image:An illustration showing how to use the CPU replacement tool.
  6. Ensure that the processor is secure in the tool before rotating the tool.
  7. Rotate the tool, so the processor faces downward.
  8. Properly position the tool over the processor socket and lower it into place.

    Ensure that the notches on the sides of the processor align with the keys on the socket, and the green triangle on the side of the tool is aligned with the front left corner of the processor socket (when viewing from the front of the server).
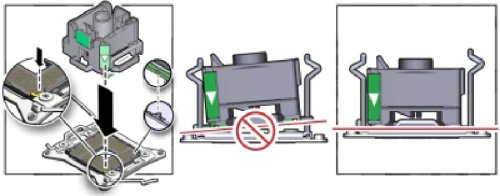

    image:An illustration showing how to install a processor.
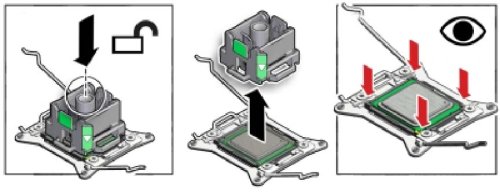
  9. Press the center button to release the processor.

    Caution - Component damage. Do not press down on the processor. Irreparable damage to the processor or motherboard might occur from excessive downward pressure.


    image:An illustration showing how to install a pressure frame cover assembly.
  10. Remove the processor removal/replacement tool.
  11. Visually check the alignment of the processor in the socket.

    When properly aligned, the processor sits flat in the processor socket and has minimal side to side movement.

  12. Close the processor pressure frame cover.
  13. Lower the first retaining lever and secure it under the retaining clip.
  14. Lower the second retaining lever and secure it under the retaining clip.

    This action locks the processor in the socket.
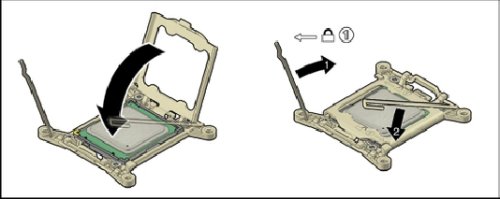

    image:An illustration showing how to install a pressure frame cover assembly.

Next Steps