JavaScript is required to for searching.
Skip Navigation Links
Exit Print View
Sun Blade X4-2B Service Manual
Oracle Technology Network
Library
PDF
Print View
Feedback
search filter icon
search icon

Document Information

Using This Documentation

Service Manual Overview

About the Sun Blade X4-2B

Troubleshooting the Server Module

Preparing for Service

Servicing Server Module Components

Servicing a Storage Drive (CRU)

Identifying Storage Drives

Identifying Storage Drive Indicators and Mechanical Components

Ready to Remove Indicator

Service Action Required Indicator

Power/OK Indicator

Lever and Lever Release Button

Storage Drive Failure and RAID

About Disk Backplane Cabling

Remove a Storage Drive

Install a New Storage Drive

Replace a Storage Drive

Remove Storage Drive Filler Panels

Insert Storage Drive Filler Panels

Servicing DIMMs (CRU)

DIMM Fault Remind Circuit and ECC Errors

Fault Remind Button and Charge Status Indicator

DIMM Fault Indicators

Inconsistencies Between DIMM Fault LEDs and the BIOS Isolation of Faulty DIMMs

Error Correction and Parity

Identify Faulty DIMMs

DIMM Population Rules and Guidelines

Basic Memory Guidelines

Detailed Memory Population Rules

Remove DIMMs

Install DIMMs

Servicing USB Flash Sticks (CRU)

Remove USB Flash Sticks

Install USB Flash Sticks

Servicing a Fabric Expansion Module (CRU)

Remove a FEM

Install a FEM

Servicing a RAID Expansion Module (CRU)

Remove a REM Card

Install a REM Card

Replace a REM Battery on the REM Card

Servicing Processors (FRU)

Selecting the Correct Processor Removal/Replacement Tool

Processor Fault Remind Circuit

Fault Remind Button and Charge Status Indicator

Processor Fault Indicators

Identify a Faulty Processor

Remove a Processor Heat Sink (FRU)

Remove a Processor (FRU)

Install a Processor (FRU)

Install a Processor Heat Sink (FRU)

Servicing the Motherboard Assembly (FRU)

Remove Motherboard Assembly Components (FRU)

Install Motherboard Assembly Components (FRU)

Update FRUID (Service Only)

Servicing the System Battery (CRU)

Returning the Server Module to Operation

BIOS Power-On Self-Test (POST) Checkpoints

BIOS Setup Utility Menu Options

Index

Remove Motherboard Assembly Components (FRU)

Use this procedure to replace the motherboard assembly if the motherboard or the disk backplane fails.


Caution - The motherboard should be serviced only by an Oracle qualified service technician.


Caution - Ensure that all power is removed from the server before removing or installing the server module enclosure.


Caution - These procedures require that you handle components that are sensitive to electrostatic discharge. This sensitivity can cause the components to fail. To avoid damage, ensure that you follow anti-static practices as described in Performing ESD and Anti-static Prevention Measures,


  1. Back up the SP configuration.

    Refer to http://www.oracle.com/goto/x86AdminDiag/docs.

  2. Prepare the server module for service.

    For instructions, see Preparing for Service .

  3. Insert a blade filler panel into the empty chassis slot.

    See Install Server Module Filler Panels.


    Caution - Data loss and over-temperature condition possible if slots are open more than one minute.


  4. Place the removed server module on an anti-static mat next to the replacement the server module.

    See Performing ESD and Anti-static Prevention Measures.

  5. Label the server module components before removal to ensure components are returned to original locations.
    • Storage drives

    • USB flash sticks

    • DIMMs

    • CPUs

    • FEM

    • REM

    See About System Components.

  6. Remove any storage drives from the enclosure and install them on the replacement enclosure.

    For instructions, see Servicing a Storage Drive (CRU)

  7. Remove any storage drive filler panels from the enclosure and install them on the replacement enclosure.

    For instructions, see Remove Storage Drive Filler Panels and Install Server Module Filler Panels

  8. Remove the internal USB flash sticks from the motherboard and install them on the replacement motherboard.

    Note the flash drive positions (0 and 1).

    For instructions, see Remove USB Flash Sticks.

  9. Remove the internal FEM card from the motherboard and install it on the replacement motherboard.

    For instructions, see Servicing a Fabric Expansion Module (CRU).

  10. Remove the internal REM card from the motherboard and install it on the replacement motherboard.

    For instructions, see Servicing a RAID Expansion Module (CRU).

  11. Remove the DDR3 DIMMs from the motherboard and install them on the replacement motherboard.

    Install the DDR3 DIMMs only in the sockets (connectors) that correspond to the sockets from which they were removed. Performing a one-to-one replacement of the DIMMs significantly reduces the possibility that the DIMMs will be installed in the wrong sockets. If you do not reinstall the DIMMs in the same sockets, server performance might suffer and some DIMMs might not be used by the server..

    For instructions, see Servicing DIMMs (CRU).

  12. Remove the processors from the faulty motherboard.

    Note the processor positions (0 and 1).

    For instructions, see Remove a Processor Heat Sink (FRU) and Remove a Processor (FRU).
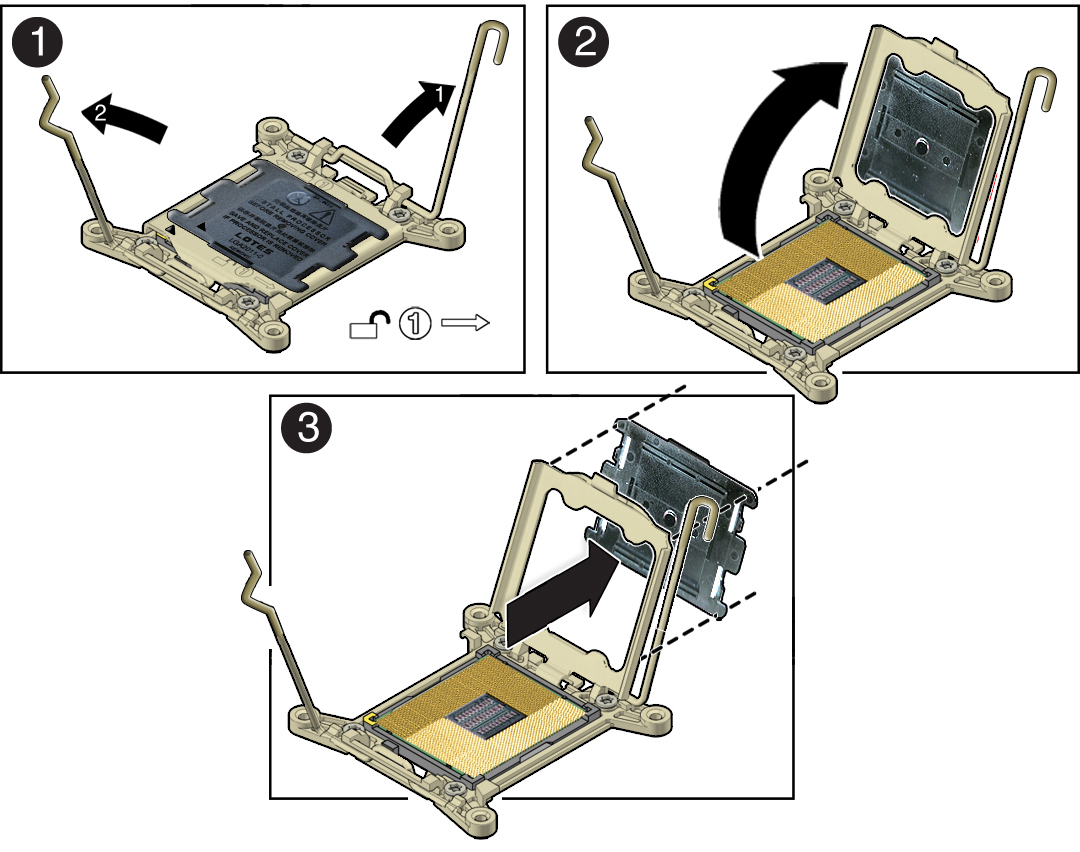
  13. Remove the processor socket covers from the replacement motherboard and install the processors.
    1. Disengage the processor ILM assembly hinge lever on the right side of the processor socket (viewing the server from the front) by pushing down on the lever and moving it to the side away from the processor, and then rotating the lever upward [Frame 1]. image:Graphic showing how to remove a processor socket cover.
    2. Disengage the processor ILM assembly load lever on the left side of the processor socket (viewing the server from the front) by pushing down on the lever and moving it to the side away from the processor, and then rotating the lever upward [1].
    3. Lift the processor ILM assembly load plate off of the processor socket by rotating the ILM assembly hinge lever on the right side of the processor toward the closed position (the load plate is lifted up as the hinge lever is lowered) and carefully swing the load plate to the fully open position [2].
    4. Grasp the top and underside of the processor socket cover with one hand (place your thumb against the underside of the cover), place your other thumb against the underside of the cover, and carefully push the cover out of the processor ILM assembly load plate [3].

      Caution - Be careful not to allow the processor socket cover to fall into the processor socket as this could result in damage to the socket.


    5. Install a processor into the socket from which you removed the processor socket cover.

      For instructions for installing a processor, see Servicing Processors (FRU) “Install a Processor”.

    6. Repeat Step a through Step e above to remove the second processor socket cover from the replacement motherboard and install the second processor.
  14. Install the Motherboard Assembly Components.

    For instructions, see Install Motherboard Assembly Components (FRU).

Next Steps