Users can also create scheduled orders by clicking the Create scheduled order link on the Scheduled Orders page (user/scheduled_orders.jsp) in My Account.
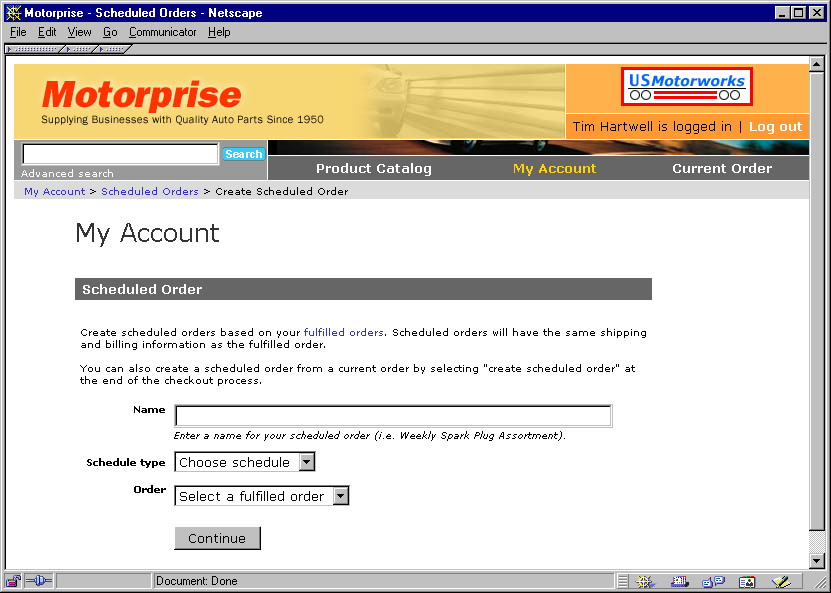
Setting up a scheduled order in My Account.
Creating scheduled orders from My Account is similar to creating them from the order confirmation page. However, the template order is passed to ScheduledOrderFormHandler differently. When the user chooses to create a scheduled order from the order confirmation page, we assign the ID of the order being created to prototypeOrderId and pass it to scheduled_order_new.jsp, which assigns the order ID to ScheduledOrderFormHandler.complexScheduledOrderMap.templateOrderId.. If the user clicks the Create new scheduled order link from the Scheduled Orders page in My Account, we display a list of all the user’s fulfilled orders. The user can select an order from this list that is assigned to
userInputFields.orderIdScheduledOrderFormHandler.complexScheduledOrderMap.templateOrderId..
userInputFields.orderId
The following is the code in scheduled_order_new.jsp that displays the fulfilled orders and submit buttons for creating a scheduled order from My Account:
<dsp:droplet name="OrderLookup">
   <dsp:param name="userId" bean="Profile.repositoryid"/>
   <dsp:param name="state" value="closed"/>
   <dsp:oparam name="output">
      <dsp:setvalue param="result" paramvalue="result"/>
   </dsp:oparam>
</dsp:droplet>

<dsp:droplet name="IsNull">
   <dsp:param name="value" param="prototypeOrderId"/>
   <dsp:oparam name="true">
      <dsp:droplet name="OrderLookup">
         <dsp:param name="userId" bean="Profile.repositoryId"/>
         <dsp:param name="state" value="closed"/>
            <dsp:oparam name="output">
               <dsp:form action="scheduled_order_new.jsp" method="post">

<table border=0 cellpadding=3 width=100%>
   <tr>
      <td colspan=2>
         <dsp:droplet name="IsNull">
            <dsp:param bean="ScheduledOrderFormHandler.repositoryId"
               name="value"/>
            <dsp:oparam name="true"><span class=small>Create scheduled orders
               based on your <dsp:a href="orders_filled.jsp">fulfilled
               orders</dsp:a>. Scheduled orders will have the same shipping and
               billing information as the fulfilled order. <p>You can also create
               a scheduled order from a current order by selecting "create
               scheduled order" at the end of the checkout process.</span>
            </dsp:oparam>
            <dsp:oparam name="false"><span class=small>You can edit the name of
               your order, schedule type, and order placement information.</span>
            </dsp:oparam>
         </dsp:droplet>
      </td>
   </tr>
   <tr><td><dsp:img src="../images/d.gif"/></td></tr>
   <tr valign=bottom>
      <td valign="top" align=right><span class=smallb>Name</span></td>
      <td><dsp:input bean="ScheduledOrderFormHandler.value.name" name="name"
         size="35" type="text"/><br>
      <span class=help>Enter a name for your scheduled order (i.e. Weekly Spark
         Plug Assortment).</span></td>
   </tr>
   <tr>
      <td align=right><span class=smallb>Schedule type</span></td>
      <td align="left">
         <dsp:select bean="ScheduledOrderFormHandler.moveToMode" name="select"
            size="1">
            <dsp:option value=""/>Choose schedule
            <dsp:option value="Daily"/>daily
            <dsp:option value="Weekly"/>weekly
            <dsp:option value="Monthly"/>monthly
         </dsp:select>
      </td>
   </tr>

<dsp:droplet name="IsNull">
   <dsp:param bean="ScheduledOrderFormHandler.repositoryId" name="value"/>
   <dsp:oparam name="true">
   <tr>
      <td align="right" valign=top><span class=smallb>Order</span></td>
      <td>
         <dsp:select bean="ScheduledOrderFormHandler.complexScheduledOrderMap.
            templateOrderId.userInputFields.orderId">
            <dsp:droplet name="ForEach">
               <dsp:param name="array" param="result"/>
               <dsp:oparam name="outputStart">
                  <dsp:option value=""/>  Select a fulfilled order
               </dsp:oparam>
               <dsp:oparam name="output">
                  <dsp:getvalueof id="option384" param="element.id"
                     idtype="java.lang.String">
                     <dsp:option value="<%=option384%>"/>
                  </dsp:getvalueof><dsp:valueof param="element.id"/>
               </dsp:oparam>
            </dsp:droplet>
         </dsp:select><br>
      </td>
   </tr>
   </dsp:oparam>
   <dsp:oparam name="false">
   </dsp:oparam>
</dsp:droplet>

   <tr><td><dsp:img src="../images/d.gif"/></td></tr>
   <tr>
      <td></td>
      <input name="createNew" type="hidden" value='<dsp:valueof
         param="createNew"/>'>
      <dsp:input bean="ScheduledOrderFormHandler.moveToErrorURL" type="hidden"
         value="scheduled_order_new.jsp"/>
      <dsp:input bean="ScheduledOrderFormHandler.moveToSuccessURL" type="hidden"
         value="scheduled_order_calendar.jsp?createNew=new"/>
      <td><dsp:input bean="ScheduledOrderFormHandler.moveToURL" type="submit"
         value="Continue"/></td>
   </tr>
   <!-- vertical space -->
   <tr><td><dsp:img vspace="0" src="../images/d.gif"/></td></tr>
</table>
</dsp:form>
</dsp:oparam>
<dsp:oparam name="empty">

<dsp:param name="value" param="result"/>
<dsp:oparam name="true">
   You have no <dsp:a href="orders_filled.jsp">fulfilled orders</dsp:a> at this
   time to create a scheduled order.  <p>You can create a scheduled order from a
   current order by selecting "create scheduled order" at the end of the checkout
   process.
</dsp:oparam>
   You have no <dsp:a href="orders_filled.jsp">fulfilled orders</dsp:a> at this
   time to create a scheduled order.  <p>You can create a scheduled order from a
   current order by selecting "create scheduled order" at the end of the checkout
   process.

</dsp:oparam>
</dsp:droplet><!--end OrderLookup-->
As shown above, we used the OrderLookup component to fetch all the user’s orders with the order state “closed” and display them so that the user can select one. After the user chooses the schedule type, scheduled order name, and the order, he or she is directed to schedule_order_calendar.jsp to choose the calendar. The rest of the process is identical to creating a scheduled order from the checkout process.
Deleting a Scheduled Order
Users can delete a scheduled order by selecting it on the Scheduled Orders page in My Account and clicking the Delete scheduled order button at the end of the page. The user is directed to scheduled_order_preview.jsp, and the order ID of the selected order is passed as scheduledOrderId, which displays the order information, and provides options to edit or delete the order. The scheduledOrderId is assigned to ScheduledOrderFormHandler.repositoryId.
The JSP code from scheduled_order_preview.jsp to delete a scheduled order is:
<dsp:input bean="ScheduledOrderFormHandler.deleteSuccessURL" type="hidden"
   value="scheduled_orders.jsp"/>
<dsp:input bean="ScheduledOrderFormHandler.deleteErrorURL" type="hidden"
   value="scheduled_order_preview.jsp"/>
<dsp:input bean="ScheduledOrderFormHandler.delete" type="submit" value="Delete
   scheduled order"/>
Updating a Scheduled Order
Users can select scheduled orders on the Scheduled Orders page in My Account and click the Edit order info link. They can then change any information for that scheduled order. After making the necessary changes, they click the Update button. This process is similar to that of creating a new scheduled order, except that we display an option to update the order and the existing scheduled order information.
First, we used the following JSP code from scheduled_order_calendar to verify the validity of the user inputs:
<dsp:input bean="ScheduledOrderFormHandler.verifySuccessURL" type="hidden"
   value="scheduled_order_preview.jsp?source=scheduledOrder&createNew=new"/>
<dsp:input bean="ScheduledOrderFormHandler.verifyErrorURL" type="hidden"
   value="scheduled_order_calendar.jsp"/>
<dsp:input bean="ScheduledOrderFormHandler.verify" type="submit"
   value="Continue"/>
We used this JSP code snippet to update the scheduled order:
<dsp:input bean="ScheduledOrderFormHandler.updateSuccessURL" type="hidden"
   value="scheduled_orders.jsp"/>
<dsp:input bean="ScheduledOrderFormHandler.updateErrorURL" type="hidden"
   value="scheduled_order_calendar.jsp"/>
<dsp:input bean="ScheduledOrderFormHandler.update" type="submit"
   value="Update"/><p>
<span class=smallb><dsp:a href="scheduled_orders.jsp">Return to scheduled
   orders</dsp:a></span>
The verification is done when the user clicks the Preview button. If any invalid data are found, such as a missing order name, an error message is displayed at the top of the screen.
Core Commerce has a back-end service called ScheduledOrderService that polls the Order Repository at a periodic interval and submits scheduled Orders according to their schedules. It has a property called schedule that defines how often to run the placeScheduledOrders task. Because Motorprise is a demo, we wanted the scheduled orders to be checked often, so we set the schedule property in <ATG11dir>\MotorpriseJSP\j2ee-apps\motorprise\config\atg\commerce\order\scheduled\ to “every 10 seconds” so that you can see scheduled order functionality immediately.
ScheduledOrderService.properties
For more information, see the Core Commerce Programming Guide.
