39 Set Up Supplier and Item Information
This chapter contains these topics:
-
Section 39.3, "Setting Up Guidelines for Delivery Performance,"
-
Section 39.5, "Defining a Summary of Supplier Performance Information."
The system processes an order based on the items that you purchase and the supplier from whom you make the purchases. For example, you can define procurement instructions for a supplier so that each time you enter an order, the system retrieves default values for that supplier.
You can specify the items that you purchase from a supplier to create supplier and item relationships. For each item, you can enter information such as whether the supplier is certified to sell the item. If a supplier is not certified to sell an item, the system does not let you enter the item on a purchase order for the supplier.
You can review information about the quality of a supplier's services, including delivery performance and the condition of items upon receipt. To ensure that this information is accurate, you must set up guidelines so that the system can recognize on-time deliveries and items in acceptable condition.
You can review a summary of performance information to compare suppliers' costs and services for a certain item. Before you can review this information, you must define the performance factors. Factors might include number of returned items, last-in costs, average lead times, and so on.
39.1 Defining Supplier Procurement Instructions
From Stock Based Procurement (G43A), choose Supplier Management
From Supplier Management (G43A16), choose Procurement Instructions
The system processes an order based on the items that you purchase and the supplier from whom you make the purchases. You can define procurement instructions for a supplier so that each time you enter an order for the supplier, the system retrieves default values such as a landed cost rule, a price rule, a print message, and so on.
You can use procurement instructions to specify item restrictions for a supplier. Item restrictions determine which items you can or cannot purchase from a supplier. If you restrict the purchase of certain items, you cannot enter the items on a purchase order for the supplier.
You can specify limitations for a supplier, such as minimum and maximum order amounts. You can also specify whether evaluated receipts processing is allowed for the supplier, that is, whether you can create vouchers in batch mode from existing receipt information.
You can have the system retrieve default values for a purchase order based on the address to which you ship the order. For example, you can have the system calculate taxes based on the ship-to address. You specify which values the system retrieves for orders based on the shipping address. You can use procurement instructions to define default values for shipping address numbers as well as supplier address numbers.
You can define procurement instructions at the supplier and ship-to level, or you can take it a step further and define instructions at the address, company, and branch level.
Changes you make to procurement instructions do not affect orders that you have already created.
Complete the following tasks:
-
Define procurement instructions
-
Define supplier or ship-to address order values
To define procurement instructions
On Procurement Instructions (P4306)
Figure 39-1 Procurement Instructions screen
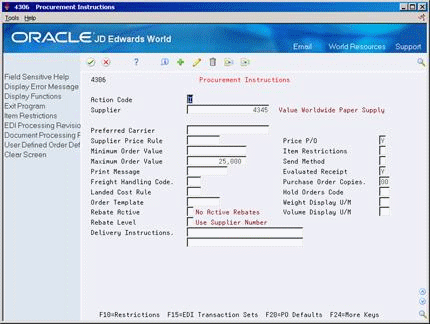
Description of "Figure 39-1 Procurement Instructions screen"
-
Complete the following fields:
-
Supplier (or ship-to address number)
-
Preferred Carrier
-
Supplier Price Rule
-
Minimum Order Value
-
Maximum Order Value
-
Print Message
-
Freight Handling Code
-
Landed Cost Rule
-
Order Template
-
Rebate Active
-
Rebate Level
-
Delivery Instructions
-
Price P/O
-
Send Method
-
Evaluated Receipt
-
Purchase Order Copies
-
Hold Orders Code
-
Weight Display U/M
-
Volume Display U/M
-
-
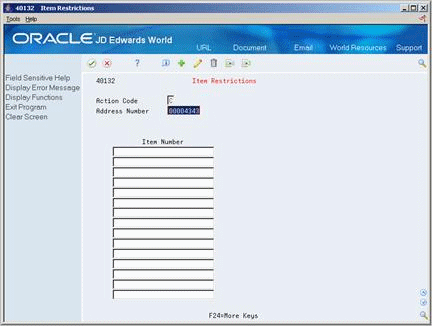
To enter item restrictions for a supplier, do one of the following:
-
Enter I (Include) in the Item Restrictions field to enter only those items that you can purchase from the supplier:
-
Enter E (Exclude) in the Item Restrictions field to enter items that you cannot purchase from the supplier:
-
-
On Item Restrictions, complete the following field:
-
Item Number
-
| Field | Explanation |
|---|---|
| Preferred Carrier | The address number of the carrier that is to deliver the order. You might select a carrier based on a route or special handling requirements. |
| Supplier Price Rule | A user defined code (system 40, type PC) that identifies a group of suppliers that provide the same types of discounts on items.
Form-specific information The system can calculate discounts on items that you purchase from a supplier based on the price group to which you assign the supplier. You create inventory price rules to set up discounts, after which, you attach the rules to both the supplier price groups (or individual supplier) and items to which they pertain. |
| Minimum Order Value | The minimum amount for which you can place an order with this supplier. If you try to enter an order for less than this amount, the system displays a warning message.
This field is maintained as an integer without decimals. |
| Maximum Order Value | The maximum amount for which you can place an order with this supplier. If you try to enter an order for more than this amount, the system displays a warning message.
This field is maintained as an integer without decimals. |
| Print Message | A code that you assign to each print message. Examples of text messages are engineering specifications, hours of operation during holiday periods, and special delivery instructions. |
| Freight Handling Code | A user defined code (system 42/type FR) that identifies when you take responsibility of the goods so that freight charges are applied accordingly. |
| Landed Cost Rule | A user defined code (41/P5) that indicates the landed cost rule for an item. The landed cost rule determines purchasing costs that exceed the actual price of an item, such as broker fees, commissions, and so forth. You set up landed cost rules on Landed Cost Revisions.
Form-specific information You can assign a landed cost rule to a supplier if you frequently incur the same landed costs each time you place an order with the supplier. This is the default cost rule for each purchase order that you enter for the supplier. |
| Order Template | A list of items that you frequently order. The items are often grouped based on the product type, such as fuels, lubricants, packaged goods and so forth.
Form-specific information You can assign an order template to a supplier if you usually order the same items from the supplier. This is the default order template for the supplier. |
| Rebate Active | A code that indicates whether rebates are active. |
| Rebate Level | This field indicates whether the system processes rebate information for the supplier or for the parent of the supplier. |
| Delivery Instructions | Text that describes the delivery instructions for this order. |
| Price P/O | A code that indicates whether price information prints on the purchase order. |
| Send Method | This code indicates the method you use to send documents to a supplier. There is no automatic processing associated with this field. Instead, the code can be used as data selection criteria for certain procedures. |
| Evaluated Receipt | A code that indicates if an order is eligible for the evaluated receipt settlement process. An evaluated receipt settlement indicates that you have an agreement with the supplier to create vouchers based on the items that you receive. You use the Evaluated Receipt Settlement (P43800) procedure to create vouchers from receipt records. As a result, the supplier does not send you invoices and you can bypass the Voucher Match procedure.
Valid values are: N Not eligible for evaluated receipt settlement processing. Y – Eligible for evaluated receipt settlement processing. I – Receipt transaction is in process. T – Eligible for evaluated receipt settlement processing. However, a tolerance error occurred during the receipt process. R – Eligible for evaluated receipt settlement processing. However, the receipt is currently in the receipt routing process. V – A voucher has been created for the receipt transaction using the evaluated receipt settlement process. |
| Purchase Order Copies | The number of purchase order copies that the supplier requires. When you print a purchase order for the supplier, the system prints the number of copies that you specify in this field. The system always prints at least one purchase order. |
| Hold Orders Code | A user defined code (table 42/HC) that identifies why an order is on hold.
Form-specific information This is the default hold code for each purchase order that you enter for the supplier. You can assign a hold code to a supplier so that all orders you enter for the supplier are put on hold. |
| Weight Display U/M | A user defined code (system 00/type UM) that identifies the unit of measure in which the system displays the weight of an order, for example, ounces, pounds, or tons. |
| Volume Display U/M | A user defined code (system 00/type UM) that identifies the unit of measure in which the system displays the volume of an order, for example, liters or gallons. |
| Item Restrictions | A code that designates whether restrictions exist for the purchase of items from this supplier.
Valid codes are: Blank – No restrictions. I– Items on the list can be purchased from the supplier. E – Every item may be purchased from the supplier EXCEPT for the items on the list. |
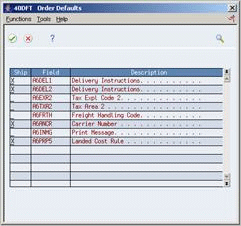
To define supplier or ship-to address order values
On Procurement Instructions (P4306)
-
On Order Defaults, enter X in one of the following columns for each of the order fields that display:
-
Supplier
-
Ship To
The purchase order header values in the Order Defaults window are pre-defined by the system and are the only fields for which you can have the system retrieve defaults based on the ship-to address.
-
39.1.1 What You Should Know About
| Topic | Description |
|---|---|
| Procurement Instructions by company and business unit or company and branch | You can set up Procurement Instructions at the address and business unit/branch level, which will override instructions at the address level only.
To set up instructions at the business unit level, you must access Procurement Instructions through Supplier Master Information (P01054). In Supplier Master Information, press F17 to access Supplier Information by Company and BU (P01154). From this screen, press F13 to access Purchasing Instructions by Company and Branch (P43063). You can set up all the same instructions at the branch level with the exception of Item Restrictions, which are only applicable at the supplier level. |
| Importing procurement instructions by company and branch | As an alternative to entering purchasing instructions by company and branch manually, you can use the Supplier-Purchasing Instructions Rev. - Z-File program (P43063Z) to import an extensive amount of data from the Supplier-Purchasing Instructions Revisions - Z-File (F43063Z) into your system. From the Purchasing Z-File Processes menu (G4301Z), choose Supplier-Purchasing Company/Business Unit.
See: |
| Item restrictions and order limitations | The system will only validate item restrictions for the supplier address number. It will not validate restrictions against the ship-to address number.
Restrictions are intended to work with items set up in the inventory system only. Only order line types with an Inventory Interface of Y, D, or B will work with Item Restrictions. Item Restrictions are not document type specific. |
| Item number for restrictions | Item Restrictions are listed in order of the primary item number (that is, short, second or third) as specified for branch ALL in Branch Constants (P41001). |
| Importing procurement instructions | As an alternative to entering procurement instructions manually, you can use the Supplier-Purchasing Instructions Rev. - Z-File program (P4306Z) to import an extensive amount of data from the Supplier-Purchasing Instructions Revisions - Z-File (F4306Z) into your system. From the Purchasing Z-File Processes menu (G4301Z), choose Supplier-Purchasing Instructions.
See: |
39.2 Creating Supplier and Item Relationships
From Stock Based Procurement (G43A), choose Supplier Management
From Supplier Management (G43A16), choose Supplier/Item Information
You can create relationships between a supplier and the items that you purchase from the supplier. For example, if you purchase widgets from AAA Supply Company, you can create a relationship between the AAA Supply Company and the widget item. You can define information for the relationship, such as:
-
The status of the relationship (whether you can purchase the item from the supplier)
-
The receipt route for the relationship (the route for the item when you purchase it from the supplier)
-
The price of the item (when you purchase it from the supplier)
You can manually create supplier and item relationships or you can have the system create them for you when you purchase items from a supplier.
The system stores information for item and supplier relationships in the Supplier/Item Relationships file (F43090). You can run the Supplier Analysis Regeneration program (P43900) to create records in this file based on existing receipt information.
To create supplier and item relationships
On Supplier/Item Information (P43042)
Figure 39-4 Supplier/Item Information screen
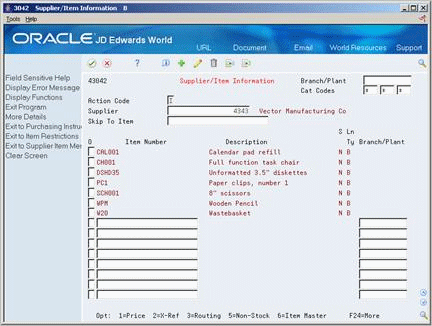
Description of "Figure 39-4 Supplier/Item Information screen"
-
To review existing supplier and item relationships, complete the following fields:
-
Branch/Plant
-
Supplier
-
-
To create a new relationship, complete the following fields on the first blank line:
-
Item Number
-
Branch/Plant
If you are working with non-stock items, the Branch/Plant field is not applicable. You must set processing option 2 to allow for the addition of new relationships.
-
-
To access Routing/Analysis Revisions, enter 3 in the following field:
Figure 39-5 Routing/Analysis Revisions screen
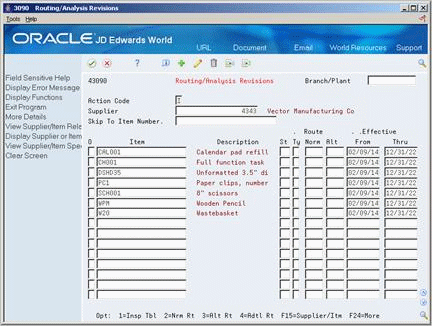
Description of "Figure 39-5 Routing/Analysis Revisions screen"
-
On Routing/Analysis Revisions, complete the following field:
-
St (Certification Status)
| Field | Explanation |
|---|---|
| St | A code that indicates whether the supplier is certified to sell this item. The code that you enter determines how the system manages orders that you enter for the supplier and item.
Valid values are: 1 – The system prohibits you from purchasing this item from the supplier. 2 – The system displays a warning message if you enter an order for the item from the supplier. Blank – You can place orders for the item from the supplier. |
39.2.1 What You Should Know About
|
See Also:
|
39.3 Setting Up Guidelines for Delivery Performance
From Stock Based Procurement (G43A), choose Receipt Routing
From Receipt Routing (G43A14), choose Routing/Analysis Revisions
You can determine if a supplier has a history of delivering a specific item on time by reviewing delivery performance information. To ensure that this information is accurate, you must define how you want the system to calculate on-time deliveries.
An order is on time if you receive it the same day that the supplier promised to deliver it. You can allow a certain number of days before or after the promised date that the order can still be on time. For example, you can allow two late days and two early days. If the promised date for an order is 3/15, the order is not late unless you receive it after 3/17, and it is not early unless you receive it before 3/13.
You can also specify the percentage of an order that must be delivered for the system to determine the receipt date. For example, you can specify that you must receive 90 percent of an order for the system to use the receipt date to determine whether the delivery is on time, early, or late.
To set up guidelines for delivery performance
On Routing/Analysis Revisions (P43090)
Complete the following fields:
-
Days Allowed Early
-
Days Allowed Late
-
Leadtime Qty %
| Field | Explanation |
|---|---|
| Days Allowed Early | The number of days prior to the promised date in which delivery of the item is acceptable. For example, you enter 2 to indicate that the supplier can deliver the item a maximum of 2 days early to qualify for an on-time delivery. |
| Days Allowed Late | The number of days after the promised date in which delivery of the item is acceptable. For example, you enter 2 to indicate that the supplier can deliver the item a maximum of 2 days later than the promised date to qualify for an on-time delivery. |
| Leadtime Qty % | The percentage of an order that you must receive for the system to calculate leadtime. Leadtime is the difference between the date that you enter an order detail line and the date that you receive the order.
The system determines the receipt date for items in a receipt route based on the date at which the items arrive at the operation flagged for receipt acknowledgement. Form-specific information The percentage you enter here overrides the percentage that you set up as the default percentage in the data dictionary. |
39.4 Setting Up Guidelines for Acceptable Items
From Stock Based Procurement (G43A), choose Supplier Management
From Supplier Management (G43A16), choose Quality Analysis
You can determine if a supplier has a history of delivering a specific item in good condition by reviewing quality performance information. To ensure that this information is accurate, you must indicate how you want the system to identify acceptable and unacceptable items.
You must send items through receipt routing in order to use the Quality Analysis functionality. Quality performance information includes the percentages of an item that were acceptable and unacceptable in a fiscal period. The system calculates each percentage based on how you categorize items that you remove (or disposition) from a receipt route, including:
-
Returns
-
Reworks
-
Scrap
-
Rejects
-
Adjustments
You must specify which categories reflect acceptable and unacceptable items. For example, you can specify that the scrap category is unacceptable, so that each time you remove an item from a receipt route as scrap, the system classifies the item as unacceptable.
To set up guidelines for acceptable items
On Quality Analysis (P43231)
-
Press F2 to access Quality Classification (P43239).
Figure 39-6 Quality Classification screen
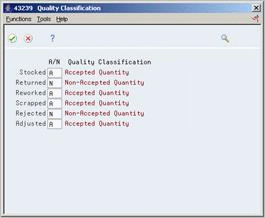
Description of "Figure 39-6 Quality Classification screen"
-
On Quality Classification, complete the following field for each category:
-
A/N (Acceptable/Non-Acceptable)
-
| Field | Explanation |
|---|---|
| A/N | This code determines whether a disposition category contains items of acceptable or unacceptable quality. For example, you can enter N (non-acceptable) for the scrapped category. When you remove items from the receipt route using the scrap category, the system classifies the items as unacceptable. You can review the quality of items that you have received from a supplier on Quality Analysis.
Valid values for this field are: Blank – items in this category are neither acceptable or unacceptable A – items in this category are acceptable N – items in this category are not acceptable |
39.5 Defining a Summary of Supplier Performance Information
From Stock Based Procurement (G43A), choose Supplier Management
From Supplier Management (G43A16), choose Define Inquiry Columns
You can review a summary of performance information to compare suppliers' costs and services for a certain item. Before you can review this information, you must define the performance factors that you want to compare, such as:
-
The average unit cost for an item
-
The last cost you paid for an item
-
The percentage of on-time deliveries
-
The average number of days that it takes to deliver the item (leadtime)
You must set up a column for each performance factor that you want to review. You must specify the title of the column, as well as values and calculations. You can also specify the decimal placement and number format, and you can assign help text.
You can create formats to review multiple performance factors (columns). You can assign up to four columns to a format. You can also create paths so that you can scroll through multiple formats.
After you set up columns, formats, and paths, you can assign them to the Supplier Analysis Summary form.
To define a summary of supplier performance information
On Define Inquiry Columns (P43921)
Figure 39-7 Define Inquiry Columns screen
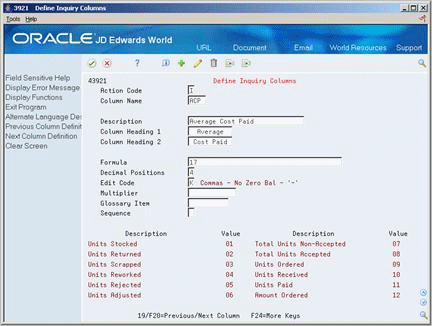
Description of "Figure 39-7 Define Inquiry Columns screen"
-
To name and describe a column, complete the following fields:
-
Column Name
-
Descriptions
-
Column Heading 1
-
Column Heading 2
-
-
To indicate how the system should calculate figures for the column, complete the following field:
-
Formula
-
-
To specify details about the column, complete the following fields and press Enter:
-
Decimal Positions
-
Edit Code
-
Multiplier
-
Glossary Item
-
Sequence
-
-
Press F3 to return to the Supplier Management menu.
-
Access Define Inquiry Formats (P5193).
Figure 39-8 Define Inquiry Formats screen
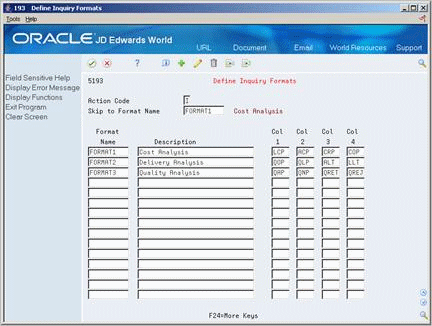
Description of "Figure 39-8 Define Inquiry Formats screen"
-
On Define Inquiry Formats, complete the following fields and press Enter:
-
Format Name
-
Description
-
Col 1
-
Col 2
-
Col 3
-
Col 4
-
-
Press F3 to return to the Supplier Management menu.
-
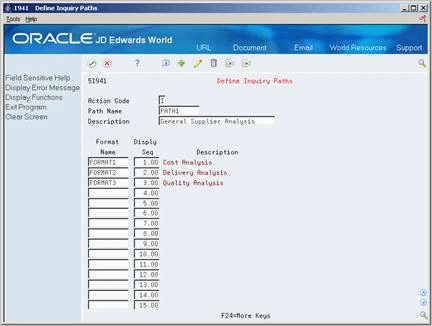
On Define Inquiry Paths, complete the following fields and press Enter:
-
Path Name
-
Description
-
Format Name
-
Display Sequence
-
| Field | Explanation |
|---|---|
| Column Name | Identifies a column set up for the Job Status Inquiry screen. It is an alphanumeric code. |
| Description | A user defined name or remark. |
| Column Heading 1 | The first line in the heading that describes the column. The system automatically centers this line for the column. |
| Column Heading 2 | The second line in the heading that describes the column. The system automatically centers this line for the column. |
| Formula | A calculation that the system uses to input an amount or quantity in this column. You can use a single predefined value or multiple predefined values in conjunction with mathematical operators to enter a formula. Valid mathematical operators are:
+ Add - Subtract * Multiply / Divide ( ) Left and right parentheses for nesting For example, you can enter the following formula to have the system calculate on-time percentages: 20/(20+21+22) The formula above equals on-time percentages because:
|
| Decimal Positions | The number of characters that display to the right of the decimal point. For example, if you enter 2, the amount or quantity in this column would have two characters to the right of the decimal point, such as 7.00. |
| Edit Code | This code (table 98/EC) determines the format of numeric data. Depending on which edit code you enter, you can change the appearance of the values that display or print. |
| Multiplier | The factor by which the amounts or unit quantities in a column are multiplied. The result of the calculation in the Formula field is multiplied by this factor before it is displayed on the Job Status Inquiry screen.
For example, if you want to scale down extremely large numbers to thousands, type .001 in this field. If you want percentages to be displayed as whole numbers, type 100. |
| Glossary Item | The item in the Data Dictionary file (F9201) that describes the information a column represents on the Job Status Inquiry screen. The related glossary description is displayed when the cursor is in the column and you press F1 (cursor sensitive help).
Form-specific information The item in the Data Dictionary file (F9201) that contains a description for the column with which you are working. If you enter a data dictionary item in this field, the glossary description for the item displays when you access field help for the column. |
| Sequence | This field is used to determine if you wish to display information in ascending or descending order. |
| Format Name | Identifies a format, which is a sequence of up to four columns for the Job Status Inquiry screen. It is an alphanumeric code.
Form-specific information The Skip to Format Name field in the upper part of the screen lets you specify the format you want displayed at the top of the list. |
| Description | A user defined name or remark. |
| Path Name | Identifies a path, which is a sequence of formats for the Job Status Inquiry screen. It is an alphanumeric code. |
| Disply Seq | A number that the system uses to sequence information. |
39.5.1 What You Should Know About
| Topic | Description |
|---|---|
| Sequence of column figures | You can specify whether column figures display in ascending or descending order. When multiple columns display on the Supplier Analysis Summary screen (P43230), the figures for each column appear in ascending or descending order based on the sequence specified for the first column. |
| Entering formulas | You must specify how the system calculates performance factors. You can use predefined values in conjunction with mathematical operators to enter a formula for a column. You can review the predefined values available to use on the lower portion of the Define Inquiry Columns screen (P43921). |
| Deleting formats | You cannot delete a format using an action code of D (Delete). Instead, you must use an action code of C and remove (clear) the format that you want to delete. |
|
See Also:
|
39.5.2 Processing Options
See Section 79.2, "Define Formats - Job Status Inquiry (P5193)."
See Section 79.3, "Define Paths - Job Status Inquiry (P51941)."