20 Create Corrective Work Orders
This chapter contains these topics:
-
Section 20.6, "Working with Work Order Supplemental Information"
-
Section 20.10, "Creating a Work Order for Unscheduled Maintenance"
20.1 Creating Corrective Work Orders
You create corrective work orders in Equipment/Plant Maintenance to formally request and schedule corrective maintenance and other unscheduled maintenance, such as emergency repairs. You also use corrective work orders to record and communicate all details pertaining to the maintenance task to others who are involved.
You must create a work order master for every work order that you want to track. The master consists of basic information that defines the work order, such as the work order number, description, and the business unit to which the work order is charged. You can also enter additional information to further identify the work order, such as category codes and user defined supplemental information.
The system stores work order master information in the Work Order Master table (F4801).
You can assign record types to work orders and then enter descriptive information into each record type to communicate important information about a task to others who are involved. For example, you might want to include special instructions, information about parts and tools needed to complete the task, and so on.
In addition, you can copy parts from a standard parts list or assign non-standard parts to a work order. You can also assign detailed labor routing instructions to a work order. For example, you can:
-
Identify each work center needed to perform the maintenance tasks
-
Specify the sequence in which the tasks are performed
-
Indicate the estimated duration of each maintenance task
You can also create work orders by duplicating the information from existing work orders for those tasks that are similar to other tasks you perform.
20.1.1 Before You Begin
-
Define your chart of accounts for the charge-to business unit information. See Creating Your Chart of Accounts in the JD Edwards World General Accounting I Guide.
20.1.2 What You Should Know About
| Topic | Discussion |
|---|---|
| Work order activity rules | Different work order activity rules might be in effect, based on the document type and work order type that you assign to a work order. For example, if the activity rules specify that the subledger is inactive at a particular status and you assign that status to the work order, you will not be able to apply future transactions to the work order. Review the work order activity rules prior to assigning a document type and work order type. |
| Work order approval routing | Different approval routings might be in effect, based on the document type, work order type, status, and approval type you assign to a work order. For example, you might create a work order for which you cannot assign a particular status until the work order is approved. Review the work order approval routing prior to creating a work order. |
| Assigning default values | You can use processing options to direct the system to automatically enter default values in the following fields on Work Order Entry:
You can also retrieve numerous default values from a parent work order, if you specify one. For example, you can use values from a parent work order to enter the following fields.
In addition, you can use processing options to automatically complete all of the address book fields, such as Manager and Supervisor, if you defined them when setting up the system. See Chapter 38, "Setting Up Default Managers and Supervisors". |
| Optional fields on the Work Order Entry screen | Many of the fields on the Work Order Entry screen are optional. You can use processing options to specify that certain of these fields require an entry. Information in these fields is particularly useful when you search for a work order or group of work orders using Backlog Management. |
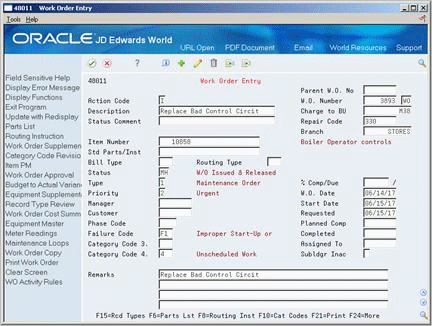
20.2 Entering Basic Work Order Information
From Equipment/Plant Management (G13), choose Equipment Work Orders
From Equipment Work Orders (G1316), choose Work Order Entry
Depending on the complexity of your maintenance organization, you can create work orders that include only the most basic information required by the system, such as the work order number, description, business unit, and branch. Or you can include equipment numbers, a variety of explanations, scheduling dates, and control codes. You can also enter budgeting information to help you track costs and resources.
To enter basic work order information
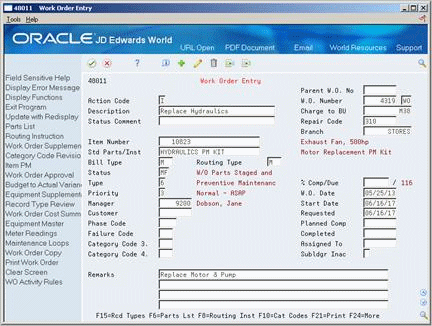
On Work Order Entry
-
Complete the following fields:
-
Description
-
Charge to BU
-
Branch
The Branch field might already contain a default value.
-
-
Complete the following optional field:
-
Start Date
You must enter a start date if you plan to attach routing instructions or a parts list.
-
-
To assign parts from a standard parts list, complete the following field:
-
Stnd Parts/Inst (Standard Parts or Instructions)
-
-
Complete the following optional address book fields:
-
Manager
-
Customer
-
Assigned to
-
-
Complete the following optional work order date fields:
-
Planned Comp (Completion Date)
-
Completed Date
-
Requested Date
-
-
To prevent the entry of transactions to the work order, complete the following field:
-
Subledger Inactive
-
-
To enter additional information for the work order, complete any of the remaining fields.
| Field | Explanation |
|---|---|
| Branch | A code that represents a high-level business unit. It can be used to reference a branch or plant that might have departments or jobs, which represent lower-level business units (data item MCU), subordinate to it. For example:
Business unit security is based on the higher-level business unit. Form-specific information This field identifies the Branch/Plant that keeps the parts inventory. |
| Start Date | This is a start date that you can enter, or an automatic start date which the planning system calculates using a backscheduling routine. The routine starts with the required date and offsets the total lead time to calculate the appropriate start date.
Will default from system date or you can enter a date. Form-specific information You must enter a start date if you attach a parts list or routing to the work order. |
| W.O. Date | The date the work order was entered into the system. |
| Requested | The date that an item is to arrive or that an action is to be complete. |
| Subldgr Inac | A code that indicates whether a specific subledger is active or inactive. Any value other than blank indicates that a subledger is inactive. Examples are jobs that are closed, employees that have been terminated, or assets that have been disposed. If a subledger becomes active again, set this field back to blank.
To use subledger information in the tables for reports but prevent transactions from posting to the master record, enter a value other than blank in this field. |
20.2.1 What You Should Know About
| Topic | Discussion |
|---|---|
| Equipment under warranty | When you create a work order for a piece of equipment that is under warranty, a warning message appears to alert you that a warranty is in effect. You indicate that a piece of equipment is under warranty by creating PM service types for the warranty.
See Chapter 14, "Creating PM Schedules for Each Piece of Equipment"for more information about creating PM service types for equipment under warranty. |
| Deleting a work order | You can delete any work order unless it has any of the following characteristics:
|
| Model work orders | A model work order is defined by the presence of an X in the first position of the second line of description for the user defined code for Work Order Type (system 00, type TY).
You can specify that the system exclude model work orders from Backlog Management searches. See Chapter 15, "Creating a Model Work Order" for more information on using model work orders. See Chapter 36, "Setting Up User Defined Codes"for more information about work order types. |
| Parts lists and routings for model work orders | When you choose Parts List from a model work order, the system accesses the Standard Parts List screen. When you choose Routings, the system accesses the Standard Instructions screen. |
| Work Order entry and the charge to BU field | If an equipment number is entered on the work order and the Charge to BU is left blank, the system will default the Charge to BU from the Equipment Master Responsible BU field. |
20.3 Assigning Estimated Costs to a Work Order
From Equipment/Plant Management (G13), choose Equipment Work Orders
From Equipment Work Orders (G1316), choose Work Order Entry
After you create a work order, you can use Work Order Cost Summary to assign estimated costs to the work order. You can use estimated costs to provide responsible individuals with budgeting information regarding the work order. In addition, depending on how you set up work order approvals, the estimated costs that you assign to a work order determine its approval routing. You can assign the following information on Work Order Cost Summary:
-
Estimated hours
-
Duration (the total time that is required to complete the work order)
-
Estimated labor cost
-
Estimated material cost
-
Estimated costs not related to labor or material, such as subcontractor costs
Depending on how you have set up equipment constants, you can also enter actual costs for the work order.
To assign estimated costs to work order
On Work Order Entry
-
To locate a work order, complete the following field:
-
Work Order Number
-
-
Choose Work Order Cost Summary.
Figure 20-2 Work Order Cost Summary screen

Description of "Figure 20-2 Work Order Cost Summary screen"
-
On Work Order Cost Summary, complete any of the following fields:
-
Estimated Hours
-
Estimated Duration
-
Estimated Labor Cost
-
Estimated Material Cost
-
Estimated Other Cost
Depending on how you set up equipment constants, you might not be able to enter values in the actual cost fields.
-
-
To assign actual work order costs, complete any of the following fields:
-
Actual Labor Cost
-
Actual Material Cost
-
Actual Other Cost
Depending on how you set up equipment constants, you might not be able to enter values in the actual cost fields.
-
-
Complete the following optional fields:
-
Actual Hours
-
Actual Duration
-
-
To calculate the total estimated and actual costs and the difference between them, choose Update with Redisplay.
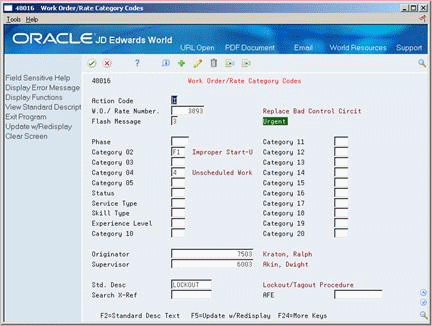
20.4 Assigning Category Codes to a Work Order
From Equipment/Plant Management (G13), choose Equipment Work Orders
From Equipment Work Orders (G1316), choose Work Order Entry
You can assign up to twenty category codes to a work order. Use category codes to further identify and organize work orders that have similar characteristics. This is especially useful to analyze and report on work order information from a variety of perspectives, such as shop, division, type of work, and so on. You can also analyze work order costs according to category codes. JD Edwards World provides several predefined category codes. You can use these or customize your own category codes. You define all values for each category code.
You can also categorize a work order by originator, supervisor, and standard description. In addition, you can specify a search cross-reference that the system uses to search for work orders. For example, if you enter an equipment number on the work order, the system enters the parent equipment number in the Search Cross Reference field.
20.4.1 What You Should Know About
| Topic | Discussion |
|---|---|
| Category code 1 | Category code 1 is a four-character category code that appears on all work order reports and most screens that are associated with work orders. |
| Work order codes | The system includes up to 20 category codes that you can define. |
To assign category codes to a work order
On Work Order Entry
-
To locate a work order, complete the following field:
-
Work Order Number
-
-
Choose Category Codes.
Figure 20-3 Work Order/Rate Category Codes screen
Description of "Figure 20-3 Work Order/Rate Category Codes screen"
-
On Work Order/Rate Category Codes, complete any of the category code fields that you want to apply to the work order.
-
Complete the following optional address book fields:
-
Originator
-
Supervisor
-
-
To assign a standard description from the Generic Rates and Messages table to the work order, complete the following optional field:
-
Standard Description
-
-
Complete the following additional optional fields:
-
Work Order Flash Message
-
Search Cross Reference
-
Authorization for Expenditure
Depending on how you set processing options for Work Order Entry, the Search Cross Reference field might contain a default value.
-
| Field | Explanation |
|---|---|
| Std. Desc | A user defined code (system 48, type SN) that is assigned to a standard note, message, or general narrative explanation. You can use this code to add instructional information to a work order. You set up codes for this field on Standard Description.
Form-specific information For Equipment/Plant Maintenance users: You can use this code to assign narrative text for a standard procedure. The information appears on the Item PM schedule and the work order routing. |
| W.O. Flash Message | A user defined code (system 00, type WM) that indicates a change in the status of a work order. The system indicates a changed work order with an asterisk (*) in the appropriate report or inquiry screen field. The flash message is highlighted in the Description field of the work order.
Form-specific information The flash message appears as a highlighted message on Backlog Management, replacing the work order description. |
| Search X-Ref | An alphanumeric value used as a cross-reference or secondary reference number. Typically, this is the customer number, supplier number, or job number. |
| AFE | A number that provides additional information about an object, such as an asset or a work order. You can enter information in this field to track an item that is Authorized for Expenditure. |
20.4.2 What You Should Know About
20.5 Adding Text to a Work Order
From Equipment/Plant Management (G13), choose Equipment Work Orders
From Equipment Work Orders (G1316), choose Work Order Entry
You can add additional text to further describe details about a work order by using record types assigned to work orders. For example, you might want to include an extended description of the maintenance task in record type A, special instructions in record type B, parts and tools needed in record type C, and so on.
Depending on the type of information that you need to include, you can enter text in two formats. You define the format for each record type when you set up work orders. The formats are:
-
Description only
-
Description with three columns
You can also copy descriptive information from another work order.
On Work Order Entry

-
To locate a work order, complete the following field:
-
Work Order Number
-
-
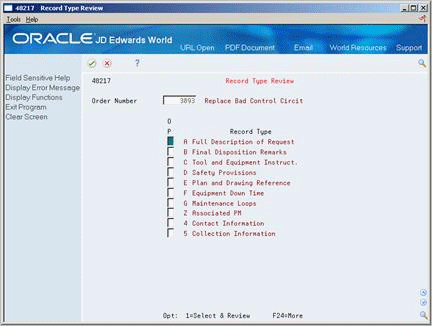
Choose the Record Types function.
-
On Record Type Review, choose Select and Review for each record type to add text.
Figure 20-6 W. O. Detail Entry screen (Full Description of Request)
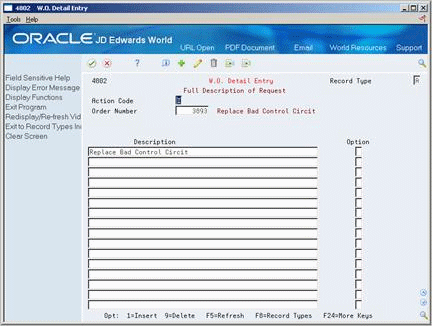
Description of "Figure 20-6 W. O. Detail Entry screen (Full Description of Request)"
-
On Work Order Detail Entry, enter the appropriate information for the current record type.
-
Repeat steps 3 and 4 for each record type you want to add to the work order.
20.6 Working with Work Order Supplemental Information
You can add additional user defined information to a work order. Use supplemental information to assist in tracking and reporting on work orders. For example, you might set up a supplemental data type associated with safety procedures and enter specific safety procedures for each work order.
After you have entered supplemental data, you can review the information using the following formats:
| Format | Description |
|---|---|
| By data type | You can review a list of additional work order information based on a particular supplemental data type. For example, assume that you have set up a supplemental data type for budget estimates. You can review a list of all work orders for which you have assigned the supplemental data type for budget estimates. |
| By work order | You can review a list of the additional information by supplemental data type that you assigned to individual work orders. |
Adding supplemental data to work orders consists of the following tasks:
-
Entering supplemental information to a work order
-
Reviewing supplemental data by type
-
Reviewing supplemental data by work order
20.6.1 Entering Supplemental Information to a Work Order
From Work Order/Service Billing Processing (G48), choose Work Order Processing
From Work Order Processing (G4811), choose Supplemental Data
From Work Order Supplemental Data (G4813), choose Data Entry
Enter supplemental information to a work order when you need to record informati006Fn that is not included on the work order header or in work order record types. You can use supplemental information to assist in tracking and reporting on work orders.
After you enter supplemental information to a work order, you can review the information by selecting a data type and reviewing all work orders that contain that data, or by reviewing all of the supplemental data for a specific work order.
See Also:
To enter supplemental information to a work order
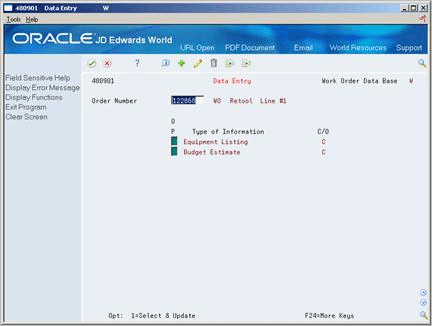
-
Complete the following field:
-
Order Number
-
-
For each type of information that you want to enter, choose Select and Update.
Figure 20-8 Work Orders screen (Equipment Listing)
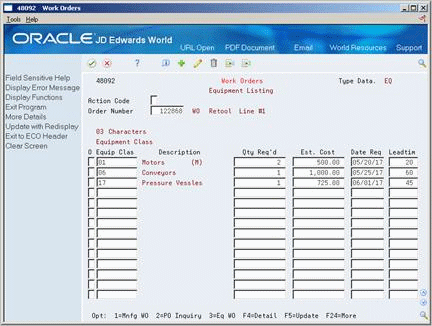
Description of "Figure 20-8 Work Orders screen (Equipment Listing)"
-
Choose Detail.
Figure 20-9 Work Orders screen, Equipment Listing (Detail area)
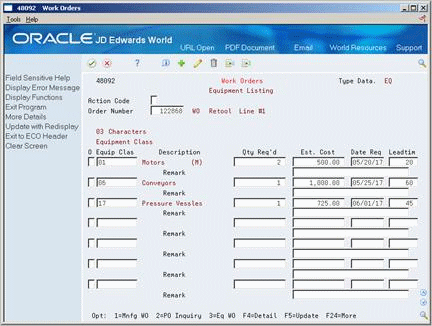
Description of "Figure 20-9 Work Orders screen, Equipment Listing (Detail area)"
-
Complete the appropriate fields.
-
Choose Update with Redisplay.
20.6.2 Reviewing Supplemental Data by Type
From Work Order/Service Billing Processing (G48), choose Work Order Processing
From Work Order Processing (G4811), choose Supplemental Data
From Work Order Supplemental Data (G4813), choose Inquiry by Data Type
You can review a list of additional work order information based on a particular supplemental data type. For example, assume that you have set up a supplemental data type for budget estimates. You can review a list of all work orders for which you have assigned the supplemental data type for budget estimates.
To review supplemental data by type
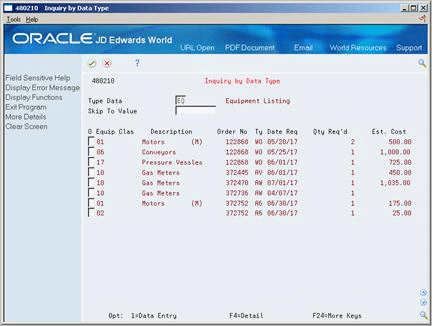
-
Complete the following field:
-
Type Data
-
-
To view additional information, choose Detail.
Figure 20-11 Inquiry by Data Type screen (Detail area)
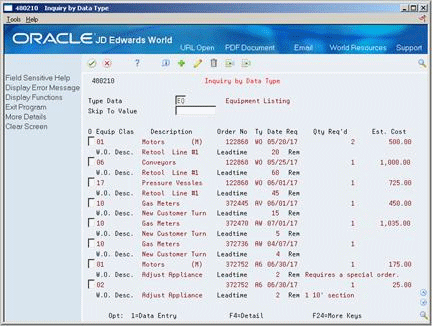
Description of "Figure 20-11 Inquiry by Data Type screen (Detail area)"
20.6.3 Reviewing Supplemental Data by Work Order
From Work Order/Service Billing Processing (G48), choose Work Order Processing
From Work Order Processing (G4811), choose Supplemental Data
From Work Order Supplemental Data (G4813), choose Inquiry by Order
You can review a list of the additional information by supplemental data type that you assigned to individual work orders. This is particularly useful if you need to see at a glance all of the supplemental information you entered for a specific work order.
When you enter a work order number on Inquiry by Order, basic work order information appears, in addition to its supplemental data. For example, you can review the following information about the work order:
-
Type
-
Priority
-
Status
-
Work order dates, such as the start date and the completed date
To review supplemental data by work order
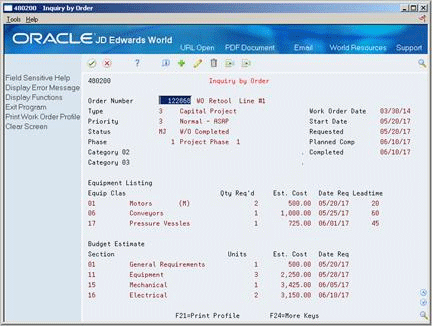
Complete the following field:
-
Order Number
20.7 Assigning Parts to a Work Order
You can assign parts to a work order to satisfy parts requirements for maintenance tasks. Depending on how you set up your system, you can indicate how and when the system commits inventory to satisfy a work order's parts requirements. For example, you can direct the system to commit inventory to a work order only at a particular work order status.
You can assign parts from a standard parts list that you enter when you create the work order. In addition, you can assign inventory parts that do not appear on a standard parts list, such as when you are creating a work order for an unanticipated emergency repair. You can also assign parts for which you do not maintain an inventory master, such as special order parts for which you rarely have a need. All parts inventory information applicable to a work order appears on Work Order Parts List.
Assigning parts to a work order consists of the following tasks:
-
Assigning parts from a standard parts list
-
Working with selected parts from inventory
-
Assigning parts without an inventory master
20.7.1 Before You Begin
-
Verify that you have purchased and installed the following systems. You must have installed these systems to be able to use Work Order Parts List:
-
· System 30: Product Data Management
-
· System 31: Shop Floor Control
-
· System 40: Inventory Base and Order Processing
-
· System 41: Inventory Management
-
· System 43: Procurement
-
-
Review processing options for the Section 27.2, "Reviewing Work Order Parts Lists". See Section 38.7, "Setting Up Standard Parts Lists and Work Order Instructions"
-
Verify that standard parts lists have been set up. See Section 38.7.4, "Setting Up a Standard Parts List".
See Also:
-
Appendix A, "Inventory Concepts and Setup" for more information about inventory terms and concepts
-
Section 38.7.4, "Setting Up a Standard Parts List"for more information about how the system commits inventory
20.7.2 Assigning Parts from a Standard Parts List
From Equipment/Plant Management (G13), choose Equipment Work Orders
From Equipment Work Orders (G1316), choose Work Order Entry
You can assign parts to a work order from a standard parts list. This is especially useful when you create work orders for routine maintenance tasks that require identical parts.
When you assign parts from a standard parts list to a work order, you can use a processing option to specify whether the system automatically chooses the add option for all of the parts from the standard parts list, or leaves the option field blank, allowing you to include only certain parts. This is especially useful if the standard parts list is lengthy and you only need to select a few parts.
20.7.3 Before You Begin
-
Verify that the following fields on Work Order Entry have been completed:
-
· Standard Parts or Instructions
-
· Start Date
-
-
Install the following systems in order to access Work Order Parts List:
-
· System 30: Product Data Management
-
· System 31: Shop Floor Control
-
· System 40: Inventory Base and Order Processing
-
· System 41: Inventory Management
-
· System 43: Procurement
-
To assign parts from a standard parts list
On Work Order Entry
-
To locate a work order, complete the following field:
-
Work Order Number
-
-
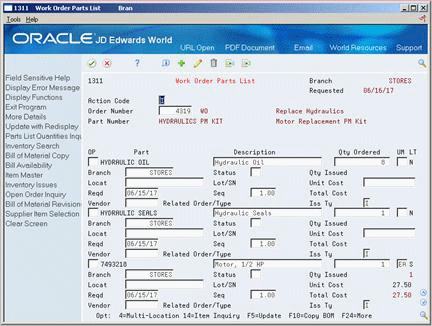
Choose Parts List.
Figure 20-13 Work Order Parts List screen
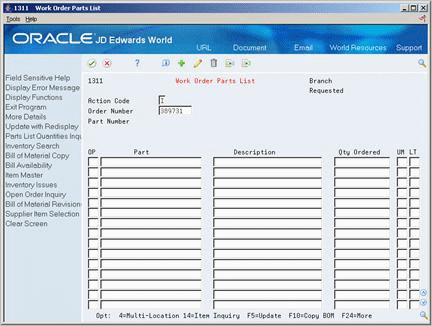
Description of "Figure 20-13 Work Order Parts List screen"
-
On Work Order Parts List, choose Copy BOM.
Figure 20-14 Work Order Parts List screen (showing Copy from BOM fields)
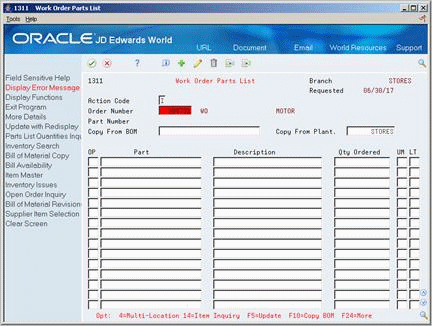
Description of "Figure 20-14 Work Order Parts List screen (showing Copy from BOM fields)"
-
Review the following fields:
-
Copy From Bill of Material
-
Copy From Plant
The system assigns default values to these fields based on values from the work order.
-
-
Accept the default values or revise them if needed.
-
Choose Bill of Material Copy.
The system completes the Work Order Parts List screen with values from the standard parts list.
Figure 20-15 Work Order Parts List screen
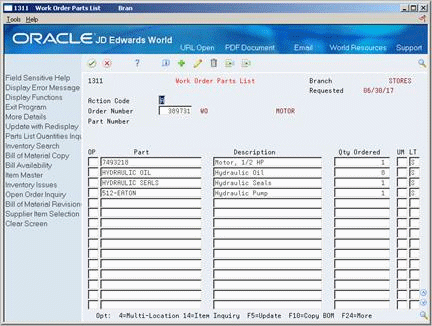
Description of "Figure 20-15 Work Order Parts List screen"
-
On Work Order Parts List, choose Add Part for BOM Copy for each part you want to include on the parts list for the work order.
Depending on how you set up processing options, this option might already have been preloaded for each part from the standard parts list. If so, you can clear the option for each part that you do not want to include on the Work Order Parts List.
-
To complete the process, choose the Update with Redisplay.
| Field | Explanation |
|---|---|
| Copy From BOM | The item number entered which can be in any of the three formats (short, long, or 3rd item number).
Form-specific information This item number is the Standard Parts List number used to create the work order parts list. |
| Copy From Plant | The destination business unit that you want to copy accounts to.
Form-specific information The branch/plant that you want to copy Standard Parts List information from. |
| LT | A code that controls how the system processes lines on a transaction. It controls the systems with which the transaction interfaces (General Ledger, Job Cost, Accounts Payable, Accounts Receivable, and Inventory Management). It also specifies the conditions under which a line prints on reports and is included in calculations. Codes include:
S – Stock item J – Job cost N – Non-stock item F – Freight T – Text information M – Miscellaneous charges and credits W – Work order |
20.7.5 Working with Selected Parts from Inventory
From Equipment/Plant Management (G13), choose Equipment Work Orders
From Equipment Work Orders (G1316), choose Work Order Entry
You can assign parts that do not appear on a standard parts list, such as when you are creating a work order for an unanticipated emergency repair. If you need a part that is not currently available at your location, you can search for other locations that stock the part and assign them to the work order parts list.
When a part is unavailable, you can specify a substitute part. In addition, you can add explanatory text to any part that you include on a work order parts list.
Working with selected parts from inventory includes:
-
Assigning selected parts from inventory
-
Adding non-stock parts to a parts list
-
Revising the location for a part
-
Choosing a substitute part
-
Adding explanatory text to a part
20.7.6 Before You Begin
-
Set up substitute parts through the Inventory Cross Reference program. See Setting Up Item Cross-References in the JD Edwards World Inventory Management Guide for more information about assigning inventory cross-references.
To assign selected parts from inventory
On Work Order Entry
-
To locate a work order, complete the following field:
-
Work Order Number
-
-
Choose Parts Lst.
-
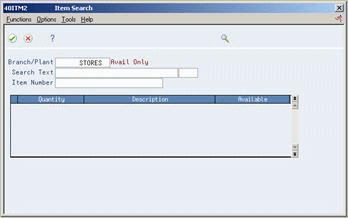
On Work Order Parts List, access the field help on the following field:
-
Part
-
-
On Item Search, search for specific parts by entering descriptive text in the following field:
-
Search Text
-
-
Complete the following field next to each part that you want to add to the work order parts list:
-
Quantity
-
-
Choose Exit.
The system returns to the Work Order Parts List with your selection.
-
On Work Order Parts List, choose More Details.
Figure 20-18 Work Order Parts List screen
Description of "Figure 20-18 Work Order Parts List screen"
-
Complete the following optional field:
-
Vendor
-
To add non-stock parts to a parts list
On Work Order Entry
-
To locate a work order, complete the following field:
-
Work Order Number
-
-
Choose Parts List.
-
On Work Order Parts List, complete the following fields:
-
Part Number
-
Description
-
Quantity
-
Line Type
-
20.7.7 What You Should Know About
| Topic | Discussion |
|---|---|
| Line types | Line types distinguish the various methods of recording stock and non-stock inventory.
See Appendix A, "Inventory Concepts and Setup"for more information about line types. |
To revise the location for a part
On Work Order Entry
-
To locate a work order, complete the following field:
-
Work Order Number
-
-
Choose Parts List.
-
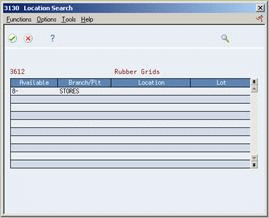
On Work Order Parts List, choose Location Search for each part you want to revise the location.
-
On Location Search, choose Return Value for the alternate location.
The system replaces the original location information with the new information.
20.7.8 What You Should Know About
On Work Order Entry
-
To locate a work order, complete the following field:
-
Work Order Number
-
-
Choose Parts List.
-
On Work Order Parts List, choose Item Substitutes for each part to substitute.
Figure 20-20 Component Part Substitutions screen
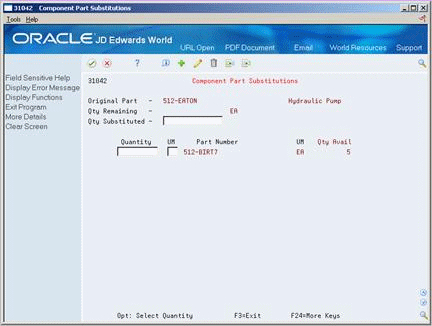
Description of "Figure 20-20 Component Part Substitutions screen"
-
On Component Part Substitutions, complete the following field for each part substitute:
-
Quantity
-
20.7.9 What You Should Know About
| Topic | Discussion |
|---|---|
| Substitute part availability | In order for a substitute part to appear on Component Part Substitution, the substitute part must have a quantity on hand in the inventory system.
See Appendix A, "Inventory Concepts and Setup"for more information about quantity on hand. |
To add explanatory text to a part
On Work Order Entry
-
To locate a work order, complete the following field:
-
Work Order Number
-
-
Choose Parts List.
-
On Work Order Parts List, choose Additional Part Text for each item to add text.
Figure 20-21 Additional Part Information screen
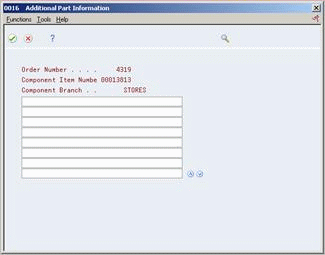
Description of "Figure 20-21 Additional Part Information screen"
-
On Additional Part Information, enter the explanatory text.
When you enter explanatory text for a part, the system highlights the part on the work order parts list.
20.7.10 Assigning Parts without an Inventory Master
From Equipment/Plant Management (G13), choose Equipment Work Orders
From Equipment Work Orders (G1316), choose Work Order Entry
You can assign parts for which you do not maintain an inventory master to a work order. This is especially useful to add parts for which you rarely have a need, such as special order parts, to a work order.
To assign parts without an inventory master
On Work Order Entry
-
To locate a work order, complete the following field:
-
Work Order Number
-
-
Choose Parts List.
-
On Work Order Parts List, complete the following fields:
-
Part
-
Description
-
Quantity
-
LT (Line Type)
-
-
Complete the following optional field:
-
Unit of Measure
-
-
Choose More Details.
-
Complete the following optional fields:
-
Vendor
-
Unit Cost
-
20.8 Assigning Labor Routing to a Work Order
From Equipment/Plant Management (G13), choose Equipment Work Orders
From Equipment Work Orders (G1316), choose Work Order Entry
You can specify which work center is responsible for each maintenance task on a work order. You can specify the sequence of operations for each task, as well as the labor rates and the number of hours necessary to complete each task.
You can assign labor routing instructions to a work order using the following methods:
-
Copy labor routing information from standard instructions
-
Manually assign labor routing instructions
When you know in advance the labor requirements for a particular task, you can set up standard routing instructions for the task. You can copy from the instructions when you need to assign labor routings for similar tasks.
You can manually assign labor routing instructions for any maintenance task for which you have not set up standard routing instructions.
20.8.1 Before You Begin
-
Verify that you have purchased and installed the following systems. You must have installed these systems to be able to use Equipment Work Order Routings:
-
· System 30: Product Data Management
-
· System 31: Shop Floor Control
-
· System 40: Inventory Base and Order Processing
-
· System 41: Inventory Management
-
· System 43: Procurement
-
-
Review processing options for the Equipment Work Order Routings program. See Section 38.7.1, "Revising Processing Options for Parts Lists and Labor Routings"
-
Verify that the following fields on Work Order Entry are complete:
-
· Standard Parts or Instructions
-
· Start Date
-
To copy labor routing information from standard instructions
On Work Order Entry
-
To locate a work order, complete the following field:
-
Work Order Number
-
-
Choose Routing Instructions.
Figure 20-22 Equipment W. O. Routings screen
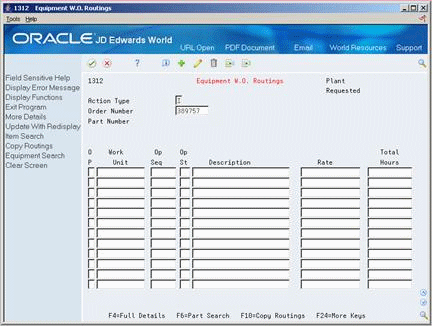
Description of "Figure 20-22 Equipment W. O. Routings screen"
-
On Equipment Work Order Routings, choose Copy Routings.
Figure 20-23 Equipment W. O. Routings screen (showing Copy from Routings fields)
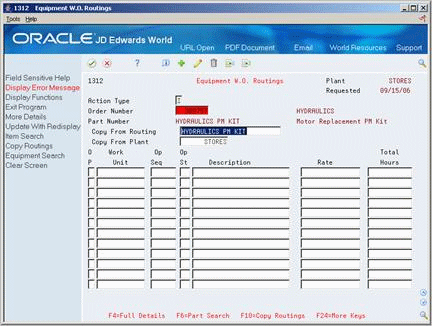
Description of "Figure 20-23 Equipment W. O. Routings screen (showing Copy from Routings fields)"
-
Review the following fields and revise them if needed:
-
Copy From Routings
-
Copy From Plant
-
-
Choose Copy Routings.
The system completes the Equipment Work Order Routings screen with values from the standard instructions.
Figure 20-24 Equipment Work Order Routings screen (showing completed fields)
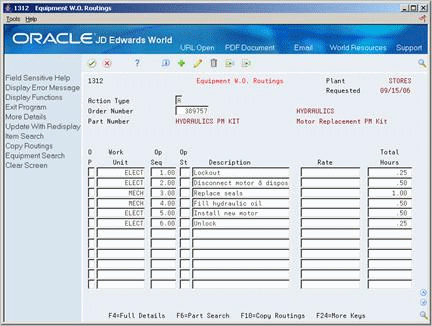
Description of "Figure 20-24 Equipment Work Order Routings screen (showing completed fields)"
-
On Standard Instructions, revise any information that does not apply to the current work order.
-
To complete the process, choose Update with Redisplay.
To manually assign labor routing instructions
On Work Order Entry
-
To locate a work order, complete the following field:
-
Work Order Number
-
-
Choose Routing Instructions.
-
On Equipment Work Order Routings, complete the following fields for each labor routing that you want to establish:
-
Work Unit
-
Operation Sequence
-
Description
-
Total Hours
-
-
Complete the following optional fields:
-
Operation Status
-
Rate
-
-
Choose More Details.
Figure 20-25 Equipment W. O. Routings screen (Details area)
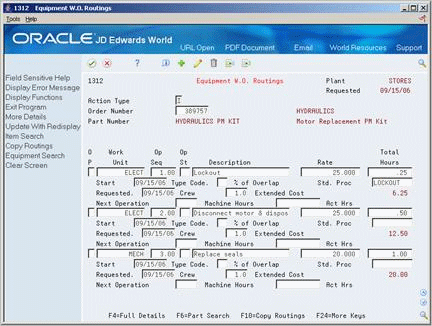
Description of "Figure 20-25 Equipment W. O. Routings screen (Details area)"
-
Complete the following optional fields:
-
Start Date
-
Requested Date
-
Standard Procedures
These fields might contain default values.
-
-
Complete the following optional fields:
-
Percent of Overlap
-
Crew Size
-
| Field | Explanation |
|---|---|
| Op St | A user defined code (31/OS) that identifies the current status of a work order or engineering change order as the operation steps in the routing are completed. |
| Rate | This is the rate used to estimate the labor cost of a routing step. The system derives this rate from frozen standard rates. |
| Std. Proc | A user defined code (system 48, type SN) that is assigned to a standard note, message, or general narrative explanation. You can use this code to add instructional information to a work order. You set up codes for this field on Standard Description. |
| Work Unit | An alphanumeric field that identifies a separate entity within a business for which you want to track costs. For example, a business unit might be a warehouse location, job, project, work center, or branch/plant.
You can assign a business unit to a voucher, invoice, fixed asset, and so on, for purposes of responsibility reporting. For example, the system provides reports of open accounts payable and accounts receivable by business units to track equipment by responsible department. Security for this field can prevent you from locating business units for which you have no authority. Note: The system uses this value for Journal Entries if you do not enter a value in the AAI table. Form-specific information Use this field to identify the craft or resource (business unit) that will perform the maintenance task. |
| Op Seq | In routings, this number is used to sequence the fabrication or assembly steps in the manufacture of an item. You can track costs and charge time by operation.
In bills of material, this number designates the routing step in the fabrication or assembly process that requires a specified component part. You define the operation sequence after you create the routing for the item. The Shop Floor Control system uses this field in the backflush/preflush by operation process. In engineering change orders, this number is used to sequence the assembly steps for the engineering change. Skip To fields allow you to enter an operation sequence that you want to begin the display of information. You can use decimals to add steps between existing steps. For example, use 12.5 to add a step between steps 12 and 13. Form-specific information You can use this field to sequence the maintenance tasks to perform in the maintenance of an item. |
| Requested | The date that an item is to arrive or that an action is to be complete.
Form-specific information The system enters a default value based on the work order start date. |
| Start | This is a start date that you can enter, or an automatic start date which the planning system calculates using a backscheduling routine. The routine starts with the required date and offsets the total lead time to calculate the appropriate start date.
This system enters a default date from system date or you can enter a date. Form-specific information This is the date the system schedules the work order activity to begin. The system enters a default value based on the work order start date. |
| % of Overlap | The overlapping of successive operations. The actual overlap percentage entered for the operation sequence is the percent by which that operation overlaps the prior operation. For example, if you enter 80%, this indicates that work can begin on the overlapped operation when 20% of the prior operation is completed.
Overlapping has no effect on move and queue calculations. The percent entered must be less than or equal to 100%. Note: Enter percents as whole numbers: 5% as 5.00 |
| Crew | The number of people who work in the specified work center or routing operation.
The system multiplies the Run Labor value in the Routing Master table (F3003) by crew size during costing to generate total labor dollars. If the Prime Load Code is L or B, the system uses the total labor hours for backscheduling. If the Prime Load Code is C or M, the system uses the total machine hours for backscheduling without modification by crew size. Form-specific information If you leave this field blank, the system enters a value based on the Work Center Master table (F30006) for the work unit. |
20.8.2 What You Should Know About
20.9 Copying a Work Order
From Equipment/Plant Management (G13), choose Equipment Work Orders
From Equipment Work Orders (G1316), choose Work Order Entry
When you have an existing work order with information that is applicable to other work orders, you can copy it using Copy Work Order. For example, you might need to perform maintenance on a machine that is similar to the maintenance you performed on another machine. Instead of creating a new work order, you can copy the work order for the previous maintenance. When you copy an existing work order, the system assigns a unique number to the new work order. Otherwise, the following information remains unchanged:
-
All information from the Work Order Entry screen
-
Parts instructions
-
Labor routing instructions
-
Record types
You can also use a parent work order as the basis for creating a work order. The system uses the information stored in the master for the parent work order to automatically enter the basic work order information, category codes, and record type information into the new work order. Use this method when you need to group work orders that share common information you use for reporting and cost accounting.
You can use the following methods to copy a work order:
-
Copy a work order using an existing work order
-
Create a work order based on a parent work order
To copy a work order using an existing work order
On Work Order Entry
-
Complete the following field to locate a work order:
-
Work Order Number
-
-
Choose Copy Work Order.
A new work order displays, identical to the one that you copied, but with a unique work order number. The system copies parts, routing instructions, and record types from the original work order to the new work order.
To create a work order based on a parent work order
On Work Order Entry
-
Complete the following fields:
-
Parent Work Order Number
-
Description
-
Branch
-
Equipment Number
-
-
Complete all of the fields that must contain unique information rather than the default information that the system provides from the parent work order.
-
Complete the following optional field:
-
Completed Date
-
-
To create the new work order, choose Update with Redisplay.
After you have created the new work order, assign estimated costs to the work order, if necessary. You can then assign any additional category codes and record type information to that added by the system from the parent work order.
20.10 Creating a Work Order for Unscheduled Maintenance
From Equipment/Plant Management (G13), choose Equipment Work Orders
From Equipment Work Orders (G1316), choose Backlog Management
When you have set up maintenance tasks to come due on an as-needed basis rather than a scheduled interval, you can notify the system when you want to create a work order to perform the tasks. For example, you might want to wash a piece of equipment only when it is in the shop for other maintenance.
Note:
When you create a work order for unscheduled maintenance, the system runs the XJDE001 version of the PM Update program. The default values for this version ensure that the system updates the maintenance status and PM schedule for only the equipment for which the unscheduled maintenance task applies. JD Edwards World recommends that you do not change the processing options for this version.20.10.1 Before You Begin
-
Set up a PM service type for each unscheduled maintenance task and verify that the service type has no schedule date or service interval. See Chapter 15, "Creating a PM Schedule"for more information about setting up service types.
To create a work order for unscheduled maintenance
-
Complete the following field to locate a piece of equipment:
-
Equipment Number
-
-
Choose Unscheduled Maintenance.
The Unscheduled Maintenance window appears, showing all unscheduled maintenance procedures that are set up for the equipment.
Figure 20-27 Unscheduled Maintenance screen
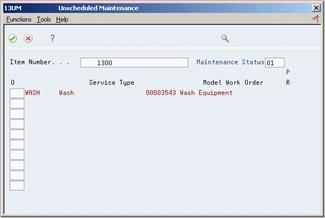
Description of "Figure 20-27 Unscheduled Maintenance screen"
-
Choose Create Work Order.
The system updates the PM schedule to indicate the maintenance as 100 percent due and generates the corresponding work order.
20.10.2 What You Should Know About
| Topic | Discussion |
|---|---|
| Accessing the Unscheduled Maintenance window | You can access the Unscheduled Maintenance window from Equipment Backlog or Backlog Management. |
See Also:
-
Chapter 23, "Locating Work Orders"or the processing options for this program