Chapter 101: Retail Store Overview

Purpose: A retail store in a warehouse in CWDirect that represents an actual store where consumers can purchase merchandise. Once you set up the retail store in Creating and Maintaining Warehouses (WWHS), you can:
• create store promotions for the retail store. A store promotion is a sale for specific items in selected stores. During the promotion, you can define a sale price for the items in the promotion and increase the amount of inventory you keep in the store for the duration of the promotion.
• create retail store restock orders as a means to transfer stock to selected stores, generate pick slips for the restock orders, and process the transfer of inventory from your main warehouse to the stores.
• download items, customer address changes, A/R bill to accounts, purchase order, and inventory recount requests to the retail store.
• upload sold to customer addresses, purchase order receipts, and store add-on requests from retail stores into CWDirect.
In this chapter:
• Understanding Store Promotions
• Minimum and Maximum Override Dates
• Step 1: Which Stores are Eligible for Restock?
• Step 2: Which Items in Each Store Need More Inventory?
• Step 3: Creating a Store Restock Order
• Step 4: Confirming Shipment of a Store Restock Order
• Creating Store Restock Orders in Order Entry
• Downloading CWDirect Information to a Retail Store
• Uploading Retail Store Information to CWDirect
• Understanding Store Promotions
• Setting up Store Restock Information
• Setting up Store Restock Information
• Retail Store Related System Control Values11
Understanding Store Promotions
About store promotions: A store promotion is a sale for specific items in selected stores. You can set up two types of store promotions:
• Discount promotion. A discount promotion is a promotion you define for specific items that are on sale for a discounted price. For example, you can create a “back to school” promotion for school supplies in your store. Each school supply item is sold at a reduced price for the length of the promotion. You can also increase the amount of inventory you keep in the store for each item in the promotion.
• Minimum/maximum promotion. A minimum/maximum promotion is a promotion you define for specific items that are not sold at a reduced price. Instead, you wish to change the amount of inventory you keep in the store for each item. For example, you can create a “summer specials” promotion for summer items in your store. Each summer item, such as flip flops or fans, is sold at regular price, but you expect an increase in sales because the items will be more in demand.
See Chapter 106: Working with Store Promotions (WSPR).
Store promotion type: In order to define whether a store promotion is a discount promotion or a minimum/maximum promotion, you must set the Minimum/maximum only field for the store promotion type correctly.
• If the Minimum/maximum only field for the store promotion type is set to Y, the system identifies the promotion as a minimum/maximum promotion. When this field is set to Y, the system does not allow you to define a price for an item or set up an item as free of charge for the promotion.
• If the Minimum/maximum only field for the store promotion type is set to N or blank, the system identifies the promotion as a discount promotion. When this field is set to N, the system requires you to define a price for an item or set up the item as free of charge for the promotion.
See Chapter 105: Working with Store Promotion Types (WSPT) for more information on setting up store promotion types.
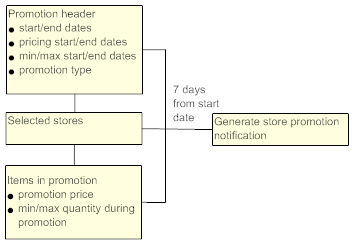
Store promotion start/end dates: When you set up a store promotion, you must define the date the store promotion begins and the date the store promotion ends.The system uses the start date and end date to determine when the store should begin preparing for the sale and when the store should begin preparing for the next sale, or reduce the inventory to its normal inventory and/or price.
Minimum and Maximum Override Dates
The system uses the start date and end date to determine when the amount of stock in the store should be changed for the store promotion and when the amount of stock should be reduced to its normal amount.
Minimum/maximum lead days: The system uses the Store Promotion Minimum/Maximum Lead Days (G18) system control value to determine the minimum/maximum override start date. The system subtracts the number defined in this system control value from the promotion start date to determine the minimum/maximum override start date.
Example: |
promotion start date = 6/6 minimum/maximum lead days = 4 6/6 - 4 = 6/2 (6/2 is the minimum/maximum start date; this is the date the store changes the minimum quantity and maximum quantity in the store for the specified items so that the items are available for the promotion). |
Minimum/maximum end days: The system uses the Store Promotion Minimum/Maximum End Days (G19) system control value to determine the minimum/maximum override end date. The system subtracts the number defined in this system control value from the promotion end date to determine the minimum/maximum override end date.
Example: |
promotion end date = 6/12 minimum/maximum end days = 4 6/12 - 4 = 6/8 (6/8 is the minimum/maximum end date; this is the date the store changes the minimum quantity and maximum quantity in the store for the specified items back to the items regular inventory amount so that the store is not overstocked). |
When the current date falls between the minimum/maximum override start date and the minimum/maximum override end date, the system looks at the minimum quantity and the maximum quantity defined for the rank associated with the store, to determine how much inventory the store needs to restock the store for the promotion.
The system uses the start date and end date to determine the pricing start date and the pricing end date.
The store uses the pricing start date to determine when the prices of items in the promotion should be changed to the promotion price and uses the pricing end date to determine when the prices of items in the promotion should be changed back to the normal store price.
Pricing lead days: The system uses the Store Promotion Pricing Lead Days (G16) system control value to determine the pricing start date. The system subtracts the number defined in this system control value from the promotion start date to determine the pricing start date.
Example: |
promotion start date = 6/6 pricing lead days = 2 6/6 - 2 = 6/4 (6/4 is the pricing start date; this is the date the store changes the item's price so that the items are sold at the promotion price). |
Pricing end days: The system uses the Store Promotion Pricing End Days (G17) system control value to determine the pricing end date. The system subtracts the number defined in this system control value from the promotion end date to determine the pricing end date.
Example: |
promotion end date = 6/12 pricing end days = 2 6/12 - 2 = 6/10 (6/10 is the pricing end date; this is the date the store changed the item's price back to its regular price). |
Store promotion items: For each item in the store promotion, you can define:
• a promotion price if the Minimum/maximum only field for the store promotion type is set to N. The system uses the promotion price to override the item's regular store price during the store promotion. The system uses the pricing start date to determine when the item should be priced at the promotion price and uses the pricing end date to determine when the item should be changed back to its regular store price.
• a minimum quantity and maximum quantity for each store rank. The system uses the minimum and maximum quantities to override the item's regular minimum and maximum quantities if the date when you perform the store restock falls between the minimum/maximum override start date and the minimum/maximum override end date defined for the store promotion.
Store promotion notifications: Once the current date is 7 days from the start date of a promotion, you can generate a Store Promotion Notification.
The store promotion notification lists the promotions assigned to each store and the items that are in the promotion. The store can use the notification to prepare for the store promotion.
Retail store promotion:
About retail store restock: Store restock orders are a means for you to pick inventory from your main warehouse for shipment to retail stores in order to replenish their stock.
You can use Working with Retail Store Restock (WRSR) to generate retail store restock orders. You can also enter restock orders in order entry.
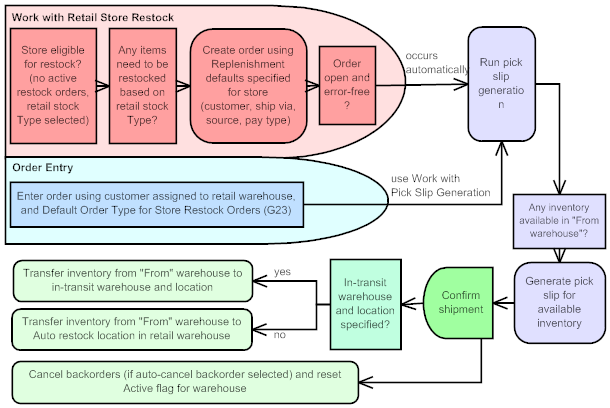
Generating store restock orders automatically: As part of generating restock orders through Working with Retail Store Restock (WRSR), the system determines the items and quantities to include for each selected retail store by checking whether:
• the quantity available in the retail store is less than the maximum quantity required. The system uses the item warehouse information you have set up for the warehouse that represents the retail store to determine the maximum quantity for the item in the retail store.
• the item is in an active promotion for the retail store, and the maximum quantity of the item in the promotion is greater than the current quantity available in the store. You can set up a promotion for a retail store in Working with Store Promotions (WSPR).
In order to create retail store restock orders, you associate a Customer Sold To record with the warehouse representing the retail store. The Working with Retail Store Restock (WRSR) menu option uses this customer when creating the store restock orders.
Generating pick slips for retail store restock orders: The Working with Retail Store Restock (WRSR) menu option not only creates the retail store restock orders, it then generates the pick slips that you use to pick the inventory from your main warehouse and prepare it for shipment to the retail stores. If you enter retail store restock orders in order entry, you need to generate pick slips in a separate step.
Pick slips are generated in the From whse specified for the retail store, which is normally your main picking warehouse.
Confirming shipment of retail store restock orders: When you confirm shipment of a retail store restock order, the system normally processes a transfer inventory transaction rather than an issue transaction, as it does when you ship an order to a customer. You can also configure your retail stores so that backordered items cancel automatically at the time you confirm shipment.
Retail store restock:
The steps the system takes when generating store restock orders through the Working with Retail Store Restock (WRSR) menu option are described below.
Step 1: Which Stores are Eligible for Restock?
The system determines if the stores selected for store restock are eligible for restock. In order for a store to be eligible for restock:
• the Active restock field for the store must be set to N. This field indicates whether an open store restock order already exists for the store. You cannot submit another restock for the store until the existing restock order is completed (shipped or canceled).
• the Restock customer field for the store must specify a customer that also has the warehouse code identifying the retail store specified in the Warehouse field.
Step 2: Which Items in Each Store Need More Inventory?
The system uses the value in the Restock type field for the store to determine which items in the store are in need of restock. You can set the Restock type field to the following values:
• F (full restock to highest maximum quantity), the system restocks items whose on-hand quantity is less than or equal to the highest minimum defined. See Full Restock.
• A (out of stock items only), the system restocks items whose on-hand quantity equals zero if the store's item maximum is greater than zero. See Out of Stock Restock.
• L (loose pick), the system restocks items flagged with the Location Class for Loose Pick Store Restock (G22), and uses the “out-of-stock-items-only” restock logic to restock the item. For any items that are not flagged with a location class, the system uses the full restock logic to determine how to restock the item. See Loose Pick Restock.
Add-on request: For each type of restock, you can also include any items from a store add-on request. For example, a store might require an additional quantity if an item was previously out of stock and the store has issued several rain checks. See Working with Add on Request Items (WSAI) for more information.
Items excluded from restock: Regardless of the setting of the Restock type field, the system excludes items from restock if:
• the Excl store restk (Exclude from retail store restock) field for the item/SKU is set to Y. The system includes item/SKUs that have this field set to Y in a store add-on request, but the item is canceled immediately.
• the item’s Status matches the Default Item Status for Exclusion on Store Restock Orders (G24).
When the Restock type field for the store is set to F (full restock to highest maximum quantity), the system restocks items whose on-hand quantity is less than or equal to the minimum:
Example: |
Item |
Minimum quantity |
Maximum quantity |
On-hand quantity |
|
A123 |
12 |
36 |
16 |
|
B456 |
24 |
40 |
6 |
|
C789 |
8 |
16 |
8 |
When you perform a restock for the store, the system:
• does not include item A123, because the on-hand quantity is above the minimum.
• includes item B456, because the on-hand quantity is less than the minimum, and uses a quantity of 34 so that the item is restocked to its maximum.
• includes item C789, because the on-hand quantity equals the minimum, and uses a quantity of 8 so that the item is restocked to its maximum.
When the Restock type field for the store is set to A (out of stock items only), the system restocks items whose on-hand quantity is zero or less if the store's item maximum is greater than zero:
Example: |
Item |
Minimum quantity |
Maximum quantity |
On-hand quantity |
|
A123 |
12 |
36 |
16 |
|
B456 |
24 |
40 |
0 |
|
C789 |
8 |
16 |
-8 |
When you perform a restock for the store, the system:
• does not include A123, because the on-hand quantity is more than zero.
• includes item B456, because the on-hand quantity is zero, and uses a quantity of 40 since that is the maximum.
• includes item C789, because the on-hand quantity is less than zero (that is, it is backordered in the retail store), and uses a quantity of 16 since that is the maximum. Note: The system does not consider the backorder quantity when calculating the restock quantity.
When the Restock type field for the store is set to L (loose pick), the system restocks items flagged with the Location Class for Loose Pick Store Restock (G22), using A (out of stock only) criteria.
If an item has not been assigned to a location class, the system restocks the item using the F (full restock type) criteria.
Example: |
Location class for loose pick store restock = LP |
||||
|
Item |
Location class |
Minimum quantity |
Maximum quantity |
On-hand quantity |
|
A123 |
LP |
12 |
36 |
16 |
|
B456 |
LP |
24 |
40 |
0 |
|
C789 |
HL |
8 |
16 |
0 |
|
D123 |
|
4 |
8 |
1 |
When you perform a restock for these items, the system:
• does not include item A123, because the on-hand quantity is greater than zero.
• includes item B456, because the on-hand quantity is zero and the item’s class matches the Location Class for Loose Pick Store Restock (G22). The quantity is 40, since this is the maximum.
• does not include item C789, because the location class for the item does not match the Location Class for Loose Pick Store Restock (G22).
• includes item D123, because the on-hand quantity is less than the minimum and the item is not assigned to a location class. The quantity is 7, so that the item will be restocked to the maximum.
Calculating the Store Restock Replenishment Quantity
Determining the highest min/max for the store restock replenishment quantity: You can define minimum and maximum quantities for an item in the item warehouse, or any active store promotions for the store’s rank. When restocking an item, the system uses the highest minimum and maximum quantities it finds.
Note: The system can combine the minimum and maximum quantities from different sources. For example, it might use the highest minimum quantity from the item warehouse, and the highest maximum quantity from an active promotion.
Pieces Per Case?
The setting of the Exclude Pieces Per Case for Retail Store Restock (K82) system control value controls whether the system considers the pieces per case specified for an item in the retail replenishment calculation used to determine how much inventory to move to the retail store.
• If set to Y, the system does not consider the pieces per case specified for an item when determining the restock quantity. The system uses the restock quantity from the above calculation as the restock order quantity. Example: If the pieces/case is 20 and the calculated restock quantity is 45, the system creates a restock quantity of 45.
• If set to N, the system considers the pieces per case specified for an item when determining the restock quantity:
• If a pieces/case metric has not been specified for the item, the system uses the restock quantity from the above calculation as the restock order quantity. Example: If the pieces/case is 20 and the calculated restock quantity is 45, the system creates a restock quantity of 45.
• If a pieces/case metric has been specified for the item, then the restock quantity is the multiple of the pieces/case metric that is closest to the calculated restock quantity. Example: If the pieces/case is 20 and the calculated restock quantity is 45, the system creates a restock quantity of 40 (20 * 2). If the pieces/case is 20 and the calculated restock quantity is 55, the system creates a restock quantity of 60 (20 *3). You specify the pieces/case through Performing Initial Item Entry (MITM). Note: If the calculated restock quantity is less than the pieces/case for the item, the system restocks the item only if the restock quantity is greater than half of the pieces/case. Example: If the pieces/case is 20 and the calculated restock quantity is 11, the system creates a restock quantity of 20. If the pieces/case is 20 and the calculated restock quantity is 10 or less, the system does not restock the item.
Note: Regardless of the setting of the Exclude Pieces Per Case for Retail Store Restock (K82) system control value, the system does not consider the pieces/case for an item on a store add-on request.
Include In-Transit Quantity?
The setting of the Include In-Transit Location On Hand for Retail Replenishment (J89) system control value determines whether the system includes the quantity in the in-transit warehouse/location for the retail store in the retail replenishment calculation used to determine how much inventory to move to the retail store. You may wish to include the store in-transit on hand quantity in the retail replenishment calculation to ensure that the retail store is not over-replenished.
• If set to Y, the system includes the in-transit quantity in the retail replenishment calculation. Example: If the calculated retail replenishment quantity is 45, but 20 units are already in-transit to the retail store, the system will create the retail replenishment for 25 units so that the item in the store is not over-replenished; when the total units are received into the store, the store will have 45 units on-hand (20 in-transit + 25 in retail replenishment = 45).
• If set to N, the system does not include the in-transit quantity in the retail replenishment calculation. Example: If the calculated retail replenishment quantity is 45, but 20 units are already in-transit to the retail store, the system will create the retail replenishment for 45 units; when the total units are received into the store, the store will have 65 units on-hand (20 in-transit + 45 in retail replenishment = 65).
If an in-transit warehouse/location is not defined: If an in-transit warehouse/location is not defined for the retail store warehouse, the system does not evaluate the Include In-Transit Location On Hand for Retail Replenishment (J89) system control value; once a pick slip is confirmed for a retail stock order, the system transfers the inventory to the auto restock location for the retail store warehouse.
In-transit warehouse/location setup: In order to include the quantity in the in-transit warehouse/location in the retail replenishment calculation, you must:
• Set up the in-transit warehouse/location as a separate warehouse from the retail store warehouse (the In-trans whs (In-transit warehouse) field defined for the retail store warehouse at the Create must contain a warehouse code that is different from the retail store warehouse code).
• define a separate in-transit location for each retail store so that the location can be used to distinguish the on hand quantity for each retail store.
Note: If the in-transit warehouse is the same warehouse code as the retail store warehouse, the system always includes the in-transit quantity as part of the overall retail warehouse on hand inventory, regardless of the setting of the Include In-Transit Location On Hand for Retail Replenishment (J89) system control value. You must configure CWDirect to have a location in the retail store where the system records received inventory and another in-transit location within the same warehouse. If there are not two distinct locations, you will not be able to differentiate in-transit versus not in-transit inventory.
The table below explains how the system determines the quantity to replenish, based on the setting of the Include In-Transit Location On Hand for Retail Replenishment (J89) system control value and how the in-transit location is set up.
SCV J89 |
In-Transit Location Setup |
Results |
Y |
The system uses a single in-transit warehouse for all retail stores, but uses a separate in-transit location in the warehouse for each retail store |
The system includes the in-transit quantity in the retail replenishment calculation. See Example: Include In-Transit Quantity, Separate In-Transit Location per Store for an example. |
Y |
The system uses a separate in-transit warehouse and location for each retail store |
|
Y |
The system uses a single in-transit warehouse and location for all retail stores |
The system includes the in-transit quantity in the retail replenishment calculation. However, because you are using only one in-transit location to distribute inventory to multiple retail stores, the system cannot determine which quantity in the in-transit location is supposed to move to each store and instead considers the full quantity in the in-transit location as being in-transit to each store. If the total quantity in the in-transit location is greater than the minimum required for the retail store, the system does not generate a store replenishment for the store. See Example: Include In-Transit Quantity, Single In-Transit Location for All Stores for an example. |
N |
The system uses a single in-transit warehouse for all retail stores, but uses a separate in-transit location in the warehouse for each retail store |
The system does not include the in-transit quantity in the retail replenishment calculation. See Example: Exclude In-Transit Quantity for an example. |
N |
The system uses a separate in-transit warehouse and location for each retail store |
|
N |
The system uses a single in-transit warehouse and location for all retail stores |
|
N |
The system uses a special in-transit location in the retail store warehouse itself to represent the quantity that is in-transit to the store |
Regardless of the setting of the Include In-Transit Location On Hand for Retail Replenishment (J89) system control value, the system includes the quantity in the in-transit location in the retail replenishment calculation. See Example: In-Transit Location within Store for an example. |
Y |
Step 3: Creating a Store Restock Order
The system creates a store restock order for each store that has items in need of restock as described above. The Maximum Number of Lines to Include on Store Restock Order (I51) system control value identifies the number of order detail lines the system can include on a store restock order before creating a new order.
Store add-on request items: The system adds any store add-on request items to the end of the order. For each store add-on request item, the system creates an order line message indicating the item is a store add-on, using a print code of I so that the message prints on the shipping confirmation.
Store add-on request items that have the Exclude store restock field set to Y are added to the order, but the order detail line is canceled automatically using the Default Cancel Reason Code for Store Restock Orders (G21).
Order edits: Once the system creates the restock order, it edits the orders for correct data.
• If there are errors on the restock order, the system generates the Print Phone Errors Report and assigns the restock order to the next available order batch number. You can correct the errors in batch order entry.
• If there are no errors and the order is not placed on hold, the system generates a pick slip for the order using the pick slip generation selection option selected when you used Working with Retail Store Restock (WRSR).
See Setting up Store Restock Information for a description of the information that the system requires in order to generate store restock orders.
Troubleshooting:
• If using the Working with Retail Store Restock (WRSR) menu option does not produce a store restock order, confirm that the restock Type is not blank for the retail store, and that the Active flag is set to N. If the Type is blank or the Active flag is set to Y, the system does not generate store restock orders. To reset the Active flag, you need to confirm shipment of or cancel any open orders for the Customer # assigned to the retail store. See the Create Store Screen for a discussion of these fields.
• If the system generates a store restock order but does not generate a pick slip, it might be because the order was put on hold. Use the Release Held Orders Screen (Working with Releases) to release the order from hold, and then use Working with Pick Slip Generation (WPSG) to generate pick slips, making sure to select an option that has the Store restock orders flag set to Y.
Step 4: Confirming Shipment of a Store Restock Order
Billing updates: When you confirm shipment of the restock order, the billing async job performs the following updates:
• the Quantity sold, Dollars sold, Quantity no duplicate, and Dollars no duplicate fields in the Store Promotion Item file are increased.
• if the Automatic cancel backorder field for the sold-to customer on the restock order is set to Y, the Automatic cancel backorder field on the order was to Y when the order was created. As a result, any backorder quantity on an order detail line is canceled and the system uses the Default Cancel Reason Code for Store Restock Orders (G21) to cancel the order detail line.
Performing an inventory transfer: When you confirm shipment of a retail store restock order, the system processes a transfer inventory transaction. This transfer moves the inventory from your main picking warehouse (the From whse specified for the retail store) as follows:
• If there is an In-transit warehouse and In-transit location specified for the retail store, the inventory is transferred there when you confirm shipment. Using an in-transit warehouse and location enables you to track the status of inventory that is in shipment and has not yet arrived at the retail store. You will need to perform a transfer at a later date from the in-transit warehouse and location to the warehouse that represents your retail store and its Auto restock location. When the store receives the shipment, you can perform the transfer either through a menu option such as Working with Inventory Transactions in Batch Mode (WITB) or through the Generic Inventory Transaction Upload.
• If there is no In-transit warehouse and In-transit location specified for the retail store, the inventory is transferred directly to the warehouse that represents the retail store and its Auto restock location when you confirm shipment.
The updates that take place when you confirm shipment are the same regardless of whether you generated the retail store restock orders through the Working with Retail Store Restock (WRSR) menu option or in order entry.
Also, once the restock order has been billed and has been closed or canceled, the system sets the Active field for the store to N so that the store is eligible for another restock order.
Troubleshooting:
• If an item stock allocation error occurs for any item on the retail store restock order, the system does not automatically cancel the order, and as a result does not reset the Active flag for the retail store warehouse to N. Until the Active flag for the retail store warehouse is set to N, you cannot use Working with Retail Store Restock (WRSR) to generate retail store restock orders for the retail store. To correct, use order maintenance to cancel the item on the order that caused the item stock allocation error. See the Item Stock Allocation Error Report for a list of conditions that can cause an item stock allocation error.
• If there is not either a Auto restock location or In-transit warehouse and In-transit location specified for the retail warehouse at the time you confirm shipment, the system does not process an item transfer; instead, it processes an issue transaction (I) as it would for a standard order shipment.
Reports generated: During the store restock process through Working with Retail Store Restock (WRSR), the system generates the following reports:
• Print Phone Errors Report: lists any errors on the store restock orders
• Store Selection Exception - Store Restock Generation Report: lists any stores that are not eligible for store restock
• Store Restock Generation - Restock Summary Report: lists the stores that were eligible for store restock
• Store Add-on Request Backorder Report: lists store add-on request items that are completely backordered
• Order Batch Listing Report: this report is generated if the restock orders did not contain any errors; if the order contained errors, you must first correct them
• Pick Generation - Store Restock Orders Backorder Analysis Detail Report: generated during pick slip generation; lists any items on the restock order that are completely backordered
• Store Restock Pick Generation - Restock Analysis Summary Report: lists the number of items and units ordered for the retail store, how many of the items and units printed, and how many are on backorder.
Store restock confirmations: Once you have confirmed the store restock order, you can generate a Store Restock Confirmation, which you can mail or fax to your retail store. The store restock shipping confirmation lists each store, the restock order number associated with the store, and the items that have been shipped to the store.
Anticipated retail store restock: When you generate an anticipated store restock, the system determines which stores are in need of restock, which items in each store need more inventory, and how much inventory is needed; it then produces two reports that allow you to “look ahead” to determine when you need to perform an actual store restock.
The two reports the anticipated store restock generates are:
• Store Selection Exception Report - Anticipated Store Restock
• Anticipated Store Restock Generation - Restock Summary
Creating Store Restock Orders in Order Entry
In addition to using the Working with Retail Store Restock (WRSR) menu option, you can enter store restock orders in order entry. The system identifies the order as a store restock order if:
• the order type matches Default Order Type for Store Restock Orders (G23) system control value
• the customer sold-to has a Warehouse specified at the Second Create Customer Sold To Screen that matches a retail store
In this situation, the system sets the Store restock order flag on the order header to Y.
Generating pick slips: To generate pick slips for store restock orders you enter in order entry, use the Working with Pick Slip Generation (WPSG) menu option, making sure to select an option that has the Store restock orders flag set to Y.
Confirming shipment: When you confirm shipment of a store restock order entered in order entry, the system performs the same updates as described above under Step 4: Confirming Shipment of a Store Restock Order.
Downloading CWDirect Information to a Retail Store
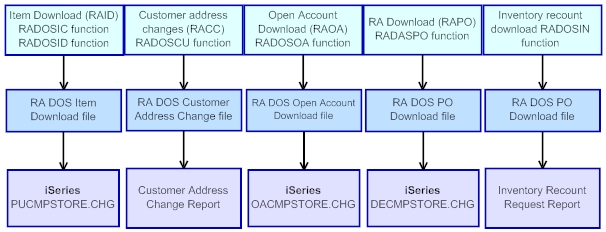
Information you can download: For interface from CWDirect to a retail store system, such as RA DOS, you can submit a program to download:
• item information for new items, items that have changed, and items that have been deleted in Submit RA DOS Item Download or by running the RADOSIC and RADOSID periodic functions.
• customer sold to address changes in Submit RA DOS Customer Address Changes or by running the RADOSCU periodic function.
• A/R bill to credit information in Submit RA DOS Open Account Download or by running the RADOSOA periodic function.
• purchase order and vendor information in Submit RA DOS PO Download or by running the RADOSPO periodic function.
• inventory count requests in RA DOS Inventory Recount Requests or by running the RADOSIN periodic function.
The download process: When you download information to a retail store, the system:
• submits a batch job that determines what information is eligible for download.
• sends the information that is eligible for download to an RA DOS Download file.
• then:
• sends the information in the RA DOS Download file to a file on the AS/400, or
• creates a report that you can fax or mail to the retail store.
How information is downloaded to a retail store system such as RA DOS:
See Chapter 111: Working with the RA DOS Download Interface for more information on how to download information from CWDirect to a retail store system.
Uploading Retail Store Information to CWDirect
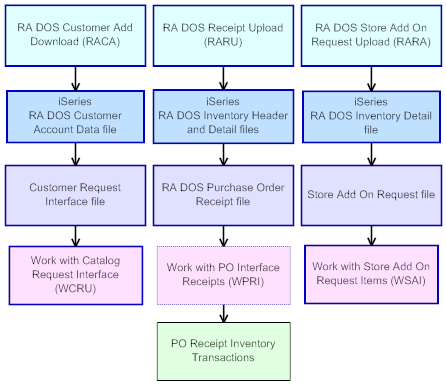
Information you can upload: For interface from a retail store system, such as RA DOS, to CWDirect, you can upload:
• new or changed sold to customer addresses in RA DOS Customer Address Upload or by running the RADOSCA periodic function.
• purchase order receipts in RA DOS Receipt Upload or by running the RADOSRU periodic function.
• store add-on requests in RA DOS Store Add-on Request Upload or by running the RADOSAD periodic function.
The upload process: When you upload information from a retail store to CWDirect, the system:
• submits a batch job that determines what information is eligible for upload.
• uploads the eligible information from a file on the AS/400 to a CWDirect file.
You can then edit the information that has been uploaded in a menu option.
How information is uploaded to CWDirect from a retail store system, such as RA DOS:
See Chapter 112: Working with the RA DOS Upload Interface for more information on how to upload information to CWDirect from a retail store system, such as RA DOS.
Advancing to the store screen: In order to set up a warehouse to represent a retail store, you must:
• set the Use Retail Store File (G15) system control value to Y. This system control value controls whether you advance to the Store screen, where you can set up and maintain retail store information for the warehouse.
• enter Y in the Retail outlet field for the warehouse. The Retail outlet field indicates the warehouse represents a retail store.
If you do not have both of these values set to Y, you do not advance to the Store screen.
When you set up retail store information for a warehouse, you can define information for the store, such as:
• store information
• restock information
• sales information
• item warehouse information
Store information: You can define store information for the store, such as:
• the region and district where the store is located
• when the store opened, relocated, and closed
• the phone number, speed dial number, and modem number for the store
• whether the store is active (that is, the store is open for business), or inactive (that is, the store is new and not yet open for business)
Most of these fields are informational only; in other words, they do not control functionality in the system.
Setting up Store Restock Information
If you are going to be using store restock orders to transfer inventory from your main warehouse to the store location, you need to complete the following setup in addition to the Retail Store Related System Control Values:
Information |
Menu Option |
Used How? |
Field at Change Store screen |
customer who represents the retail store location |
The system assigns this customer to orders generated through the Working with Retail Store Restock (WRSR) menu option. Also, if you enter an order for this customer and use the Default Order Type for Store Restock Orders (G23), the system flags the order as a retail store restock order, processing a transfer when you confirm shipment of the order rather than a regular order shipment. If the Auto can B/O (Automatically cancel backorders) field for the restock customer is set to Y, the system sets the Cancel backorder field on the order to Y. |
Customer # |
|
order type to identify store restock orders |
Specify this order type in the Default Order Type for Store Restock Orders (G23) system control value to have the system use this order type when you use the Working with Retail Store Restock (WRSR), and identify a store restock order when you use this order type in order entry |
N/A |
|
ship via to assign to store restock orders |
The system assigns this ship via to orders generated through the Working with Retail Store Restock (WRSR) menu option. |
Ship via |
|
source code to use on store restock orders |
The system assigns this source code to orders generated through the Working with Retail Store Restock (WRSR) menu option. Typically, you create a separate source code for these orders, using a different pricing method than on source codes you use for customer orders. |
Source |
|
pay type |
The system assigns this pay type to orders generated through the Working with Retail Store Restock (WRSR) menu option. Typically, you create a new cash pay type that has a very high Order $ limit in order to prevent retail store restock orders from going on hold, and to create separate postings to the General Ledger Interface file. |
Pay type |
|
restock location in retail store |
The location in the retail store where the system transfers the stock after you confirm shipment of the retail store restock order. You define this location at the Create Warehouse Screen or the Change Warehouse screen. See also the In-trans whs (In-transit warehouse) and In-trans loc (In-transit location), described below. |
N/A |
Additional Replenishment Options at the Change Store Screen
In addition to the information listed in the above table, use the Change Store screen to indicate:
• From whse (Restock from warehouse): The main warehouse where the retail store restock orders should be reserved.
• Type (Restock type): Indicates the logic that the system should use in determining when an item needs to be restocked in the retail store. You must select a Type in order to have the Working with Retail Store Restock (WRSR) generate store restock orders for the retail store. See Understanding Store Restock for a discussion.
• In-trans whs (In-transit warehouse) and In-trans loc (In-transit location): Optionally, you can specify an in-transit warehouse and location to have the system process a transfer to this warehouse and location when you confirm shipment of a store restock order. Using the in-transit warehouse and location allows you to better identify inventory that you have shipped from your main warehouse, but which has not yet arrived at the retail store. See In-Transit Warehouse/Location Setup Options for examples of how you can set up your in-transit warehouse and location.
The remaining fields in the Replenishment area of the screen are informational only.
In-Transit Warehouse/Location Setup Options
The following options are available when defining your in-transit warehouse/location.
• Single In-Transit Warehouse, Separate In-Transit Location for Each Store
• Separate In-Transit Warehouse and Location for Each Store
• Single In-Transit Warehouse and Location for All Retail Stores
• In-Transit Location within Each Retail Store
Typically, you use a non-allocatable warehouse as the in-transit warehouse; also, the warehouse should not be viewable in order entry, and it should not be set up to receive restock transfers. See the Create Warehouse Screen for related fields.
Include in-transit quantity in retail replenishment calculation? If you wish to include the in-transit quantity in the retail replenishment calculation, you must:
• Enter Y in the Include In-Transit Location On Hand for Retail Replenishment (J89) system control value.
• Set up the in-transit warehouse/location as a separate warehouse from the retail store warehouse (the In-trans whs (In-transit warehouse) field defined for the retail store warehouse at the Create Store Screen must contain a warehouse code that is different from the retail store warehouse code).
• Define a separate in-transit location for each retail store so that the location can be used to distinguish the on hand quantity for each retail store.
Note: If the in-transit warehouse is the same warehouse code as the retail store warehouse, the system always includes the in-transit quantity as part of the overall retail warehouse on hand inventory, regardless of the setting of the Include In-Transit Location On Hand for Retail Replenishment (J89) system control value. You must configure CWDirect to have a location in the retail store where the system records received inventory and another in-transit location within the same warehouse. If there are not two distinct locations, you will not be able to differentiate in-transit versus not in-transit inventory.
Single In-Transit Warehouse, Separate In-Transit Location for Each Store
Create a single in-transit warehouse to use for all retail stores, but a separate in-transit location in this warehouse to use for each retail store.
Example:
Warehouse 100 - In-Transit Warehouse |
|
location B010101 |
In-transit location used to replenish the Boston Retail Store (warehouse 123). |
location C010101 |
In-transit location used to replenish the Nashua Retail Store (warehouse 203). |
Separate In-Transit Warehouse and Location for Each Store
Create a separate in-transit warehouse and location to use for each retail store.
Warehouse 100 - Boston In-Transit Warehouse |
|
location B010101 |
In-transit location used to replenish the Boston Retail Store (warehouse 123). |
Warehouse 200 - Nashua In-Transit Warehouse |
|
location C010101 |
In-transit location used to replenish the Nashua Retail Store (warehouse 203). |
Single In-Transit Warehouse and Location for All Retail Stores
Create a single in-transit warehouse and location to use for all retail stores.
Warehouse 100 - In-Transit Warehouse |
|
location MAIN |
In-transit location used to replenish all retail stores (warehouse 123 and warehouse 203). |
In-Transit Location within Each Retail Store
Create a special in-transit location in the retail store warehouse itself, so you can use the same warehouse code to track in-transit inventory en route to this store.
Warehouse 123 - Boston Retail Store |
|
location INTRANS |
In-transit location within the Boston Retail Store warehouse used to replenish the Boston Retail Store. |
Warehouse 203 - Nashua Retail Store |
|
location INTRANS |
In-transit location within the Nashua Retail Store warehouse used to replenish the Nashua Retail Store. |
Setting up Item Warehouse Information for Retail Store Restock
You need to set up an item warehouse record for each item you need to restock in the retail store, including:
• a minimum quantity and maximum quantity for the item in the store
• an original retail price for the item in the store
• a current retail price for the item in the store
You can use the Work with Item Warehouse Screen or the Work with Item Warehouse Values screen to specify these values.
Sales Information
You can define sales information for the store, such as:
• the customer the system uses as the sold to and ship to customer when you upload retail orders from the RA DOS system if the RA DOS order does not contain a customer number.
• the ship via code the system uses when you upload retail orders from the RA DOS system
• the source code the system uses when you upload retail orders from the RA DOS system.
Related Secured Features
You can update item warehouse information for warehouses that represent retail stores in Creating and Maintaining Warehouses (WWHS) or Working with Item Warehouse Values (WIWV).
• In order to update the Original retail price, Current retail price or Protect price fields for an item warehouse, you must have access to the Maintain Item Warehouse Retail Price (A91) secured feature.
• In order to update the Minimum quantity, Maximum quantity, or Protect minimum and maximum quantity fields for an item warehouse, you must have access to the Maintain Item Warehouse Minimum/Maximum Quantity (A92) secured feature.
Retail Store Related System Control Values
System Control Value |
Description |
Indicates whether you advance to the Store screen when you are working with a warehouse that represents a retail store. |
|
Defines the number of days the system uses to calculate a pricing start date for a store promotion. |
|
Defines the number of days the system uses to calculate a pricing end date for a store promotion. |
|
Defines the number of days the system uses to calculate a minimum/maximum override start date for a store promotion. |
|
Defines the number of days the system uses to calculate a minimum/maximum override end date for a store promotion. |
|
This system control value is not currently implemented. |
|
Specifies the cancel reason code the system defaults to a restock order detail line that is automatically canceled during billing. |
|
Specifies the location class the system uses to determine the items that can be included in a loose pick store restock. |
|
Specifies the order type the system defaults to store restock orders. |
|
Default Item Status for Exclusion on Store Restock Orders (G24) |
Specifies the item status the system uses to determine if an item is excluded from store restock orders. |
Defines the program name the system uses to translate CWDirect item and SKU codes to another system's item and SKU codes. |
|
Maximum Number of Lines to Include on Store Restock Order (I51) |
Specifies the maximum number of order detail lines the system can include on a store restock order before creating a new order. When you perform a store restock, the system creates a separate order detail line for each item eligible for restock. |
Include In-Transit Location On Hand for Retail Replenishment (J89) |
Defines whether the system includes the quantity in the in-transit warehouse/location for the retail store in the retail replenishment calculation used to determine how much inventory to move to the retail store. You may wish to include the store in-transit on hand quantity in the retail replenishment calculation to ensure that the retail store is not over-replenished. |
Defines whether the system considers the pieces per case value for an item in the retail replenishment calculation used to determine how much inventory to move to the retail store. |
Related Menu Options
In order to define a region or rank for a store you must create valid region and rank codes. Additionally, you must create store promotion type codes to identify the type of store promotion you wish to run for a store. See:
• Working with Store Ranks (WSTR) on how to create and maintain codes that represent a store rank.
• Working with Store Regions (WSRG) on how to create and maintain codes that represent a region where a store is located.
• Working with Store Promotion Types (WSPT) on how to create and maintain codes that represent a type of store promotion.
| Part N: Retail Stores | Contents | SCVs | Search | Glossary | Reports | XML | Index | Chapter 102: Working with Store Ranks (WSTR) |

WH15_01 CWDirect 18.0 August 2015 OTN