Chapter 5: Working with Pick Slip Generation (WPSG)

Overview: Pick Slip Generation controls the warehouse work load by determining the volume and type of orders to be printed.
The Pick Slip Generation (1 of 2) Screen and the Pick Slip Generation (2 of 2) Screen are used to create and work with pick slip options; to select pick slip criteria such as warehouses, shippers, items, location classes, orders, customers, purchase orders, payment types and priorities; to display a flash report; and to generate pick slips and batch reservations, including batch reservation of zone reservation coded (weather-sensitive) items.
Pick slip options: Pick slip options define the criteria used when printing pick slips. For example, you can choose to print pick slips for a specified warehouse, shipper, item, location class, long SKU class, order, sold-to customer, purchase order, and payment type, as well as arrival date range, postal code range, UPS zone, geographic zone, or Parcel Post zone. In addition, you can combine picks for a customer, specify complete orders only or single line orders only, use zone skipping, include special handling items or limit the picks to special handling items only, indicate that you want the system to perform cubing, enter a backorder dollar limit, or override all orders to a specific ship via.
Wave picking options: Wave picking options define the criteria used when printing pick slips if you Use Wave Picking (J87). For example, you can specify a separate wave (pick batch) based on items that require special handling, items that are express shipped, international orders, and single or multiple line pick slips; see the Work with Wave Picking Options Screen.
Generating pick slips: The system uses the pick slip options, system control values, and the order information to create the pick slip. When you select the Generate Pick Slip option, the system submits a batch job (PICK_GEN) to generate the pick slips, checks the arrival date for each line on an order, and calculates when to print the pick slip. The system also generates the Pick Slip Generation Analysis Report, which lists each order evaluated for pick slip generation, providing information on whether the order was selected and, if not, the reason for exclusion.
Batch reservation: When you select the Batch Reservation option, the system reserves stock for orders by running the Batch Reservation Program before pick slips are printed. During Batch Reservation, the system determines which orders receive inventory, based on the order date, reservation priority, etc. See Performing Batch Reservation.
Batch reservation for zone reservation coded inventory: Batch reservation is also used to reserve and generate pick slips for zone reservation coded (weather sensitive) inventory such as plant stock. These items must be shipped at an optimal time for planting in the geographic zones to which they are going. See Reserving Items/Generating Pick Slips.
Gift acknowledgements? The pick slip generation job also generates gift acknowledgements for gift orders if the Automatic Generation of Gift Acknowledgement (B92) system control value is set to P and the customer is not eligible to receive a shipment confirmation email, as described under Shipment and Return Confirmation Emails.
Picks not included? If you run pick slip generation and the system does not include the picks you were expected, you can use Pick Print Eligibility (WPPE) to determine the reason why the picks for an order were not included.
The term Zone is used in three specific contexts in pick generation:
• UPS or Parcel Post Shipping zones: These shippers have divided the country into zones, which are used to determine shipping charges. You can select up to 8 zones for UPS or Parcel Post to generate pick slips for orders which will be shipped to the selected zones. UPS or Parcel Post zones are also used in zone skipping, an option which reduces freight charges when you ship a carton by one carrier to a central drop point, where another carrier picks it up and delivers it to its final destination. UPS and Parcel Post shipping zones are defined in and validated against the SCF Ship Via File. See Chapter 32: Working with SCF/Ship Via Values (WSHV).
• Geographic zones: Geographic zones are regions of the country which relate to weather conditions. Geographic zones are used in zone reservation processing to control shipping dates for weather-sensitive (zone reservation coded) inventory such as plant stock. You can select the geographic zones for which you want to print pick slips. Geographic zones are defined in and validated against the Geographic Zone File. See Chapter 53: Shipping Zone Reservation Overview.
• Warehouse zones: A warehouse zone is the major subdivision within a warehouse. Typically, a warehouse location is identified by zone, aisle, shelf and bin. For example, the location A010203 typically indicates Zone A, Aisle 01, Shelf 02 and Bin 03. Warehouse zone is the final criterion for sorting pick slips as they are printed. In addition, you can specify warehouse zones and/or a range of aisles for replenishing your pickable locations. See Warehousing Chapter 43: Creating and Maintaining Locations (WLOC).
In this chapter:
• Work with Pick Slip Generation Options Screen
• Pick Slip Generation (1 of 2) Screen
• Pick Slip Generation (2 of 2) Screen
• Select Warehouse for Pick Slip Screen
• Select Shipper for Pick Slip Screen
• Select Items for Pick Slip Screen
• Select Location Class for Pick Slip Screen
• Select Orders for Pick Slip Screen
• Select Customers for Pick Slip Screen
• Select Purchase Order for Pick Slip Screen
• Select Pay Type for Pick Slip Screen
• Select Source Code Categories for Pick Slip Screen
• Select Order Priorities for Pick Slip Screen
• Select Lines of Business for Pick Slip Screen
• Select Geographic Zones for Pick Slip Screen
• Select Long SKU Class for Pick Slip Screen
• Select Item Class for Pick Slip Screen
• Select State for Pick Slip Screen
• Special Shipper OVR by Day/Via/Zone Screen
• Work with Wave Picking Options Screen
• Change Wave Type Options Screen
Work with Pick Slip Generation Options Screen
Purpose: Use this screen to create, delete and work with selection criteria when printing pick slips; to generate pick slips; and to perform batch reservation.
How to display this screen: Enter WPSG in the Fast path field at the top of any menu, or select Work with Pick Slip Generation from a menu.
FLR0198 DISPLAY Work With Pick Slip Generation Options 3/19/08 11:44:35 KAB Co2
Opt Description
Type options, press Enter. 4=Delete 5=Work With Options 8=Work With Wave Options 9=Generate Picks 10=Batch reservation
BY SELECTED ORDER NUMBER FOR ALL STORE RESTOCK ORDERS WAVE PICKING ALL ORDERS
F3=Exit F6=Create F12=Cancel |
Field |
Description |
Description |
The description of a pick slip generation option. Alphanumeric, 50 positions; optional. |
Screen Option |
Procedure |
Create pick slip generation options |
Press F6 to advance to the Pick Slip Generation (1 of 2) Screen. |
Delete pick slip generation options |
Enter 4 next to a pick slip generation option to delete it. If you Use Wave Picking (J87), the system also deletes the wave picking options defined for the pick slip generation option. |
Work with pick slip options |
Enter 5 next to a pick slip generation option to advance to the Pick Slip Generation (1 of 2) Screen. |
Work with wave picking options |
Enter 8 next to a pick slip generation option to advance to the Work with Wave Picking Options Screen. Note: Use this option only if you Use Wave Picking (J87); see Using Wave Picking for an overview. |
Generate picks |
Enter 9 next to a pick slip generation option to generate picks for reserved stock. See Generating Pick Slips for Reserved Stock. |
Generate batch reservation |
Enter 10 next to a pick slip generation option to generate batch reservation. See Performing Batch Reservation. |
Pick Slip Generation (1 of 2) Screen
Purpose: Use this screen and the Pick Slip Generation (2 of 2) Screen to define or limit the pick slip criteria that are used to generate pick slips. You can select one, several, all or none of the fields.
When you enter Y at a field, the system displays a subsequent screen, which allows you to enter specific criteria. For example, valid warehouses, shippers or items must be specified when you enter Y in the Warehouse, Shipper, or Item fields during pick slip generation.
When you select N, the system uses all valid criteria for that field. For example, all valid warehouses, shippers or items will be considered during pick slip generation.
Pick slip generation analysis: When you generate pick slips, the system produces the Pick Slip Generation Analysis Report, which lists each order evaluated for pick slip generation, providing information on whether the order was selected and, if not, the reason for exclusion.
How to display this screen: At the Work with Pick Slip Generation Options Screen, press F6.
FLR0065 ENTER Pick Slip Generation (1 of 2) 4/15/11 12:56:12 EZK Mail Order
Description Max # of orders . . . . . . Max # of units . . . . . . .
Selected warehouses . . . . N (Y,N) Selected source categories . (Y,N) Selected shippers . . . . . N (Y,N) Selected priorities . . . . N (Y,N) Selected items . . . . . . . N (Y,N) Selected Lines of Business . N (Y,N) Selected location classes . N (Y,N) Selected geographic zones . N (Y,N) Selected orders . . . . . . (Y,N) Selected sold-to customers . (Y,N) Selected item class . . . . N (Y,N) Selected purchase orders . . N (Y,N) Selected states . . . . . . N (Y,N) Selected payment types . . . N (Y,N) Special shipper override . . Y (Y/N) Preauthorized Orders Only . N (Y/N) Arrival date range . . . . . to SCF code range . . . . . . . to Exclude SCF range . N (Y,N) Postal Code range . . . . . to Selected UPS zones . . . . . Selected P/P zones . . . . . More... F2=Dsp Flash Rpt F3=Exit F9=Accept F12=Cancel F20=Review |
Note: All selection ranges are inclusive unless otherwise noted.
Field |
Description |
Description |
A description of the pick slip selection. Alphanumeric, 50 positions; required. |
Max # of orders |
The maximum number of orders to pick. This value does not necessarily have to match the actual number of picks. 0 = No limit. Numeric, 5 positions; optional. |
Max # of units |
The maximum number of units to pick. The system will stop generating pick slips for orders once this number is reached. However, the actual number of units for which pick slips are generated may be higher than the maximum if the system starts generating pick slips for an order which will bring the number of units above the maximum. The system will not partially ship the order just to keep below the maximum threshold. 0 = No limit. Numeric, 9 positions; optional. |
This value allows you to select the warehouse(s) for pick slip generation. Y = The system displays the Select Warehouse for Pick Slip Screen. N or blank = The system prints pick slips for all valid warehouses. Alphanumeric, 1 position; optional. |
|
This value allows you to select the source code categories for pick slip generation. Y = The system displays the Select Source Code Categories for Pick Slip Screen. N or blank = The system prints pick slips for all valid source code categories. Alphanumeric, 1 position; optional. |
|
This value allows you to select the shipper(s) for pick slip generation. Y = The system displays the Select Shipper for Pick Slip Screen. N or blank = The system prints picks for all valid shippers. Alphanumeric, 1 position; optional. |
|
This value allows you to select one or more order priorities for pick slip generation. The Priority field displays on the Order Entry header screen. The value for this field defaults from the B/O Priority defined for the source code, but you can override it in Order Entry. If the Auto Update Order Priority (G45) system control value is set to Yselected, changing the Arrival date in order entry automatically updates the Priority to 9 (highest priority). Note: Priority can be used as a selection criterion for overriding shipping zone reservation restrictions if the Auto Update Order Priority (G45) is set to Y. Y = The system displays the Select Order Priorities for Pick Slip Screen. N or blank = The system prints pick slips for all priorities. Alphanumeric, 1 position; optional. |
|
This value allows you to enter the item(s) for pick slip generation. This option is useful when backordered items are received, via PO, into a staging area, so that you can fulfill these orders quickly. Y = The system displays the Select Items for Pick Slip Screen. N or blank = The system prints pick slips for all valid items. Alphanumeric, 1 position; optional. |
|
This value allows you to select one or more lines of business for pick slip generation. Y = The system displays the Select Lines of Business for Pick Slip Screen. N (default) = The system prints pick slips for all lines of business. Alphanumeric, 1 position; optional. |
|
This value allows you to select location classes for pick slip generation. Y = The system displays the Select Location Class for Pick Slip Screen. N or blank = The system prints pick slips for all valid location classes. Alphanumeric, 1 position; optional. |
|
This value allows you to select one or more geographic zones for pick slip generation. Geographic zones are used to restrict shipping of zone reservation coded (weather-sensitive) inventory. See Chapter 53: Shipping Zone Reservation Overview. Y = The system displays the Select Geographic Zones for Pick Slip Screen. N or blank = The system prints pick slips for all geographic zones. Alphanumeric, 1 position; optional. |
|
This value allows you to select up to 100 individual orders for pick slip generation. Y = The system displays the Select Orders for Pick Slip Screen. N or blank = The system prints pick slips for all valid orders. Alphanumeric, 1 position; optional. |
|
This field displays only if the Order Combination Pick Selection Type (G47) system control value is set to L/S CLASS. This value allows you to select one or more long SKU classes for pick slip generation. Orders which include items of a single long SKU class, or orders which include items from multiple long SKU classes may be selected. This selection criterion is useful in generating pick slips for zone reservation coded (weather-sensitive) items if you have set up long SKU classes to correspond to zone reservation codes. See Zone Reservation/Long SKU Class. Y = The system displays the Select Long SKU Class for Pick Slip Screen. N or blank = The system prints pick slips for orders regardless of the long SKU class of items. Alphanumeric, 1 position, optional. |
|
This value allows you to select individual sold-to customers for pick slip generation. Y = The system displays the Select Customers for Pick Slip Screen. N or blank = The system prints pick slips for all valid sold-to customers. Alphanumeric, 1 position; optional. |
|
This value allows you to select one or more item classes for pick slip generation. Y = The system displays the Select Item Class for Pick Slip Screen. N or blank = The system prints pick slips for all item classes. Item classes are defined in and validated against the Item Class file. Alphanumeric, 1 position; optional. |
|
This value allows you to enter the purchase orders order(s) for pick slip generation. Y = The system displays the Select Purchase Order for Pick Slip Screen. Purchase orders are required when the customer is using an accounts receivable pay type on an order. N or blank = The system prints pick slips for all valid purchase orders, or for orders that do not require purchase orders. Alphanumeric, 1 position; optional. |
|
This value allows you to select one or more states for pick slip generation. Y = The system displays the Select State for Pick Slip Screen. N or blank = The system prints pick slips for all states. Alphanumeric, 1 position; optional. |
|
This value allows you to select the payment types for pick slip generation. Y = The system displays the Select Pay Type for Pick Slip Screen. N or blank = The system prints pick slips for all valid pay types. Alphanumeric, 1 position; optional. |
|
Special shipper override |
This value allows you to override the ship via on the pick slip if it matches a record defined at the Special Shipper OVR by Day/Via/Zone Screen. This option is displayed only if the Deadline for Special Shipper Override (L43) specifies a date in the future. Y = The system displays the Special Shipper OVR by Day/Via/Zone Screen and overrides the ship via on each pick slip that qualifies based on the criteria described for the Deadline for Special Shipper Override (L43). N or blank = The system does not display the Special Shipper OVR by Day/Via/Zone Screen or override the ship via based on these overrides. Alphanumeric, 1 position; optional. |
This value allows you to select orders that are preauthorized for pick slip generation. A preauthorized order contains a pre-paid payment method, such as cash or check, or a credit card payment method that has already received an approved authorization response. A pick slip will not be generated if the Use Auto Authorization Interface (C14) system control value is set to Y and: • the order has a credit card pay type that has not been authorized. • the authorization for the credit card pay type has expired. • the authorization amount for the credit card pay type is less than the shippable amount. Y = The system prints picks slips for orders that contain a pre-paid payment method and/or a credit card that has already received an approved authorization. N (default) = The system prints pick slips for orders, regardless if the payment method on the order has been preauthorized. The system sends credit cards up for authorization during pick slip generation if they have not already received an authorization response. |
|
|
Note: If Preauthorized orders only is set to N, the system will not generate pick slips for orders that contain a credit card payment method if the authorization service defined for the pay type is set up as online authorization only (the Batch/online field is set to I). See System Operations Chapter 49: Performing Online Credit Card Authorizations for an overview of the online credit card authorization process. Alphanumeric, 1 position; required. |
The arrival date is the date on which the customer wants to receive the order. The arrival date range is used to print pick slips for orders whose arrival dates are within this date range. To determine the arrival date, the system uses the following calculation:
Arrival date - (Pick Processing Days + Transfer Lead Days + Lead Days) = Date
The system generates pick slips if the system-calculated date is less than or equal to today's date; otherwise, the system holds printing the pick slips until the date is within the allotted time frame (the arrival date range). Numeric, 6 positions; optional. |
|
This value allows you to enter a range of SCF codes for pick slip generation. This selection criterion can be used to generate pick slips for zone reservation coded (weather-sensitive) inventory when you want to ship only to a specific geographic area. See About Geographic Zones. SCF codes are defined in and validated against the SCF Code file. If you enter an invalid SCF code, a message similar to the following will display at the bottom of the screen: The SCF code (XXX) does not exist.
The from SCF code cannot be greater than the to SCF code. If you enter a from code greater than the to code, the following message will display at the bottom of the screen: From SCF code (XXX) cannot be greater than To SCF code (XXX).
Numeric, 3 positions; optional. |
|
This value allows you to exclude a range of SCF codes for pick slip generation. This selection criterion can be used while generating pick slips for zone reservation coded (weather-sensitive) inventory when you want to specify a geographic area to which you do not want to ship inventory. See About Geographic Zones. SCF codes are defined in and validated against the SCF file (WSCF). Alphanumeric, 1 position; optional. |
|
This value allows you to enter a range of zip codes for pick slip generation. Use this selection to schedule shipments by geographic location. This selection criterion can be used while generating pick slips for zone reservation coded (weather-sensitive) inventory when you want to specify a geographic area to which you do not want to ship inventory. See About Geographic Zones. Postal codes are defined in and validated against the Postal Code file (WZIP). Numeric, 6 positions; optional. |
|
These eight fields allow you to enter UPS zones for pick slip generation. The system prints pick slips for destination zones that match your entry(s). Destination zones are defined in and validated against the SCF Ship Via file and are defined for each Ship Via. You must define UPS destination zones for all SCF addresses in order to use these fields. Enter up to 8 valid UPS destination zones in the Selected UPS zones fields to generate pick slips for orders which will be shipped to these zones. Numeric, eight 3-position fields; optional. |
|
These eight fields allow you to enter Parcel Post zones for pick slip generation. The system prints pick slips for destination zones that match your entry(s). Destination zones are defined in and validated against the SCF Ship Via file and are defined for each Ship Via. You must define Parcel Post destination zones for all SCF addresses in order to use these fields. Enter up to 8 valid Parcel Post destination zones in the Selected P/P zones fields to generate pick slips for orders which will be shipped to these zones. Numeric, eight 3-position fields; optional. |
Pick Slip Generation (2 of 2) Screen
Purpose: Use this screen, with the Pick Slip Generation (1 of 2) Screen, to define or limit the pick slip criteria that are used to generate pick slips. You can select one, several, all or none of the fields.
How to display this screen: Press Enter at the Pick Slip Generation (1 of 2) Screen.
FLR0066 ENTER Pick Slip Generation (2 of 2) 3/30/06 14:32:32 KAB Co Complete orders only . . . . N (Y,N) Let Down Replen.Fill to Max N (Y,N) Single line orders only . . N (Y,N) Multi-line orders only . . . N (Y,N) Gift wrap orders only . . . N (Y,N) Bulk orders only . . . . . . N (Y,N) Zone skipping . . . . . . . N (Y,N) Include special handling . . N (Y,N) Order level spcl hndl. N (Y/N) Special handling only . . . N (Y,N) Split special handling Picks N (Y,N) Split picks by item class . N (Y,N) Store Restock orders . . . . N (Y,N) Best Way Shipping . . . . . N (Y,N) Perform cubing . . . . . . . N (Y,N) Max # of Cartons . . B/O under $ limit . . . . . Override all orders to via . Master Label Orders Only . . N (Y,N) Pick message code/text . . .
F2=Dsp Flash Rpt F3=Exit F9=Accept F12=Cancel |
Field |
Description |
Y = Ship orders only if they can be fulfilled completely. N or blank = Include partial orders. Note: If a multi-line order includes a line whose item or item class has been excluded from this pick slip generation template, the system will consider the balance of the order “complete” and will generate pick slips for the remainder of the order. Alphanumeric, 1 position; optional. |
|
Defines whether the system stocks the locations during let down replenishment just enough to allow picking or enough to fulfill all pick slips, plus refill the bin. Y = During Let Down Replenishment, the system will calculate the quantity required to fulfill the pick slips and to refill the location back to its maximum quantity. N (default) = During Let Down Replenishment, the system will only move enough stock to cover the open pick slips. Note: If the Replenish from Primary during Let Down Replenishment (J42) system control value is set to Y and the only location available to move stock from is a primary location, the system will only move the quantity required to cover the open pick slips, regardless of the setting of the Let down replenishment -- Fill to max field. See Let Down Replenishment for more information on Let Down Replenishment processing. Alphanumeric, 1 position; optional. |
|
Y = Generate pick slips for orders that have only one reserved order line. For example, if an order contains 5 order lines, but only 1 line is reserved, the system will include the order in the single line orders only pick run. N or blank = Generate picks slips for orders regardless of the number of reserved order lines. An error message displays if you enter Y in both the Single line orders only field and the Multi-line orders only field: Cannot select both one line only orders and multi-line only orders. The system considers the following orders single line orders: • An order containing only one reserved order line, regardless of the reserved quantity. • An order containing only one order line that is reserved across multiple warehouses. • An order containing only a finished good item. Alphanumeric, 1 position; optional. |
|
Y = Generate pick slips for orders that have more than one reserved order line. For example, if an order contains 5 order lines and 2 order lines are reserved, the system will include the order in the multi-line orders only pick run. N or blank = Generate pick slips for orders regardless of the number of reserved order lines. An error message displays if you enter Y in both the Single line orders only field and the Multi-line orders only field: Cannot select both one line only orders and multi-line only orders. The system considers the following orders multi-line orders: • An order containing more than one reserved order line. • An order containing only a set item and its components. If some of the components are not reserved, the system will select to print the reserved components unless the components are coordinate grouped. • An order containing only a continuity item. If some of the components for the interval are not reserved, the system will select to print the reserved components unless the components are coordinate grouped. Alphanumeric, 1 position; optional. |
|
Y = Generate pick slips only for orders that contain a gift wrap item (the Gift wrap field for one or more of the items on the order is set to Y). N (default) = Generate pick slips for orders regardless of whether a gift wrap item is on the order. Alphanumeric, 1 position; required. |
|
Y = Generate pick slips only for orders that contain a bulk item (the Oversized field for one or more of the items on the order is set to Y). N (default) = Generate pick slips for orders regardless of whether there is a bulk item on the order. Alphanumeric, 1 position; required. |
|
Zone skipping |
Zone skipping is a method of reducing freight charges by shipping inventory via one carrier to a central drop point, where it is picked up by another carrier and delivered to its final destination. Zone skipping determines which shipping indicia message prints on the pick slip. Y = Use zone skipping to ship your orders. Pick slips generated with this option will display shipping indicia specified in the Work with Ship Via Screen for the drop point entered in Editing Warehouse Drop Points (EWDP) for the SCF/Ship Via of the order. N or blank = Do not use zone skipping. Pick slips generated with this option will display shipping indicia specified in the Work with Ship Via screen for the drop point entered in the Warehouse file. See Work with Ship Via Indicia Screen. Alphanumeric, 1 position; optional. |
This value controls whether you include special handling items. Y = Include special handling items as well as regular items when you generate pick slips. N or blank = Do not include special handling items when generating pick slips. Alphanumeric, 1 position; optional. |
|
Y = Generate pick slips for special handling items only, excluding regular items. N or blank = Include regular items. Alphanumeric, 1 position; optional. |
|
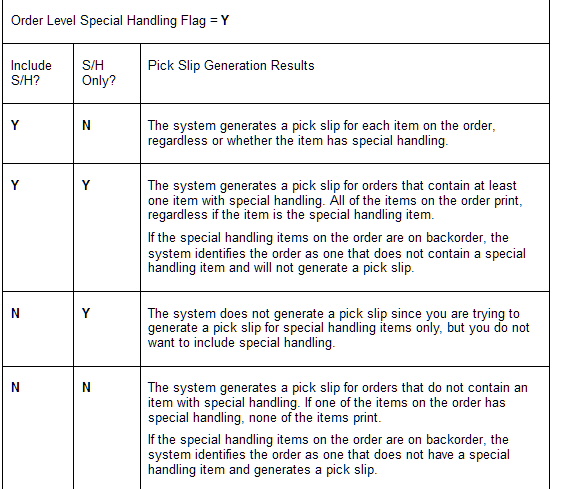
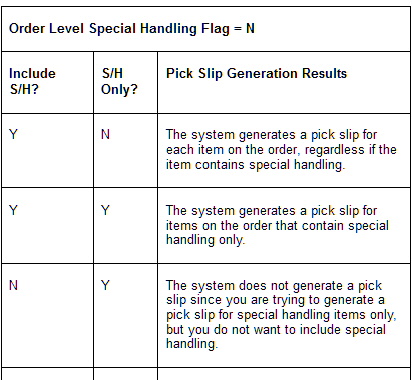
Controls whether the system evaluates the Include special handling and Special handling only fields at the order level, instead of at the order detail line level. Y = The system evaluates the Include special handling and Special handling only fields at the order level. N = The system evaluates the Include special handling and Special handling only fields at the order detail line level. Evaluating Special Handling at the Order Level If Order level special handling is set to Y, the system selects items for pick slip generation at the order level, using the following criteria: |
|
|
|
|
Evaluating Special Handling at the Order Detail Line Level If Order level special handling is set to N, the system selects items for pick slip generation at the order detail line level, using the following criteria: |
|
|
Y = Split pick slips for special handling items into a separate spool file. If an order contains both regular and special handling items, it will generate two pick slips, one in each spool file. N or blank = Include both special handling items and regular items in the same spool file. If an order contains both regular and special handling items, it will still generate two pick slips within the same spool file, one for each type of item. Note: • Special handling items are included only if the Include S/H? option is set to Y. Similarly, non-special handling items are included only if the S/H Only? option is set to N. • If the standard pick sort program supplied by MICROS (FLR0395) is not specified in the Pick Sort Program Name (C65) system control value, your special handling pick slips might not split into a separate spool file. Alphanumeric, 1 position; optional. |
|
Split picks by item class |
Y = Print separate class pick slips for separate item classes. If an order contains items from more than one item class, the system will generate one pick slip for each item class on the order. N or blank = Generate separate pick slips for separate item classes on an order. Alphanumeric, 1 position; optional. |
This value indicates whether to generate pick slips for store restock orders. The system identifies a store restock order by checking the Store restock order field on the order. If the Store restock order field on the order is set to Y, the order is a store restock order. Valid values are: Y = Generate pick slips for store restock orders only and exclude regular orders. N or blank = Do not generate pick slips for store restock orders. When you select a pick slip generation option through the Working with Retail Store Restock (WRSR) menu option, the option you select must have this flag set to Y. See Understanding Store Restock for an overview. Alphanumeric, 1 position; required. |
|
The best shipper is a cheaper alternative to the designated shipper on the order. This value is based on the Perform Best Way Shipping (C47) system control value. Y = Use best way shipping. The system determines which shipping method is best by calculating the lead time and freight charges for the shipper entered on the Order/Ship to and comparing this information to other shippers. Note: As pick slips are created during pick slip generation, the cube of the pick is used to determine the extra weight to be added to the pick slip for the packing materials. The extra weight is added to the weight of the pick and the total weight is rounded up to the next pound, before running Best Way Shipping. See Chapter 38: Working with Dunnage Weight (WDUN). N = Do not use best way shipping. See Chapter 33: Working with Shipping Rates (WSHR) for an overview of best way shipping. |
|
|
Note: This flag does not control best way shipping in order entry, which you can use to offer your customers a choice between different shippers for an order. See Working with Best Way Shippers for the difference between best way shipping at pick slip generation and in order entry. Alphanumeric, 1 position; required. |
Perform cubing |
This value indicates whether you are using a cubic system of measurement to compute how many items can fit in a carton. Y = Turn cubing on for a single run. To limit the number of picks, set this field to Y and enter a value at the Max # of Cartons field. N or blank = Turn cubing off for a single run. Note: This value overrides the value defined in the System Control file. See Performing Cubing. Alphanumeric, 1 position; optional. |
Max # of cartons |
This value allows you to limit the number of orders printed by defining the maximum number of cartons for which you print pick slips. Assuming you are using the cubing feature, the total picks printed may exceed the total number of orders available to print. This field is only relevant if you set the previous field, Perform Cubing? (B36), to Y. Numeric, 5 positions; optional. |
B/O under $ limit |
This field allows you to define a dollar limit under which backorders should not print. If an order can only be partially shipped and the value is under the amount defined, the system won't print it. This is true only for partial shipments where there are still open lines on the order. Numeric, 11 positions with a 2-place decimal; optional. |
Override all orders to via |
This value allows you to supersede the ship via code on the pick slip and to ship all orders via the designated shipper whose code you enter here. Ship Via codes are defined in and validated against the Ship Via file. Note: There is no requirement that an SCF Ship Via record exist for the SCF on the pick slip and the ship via specified here. Numeric, 2 positions; optional. |
Indicates whether to generate pick slips for orders whose master carton label field in the Order Header file is set to Y. Valid values are: Y = Generate pick slips for master label orders only and exclude regular orders. N = Generate pick slips for both master label orders and regular orders. If the Master carton label field is set to Y, the system prints a master pick slip for the order. You can use the master pick slip to confirm all pick slips for the order at one time. See Master Pick Slips. Alphanumeric, 1 position; required. |
|
Pick message code |
A code that represents the pick slip message. See Working with Pick Slip Messages (WPSM). Alphanumeric, 2 positions; optional. |
Pick message text |
The text of the message. This free-form message will print on each pick slip. See Working with Pick Slip Messages (WPSM). Alphanumeric, 50 positions (each line); display-only. |
 Alphanumeric, 1 position; required.
Subsequent screens: The table below lists the Y/N fields from the Pick Slip Generation (1 of 2) Screen, the subsequent screens that display when you enter Y at the field and where to find additional information in this chapter.
Enter a Y atfield... |
To display the... |
Selected warehouses |
|
Selected shippers |
|
Selected items |
|
Selected location classes |
|
Selected orders |
|
Selected sold-to customers |
|
Selected purchase orders |
|
Selected payment types |
|
Selected source categories |
|
Selected priorities |
|
Selected lines of business |
|
Selected geographic zones |
|
Selected long SKU class |
|
Selected item class |
|
Selected states |
Screen Option |
Procedure |
Display the flash report |
Press F2. The system displays the flash report. See Reviewing Operations Control Summary (FLSH) |
Accept entries |
Press F9. The system accepts your entries, returns to the Work with Pick Slip Generation Options Screen and lists the pick slip option that you just created. |
Review pick slip selections |
Press F20. The system returns to the subsequent screens that you selected by entering a Y at the Y/N field(s). When working with pick slips, you must press F20 to work with the subsequent screens. |
Select Warehouse for Pick Slip Screen
Purpose: Use this screen to print pick slips for selected warehouses.
How to display this screen: Enter Y in the Selected warehouses field at the Pick Slip Generation (1 of 2) Screen.
FLR0070 DISPLAY Select Warehouse for Pick Slip 11/08/97 16:44:25 The KL Mail Order Company
Opt Whs Description Orders Avail Sel
Type options, press Enter. 1=Select 4=Cancel
3 QA WAREHOUSE 0 N 10 THE MAIN WAREHOUSE 0 N 20 DAMAGED WAREHOUSE 0 N 30 THE STAGING WAREHOUSE 0 N
F3=Exit F7=Select All F12=Cancel |
Field |
Description |
A code that represents a warehouse. Warehouses are defined and validated against the Warehouse file (WWHS); see Warehousing Chapter 41: Creating and Maintaining Warehouses (WWHS). Numeric, 3 positions; optional. |
|
Description |
The description of the warehouse. Alphanumeric, 30 positions; optional. |
Orders avail (Orders available) |
The number or orders available for pick slips. This figure equals the number of orders with reserved items and no pick slips currently printed. Used for informational purposes only. Numeric, 7 positions; display-only. |
Sel (Selected) |
Y indicates the record is selected, N indicates the record is not selected. Alphanumeric, 1 position; optional. |
Screen Option |
Procedure |
Select a single warehouse |
Enter 1 next to a warehouse to select a warehouse. The system enters a Y in the Sel field. |
Cancel a warehouse selection |
Enter 4 next to a warehouse to cancel a warehouse selection. The system enters an N in the Sel field. |
Select all warehouses |
Press F7. The system enters a Y in the Sel field for all warehouses. |
Select Shipper for Pick Slip Screen
Purpose: Use this screen to print pick slips for specified shippers. This screen displays a list of ship via codes that are available for selection.
How to display this screen: Enter Y in the Selected shippers field at the Pick Slip Generation (1 of 2) Screen.
FLR0069 DISPLAY Select Shipper for Pick Slip 2/03/99 10:05:34 KAL Co.
Opt Via Description Via Sel Pty
Type options, press Enter. 1=Select 4=Cancel
1 UPS GROUND 5 N 2 PARCEL POST 9 N 3 FEDERAL EXPRESS 9 N 4 UPS SECOND DAY 9 N 5 OVERSEAS OVERSIZED SHIPPER 5 N 6 OVERSEAS EXPRESS 5 N 7 OVERSEAS STANDARD 5 N 8 OVERSEAS ECONOMY 5 N 11 SHIP VIA PRIORITY 1 1 N 12 SHIP VIA PRIORITY 2 2 N +
F3=Exit F7=Select All F12=Cancel |
Field |
Description |
Via (Ship via) |
A code that represents the carrier for this order. Ship via codes are defined in and validated against the Ship Via file; see Chapter 30: Working with Ship Via Codes (WVIA). Numeric, 2 positions; optional. |
Description |
The description of the shipper. Alphanumeric, 30 positions; optional. |
Via pty (Ship via priority) |
The ship via priority assigned to this ship via. Ship via priority controls how the system allocates inventory to backorders, reserves inventory during Batch Reservation, or sorts pick slips. Ship via priority ranges from 0 - 9 where 0 is the lowest priority and 9 is the highest priority. Numeric, 1 position; optional. |
Sel (Selected) |
Y indicates the record is selected, N indicates the record is not selected. Alphanumeric, 1 position; optional. |
Option |
Procedure |
Select a single ship via |
Enter 1 next to a shipper to select that shipper. The system enters a Y in the Sel field. |
Cancel a ship via selection |
Enter 4 next to a shipper to cancel a shipper selection. The system enters an N in the Sel field. |
Select all ship vias |
Press F7. The system enters a Y in the Sel field for all shippers. |
Select Items for Pick Slip Screen
Purpose: Use this screen to print pick slips for specific items. This option is useful when you receive, via PO, an order including items for which you have a number of backorders. You can generate pick slips for these items while the shipment is still in the staging area.
Note: You can specify up to 500 items at this screen. Although the system does not display an error message, it does not accept more than 500 items.
How to display this screen: Enter Y in the Selected Items field at the Pick Slip Generation (1 of 2) Screen.
FLR0225 ADD Select Items for Pick Slip 8/17/99 15:31:34 LJW MAIL ORDER COMPANY
Item COLO STYL SIZE Description Exclude? Ord Avl N 0 N 0 N 0 N 0 N 0 N 0 N 0 N 0 N 0 N 0 N 0 N 0 N 0 N +
F3=Exit F6=Change F12=Cancel |
Field |
Description |
Item |
A code that represents a unit of inventory. You can specify up to 500 items at this screen. Although the system does not display an error message, it does not accept more than 500 items. Alphanumeric, 12 positions; optional. |
Colo Styl Size |
The SKU code that further identifies the item. The three elements are defined in the System Control file and validated against the SKU Element (1, 2, 3) files. Alphanumeric, one 14-position field (full SKU) or three 4-position fields (split SKU); optional. |
Description |
A description of the item. Alphanumeric, 30 positions; display-only. |
Exclude? |
This value determines whether the selected item will be excluded from pick slip generation. Y = exclude the selected item from pick slip generation. N (default) = generate pick slips for the selected item(s). Note: Excluding an item from pick slip generation will not affect the Ship complete criterion if both criteria are chosen on the same template. An order with an excluded item will still be considered “complete” and pick slips will be generated for the remainder of the items on the order. Example: An order includes Daisies, Tulips, and Daffodils. Daffodils are excluded on the Select Items screen. At the same time, you have selected Complete orders only. A pick slip will not be generated for Daffodils, but the system will generate pick slips for the Daises and Tulips on the order. Alphanumeric, 1 position; required. |
Ord avail (Orders available) |
The quantity of the item that is available to sell. This field is not currently implemented. Numeric, 7 positions; display-only. |
Screen Option |
Procedure |
Change an item |
Press F6. The system displays the items that you previously entered. This allows you to review your entries. Note: You cannot change an item code if you are in change mode. You must delete the item and then return to “add” mode and re-enter the item. The system displays a message if you attempt to enter a duplicate item. |
Select Location Class for Pick Slip Screen
Purpose: Use this screen to print pick slips for a specific location class. Location classes represent a warehouse location, such as caged area or fragile area. Both items/SKUs and locations can be assigned location classes. Items/SKUs can be stored only in locations that have the same location class. Only items/SKUs that have the same location class appear on the same pick ticket.
You can assign a location class to a location at the Create Location Screen. You can assign an item to a location class at the Create Item Screen. You can assign a SKU to a location class at the SKU Location Class/Picks Screen.
Splitting an order by location class: CWDirect uses the location class defined at the SKU level to determine if an order should split into several pick slips if you generate picks slips using a pick slip template that has the Selected location classes field set to Y. If you generate pick slips using a pick slip template that has the Selected location classes field set to N, CWDirect only uses the location class defined at the item level to determine if an order should split into several pick slips. See Splitting an Order.
How to display this screen: Enter Y in the Selected Location Classes field at the Pick Slip Generation (1 of 2) Screen.
FLR0074 DISPLAY Select Location Class for Pick Slip 2/03/99 10:17:30 KAL Co.
Opt Loc Cls Description Orders Avail Sel # to Gen
Type options, press Enter. 1=Select 4=Cancel
AC ACCESSORIES 0 N 0 BK BACKROOM STORAGE 0 N 0 ED LOCATION CLASS EDIT 0 N 0 HL HOLIDAY 0 N 0 HZ HAZARDOUS MATERIALS 0 N 0 MN MAIN STOCK 0 N 0
F3=Exit F7=Select All F12=Cancel |
Field |
Description |
Loc cls (Location class |
A code that represents a location type, such as caged area or fragile area. Location classes are defined in and validated against the Location Class file; see Warehousing Chapter 42: Creating and Maintaining Location Classes (WLCL). Alphanumeric, 2 positions; optional. |
Description |
The description of the location class. Alphanumeric, 30 positions; optional. |
Orders avail (Orders available |
The quantity of orders that are available to pick. This field is not currently implemented. Numeric, 7 positions; display-only. |
Sel (Selected) |
Y indicates the record is selected, N indicates the record is not selected. Alphanumeric, 1 position; optional. |
# to gen (Number to generate) |
The maximum number of picks to generate for this location class. Numeric, 7 positions; optional. |
Screen Option |
Procedure |
Select a single location class |
Enter 1 next to a location class to select it. The system enters a Y in the Sel field. |
Cancel a location class selection |
Enter 4 next to a location class to cancel a location class selection. The system enters an N in the Sel field. |
Select all location classes |
Press F7. The system enters a Y in the Sel field for all location classes. |
Select Orders for Pick Slip Screen
Purpose: Use this screen to print pick slips for specific orders. You can specify up to 100 orders at a time.
A message displays if the order is on hold:
Order (14) is not open. Cannot be selected for Pick Slip.
You can release orders from hold through Release Held Orders. See Customer Service Chapter 82: Selecting Held Orders (ERHO).
How to display this screen: Enter Y in the Selected Orders field at the Pick Slip Generation (1 of 2) Screen.
FLR0077 ADD Select Orders for Pick Slip 11/08/97 16:57:21 The KL Mail Order Company
Order #
+
F3=Exit F6=Change F12=Cancel |
Field |
Description |
Order # |
A unique number assigned by the system to identify an order. An error message similar to the following displays if the order is on hold:
Order (14) is not open. Cannot be selected for Pick Slip.
You can release orders from hold through Release Held Orders. See Customer Service Chapter 82: Selecting Held Orders (ERHO). Maximum number of orders: You can select up to 100 orders at a time for pick slip generation. If you attempt to enter more than 100 orders, the system displays an error message such as: The number of orders selected (121) exceeds the maximum allowed (100). Numeric, 8 positions; optional. |
Name |
The name of the customer who placed the order. Customer names are defined in and validated against the Customer Sold-to file. Alphanumeric, 15 positions (first name), 1 position (initial), 25 positions (last name); display-only. |
Screen Option |
Procedure |
Change an order. |
Press F6. The system displays the orders that you previously entered. This allows you to review your entries. Note: You cannot change an order number if you are in change mode. You must delete the order and then return to “add” mode and re-enter the order. The system displays a message if you attempt to enter a duplicate order number. |
Select Customers for Pick Slip Screen
Purpose: Use this screen to print pick slips for specific customers.
How to display this screen: Enter Y in the Selected Customers field at the Pick Slip Generation (1 of 2) Screen.
FLR0078 ADD Select Customers for Pick Slip 11/08/97 16:59:50 The KL Mail Order Company
Customer # Name Orders Avail 0 0 0 0 0 0 0 0 0 0 0 0 0 0 +
F3=Exit F6=Change F12=Cancel |
Field |
Description |
Customer # |
A unique number assigned by the system to identify a customer who places an order. Customers are defined in and validated against the Customer Sold-to file; see Customer Service Creating and Updating Sold-to Customers (WCST). Numeric, 9 positions; optional. |
Name |
The name of the customer who placed the order. Defined in and validated against the Customer Sold-to file. Alphanumeric, 15 positions (first name), 1 position (initial), 25 positions (last name); display-only. |
Ord avl (Orders available) |
The quantity of orders that are available to pick. This field is not currently implemented. Numeric, 7 positions; display-only. |
Screen Option |
Procedure |
Change a customer selection |
Press F6. The system displays the customers that you previously entered. This allows you to review your entries, and then continue entering customers, as necessary. The system displays a message if you attempt to enter a duplicate customer number. |
Select Purchase Order for Pick Slip Screen
Purpose: Use this screen to print pick slips for specific purchase order numbers.
How to display this screen: Enter Y in the Selected Purchase Orders field at the Pick Slip Generation (1 of 2) Screen.
FLR0081 NEW Select Purchase Order for Pick Slip 11/08/97 14:17:01 Mail Order Company
Customer # Purchase Order # Ship to Name
F3=Exit F6=Change F12=Cancel |
Field |
Description |
Customer # |
A unique number assigned by the system to identify the customer who placed the order. Customers are defined in and validated against the Customer Sold-to file; see Creating and Updating Sold-to Customers (WCST). Numeric, 9 positions; optional. |
Purchase order # |
The customer's purchase order number. Purchase orders are required when the customer is using an accounts receivable pay type on an order. Numeric, 7 positions; required. |
Ship-to name |
The name of the customer who will receive the order. Alphanumeric, 15 positions (first name), 1 position (initial), 25 positions (last name); display-only. |
Screen Option |
Procedure |
Change a purchase order selection |
Press F6. The system displays the purchase orders that you previously entered. This allows you to review your entries, and then continue entering purchase orders, as necessary. The system displays a message if you attempt to enter a duplicate purchase order number. |
Select Pay Type for Pick Slip Screen
Purpose: Use this screen to print pick slips for specific payment types.
How to display this screen: Enter Y in the Selected Pay Type field at the Pick Slip Generation (1 of 2) Screen.
FLR0082 DISPLAY Select Pay Type for Pick Slip 11/08/97 17:03:12 The KL Mail Order Company
Opt Pay Typ Description Orders Avail Sel
Type options, press Enter. 1=Select 4=Cancel
1 CASH/CHECK 0 N 2 COD 0 N 4 VISA 0 N 5 MASTERCARD 0 N 9 ACCOUNTS RECEIVABLE 0 N 10 GIFT CERTIFICATE 0 N 11 COLD HARD CASH 0 N 12 COUPON 0 N 31 CANADIAN CASH/CHECK 0 N 32 CANADIAN CREDIT CARD 0 N 33 CANADIAN A/R 0 N +
F3=Exit F7=Select All F12=Cancel |
Field |
Description |
Pay typ (Payment type) |
A user-defined code that represents the method of payment on the order. Each payment type must conform to one of the following categories: • Cash/check • Credit card • A/R • C.O.D. • Coupon/credit Pay types are defined in and validated against the Pay Type file. See Accounts Payable Chapter 5: Working with Pay Types (WPAY). Numeric, 2 positions; optional. |
Description |
The description of the payment type. Alphanumeric, 30 positions; optional. |
Orders avail (Orders available) |
The quantity of orders that are available to pick. This field is not currently implemented. Numeric, 7 positions; display-only. |
Sel (Selected) |
Y indicates the record is selected, N indicates the record is not selected. Alphanumeric, 1 position; optional. |
Screen Option |
Procedure |
Select a single payment type |
Enter 1 next to a payment to select it. The system enters a Y in the Sel field. |
Cancel a payment type selection |
Enter 4 next to a payment type to cancel a payment selection. The system enters an N in the Sel field. |
Select all pay types |
Press F7. The system enters a Y in the Sel field for all pay types. |
Select Source Code Categories for Pick Slip Screen
Purpose: Use this screen to print pick slips for specific source code categories.
How to display this screen: Enter Y in the Selected Source Categories field at the Pick Slip Generation (1 of 2) Screen.
FLR0446 DISPLAY Select Source Categories for Pick Slip 2/03/99 10:51:54 KAL Co.
Opt Src Cat Sel
Type options, press Enter. 1=Select 4=Cancel
I1 ITM SOURCE CATEGORY 1 N I2 ITM SOURCE CATEGORY 2 N JY JOY SOURCE CATEGORY N MN MAIN SOURCE CODES N MW MAW SOURCE CATEGORY N PR PRESTIGE SOURCE CODES N P1 PFT SOURCE CATEGORY 1 N P2 PFT SOURCE CATEGORY 2 N SE SECONDARY SOURCE CODES N
F3=Exit F7=Select All F12=Cancel |
Field |
Description |
Src cat (Source code category) |
A category assigned to a group of source codes, usually used for tracking purposes in forecasting. Source code categories are assigned in the Source Code file and defined in and validated against the Source Code Category file. See Marketing Chapter 30: Forecasting Reports. Alphanumeric, 2 positions; optional. |
Description (Unlabeled field to the right of the source code category) |
The description associated with the source code category. Alphanumeric, 40 characters; display-only. |
Screen Option |
Procedure |
Select a single source code category |
Enter 1 next to a source code category to select it. The system enters a Y in the Sel field. |
Cancel a source code category selection |
Enter 4 next to a source code category to cancel a source code category selection. The system enters an N in the Sel field. |
Select all source code categories |
Press F7. The system enters a Y in the Sel field for all pay types. |
Select Order Priorities for Pick Slip Screen
Purpose: Use this screen to print pick slips for specific order priorities.
The Priority for an order displays on the Order Entry header screen. The B/O Priority defined for the source code provides the default value for this field.
About automatic updating of the order priority: If the Auto Update Order Priority (G45) system control value is set to Y, the priority for an order will be automatically updated to 9 (highest priority) when you enter an override to the Arrival date in order entry.
If the Auto Update Order Priority (G45) system control value is set to Y, you can use Priority as a selection criterion to reserve and print pick slips for zone reservation coded (weather-sensitive) items for which you have entered an override to the system-generated arrival date. See Chapter 53: Shipping Zone Reservation Overview.
How to display this screen: Enter Y in the Selected Priorities field at the Pick Slip Generation (1 of 2) Screen.
FLR0497 ENTER Select Order Priorities for Pick Slip 11/08/97 15:00:14 Mail Order Inc.
Include the following:
Order priority 9 (Y,N) Order priority 8 (Y,N) Order priority 7 (Y,N) Order priority 6 (Y,N) Order priority 5 (Y,N) Order priority 4 (Y,N) Order priority 3 (Y,N) Order priority 2 (Y,N) Order priority 1 (Y,N) Order priority 0 (Y,N)
F3=Exit F12=Exit |
Completing this screen: Enter a Y next to each order priority to include for pick slips. Enter a N or Field Exit next to an order priority to exclude it. When you are done, press Enter.
Select Lines of Business for Pick Slip Screen
Purpose: Use this screen to print pick slips for specific lines of business.
The system automatically assigns an order to a line of business in order entry or order maintenance if the order meets the requirements for a specific line of business assignment. See Chapter 43: Working with Lines of Business (WLOB).
How to display this screen: Enter Y in the Selected lines of business field at the Pick Slip Generation (1 of 2) Screen.
CSR0919 DISPLAY Select Lines of Business for Pick Slip 2/03/99 10:59:13 KAL Co. Lines selected 0 Opt LOB Description Sel Maximum . . : 100 Cd
Type options, press Enter. 1=Select 4=Cancel
KAL KAL LINE OF BUSINESS N 1 LOB 555, 55, A01 N 2 LOB 555, 55 N 3 LOB 555, A01 N 4 LOB 555 N 5 LOB 55, A01 N 6 LOB 55 N 7 LOB A01 N
F3=Exit F7=Select All F12=Cancel |
Field |
Description |
Lines selected |
The number of lines of business selected to print pick slips. This field updates whenever you select or deselect a line of business. Numeric, 2 positions; display-only. |
LOB code |
A code used to identify a line of business. Line of business codes are defined in and validated against the Line of Business file. Alphanumeric, 3 positions; optional. |
Description |
A description of the line of business. Alphanumeric, 40 positions; optional. |
Sel |
Y indicates the record is selected, N indicates the record is not selected. Alphanumeric, 1 position; optional. |
Maximum (Maximum line count) |
The maximum number of lines of business you can select to print pick slips. You can select up to 100 lines of business. Numeric, 3 positions; optional. |
Screen Option |
Procedure |
Select a line of business |
Enter 1 next to the line of business to select it. The system updates the Selected field to Y. |
Deselect a line of business |
Enter 4 next to the line of business to deselect it. The system updates the Selected field to N. |
Select all lines of business |
Press F7. The stem updates the Selected field for all lines of business to Y. |
Select Geographic Zones for Pick Slip Screen
Purpose: Use this screen to print pick slips for specific geographic zones.
About geographic zones: Geographic zones are regions of the country which relate to relative weather conditions. The shipping zone reservation process uses geographic zones to restrict reservation of weather-sensitive inventory such as plant stock. You can reserve and print pick slips for zone reservation inventory by geographic zone, using the batch generation option at the Work with Pick Slip Generation Options Screen. See Chapter 53: Shipping Zone Reservation Overview.
Setting up geographic zones: Geographic zones are assigned to zip codes or to SCF codes. You must assign geographic zones to your shipping addresses, in either the Zip Code file (Fast path = WZIP), or the SCF Code file (Fast path = WSCF), in order to use geographic zones as a criterion for pick slip generation. Any geographic zone assigned to a zip code will override a geographic zone applied to a corresponding SCF code for an order's shipping address. See Customer Service Chapter 15: Setting Up the Postal Code File (WZIP) and Fulfillment Chapter 31: Working with SCF Codes (WSCF).
How to display this screen: Enter Y in the Selected geographic zones field at the Pick Slip Generation (1 of 2) Screen.
FLR0912 DISPLAY Select Geographic Zones for Pick Slip 7/23/99 14:46:11 EVOLUTIONARY NICHE CO
Geographic Opt Zone Code Description Sel
Type options, press Enter. 1=Select 4=Cancel
02 -50 TO -40 N 03 -40 TO -30 N 04 -30 TO -20 N 05 -20 TO -10 N 06 -10 TO 0 N 07 0 TO 10 N 08 10 TO 20 N 09 20 TO 30 N +
F3=Exit F7=Select All F12=Cancel |
Field |
Description |
Geographic zone code |
A code that identifies the geographic zone. Geographic zones are used to divide the country into shipping regions for the purpose of restricting the shipment of climate-sensitive plant stock. Alphanumeric, 3 positions; optional. |
Description |
A description of the geographic zone. Alphanumeric, 30 positions; optional. |
Sel (Selected) |
This value indicates whether to print pick slips for orders shipped to this geographic zone. Valid values are: Y = print pick slips for orders shipped to this geographic zone. N = do not print pick slips for orders shipped to this geographic zone. Alphanumeric, 1 position; optional. |
Screen Option |
Procedure |
Select a geographic zone |
Enter 1 next to the geographic zone to select it. The system updates the Selected field to Y. |
Deselect a geographic zone |
Enter 4 next to the geographic zone to deselect it. The system updates the Selected field to N. |
Select all geographic zones |
Press F7. The stem updates the Selected field for all geographic zones to Y. |
Select Long SKU Class for Pick Slip Screen
Purpose: Use this screen to print pick slips for orders which include only one specific long SKU class, or for orders which include multiple long SKU classes.
For each long SKU class selected, the system will print pick slips for orders whose order lines are assigned to the selected long SKU class. Each order may also include items which are not assigned to any long SKU class; these items will also be included in pick slip generation.
Example: The system will generate pick slips for all items on the following order if you select long SKU class 4 for pick slips:
Order line |
Item |
Long SKU class |
L/S description |
1 |
ABC1000 |
4 |
Shrub |
2 |
ABC1001 |
4 |
Shrub |
3 |
XYZ1000 |
|
none |
4 |
ABC1002 |
4 |
Shrub |
Selecting the long SKU class 9999 indicates that you want to print pick slips for orders whose order lines are assigned to different long SKU classes. Each order may also include items which are not assigned to any long SKU class; these items will also be included in pick slip generation.
Example: The system will generate pick slips for all items on the following order if you select long SKU class 9999 (Mixed) for pick slips:
Order line |
Item |
Long SKU class |
L/S description |
1 |
ABC1000 |
4 |
Shrub |
2 |
DEF1000 |
2 |
Bulb |
3 |
ABC1001 |
4 |
Shrub |
4 |
XYZ1000 |
|
none |
Note: You must define a 9999 (Mixed) long SKU class in the Long SKU Class file in order to select Mixed long SKU class for pick slip generation. See Merchandising Chapter 8: Working with Long SKU Classes (WLSC).
Zone reservation codes and long SKU classes: This selection criterion is useful in generating pick slips for zone reservation coded (weather-sensitive) items if you have set up long SKU classes to correspond to zone reservation codes. See Fulfillment Chapter 53: Shipping Zone Reservation Overview.
Note: This screen displays only if the Order Combination Pick Selection Type (G47) system control value is set to L/S class.
How to display this screen: Enter Y in the Selected long SKU classes field at the Pick Slip Generation (1 of 2) Screen.
FLR0913 DISPLAY Select Long SKU Class for Pick Slip 7/23/99 15:55:57 EVOLUTIONARY NICHE CO
Long SKU # units Opt Class Description Sel to Gen
Type options, press Enter. 1=Select 4=Cancel
1 BULBS N 2 BARE ROOT PLANTS N 3 POTS N 4 SHRUBS N 5555 LONG SKU CLASS N 9999 MIXED N
F3=Exit F7=Select All F12=Cancel |
Field |
Description |
Long SKU class |
A code that identifies the long SKU class. The code 9999 must be used to identify a Mixed long SKU class. Long SKU class codes are defined in and validated against the Long SKU Class file. See Merchandising Chapter 8: Working with Long SKU Classes (WLSC). Numeric, 4 positions; optional. |
Description |
A description of the long SKU class. Alphanumeric, 30 positions; optional. |
Sel (Selected) |
This value indicates whether to print pick slips for orders whose items belong to this long SKU class. Y = Print pick slips for orders whose items belong to this long SKU class. If an order with items belonging to this long SKU class also includes items which belong to no long SKU class, the system will generate pick slips for the entire order. N = Do not print pick slips for orders whose items belong to this long SKU class. Alphanumeric, 1 position; optional. |
# units to gen (Number of units for pick slip generation) |
The maximum number of units you want to pick for this long SKU class. The system will stop generating pick slips for orders containing items for this long SKU class once this number is reached. However, the actual number of units for which pick slips are generated may be higher than the maximum if the system starts generating pick slips for an order which will bring the number of units above the maximum. The system will not partially ship the order just to keep below the maximum threshold. 0 = No limit. Numeric, 9 positions; optional. |
Screen Option |
Procedure |
Select a long SKU class |
Enter 1 next to the long SKU class to select it. The system updates the Selected field to Y. |
Deselect a long SKU class |
Enter 4 next to the long SKU class to deselect it. The system updates the Selected field to N. |
Select all long SKU classes |
Press F7. The system updates the Selected field for all long SKU classes to Y. |
Select Item Class for Pick Slip Screen
Purpose: Use this screen to print pick slips for specific item classes.
Item class can be used to define item groups within a long SKU class, and can be useful for generating pick slips for zone reservation coded (weather-sensitive) inventory assigned to a long SKU class which parallels its zone reservation code. See Chapter 53: Shipping Zone Reservation Overview.
How to display this screen: Enter Y in the Selected item class field at the Pick Slip Generation (1 of 2) Screen.
FLR0914 DISPLAY Select Item Class for Pick Slip 7/30/99 16:08:00 LJW MAIL ORDER CO
Opt Class Description Sel
Type options, press Enter. 1=Select 4=Cancel 7=Exclude
B1 BULB CLASS 1 N B2 BULB CLASS 2 N CSH CUSTOM S/H ALLOWED Y P1 POT CLASS 1 N P2 POT CLASS 2 N RST CUSTOM S/H RESTRICTED Y
F3=Exit F7=Select All F12=Cancel |
Field |
Description |
Class |
A code which identifies an item class. Item classes are defined in and validated against the Item Class file. See Merchandising Chapter 5: Working with Item Classes (WICL). Alphanumeric, 3 positions; optional. |
Description |
A description of the item class. Alphanumeric, 30 positions; optional. |
Sel (Selected) |
This value indicates whether you want to print pick slips for items which belong to this item class. Y = Print pick slips for items of this order class N = Do not print pick slips for items of this order class. X = Exclude items of this class from pick slip generation. Note: Excluding an item class from pick slip generation will not affect the Ship complete criterion if both criteria are chosen. An order with an excluded item class will still be considered “complete” and pick slips will be generated for the remainder of the items on the order. Example: An order includes a potted plant, a bare root plant, and a package of seeds. You have excluded the Potted plant item class. You have also selected Complete orders only. The system will not generate a pick slip for the potted plant, but will generate pick slips for the bare root plant and the seeds. Alphanumeric, 1 position; optional. |
Screen Option |
Procedure |
Select an item class |
Enter 1 next to an item class to select it. The system updates the Selected field to Y. |
Deselect an item class |
Enter 4 next to an item class to deselect it. The system updates the Selected field to N. |
Exclude an item class |
Enter 7 next to the item class to exclude the item class from pick slip generation. The system updates the Selected field to X. |
Select all item classes |
Press F7. The stem updates the Selected field for all item classes to Y. |
Select State for Pick Slip Screen
Purpose: Use this screen to print pick slips for specific states, or to exclude specific states from pick slip generation.
How to display this screen: Enter Y in the Selected States field at the Pick Slip Generation (1 of 2) Screen.
FLR0915 DISPLAY Select State for Pick Slip 8/02/99 13:38:01 LJW MAIL ORDER
Opt Cty State Description Sel
Type options, press Enter. 1=Select 4=Cancel 7=Exclude
CAN AL ALBERTA Y CAN NS NOVA SCOTIA Y USA AK ALASKA Y USA AL ALABAMA Y USA AR ARKANSAS Y USA AZ ARIZONA Y USA CA CALIFORNIA Y USA CO COLORADO Y USA CT CONNECTICUT Y USA DC WASHINGTON DC Y USA DE DELAWARE Y +
F3=Exit F7=Select All F12=Cancel |
Field |
Description |
Cty (Country) |
A code which identifies a country. Countries are defined in and validated against the Country file. See Customer Service Chapter 14: Setting Up the Country File (WCTY). Alphanumeric, 3 positions; optional. |
State |
A code which identifies a state. States are defined in Work with Countries. See Customer Service Chapter 14: Setting Up the Country File (WCTY). Alphanumeric, 2 positions; optional. |
Description |
A description of the state. Alphanumeric, 25 positions; display-only. |
Sel (Selected) |
This value indicates whether you want to print pick slips for orders which will ship to this state. Y = Print pick slips for orders which will ship to this state. N = Do not select this state for pick slips. X = Exclude orders being shipped to this state from pick slip generation. Alphanumeric, 1 position; optional. |
Screen Option |
Procedure |
Select a state |
Enter 1 next to a state to select it. The system updates the Selected field to Y. |
Deselect a state |
Enter 4 next to a state to deselect it. The system updates the Selected field to N. |
Exclude a state |
Enter 7 next to a state to exclude the state from pick slip generation. |
Select all states |
Press F7. The system updates the Selected field for all states to Y. |
Special Shipper OVR by Day/Via/Zone Screen
Purpose: Use this screen to set up ship via overrides by current ship via, shipping zone, and the number of days before the Deadline for Special Shipper Override (L43).
For more information: See the Deadline for Special Shipper Override (L43) system control value for a discussion.
How to display this screen: Enter Y in the Special shipper override field at the Pick Slip Generation (1 of 2) Screen.
FLR1231 DISPLAY Special Shipper OVR by Day/Via/Zone 4/15/11 13:44:37 Sarah`s Fun Shop
Opt # days Ship Shipping Ship via prior to via zone override deadline
Type options, press Enter. 4=Delete
1 1 1 3 2 1 2 3 3 1 3 3 4 1 4 3
F3=Exit F12=Cancel |
Field |
Description |
# of days prior to deadline |
The number of days prior to the Deadline for Special Shipper Override (L43) when this ship via override is effective. Numeric, 3 positions; required to create an override. |
Ship via |
The ship via that must currently be assigned to the pick slip in order for the pick slip to receive the override. See the Deadline for Special Shipper Override (L43) system control value for a discussion. Ship via codes are defined in and validated against the Ship Via file; see Chapter 30: Working with Ship Via Codes (WVIA). You can enter just a Ship via code, just a Ship via override code, or just a Ship via code and a Ship via override code for scanning. See the screen options below for more information. Numeric, 2 positions; required to create an override. |
Shipping zone |
The shipping zone that must be assigned to the SCF Ship Via record for the pick slip to receive the override. See the Deadline for Special Shipper Override (L43) system control value for a discussion. Numeric, 3 positions; required to create an override. |
Ship via override |
The ship via that the system assigns to the pick slip if it qualifies for the override. See the Deadline for Special Shipper Override (L43) for a discussion. Ship via codes are defined in and validated against the Ship Via file; see Chapter 30: Working with Ship Via Codes (WVIA). You can enter just a Ship via code, just a Ship via override code, or just a Ship via code and a Ship via override code for scanning. See the screen options below for more information. Numeric, 2 positions; required to create an override. |
Screen Option |
Procedure |
Add an override |
Complete all of the fields on the screen and press Enter to create a new override. Note: When you create an override, the screen: • retains the values you entered in the Ship via and Ship via override fields. • repositions to overrides whose Ship via is equal to or greater than your entry, and whose Ship via override matches your entry. |
Delete an override |
Enter 4 next to an override to delete it. Note: You cannot change an existing override. |
Display additional overrides |
To scan: • Enter a Ship via, a Ship via override, or both these fields, but neither the # of days prior to deadline or the Shipping zone. • Press Enter. The screen lists existing overrides whose: • Ship via is equal to or greater than your entry, and whose: • Ship via override matches your entry. Or, • Press Page Down with all the enterable fields empty to display additional overrides regardless of their Ship via or Ship via override. |
Work with Wave Picking Options Screen
Purpose: Use this screen to define how you would like orders selected for wave picking to separate and sort into different wave types during pick slip generation.
To use wave picking: In order to use wave picking during pick slip generation, the Use Wave Picking (J87) system control value must be set to Y and the Use Cart/Bin Picking? (B38) system control value must be set to N.
For more information: See Using Wave Picking for an overview of the wave picking process and the required setup.
To complete this screen: Use the Work with Wave Picking Options screen to define the following pick wave options:
Pick Wave Option |
Description |
Which wave types to generate |
The Select field for each wave type controls whether the system separates the wave type into its own wave during pick slip generation. You can create a separate wave for the following wave types: • Special Handling, Single-Line Pick • Special Handling, Multi-Line Pick • Express Ship, Single-Line Pick • Express Ship, Multi-Line Pick • International, Single-Line Pick • International, Multi-Line Pick • Single-Line Pick • Multi-Line Pick Wave Type Default When you first advance to the Work with Wave Picking Options screen, the Select field for each wave type is set to Y, indicating the system separates the wave type into its own wave during pick slip generation. See Wave type for a description of each wave type. Express Ship Wave Types: Ship Via Priority If you select the Express Ship, Single-Line Pick and/or the Express Ship, Multi-Line Pick wave type, you must define the ship via priority that is used to identify an express ship via. See Ship via priority for a description of the ship via priority defined for the Express Ship wave types. |
|
Special Handling Wave Types In order to generate a Special Handling, Single-Line and/or Special Handling, Multi-Line wave type, the Include special handling field for the pick slip generation template must be set to Y or the Special handling only field for the pick slip generation template must be set to Y. The Order level spcl hndl (Order level special handling) field for the pick slip generation template controls whether the system evaluates the Include special handling and Special handling only fields defined for the pick slip generation template at the order level or the order detail line level; see Evaluating Special Handling at the Order Level and Evaluating Special Handling at the Order Detail Line Level for more information. |
The size of the wave |
The # of lanes and # of bins you define for each wave type determines the size of the wave (the number of pick slips that can be included in a single wave before a new wave must be generated). Once a wave type reaches the maximum number of lanes and bins, the system creates a new wave for that particular wave type. The system uses the following calculation to determine the number of pick slips that can be included in a single wave: # of lanes x # of bins = # of picks per wave Wave Size Default When you first advance to the Work with Wave Picking Options screen, the # of lanes and # of bins for each wave type is 0; before you generate pick slips using wave picking options, you must first define a # of lanes and # of bins for each wave type. If you generate pick slips before defining a # of lanes and # of bins, the system can generate only one wave for each selected wave type. |
The order in which the waves are generated |
The Wave sequence defines the order in which the system generates each type of wave during pick slip generation; for example, you may wish to generate waves that contain items that require special handling first. Wave Sequence Default When you first advance to this screen, the default Wave sequence is: • Special Handling Single (Wave sequence 1) • Special Handling Multi (Wave sequence 2) • Express Single (Wave sequence 3) • Express Multi (Wave sequence 4) • International Single (Wave sequence 5) • International Multi (Wave sequence 6) • Single Line (Wave sequence 7) • Multi Line (Wave sequence 8) |
If you do not define wave options:
• If you enter Y in the Use Wave Picking (J87) system control value but do not enter 8 next to a pick slip generation template before running pick slip generation, the system generates pick slips, assigning all of the pick slips to a “blank” wave; the system generates the Wave Summary Report with the Wave type blank. Even though the Wave type is blank, the system continues to assign a wave number, lane number and bin number to each pick slip in the “blank” wave.
• If you enter Y in the Use Wave Picking (J87) system control value and enter 8 next to a pick slip generation template but do not set up each wave type (you do not define a # of lanes or # of bins for each wave type and do not specify a Ship via priority for the Express Single and Express Multi wave types), the system places picks slips that contain an item that requires special handling in the Special Handling Single or Special Handling Multi wave types and places all other pick slips in the Express Single or Express Multi wave types. Because a # of lanes and # of bins is not defined, the system can generate only one wave for each wave type.
How to display this screen: Enter 8 next to a pick slip generation option at the Work with Pick Slip Generation Options Screen.
FLR1210 DISPLAY Work with Wave Picking Options 4/01/08 11:39:24 KAB Co2
WAVE PICKING
Opt Wave Type Select # of # of Wave Lanes Bins Seq
Type options, press Enter. 1=Select 2=Change 7=Deselect
Special Handling Single Y 2 6 1 Special Handling Multi Y 4 6 2 Express Single Y 6 20 3 Express Multi Y 8 25 4 International Single N 5 120 5 International Multi N 5 120 6 Single Line Y 9999999 999 7 Multi Line Y 9999999 999 8
F3=Exit F7=Select/Deselect All F12=Cancel |
The system displays wave types on this screen in wave sequence.
Field |
Description |
Pick slip generation template (unlabeled field at the top of the screen) |
The pick slip generation template you selected at the Work with Pick Slip Generation Options Screen for which you wish to define wave picking options. Alphanumeric, 50 positions; display-only. |
A description of the type of wave (pick batch) you can generate during pick slip generation. The Select field determines if the system generates a separate wave for this wave type. The valid wave types are: Special Handling Single Special Handling, Single-Line Pick: The system generates a separate wave for single-line pick slips that require special handling. Special Handling Multi Special Handling, Multi-Line Pick: The system generates a separate wave for multi-line pick slips that require special handling. A multi-line pick slip is a pick slip that contains two or more line items. Express Single Express Ship, Single-Line Pick: The system generates a separate wave for single-line pick slips that contain an express ship via. The system considers a ship via express ship if the ship via priority for the ship via on the order header matches the ship via priority defined for the Express Single or Express Multi wave type. Express Multi Express Ship, Multi-Line Pick: The system generates a separate wave for multi-line pick slips that contain an express ship via. The system considers a ship via express ship if the ship via priority for the ship via on the order header matches the ship via priority defined for the Express Single or Express Multi wave type. International Single International, Single-Line Pick: The system generates a separate wave for single-line pick slips that ship to an international address. The system considers an address an international address if the country code does not match the country code defined in the Default Country for Customer Address (B17) system control value. |
|
|
International Multi International, Multi-Line Pick: The system generates a separate wave for multi-line pick slips that ship to an international address. The system considers an address an international address if the country code does not match the country code defined in the Default Country for Customer Address (B17) system control value. Single Line Single Line Pick: The system generates a separate wave for single-line pick slips that do not fall into any other wave type. Multi Line Multi Line Pick: The system generates a separate wave for multi-line pick slips that do not fall into any other wave type. Alphanumeric, 25 positions; display-only. |
Defines whether the system generates a separate wave for this wave type. Valid values are: Y = During pick slip generation, the system separates the pick slips that fall under this wave type into a separate wave from other pick waves. N = During pick slip generation, the system does not separate the pick slips that fall under this wave type into a separate wave; instead, the pick slips are placed into another wave type that meets the pick slip criteria, such as the single-line wave type or multi-line wave type. You cannot deselect the Single Line and Multi Line wave types; if a pick slip does not meet any other pick slip criteria, the system will separate the pick slips into either the Single Line wave type or Multi Line wave type. Alphanumeric, 1 position; display-only. |
|
The number of lanes that can be included in a single wave for this wave type before the system generates a new wave. If you wish to generate a single wave for a particular wave type, set the # of lanes to 9999999 and the # of bins to 999. Numeric, 7 positions; display-only. |
|
The number of bins that can be included in a single wave for this wave type before the system generates a new wave. If you wish to generate a single wave for a particular wave type, set the # of lanes to 9999999 and the # of bins to 999. Numeric, 3 positions; display-only. |
|
Wave seq |
The order in which the system generates waves during a pick slip generation run. Example: If the Wave sequence for the Special Handling Single wave type is 1, the system generates the Special Handling Single wave type first during the pick slip generation run. Note: If you define the same Sequence # for all wave types, the system generates waves in the following sequence: • Express Multi • Express Single • International Multi • International Single • Multi Line • Special Handling Multi • Special Handling Single • Single Line Numeric, 2 positions; display-only. |
Screen Option |
Procedure |
Select a wave picking option to indicate you wish to generate a separate wave for the wave type |
Enter 1 next to a wave picking option to select it. The system updates the Select field to Y. |
Change a wave picking option |
Enter 2 next to a wave picking option to advance to the Change Wave Type Options Screen. |
Deselect a wave picking option to indicate that you do not wish to generate a separate wave for the wave type |
Enter 7 next to a wave picking option to deselect it. The system updates the Select field to N. You cannot deselect the Single Line wave type or Multi Line wave type: Option not valid for wave type. |
Select or Deselect all wave picking options |
Press F7. The system toggles the Select field for all wave picking options except the Single Line wave type and Multi Line wave type between Y (selected) and N (deselected). You cannot deselect the Single Line wave type and Multi Line wave type. |
Change Wave Type Options Screen
Purpose: Use this screen to change the options for a particular wave type.
How to display this screen: Enter 2 next to a wave type at the Work with Wave Picking Options Screen.
FLR1208 CHANGE Change Wave Type Options 3/19/08 13:43:50 KAB Co2
Express Single
# of Lanes . . . . # of Bins . . . . . Wave sequence . . . 3 Ship Via Priority .
F3=Exit F12=Cancel |
Field |
Description |
Wave type (Unlabeled field at the top of the screen) |
The wave type for which you are defining wave type options; this is the wave type you selected at the Work with Wave Picking Options Screen. Alphanumeric, 25 positions; display-only. |
# of lanes |
The maximum number of lanes that can be included in a single wave for this wave type. Once the maximum number of lanes for a wave is reached, the system creates a new wave for this wave type. If you wish to generate a single wave for a particular wave type, set the # of lanes to 9999999 and the # of bins to 999. Numeric, 7 positions; required. |
# of bins |
The maximum number of bins that can be included in a single wave for this wave type. Once the maximum number of bins for a wave is reached, the system creates a new wave for this wave type. If you wish to generate a single wave for a particular wave type, set the # of lanes to 9999999 and the # of bins to 999. Numeric, 3 positions; required. |
Wave sequence |
A user-defined sequence number to determine the order in which the different wave types are produced during a pick slip generation run, where 1 is the first wave produced and 99 is the last wave produced. For example, if you want to produce the Special Handling Single waves first, enter 1 for the Special Handling Single wave type. Note: If you define the same Sequence # for all wave types, the system generates waves in the following sequence: • Express Multi • Express Single • International Multi • International Single • Multi Line • Special Handling Multi • Special Handling Single • Single Line |
|
Note: The wave sequence does not determine the hierarchy in which the system determines which orders fall into which wave type. Because a pick slip can be associated with more than one wave type, the system uses the following hierarchy to determine which wave type to assign to a pick slip. 1. Special Handling, Single Line 2. Special Handling, Multi Line 3. Express Ship, Single Line 4. Express Ship, Multi Line 5. International, Single Line 6. International, Multi Line 7. Single Line 8. Multi Line Numeric, 2 positions; optional. |
|
(Displays only for the Express Single and Express Multi wave types) |
Identifies the ship via priority in the Ship Via file that represents an express ship via. The system uses this value to determine which orders to include in the Express Single and Express Multi wave types. • If the ship via priority for the ship via on an order matches the ship via priority for the Express Single and Express Multi wave types, the system considers the order an express ship order and includes the order in the wave for the Express Single or Express Multi wave type. • If the ship via priority for the ship via on an order does not match the ship via priority for the Express Single and Express Multi wave types, the system considers the order a non-express ship order and includes the order in the wave for a wave type other than Express Single or Express Multi. Note: If you select the Express Single or Express Multi wave type and do not define a ship via priority, the system places every order, except those that fall under the Special Handling Single or Special Handling Multi wave types in the Express wave types. Numeric, 1 position; required (displays only for the Express Single and Express Multi wave types). |
| Gift Acknowledgement | Contents | SCVs | Search | Glossary | Reports | XML | Index | Chapter 6: Selecting Vendors for Drop Ship Processing (MDSP) |

FU01_05 CWDirect 18.0 August 2015 OTN