Defining Agreements
This topic provides an overview of agreement definitions.
|
Page Name |
Definition Name |
Usage |
|---|---|---|
|
RF_AGREEMENT_HDR |
Define agreement header information. |
|
|
RF_AGREEMENT_COV |
Specify people that are entitled to call center support or customer sites that are entitled to the service that is detailed by agreement lines. |
|
|
RF_AGREEMENT_ENTL |
Specify the default values to appear on rows that are added on the Agreement Line page. |
|
|
RF_AGREEMENT_LINE |
Define detailed agreement line information for each service or support offering. |
|
|
RF_AGREEMENT_BILL |
Define agreement billing information. |
When you create a case or service order for a customer and click the Select Agreement or Warranty button, the CRM system searches for agreement lines or warranties that cover the case or service order and displays the associated entitlements.
The CRM system uses the values that you have entered in the fields for product ID, serial number, and either site or SIN to search for agreement line and warranty matches for service orders.
For cases, the CRM system uses the same fields, as well as those for contact or PIN. For both cases and service orders, the entitlement match page also displays any transaction price information that is defined under the terms of the agreement.
Internal agreements define the levels of service that are available to Help Desk and HR Help Desk cases. These cases use the additional information of organizational relationship, as defined by the person type, and worker status to locate and display the levels of service that are defined on the agreement.
External - No Pricing agreements are similar to External agreements, except they do not display pricing-related fields, only prepaid amounts. Using External - No Pricing agreements enables you to specify how many free prepaid cases or services, or hours of support, a customer is entitled to on an agreement. For PeopleSoft Support, you can specify prepaid at the agreement header level or in the product grid on the agreement line. For FieldService, you can specify prepaid on the agreement header, agreement line for service, or on the product grid on the agreement line.
Use the Agreement page (RF_AGREEMENT_HDR) to define agreement header information.
Navigation
Image: Agreement page (1 of 3)
This example illustrates the fields and controls on the Agreement page (1 of 3).
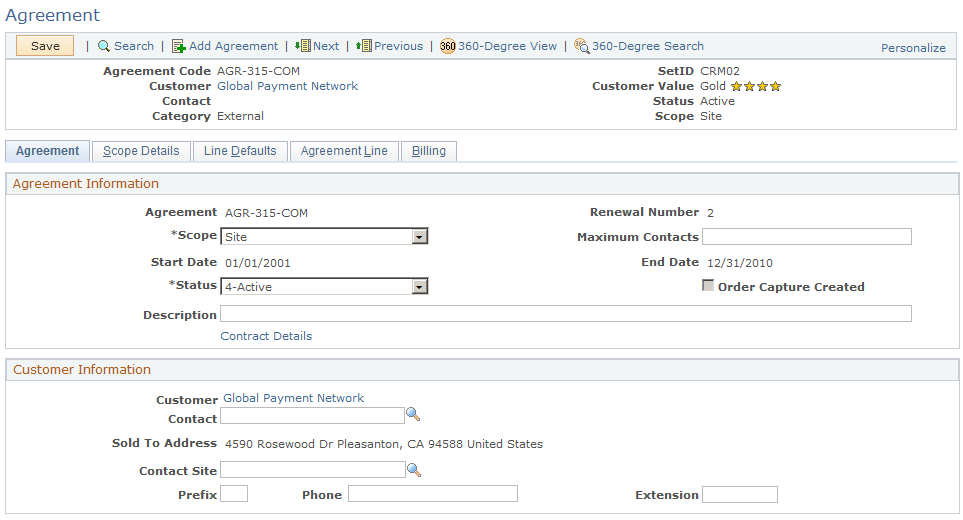
Image: Agreement page (2 of 3)
This example illustrates the fields and controls on the Agreement page (2 of 3).

Image: Agreement page (3 of 3)
This example illustrates the fields and controls on the Agreement page (3 of 3).

|
Field or Control |
Definition |
|---|---|
| Agreement Category |
This field is required on the Add page when you are adding a new agreement. For agreements used in PeopleSoft HelpDesk, you must select Internal as the agreement category. For agreements used in PeopleSoft Support and PeopleSoft Integrated FieldService, select either External or External - No Pricing as the agreement category. Note: In the top section of this page the system changes the field label to Category. |
Copy From Agreement Template
When you create a new agreement, you can either add all the information to it manually, or base it on an agreement template.
Note: This group box does not appear if the agreement has already been created and saved.
|
Field or Control |
Definition |
|---|---|
| Copy from Template and Template ID |
Select a template and then click the Copy from Template button to populate the agreement with information that is established in the selected agreement template. Note: Because the integration with PeopleSoft Contracts requires certain validations before a user can set the status of an agreement to Active, the system does not copy the value of the Status field from the agreement template to the new agreement. The system initially sets the status of the new agreement to Pending. A user can change the status of the agreement to Active by taking certain actions; but they cannot create a new agreement with a status of Active by copying information from an agreement template. |
Agreement Information
|
Field or Control |
Definition |
|---|---|
| Renewal Number |
Displays the renewal version of the agreement. When an agreement is first created, this value is set to 1. Each time you renew the agreement by clicking the Renew Agreement button, the CRM system increments this value by 1. |
| Scope and Maximum Contacts |
Select either Site or Contact to indicate if the agreement applies to sites or callers (contacts). If you select Contact, enter the maximum number that would be allowed to call within the scope of the agreement. Note: These fields do not appear on the page if you are creating an agreement for PeopleSoft HelpDesk and selected Internal as the agreement category when you added the agreement. |
| Status |
Select from Pending, Pending Activation, Action Required, Active, or Closed. There are no system processes that change the status value of the agreement, but you can manually change the status. When an entitlement search is performed for a case or a service order, the CRM system includes only agreements with an Active status that are effective on the date that the search is performed. Note: When renewing an agreement, you should manually adjust the status of the old agreement to Closed on the date that it expires and ensure that the status of the new agreement is set to Active. For example, if you renew an agreement one week before it expires, the new agreement should have a status of Pending Activation, and the old agreement should retain its status of Active until the renewal date matches the current date. At that point the old agreement status should be set to Closed, and the new agreement status should be set to Active. If you have an integration with PeopleSoft Transaction Billing Processor, the system makes the Pending Activation and Action Required statuses available. Additionally, if you are using this integration, the system changes the status from Pending Activation to Active or Action Required based on the success you have creating a corresponding entry in PeopleSoft Transaction Billing Processor. |
| Order Capture Created |
If this check box is selected the agreement was created through PeopleSoft Order Capture. |
| Contract Details |
Click this link to go the Contract Information page. Use this page to view contract information associated with the contracts business unit, general ledger business unit, and contract details. This applies only when integrating to the Contracts module in PeopleSoft Financials. |
Internal Agreement Type
This section appears on the page for internal agreements only.
Customer Information
This section does not appear on the page if you are creating an agreement for PeopleSoft HelpDesk and selected Internal as the agreement category when you added the agreement.
|
Field or Control |
Definition |
|---|---|
| Customer |
Click the Search button to select the name of the customer. Customers are established by using the Customer EIP, the Company component (select ) or the Consumer component (select ). |
| Contact |
Click the Search button to select the name of the customer's agent. This is the person to contact about agreement administration issues, such as renewing and remitting payment for agreements. You define contacts by using the Contact component or the Contacts page of the Company, Consumer, or Site component. |
| Contact Site |
Select the customer site that is associated with the contact. You establish this relationship by using the Customers page of the Contact component. Note: The prompt for this field shows only sites that are associated with the contact. |
| Prefix, Phone, and Extension |
Enter the telephone information for the customer's contact. If you select a contact, the CRM system populates these fields with the primary telephone information of the person's role as a customer's contact. You can modify this information as needed. |
Contact Information
These fields appear on the page only if you are creating an agreement for PeopleSoft HelpDesk and selected Internal as the agreement category when you added the agreement.
The contact fields on the main Agreement page for internal agreements are functionally similar to the customer contact fields mentioned above for external agreements. They refer to the person to contact about the agreement administration issues.
Some users may mistakenly assume that the contact listed on the main page of an internal agreement represents the person or worker for whom the agreement was created, or who was covered by the agreement. This field is only used to represent the administrative contact for the internal agreement.
|
Field or Control |
Definition |
|---|---|
| First Name, Last Name, Phone, Location and Search |
Click the Search button to select the name of the contact. You define contacts by using the Workforce component (select Workforce, Create Worker). |
| Prefix, Phone, and Extension |
Enter the telephone information for the contact. If you select a contact, the CRM system populates these fields with the primary telephone information of the contact. You can modify this information as needed. |
Default Provider Group
Enter the default provider group and group member that get assigned to perform the services that are covered by this agreement. These default values apply to service orders only; they do not apply to cases.
Note: This group box does not appear on the page if you are creating an agreement for PeopleSoft HelpDesk and selected Internal as the agreement category when you added the agreement.
Use the Agreement - Scope Details page (RF_AGREEMENT_COV) to specify people that are entitled to call center support or customer sites that are entitled to the service that is detailed by agreement lines.
Navigation
Image: Agreement - Scope Details page
This example illustrates the fields and controls on the Agreement - Scope Details page.
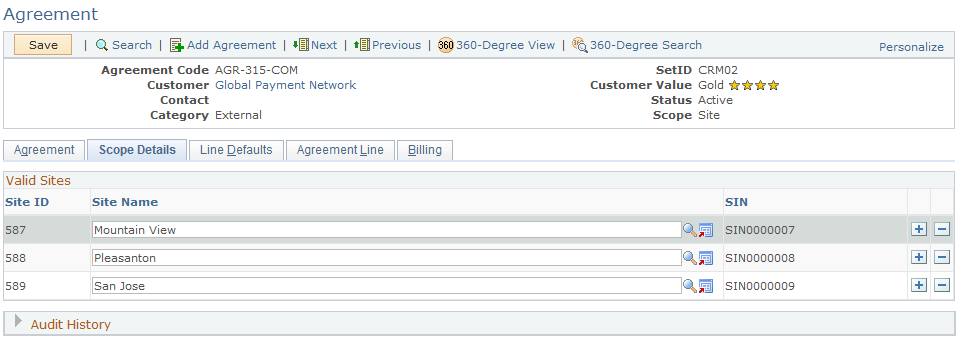
This page varies depending on the scope that is specified on the Agreement page. For agreements with the contact scope, you enter the people who are eligible for support. These agreements are only available to PeopleSoft Support. For agreements with the site scope, you enter sites that are eligible for service. These agreements are available to both PeopleSoft Support and PeopleSoft Integrated FieldService.
Note: This page does not appear if you are creating an agreement for PeopleSoft HelpDesk and selected Internal as the agreement category when you added the agreement.
Named Callers
This grid appears if the selected agreement has a scope of contact. Enter the people who are eligible to request support that is related to this agreement.
|
Field or Control |
Definition |
|---|---|
| Primary |
Select if this person is the primary caller. |
| Name |
Enter the name of a person who is entitled to request support that is defined by the agreement lines. Named callers must first be established as contacts by using the Contact component or the Contacts page of the Company, Consumer, or Site component. The number of contacts that you specify cannot exceed the number of maximum contacts that are recorded on the Agreement page. Note: For consumer agreements with scope as the contact, the CRM system populates the first row of the Named Callers grid with the name of the customer that is specified on the Agreement page. You can change this value or add additional rows. |
| PIN (personal identification number) |
Displays a unique value that is generated by the CRM system for each caller when the agreement is saved. Customers calling to request support under the terms of the agreement provide their PIN to your customer service representative (CSR). The CRM system uses the PIN that the CSR enters on cases to identify the agreement that defines the customer's entitlements. Note: The PIN is unique for every person within an agreement. If a person is a named caller on two agreements, this person is assigned two PINs. |
Valid Sites
This grid appears if the selected agreement has site as the scope. Enter customer sites that are eligible to receive support or services specified on its agreement lines.
|
Field or Control |
Definition |
|---|---|
| Site Name |
Enter the name of the site that is covered by this agreement. The CRM system displays the site ID of the selected site automatically. |
| SIN (site identification number) |
Displays a unique value that is generated by the CRM system for each site when the agreement is saved. Customers calling to request service under the terms of the agreement provide the SIN to your CSR. The CRM system uses the SIN that the CSR enters on cases or service orders to identify the agreement line that defines the customer's entitlements for a particular site. Note: The SIN is unique for every site within an agreement. If a site is valid on two agreements, the site is assigned two SINs. |
Use the Agreement - Line Defaults page (RF_AGREEMENT_ENTL) to specify the default values to appear on rows that are added on the Agreement Line page.
Navigation
Image: Agreement - Line Defaults page (1 of 2)
This example illustrates the fields and controls on the Line Defaults page (1 of 2).
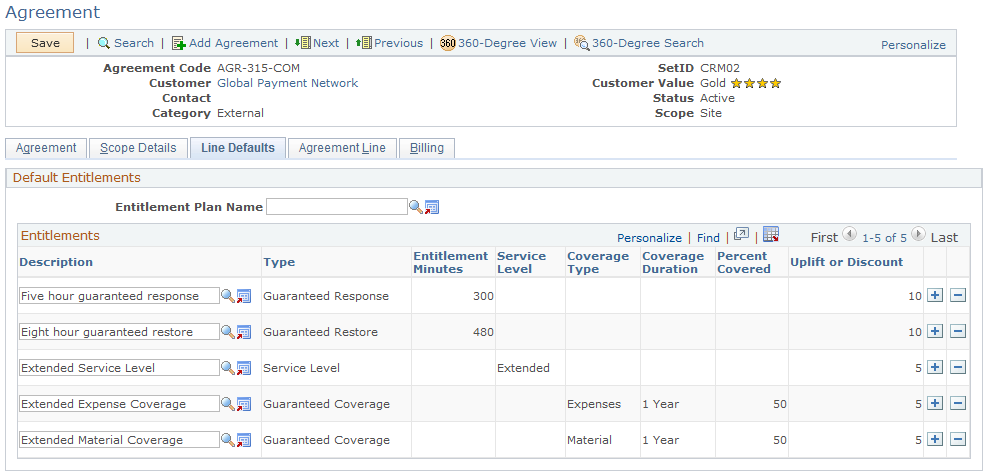
Image: Line Defaults page (2 of 2)
This example illustrates the fields and controls on the Agreement - Line Defaults page (2 of 2).

Note: If you are creating an agreement for PeopleSoft HelpDesk and selected Internal as the agreement category when you added the agreement, the system does not display the Coverage Type, Percent Covered, Coverage Duration and Uplift or Discount fields. The group boxes with the Person Type and Worker Status check boxes shown in the example above is only relevant for and displayed for internal agreements. It is not displayed for external or external-no pricing agreements
Default Entitlements
|
Field or Control |
Definition |
|---|---|
| Entitlement Plan Name |
Select a default entitlement plan to populate the grid initially. You define entitlement plans on the Entitlement Plan Setup page. The list of entitlements in the grid becomes the default entitlement set for each new line that is added on the Agreement Line page. Add or delete entitlements on each agreement line to define the final set of entitlements that is contractually owed to the customer. Each line in the grid is associated with the entitlement information that is defined on the Entitlements page. |
| Description |
Click the Lookup Entitlement Name button to locate entitlements that you want to add to the Entitlements grid. |
Note: Any changes that you make to the defaults do not affect any existing agreement lines.
Additional Selections for Internal Cases
|
Field or Control |
Definition |
|---|---|
| Person Type |
Select the person type. Available choices are Employee, Contingent Worker, and Person of Interest. Note: Person of Interest does not appear for IT Help Desk cases. |
| Worker Status |
Select the status of the worker. |
Use the Agreement Line page (RF_AGREEMENT_LINE) to define detailed agreement line information for each service or support offering.
Navigation
Image: Agreement - Agreement Line page: View Line Summary link
This example illustrates the fields and controls on the Agreement Line - View Line Summary page: View Line Summary link.
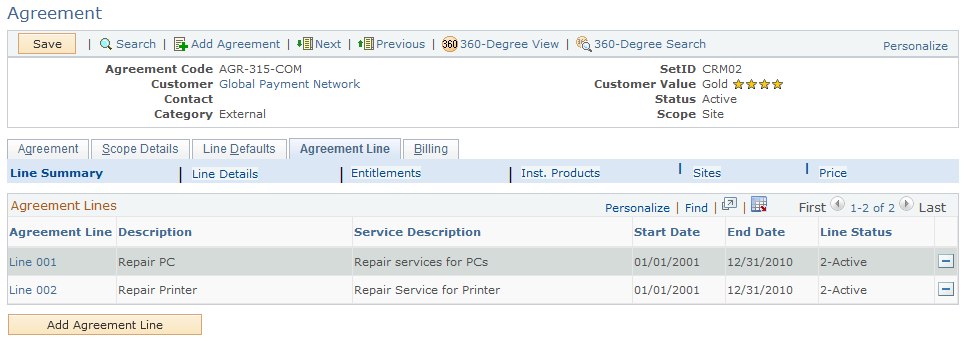
Image: Agreement - Agreement Line page: Line Details link (1 of 3)
This example illustrates the fields and controls on the Agreement - Agreement Line page: Line Details link (1 of 3).
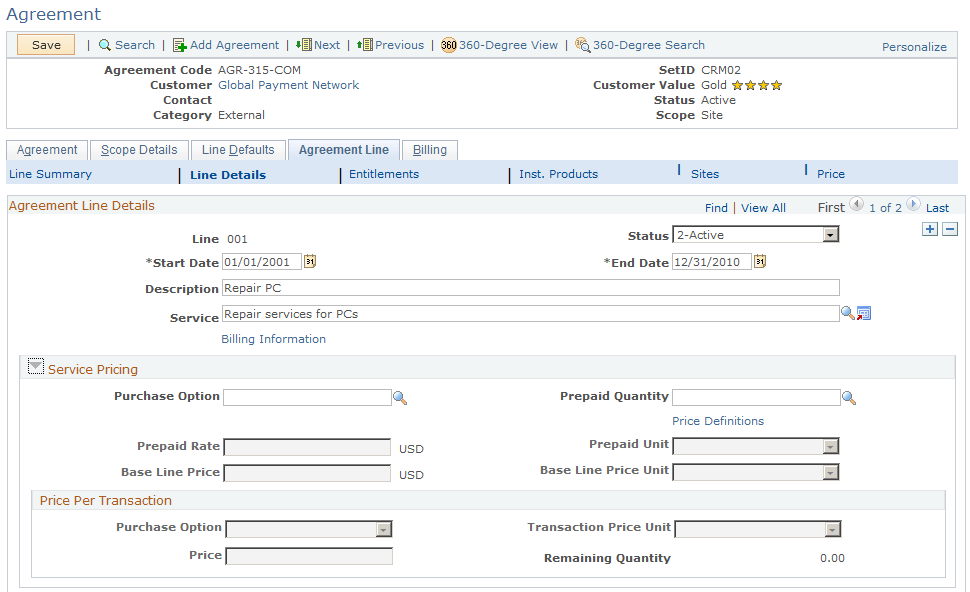
Image: Agreement - Agreement Line page: Line Details link (2 of 3)
This example illustrates the fields and controls on the Agreement - Agreement Line page: Line Details link (2 of 3).
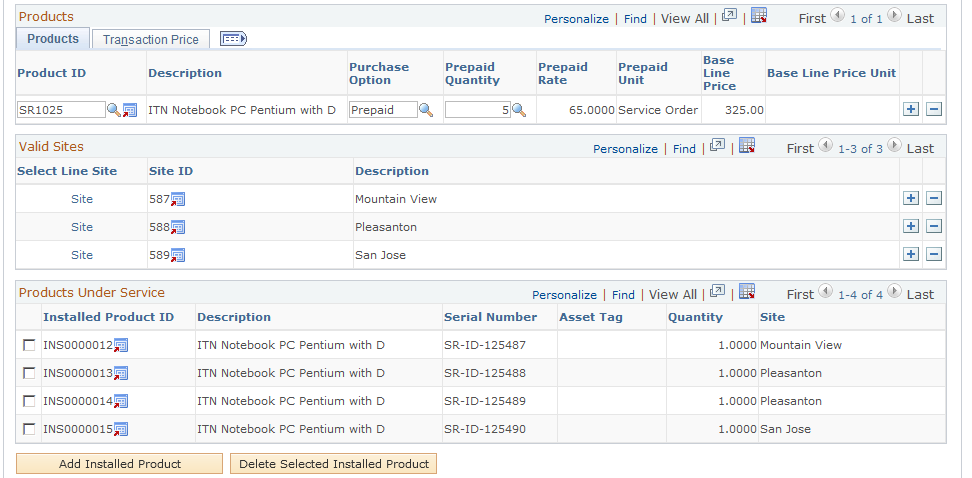
Image: Agreement - Agreement Line page: Line Details link (3 of 3)
This example illustrates the fields and controls on the Agreement - Agreement Line page: Line Details link (3 of 3).
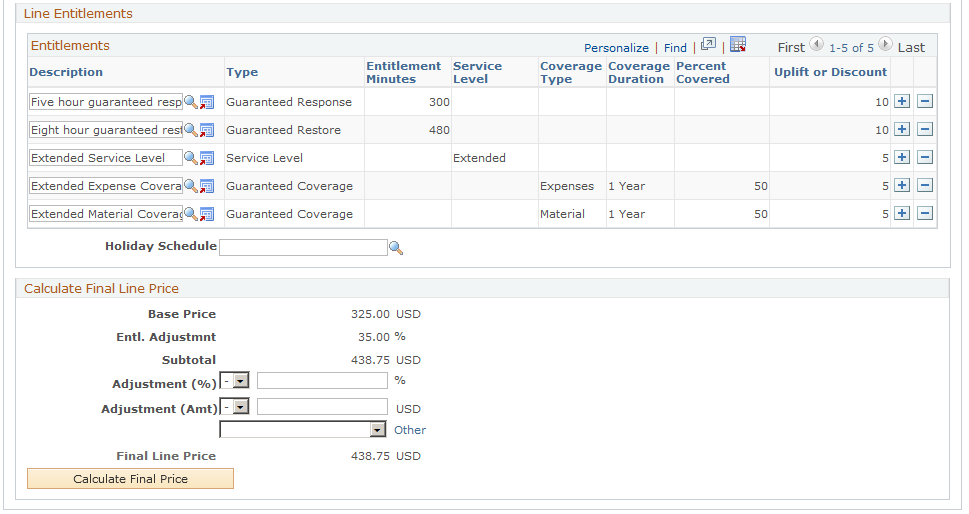
Image: Agreement - Agreement Line page: Installed Products link
This example illustrates the fields and controls on the Agreement - Agreement Line page: Installed Products link.
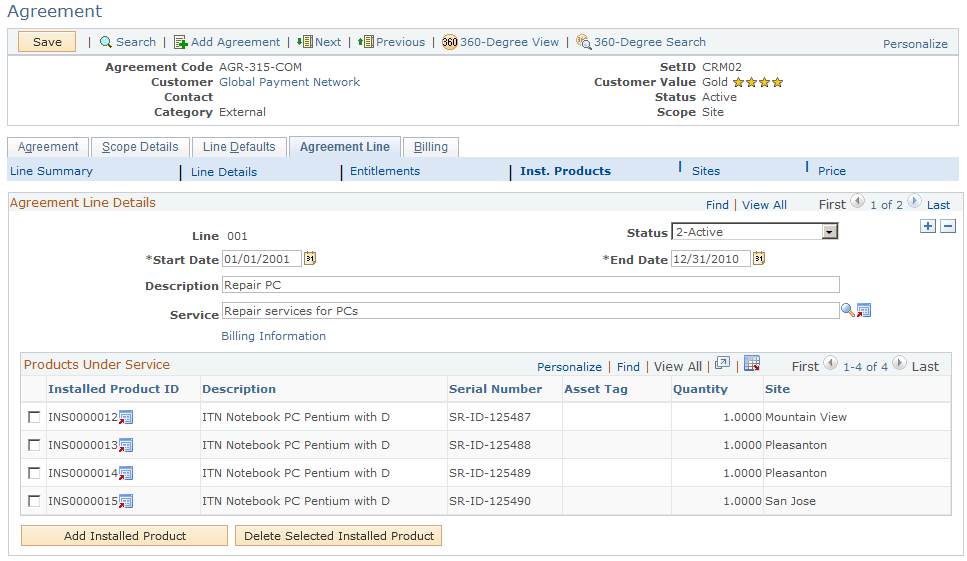
Image: Agreement - Agreement Line page: Entitlements link
This example illustrates the fields and controls on the Agreement - Agreement Line page: Entitlements link.
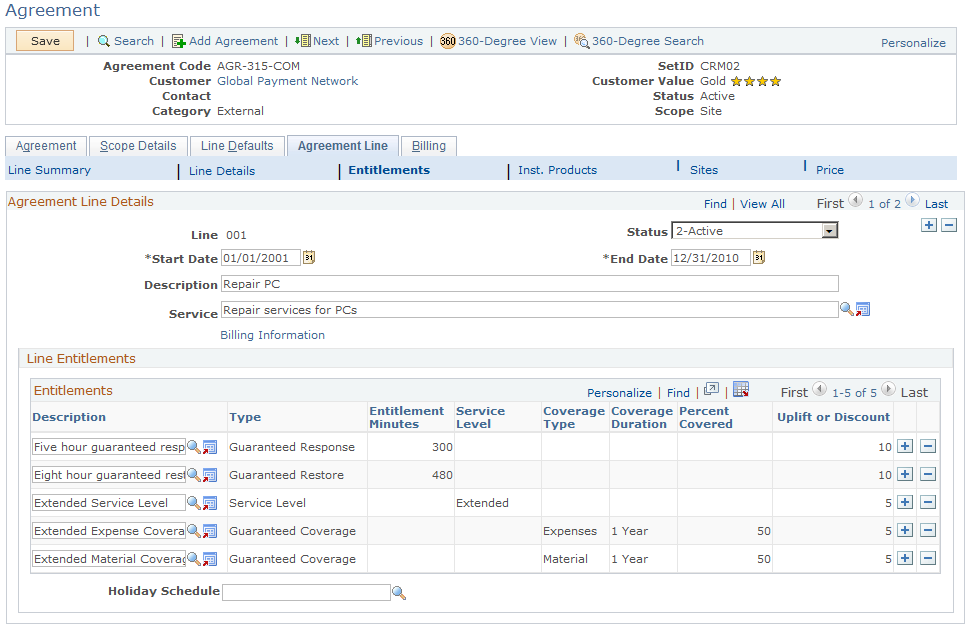
Image: Agreement - Sites page
This example illustrates the fields and controls on the Agreement - Sites page.
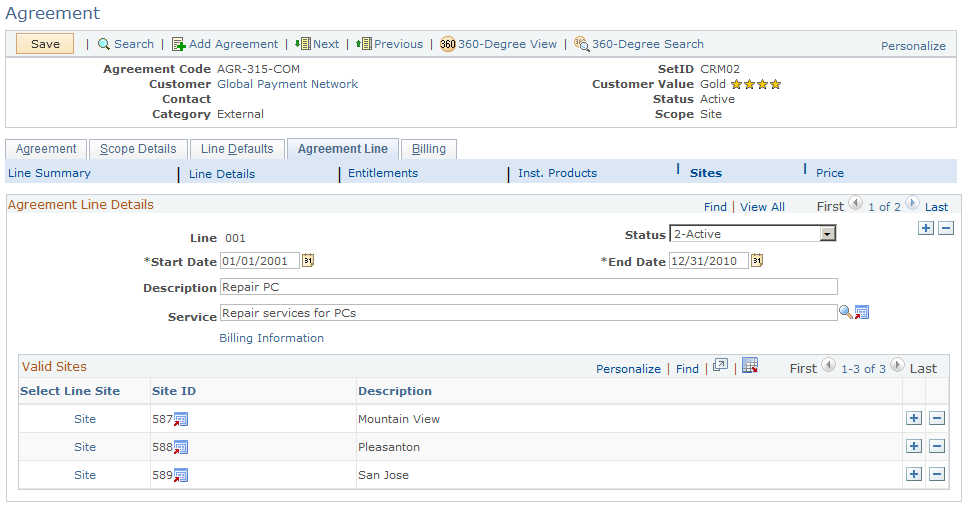
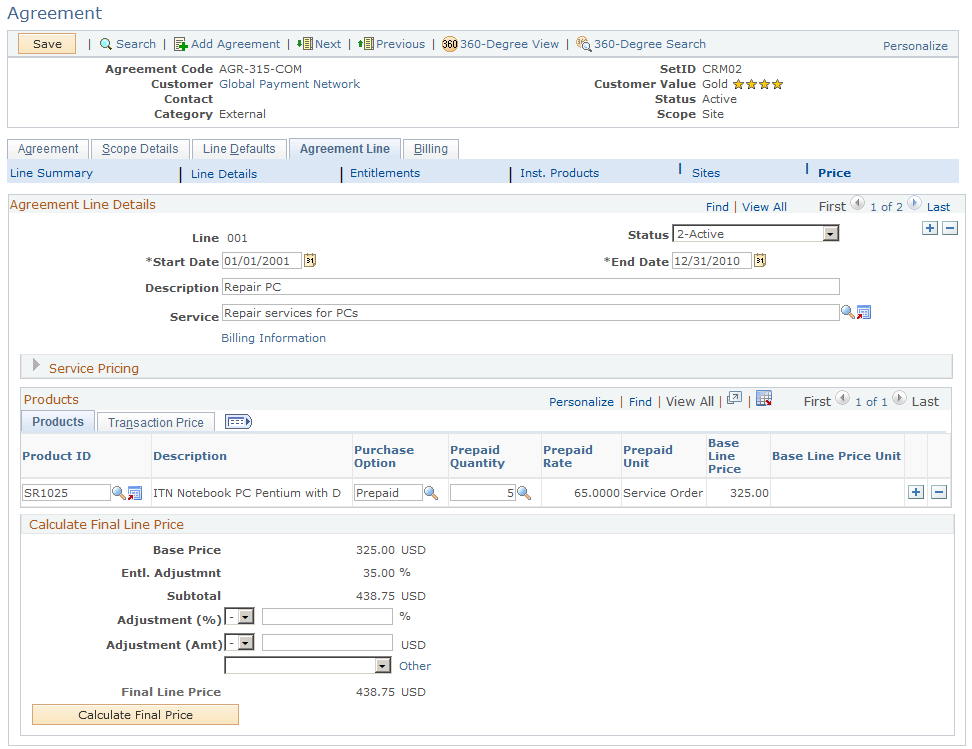
Image: Agreement - Agreement Line page: Price Information link
This example illustrates the fields and controls on the Agreement - Agreement Line page: Price Information link.
Note: If you are creating an agreement for PeopleSoft HelpDesk and selected Internal as the agreement category when you added the agreement, the system does not display the Sites and Price Information sub pages and links. If you selected External - No Pricing as the agreement category, the system does not display the Price Information sub page.
Agreement Line: View Line Summary
If an agreement has multiple agreement lines, they are listed in the Agreement Lines summary grid (available when you click the View Line Summary link) with basic information such as agreement line and service descriptions, product name, and product ID number. Click the agreement line number link to access the Agreement Line Details group box, where you can edit and view the corresponding line in detail.
If there is only one line in the agreement, the CRM system displays the Agreement Line Details group box together with pricing, site, entitlements, and product information.
When you click the Line Details link at the top of the page, the CRM system displays information for the selected agreement line in group boxes such as Retrieve Base Line Price, Calculate Final Line Price, Entitlements and so on. To minimize the need for scrolling, you can click the Sites, Entitlements, Installed Products, or Price Information links to view corresponding information selectively.
Agreement Line: Line Details - Agreement Line Details
Use this group box to add new lines to the agreement. Enter the status, start and end dates, description and service for the agreement service line. Click the Billing Information link to set up the billing schedule, purchase order, and payment terms information for the agreement line.
The Billing Information link only appears when the customer is integrating with the Contracts module in PeopleSoft Financials.
Note: For internal agreements (IT Help Desk and HR Help Desk), the Person Type and Worker Status fields also appear in this section.
Agreement Line: Line Details - Service Pricing
Use this group box to enter purchase option and transactional information for the agreement line service. Click the Price Definitions link to access the Service Pricing page.
Agreement Line: Line Details - Products
Use this section to define the products, purchase options, and prepaid quantity (if there is one). The system displays the prepaid rate, base line price, and base line price unit if it is stored in the system.
To view the transaction price for the product, click the Transaction Price tab. This section displays the transaction price on the corresponding agreement service pricing record. The price is based on the service or service-product combination that is defined for the agreement line.
The CRM system matches the value for the service and product fields on the agreement line with a unique pricing record that contains the same service and product values. In addition, this pricing record must contain the appropriate currency code for the agreement line. Never define more than one agreement service pricing record in the Pricing Information page for the same combination of service, product, and currency code, because this implies multiple prices for a single transaction.
You may associate a support-oriented agreement line with multiple products unless you have an integration to PeopleSoft Contracts. In this case you can only have one product per support-oriented agreement line (an agreement line with no Service). If you are not using the Contracts Integration feature, the save-edit check is disabled and you can enter multiple rows of data in the Product grid for the agreement line.
After defining the product and purchase option (prepaid options, if applicable), the other price related fields on this grid are populated when the user clicks the Calculate Final Price button.
When you perform an entitlement search from a case or a service order, the CRM system displays the transaction price or the remaining quantity that is defined on the customer's agreement.
Note: A credit card link on support cases is enabled when the associated agreement line includes a price per transaction and does not entitle the customer to 100 percent coverage of time, material, and expenses. Also, many of the fields related to pricing do not appear if you selected External - No Pricing as the agreement category.
|
Field or Control |
Definition |
|---|---|
| Purchase Option |
Displays the method of purchasing the service or support offering for an agreement or agreement service transaction. |
| Prepaid Rate, Prepaid Unit, Baseline Price and Baseline Price Unit |
Displays the amount paid per unit of work or per unit of time, depending on the purchase option of the agreement. Rates that are retrieved from an agreement service pricing record with a flat purchase option can be by the hour, case, or service order. Rates that are retrieved from an agreement service pricing record with a time and material purchase option can be per unit of time—hour, day, week, month, or year. |
| Transaction Purchase Option, Transaction Price Unit, Transaction Price, and Currency Code |
Displays the transaction purchase option, the price per unit, the total transaction price and the currency. The currency that is displayed for the rate reflects the currency that is entered on the Billing page of this component. |
| Remaining Quantity |
Displays the amount of the prepaid quantity that has not been used. For field service agreements, the prepaid quantity is in units of service orders or hours. For example, the CRM system reduces this quantity each time a user saves a new service order that is covered by the agreement line. If the service order is canceled, the CRM system readjusts the remaining quantity accordingly. For support agreements, the prepaid quantity is in units of cases or hours. Workflow processes must be implemented to update remaining quantity on support agreements. |
Agreement Line: Line Details - Valid Sites
Use this section to add any valid sites to the agreement line. The system displays the site ID and description.
Note: Every line of a site-based agreement must be linked to at least one site.
Agreement Line : Line Details - Products Under Service
Use this section to add or delete any installed products that are covered by the agreement line. The system displays the description, serial number, asset tag (if there is one), quantity, and site where the product is installed.
Use the Add Installed Product and Delete Installed Selected Product buttons to make changes to the products listed under this group box.
Agreement Line: Line Details - Entitlements
This section lists the entitlements that are contractually owed to the customer for an agreement line. These are initially populated by using the set of entitlements that are defined on the Default Entitlements page of this component. You can add or delete entitlements in the grid by adding and deleting rows.
The system also displays the Holiday Schedule field after the entitlements. It appears by default from the Service Level page. You can override it or clear it. For Platinum customers, you may want inactivate the holiday schedule by clearing the field. If you enter a holiday schedule without a service level, the system treats it as a 7 x 24 entitlement with holiday schedule.
Entitlements Apply To
The system displays a group of fields based on the options you selected on the Agreement Search Configuration page for the business unit you are using.
Use the fields that appear in this group box to link the response and restore times to the different values for the various fields that appear.
For example, if you selected the Match Using Case Criteria option and selected Role, Department, Priority, Source, and Location as categories that you wanted the system to use when searching for agreements, the system would display all of the fields on this page.
If you do set values for the fields appearing in this group box, the system uses them to search for agreements when a user selects the Select Agreement link from the Case page.
For example, if you set the Priority field to Low on this page, the system would locate this agreement line and use the response and restore times that you set up on the agreement line for all low priority cases that meet the other criteria of the agreement line.
For all low priority cases that fulfill the other matching considerations for a valid agreement line for all low priority cases, the system uses other standard fields that are considered for an agreement match, such as start and end date, status, product, installed product, asset, and so on. The system is not using the other criteria in the Entitlements Apply To section.
Agreement Line: Line Details - Calculate Final Line Price
This section displays the variables that the CRM system used to calculate the final line price for the agreement line.
Note: This section does not appear if you are creating an agreement for PeopleSoft HelpDesk and selected Internal as the agreement category when you added the agreement. If you selected External - No Pricing as the agreement category, the system does not display this section either.
|
Field or Control |
Definition |
|---|---|
| Base Price |
Displays the base price for the service or service product combinations of the agreement line. Note: For agreement lines with a prepaid purchase option, this value is informational only. The prepaid rate, not the base price, is used to calculate the final line price. |
| Entitlement Adjustment |
Displays the sum of the uplift and discount percentage values that are associated with the entitlements on this agreement line after clicking the Calculate Final Price button. |
| Subtotal |
Displays the subtotal for the agreement line after the base price has been adjusted by the entitlement uplift or discount. |
| Adjustment (Percentage) |
Select the positive (+) or the negative (–) sign from the drop-down list box and then enter a percentage by which you want to adjust the price of the agreement line. |
| Adjustment (Amount) |
Select the positive (+) or the negative (–) sign from the drop-down list box and then enter an amount by which you want to adjust the price of the agreement line. |
| Reason |
Select the reason that you are making the adjustment. If the reason is not listed in the drop-down list box, click the Other link and enter the reason you are making the adjustment. |
| Final Line Price |
Displays the final price for the agreement line. Sum of the Prepaid Quantity x Prepaid Rate |
| Calculate Final Price |
Click this button to calculate the final price for the agreement line. The system retrieves all appropriate service or service/product prices, calculates subtotals and adds and subtracts any discounts or adjustments that you have made to the base price. |
Agreement Line: Installed Products
The section lists all of the installed products covered by that agreement line. If the agreement covering the service order has a scope of Site, the installed products are limited to those that match the sites that are covered by the agreement line.
The CRM system displays the Products Under Service grid if you choose to view line details or just the installed product information of the agreement line.
It lists the customer's installed products that are eligible for the service or support specified on the agreement line. Installed product information must be added manually to the agreement.
When installed products are added to an agreement line, the CRM system automatically updates them on the agreement line whenever replacements are made at the customer's site (when material is recorded in the Service Order on the Time Material Expense page).
Before selecting an installed product, you must define a product for the agreement line; and, for agreements with a scope of Site, select the sites that will be covered by the line.
If the scope of the agreement is Contact, the installed product choices are limited to those that match the product and customer specified. You can never select installed products with a status of Uninstalled.
Agreement Line: Entitlements
This section lists the entitlements that are contractually owed to the customer for an agreement line, including the holiday schedule. These are initially populated by using the set of entitlements that are defined on the Default Entitlements page of this component.
Agreement Line: Sites
The section lists all of the sites associated with the agreement line: the allowable values are determined by the sites that were entered on the Scope Details page. You can add or delete sites displayed in the grid by adding and deleting rows.
Note: This section does not appear if you are creating an agreement for PeopleSoft HelpDesk and selected Internal as the agreement category when you added the agreement.
Agreement Line: Price Information
Use this group box to enter purchase option and transactional information for the agreement line. Click the Price Definitions link to access the Service Pricing page.
For more information and field descriptions, refer to the Line Details - Products section for the Agreement Line Tab.
Note: This section does not appear if you are creating an agreement for PeopleSoft HelpDesk and selected Internal as the agreement category when you added the agreement. If you selected External - No Pricing as the agreement category, the system does not display this section either.
Use the Agreement - Billing page (RF_AGREEMENT_BILL) to define agreement billing information.
Navigation
Note: This page does not appear if you are creating an agreement for PeopleSoft HelpDesk and selected Internal as the agreement category when you added the agreement. If you selected External - No Pricing as the agreement category, the system does not display this page either.
Image: Agreement - Billing page (1 of 2)
This example illustrates the fields and controls on the Agreement - Billing Details page (1 of 2).
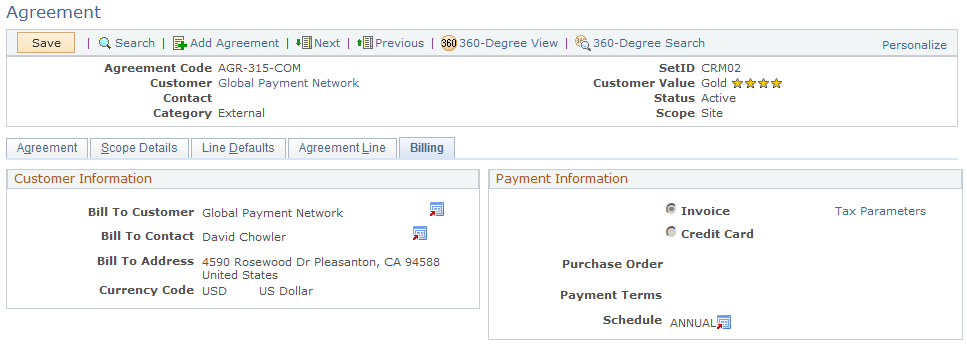
Image: Agreement - Billing page (2 of 2)
This example illustrates the fields and controls on the Billing Details page (2 of 2).
Customer Information
These fields capture information to determine how much to charge the customer for the agreement and the method of remittance that the customer uses.
|
Field or Control |
Definition |
|---|---|
| Bill to Customer |
Select the customer that should be billed for the service. The primary customer appears by default in this field. |
| Bill To Contact |
Select the contact that should be billed for the service. The primary contact appears by default in this field. |
| Bill To Address |
Select the bill to customer address to which the bill should be sent. The primary bill to address appears by default in this field. |
| Currency Code |
Select the currency that the customer is using for the transaction. The currency name appears to the right of the field. When the information is sent to PeopleSoft Contracts, the system prints the name of the currency on the invoice. The base currency of the sold to customer appears by default in this field. |
Payment Information
|
Field or Control |
Definition |
|---|---|
| Purchase Order |
Enter the customer-provided purchase order number. Note: This field does not have any integration to PeopleSoft Supply Chain Management (PeopleSoft SCM) and is not required. If you enter a purchase order number in this field, the system posts it to PeopleSoft Contracts. When PeopleSoft Contracts sends the information to PeopleSoft Billing for invoice generation, the system prints the purchase order number on the invoice. |
| Invoice |
Select if the customer intends to pay for the service by invoice. |
| Payment Terms |
If you selected the Invoice option, use this field to select the payment terms for the invoice (for example, NET30 - Due in 30 days). The payment terms appear on the invoice that is sent to the customer. |
| Credit Card |
Select if the customer intends to pay for the service by credit card. The system displays the Credit Card Information link after you select this option. |
| Credit Card Information |
Click to access the Credit Card Details page, where you enter credit card authorization information, such as the card type, card number, expiration month and year, and card verification number. Note: The system deletes the card verification number after the credit card authorization process is completed. The system populates the name of the cardholder, email address and phone number of the bill to contact (selected on the Billing page). It also populates the bill to address as the default address for the new credit card. You can enter a new address, or click the Edit link to update the selected address in the corresponding Person record. The system displays the authorization status, date, and code on the Transactions Results page after you click the Submit Transaction button on the Credit Card Details page. Note: You can integrate credit card information with Cybersource, a third-party card vendor. The Credit Card Details page is also used in the Case component to submit customers' credit card information for authorization purposes. |
| Tax Parameters |
Click this link to access the Tax Parameters page. Use this page to indicate whether the customer is exempt from taxes. If the customer is tax exempt, enter the exemption certificate number and tax code that the customer supplies to you. The system uses a default tax code based on the customer's address; however, you can override it by choosing another value. |
| Schedule |
Select the schedule to indicate the way in which the revenue needs to be recognized in the general ledger. The system synchronizes this information from the general ledger. |
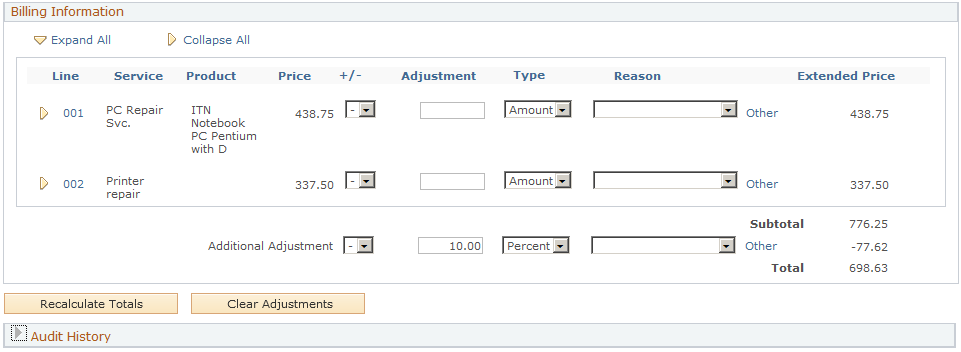
Billing Information
Managers can use this section to adjust the fees by increasing or decreasing a fee by a percent or by an amount.
The system does not use the new price in the totals until a user clicks the Recalculate Totals button. The system then calculates the sum of all active or closed lines, including those that have changed, and provides the recalculated amount in the Total Amount field.
|
Field or Control |
Definition |
|---|---|
 |
Click the Expanded button to the left of the Line column to view all billable amounts that were included in the price for a given fee. |
| +/-Add or Delete Button |
Select the positive (+) or the negative (–) sign from the drop-down list box and then enter the number by which you want to adjust the price of the agreement line. |
| Adjustment |
Enter the number, either a percentage or an amount, by which you want to make an adjustment. |
| Type |
Select Percent or Amount. |
| Reason |
Select the reason for the adjustment. These values are user-definable. You define reason codes on the Reason Code page (select ). Use Agreement Billing Adjustment, Case Billing Adjustment or Svc Order Billing Adjustment as the reason type when you set up your reason codes. |
| Other |
If the predefined values for the Reason field do not describe the reason for the adjustment, click this link to access the Other Reason page where you can enter a unique description of the reason. |
| Extended Price |
This value is calculated when you click the Recalculate Totals button. The system sums the total of the price, plus or minus any adjustments. |
| Recalculate Totals |
Click this button any time there is a change to the Billing Details grid that impacts the price or the currency code. The system recalculates the total cost of the fees. |
| Clear Adjustments |
Click this button to clear the adjustments that were made and return to the original total amounts. |