Add a Radio Button Action
The radio button action enables a robot to interact with radio buttons. For example, determine whether any radio buttons are selected or a specific radio button is selected.
Add a Radio Button Action Using the Recorder
- Open the robot for editing.
See Open a Robot.
- Start the
recorder.
- On the canvas, select the action to record after.
- On the toolbar, select Record after the selected
action
 .
. - In
the panel, from the Select browser tab to target drop-down, select
the application where the robot works. You might need to scroll to find it.
If the application doesn't appear, close the panel, open the application in another tab, and start the recorder again.
The RPA Smart Recording panel appears.
- Select
Begin Recording.
The Smart Recording window appears in the lower-left corner of your browser. Additionally, your mouse cursor can now target elements in the user interface.

- Point to the radio button. Wait for the
shading to turn green and the mouse icon to change to a hand, and then select the UI
element.

For more tips, see Quick Start for Building Robots.
A panel appears with details about the element you selected. - Configure the action.
- Fill in the fields.
-
Name: Enter the name of the target. This text appears on the robot action in the canvas and in the list of targets in the robot.
Your settings determine whether Oracle Integration reuses targets for previously selected UI controls. You can override these settings, if needed. Reusing a target offers benefits. For example, you can update a target one time, and all actions that use the target get the update.
-
Target name: Review the XML Path Language, or XPath, for the element that you selected. Underscores (_) appear in place of invalid characters. You can update the value, if you want.
-
Action: Select how the robot interacts with the radio button. See Operations for the Radio Button Action.
The action that you select determines the other fields that appear.
-
- Provide values for the action that you selected.
Action Fields to update Is Radio Button Selected
-
Save to: Choose where to store the result, which is either True or False. You have the following options:
-
Assign the value to a variable.
-
Select the Output tab.
-
Click within the Save to field, and select Variables
 .
.The Variables panel appears.
-
Determine whether the variable that you need appears in the list. If not, create it. See Create a Variable.
-
Select the variable to assign the value to, and drag it to the Save to field.
-
-
Assign the value to a property of the output.
-
Select the Output tab.
-
Click within the Save to field, select More options, and then select
 Output.
The Output panel appears.
-
Determine whether the output that you need appears in the list. If not, create it. See Create a Trigger's Input or Output.
-
Select the output to assign the value to, and drag it to the Save to field.
-
-
Is Radio Button Set To
-
Value: Specify a radio button. The robot determines whether it's selected. First, choose the radio button's label from the Set Value field, and then select Set Runtime value.
-
Test value: Optionally, specify a radio button. The recorder determines now whether that specific option is selected right now. First, choose the radio button's label from the Set Value field, and then select Set Runtime value.
-
Save to: Choose where to store the result, either True or False. You have the following options:
-
Assign the value to a variable.
-
Select the Output tab.
-
Click within the Save to field, and select Variables
 .
.The Variables panel appears.
-
Determine whether the variable that you need appears in the list. If not, create it. See Create a Variable.
-
Select the variable to assign the value to, and drag it to the Save to field.
-
-
Assign the value to a property of the output.
-
Select the Output tab.
-
Click within the Save to field, select More options, and then select
 Output.
The Output panel appears.
-
Determine whether the output that you need appears in the list. If not, create it. See Create a Trigger's Input or Output.
-
Select the output to assign the value to, and drag it to the Save to field.
-
-
Select Radio Button
-
Value: Specify the radio button that must be selected. First, choose the radio button's label from the Set Value field, and then select Set Runtime value.
-
Test value: Specify the radio button that must be selected now, while you record. First, choose the radio button's label from the Set Value field, and then select Set Runtime value.
If needed, you can choose different values for these fields.
-
- Select Save.
- Fill in the fields.
- Choose
the appropriate next step:
-
Add another action using the recorder. See Add an Action to a Robot.
-
Pause the recorder so you can figure out your next steps. Select Pause
 in the Smart Recording window in the lower-left corner of the browser.
 -
Stop the recorder and return to the canvas. Select Stop
 in the Smart Recording window in the lower-left corner of the browser.
If you close the application that you're recording in, you can still stop the recorder. Select Stop
 in the toolbar of the canvas.
 -
Customize the action you just added, such as by creating validation or identifying the screenshots to capture. Stop the recording, double-click the action on the canvas, and update the action as needed. All actions are read-only until you stop the recorder.
-
- Above the canvas, select Save.
Add a Radio Button Action Using the Low-Code Tools
- Open the robot for editing.
See Open a Robot.
- Add the action
to the robot.
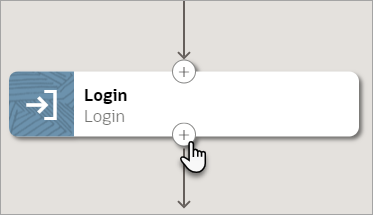
- On the canvas,
point to an action, and click
+.

A menu of available actions appears.
- Select Radio Button.
A Radio Button action appears on the canvas, and the Radio Button panel appears.
- On the canvas,
point to an action, and click
+.
- Configure the action.
- In the panel, enter a Name and
Description for the
action.
The Name appears on the action in the canvas and should help you and others understand the goal of the action.
- From Operations, select how the robot interacts with the radio button.
- In another browser window or tab, open the application where the robot works.
- In the panel, enter a Name and
Description for the
action.
- Specify the information that is passed into the action on the
Input tab.
Field Description Value If the operation that you selected requires you to target an individual radio button, the Value field appears on the Input tab.
If this field appears, specify details for it:
-
Right-click the radio button that the robot needs to interact with, and select Inspect.
-
In the HTML code for the page, locate the
idor thevalueof the radio button. -
Type the value for the
idorvalueinto the Value field in the robot.You don't need to format the value in a specific way. For example, if the
idischoice1, typechoice1.
Group Name -
In the application that the robot needs to work, right-click the radio button group that the robot needs to interact with, and select Inspect.
-
In the HTML code for the page, locate the
namefor the radio buttons in the radio button group. -
Type the value for the
nameinto the Group Name field in the robot.
Screenshots Specify whether to capture any screenshots as part of the action. See Capture Screenshots in Robots.
-
- If the Output tab appears, specify where to save the
radio button information from this action. You have the following options:
-
Assign the value to a variable. The value is a boolean value, indicating whether a radio button is selected.
-
Click within the Save to field, and select Variables
 .
.The Variables panel appears.
-
Determine whether the variable that you need appears in the list. If not, create it. See Create a Variable. The variable must have a type of boolean.
-
Select the variable to assign the value to, and drag it to the Save to field.
-
-
Assign the value to a property of the output. The value is a boolean value, indicating whether a radio button is selected.
-
Click within the Save to field, select More options, and then select
 Output.
The Output panel appears.
-
Determine whether the output that you need appears in the list. If not, create it. See Create a Trigger's Input or Output. The property must have a type of boolean.
-
Select the output to assign the value to, and drag it to the Save to field.
-
-
- On the Pre Validate and Post Validate tabs, specify whether to complete any validation before and after the action.
- Click OK.
- Above the canvas, select Save.
Operations for the Radio Button Action
| Option | Description | Example |
|---|---|---|
|
Is Radio Button Selected |
Determine whether any radio buttons in a group are selected. |
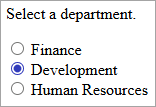
The action returns True for the following radio buttons:
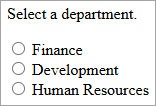
The action returns False for the following radio buttons:
|
|
Is Radio Button Set To |
Determine whether a specific radio button is selected. |
The action returns True if you're checking whether Development is selected:
The action returns False if you're checking whether Finance is selected:
|
|
Select Radio Button |
Select a radio button. |
If you tell the robot to select the Development radio button, the robot selects that option:
|

