Location and Working Hours Restrictions
Applies to NSPOS 2020.1.X and later.
You can set up employee location-restrictions in NetSuite ERP that limit where an associate can log in. Previously, this feature was available only from an NSPOS register. You can also restrict access to only the working hours assigned to the employee's normal shift.
Updates in NetSuite ERP:
-
Added a method to manage location assignments from the employee record
-
Added a method to assign employee working hour restrictions
-
Defaulted location assignments for new employees to the location where their NSPOS setup is created
Updates in NSPOS:
-
Defaulted location assignments for new employees to the location where their NSPOS setup is created
See Employees and NSPOS to work with employee locations, working hours, and more.
You can modify location and working hour assignments as needed.
Location Restrictions
You can limit the locations in which a cashier, sales associate, or other employee can log into an NSPOS register. By specifying the authorized locations, the employee will be unable to log in at other 'unassigned' locations.
Multiple locations can be authorized, with the default for new and existing employees being 'all locations.' Locations can be assigned using the employee record in NetSuite ERP or the management function in NSPOS. A store manager (Resource ID 9070) or administrator (Resource ID 9090) might use the NSPOS option to change location restrictions from an NSPOS register.
If no location is set up for an employee, and they no longer have the 'all locations' default, they cannot log in to any register in any location.
After setting up a location restriction, there is a brief delay for it to synchronize between the replication server and NetSuite ERP.
No Temporary Override for Locations
A location restriction cannot receive a temporary override. If an employee needs a temporary authorization, a manager or administrator can create a 'new' employee and authorize them to the location.
To set up location restrictions in NetSuite:
-
Log into NetSuite.
-
Go to Lists > Employees > Employees.
-
Click Edit for the employee to assign locations.
-
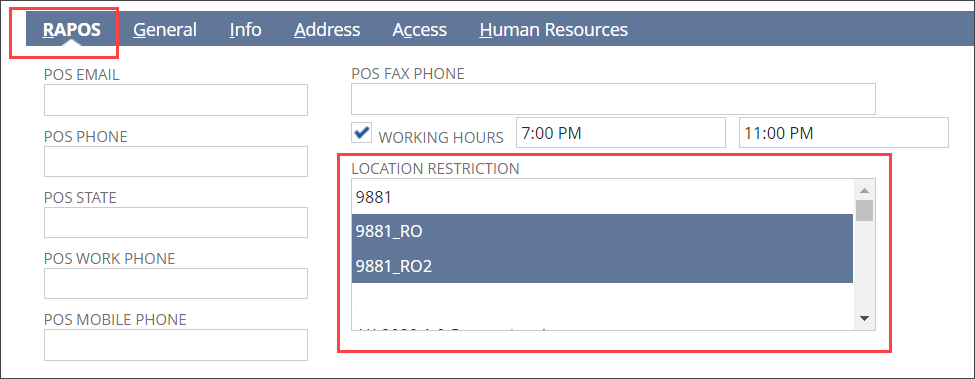
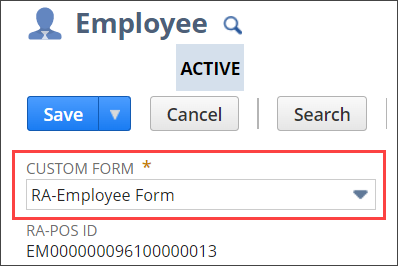
For Custom Form, select RA -Employee Form.
-
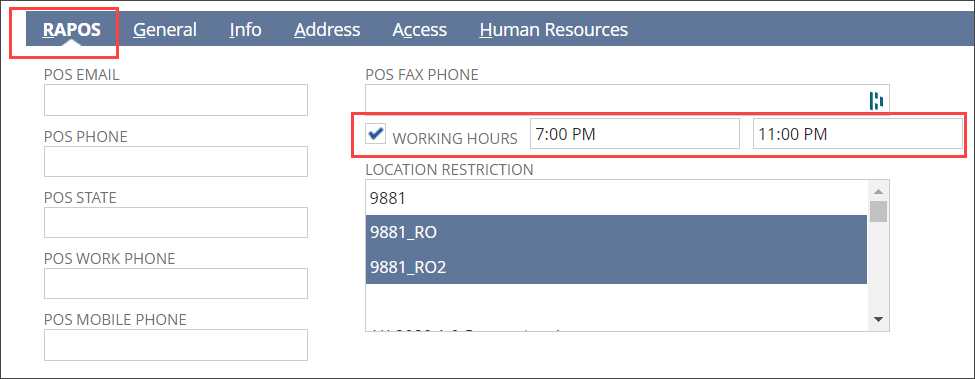
On the RAPOS subtab, under Location Restriction, highlight the location to which the employee should have access.
The employee cannot log on at locations not highlighted.
Tip:Press the Ctrl key to select multiple locations. If no locations are highlighted, the employee can log into all locations.
-
Click Save.
To review location assignments, click View on the employee's record and open the Custom subtab.
Although the default is 'all locations,' if you Edit an employee record, you must set up their location restrictions.
If a location assigned to an employee is set to Inactive, viewing the employee's record will still show the assignment. Editing the employee record will remove the assignment.
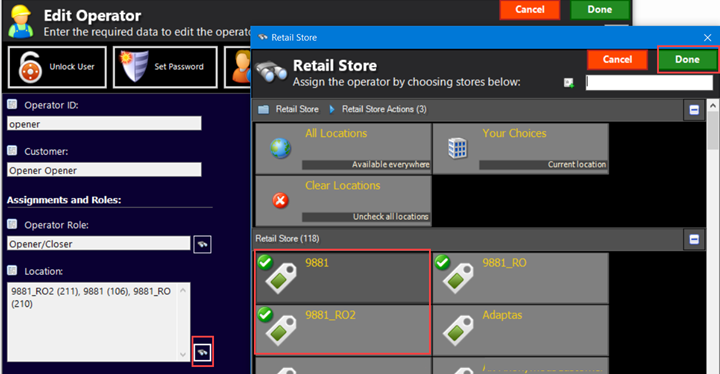
To set up location restrictions in NSPOS:
-
Press Ctrl+F12 on the keyboard to open the Function List.
-
Enter part of the employee's name
receiptsin the search field. -
Tap the employee's name.
-
Under Location, tap the 'binoculars' search icon.
Tap the locations to which the employee should have logon access.
Tip:To grant an employee access to all locations, highlight all locations.
If your list of locations is large, enter search criteria at the top to display a specific location.
-
Tap Done to close the location list.
-
Tap Done to save the restriction assignments.
If an employee must work another employee's shift at a location to which the replacement is not assigned, the store manager or administrator can use these steps to add the location.
Working Hours
Use the NSPOS working hours feature to limit register access by the hours assigned to an employee's shift. The option prevents an employee from logging in outside of those hours, and will automatically log off an employee when their working hours end. The employee is prompted on the register 15 minutes before they are logged off.
This feature is helpful for managing overtime hours and for preventing unauthorized access when a store is not open. The default for new and existing employees is no working hour restrictions.
Things to note:
-
Working hours run from 12:00 AM to 11:59 PM in the register location's time zone
-
Working hours apply to all seven days of the week.
-
Working hours are set and can be viewed in NetSuite ERP
-
Working hours are not available for viewing from an NSPOS register
-
Working hours can be temporarily extended for up to 12 hours
If a scheduled employee is not available for a shift, their substitute's working hours can be extended. However, the substitute must be authorized to work in the location.
Working hours are set within a 24-hour period that starts and ends at midnight. You cannot using set up 'night shift' hours that overlap the midnight transition.
At Working Hours Shift End
Prior to automatically logging off an employee, NSPOS verifies whether a transaction is open (in progress) on the register. This check is done to prevent data loss and to avoid impacting your business.
-
If a transaction is open, the log off is paused until immediately after the transaction is closed
-
If there are no open transactions, the log off occurs as expected
To set up working hours for an employee working in NSPOS:
-
Log into NetSuite.
-
Go to Lists > Employees > Employees.
-
Find the desired employee and click Edit.
-
For Custom Form, select RA -Employee Form.
-
Open the RAPOS subtab.
-
Check the Working Hours box.
-
Enter the Shift Begin and Shift End times.
Working hours apply to all seven days of the week.
Important:An employee cannot log into NSPOS until their working hours begin. If an employee needs to log in before their shift to prepare the cash drawer or perform other register tasks, set their hours to begin at least 30 minutes early.
-
Click Save.
To review a working hours assignment, click View on the employee's record and open the Custom subtab.
Extending a Working Hours Shift
When the employee receives a 15 minute log off alert, an option is provided for a store manager (Resource ID 9070) or administrator (Resource ID 9090) to extend their shift. A shift can be extended up to 12 hours and is entered in minutes, from 1 to 720. The default time to extend is 15 minutes.
If a shift will extend past midnight local time, a new extension must be entered when midnight is reached.