Track Customer Deposit Balances
This use case shows you how to track deposit and refund balances on sales orders, which you could use to track layaways. You could also build other customizations that require the customer deposits, deposit refunds, and gift certificates applied to a sales order before it's invoiced.
This project is available on the SuiteCloud Project Repository on Oracle Samples GitHub. It includes the complete project customization setup with custom objects, unit tests, package file configuration, and more.
Customization Details
This customization for this use case includes:
-
A custom field (Amount Deposited) to store the calculated total amount of deposits made on the sales order
-
A custom field (Balance Remaining) to store the balance remaining on the sales order
-
A saved search (Deposit Balance on Sales Order) to determine the balance of customer deposits
-
Four user event scripts triggered on the beforeSubmit and afterSubmit entry points
Steps in this tutorial to complete this customization:
This tutorial is also available as a Complete SuiteCloud Project.
Before You Begin
The following table lists features, permissions, and other requirements necessary for performing this tutorial and implementing the solution:
|
Required Features |
The following features must be enabled in your account:
For more information, see Enabling Features. |
|
Required Permissions |
You need a role with access to the following:
For more information, see NetSuite Permissions Overview. |
|
Other Requirements |
None |
Step 1: Create the Custom Fields and Saved Search
This customization uses two custom fields. The Amount Deposited field stores the calculated total deposits made on the sales order. The Balance Remaining field stores the balance remaining on the sales order.
This customization uses a transaction saved search with deposit balances on sales orders. When calculating the balance of customer deposits, you need to include related deposit applications in case any deposits were refunded. This saved search helps you do that. This saved search also considers if gift certificates or discounts have been applied to the sales order.
To create the Amount Deposited transaction body field:
-
Go to Customization > Lists, Records, Fields > Transaction Body Fields > New.
-
Enter values for each field as listed in the following table:
Field
Value
Label
Amount Deposited
ID
_total_deposit_paid
Type
Currency
Store Value
Checked
Applies To
Sale, unless you want to hide the field by default and edit a custom form to show the field
Display > Subtab
Main
Display > Display Type
Inline Text
Display > Help
This field is set by a script to show the total amount deposited on the sales order.
Validation & Defaulting > Default Value
0.00
-
Click Save.
To create the Balance Remaining transaction body field:
-
Go to Customization > Lists, Records, Fields > Transaction Body Fields > New.
-
Enter values for each field as listed in the following table:
Field
Value
Label
Balance Remaining
ID
_balance_remaining
Type
Currency
Store Value
Checked
Applies To
Sale, unless you want to hide the field by default and edit a custom form to show the field.
Display > Subtab
Main
Display > Display Type
Inline Text
Display > Help
This field is set by a script to show the remaining balance on the sales order after deposits, refunds, and gift certificates.
Validation & Defaulting > Default Value
0.00
-
Click Save.
The saved search includes criteria and results settings for creating a transaction saved search with deposit balances on sales orders. The saved search is complex because it uses expressions and formulas.
To create the saved search:
-
Go to Reports > Saved Searches > All Saved Searches > New.
-
Select Transaction.
-
On the Saved Transaction Search page, enter or select the following values:
Field
Value
Search Title
***USED IN SCRIPT*** Deposit Balance on Sales Orders
ID
_sobalancedue
Criteria > Use Expressions
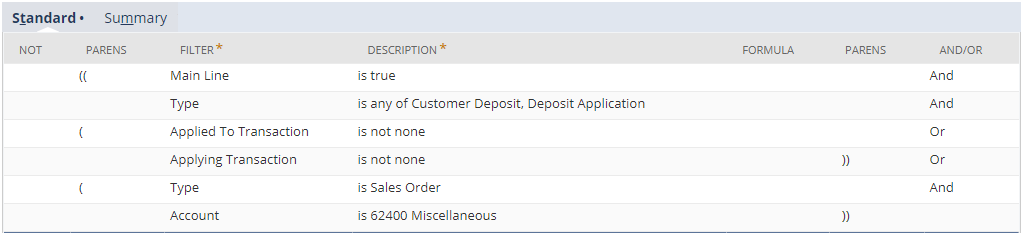
In the Description for the Account filter, you need to set the value for the correct account in your COA.
Results
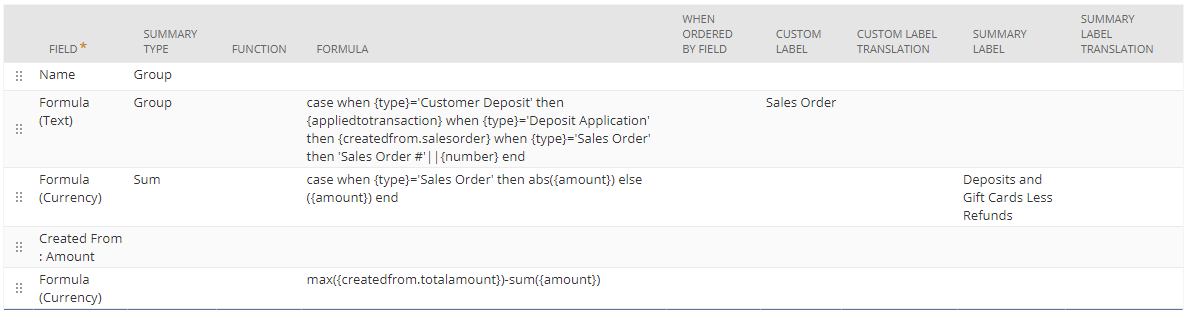
Here are the formulas you can copy and paste into your search:
-
case when {type}='Customer Deposit' then {appliedtotransaction} when {type}='Deposit Application' then {createdfrom.salesorder} when {type}='Sales Order' then 'Sales Order #'||{number} end
-
case when {type}='Sales Order' then abs({amount}) else ({amount}) end
-
max({createdfrom.totalamount})-sum({amount})
-
-
Click Save & Run to ensure your search runs and returns the correct results. You should see a list of sales orders with customer deposits and refund balances. Click a sales order number to see the amounts that make up the total balance.
For more information about creating custom fields and saved searches, see the following help topics:
Step 2: Write the Set Custom Fields User Event Script
This script sets the custom Amount Deposited and Balance Remaining fields on a sales order record when the user saves it.
Script Summary
The following table summarizes this script:
|
Script: Deposit Balance Set Custom Fields |
|
|---|---|
|
Script Type |
|
|
Modules Used |
|
|
Entry Points |
|
For more information about script types and entry points, see SuiteScript 2.1 Script Types.
The Complete Script
This tutorial includes the complete script along with individual steps you can follow to build the script in logical sections. The complete script is provided below so that you can copy it, paste it into your text editor, and save it as a .js file (for example, ue_set_custom_fields.js).
If you would rather create this script step by step, follow the steps in Build the Script.
This tutorial script uses the define function, which is required for an entry point script (a script you attach to a script record and deploy). If you want to copy the script into the SuiteScript Debugger and test it, you must use the require function. For more information, see SuiteScript Debugger.
Note
This sample uses SuiteScript 2.1.
              /**
 * @NApiVersion 2.1
 * @NScriptType UserEventScript
 * @NModuleScope SameAccount
 */

define(['N/record', 'N/search', 'N/log'], (record, search, log) => {
    function afterSubmit(scriptContext) {
        const contextOrder = scriptContext.newRecord;
        const soID = contextOrder.id;
        const salesorder = record.load({
            type: record.Type.SALES_ORDER,
            id: soID
        });
        const soTotal = salesorder.getValue({
            fieldId: 'total'
        });
        const soEntity = salesorder.getValue({
            fieldId: 'entity'
        });
        const soTranId = salesorder.getValue({
            fieldId: 'tranid'
        });
        const soFullTextTranID = 'Sales Order #'+soTranId;
        const mySearch = search.load({
            id: 'customsearch_sobalancedue'
        });
        const entityFilter = search.createFilter({
            name: 'entity',
            operator: search.Operator.ANYOF,
            values: soEntity
        });
        const soIdFilter = search.createFilter({
            name: 'formulatext',
            operator: search.Operator.IS,
            formula: "CASE WHEN {type}='Customer Deposit' then {appliedtotransaction} when {type}='Deposit Application' then {createdfrom.salesorder} when {type}='Sales Order' then 'Sales Order #'||{number} end",
            values: soFullTextTranID
        });
        mySearch.filters.push(entityFilter, soIdFilter);
        const soresults = mySearch.run();
        mySearch.run().each(function(soresults) {
            let soTextID = soresults.getValue({
                name: 'formulatext',
                summary: search.Summary.GROUP
            });
            if (soFullTextTranID === soTextID) {
                let totalPaid = soresults.getValue({
                    name: 'formulacurrency',
                    summary: search.Summary.SUM
                });
                let remainingBalanceOnOrder = parseFloat(parseFloat(soTotal))-parseFloat(totalPaid);
                salesorder.setValue({
                    fieldId: 'custbody_total_deposit_paid',
                    value: totalPaid
                });
                salesorder.setValue({
                    fieldId: 'custbody_balance_remaining',
                    value: remainingBalanceOnOrder
                });
                let id = salesorder.save({
                    enableSourcing: true,
                    ignoreMandatoryFields: true
                });
            }
        });
    }
    return{
        afterSubmit: afterSubmit
    };
});
Build the Script
You can write the script using a step-by-step approach that includes the following:
The code snippets included below don't include indentation. Refer to The Complete Script for suggested formatting.
Start with required opening lines
You need JSDoc comments and a define function at the top of the script file. The JSDoc comments in this script indicate that it's a SuiteScript 2.1 user event script. The script uses three SuiteScript modules specified in the define statement:
-
N/record- enables you to work with NetSuite records -
N/search- enables you to create and run on-demand or saved searches and analyze and iterate through the search results -
N/log- enables you to log execution details
Start a new script file using any text editor and add the following JSDoc comments and define function at the top of the file:
This tutorial script uses the define function, which is required for an entry point script (a script you attach to a script record and deploy). If you want to copy the script into the SuiteScript Debugger and test it, you must use the require function. For more information, see SuiteScript Debugger.
                /**
 * @NApiVersion 2.1
 * @NScriptType UserEventScript
 * @NModuleScope SameAccount
 */

define(['N/record', 'N/search', 'N/log'], (record, search, log) => {
});
Create the entry point function
This script is triggered on the afterSubmit entry point when you save a sales order.
Add the following function definition at the top of the define function:
                function afterSubmit(scriptContext) {
}
Load the new sales order record
This section of the script loads the new sales order record.
Add the following code at the top of the afterSubmit entry point function:
                const contextOrder = scriptContext.newRecord;
const soID = contextOrder.id;
const salesorder = record.load({
    type: record.Type.SALES_ORDER,
    id: soID
});
Get values from the new sales order record
This section of the script gets values from the sales order and loads the saved search.
Add the following code within the afterSubmit entry point function:
                const soTotal = salesorder.getValue({
    fieldId: 'total'
});
const soEntity = salesorder.getValue({
    fieldId: 'entity'
});
const soTranId = salesorder.getValue({
    fieldId: 'tranid'
});
const soFullTextTranID = 'Sales Order #'+soTranId;
const mySearch = search.load({
    id: 'customsearch_sobalancedue'
});
Create and apply filters for your saved search
This section of the script creates filters and applies them to your saved search.
Add the following code within the afterSubmit entry point function:
                const entityFilter = search.createFilter({
    name: 'entity',
    operator: search.Operator.ANYOF,
    values: soEntity
});
const soIdFilter = search.createFilter({
    name: 'formulatext',
    operator: search.Operator.IS,
    formula: "CASE WHEN {type}='Customer Deposit' then {appliedtotransaction} when {type}='Deposit Application' then {createdfrom.salesorder} when {type}='Sales Order' then 'Sales Order #'||{number} end",
    values: soFullTextTranID
});
mySearch.filters.push(entityFilter, soIdFilter);
Run the saved search and process the results
The last section of the script calculates the remaining balance using the total current value of the sales order and the total paid value from the saved search. It then sets the custom fields and saves the updated sales order. When the user sees the saved sales order, the values are populated in the Total Deposit Paid and Remaining Balance fields.
Add the following code into the afterSubmit entry point function:
                const soresults = mySearch.run();
mySearch.run().each(function(soresults) {
    let soTextID = soresults.getValue({
        name: 'formulatext',
        summary: search.Summary.GROUP
    });
    if (soFullTextTranID === soTextID) {
        let totalPaid = soresults.getValue({
            name: 'formulacurrency',
            summary: search.Summary.SUM
        });
        let remainingBalanceOnOrder = parseFloat(parseFloat(soTotal))-parseFloat(totalPaid);
        salesorder.setValue({
            fieldId: 'custbody_total_deposit_paid',
            value: totalPaid
        });
        salesorder.setValue({
            fieldId: 'custbody_balance_remaining',
            value: remainingBalanceOnOrder
        });
        let id = salesorder.save({
            enableSourcing: true,
            ignoreMandatoryFields: true
        });
    }
});
Create the return statement
This section of the script associates the afterSubmit function with the afterSubmit user event script entry point.
Add the following code immediately above the closing }); in your script:
                return {
    afterSubmit: afterSubmit
};
Save your script file
You need to save your script file so you can upload it to the NetSuite File Cabinet. Before you save your script file, you may want to adjust the indentation to improve the readability of the script. Refer to The Complete Script for suggested formatting.
When you're happy with your script, save it as a .js file (for example, ue_set_custom_fields.js).
Step 3: Write the Update Custom Fields User Event Script
This script updates the custom Amount Deposited and Balance Remaining fields when the user loads or saves a sales order.
Script Summary
The following table summarizes this script:
|
Script: Deposit Balance Update Custom Fields |
|
|---|---|
|
Script Type |
|
|
Modules Used |
|
|
Entry Points |
|
For more information about script types and entry points, see SuiteScript 2.1 Script Types.
The Complete Script
This tutorial includes the complete script along with individual steps you can follow to build the script in logical sections. The complete script is provided below so that you can copy it, paste it into your text editor, and save it as a.js file (for example, ue_update_custom_fields.js).
If you would rather create this script step by step, follow the steps in Build the Script.
This tutorial script uses the define function, which is required for an entry point script (a script you attach to a script record and deploy). If you want to copy the script into the SuiteScript Debugger and test it, you must use the require function. For more information, see SuiteScript Debugger.
Note
This sample uses SuiteScript 2.1.
              /**
 * @NApiVersion 2.1
 * @NScriptType UserEventScript
 * @NModuleScope SameAccount
 */

define(['N/record', 'N/search', 'N/log'], (record, search, log) => {
    function beforeSubmit(scriptContext) {
        const contextDep = scriptContext.newRecord;
        const soID = contextDep.getValue({
            fieldId: 'salesorder'
        });
        if ((soID !== null) && (scriptContext.type === scriptContext.UserEventType.DELETE)) {
            const depAmt = contextDep.getValue({
                fieldId: 'payment'
            });
            const salesorder = record.load({
                type: record.Type.SALES_ORDER,
                id: soID
            });
            const status = salesorder.getValue({
                fieldId: 'status'
            });
            if (status !== 'Billed') {
                const soTotalPaid = salesorder.getValue({
                    fieldId: 'custbody_total_deposit_paid'
                });
                const soRemainingBalance = salesorder.getValue({
                    fieldId: 'custbody_balance_remaining'
                });
                salesorder.setValue({
                    fieldId: 'custbody_total_deposit_paid',
                    value: soTotalPaid - depAmt
                });
                salesorder.setValue({
                    fieldId: 'custbody_balance_remaining',
                    value: (soRemainingBalance + depAmt)
                });
                const id = salesorder.save({
                    enableSourcing: true,
                    ignoreMandatoryFields: true
                });
            }
        }
    }
    function afterSubmit(scriptContext) {
        const contextDep = scriptContext.newRecord;
        const soID = contextDep.getValue({
            fieldId: 'salesorder'
        });
        if ((soID !== null) && ((scriptContext.type === scriptContext.UserEventType.CREATE) || (scriptContext.type === scriptContext.UserEventType.EDIT))) {
            const salesorder = record.load({
                type: record.Type.SALES_ORDER,
                id: soID
            });
            const status = salesorder.getValue({
                fieldId: 'status'
            });
            if (status !== 'Billed') {
                const soEntity = salesorder.getValue({
                    fieldId: 'entity'
                });
                const soTranId = salesorder.getValue({
                    fieldId: 'tranid'
                });
                const soFullTextTranID = 'Sales Order #' + soTranId;
                const mySearch = search.load({
                    id: 'customsearch_sobalancedue'
                });
                const entityFilter = search.createFilter({
                    name: 'name',
                    operator: search.Operator.IS,
                    values: soEntity
                });
                const soIdFilter = search.createFilter({
                    name: 'formulatext',
                    operator: search.Operator.IS,
                    summary: search.Summary.MAX,
                    formula: "CASE WHEN {type}='Customer Deposit' then {appliedtotransaction} when {type}='Deposit Application' then {createdfrom.salesorder} when {type}='Sales Order' then 'Order #'||{number} end",
                    values: soFullTextTranID
                });
                mySearch.filters.push(entityFilter, soIdFilter);
                const soresults = mySearch.run();
                mySearch.run().each(function(soresults) {
                    let soTextID = soresults.getValue({
                        name: 'formulatext',
                        summary: search.Summary.GROUP
                    });
                    if (soFullTextTranID === soTextID) {
                        let totalPaid = soresults.getValue({
                            name: 'formulacurrency',
                            summary: search.Summary.SUM
                        });
                        let soTotal = salesorder.getValue({
                            fieldId: 'total'
                        });
                        let remainingBalanceOnOrder = parseFloat(soTotal)-parseFloat(totalPaid);
                        salesorder.setValue({
                            fieldId: 'custbody_total_deposit_paid',
                            value: totalPaid
                        });
                        salesorder.setValue({
                            fieldId: 'custbody_balance_remaining',
                            value: remainingBalanceOnOrder
                        });
                        let id = salesorder.save({
                            enableSourcing: true,
                            ignoreMandatoryFields: true
                        });
                    }
                });
            }
        }
    }
    return {
        beforeSubmit: beforeSubmit,
        afterSubmit: afterSubmit
    };
});
Build the Script
You can write the script using a step-by-step approach that includes the following:
-
Get values from the sales order if it isn't in Billed status
-
Make sure the sales order ID is valid and the the user is creating or editing the record
The code snippets included below don't include indentation. Refer to The Complete Script for suggested formatting.
Start with required opening lines
You need JSDoc comments and a define function at the top of the script file. The JSDoc comments in this script indicate that it's a SuiteScript 2.1 user event script. The script uses three SuiteScript modules specified in the define statement:
-
N/record- lets you work with NetSuite records -
N/search- lets you create and run on-demand or saved searches and analyze and iterate through the search results -
N/log- lets you log execution details
Start a new script file using any text editor and add the following JSDoc comments and define function at the top of the file:
This tutorial script uses the define function, which is required for an entry point script (a script you attach to a script record and deploy). If you want to copy the script into the SuiteScript Debugger and test it, you must use the require function. For more information, see SuiteScript Debugger.
                /**
 * @NApiVersion 2.1
 * @NScriptType UserEventScript
 * @NModuleScope SameAccount
 */

define(['N/record', 'N/search', 'N/log'], (record, search, log) => {
});
Create the entry point functions
This script is triggered on the beforeSubmit and afterSubmit entry points when a sales order is saved.
Add the following function definitions at the top of the define function:
                function beforeSubmit(scriptContext) {
}
function afterSubmit(scriptContext) {
}
Get the new deposit record and check the event type
This section of the script gets the value of the sales order the customer deposit is created from. If the customer deposit was created from a sales order and is being deleted, it updates the amount deposited and amount remaining on that sales order.
This section of the script runs after the customer deposit is saved but before it's submitted to the database, using the beforeSubmit entry point. Add the following code at the top of the beforeSubmit entry point function:
                const contextDep = scriptContext.newRecord;
const soID = contextDep.getValue({
    fieldId: 'salesorder'
});
if ((soID !== null) && (scriptContext.type === scriptContext.UserEventType.DELETE)) {
}
Get values from the sales order if it isn't in Billed status
This section of the script loads the sales order, checks if it's in Billed status. If the sales order is not in Billed status, the script sets the custom fields based on the deposit and calculated balance remaining.
Add the following code within the if statement of the beforeSubmit entry point function:
                const depAmt = contextDep.getValue({
    fieldId: 'payment'
});
const salesorder = record.load({
    type: record.Type.SALES_ORDER,
    id: soID
});
const status = salesorder.getValue({
    fieldId: 'status'
});
if (status !== 'Billed') {
    const soTotalPaid = salesorder.getValue({
        fieldId: 'custbody_total_deposit_paid'
    });
    const soRemainingBalance = salesorder.getValue({
        fieldId: 'custbody_balance_remaining'
    });
    salesorder.setValue({
        fieldId: 'custbody_total_deposit_paid',
        value: soTotalPaid - depAmt
    });
    salesorder.setValue({
        fieldId: 'custbody_balance_remaining',
        value: (soRemainingBalance + depAmt)
    });
    const id = salesorder.save({
        enableSourcing: true,
        ignoreMandatoryFields: true
    });
}
Make sure the sales order ID is valid and the the user is creating or editing the record
This section of the script makes sure the record is valid and the user is creating or editing the order, not viewing it.
Add the following code at the top of the afterSubmit entry point function:
                const contextDep = scriptContext.newRecord;
const soID = contextDep.getValue({
    fieldId: 'salesorder'
});
if ((soID !== null) && ((scriptContext.type === scriptContext.UserEventType.CREATE) || (scriptContext.type === scriptContext.UserEventType.EDIT))) {
}
Get the sales order status
This section of the script loads the sales order and checks to see if it's in Billed status (which determines whether the saved search runs).
Add the following code within the if statement:
                const salesorder = record.load({
    type: record.Type.SALES_ORDER,
    id: soID
});
const status = salesorder.getValue({
    fieldId: 'status'
});
if (status !== 'Billed') {
}
Create and apply filters for your saved search
This section of the script loads the saved search to match the customer deposit order to the order in the search results. The saved search uses formulas because the link between a customer deposit or customer refund and a sales order can take different paths.
Add the following code within the nested if statement:
                const soEntity = salesorder.getValue({
    fieldId: 'entity'
});
const soTranId = salesorder.getValue({
    fieldId: 'tranid'
});
const soFullTextTranID = 'Sales Order #' + soTranId;
const mySearch = search.load({
    id: 'customsearch_sobalancedue'
});
const entityFilter = search.createFilter({
    name: 'name',
    operator: search.Operator.IS,
    values: soEntity
});
const soIdFilter = search.createFilter({
    name: 'formulatext',
    operator: search.Operator.IS,
    summary: search.Summary.MAX,
    formula: "CASE WHEN {type}='Customer Deposit' then {appliedtotransaction} when {type}='Deposit Application' then {createdfrom.salesorder} when {type}='Sales Order' then 'Order #'||{number} end",
    values: soFullTextTranID
});
mySearch.filters.push(entityFilter, soIdFilter);
Run the search and process the results
This section of the script gets the balances from the saved search and sets the custom fields on the sales order that the deposit came from.
Add the following code within the nested if statement:
                const soresults = mySearch.run();
mySearch.run().each(function(soresults) {
    let soTextID = soresults.getValue({
        name: 'formulatext',
        summary: search.Summary.GROUP
    });
    if (soFullTextTranID === soTextID) {
        let totalPaid = soresults.getValue({
            name: 'formulacurrency',
            summary: search.Summary.SUM
        });
        let soTotal = salesorder.getValue({
            fieldId: 'total'
        });
        let remainingBalanceOnOrder = parseFloat(soTotal)-parseFloat(totalPaid);
        salesorder.setValue({
            fieldId: 'custbody_total_deposit_paid',
            value: totalPaid
        });
        salesorder.setValue({
            fieldId: 'custbody_balance_remaining',
            value: remainingBalanceOnOrder
        });
        let id = salesorder.save({
            enableSourcing: true,
            ignoreMandatoryFields: true
        });
    }
});
Create the return statement
This part of the script associates the beforeSubmit function with the beforeSubmit user event script entry point and the afterSubmit function with the afterSubmit user event script entry point.
Add the following code immediately above the closing }); in your script:
                return {
    beforeSubmit: beforeSubmit,
    afterSubmit: afterSubmit
};
Save your script file
You need to save your script file so you can upload it to the NetSuite File Cabinet. Before you save your script file, you may want to adjust the indentation to improve the readability of the script. Refer to The Complete Script for suggested indentation.
When you're happy with your script, save it as a .js file (for example, ue_update_custom_fields.js).
Step 4: Write the Handle Refund User Event Script
This script updates the sales order if a refund has been issued.
Script Summary
The following table summarizes this script:
|
Script: Deposit Balance Handle Refund |
|
|---|---|
|
Script Type |
|
|
Modules Used |
|
|
Entry Points |
|
For more information about script types and entry points, see SuiteScript 2.1 Script Types.
The Complete Script
This tutorial includes the complete script along with individual steps you can follow to build the script in logical sections. The complete script is provided below so that you can copy it, paste it into your text editor, and save it as a .js file (for example, ue_handle_refund.js).
If you would rather create this script step by step, follow the steps in Build the Script.
This tutorial script uses the define function, which is required for an entry point script (a script you attach to a script record and deploy). If you want to copy the script into the SuiteScript Debugger and test it, you must use the require function. For more information, see SuiteScript Debugger.
Note
This sample uses SuiteScript 2.1.
              /**
 * @NApiVersion 2.1
 * @NScriptType UserEventScript
 * @NModuleScope SameAccount
 */

define(['N/record', 'N/search', 'N/log'], (record, search, log) => {
    return {
        afterSubmit: function(scriptContext) {
            const contextRef = scriptContext.newRecord;
            const refId = contextRef.id;
            UpdateSalesOrder(refId);
        }
    };
    function UpdateSalesOrder(refId) {
        const refund = record.load({
            type: record.Type.CUSTOMER_REFUND,
            id: refId,
            isDynamic: true
        });
        const soEntity = refund.getValue({
            fieldId: 'customer'
        });
        const lines = refund.getLineCount({
            sublistId: 'apply'
        });
        for (let i = 0; i < lines; i++) {
            let depositnum = refund.getSublistText({
                sublistId: 'apply',
                fieldId: 'internalid',
                line: i
            });
            let refundamt = refund.getSublistValue({
                sublistId: 'apply',
                fieldId: 'amount',
                line: i
            });
            let order = search.lookupFields({
                type: search.Type.DEPOSIT_APPLICATION,
                id: depositnum,
                columns: 'createdfrom.salesorder'
            });
            let soFullTextTranID = order['createdfrom.salesorder'][0].text;
            let orderId = order['createdfrom.salesorder'][0].value;
            let soTotalPaid = search.lookupFields({
                type: search.Type.SALES_ORDER,
                id: orderId,
                columns: ['total']
            });
            let soTotal = soTotalPaid['total'];
            let mySearch = search.load({
                id: 'customsearch_sobalancedue'
            });
            let entityFilter = search.createFilter({
                name: 'internalid',
                join: 'customer',
                operator: search.Operator.EQUALTO,
                summary: search.Summary.MAX,
                values: soEntity
            });
            let soIdFilter = search.createFilter({
                name: 'formulatext',
                operator: search.Operator.IS,
                formula: "CASE WHEN {type}='Customer Deposit' then {appliedtotransaction} when {type}='Deposit Application' then {createdfrom.salesorder} when {type}='Sales Order' then 'Sales Order #'||{number} end",
                values: soFullTextTranID
            });
            mySearch.filters.push(entityFilter, soIdFilter);
            let soresults = mySearch.run();
            mySearch.run().each(function(soresults) {
                let soTextID = soresults.getValue({
                    name: 'formulatext',
                    summary: search.Summary.GROUP
                });
                if (soFullTextTranID === soTextID) {
                    let totalPaid = soresults.getValue({
                        name: 'formulacurrency',
                        summary: search.Summary.SUM
                    });
                    let remainingBalanceOnOrder = parseFloat(soTotal);
                    remainingBalanceOnOrder = parseFloat(remainingBalanceOnOrder)-parseFloat(totalPaid);
                    let salesorder = record.load({
                        type: record.Type.SALES_ORDER,
                        id: orderId,
                        isDynamic: true
                    });
                    salesorder.setValue({
                        fieldId: 'custbody_total_deposit_paid',
                        value: totalPaid
                    });
                    salesorder.setValue({
                        fieldId: 'custbody_balance_remaining',
                        value: remainingBalanceOnOrder
                    });
                    let id = salesorder.save({
                        enableSourcing: true,
                        ignoreMandatoryFields: true
                    });
                }
            });
        }
    }
});
Build the Script
You can write the script using a step-by-step approach that includes the following:
The code snippets included below don't include indentation. Refer to The Complete Script for suggested formatting.
Start with required opening lines
You need JSDoc comments and a define function at the top of the script file. The JSDoc comments in this script indicate that it's a SuiteScript 2.1 user event script. The script uses three SuiteScript modules specified in the define statement:
-
N/record- lets you work with NetSuite records -
N/search- lets you create and run on-demand or saved searches and analyze and iterate through the search results -
N/log- lets you log execution details
Start a new script file using any text editor and add the following JSDoc comments and define function at the top of the file:
This tutorial script uses the define function, which is required for an entry point script (a script you attach to a script record and deploy). If you want to copy the script into the SuiteScript Debugger and test it, you must use the require function. For more information, see SuiteScript Debugger.
                /**
 * @NApiVersion 2.1
 * @NScriptType UserEventScript
 * @NModuleScope SameAccount
 */

define(['N/record', 'N/search', 'N/log'], (record, search, log) => {
});
Create the entry point function
This script is triggered on the afterSubmit entry points when a sales order is saved.
Add the following function definition at the top of the define function:
                return {
    afterSubmit: function(scriptContext) {
        const contextRef = scriptContext.newRecord;
        const refId = contextRef.id;
        UpdateSalesOrder(refId);
    }
};
Create the UpdateSalesOrder function
This section of the script uses a function to update the sales order. This function is called from the afterSubmit entry point function.
Add the following code after the end of the return statement:
                function UpdateSalesOrder(refId) {
}
Load the customer refund
This section of the script loads the customer refund and gets the total refund amount and the number of lines or transactions it's applied to.
Add the following code at the top of the UpdateSales Order function:
                const refund = record.load({
    type: record.Type.CUSTOMER_REFUND,
    id: refId,
    isDynamic: true
});
const soEntity = refund.getValue({
    fieldId: 'customer'
});
const lines = refund.getLineCount({
    sublistId: 'apply'
});
Add a for loop
This section of the script uses a for loop to iterate through each deposit application associated with the customer refund and gets the amount applied.
Add the following code within the UpdateSalesOrder function:
                for (let i = 0; i < lines; i++) {
}
Get the deposit number and the refund amount
For each deposit application associated with the customer refund, this script gets the deposit number and the refund amount.
Add the following code at the top of the for loop:
                let depositnum = refund.getSublistText({
    sublistId: 'apply',
    fieldId: 'internalid',
    line: i
});
let refundamt = refund.getSublistValue({
    sublistId: 'apply',
    fieldId: 'amount',
    line: i
});
Find the linked sales order
This section of the script looks up each deposit application to find the linked sales order and its total.
Add the following code within the for statement:
                let order = search.lookupFields({
    type: search.Type.DEPOSIT_APPLICATION,
    id: depositnum,
    columns: 'createdfrom.salesorder'
});
let soFullTextTranID = order['createdfrom.salesorder'][0].text;
let orderId = order['createdfrom.salesorder'][0].value;
let soTotalPaid = search.lookupFields({
    type: search.Type.SALES_ORDER,
    id: orderId,
    columns: ['total']
});
let soTotal = soTotalPaid['total'];
Load the saved search
This section of the script loads the saved search to get the current balance of the deposits and gift certificates paid toward the sales order, minus any refunds.
Add the following code within the for statement:
                let mySearch = search.load({
    id: 'customsearch_sobalancedue'
});
Create and apply search filters for you saved search
This section of the script creates and applies two search filters for your saved search.
Add the following code within the for statement:
                let entityFilter = search.createFilter({
    name: 'internalid',
    join: 'customer',
    operator: search.Operator.EQUALTO,
    summary: search.Summary.MAX,
    values: soEntity
});
let soIdFilter = search.createFilter({
    name: 'formulatext',
    operator: search.Operator.IS,
    formula: "CASE WHEN {type}='Customer Deposit' then {appliedtotransaction} when {type}='Deposit Application' then {createdfrom.salesorder} when {type}='Sales Order' then 'Sales Order #'||{number} end",
    values: soFullTextTranID
});
mySearch.filters.push(entityFilter, soIdFilter);
Run the search and process the results
This section of the script loads each related sales order and sets the new values for total paid and remaining balance.
Add the following code within the for statement:
                let soresults = mySearch.run();
mySearch.run().each(function(soresults) {
    let soTextID = soresults.getValue({
        name: 'formulatext',
        summary: search.Summary.GROUP
    });
    if (soFullTextTranID === soTextID) {
        let totalPaid = soresults.getValue({
            name: 'formulacurrency',
            summary: search.Summary.SUM
        });
        let remainingBalanceOnOrder = parseFloat(soTotal);
        remainingBalanceOnOrder = parseFloat(remainingBalanceOnOrder)-parseFloat(totalPaid);
        let salesorder = record.load({
            type: record.Type.SALES_ORDER,
            id: orderId,
            isDynamic: true
        });
        salesorder.setValue({
            fieldId: 'custbody_total_deposit_paid',
            value: totalPaid
        });
        salesorder.setValue({
            fieldId: 'custbody_balance_remaining',
            value: remainingBalanceOnOrder
        });
        let id = salesorder.save({
            enableSourcing: true,
            ignoreMandatoryFields: true
        });
    }
});
Create the return statement
In this script, you already added the return statement when you added the entry point function at the top of the define function (see Create the entry point function).
Save your script file
You need to save your script file so you can upload it to the NetSuite File Cabinet. Before you save your script file, you may want to adjust the indentation to improve the readability of the script. Refer to The Complete Script for suggested formatting.
When you're happy with your script, save it as a .js file (for example, ue_handle_refund.js).
Step 5: Write the Handle Deletion of a Deposit Application User Event Script
This script handles the deletion of a deposit application that's associated with a customer refund or customer deposit when a user saves a sales order.
Script Summary
The following table summarizes this script:
|
Script: Deposit Balance Handle Deletion of Deposit Application |
|
|---|---|
|
Script Type |
|
|
Modules Used |
|
|
Entry Points |
|
For more information about script types and entry points, see SuiteScript 2.1 Script Types.
The Complete Script
This tutorial includes the complete script along with individual steps you can follow to build the script in logical sections. The complete script is provided below so that you can copy it, paste it into your text editor, and save it as a .js file (for example, ue_handle_deposit.js).
If you would rather create this script step by step, follow the steps in Build the Script.
This tutorial script uses the define function, which is required for an entry point script (a script you attach to a script record and deploy). If you want to copy the script into the SuiteScript Debugger and test it, you must use the require function. For more information, see SuiteScript Debugger.
Note
This sample uses SuiteScript 2.1.
              /**
 * @NApiVersion 2.1
 * @NScriptType UserEventScript
 * @NModuleScope SameAccount
 */

define(['N/record', 'N/search', 'N/log'], (record, search, log) => {
    function afterSubmit(scriptContext) {
        const contextDepApp = scriptContext.oldRecord;
        const depAppId = contextDepApp.id;
        const soEntity = contextDepApp.getValue({
            fieldId: 'customer'
        });
        const createdFrom = contextDepApp.getValue({
            fieldId: 'deposit'
        });
        const cusDeposit = record.load({
            type: record.Type.CUSTOMER_DEPOSIT,
            id: createdFrom,
            isDynamic: true
        });
        const orderId = cusDeposit.getValue({
            fieldId: 'salesorder'
        });
        const soFullTextTranID = cusDeposit.getText({
            fieldId: 'salesorder',
        });
        const mySearch = search.load({
            id: 'customsearch_sobalancedue'
        });
        const entityFilter = search.createFilter({
            name: 'internalidnumber',
            operator: search.Operator.IS,
            values: soEntity
        });
        const soIdFilter = search.createFilter({
            name: 'formulatext',
            operator: search.Operator.IS,
            formula: "CASE WHEN {type}='Customer Deposit' then {appliedtotransaction} when {type}='Deposit Application' then {createdfrom.salesorder} when {type}='Sales Order' then 'Sales Order #'||{number} end",
            values: soFullTextTranID
        });
        mySearch.filters.push(entityFilter, soIdFilter);
        const soresults = mySearch.run();
        mySearch.run().each(function(soresults) {
            let soTextID = soresults.getValue({
                name: 'formulatext',
                summary: search.Summary.GROUP
            });
            if (soFullTextTranID === soTextID) {
                let totalPaid = soresults.getValue({
                    name: 'formulacurrency',
                    summary: search.Summary.SUM
                });
                let salesorder = record.load({
                    type: record.Type.SALES_ORDER,
                    id: orderId,
                    isDynamic: true
                });
                let soTotal = salesorder.getValue({
                    fieldId: 'total'
                });
                let remainingBalanceOnOrder = parseFloat(soTotal);
                remainingBalanceOnOrder = parseFloat(remainingBalanceOnOrder) - parseFloat(totalPaid);
                salesorder.setValue({
                    fieldId: 'custbody_total_deposit_paid',
                    value: totalPaid
                });
                salesorder.setValue({
                    fieldId: 'custbody_balance_remaining',
                    value: remainingBalanceOnOrder
                });
                let id = salesorder.save({
                    enableSourcing: true,
                    ignoreMandatoryFields: true
                });
            }
        });
    }
    return {
        afterSubmit: afterSubmit
    };
});
Build the Script
You can write the script using a step-by-step approach that includes the following:
The code snippets included below don't include indentation. Refer to The Complete Script for suggested formatting.
Start with required opening lines
You need JSDoc comments and a define function at the top of the script file. The JSDoc comments in this script indicate that it's a SuiteScript 2.1 user event script. The script uses three SuiteScript modules specified in the define statement:
-
N/record- lets you work with NetSuite records -
N/search- lets you create and run on-demand or saved searches and analyze and iterate through the search results -
N/log- lets you log execution details
Start a new script file using any text editor and add the following JSDoc comments and define function at the top of the file:
This tutorial script uses the define function, which is required for an entry point script (a script you attach to a script record and deploy). If you want to copy the script into the SuiteScript Debugger and test it, you must use the require function. For more information, see SuiteScript Debugger.
                /**
 * @NApiVersion 2.1
 * @NScriptType UserEventScript
 * @NModuleScope SameAccount
 */

define(['N/record', 'N/search', 'N/log'], (record, search, log) => {
});
Create the entry point function
This script is triggered on the beforeSubmit and afterSubmit entry points when a sales order is saved.
Add the following function definition at the top of the define function:
                function afterSubmit(scriptContext) {
}
Get values for the related customer and customer deposit
This section of the script loads the previous version of the deposit application in case was deleted so that it can get the related customer and customer deposit values.
Add the following code within the afterSubmit entry point script:
                const contextDepApp = scriptContext.oldRecord;
const depAppId = contextDepApp.id;
const soEntity = contextDepApp.getValue({
    fieldId: 'customer'
});
const createdFrom = contextDepApp.getValue({
    fieldId: 'deposit'
});
const cusDeposit = record.load({
    type: record.Type.CUSTOMER_DEPOSIT,
    id: createdFrom,
    isDynamic: true
});
const orderId = cusDeposit.getValue({
    fieldId: 'salesorder'
});
const soFullTextTranID = cusDeposit.getText({
    fieldId: 'salesorder',
});
Load the saved search and create and apply search filters
This section of script loads the saved search you created and adds filters to find the sales order related to the deposit application, along with its current total deposited.
Add the following code into the afterSubmit entry point script:
                const mySearch = search.load({
    id: 'customsearch_sobalancedue'
});
const entityFilter = search.createFilter({
    name: 'internalidnumber',
    operator: search.Operator.IS,
    values: soEntity
});
const soIdFilter = search.createFilter({
    name: 'formulatext',
    operator: search.Operator.IS,
    formula: "CASE WHEN {type}='Customer Deposit' then {appliedtotransaction} when {type}='Deposit Application' then {createdfrom.salesorder} when {type}='Sales Order' then 'Sales Order #'||{number} end",
    values: soFullTextTranID
});
mySearch.filters.push(entityFilter, soIdFilter);
Run the search and process the results
This section of the script runs the saved search you created to find the sales order related to the deposit application and its current total deposited.
Add the following code within the afterSubmit entry point script:
                const soresults = mySearch.run();
mySearch.run().each(function(soresults) {
    let soTextID = soresults.getValue({
        name: 'formulatext',
        summary: search.Summary.GROUP
    });
    if (soFullTextTranID === soTextID) {
    }
});
Load the sales order and set values
This section of the script loads the sales order related to the deposit application and sets the deposit paid and new remaining balance based on the saved search results.
Add the following code within the if statement:
                let totalPaid = soresults.getValue({
    name: 'formulacurrency',
    summary: search.Summary.SUM
});
let salesorder = record.load({
    type: record.Type.SALES_ORDER,
    id: orderId,
    isDynamic: true
});
let soTotal = salesorder.getValue({
    fieldId: 'total'
});
let remainingBalanceOnOrder = parseFloat(soTotal);
remainingBalanceOnOrder = parseFloat(remainingBalanceOnOrder) - parseFloat(totalPaid);
salesorder.setValue({
    fieldId: 'custbody_total_deposit_paid',
    value: totalPaid
});
salesorder.setValue({
    fieldId: 'custbody_balance_remaining',
    value: remainingBalanceOnOrder
});
let id = salesorder.save({
    enableSourcing: true,
    ignoreMandatoryFields: true
});
Create the return statement
This script associates the afterSubmit function with the afterSubmit user event script entry point.
Add the following code immediately above the closing }); in your script:
                return {
    afterSubmit: afterSubmit
};
Save your script file
You need to save your script file so you can upload it to the NetSuite File Cabinet. Before you save your script file, you may want to adjust the indentation to improve the readability of the script. Refer to The Complete Script for suggested indentation.
When you're happy with your script, save it as a .js file (for example, ue_handle_deposit.js).
Step 6: Create the Script Records
After you create your scripts, you need to create script records for each one:
-
Create the script record for the Set Custom Fields user event script
-
Create the script record for the Update Custom Fields user event script
-
Create the script record for the Handle Refund user event script
-
Create the script record for the Handle Deletion of Deposit Application user event script
For more information about creating script records, see Creating a Script Record.
Create the script record for the Set Custom Fields user event script
To create the script record for the Set Custom Fields user event script:
-
Upload your script to the NetSuite File Cabinet.
-
Go to Customization > Scripting > Scripts > New.
-
Select your script from the Script File list and click Create Script Record. The Script page is displayed.
-
On the Script page, enter the following values:
Field
Value
Name
Deposit Balance Set Custom Fields
ID
_ue_depBalance_set_fields
NetSuite prefixes the ID with customscript.
Description
This script sets the custom fields on a sales order record when the user saves the sales order.
-
Set any other fields on the script record as required.
-
Click Save.
Create the script record for the Update Custom Fields user event script
To create the script record for the Update Custom Fields user event script:
-
Upload your script to the NetSuite File Cabinet.
-
Go to Customization > Scripting > Scripts > New.
-
Select your script from the Script File list and click Create Script Record. The Script page is displayed.
-
On the Script page, enter the following values:
Field
Value
Name
Deposit Balance Update Custom Fields
ID
_ue_depBalance_update_fields
NetSuite prefixes the ID with customscript.
Description
This script updates the custom fields on a sales order record when a user loads or saves a sales order.
-
Set any other fields on the script record as required.
-
Click Save.
Create the script record for the Handle Refund user event script
To create the script record for the Handle Refund user event script:
-
Upload your script to the NetSuite File Cabinet.
-
Go to Customization > Scripting > Scripts > New.
-
Select your script from the Script File list and click Create Script Record. The Script page is displayed.
-
On the Script page, enter the following values:
Field
Value
Name
Deposit Balance Handle Refund
ID
_ue_depBalance_refund
NetSuite prefixes the ID with customscript.
Description
This script updates the sales order if a refund has been issued.
-
Set any other fields on the script record as required.
-
Click Save.
Create the script record for the Handle Deletion of Deposit Application user event script
To create the script record for the Handle Deletion of Deposit Application user event script:
-
Upload your script to the NetSuite File Cabinet.
-
Go to Customization > Scripting > Scripts > New.
-
Select your script from the Script File list and click Create Script Record. The Script page is displayed.
-
On the Script page, enter the following values:
Field
Value
Name
Deposit Balance Deletion of Deposit App
ID
_ue_depBalance_delete_depApp
NetSuite prefixes the ID with customscript.
Description
This script handles the deletion of a deposit application that is associated with a customer refund or customer deposit when a user saves a sales order.
-
Set any other fields on the script record as required.
-
Click Save.
Step 7: Deploy the Scripts
After you create the script record for each script, you can create script deployment records for them. A script deployment record determines how, when, and for whom the script runs.
For more information about script deployment records, see Script Deployment.
Deploy the Set Custom Fields user event script
To deploy the Set Custom Fields user event script:
-
Complete the steps in Step 6: Create the Script Records for your user event script.
-
Go to Customization > Scripting > Scripts.
-
Find your user event script in the list of scripts and click Deployments. The Script Deployments page appears.
-
Click New Deployment. The Script Deployment page appears.
-
On the Script Deployment page, enter the following values:
Field
Value
Applies To
Sales Order
ID
_ue_deposit_track_so
NetSuite prefixes the ID with custdeploy.
Status
Testing
The Testing status lets the script owner test the script without affecting other users in the account.
Log Level
Debug
The Debug level writes all
log.debugstatements and errors to the Execution Log subtab of the script deployment record.Execute As Role
Current Role
It's best practice to have scripts run with the user's current role to avoid granting unwanted access.
Audience > Roles
Check Select All
-
Click Save.
Deploy the Update Custom Fields user event script
To deploy the Update Custom Fields user event script:
-
Complete the steps in Step 6: Create the Script Records for your user event script.
-
Go to Customization > Scripting > Scripts.
-
Find your user event script in the list of scripts and click Deployments. The Script Deployments page appears.
-
Click New Deployment. The Script Deployment page appears.
-
On the Script Deployment page, enter the following values:
Field
Value
Applies To
Customer Deposit
ID
_ue_customer_deposit
NetSuite prefixes the ID with custdeploy.
Status
Testing
The Testing status lets the script owner test the script without affecting other users in the account.
Log Level
Debug
The Debug level writes all
log.debugstatements and errors to the Execution Log subtab of the script deployment record.Execute As Role
Current Role
It's best to have scripts run with the user's current role to avoid granting unwanted access.
Audience > Roles
Check Select All
-
Click Save.
Deploy the Handle Refund user event script
To deploy the Handle Refund user event script:
-
Complete the steps in Step 6: Create the Script Records for your user event script.
-
Go to Customization > Scripting > Scripts.
-
Find your user event script in the list of scripts and click Deployments. The Script Deployments page appears.
-
Click New Deployment. The Script Deployment page appears.
-
On the Script Deployment page, enter the following values:
Field
Value
Applies To
Customer Refund
ID
_ue_customer_refund
NetSuite prefixes the ID with custdeploy.
Status
Testing
The Testing status lets the script owner test the script without affecting other users in the account.
Log Level
Debug
The Debug level writes all
log.debugstatements and errors to the Execution Log subtab of the script deployment record.Execute As Role
Current Role
It's best to have scripts run with the user's current role to avoid granting unwanted access.
Audience > Roles
Check Select All
-
Click Save.
Deploy the Handle Deletion of Deposit Application user event script
To deploy the Handle Deletion of Deposit Application user event script:
-
Complete the steps in Step 6: Create the Script Records for your user event script.
-
Go to Customization > Scripting > Scripts.
-
Find your user event script in the list of scripts and click Deployments. The Script Deployments page appears.
-
Click New Deployment. The Script Deployment page appears.
-
On the Script Deployment page, enter the following values:
Field
Value
Applies To
Deposit Application
ID
_ue_deposit_application
NetSuite prefixes the ID with custdeploy.
Status
Testing
The Testing status lets the script owner test the script without affecting other users in the account.
Log Level
Debug
The Debug level writes all
log.debugstatements and errors to the Execution Log subtab of the script deployment record.Execute As Role
Current Role
It's best to have scripts run with the user's current role to avoid granting unwanted access.
Audience > Roles
Check Select All
-
Click Save.
Step 8: Test the Solution
After you create the script records and deploy your scripts, you can test your solution.
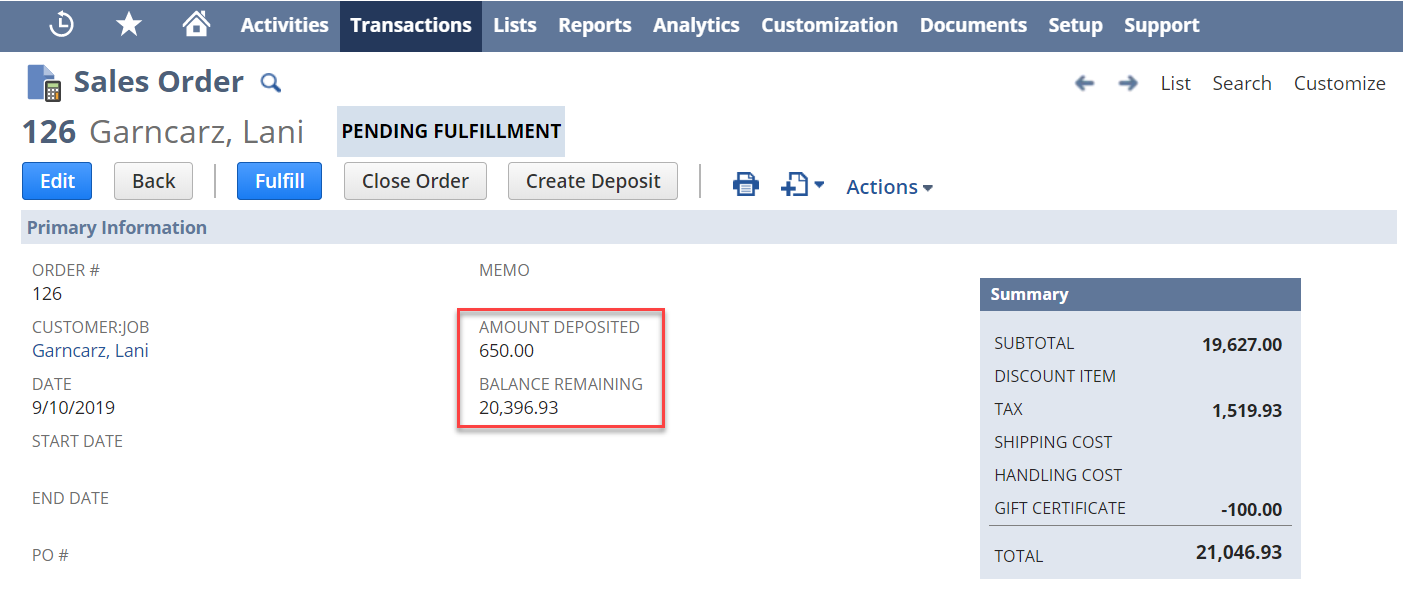
When these scripts run on sales orders, customer deposits, customer refunds, or deposit applications, the two custom fields, Amount Deposited and Balance Remaining, are updated on the sales order as shown below.
You can test this scenario in your sandbox, release preview, or by deleting your test data after you're done testing.
To test the deposit:
-
Go to Transactions > Sales > Enter Sales Orders > List.
-
Click View next to an order that is Pending Fulfillment and needs a customer deposit recorded against it. You can create a test sales order if you do not have any existing orders.
-
Click Create Deposit. If you do not see the Create Deposit button, you may need to edit the sales order and change the Custom Form selection to Standard Sales Order - Invoice. Or, select the custom form you chose when you created the Amount Deposited and Balance Remaining fields.
-
On the Customer Deposit page, change the Payment Amount to an amount that is less than the total of the sales order. Set the Payment Method to cash or check, and click Save.
-
Return to the sales order. You should see the deposit value in the Amount Deposited field, and the sales order total minus the deposit amount in the Balance Remaining field.
-
Edit the sales order to change the total, and the Balance Remaining should update when you save.
To test a refund:
-
Go to Transactions > Customers > Issue Customer Refund.
-
Select the same customer as you did for the sales order and deposit, and click the Apply subtab and the Deposits subtab.
-
Check the Apply box next to the customer deposit and enter an amount in the Payment field.
-
On the Refund Method subtab, in the Refund Method field, select Cash or Check.
-
Click Save.
-
View the sales order. You should see the Amount Deposited decrease and the Balance Remaining increase.
-
To test the deletion of a deposit application, open the customer refund created in steps 7-11.
-
On the Apply subtab, click the date to open the customer deposit the refund is applied to open the deposit.
-
On the customer deposit, on the Applied To subtab, click the date in the Date Applied column for the customer refund. This opens the deposit application.
-
Click Edit and then click Delete.
-
View the sales order again and verify that the refund is no longer applied toward the Amount Deposited.
Complete SuiteCloud Project
Project file: com.example.SalesOrderDepositTracking.zip
You can download this complete project as an SDF account customization project using the preceding ZIP file download link. After you download the project, open it in an IDE with the NetSuite SuiteCloud IDE Plug-In or Extension, such as WebStorm or Visual Studio Code. In the IDE, you'll see each customization objects (scripts, custom fields, and saved search) represented as an XML file. Using the SuiteCloud IDE Plug-In or Extension, you can deploy the entire solution to your account for testing.
Although the script deployments in the project default to Testing mode, the custom fields and saved search may be visible to others in your account. Use caution when choosing the NetSuite account and account type for testing.
To open the project in WebStorm or Visual Studio Code:
-
Extract the contents of the .zip file to your preferred project folder location.
-
In WebStorm, click File > Open. In Visual Studio Code, click File > Open Folder.
-
Go to the location of the extracted project folder, and select the folder.
The project and its components appear in the Projects list.
For information about deploying the project from the IDE to your account, see:
For more information about SuiteCloud IDE Plug-Ins and Extensions, including installation and setup, see:
Related Topics
- SuiteCloud Customization Tutorials
- Add Custom Button to Run a Suitelet
- Calculate Commission on Sales Orders
- Copy a Value to the Item Column
- Disable Tax Fields
- Hide a Column in a Sublist
- Populate Item Substitution
- Set a Default Posting Period in a Custom Field
- Set Purchase Order Exchange Rate
- Set the Item Amount to Zero for Marketing Orders
- Set Default Values in a Sublist
- Validate Order on Entry