SuiteCommerce InStore User Interface
Main Application Page
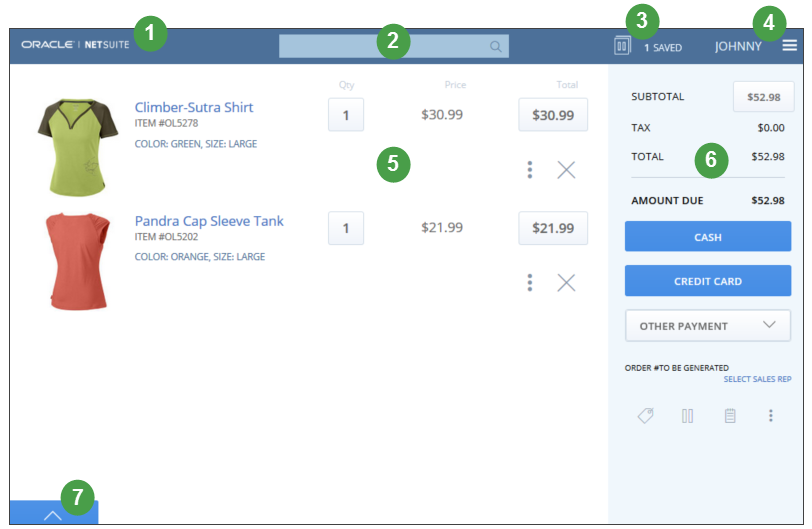
SCIS provides a touchscreen user interface. The following screenshot shows the interface while performing a transaction.
-
Application Logo - Looks different depending on how your SCIS is set up.
-
Search Bar - Lets you search for customer profiles, items, and transactions. Type the first few letters of a customer's name, a product name, or the first numbers of a transaction ID.
-
Saved Transaction menu - Tap to see a list of suspended transactions. For more information, see Saving (Suspending) an Order.
-
User menu - Tap to view additional commands, such as Enable On Screen Keyboard and Drawer Operations. For more information, see Login and User Menu.
-
Cart - Displays a list of items you've added to a transaction. For more information, see The Cart.
-
Transaction Summary - Displays totals for the transaction, including subtotal, tax due, and amount due.
-
QuickAdd tab - Tap to display the QuickAdd bar. For more information, see QuickAdd Bar.
Login and User Menu
The first page you encounter in SCIS, is the Login page. Enter your email address and a password assigned to you by your manager or system administrator.

After you log in, tap the User menu to select your next task.
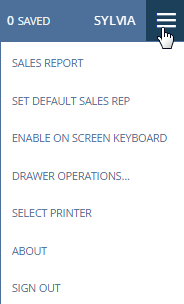
From the User menu, you can do the following:
-
View a report of your sales performance. For more information, see Viewing a Sales Report in SCIS.
-
Set the default sales representative for this session or for all sessions. For more information, see Selecting a Sales Representative.
-
Enable the on-screen keyboard so you can type on your tablet.
-
Perform cash drawer operations, such as Opening Drawer and Closing Drawer. For more information, see SCIS Cash Drawer.
-
Select a printer for printing receipts. For more information, see Selecting a Printer.
-
View the current version of SuiteCommerce InStore you're using.
-
Sign out.
QuickAdd Bar
You can use the QuickAdd bar to find items and add them to an order. Your system administrator defines the tabs that organize item QuickAdd Keys into groups on the QuickAdd bar. By default, QuickAdd Keys are organized in the following groups on the QuickAdd bar:
-
New Items
-
Promotions
-
Hard to Scan
-
Special Offers
-
Correlated Items
These groups appear as tabs in SCIS, as shown in the following screenshot.

The Cart
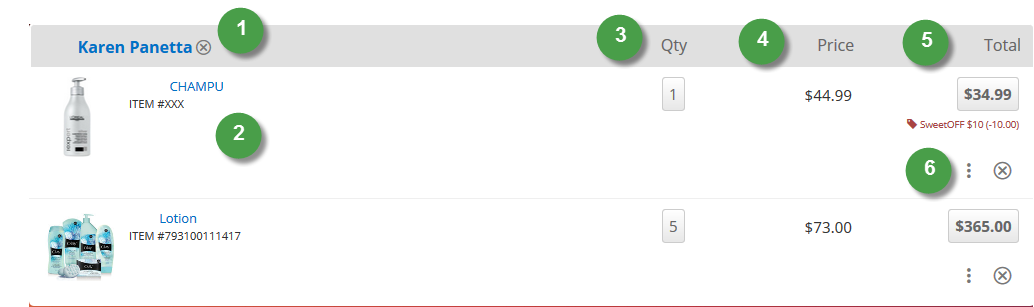
The following screenshot shows the cart with two items added to the transaction. You can tap an item name to view its Product Detail Page.
-
Customer name - Displays the customer associated with the current transaction. If you don't select a customer, the transaction is assigned to a default customer. SCIS automatically creates a default customer record for each sales associate. For more information, see Default Customer in the SCIS Administrator Guide.
-
Item description - Displays information about an item. Tap the item name to go to the Product Detail page.
-
Item quantity - Displays the quantity of an item added to the cart. Tap the item quantity to increase or decrease the number.
-
Item price - Displays the price of the item.
-
Item total - Displays the total due for a type of item. Tap the amount to apply a discount.
-
Item action menu - Tap to view a popup menu that displays additional actions you can perform on an item. For more information, see SCIS Store Pickup and Orders for Delivery. See also, Processing Returns in SCIS.
Product Detail Page
On the Product Detail page, also called the PDP, you can:
-
View the detailed description of an item
-
Add an item to the cart
-
Place an order for delivery
-
View or enter ratings and reviews
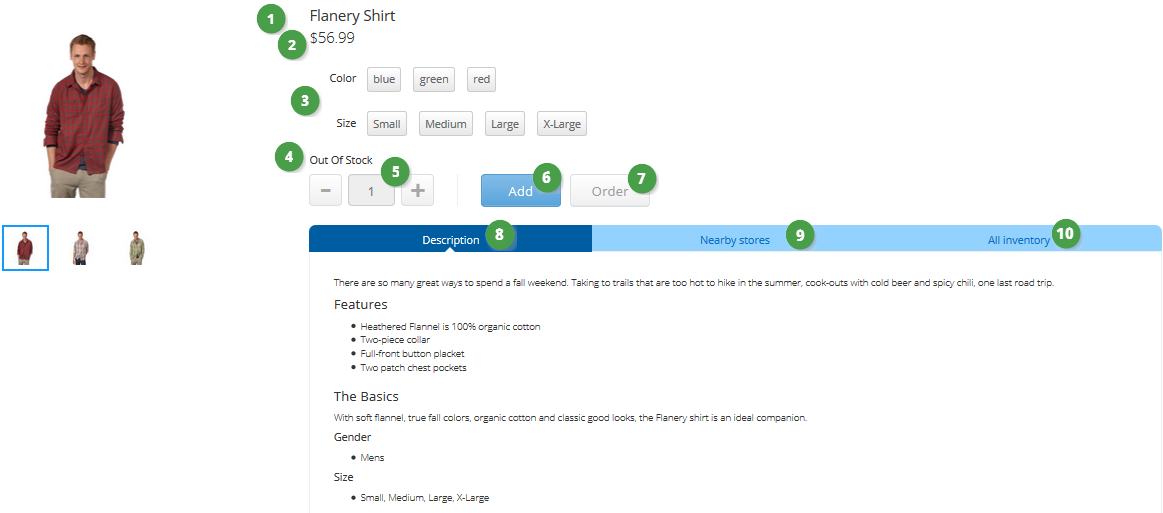
This screenshot shows the parts that make up the PDP.
-
Product Name - Shows up at the top of the Product Detail page.
-
Price - Price as configured on the item record in NetSuite.
-
Product matrix options - Matrix options are based on item record configuration in NetSuite.
-
Inventory status - Shows the quantity on hand at the location of the sales associate who is logged in.
-
Quantity to add to cart - Tap the plus and minus buttons to set the quantity add to the cart.
-
Add to cart button - Tap Add to add items to the shopping cart for cash and carry transactions.
-
Order button - Tap Order to place an order for delivery to the customer's address.
-
Description - A detailed description of the item.
-
Nearby stores - Shows a list of the local stores.
-
All inventory - Shows a list of the inventory count across different locations.
You can add an item even if the inventory shows zero at your location. If an item is not on hand, you can advise the customer if shipping is available from another location.
Swipe to Refresh
Sometimes a sales associate might need to refresh the SCIS application. Refresh means reloading or updating data you see on the screen.
Use the refresh capability in SCIS if you run into a connectivity issue, an application error, or a role or permission problem. Refreshing the application lets you continue working or start troubleshooting.
The following table describes the gestures you can use to refresh SCIS on various devices.
|
Operating System/Device |
Refresh Gesture |
|---|---|
|
iOS |
Swipe from the left edge of the screen to expose the Refresh menu. |
|
Windows |
Make a cross (x) gesture on the tablet screen with two fingers. |
|
Laptop or desktop computer |
Make a cross (x) with the cursor. |
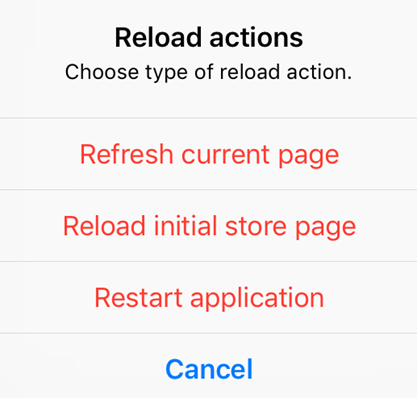
After you make a refresh gesture, options for three levels of application refresh are displayed:
-
Refresh current page - Reloads the current page.
-
Reload initial store page - Reloads the store login page.
-
Restart application - Initializes the application from topmost entry point, which is the login screen.
Popup Windows for Log Out or Application Closure
Popup windows can show up when you perform any of the following actions in the SCIS application:
-
Closing SCIS by double taping the Home button and then swiping up on the app's preview:
-
In the middle of an order, without payments applied.
-
In the middle of an order, with partial payments applied.
-
-
Logging out of SCIS when a sale is in progress:
-
In the middle of an order, without payments applied.
-
In the middle of an order, with partial payments applied.
-
The following table describes actions that trigger when a popup window displays and the supported workflows for how to proceed.
|
Action |
Workflow Options |
Popup Window |
Avalara Workflow |
|---|---|---|---|
|
Close the SCIS App while you have an order in progress and no payments applied. (1.a) |
The application closes without any notification. |
No popup window displays. |
If Avalara is activated, and the Submit on Update setting on the SCIS settings record is checked, a popup window displays when the sales associate logs in to SCIS. The sales associate can resume the last order or suspend it. 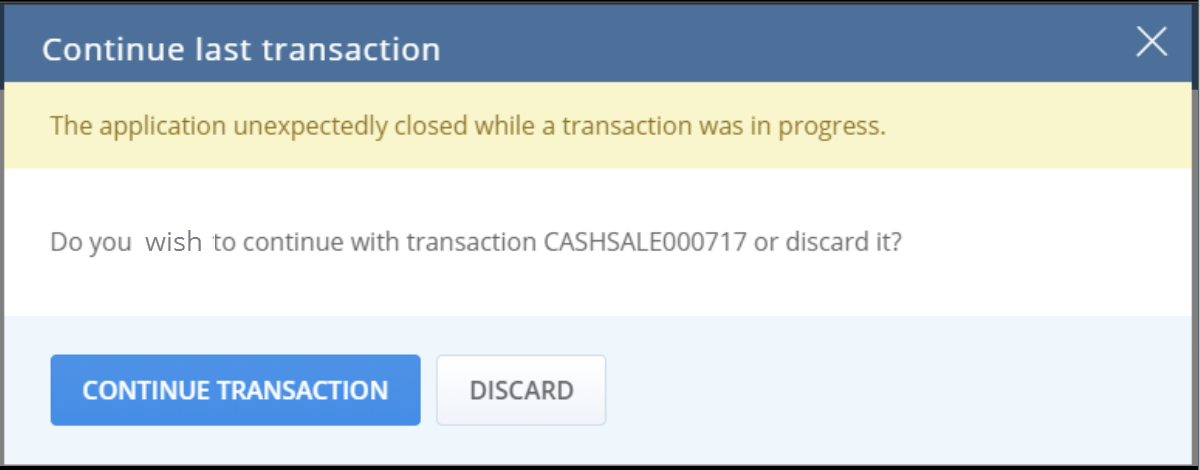
|
|
Close the SCIS App while you have an order in progress and partial payments applied. (1.b) |
The application closes without any notification. When the sales associate logs in again, a popup window is displayed. The sales associate can resume the last order or discard it. |
Without Avalara, this popup window displays. 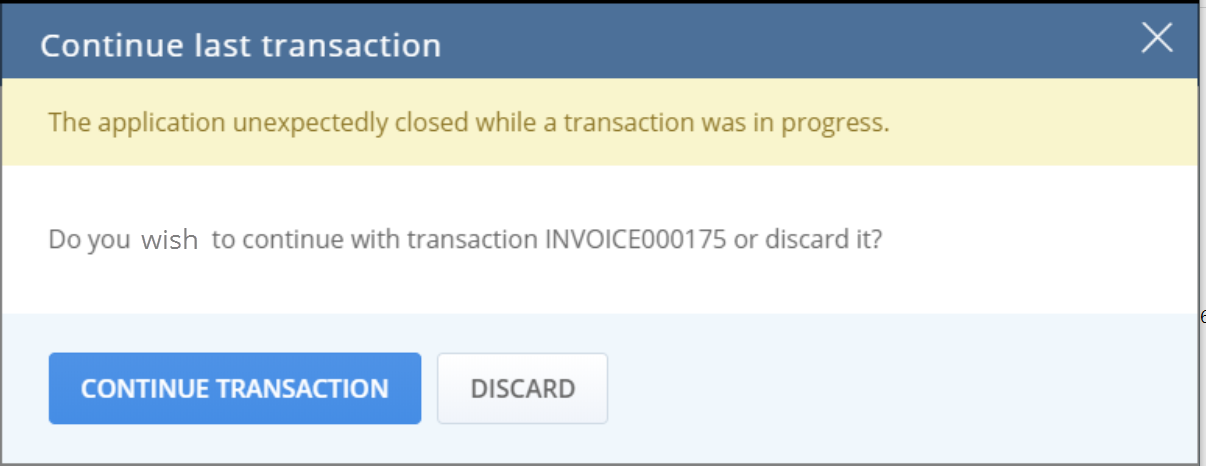
|
If Avalara is activated, the behavior is the same. 
|
|
Log out of SCIS while you have an order in progress and no payments applied. (2.a) |
When the sales associate taps Sign Out in the User menu, a popup window is displayed. The sales associate can choose to discard the order and log out or cancel signing out. |
Without Avalara, this popup window displays. 
|
If Avalara is activated and the Submit on Update setting on the SCIS settings record is checked, SCIS shows this popup window. 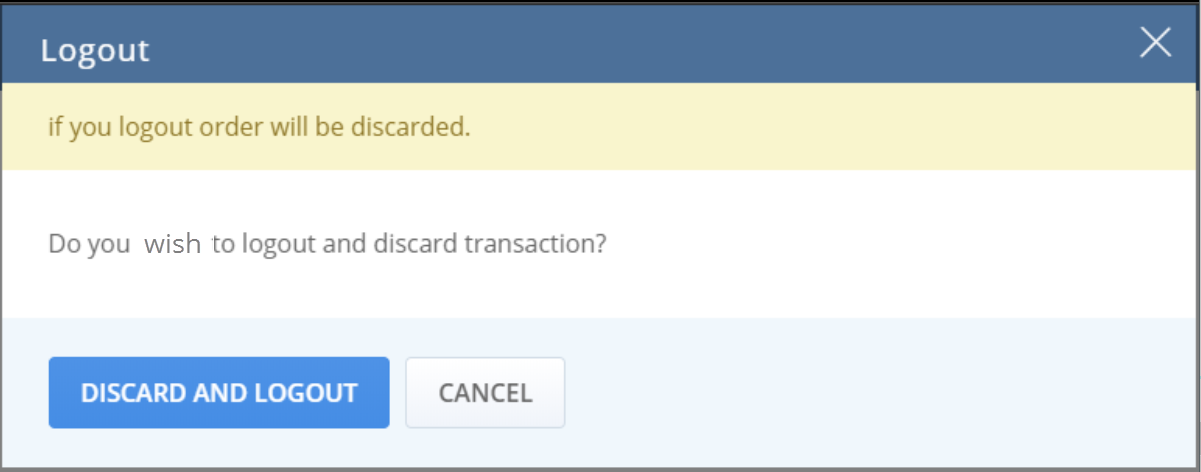
After the sales associate logs in again, no modal is shown. The order was voided. |
|
Log out of SCIS while you have an order in progress and partial payments applied. (2.b) |
When the sales associate taps Sign Out in the User menu, a popup window is displayed. The sales associate can suspend the order and log out or cancel the log-out action and go back to the cart. |
Without Avalara, this popup window displays. 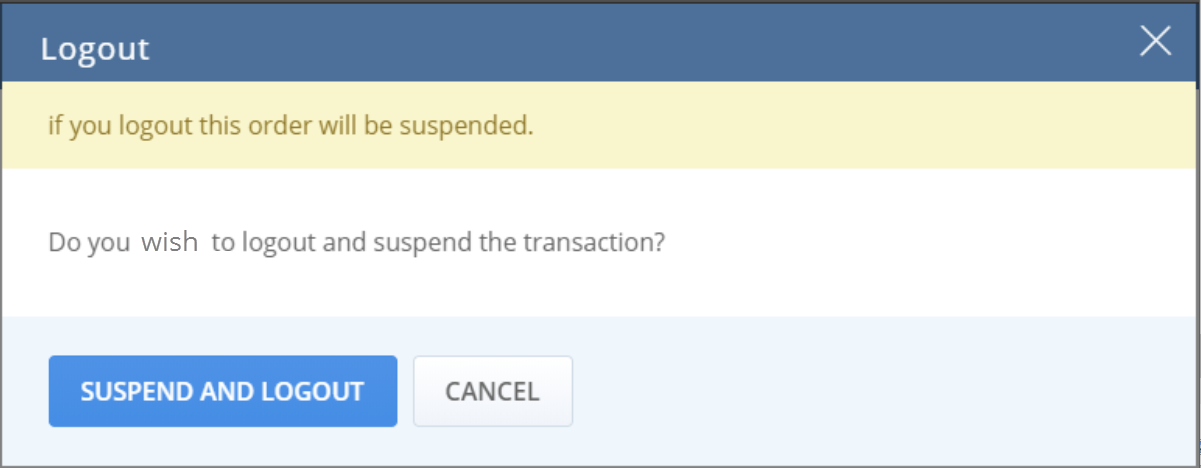
|

|