Importing Project Tasks from Microsoft Project
You can use Microsoft Project to build project plan templates or individual project plans, and then import this data into NetSuite project records.
There are currently two different ways to import project tasks. You can use either the legacy simplified version of the Import Assistant, or the standard CSV Import. To get the most convenience and functionality, it's best to use the Standard CSV Import. The Simplified Import Assistant comes with limitations and is scheduled to be removed in future releases.
For information about importing project tasks, see the following:
Requirements for Project Tasks Imports
To import project tasks from Microsoft Project into NetSuite:
-
The Project Management feature must be enabled for your account.
-
You must have the following permissions:
-
Import CSV File
-
Projects (at least View level)
-
Project Tasks (at least Create level)
-
-
You must first complete the following tasks in NetSuite:
-
Create a project in NetSuite to which the project tasks can be added. Be sure to enter a value for start date, as all scheduling for project tasks is generated from this date. Also, all resources listed in Microsoft Project should be listed in the Project's Resources subtab.
For more information, read Creating a Project Record.
-
Edit the NetSuite Employee records of project task resources, enabling the Project Resource box on the Human Resources subtab, so that the import can include assignments.
For more information, read Identifying an Employee as a Project Resource.
-
Every project task record is designated as either a project task or a milestone task. If you import a project task record and don't include any estimated work, the record is saved as a milestone task. If you do include estimated work, the record is saved as a project task. For more details about the difference between project tasks and milestone tasks, see Creating Milestone Tasks.
Standard CSV Import
To start a standard project task import, go to Setup > Import/Export > CSV Import. You'll be guided through the five steps needed to successfully import your data.
Step 1- Scan & Upload CSV File
-
In the Import Type field, select Relationships.
-
In the Record Type field, select Project Tasks.
-
In the Character Encoding field, you can choose a different character encoding format. For more information about character encoding, see Choose Import Character Encoding.
-
In the CSV Column Delimiter field, select the delimiter that separates the columns in your CSV file.
-
Under CSV File(s), select the files you want to upload. For more information, see Select a File for Import.
-
Continue to the next step by clicking the Next> button.
Step 2- Import Options
On the Import Options page, select a Data Handling option to show how your import will affect NetSuite data:
-
Add - Select this if all records in your file are new to NetSuite.
-
Update - Select this if all records in your file already exist in NetSuite, and you want to update them.
-
Add or Update - Select this if your import has a mix of new and existing records.
Task dependencies such as assignees or predecessors aren't currently available for updates by CSV import. If you select the Update option for a CSV file that includes fields that can't be updated, these fields won't show up in mapping. Any updates to this type of information must be made manually on the project record.
Optionally, you can also set advanced options. For more information about advanced CSV Import options, see Set Advanced CSV Import Options.
Step 3- File Mapping
You only need to complete this step if you're uploading multiple files. For more information about File Mapping, see Step Three File Mapping.
Step 4- Field Mapping
In this step, review and edit the mapping of CSV fields to NetSuite fields.
Note the following:
-
NetSuite fields are listed in the right pane, with already mapped fields grayed out. CSV file fields are listed in the left pane, with already mapped fields marked with a green check. The Import Assistant provides default mappings for most fields, which you can change as needed.
-
For instructions for mapping fields, see CSV Field Mapping Tasks.
-
Required fields are marked with ( Req ). You must map these fields or provide default values for them. You need to specify a mappings for the Project field, which is the name of the project, as specified on the NetSuite project record.
-
You can add or modify a default value for a field by clicking its pencil icon. (Note that by default, a default value of Not Started is set for the Status field.)
-
You can map fields for project tasks notes, predecessors, and resources by expanding the sublist folders at the bottom of the right pane.
Note:Task dependencies such as assignees or predecessors aren't currently available for updates by CSV import. If you selected the Update option for a CSV file that includes fields that can't be updated, these fields won't show up in mapping. Any updates to this type of information must be made manually on the project record.
-
You can omit a mapping for the MS Project Service Item, which is the charge rate, or you can map a service item with a null value, meaning it has a null price attached to it.
-
There is a 500-character limit for the names of resources imported for each project task. An error will occur if the names of all resources associated with an imported project task contain more than 500 total characters. It is unlikely you will encounter this error, unless you have many resources with long names associated with a project. If you do encounter this error, you can remove one or more resources from the project task and retry the import.
-
For more information about mapping fields, see General CSV Field Mapping Tips.
Step 5- Save & Import
Your CSV files are now ready to be imported into your NetSuite account. You can optionally save your Field Mapping for later use. You can either run and save the import, only save it, or run it without saving. For more information, see Step Five Save Mapping & Start Import.
Simplified Import Assistant
Using the Simplified Import Assistant
-
To begin a project tasks import, go to Activities > Scheduling > Project Tasks > Import.
-
Download and set up the NetSuite-provided project file containing the export map.
-
Click the Download link and save the BlankProjectFileWithExportMap.mpp file to your local machine.
-
Open the downloaded file in Microsoft Project.
-
Choose Tools > Organizer and click the Maps tab.
-
In the left box, labeled 'BlankProjectFileWithExportMap.mpp', select the Task export for NetSuite element. Click Copy so that this element appears in the right box, labeled 'Global.MPT'.
-
Click the Close button.
-
-
Export Microsoft Project tasks data to a CSV file.
-
Open the Microsoft Project file that contains the tasks you want to import into NetSuite.
-
Choose File > Save As. Browse to a location, enter a file name, change Save as type to CSV, and click Save.
-
On the Export Wizard first page, click Next. On the Map page, choose Use existing map and click Next. On the Map Selection page, choose Task export for NetSuite and click Finish.
-
-
Import CSV file data into NetSuite.
-
On the first page of the Import Assistant, click the Select button, browse to the CSV file containing exported Microsoft Project tasks data, and click Next.
-
Review and edit the mapping of CSV fields to NetSuite fields on the Field Mapping page, and click Run.
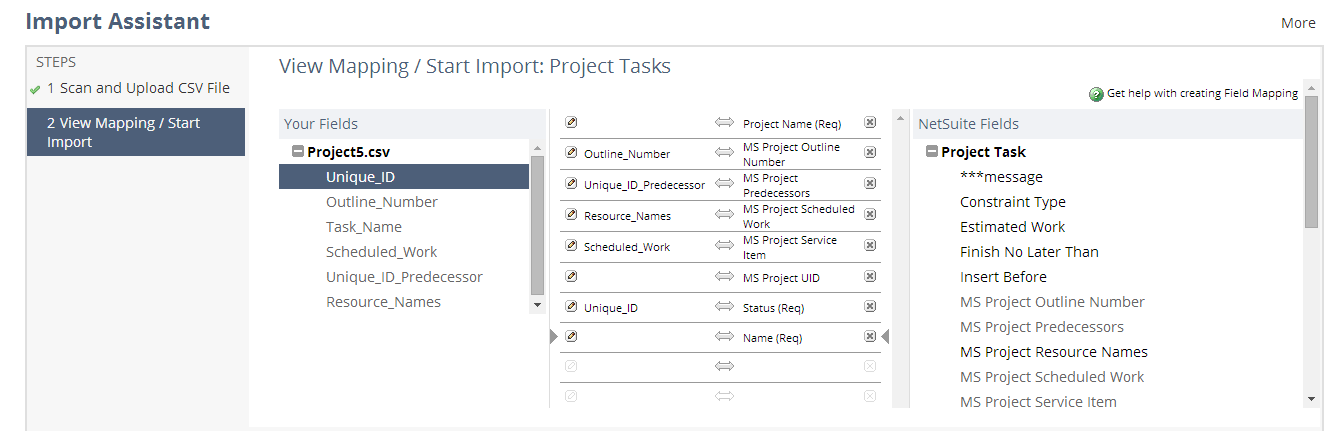
Note the following:
-
NetSuite fields are listed in the right pane, with already mapped fields grayed out. CSV file fields are listed in the left pane, with already mapped fields marked with a green check. The Import Assistant provides default mappings for most fields, which you can change as needed.
-
For instructions for mapping fields, see CSV Field Mapping Tasks.
-
Required fields are marked with ( Req ). You must map these fields or provide default values for them. You need to specify a mappings for the Project field, which is the name of the project, as specified on the NetSuite project record.
-
You can add or modify a default value for a field by clicking its pencil icon. (Note that by default, a default value of Not Started is set for the Status field.)
-
You can map fields for project tasks notes, predecessors, and resources by expanding the sublist folders at the bottom of the right pane.
-
You can omit a mapping for the MS Project Service Item, which is the charge rate, or you can map a service item with a null value, meaning it has a null price attached to it.
-
There is a 500-character limit for the names of resources imported for each project task. An error will occur if the names of all resources associated with an imported project task contain more than 500 total characters. It is unlikely you will encounter this error, unless you have many resources with long names associated with a project. If you do encounter this error, you can remove one or more resources from the project task and retry the import.
-
For more information about mapping fields, see General CSV Field Mapping Tips.
-
-
The simplified Import Assistant only supports the addition of new project tasks. To update existing project tasks, use the Standard CSV Import.