Popup and Dropdown Lists
When you're selecting from a long list of records in a NetSuite field, you can use built-in features like autocompletion and popup lists to save time. These functions include autocompletion and popup lists. Many fields also include links to search, edit, and create related records.
Autocompleting Dropdown Lists
Instead of selecting from a dropdown list, you can type the first letters of a value and the field is completed automatically.
Accessing Related Records from Dropdown Lists
Some dropdown lists include buttons to access related records, so you can quickly add, review, or change a record before you select it for a field. These buttons appear when you hover over the dropdown list.
-
Click the new
 button to create a new record in a popup window.
 -
Click the open button
 to view or edit an existing record. The record opens in view mode in a new tab. Click Edit on the record to change to edit mode.
Using Popup Lists
You can use the Maximum Entries in Dropdowns preference to force popup lists instead of dropdown lists for fields with large numbers of possible values. To set this preference, go to Home > Set Preferences. The Maximum Entries in Dropdowns field is on the General subtab. Enter the maximum number of records you want to appear in a dropdown list. If the possible values in a list exceeds this number, the list automatically becomes a popup list. If the possible values don't exceed this number, a dropdown list appears.
Enter 0 in the Maximum Entries in Dropdowns field to always use popup lists. To always use dropdown lists, enter a large number that exceeds the number of entries in any of your lists.
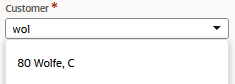
Each popup list includes double arrows  in place of the single arrow for a dropdown list. Start typing and press the Tab key to open a popup window that contains only records that begin with the letters you typed. For example, in the following screenshot, a user typed 'wol' and pressed Tab to display a list of customers.
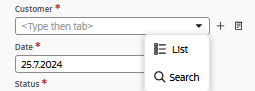
Alternatively, you can click the double arrows to display a popup and choose to open a list or search. The new and open buttons also appear when you click the arrows as shown in the following screenshot.
-
Click the new button to open a popup window and add a new record.
-
Click the open button to open the selected record in view mode in a new tab. Click Edit on the record to change to edit mode.
To clear a value that you've previously entered in the list, select the value and press the Delete key.
Using Popup List Search Links
Most fields with a popup list also have a search link. Click the Search icon, and a search window pops up. Enter criteria for the search, click Submit, and you'll see a list of items matching your search criteria. Select the item you want, and it'll be added into the field.
For example, to create a sales order for a customer in Alaska, click Search next to the Customer:Project field. When the Customer Search window pops up, type AK in the state field, and click Submit. The pop up window changes to show only your customers in Alaska. Click the name of the customer you want, and NetSuite inserts it into the Customer:Project field.
On transaction forms, NetSuite searches the full name of the item or the name of the final subitem and autofills the item field with any matching names. For example, if you type bas you'll find Summer:Picnic:Basket and Basket:Welcome.
After you inactivate a record, it won't show on transactions for selection in popup or dropdown lists. However, if the Search option appears in the popup or dropdown for a field, the search will return inactive records if the Inactive filter is set to Either or Yes. Inactive records in these search results can be added to transactions. To filter inactive records out of search results, be sure to set the Inactive filter to No in the search criteria.
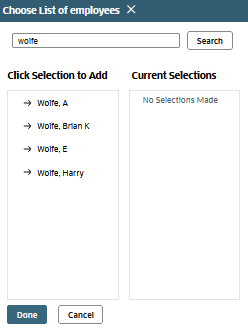
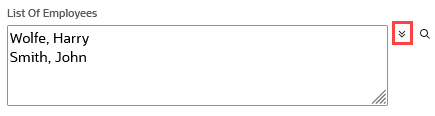
Popup Multi-Select Lists
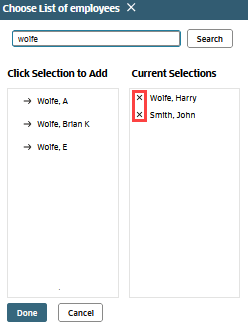
On fields that allow you to select multiple values, you can access popup multi-select lists. To quickly enter a single value in this type of field, type the first few letters and press Tab. To enter multiple values, click the double arrow button to display a popup with a complete list of records that you can select and search.

To search for records, enter the first letters of the record name and click Search. To add fields to your selection, click the record name in the left column. The item moves to the Current Selections column on the right.
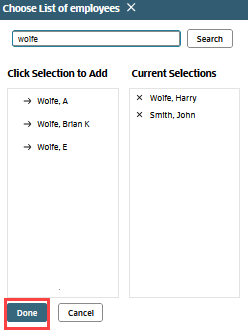
When you've selected all required records, click Done.
To change or remove values in a multi-select list, don't edit the list directly. Click the double arrow button to open the popup and make the required changes.
To remove a value from a multi-select list, click the double arrow button beside the field.
Click the X button next to the selection that you want to remove, and then click Done.
Using Popup Auto Suggest
NetSuite provides an auto suggest function for popup lists. As you type three letters or more, a list of suggested matching records appears. You can select from this list to quickly populate the field.

If you don't want to see suggested matches, you can disable the auto suggest feature by clearing the Popup Auto Suggest box on the Analytics subtab of Home > Set Preferences.