Quick Start : Send data to an API using Oracle Infinity Webhook
Introduction
This tutorial details how to send data to an API using Oracle Infinity. This allows you to send data received by Infinity in real-time to any vendor which has an API. We will be sending data to a fictional API which we will create on webhook.site.
Tip! In this tutorial, we’ll be providing you with a test website* so you can complete the tutorial without any development work:
*The test site was built using Oracle Content Management - a powerful solution to allow marketers to build their own websites quickly without any coding knowledge)
Why send data to an API?
Most vendors will have APIs to allow you to send data to them. This opens up a huge range of possibilities with Infinity such as:
-
Improve conversion rates by retargeting users: For example, you can send user activity to vendors using channels such a social (for example, see Facebook Conversions API), email (for example, see MailChimp Marketing API) and CRM (for example, see Salesforce APIs).
-
Power other systems with your data for analysis : For example, you may wish to send user activity to your own APIs or a BI tool.
The opportunities for flowing your user activity to other systems are endless!
Objectives
The objectives of the tutorial are to:
-
Generate a CX Tag to deploy Infinity to your website: We’ll be deploying the CX Tag to the test website in this example.
-
Set up an Oracle Infinity Webhook Connection: This will be configured to define how our API calls should be formed. Our API call will be structured as follows:
- Method : ‘POST’
- Authorization : None
- URL : We will create a dummy endpoint to send the data to (for example, ‘https://webhook.site/0b382d05-5569-4ef8-8f31-268c7a4e9d9d’).
- Content Type : ‘application/json’.
- Payload : The payload will be formatted as follows:
{
	"event": {
		"url": "URL user is on",
		"name": "Viewed Page"
	},
	"user": {
		"identifiers": {
			"visitor_id": "Infinity Visitor ID"
		},
		"geo": {
			"country": "COUNTRY"
		}
	}
}
- Understand how to format your API calls using Infinity’s Webhook Template: The Webhook uses Eta to format payloads. We will be using the Eta Playground to test our templates before configuring in our Infinity Webhook.
- Set up an Oracle Infinity Action: This will trigger the message to the API when required.
Prerequisites
In order to complete this tutorial, you must have the following in place:
- Oracle Infinity: You must have an Oracle Infinity account.
Step 1: Create, Configure and Implement the Oracle CX Tag on our Test Website
The Oracle CX Tag is used to implement Infinity on your website. Please follow these instructions to deploy this on the test website:
1.1 Create your Oracle CX Tag
-
Log in to the Infinity user interface.
-
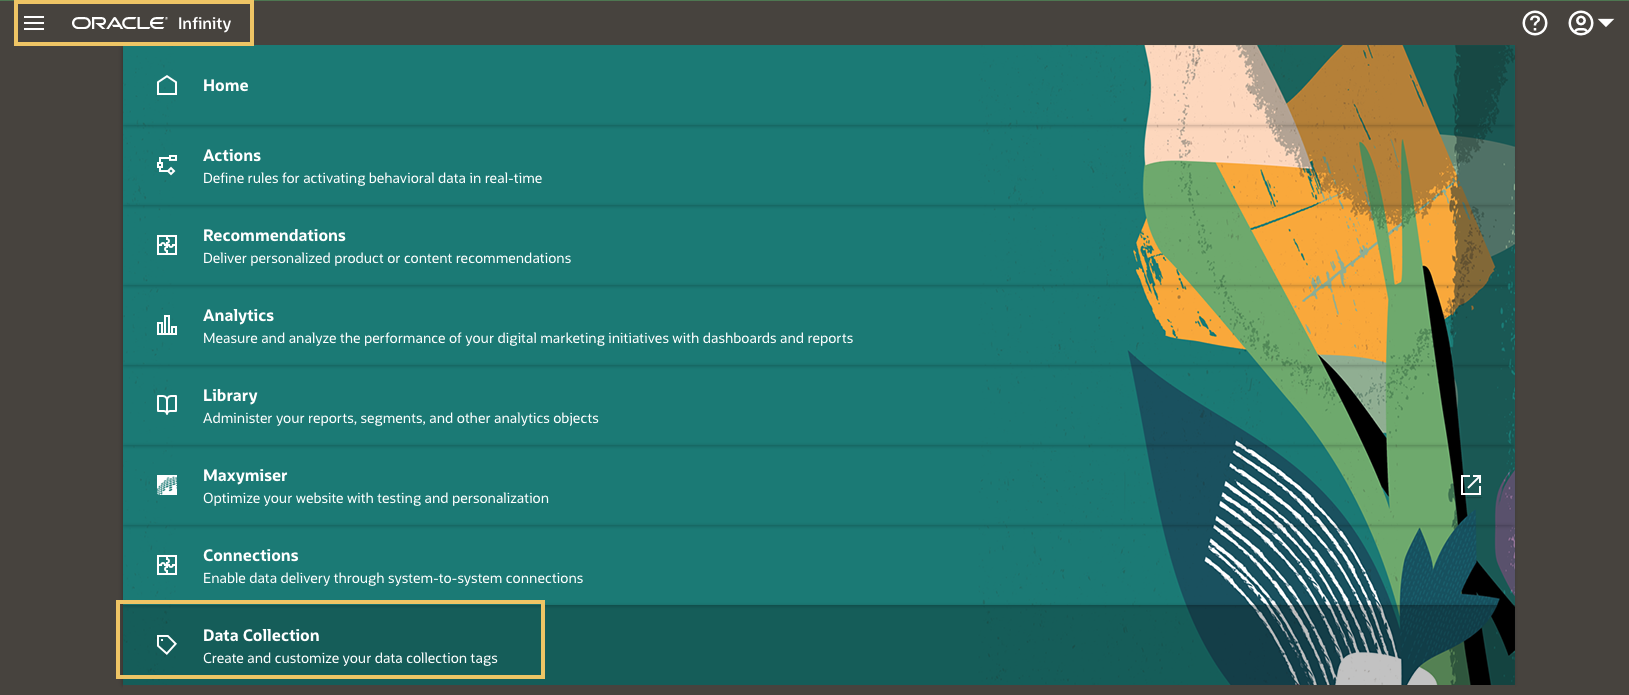
Go to Data Collection in the top-left navigation menu:
Data Collection Application
-
Click on Create Tag.
-
Enter the name ‘Demo Website Tutorial’.
1.2 Configure the Infinity Module
We now need to configure the Infinity Module to deploy the Infinity on the test website.
-
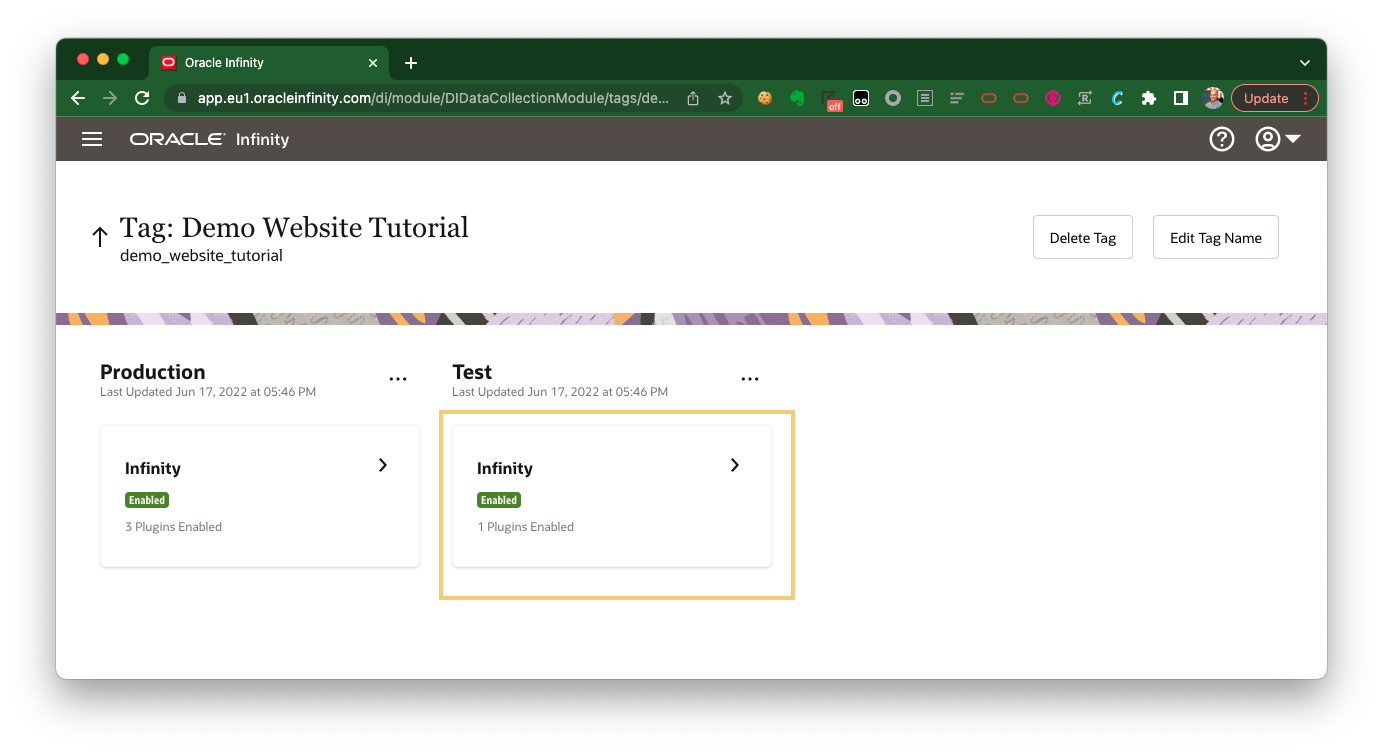
Click the Infinity Module.
Editing the Infinity Module
-
Go to the Plugins Added tab.
-
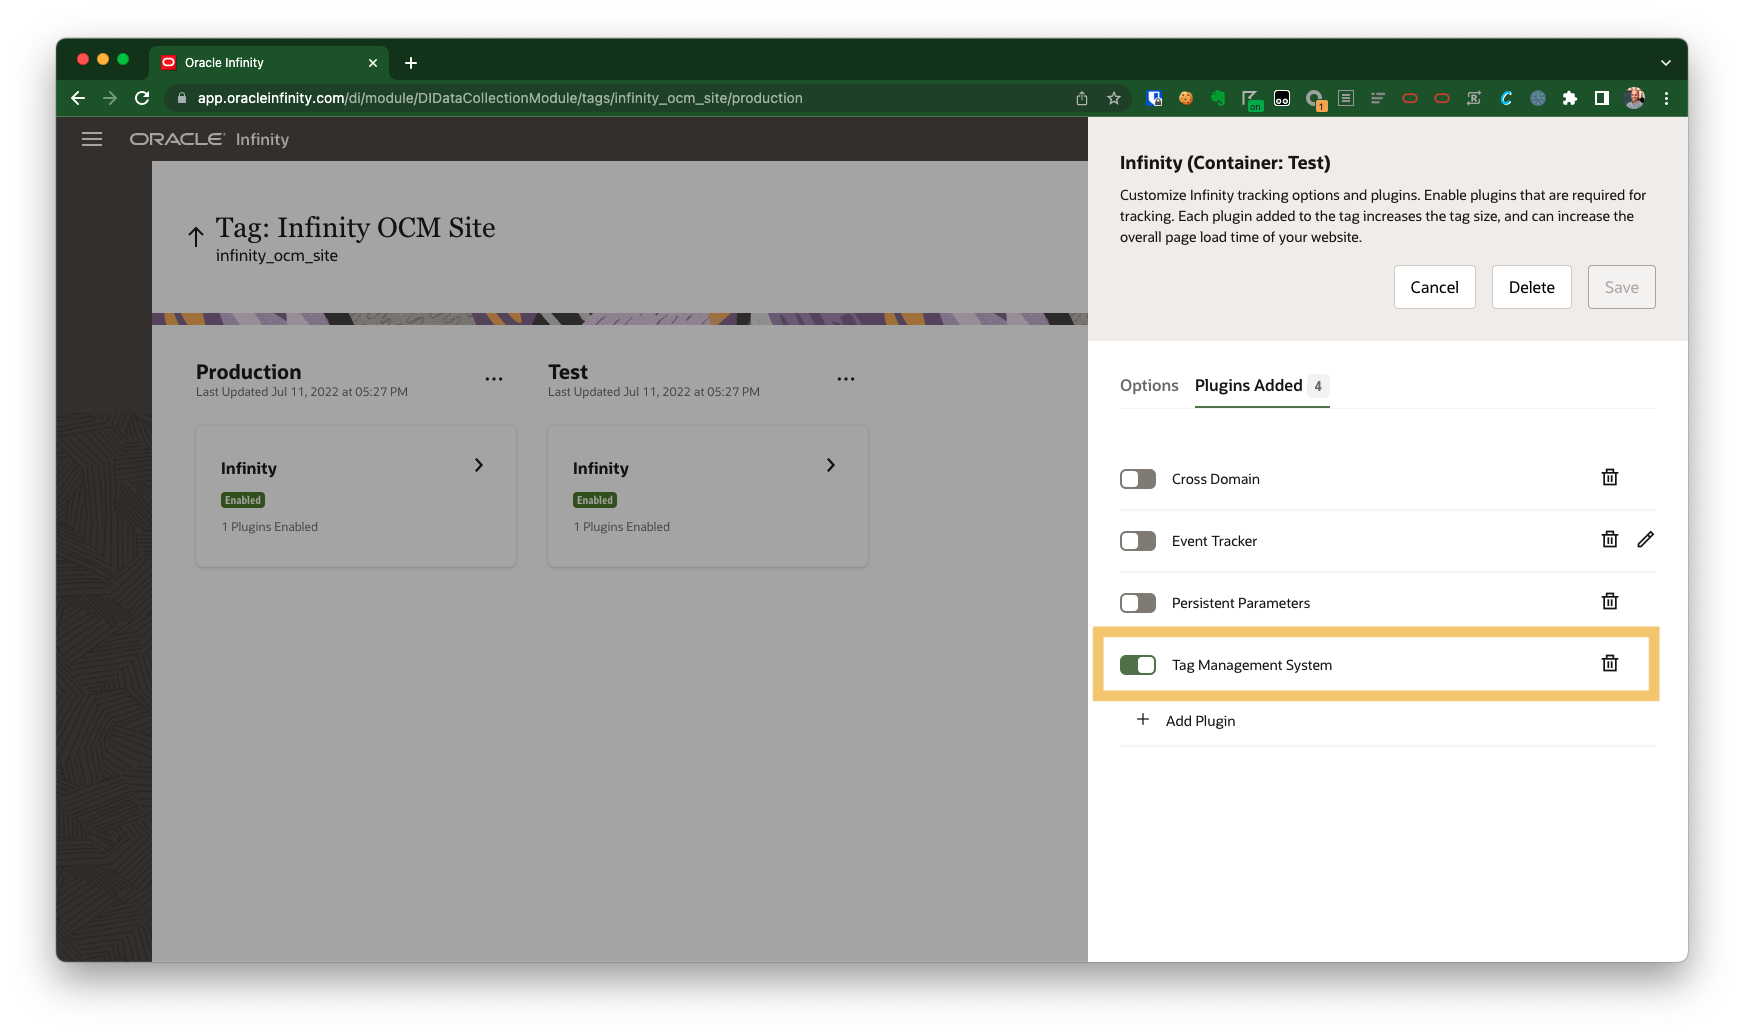
Click + Add Plugin and add the Tag Management System plugin.
-
Ensure you Enable the Tag Management System plugin then click Save.
Enabling the Tag Management System Plugin
-
Publish this to production by clicking on Publish to Production:
Publish to Production

-
Accept all of the options in the prompt and click Publish.
1.3 Deploy the Oracle CX Tag on the Test Website
Tip! Normally, we could be implementing the Oracle CX Tag on your website as per the implementation guidelines. However, we are going to be using a pre-built test website which already has the CX Tag deployed.
Our test website is especially built to allow us to use any CX tag of our choice without needing to implement the normal CX Tag code (for your browser only - it won’t load the CX Tag for other visitors).
Please complete the following steps to do this:
-
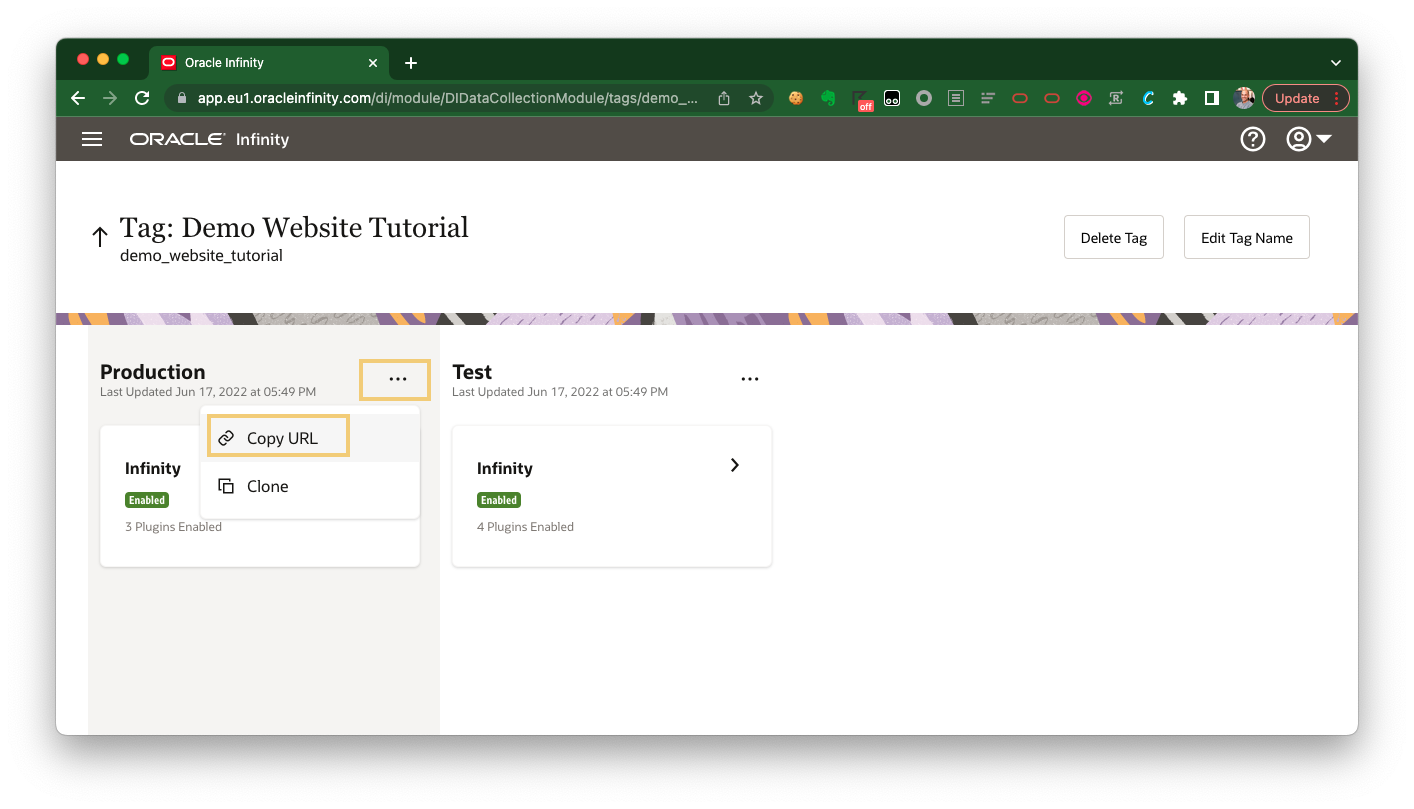
In the Data Collection application, we are going to take the the CX Tag URL that we will use to deploy the tag on our website:
Getting your CX Tag URL
-
The URL you have copied should be similar to ‘//d.oracleinfinity.io/infy/acs/account/ACCOUNTGUID/js/TAGID/odc.js’ where ‘ACCOUNT GUID’ is your Account GUID and
TAGIDis the unique ID for the tag we will be using. -
Note down the ‘ACCOUNT GUID’ and ‘TAGID’.
-
We can use this CX Tag by editing the website URL as follows:
Step 2: Implement the Infinity Tracking on your Website
Not necessary for tutorial! This step is not required in this tutorial so you can skip this step. The test website is already pre-configured with all of the required tracking.
2.1 Implement Page View Tracking
As user s browser your website, we want to capture which pages they are viewing. A simple view call tag will ensure we can do this:
Tips!
- Your website developer will be able to implement this for you on the website (or through a tag manager if you have one). See CX Tag - Tracking Reference - View Calls or CX Tag - Quick Start for full details.
<script>
// Send Data
var cxDataObject = {};

// DO NOT EDIT BELOW THIS LINE - ORA.view()
window.ORA = window.ORA || {productReady: []};
ORA.productReady.push(['analytics', function(cxDataObject) {return function() {return ORA.view({"data": cxDataObject})}}(cxDataObject)]);
</script>
Step 3: Validate Infinity Tracking on your Website
We can now test our website to see whether the required tracking has been implemented as follows:
Tip! Please see Verifying Data Collection for more information around validating Infinity Tracking with the Oracle CX Tag.
3.1 Validate the Oracle CX Tag and Infinity Modules are firing on your website
Visit your test site ensuring that you update the URL with your ‘ACCOUNTGUID’ and ‘TAGID’ (as per above).
In your browser:
-
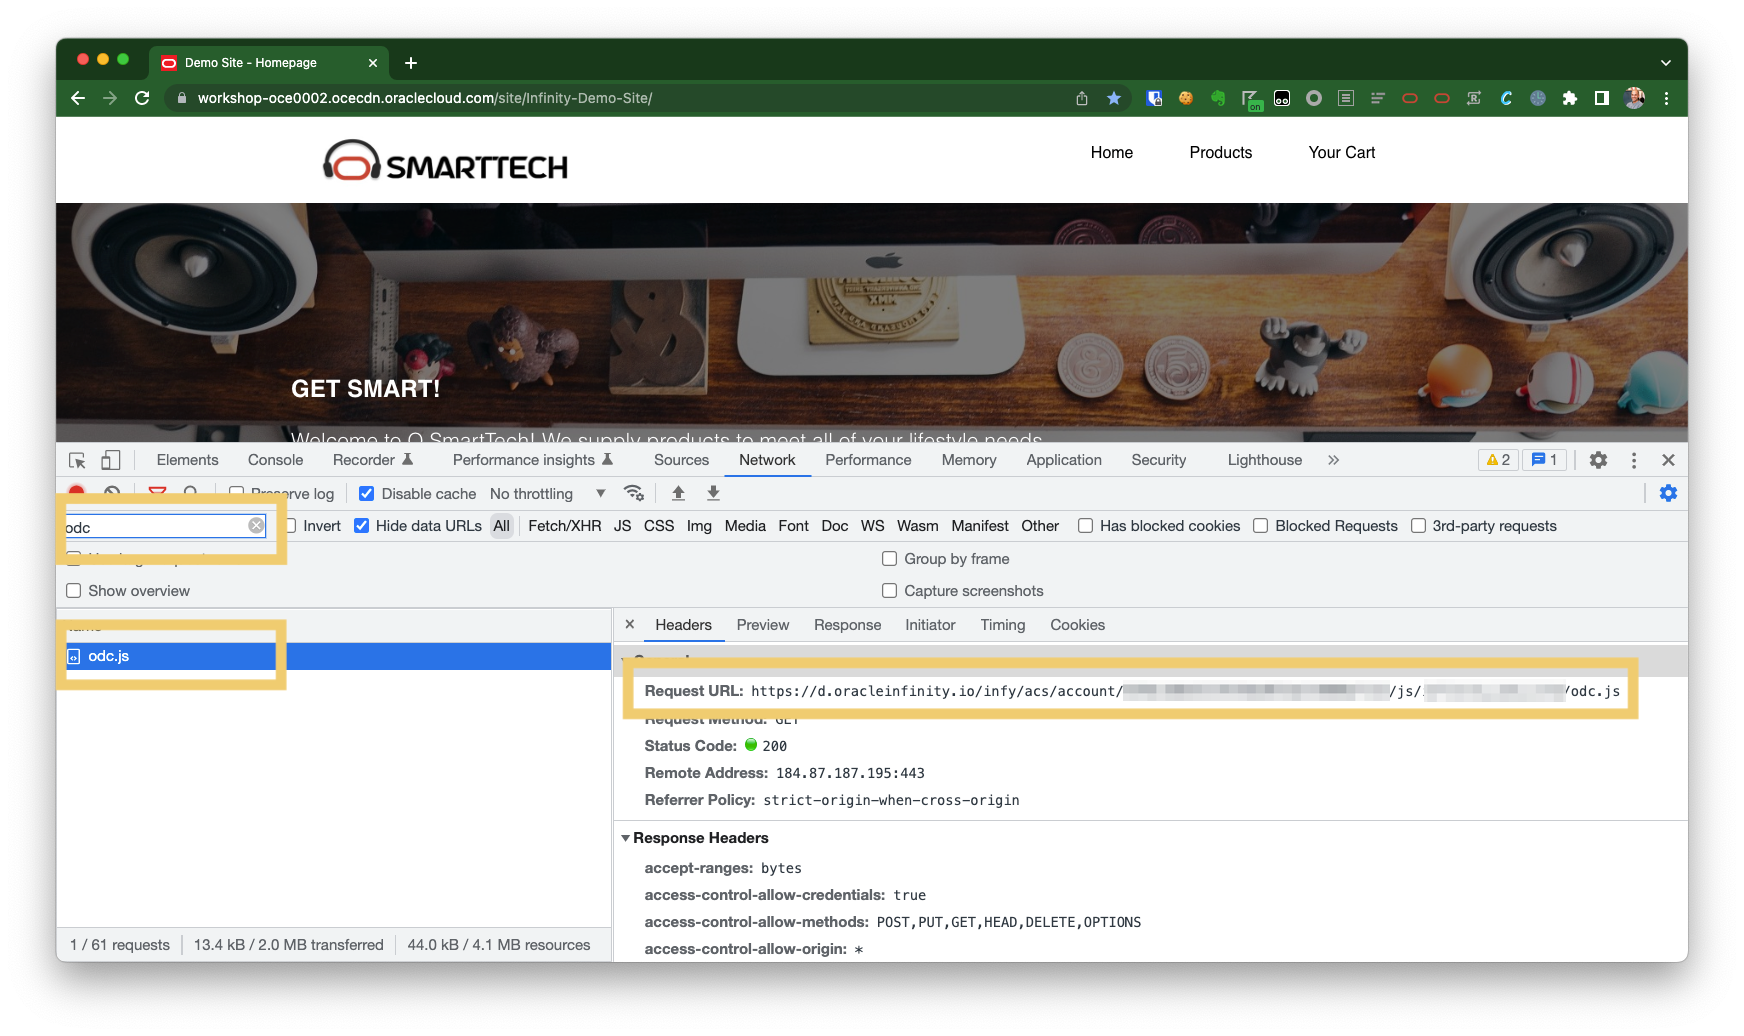
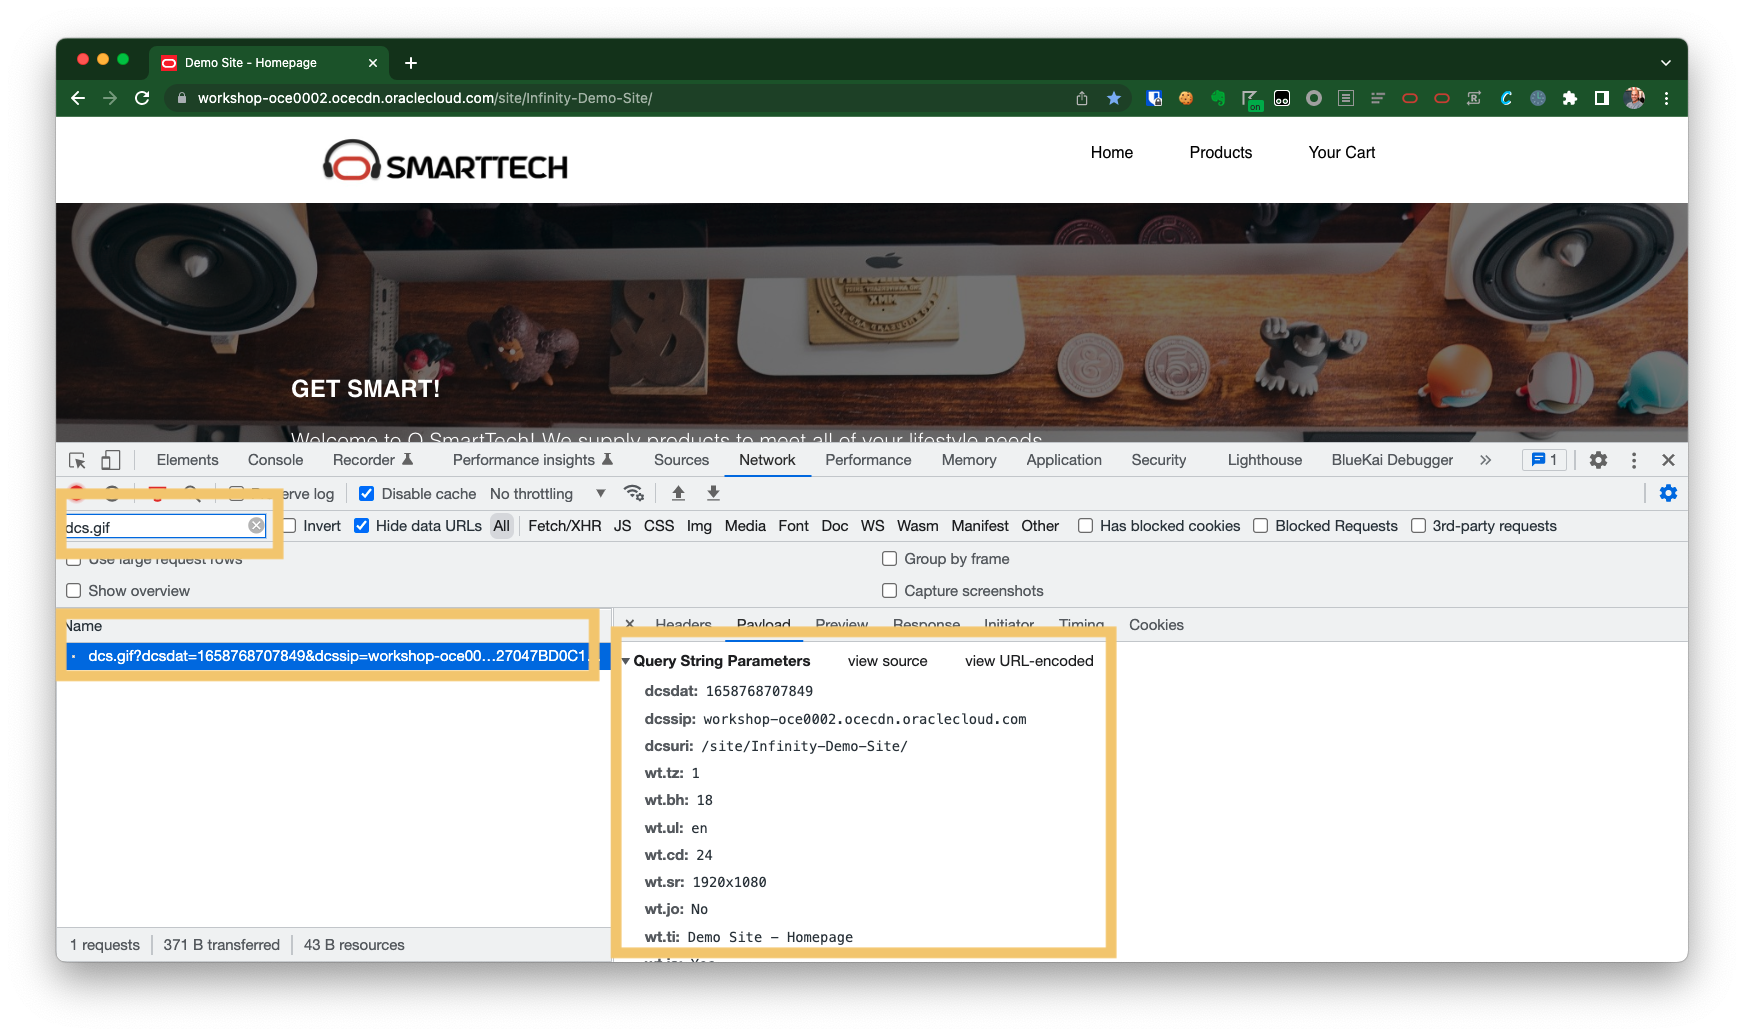
Open the developer tools (DevTools in Google Chrome), open the Network then refresh the page.
-
Filter for ‘odc.js’ to check the CX Tag is firing:
odc.js
-
Filter for ‘dc.orac’ - you should see at least one ‘dcs.gif’ request (this is a tracking request to Infinity to capture user behavior):
dcs.gif
3.2 Validate Page View Tracking
Next, we will test whether page views are being tracked on your website.
-
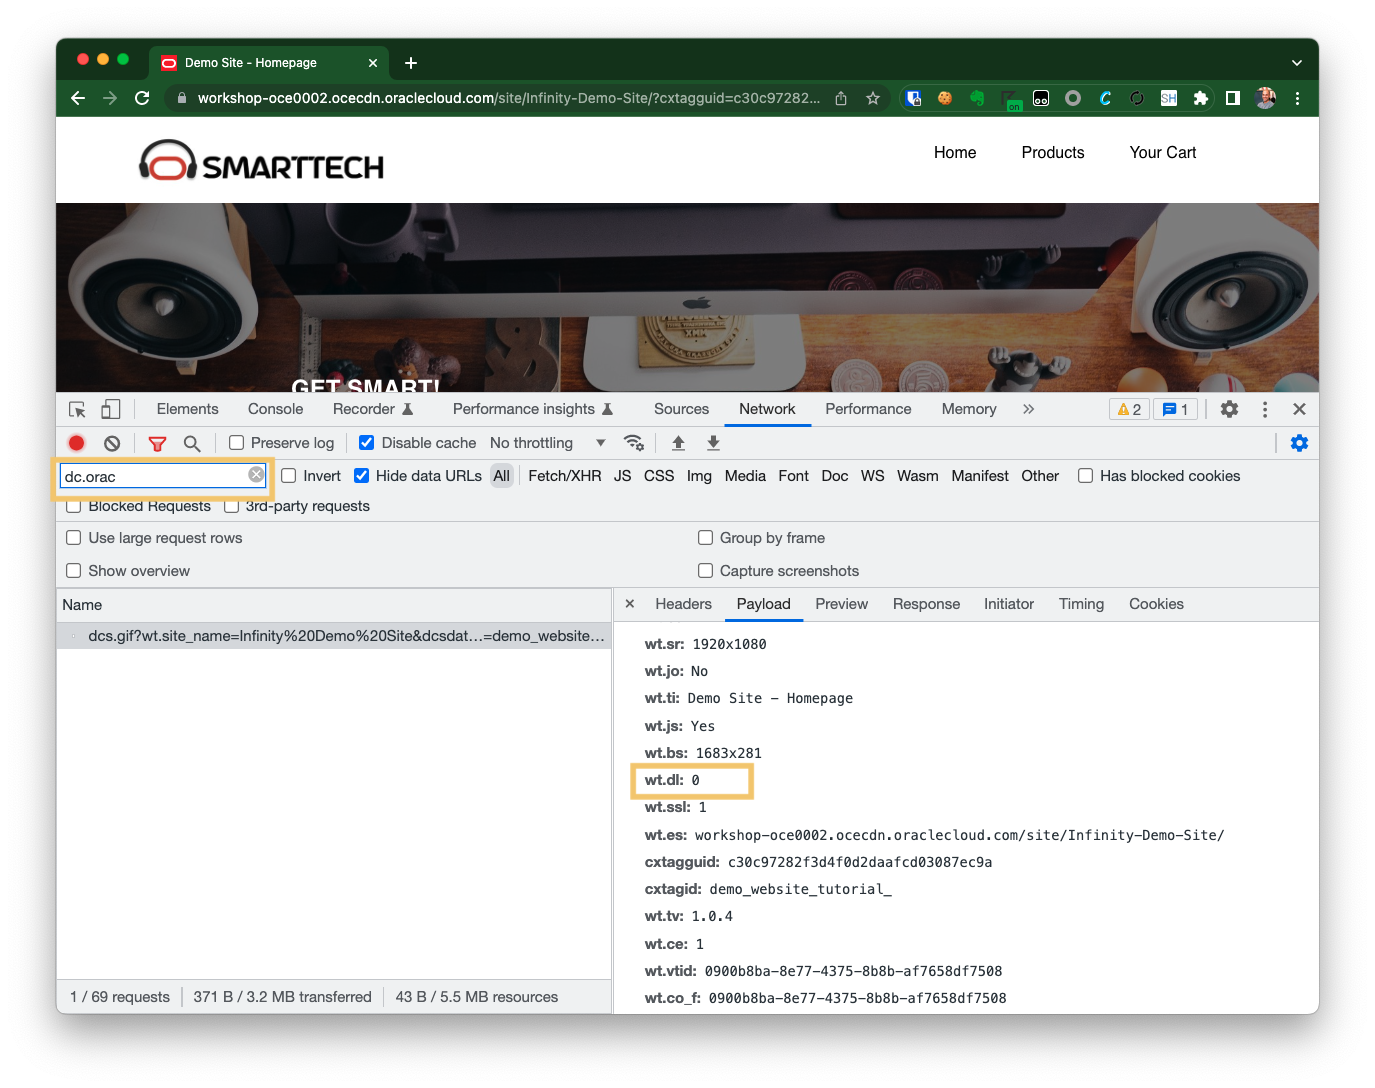
Open the developer tools (DevTools in Google Chrome), open the Network then refresh the page.
-
Refresh the page on the test website on the same page (the same page as per the pervious step)
-
Filter for ‘dc.orac’ - you should see at a ‘dcs.gif’ with at least ‘wt.dl=0’ as a query-string parameter:
dcs.gif - view call
Step 4: Configure Infinity Webhook Connection
We will first configure a Webhok Connection. We will configure this to send data to Webhook.site so we can see the API calls that Infinity it generating.
4.1 Create an endpoint on Webhook.site
To create an endpoint on wehhook.site, please follow the below:
-
Go to webhook.site.
-
It will automatically give you a new URL (for example, https://webhook.site/#!/0b382d05-5569-4ef8-8f31-268c7a4e9d9d.
-
Under Your unique URL (Please copy it from here, not from the address bar!), click Copy to Clipboard and save this URL somewhere safe (for example, https://webhook.site/0b382d05-5569-4ef8-8f31-268c7a4e9d9d):
Copy to Clipboard

-
Also, note down the current URL you are on. You will use this to check for the events you will be sending later.
4.2 Create a new Connection
We need to create a parameter for our SHA 256 Hashed Email Address to use in our Action in the next step. To do this:
-
Log in to the Infinity user interface.
-
Configure your Webhook Connection as per the documentation with the following details:
- Connection Name : ‘Webhook.site API Call’
- Description : ‘Send API calls to webhook.site’
- Base URL : Webshook.site endpoint(for example, ‘https://webhook.site/0b382d05-5569-4ef8-8f31-268c7a4e9d9d’)
- Port : Leave blank
- Authentication Type : Leave as blank
Next, you will add a new Destination to your Webhook. Add the following details:
- Destination Name : ‘Sample API Call’
- Description : ‘Send sample API calls to an API’
- Request Method : ‘POST’
- Content Type : ‘application/json’,
- Endpoint Path : ‘sample’
- Template : Paste the following code:
<%
	myPayload = {
	    "event":{},
	    "user":{
	        "identifiers":{},
	        "geo":{}
	    }
	};

	if(it.url){
	    myPayload.event.url = it.url;
	}
	if(it.country){
	    myPayload.user.geo = it.country;
	}
	if(it.visitor_id){
	    myPayload.user.identifiers.visitor_id = it.visitor_id;
	}

%>

// Return myPayload as payload in request
<%return JSON.stringify(myPayload,null,1); %>
How do I test and write my Webhook ‘Template’? Please see How do I write and test my Webhook Template? for instructions on how to write and test your Webhook template.
What if my template is too long? If your template code is particularly long, you may see an error saying it is too long. Please see What if my template is too long? below for support.
What happens if I don’t use a template at all? Please see What happens if I don’t use a template?.
4.3 Create an Infinity Action
Create your Action within Oracle Infinity as follows:
Basic Details
Please complete as follows:
-
Action Name: Name this ‘Tutorial - Webhook View Page’.
-
Action Description: Describe this as ‘On every page view, user data will be sent to webhook.site via a webhook’.
Rules
-
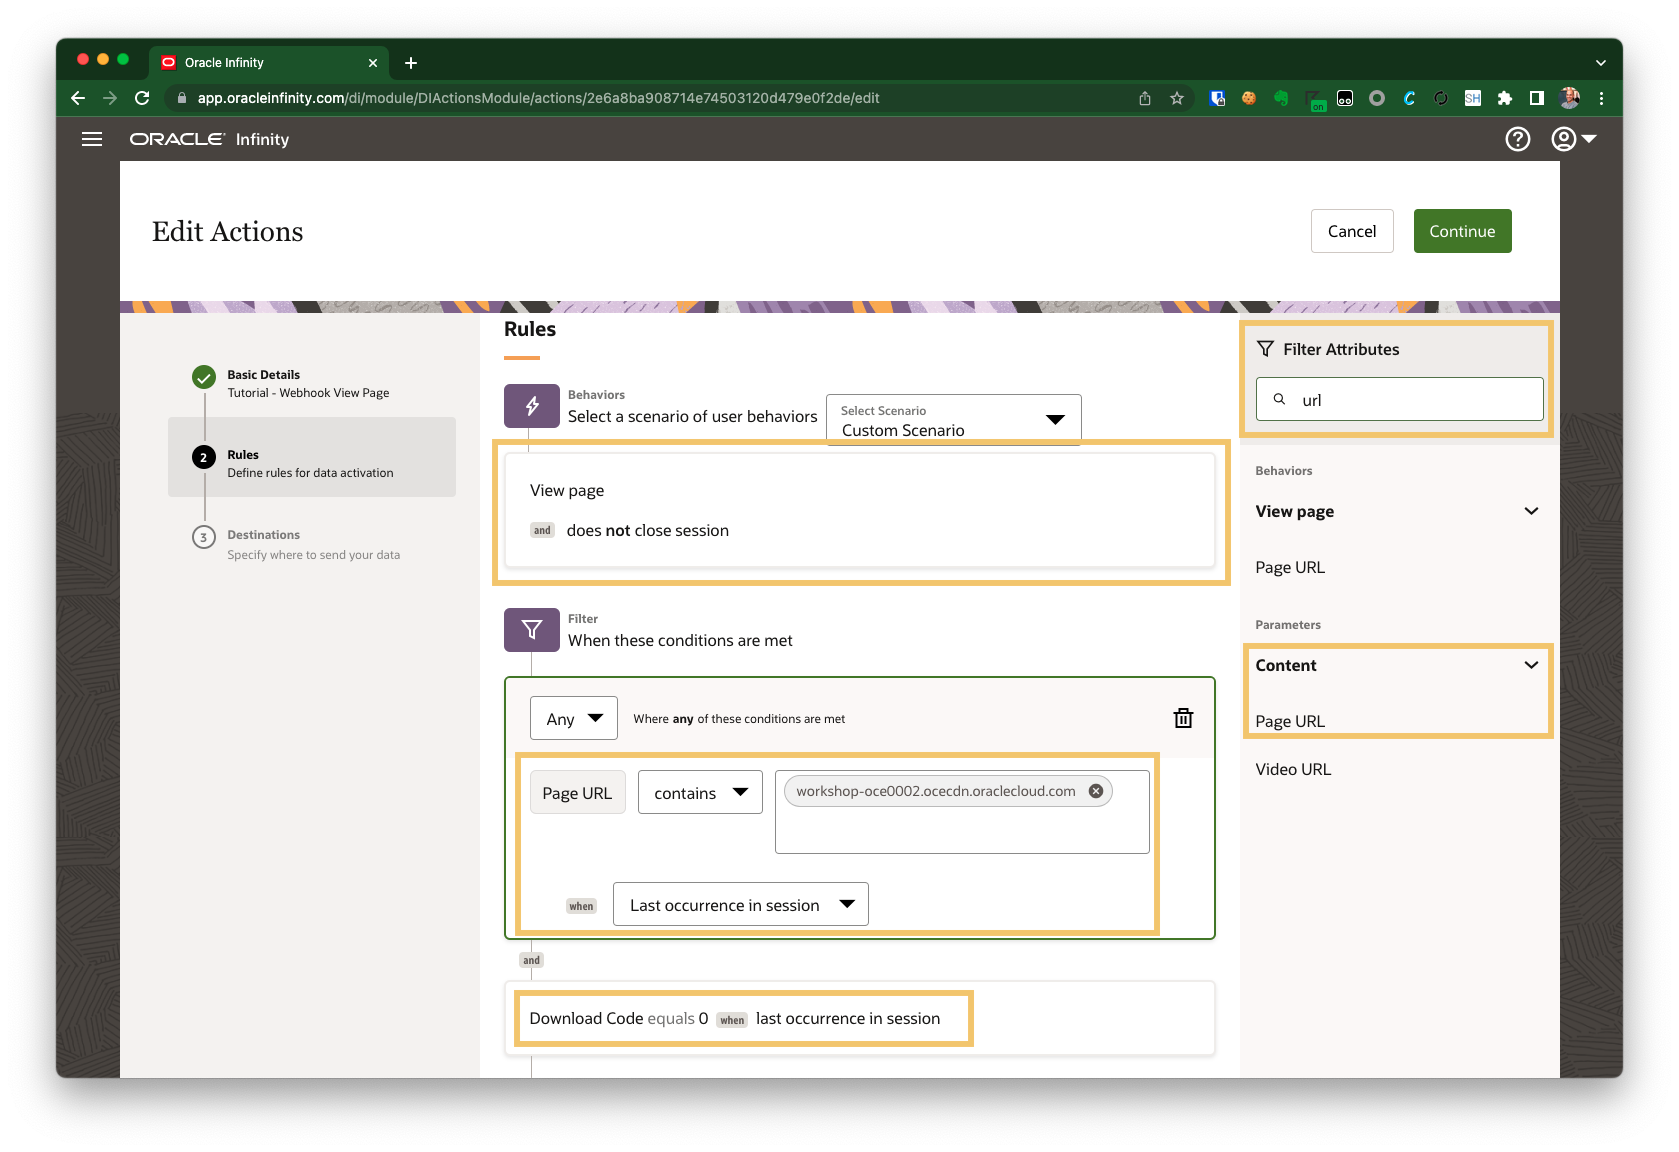
Please select the Custom Scenario Scenario.
-
From the right-hand Behaviors menu, add View page.
-
In your scenario, change Close Session to Does not Close Session.
-
Click Include to add the following filters:
- ‘Page URL’ (under Content) contains ‘workshop-oce0002.ocecdn.oraclecloud.com’ when Last occurence in session (you can search for ‘Page URL’ to find this more easily).
- ‘Download Code’ equals ‘0’ when Last occurence in session (click Include to add another and condition).
-
Click Continue.
Rules
Why am I adding a filter? You are adding this for two reasons. Firstly, to ensure this only triggers on the test website for this tutorial (not any other websites you are running a CX Tag). Secondly, once a trigger condition has been met within an open session, all subsequent events seen for the user within their session will trigger the Action unless the event doesn’t match the filter criteria.
We add the filter to ensure the action only** fires when a user views a page (not on other activities they may perform on the website).
Please see What’s the difference between ON TRIGGER() and WHERE? for further details.
Why am I adding a Download Code equals 0? We are ensuring that any other events which may happen on the same page do not qualify (for example, clicks on buttons or any automatically tracked scroll events).
Download Code is automatically set to ‘0’ on all page views - this is an easy way to ensure we exclude any other kind of activity from qualifying for our Action.
Destinations
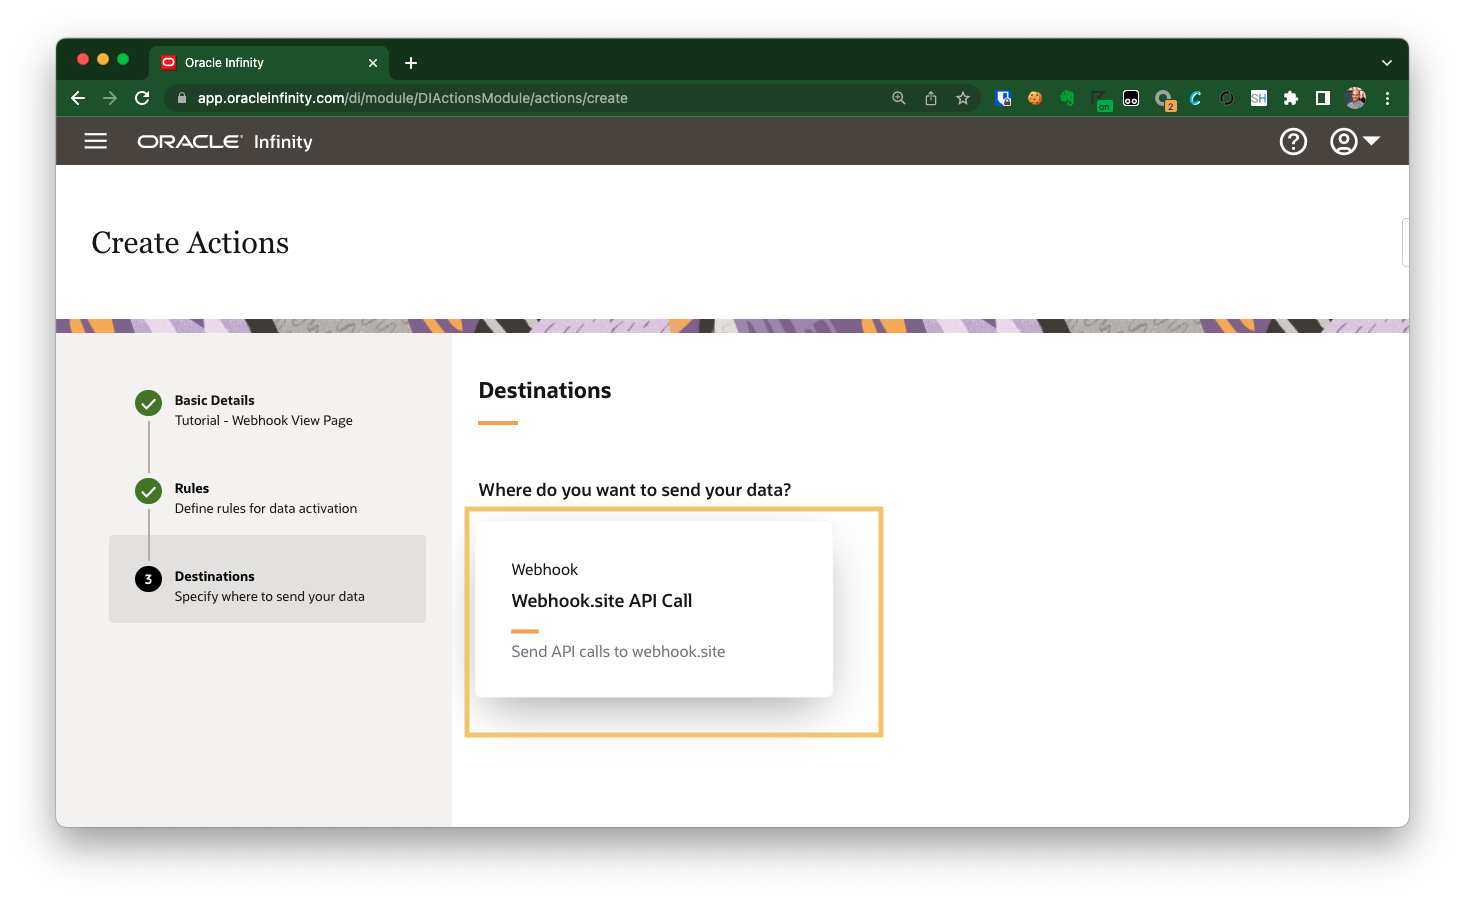
We need to configure your Action to use the Connection you created earlier:
-
Select Webhook.site API Call:
Select your Webhook.site API Call
-
Select Webhook Endpoint.
-
Select the Destination you previously created (Sample API Call).
Field Mapping
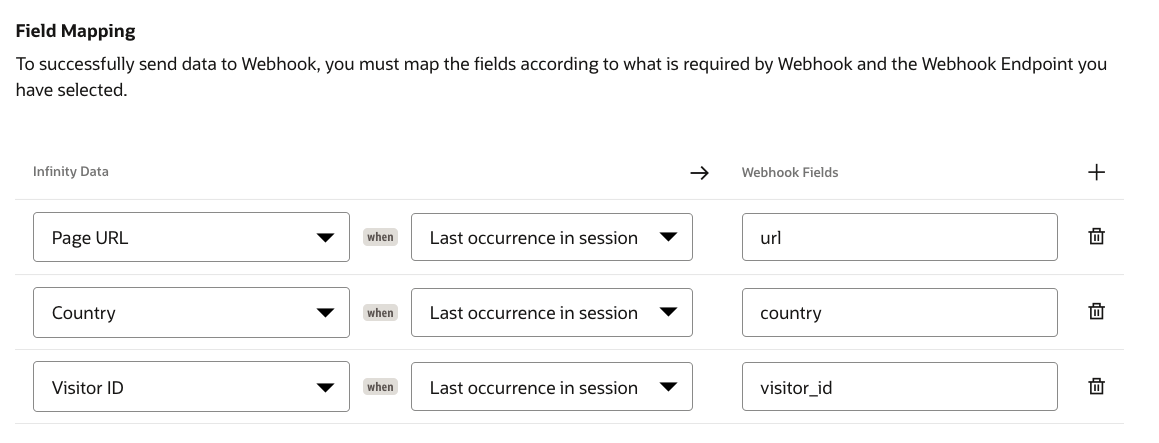
You will now map to required parameters which will be sent to our Webhook:
-
Search for ‘URL’ then select Page URL under Content, select Last Occurrence in session and then map to ‘url’.
-
Click + to add another mapping.
-
Search for ‘Country’ then select Country under Geo, select Last Occurrence in session and then map to ‘country’.
-
Search for ‘Visitor ID’ then select Visitor ID under People, select Last Occurrence in session and then map to ‘visitor_id’.
Mapping your Parameters
- Click Save to save your Action.
4.4 Push your Action Live
You can now enable your action by clicking it within the user interface then clicking Enable.
4.5 Validate
To validate your Action is working as needed, please follow these steps:
-
Visit the test website and ensure you add in your CX Tag details when you first visit. For example, https://workshop-oce0002.ocecdn.oraclecloud.com/site/Infinity-Demo-Site/?cxtagguid=CHANGE-TO-YOUR-ACCOUNT-GUID&cxtagid=CHANGE-TO-YOUR-TAG-ID
-
Browse around the website.
-
You should see the Number of Events incrementing in your Action:
Action - Event Increment

Tip! If you don’t see this increment after a minute or so of turning on your action and browsing the site, you can check for errors by going into your Action and viewing the History tab.
-
Go to the Webhook.site URL you noted down earlier. For example, ‘https://webhook.site/#!/YOUR_UNIQUE_ENDPOINT_ID/’.
-
You should see the POST requests firing as you browse the website:
Webhook.site - Checking Data
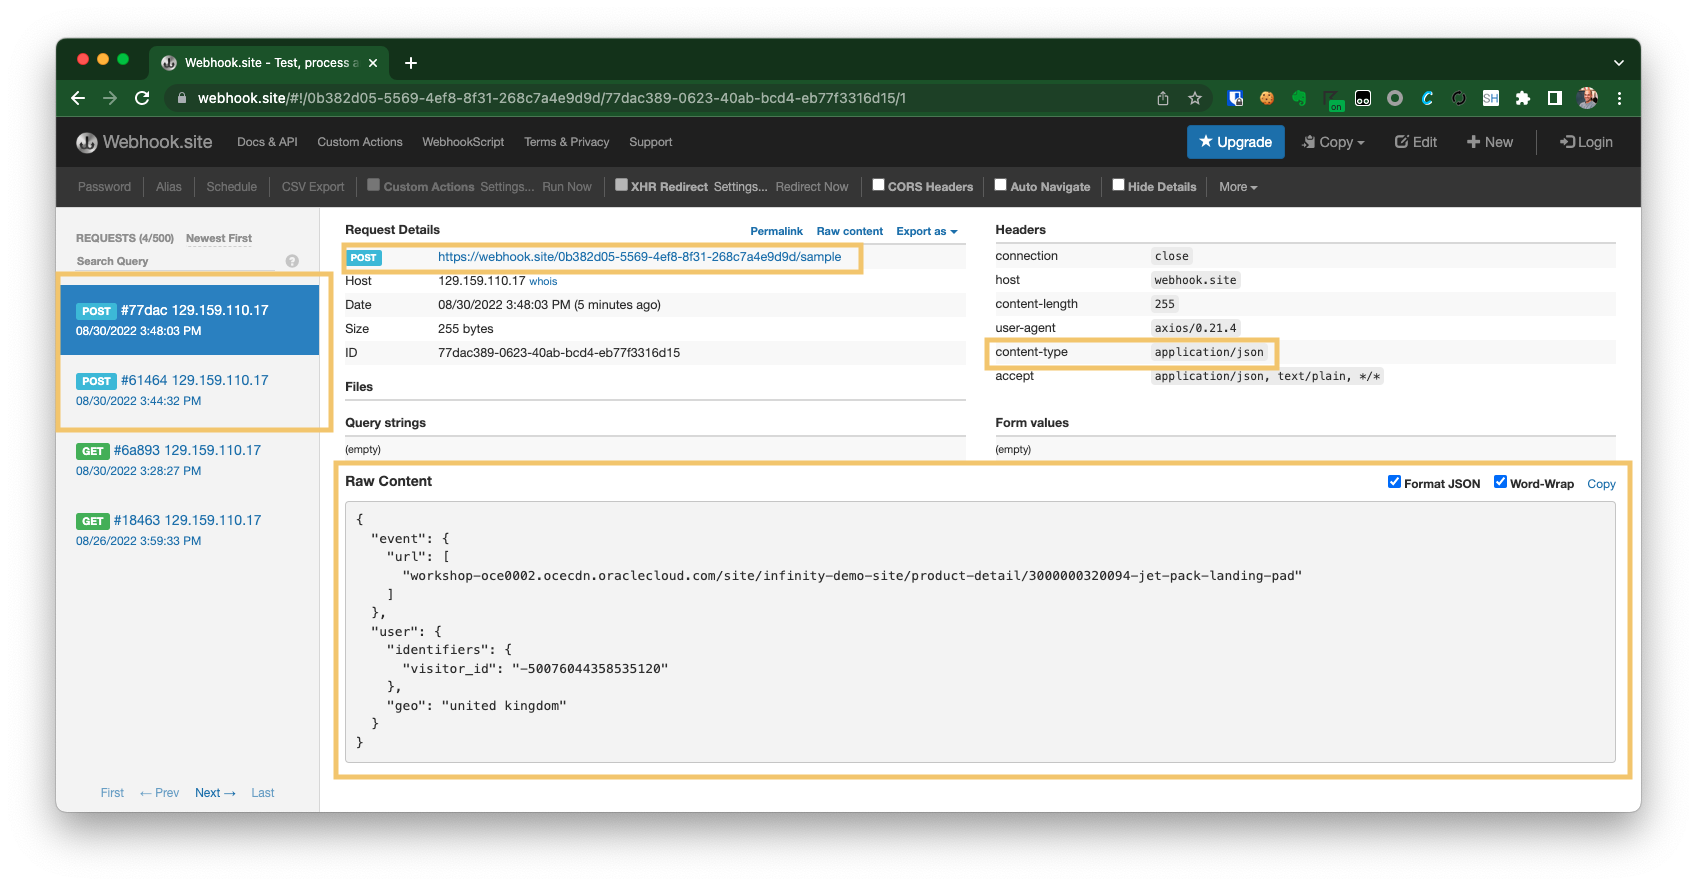
Tip! You can see the content-type (‘application/json’), the request method (‘POST’) and the payload (this shows under ‘raw content’) to validate your API calls.
If you were using Authorization, you would also see an ‘Authorization’ header there too (depending on the Authorization type you used - this is beyond the scope of this tutorial though).
Congratulations! You have now configured Oracle Infinity to send data to an API!
Next Steps
Now that you have see how you can send data to an Oracle Infinity API, why don’t you explore what APIs the vendors/applications have that you can explore?
Frequently Asked Questions
How do I log in to the Infinity User Interface?
You will have received your login URL in your original welcome email (for example, app.oracleinfinity.com or app.eu1.oracleinfinity.com.
How do I write and test my Webhook Template?
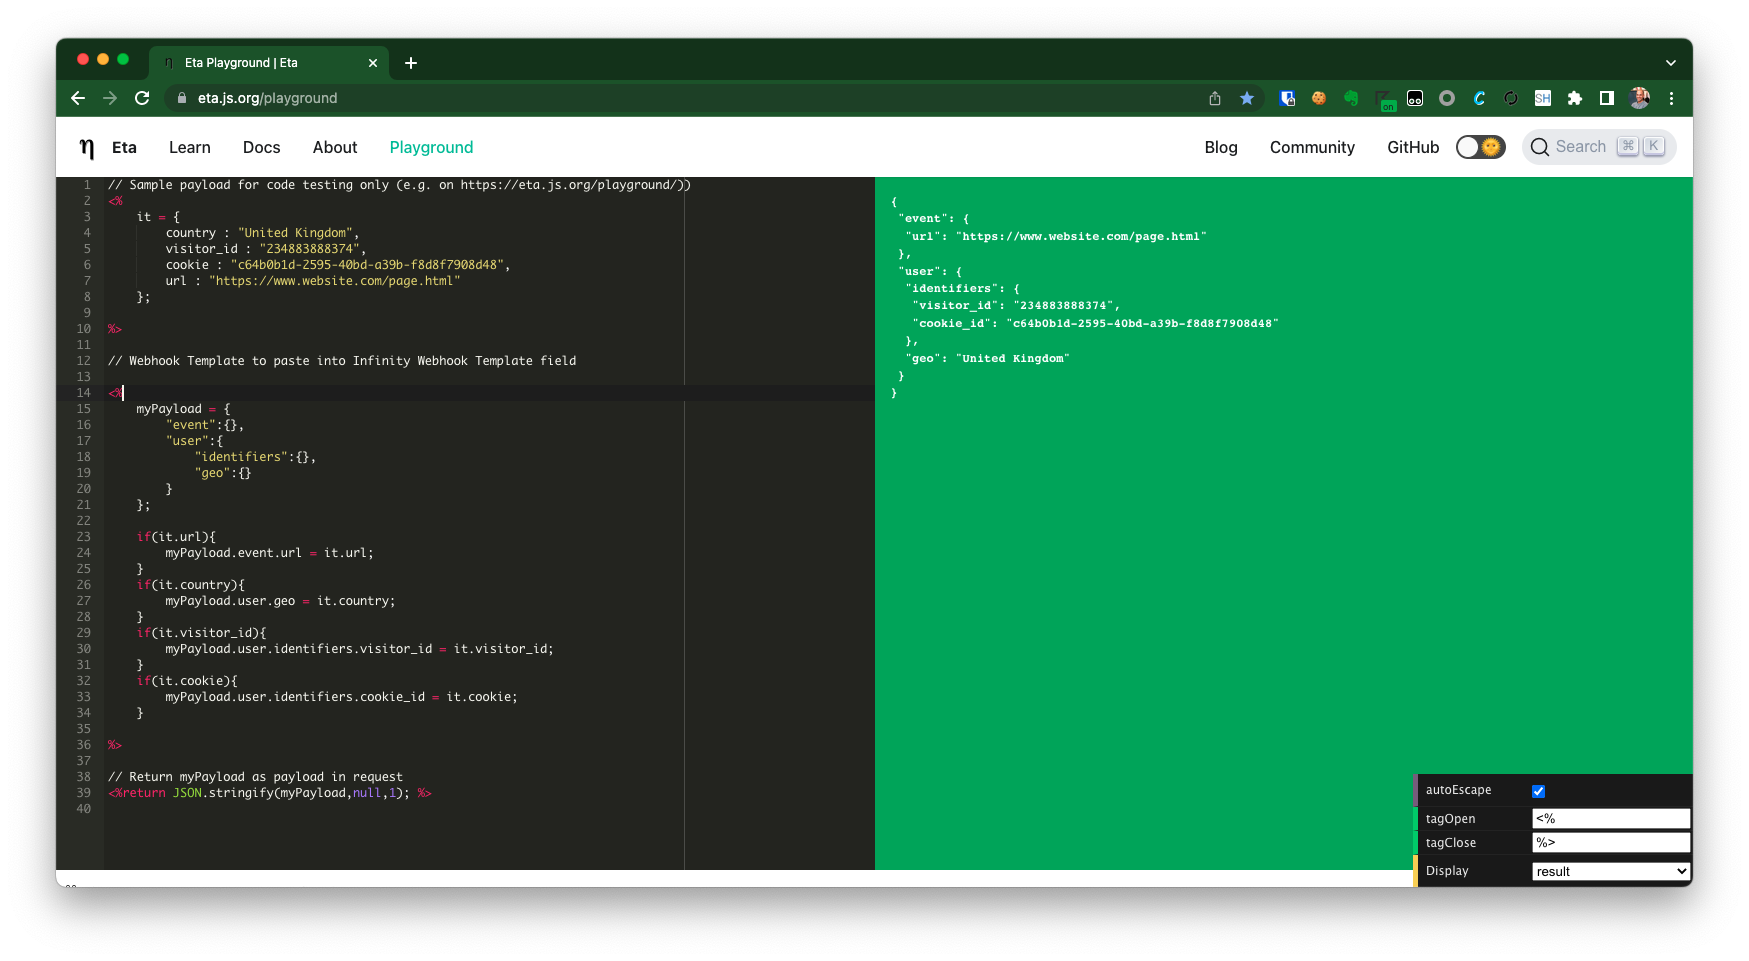
To write your Webhook Templates, you can use the Eta Playground to test your code in real-time before inputting into Infinity. For example, to generate the required API payload in this tutorial you can follow these instructions:
- Visit the Eta Playground.
- Enter the following code block into the left-hand side of the screen:
// Sample payload for code testing only (e.g. on https://eta.js.org/playground/))
<%
	it = {
		country : "United Kingdom",
		visitor_id : "234883888374",
		url : "https://www.website.com/page.html"
	};

%>

// Webhook Template to paste into Infinity Webhook Template field

<%
	myPayload = {
	    "event":{},
	    "user":{
	        "identifiers":{},
	        "geo":{}
	    }
	};

	if(it.url){
	    myPayload.event.url = it.url;
	}
	if(it.country){
	    myPayload.user.geo = it.country;
	}
	if(it.visitor_id){
	    myPayload.user.identifiers.visitor_id = it.visitor_id;
	}
%>

// Return myPayload as payload in request
<% return JSON.stringify(myPayload,null,1); %>
You will be able to write and modify template code to create your payload in playground interface:
Eta Playground - Writing your template code
How does Eta work?
-
Eta supports standard JavaScript code - you just need to wrap your JavaScript code within
<%and%>(please see Eta for further information. -
Infinity will supply the data from your Action in an object called
it. You can then run almost any JavaScript you like to create the desired payload and thenreturnyour payload. -
For example, the sample template provided in this tutorial takes the
itobject (supplied by the Infinity Action but simulated in our playground), transforms it into the required payload structure (as the objectmyPayloadand then declares it as<%return JSON.stringify(myPayload,null,1); %>to ensure it is correctly formatted as JSON. -
In the playground, we are simulating the
itpayload which will be sent to the Webhook Connection by our Infinity Action.
Note! This top-section of code is not required when we paste our template code into the Infinity Webhook Connection.
What kind of things can I do with my Eta in my template?
JavaScript is an extremely powerful method for formatting your payloads. Some examples include:
What happens if I don’t use a template?
If you don’t use a template at all, a default payload will be constructed for you. For example:
Method=POST, Content-Type=application/json
{
  "country": "united states",
  "url": "workshop-oce0002.ocecdn.oraclecloud.com/site/Infinity-Demo-Site/",
  "visitor_id": "-50076044358535120"
}
Tip! The default payload is the same regardless the content-type
Can I create ‘application/x-www-form-urlencoded’ payloads?
Yes, just format the payload as required and return it as required. For example:
// Sample payload for code testing only (e.g. on https://eta.js.org/playground/))
<%
	it = {
		country : "United Kingdom",
		visitor_id : "234883888374",
		cookie : "c64b0b1d-2595-40bd-a39b-f8d8f7908d48",
		url : "https://www.website.com/page.html"
	};

%>

// Webhook Template to paste into Infinity Webhook Template field

<%
	myPayload = [];

	if(it.url){
	    myPayload.push("url="+it.url);
	}
	if(it.country){
	    myPayload.push("country="+it.country);
	}
	if(it.visitor_id){
	    myPayload.push("visitorid="+it.visitor_id);
	}
	if(it.cookie){
	    myPayload.push("cookieid="+it.cookie);
	}

	stringPayload = myPayload.join("&");

%>

// Return myPayload as payload in request
<%return stringPayload; %>
Eta Sample - application/x-www-form-urlencoded

What if my template is too long?
If you have a particularly long template, when you paste it in the Template field in the Webhook Destination you may see an error message that it is too long.
To get around this, you can minify your code to try to keep it within the limits. For example:
Unminified Template Code (470 characters)
<%
	myPayload = {
	    "event":{},
	    "user":{
	        "identifiers":{},
	        "geo":{}
	    }
	};

	if(it.url){
	    myPayload.event.url = it.url;
	}
	if(it.country){
	    myPayload.user.geo = it.country;
	}
	if(it.visitor_id){
	    myPayload.user.identifiers.visitor_id = it.visitor_id;
	}
	if(it.cookie){
	    myPayload.user.identifiers.cookie_id = it.cookie;
	}

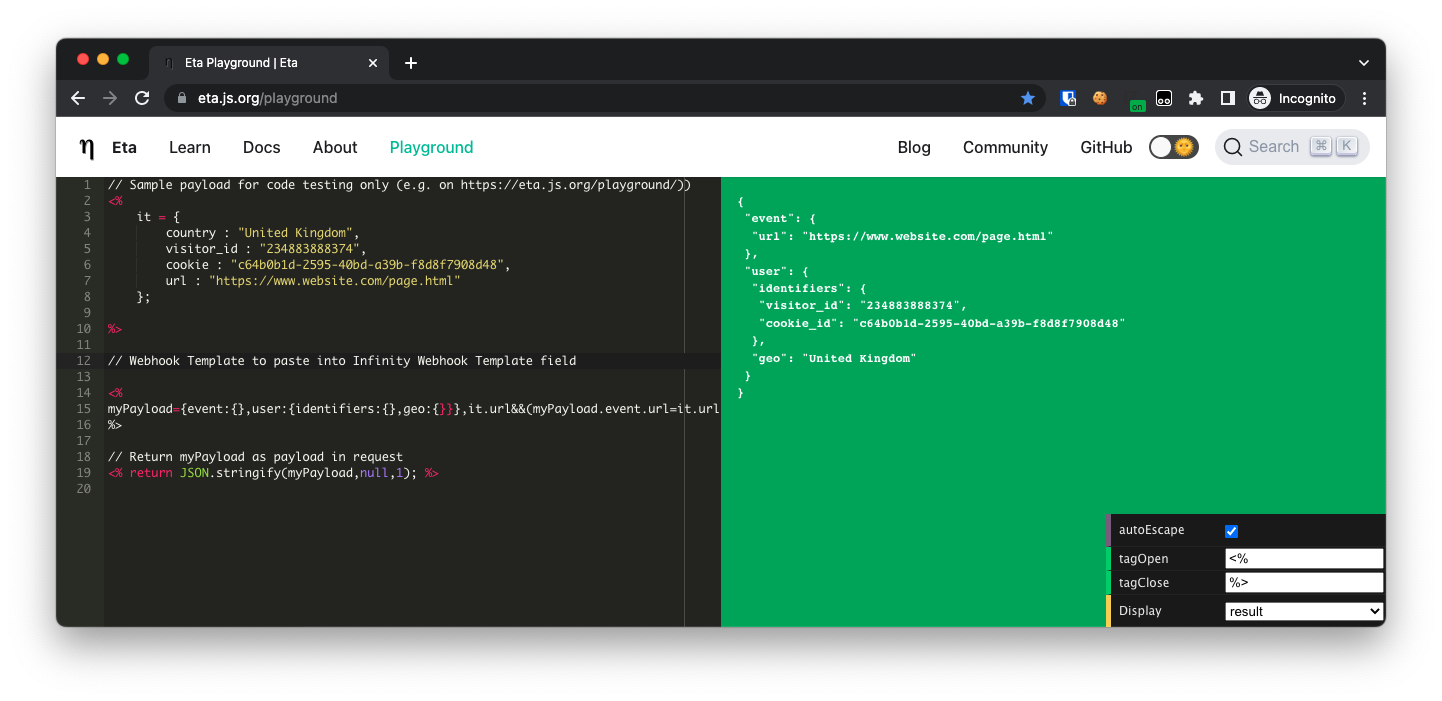
%>

// Return myPayload as payload in request
<% return JSON.stringify(myPayload,null,1); %>
Minified Template Code (356 characters)
<%
myPayload={event:{},user:{identifiers:{},geo:{}}},it.url&&(myPayload.event.url=it.url),it.country&&(myPayload.user.geo=it.country),it.visitor_id&&(myPayload.user.identifiers.visitor_id=it.visitor_id),it.cookie&&(myPayload.user.identifiers.cookie_id=it.cookie);
%>

// Return myPayload as payload in request
<% return JSON.stringify(myPayload,null,1); %>
Warning! Only minify the code between the
<%and%>! If you minify the entire template, it will not work.
Eta Sample - Minified Code
How does the Test Website work?
The test website is designed to allow you to inject your own CX Tag. This allows you to use this pre-configured site without needing to do any implementation work.
The URL for the test website is https://workshop-oce0002.ocecdn.oraclecloud.com/site/Infinity-Demo-Site/:
Test Website
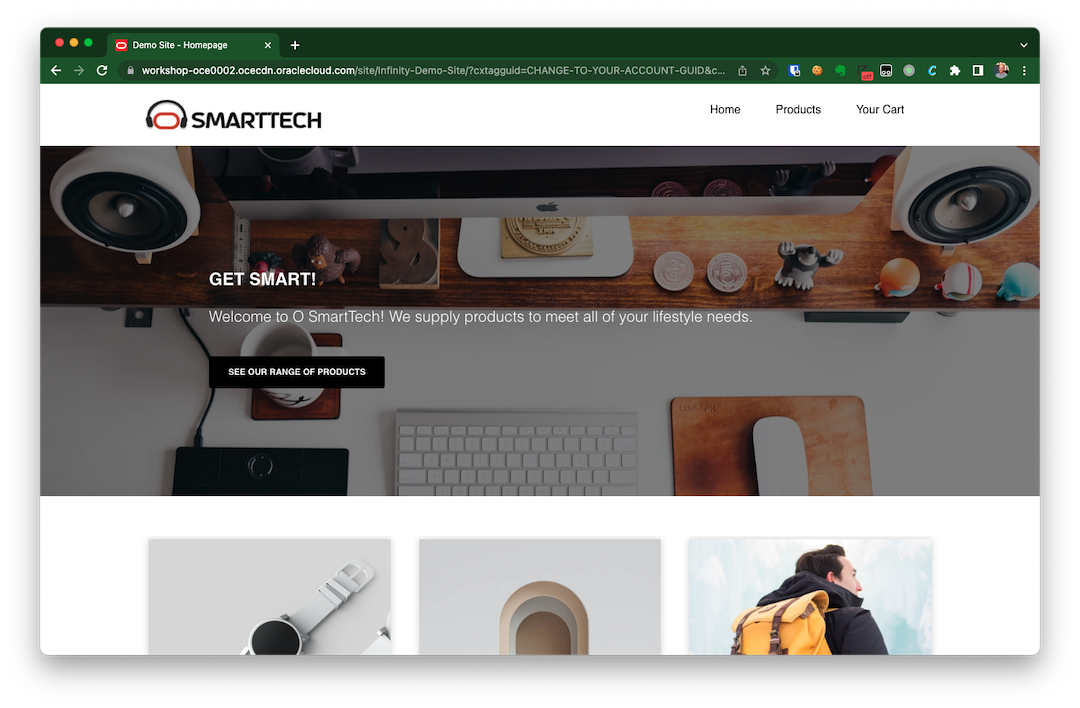
To set your browser to use your CX Tag, you will need to visit the following URL once (once set, the CX Tag details you enter will persist):
When you enter in your ‘ACCOUNT GUID’ (as ‘CHANGE-TO-YOUR-ACCOUNT-GUID’) and ‘TAG ID’ (as ‘CHANGE-TO-YOUR-TAG-ID’), the site will use the CX Tag of your choice (based on the Account GUID and Tag ID you input).
Additionally, it will persist these settings so you only need to enter the ‘cxtagguid’ and ‘cxtagid’ query-string parameters once.
For example:
-
Your CX Tag URL is ‘//d.oracleinfinity.io/infy/acs/account/SAMPLE-GUID/js/SAMPLE-TAG-ID/odc.js’
-
Therefore, your Account GUID is ‘SAMPLE_GUID’ and your Tag ID is ‘SAMPLE-TAG-ID’
-
The page will load with the following CX Tag : ‘//d.oracleinfinity.io/infy/acs/account/SAMPLE-GUID/js/SAMPLE-TAG-ID/odc.js’
-
You navigate to https://workshop-oce0002.ocecdn.oraclecloud.com/site/Infinity-Demo-Site/product-detail/3000000325005-smart-backpack.
-
The page will load with the same CX Tag (‘//d.oracleinfinity.io/infy/acs/account/SAMPLE-GUID/js/SAMPLE-TAG-ID/odc.js’)
Tip! You can override the CX Tag being used by visiting ‘https://workshop-oce0002.ocecdn.oraclecloud.com/site/Infinity-Demo-Site/?cxtagguid=CHANGE-TO-YOUR-ACCOUNT-GUID&cxtagid=CHANGE-TO-YOUR-TAG-ID’ again.
Related Links
-
Oracle Infinity User Help Center - Welcome - Learn all about Infinity and Infinity IQ.
-
Oracle Infinity User Help Center - Webhoook Connection Learn how to use the Infinity Webhook Connection.
-
Oracle Infinity Developer Help Center - CX Tag - Implementation - Learn how to implement Oracle Infinity and Oracle Maxymiser on your website using the Oracle CX Tag.
More Learning Resources
Explore other labs on docs.oracle.com/learn or access more free learning content on the Oracle Learning YouTube channel. Additionally, visit education.oracle.com/learning-explorer to become an Oracle Learning Explorer.
For product documentation, visit Oracle Help Center.
Quick Start : Send data to an API using Oracle Infinity Webhook
F43203-07
August 2022
Copyright © 2022, Oracle and/or its affiliates.