
Ceph is a scalable, distributed storage system, comprised of an object store, block store, and a POSIX-compliant distributed file system. Ceph can be used for ephemeral storage for Nova instances.
Ceph is based on RADOS: Reliable Autonomic Distributed Object Store. RADOS distributes objects across the storage cluster and replicates objects for fault tolerance. The following RADOS components are included with Oracle OpenStack for Oracle Linux:
Ceph Object Storage Device (Ceph OSD) Daemon. The Ceph OSD storage daemon. The Ceph OSD container (ceph_osd) is deployed to storage nodes. You must attach and label a disk or LUN on each storage node for use with Ceph OSD. It is recommended you have at least three storage nodes for High Availability.
Ceph Monitor (Ceph MON). A daemon that handles all communications with external applications and clients. It checks the state and the consistency of the data, and tracks active and failed nodes in the Ceph storage cluster. The Ceph MON container (ceph_mon) is deployed to control nodes. It is recommended you have at least three control nodes for High Availability.
Virtual machine instances created on Ceph storage (ephemeral backend or boot from volume) must use the RAW disk image format in Glance. You cannot create instances with QCOW2 Glance images.
Virtual machine instances deployed to Oracle VM Server with Ceph enabled
must be Hardware Virtualized. That is, you must set the Glance
image vm_mode property to hvm. For
example:
$ glance image-create --name MyVM --disk-format raw --property vm_mode=hvm \
    --container-format bare --file mydisk.img
For more information on Ceph, see the Ceph Storage for Oracle® Linux Release Notes at:
https://docs.oracle.com/cd/E52668_01/E66514/html/index.html
To enable Ceph:
# kollacli property set enable_ceph yes
Ceph requires two partitions on each storage node for an OSD: a small partition (usually around 5GB) for a journal, and another using the remaining space for the Ceph data.
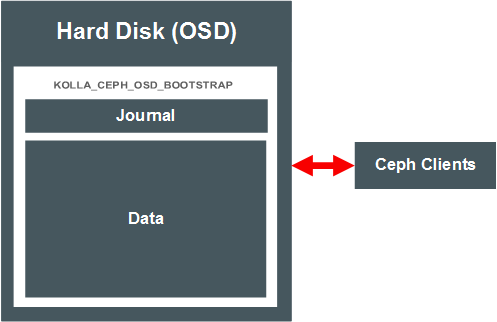
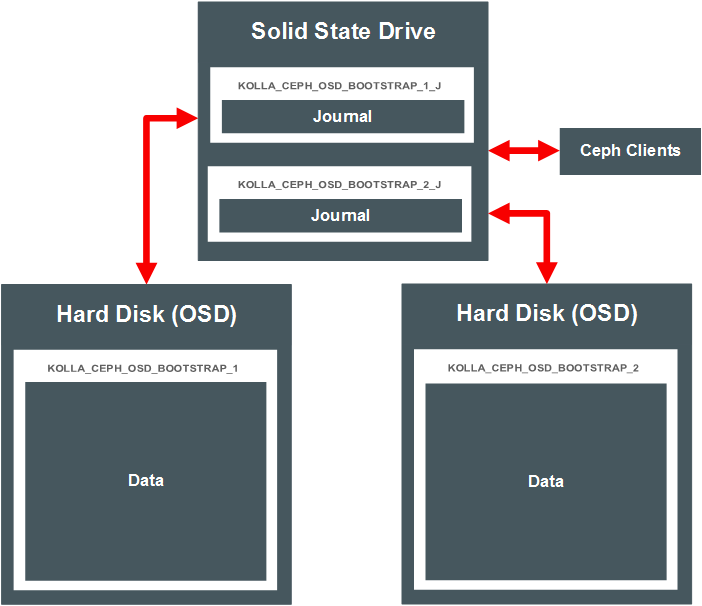
These partitions may be on the same disk or LUN (co-located) as shown in Figure 4.1, “Ceph with Co-located Journals”, or the data may be on one partition, and the journal stored on on an SSD or in memory (external journals). Figure 4.2, “Ceph with External Journals” shows a Ceph deployment using data partitions on two separate hard drives, with the journals for those OSDs located on an SSD.
The location of the OSD journal and data partitions is set using GPT partition labels. You set the labels on the disks and partitions on the storage node before you deploy OpenStack. The deployment looks for partitions with the appropriate Ceph-related labels, and wipes and reformats the disks and partitions as required for the Ceph deployment.
Examples of these labels are shown in the various diagrams in this section. You set one label for a colocated deployment, or two labels for external journals. In addition you can set labels on volumes for the Ceph cache tiering feature. The labels are described in Table 4.1, “Ceph Disk Provisioning”.
Table 4.1 Ceph Disk Provisioning
| Partition Label | Disk Provisioning |
|---|---|
| Used for co-located journals and data (data and journal on the same disk). If a partition is found with this label, the disk is wiped, and partitioned into two partitions, the first being a small 5GB partition for the journal, and the second with the remaining space for the data. |
| Used for external journals (journal on a separate device to the data).
If these two partition labels are found, the data and
journal are deployed to these partitions separately.
The label ending with
KOLLA_CEPH_OSD_BOOTSTRAP_1 KOLLA_CEPH_OSD_BOOTSTRAP_1_J |
| Used for the Ceph cache tiering optimization feature for co-located journals and datas. This option is not required in a default deployment. If a partition is found with this label, it is provisioned for cache tiering. |
| Use for the Ceph cache tiering optimization feature for external journals. This option is not required in a default deployment.
If these two partition labels are found, the data and
journal cache tiering are deployed to these partitions
separately. The label ending with
KOLLA_CEPH_OSD_CACHE_BOOTSTRAP_1 KOLLA_CEPH_OSD_CACHE_BOOTSTRAP_1_J |
On each storage node, set up
block storage for Ceph, this can be a disk or LUN. The disk is
automatically formatted as btrfs during the deployment. The
examples provided use a hard disk available at
/dev/sdb, and a Solid State Drive (SSD) on
/dev/sdc, on each storage node.
Do not mount the disk; it is mounted, formatted, and repartitioned as required during the deployment.
In order for the deployment to identify the correct volume on which to create the partitions, create a GPT partition with the appropriate label for your Ceph deployment choice, as described in Table 4.1, “Ceph Disk Provisioning”.
Using a Co-located Journal
This example creates the GPT partition label for co-located journal and data (on the same disk). The deployment in this example is shown in Figure 4.1, “Ceph with Co-located Journals”.
On the storage node, enter:
# parted /dev/sdb -s -- mklabel gpt mkpart KOLLA_CEPH_OSD_BOOTSTRAP 1 -1
If the deployment finds a partition with the
KOLLA_CEPH_OSD_BOOTSTRAP label, the
disk is wiped and
re-partitioned to one small (approximately 5 GB) partition for
the journal, and the remaining space on the disk is used as a
partition for the data.
If there are other partitions on the disk, the deployment fails
in order to avoid any unexpected data loss. Make sure you only
create a partition with the
KOLLA_CEPH_OSD_BOOTSTRAP label, and no other
partitions exist.
If you want to override this behavior, you can set the following property to ignore the warning and wipe the disk (including any other partitions):
# kollacli property set ceph_osd_wipe_disk true
Using an External Journal
Alternatively, if you want to separate the journal and data partitions and use external journals, create two partitions. In this example, the data is on the hard disk, and the journal is on the SSD. To label the data partition on the hard disk, use:
# parted /dev/sdb-s -- mklabel gpt mkpart KOLLA_CEPH_OSD_BOOTSTRAP_11 -1
Create a smaller (approximately 5 GB) partition for the journal on the SSD with the appropriate label for the OSD:
# parted /dev/sdc-s -- mkpart KOLLA_CEPH_OSD_BOOTSTRAP_1_Jstart_MBend_MB
Make sure the token in both the data and
journal labels matches for each OSD, in this case,
1.
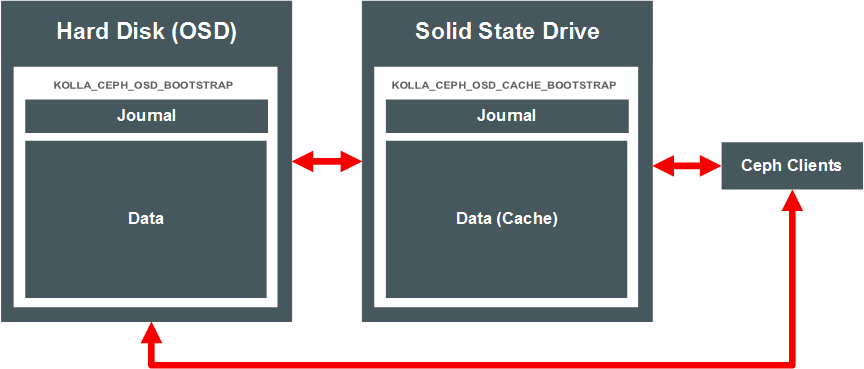
The Ceph cache tiering I/O optimization feature creates two Ceph pools: one for the backing data storage, and another as the data cache. The pools are set up automatically during the deployment when you enable Ceph cache tiering.
Cache tiering involves using fast storage devices (such as SSDs) as a cache tier, and slower/cheaper devices as a storage tier. In some situations, cache tiering may be a slower deployment model. Whether cache tiering is useful to your deployment depends on your workload as there is a performance cost associated with moving objects into or out of the cache. Figure 4.3, “Ceph Cache Tiering” shows a simple Ceph cache tiering deployment. The journals for the OSD are co-located with the data. The Ceph clients communicate with the data cache on the SSD, but also have access to the data on the backing tier if required.
To enable Ceph cache tiering:
# kollacli property set ceph_enable_cache yes
You must also set up the Ceph cache tiering partition labels on the storage nodes. These partitions are in addition to the partitions you set up for the OSDs, as shown in Section 4.10.2, “Setting up Ceph Storage”.
Usually, you set up cache tiering on a fast drive, such as an
SSD. You can co-locate or use external journals. The examples
provided set up the cache tier on an SSD at
/dev/sdc.
For co-located journal and data on the SSD, use:
# parted /dev/sdc -s -- mklabel gpt mkpart KOLLA_CEPH_OSD_CACHE_BOOTSTRAP 1 -1Alternatively, you can create a partition for the cache and journal, instead of using the entire disk with:
# parted /dev/sdc-s -- mkpart KOLLA_CEPH_OSD_CACHE_BOOTSTRAPstart_MBend_MB
To use separate cache journal and data partitions (external journals) on the SSD, use:
# parted /dev/sdc-s -- mkpart KOLLA_CEPH_OSD_CACHE_BOOTSTRAP_1start_MBend_MB# parted /dev/sdc-s -- mkpart KOLLA_CEPH_OSD_CACHE_BOOTSTRAP_1_Jstart_MBend_MB
For more information on cache tiering, see the Ceph documentation:
http://docs.ceph.com/docs/master/rados/operations/cache-tiering/
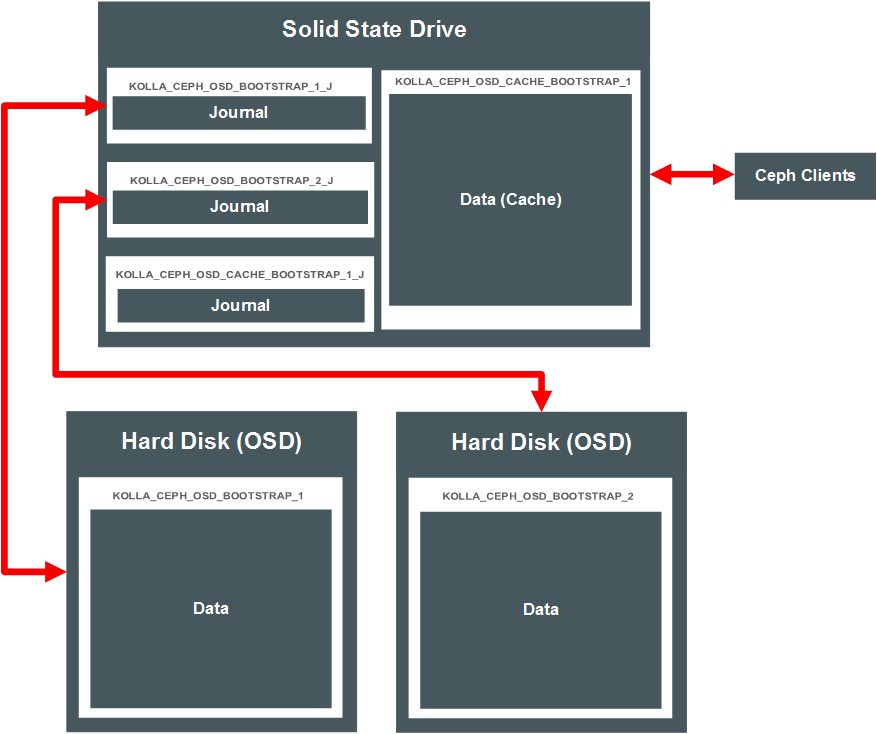
Your deployment of Ceph may be more complex than outlined in this section. You have many options on how to set up the deployment. Figure 4.4, “Ceph Complex Deployment” shows a more complex deployment. This option has OSDs on two hard drives on the server, with their respective journals on the SSD. The SSD also includes a cache tier, with a co-located journal.
A Ceph pool, by default, is created as a replicated pool, meaning every object is copied to multiple disks. You can set a Ceph pool to use erasure code instead to save disk space.
In order to use erasure code pools, you must also set up a cache tier. For information on setting up a cache tier, see Section 4.10.3, “Setting up Ceph Cache Tiering”.
The Ceph pool type is set using the
ceph_pool_type parameter with
kollacli. The default is
replicated. To use an erasure code pool, set:
# kollacli property set ceph_pool_type erasure
You can also change the erasure profile if required:
# kollacli property set ceph_erasure_profile profile
The default value for the
ceph_erasure_profile is k=4 m=2
ruleset-failure-domain=host.
For more information on the Ceph erasure code feature and profiles, see the Ceph documentation at:
http://docs.ceph.com/docs/hammer/rados/operations/erasure-code/
Setting up Oracle VM Server as a Ceph OSD node enables you to make use of the local storage on an Oracle VM Server host. You can create the appropriate partition labels on any extra storage and use the partitions as a Ceph OSD.
To set up Oracle VM Server as a Ceph OSD:
Prepare an Oracle VM Server for a deployment. See Section 3.6, “Preparing Oracle VM Server Nodes” for information on setting up an Oracle VM Server.
Log into the Oracle VM Server as the root user.
Set up the Ceph OSD partition label(s) as described in Section 4.10.2, “Setting up Ceph Storage”. This example creates the GPT partition label for co-located journal and data (on the same disk). The deployment in this example is shown in Figure 4.1, “Ceph with Co-located Journals”.
# parted /dev/
sdb-s -- mklabel gpt mkpart KOLLA_CEPH_OSD_BOOTSTRAP 1 -1Add the Oracle VM Server to the storage deployment group as described in Section 4.10.7, “Adding a Ceph Node”.
To add a Ceph MON (monitor) node to the Ceph cluster, add the
node to the control
deployment group. For example, for a node named
control01:
# kollacli host add control01
# kollacli group addhost control control01
To add a Ceph OSD storage node, you must first configure the
partition(s) or disk as outlined in
Section 4.10.2, “Setting up Ceph Storage”. You must then add the node to
the storage
deployment group. For example, for a node named
storage01:
# kollacli host add storage01
# kollacli group addhost storage storage01
To deploy the node(s):
# kollacli deploy
If you are using the Oracle Container Registry, you might need to sign in at https://container-registry.oracle.com and accept the Oracle Standard Terms and Restrictions for the Oracle software images before you can deploy.
All Ceph commands must be run on a control node, and prefixed with docker exec -it ceph_mon. For example, to view the Ceph cluster status:
# docker exec -it ceph_mon ceph status
    cluster 6cb29a51-82fc-48ab-9778-e5ead405faa3
     health HEALTH_OK
     monmap e1: 3 mons at  ...
     osdmap e13: 3 osds: 3 up, 3 in
...To remove a Ceph OSD node (storage), you should first migrate the data from the node, then remove the node from the Ceph cluster.
If you want to remove a Ceph MON node (controller), you do not need to migrate the data before you remove it, as no data is stored on the Ceph MON node.
To remove a Ceph OSD node:
(Controller node) Find the ID of the Ceph OSD node you want to remove.
#
docker exec -it ceph_mon ceph osd tree# id weight type name up/down reweight -1 3 root default -2 1 host 192.168.11.9 0 1 osd.0 up 1 -3 1 host 192.168.11.12 1 1 osd.1 up 1 -4 1 host 192.168.11.8 2 1 osd.2 up 1In this example, the OSD on the storage node with the host IP address of 192.168.11.8 is to be removed. This OSD has an ID of
2.(Controller node) Mark the OSD node as out of the Ceph cluster.
# docker exec -it ceph_mon ceph osd out
2The data on the OSD is automatically migrated to another OSD (storage node) in the Ceph cluster. Wait for the data migration to complete. You can monitor the data migration with the command:
# docker exec -it ceph_mon ceph -w
The placement group states change from
active+cleantoactive, some degraded objects, and finallyactive+cleanwhen the migration completes.(Ceph OSD node to be removed) Stop the ceph_osd container.
# docker stop ceph_osd_
2The suffix of
2for the OSD container name matches the ID for the OSD. Replace this number with the OSD ID.(Controller node) Remove the OSD from the crush map.
#
docker exec -it ceph_mon ceph osd crush remove osd.removed item id 2 name 'osd.2' from crush map2(Controller node) Remove the Ceph authentication key.
#
docker exec -it ceph_mon ceph auth del osd.updated2(Controller node) Remove the OSD from the Ceph cluster.
#
docker exec -it ceph_mon ceph osd rm osd.removed osd.22You can check that the OSD is no longer in the Ceph cluster using the command:
#
docker exec -it ceph_mon ceph osd tree# id weight type name up/down reweight -1 2 root default -2 1 host 192.168.11.9 0 1 osd.0 up 1 -3 1 host 192.168.11.12 1 1 osd.1 up 1 -4 0 host 192.168.11.8In this example, the OSD node
osd.2is no longer listed.(Master node) Remove the node so that it is not included in any future deployment.
To remove the host from the storage deployment group:
# kollacli group removehost storage
hostnameTo remove the host from the deployment:
# kollacli host removehost
hostname
To remove a Ceph MON:
(Controller node) Find the ID of the Ceph Mon node you want to remove.
#
docker exec -it ceph_mon ceph mon dumpdumped monmap epoch 1 epoch 1 fsid 6cb29a51-82fc-48ab-9778-e5ead405faa3 last_changed 2016-07-26 06:31:00.667869 created 2016-07-26 06:31:00.667869 0: 192.168.11.3:6789/0 mon.192.168.11.3 1: 192.168.11.4:6789/0 mon.192.168.11.4 2: 192.168.11.13:6789/0 mon.192.168.11.13In this example, the MON on the controller node with the IP address of 192.168.11.13 is to be removed. This MON has an ID of
192.168.11.13.(Controller node) Remove the monitor from the Ceph cluster.
#
docker exec -it ceph_mon ceph mon removeremoved mon.192.168.11.13 at 192.168.11.13:6789/0, there are now 2 monitors192.168.11.13(Ceph MON node to be removed) Stop the ceph_mon container.
# docker stop ceph_mon
(Master node) Remove the node so that it is not included in any future deployment.
To remove the host from the control deployment group:
# kollacli group removehost control
hostnameTo remove the host from the deployment:
# kollacli host removehost
hostname