When defining a facet, specify the type of selections that you want it to display and how you want ATG Search to determine those selections. You can create a list of single values, such as shoe sizes, or a list of value ranges, such as price ranges. If you choose to create ranges, you can let ATG dynamically create them, provide guidelines for creating them, or specify the exact ranges that you want to appear.
One Selection for Each Faceting Property Value
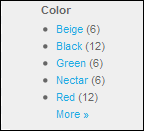
This option creates one selection for each value of the faceting property. In a brand facet, for example, each selection represents one brand name. This option works well with enumeration properties or properties that have the same value across many products, such as color or size properties.
The following example shows one selection for each value of the Color property:
To create one selection for each faceting property value:
Follow steps 1 through 6 in the procedure Creating Facets.
In the Selections section, choose One Selection for Each Faceting Property Value.
(Optional) Include specific selections to display and set the order in which they appear:
Note: The values you specify here display on your Web site, even if those selections do not contain any products.
Click the Add button for Specified Faceting Property Values.
Type a property value that you want to appear in the facet, exactly as it appears in your product catalog.
Type a number in the Priority box that specifies the priority of this value in the display order.
Click Add again and continue adding values until you have created a complete list of the selections you want to appear.
To remove an item, click its delete icon.
(Optional) Prevent specific selections from displaying:
Note: The values you specify here are not displayed on your Web site. If a property value exists in both the Specified and Excluded Facet Values lists, it will be excluded from your site. Null values are excluded automatically.
Click the Add button for Excluded Faceting Property Values.
Type a property value that you want to exclude from the facet, exactly as it appears in your product catalog.
Click Add again and continue adding values until you have created a complete list of the selections you want to exclude.
To remove an item, click its delete icon.
Continue with step 8 in the procedure Creating Facets.
Dynamic Selections
The Dynamic Selections option creates a range of values for each selection and automatically groups selections based on the available values of the property. For example, if the facet is based on the name of the products, dynamic selections groups the names alphabetically: A-F, G-L, M-R, and so on.
This option requires you to specify the following properties. ATG uses these properties to calculate number of selections displayed and the number of products each selection contains:
The maximum number of selections allowed for the facet.
The minimum number of values that each range must contain.
The minimum span of letters or numbers for each range. For example, a minimum span of 3 letters generates, at minimum, ranges of A-C, D-F, and so on.
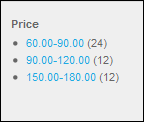
The following example shows a price facet created using dynamic selections. The maximum number of selections is 5, the minimum number of values per selection is 0, the minimum numerical span is 20, and the selections are rounded to the nearest 10.
To create dynamic selections:
Follow steps 1 through 6 in the procedure Creating Facets.
In the Selections section, choose Dynamic selections.
Type a number in the Maximum Number of Selections box. For example, if you enter 10 for a price facet, no more than ten price ranges will display.
Type a number in the Minimum Faceting Property Values Per Selection box. For example, if you enter 5, each selection must contain at least five values.
This setting determines the minimum number of values per selection, not products per selection. More than one product can have the same value. For example, for a Price facet, setting this property to 5 indicates that each selection must include products that span at least five different price values.
Type a number in the Minimum Span of Letters|Numbers Per Selection box. For example, setting this property to 3 permits selections with ranges no smaller than A-C, D-F, G-I, and so on.
(Optional) If the faceting property is a number, type a number in the Round Selection Values To Nearest box. For example, rounding to the nearest 10 displays the range $9.60-$16.89 as $10-$20.
Continue with step 8 in the procedure Creating Facets.
Guided Selection Ranges
The guided selection ranges option automatically divides selections into ranges you specify. For example, specifying three selections and a numerical span of five creates ranges 1-5, 6-10, and 11-15. This option is available for numeric values only.
Note: If there are no items that match a property value, then that value is excluded from the selection ranges.
To create guided selection ranges:
Follow steps 1 through 6 in the procedure Creating Facets.
In the Selections section, choose Guided Selection Ranges.
Type a number in the Number Of Selections box. For example, if you enter 10 for a price facet, there will be ten price ranges.
Type a number in the Numerical Size Of Selections box. This values you want represented in each selection. For example, setting this property to 5 permits groupings of 1-5, 6-10, and so on.
Continue with step 8 in the procedure Creating Facets.
Specified Selections
The specified selections option lets you set specific ranges that you want to appear as facet selections on your Web site. This option is available for numeric values only. Each selection is made up of a range that begins and ends with the points you specify. The end point for one selection is the starting point of the next. For example, specifying points 1, 8, 23, and 66 produces selections 1-8, 8-23, and 23-66.
To create specified selections ranges:
Follow steps 1 through 6 in the procedure Creating Facets.
In the Selections section, choose Specified Selections.
Type the first range point and click Add Range Point. This sets the first value in the first range.
To add an end point, type another number, and click Add Range Point. This sets the end point for the first range and the starting point for the next range.
Repeat steps 3 and 4 until the end points for each selection are defined. Remember that the end point for one selection is the start point for the next selection.
Continue to step 8 in the procedure Creating Facets.
