Using the Sun Worklist Manager Service Engine
What's in This Book
This document provides the information and instructions you need to create Worklist Manager projects in GlassFish ESB. It includes the following topics:
-
Configuring Worklist Manager Service Engine Runtime Properties
Additional Information
Worklist Manager tasks are often included in BPEL processes. For more information about BPEL processes, see BPEL Designer and Service Engine User’s Guide.
Worklist Manager Service Engine Overview
The Worklist Manager Service Engine (WLM SE) is a JBI-based service engine that introduces manual tasks into an automated workflow. A workflow is a coordinated series of business activities intended to produce a specific result. In some cases, the entire workflow cannot be automated and human interaction is required to complete the process. The WLM SE allows you to define the tasks that require human intervention and during an otherwise automated process. During processing, the WLM SE generates a worklist of these tasks.
Installing the WLM SE includes an editor, a wizard, and the service engine itself. A default database and task management console are also included for development and testing purposes. The service engine provides the runtime services for executing Worklist Manager tasks. The editor and wizard allow you to easily define Worklist Manager tasks in the NetBeans IDE design-time environment. The database stores information about each task, and is accessed by the Worklist Manager Console for task management.
The WLM SE uses a simple task definition to describe the manual tasks that cannot be automated. These tasks can then be inserted into a workflow, such as a BPEL process. Once the workflow begins, you can manage the manual tasks using the Worklist Manager Console, where users can view, claim, complete, and reassign tasks. A task definition includes user and group assignments and any of the following: search keywords, task timeouts, automatic escalations and notifications, deadlines for task completion, default values for the task output, and trigger actions that change variable values.
Installation Requirements
The WLM SE is installed as an add-on to GlassFish ESB. For information and instructions on installing the WLM SE, see Installing the GlassFish ESB Platinum Pack in Using the GlassFish ESB Installation GUI.
When you install the WLM SE, a sample Worklist Manager Console is deployed as a web application to the GlassFish server. In addition, sample Worklist Manager projects and Worklist Manager Console projects are made available in the NetBeans IDE.
Worklist Manager Service Engine Features
The WLM SE provides the following features to enable Worklist Manager task processing:
-
Graphical Wizard and Editor: The WLM SE includes a wizard to automate the process of creating a task definition framework, and an editor where you can define all of the elements of the task definition.
-
Worklist Manager Console: This web-based application provides complete task management functionality, including claiming, completing, and reassigning tasks.
-
Searchable Tasks: The Worklist Manager Console provides comprehensive full-text and keyword search capabilities and also supports AND, OR, and NOT operations. It can also filter results by status, user, and group.
-
Notifications: Tasks can be configured to send out email or other notifications when a task is escalated or changes status, or after a deadline or duration of time passes.
-
Escalations: The WLM SE supports automatic task escalation if it is not completed by a deadline or within a specific period of time.
-
Timeouts: The WLM SE allows you to define a timeout period or deadline after which the task returns an error to the BPEL process.
-
XPath Support: Support for XPath syntax lets you add variables and expressions that dynamically derive task elements and properties from the input message.
-
Security: Security for the web-based console is propagated through the Java EE Service Engine. The WLM SE supports both file realm and LDAP security.
-
LDAP Support: The WLM SE supports using LDAP for authentication and user management, and provides an LDAP browser for you to easily assign tasks and notifications.
-
Client API: The WLM SE includes a client API in the form of a static WSDL document to interact with the task management service. The API provides complete task handling functions.
-
Persistence: Task information and status is preserved in the Worklist Manager database, so users can continue processing tasks following a system failure.
Worklist Manager Service Engine Architecture
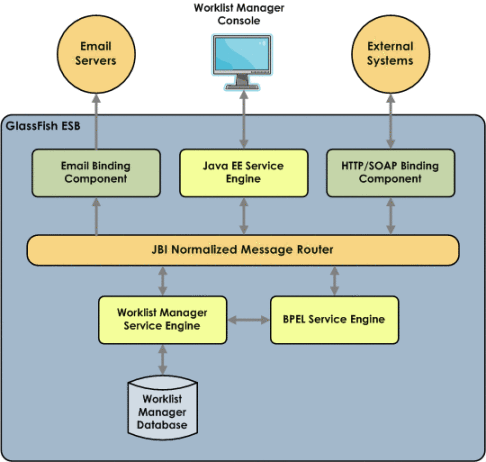
The Worklist Manager Service Engine functions as part of a larger workflow, which can include multiple binding components, BPEL processes, and worklist tasks. The following diagram illustrates the general architecture of a Worklist Manager system.
-
An external system or client sends a message to the workflow system.
-
The message is received through a binding component and is then processed through the Normalized Message Router (NMR) to the BPEL process.
-
When the BPEL process comes to the human task, it sends a request to the Worklist Manager Service Engine.
-
The Worklist Manager Service Engine writes the task to the Worklist Manager database, and waits for the task to be claimed and completed.
-
A WLM user claims and completes the task.
-
Each time a user changes the task status, the information is sent from the web client through the Java EE Service Engine and NMR to the Worklist Manager Service Engine, and the Worklist Manager Service Engine updates the database.
-
If email notifications are defined, email messages are sent out from the Worklist Manager Service Engine through the NMR and the Email Binding Component to the external email service. This happens each time a notification trigger event occurs.
-
-
Upon task completion, the Worklist Manager Service Engine sends a reply to the BPEL process. Additional notifications may be generated.
-
The BPEL process generates a message back out through the NMR and binding component to the external system or client.
The following describes the flow of data through a Worklist Manager system:
Worklist Manager Components
In addition to the service engine itself, which handles runtime processing, the WLM SE also includes the following components:
Worklist Manager Database
The Worklist Manager database stores information about each human task generated by a BPEL process or other workflow. All tasks generated from the same instance of the WLM SE are stored in the same database. The database tracks the status of each task, the users and groups assigned to a task, its priority, due dates, input and output data, and so on. The database also persists the status of each task so incomplete tasks are recovered in the event of system failure, and users can continue to process each task.
The WLM SE supports Oracle, MySQL, and Java DB (Derby) databases. For development and testing purposes, the connection pool and JDBC resource for a Java DB database are automatically created when you install the WLM SE, and the Java DB database is automatically generated the first time you start the WLM SE.
The database maintains a complete history of tasks completed, which can grow to be a very large number of records. You should periodically archive older completed tasks to prevent the tables from growing too large.
Task Definition Wizard
The Task Definition Wizard takes you through the basic steps of creating a task definition file, and uses the task-related information you enter to define the Worklist Manager task. This allows you to quickly create a framework for the task definition without any coding. Once you create the task definition, you can configure the task using the Task Definition Editor. The wizard automatically defines the title for a new task, using the name you specify in the wizard, and assigns a priority of 5 to the task.
Task Definition Editor
Once a task definition file is created by the wizard, you can use the Task Definition Editor to further customize and configure the task. From the Task Definition Editor, you can assign users and groups to a task and define escalations, notifications, timeout periods, and trigger actions. The editor provides graphical tools so you can easily edit task definitions. You can also edit the file's source code directly.
You can edit the task definition in any of the following editing windows called views, which are accessible from the Task Definition Editor toolbar:
-
Source View: The Source tab displays the underlying code for the task definition. You can use the Source view to write the entire task definition, make refinements to an existing definition, or to review the underlying code created by the Task Definition Editor.
-
Design View: The Design tab displays a task definition in graphical view on a series of tabbed pages that each display specific information about the task. The tabbed pages allow you to graphically assign tasks and define escalations, notifications, deadlines and durations, and variable updates.
-
Mapper View: The Mapper tab provides a framework to define values for input and output variables. Currently the Mapper can only be used from the Actions tab. The Mapper provides a variety of XPath functions that you can use to manipulate the input and output data.
When a task definition is open in the editor, the Navigator window appears in the lower left side of NetBeans. This window provides a logical view of the task definition. When you select a field in the Design view, the corresponding element is highlighted in the Navigator. If you double-click an element in the Navigator, the corresponding field is shown in the Design view. You can also right-click elements in the Navigator and select to either go to that element in the source or go to that element in the design. The Imports section of the Navigator list any XSD or WSDL files that are referenced from the task definition.
About the Worklist Manager Console
The Worklist Manager Console is a web-based tool to manage the human tasks that are generated from workflow processes. The console accesses the Worklist Manager tasks from the Worklist Manager database to display information about each task. Assigned users can access the console to view, claim, update, complete, and reassign tasks.
An installation of the WLM SE includes a default Worklist Manager Console that is already deployed and available from the GlassFish server. You can use this console for testing and development purposes. A similar Worklist Manager Console is also provided as sample projects in NetBeans. The sample projects include a web application and its corresponding composite application. You can download and modify these projects to create a custom Worklist Manager Console based on the default console. You can also create your own custom console using the client API provided by the Worklist Module project.
Worklist Manager Projects
A typical Worklist Manager configuration includes the following projects:
The Worklist Module Project
A Worklist Manager task is defined in a Worklist Module project in NetBeans. Each Worklist Module project includes a WSDL files to define the input, output, and binding for the task; optional XSD files to define the schema; and a task definition file that defines the scope of the task. The task definition file has a “.wf” extension. Once you build the WLM project, you can incorporate it into a BPEL business process and then into a composite application.
The BPEL Project
The BPEL process defines how data is processed and specifies where in the automated workflow the human intervention occurs. It also defines how the results of the human task are processed once the task is complete. Worklist Manager tasks are incorporated into a BPEL process through an Invoke activity. The BPEL process uses the WSDL document created for the Worklist Manager project for the partner link to the task.
When a running BPEL process comes to a Worklist Manager task, the task is written to the Worklist Manager database and the BPEL process is not completed until a WLM user claims and completes the task. The BPEL process checks the Worklist Manager database for the status of the task in order to determine whether the task is complete and the process can be continued.
The Composite Application Project
The composite application project combines the Worklist Manager and BPEL projects to create a service assembly that can be deployed to the application server. The service assembly is created by simply dragging the appropriate projects and WSDL documents onto the CASA Editor and then building the composite application to generate the connections. You can create test cases in the composite application project to test different scenarios in the worklist system you created.
About Worklist Manager Tasks
Worklist Manager tasks are defined and configured by a task definition file. A task is exposed as a web service operation by the WLM SE, and request and reply web service operations are defined for each task in the project's WSDL file. The input message of this operation is the task input and the output message of the operation is the task output.
The following topics provide information about the structure of the files that define a task and about the supported features of Worklist Manager tasks:
Task Definition File
When you define a task using the Task Definition Wizard, the wizard generates a new task definition file, which has a “.wf” extension in the WLM project. The task definition file is in XML format, and can be edited through the Task Definition Editor or by editing the XML text directly. A task generally has an input from the BPEL process, and upon completion generates output back to the BPEL process for continued processing.
The task definition file specifies the following information:
-
A title and priority for the tasks.
-
The users and groups which the tasks are assigned.
-
Keywords by which users can search on the Worklist Manager Console for tasks.
-
Durations or deadlines by which a task must be completed before it is escalated to the specified users or groups.
-
Durations or deadlines by which a task will time out if it is not completed.
-
Email or other types of notifications that are sent out when certain events occurs, such as a task being created, completed, or escalated.
-
Default values for task output fields (implemented as variable initializations).
-
Variable updates that are made when a task status changes, such as inserting the timestamp in a date field when a task is completed.
Task Definition Schema
The XML schema file for the Worklist Module project defines the structure of the data that will be sent to and output by the worklist task. It is referenced from the messages element of the WSDL file, and its namespace prefix is used in the XPath expressions in the task definition file.
XPath Expressions in Task Definitions
The task definition file supports XPath expressions to help define the properties for each task. You can use XPath expressions in task definitions to define literal values for task properties and to define variables whose values are dynamically derived from the input data. You can also use XPath functions to manipulate data and define how data is processed. A mapper is available on the Actions tab of the Task Definition Editor to automatically generate the XPath syntax for the actions you define. For basic properties, escalations, and notifications, you can enter XPath expressions directly into the fields on the Task Definition Editor or directly into the source code.
The Task Definition Editor supports the XPath 1.0 specification in Design view. The Source view also supports XPath 2.0 expressions, which allows you to define if-then-else conditions. To use XPath expressions to retrieve data from the task input, you need to register a prefix for the XML schema file namespace in the task definition file. Once you do this, you will use the prefix in the actual XPath expressions. You can manipulate input and output data using the WLM variables: $TaskInput and $TaskOutput. For example, an expression that extracts information about the price of an item might look similar to the following:
$TaskInput:part1/ns1:price where 'ns1' is the namespace prefix you defined.
Automatic email Notifications
You can configure a task to automatically generate notifications to certain users or groups of users when a certain action occurs. The WLM SE can send notifications via email when a task's status changes, or when an escalation or task timeout occurs. The Email BC is used to send the notifications. For example, when a task is assigned to a user or group of users, an email can be sent to each user to inform them that the task is ready to be worked on. Then, when the task is completed, another notification can be sent to the user's manager letting them know it is done. You can also define custom notifications that do not use email, but instead invoke a web service, for example.
When you create notifications in the task definition file, a WSDL file named EmailNotificationHandler.wsdl is automatically generated to handle the notifications. This file will require some customization to match your email server settings.
Changing Variables
When a task is being processed, you might want certain actions to change the value of an output variable. For example, you might want to insert the current date and time into the output message when a task is completed. The Task Definition Editor supports mapping literal values or values from input messages to the output variables using XPath 1.0 expressions.
Task Escalations and Timeouts
You can manage the task handling process by defining automatic escalations and timeout periods for each task. A task escalation can assign a task to another user, such as a manager, when the task is not completed within the specified time period. This ensures that a process is not held up because a human workflow task is not completed. Tasks can be escalated based on a duration or on a deadline.
A task timeout defines a deadline or duration after which a task fails. If you define a task timeout and the task is not completed within the specified duration or by the specified deadline, the task is treated as failed and returns to the workflow (BPEL process) with a system fault. This is useful for cases when a task is not completed even after it has been escalated.
Security
The Worklist Manager Console is secured using the standard Java EE security mechanism for web applications. The WLM SE supports both file realm security and LDAP security for authentication, authorization, and management of Worklist Manager Console users. Both the file realm and LDAP realm are configured through the GlassFish Admin Console. For the file realm, users and their login information are also configured through the GlassFish Admin Console. For LDAP, you can use your existing directory structure. For escalation, it is useful to have a clearly defined user hierarchy so tasks can be escalated to a user's manager or supervisor.
You can assign users and groups from an LDAP directory using the compact LDAP browser in the Task Definition Editor. The WLM SE supports the following LDAP servers:
-
Sun Java System Directory Server
-
OpenDS
-
Windows Server Active Directory
Worklist Manager Task Validation
The Task Definition Editor includes a validation function to help you create code that is valid, correctly formatted, and schema-compliant. The editor validates the task definition file against the WLM schema and validates the XPath expressions to verify that the location paths and functions are valid. It also checks for any broken references.
The above validation occurs automatically in real time. You can also validate the task definition and any imported WSDL files by selecting the validate icon on the Task Definition Editor. Any validation failures are listed in the Output window and contain links to the location of the error in the task definition source code.
Steps to Implement a Worklist Manager Task
-
Configuring Advanced Task Options (optional)
-
Configuring Worklist Manager Service Engine Runtime Properties (optional)
Below are the basic steps you need to perform to implement a Worklist Manager task:
Once you implement the Worklist Manager task, you can test the system by running messages through the system and using the Worklist Manager Console to manage the Worklist Manager tasks (described in Using the Default Worklist Manager Console).
Defining Worklist Manager Tasks
Perform these tasks in the following order to create a WLM project and define worklist tasks:
(Optional) Connecting to the LDAP Server
If you are using an LDAP directory as your source for security, you should connect to the LDAP server from NetBeans before defining your tasks. Once you are connected, you can use the WLM SE LDAP browser to assign users and groups to Worklist Manager tasks by dragging and dropping entries from the LDAP directory into the Task Definition Editor.
 To Connect to the LDAP Server
-
On the NetBeans IDE, click the Services tab.
-
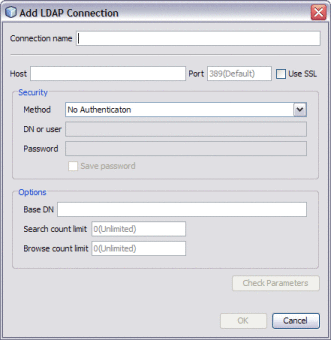
Right-click LDAP Servers and then select Add LDAP Connection.
The Add LDAP Connection dialog box appears.
-
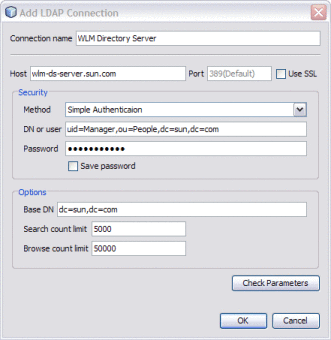
In the Connection Name field, enter a name for the connection.
-
In the Host field, enter the name of the LDAP server.
-
If you are using SSL, select Use SSL.
Note that the port number changes from 389 to 636.
-
In the Security section, do one of the following:
-
If authentication is not required, leave the authentication method at No Authentication.
-
If authentication is required, select Simple Authentication and then enter the following information:
-
DN or user: The distinguished name (DN) of the security principal used for connecting to the LDAP server.
-
Password: The password of the security principal.
-
To save the password information in NetBeans, select Save Password.
-
-
-
In the Options section, do the following:
-
In the Base DN field, enter the root DN for the user's directory.
For example, dc=sun,dc=com.
-
In the Search Count Limit field, enter the maximum number of results to return from a search of the LDAP directory.
-
In the Browse Count Limit field, enter the maximum number of LDAP entries to show when browsing the directory.
The above two options are useful if the directory is very large.
-
-
Click Check Parameters.
NetBeans verifies that the connection parameters are correct and lets you know whether the connection succeeded or failed.
-
Click OK to close the Add LDAP Connection dialog box.
-
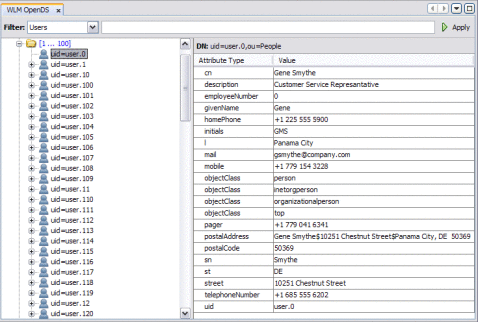
To browse the LDAP directory, expand LDAP Servers and double-click the connection you just added.
The LDAP Browser appears with the directory information displayed.
-
To install the sample console projects, continue to (Optional) Installing the Sample Worklist Manager Console Projects; otherwise skip to Creating the Worklist Module Project.
(Optional) Installing the Sample Worklist Manager Console Projects
A default Worklist Manager Console is automatically deployed to the application server when you install the WLM SE. The corresponding sample Worklist Manager Console projects are also included in the NetBeans Samples projects. You can use this console for testing purposes or you can customize it for use in production.
Note –
Two Worklist Manager samples, WLM Purchase Order and WLM Advanced Purchase Order, are also provided.
 To Install the Sample Worklist Manager Console
-
Right-click in the Projects window of the NetBeans IDE.
-
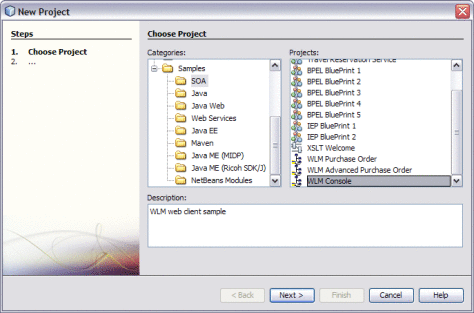
Select New Project.
The New Project Wizard appears.
-
In the Categories panel, expand Samples and then select SOA.
-
Under Projects, select WLM Console.
-
Click Next, and then click Finish.
Two projects are installed: WLMConsoleWeb and WLMConsoleCompApp.
-
Continue to Creating the Worklist Module Project.
Creating the Worklist Module Project
You create Worklist Manager tasks in a Worklist Module project. This project stores the XML schema definitions, WSDL files, and Worklist Manager task definition files.
 To Create the Project
-
If you are using LDAP for task assignment and authentication, complete the steps under (Optional) Connecting to the LDAP Server.
-
On the NetBeans IDE, click the Projects tab.
-
Right-click in the Projects window, and select New Project.
The New Project Wizard appears.
-
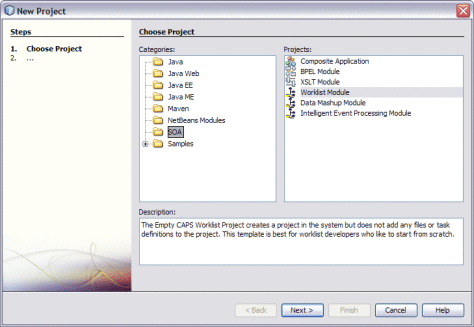
Select SOA under Categories, and then select Worklist Module under Projects.
-
Click Next.
The Name and Location window appears.
-
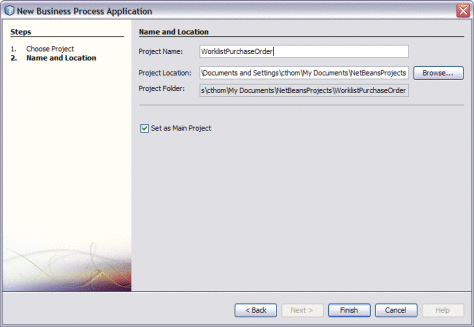
Enter a unique name for the Project and verify or update the directory for the project files.
-
Click Finish.
The new project appears in the Projects window with two folders – Worklist Files and Referenced Resources.
-
Continue to Creating the XML Schema Definition (XSD).
Creating the XML Schema Definition (XSD)
The XML schema defines the message structure and operations for the input and output data. Complex message structures are defined in the XSD file and then imported into the WSDL documents. Make sure that the input for the task matches the data structure that will be sent from the workflow or business process. This procedure provides very general instructions for creating an XSD file.
 To Create the XML Schema Definition
-
Complete the steps under Creating the Worklist Module Project.
-
In the NetBeans Projects window, right-click Worklist Files in the project you just created, and select New XML Schema.
The New XML Schema Wizard appears.
-
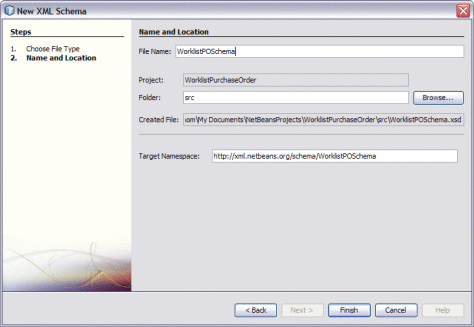
Enter a unique name for the schema, and verify or change the folder location for the file.
-
Click Finish.
The new file appears in the Project window in the Worklist Files folder of the worklist project, and opens in the XML Editor.
-
Define the schema for the WSDL document by adding complex types, simple types, elements, and so on.
-
Continue to Creating the WSDL Document.
Creating the WSDL Document
The WSDL document defines the interface for the worklist project. The instructions below outline how to create a very simple WSDL document. Yours may be more complex, depending on your data processing needs.
Note –
If this WSDL is used in a main BPEL process, communication is synchronous. If it is used in a subprocess, communication can be asynchronous.
 To Create the WSDL Document
-
Complete the steps under Creating the XML Schema Definition (XSD).
-
In the NetBeans Projects window, right-click the Worklist Files folder in the worklist project, and then select WSDL Document.
The New WSDL Document Wizard appears.
-
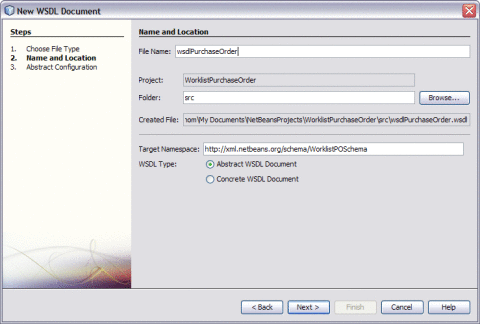
Enter a name for the WSDL document, and verify or update the folder location for the file.
-
Select Abstract WSDL Document.
For Worklist Manager purposes, you generally only need an abstract WSDL document. Since Worklist Manager tasks are typically used within a BPEL process, there is no need to define bindings and services.
-
Click Next.
The Abstract Configuration window appears.
-
In the Input section, click the ellipses next to part1, select the appropriate input type from the XML schema you created, and then click OK.
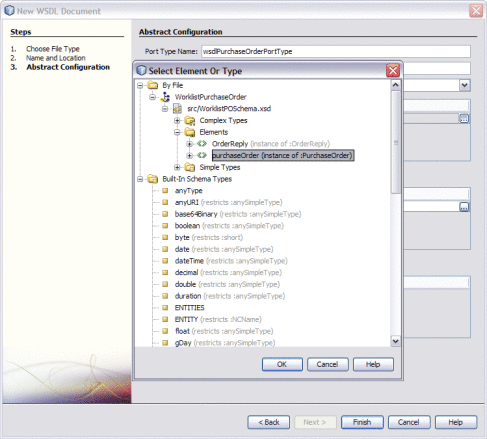
Note –If you have trouble accessing your schema elements from the dialog box, copy the schema file into the Referenced Resources folder of the project using the Refactor > Copy option.
-
Repeat the above step for the Output section.
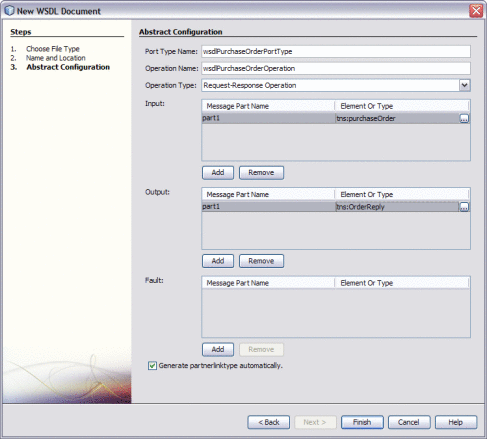
-
On the New WSDL Document Wizard, click Finish.
-
Continue to Creating the Worklist Manager Task Definition.
Creating the Worklist Manager Task Definition
Once the XSD and WSDL files are created and configured, you can define the Worklist Manager task. This includes the basic steps outlined below as well as the more advanced tasks described in Configuring Advanced Task Options, such as defining notifications and escalations.
 To Create the Worklist Manager Task Definition
-
Complete the steps under Creating the WSDL Document.
-
In the NetBeans Projects window, right-click Worklist Files in the worklist project, point to New, and then select Worklist Task Definition.
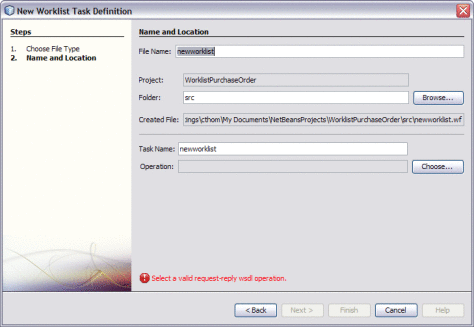
The Task Definition Wizard appears.
-
Enter a name for the task definition file, and verify or update the file location in the Folder field.
-
Update the task name (optional).
-
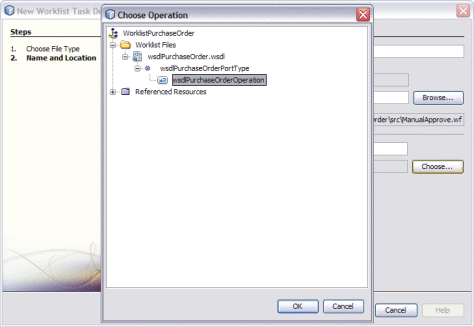
Click Choose next to the Operation field.
The Select Operation dialog box appears with the project file hierarchy shown.
-
Expand the project nodes until you see the WSDL operation you want to implement, select the operation, and then click OK.
-
On the Task Definition Wizard, click Finish.
The new task definition file appears in the project tree and opens in the Task Definition Editor.
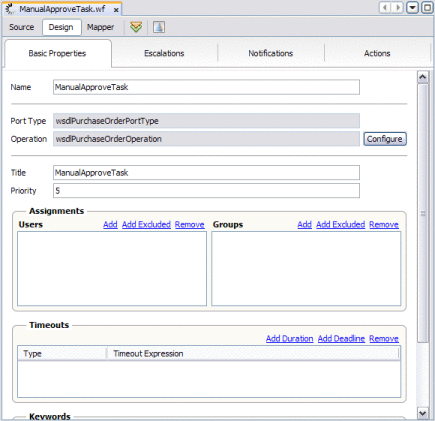
-
Register the namespace prefix of the schema file by doing the following:
-
Open the schema file you created for this project and display its properties (Window > Properties).
-
Copy the value of the Target Namespace property.
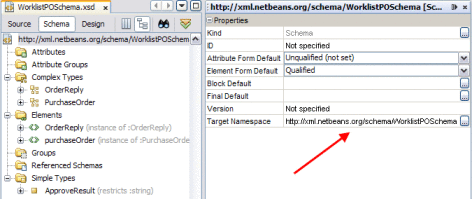
-
Return to the task definition file, and click the Source tab.
-
Add an attribute named xmlns:namespace-prefix to the task element, and paste the namespace from the schema file as the value (within double-quotes).
The following example registers the namespace prefix as 'po'.
<task xmlns:xsi="http://www.w3.org/2001/XMLSchema-instance"
      ...
      xmlns:po="http://xml.netbeans.org/scheme/WorklistPOSchema">
-
-
Save the changes and click the Design tab.
-
In the Title field, enter a title for the task.
This is the name of the task as it appears in the Worklist Manager Console's task list.
Tip –You can use XPath expressions to define variables that derive the values for the Title and Priority properties from the incoming data. For more information on using XPath expressions, see Using XPath Expressions and Functions in Task Definitions.
-
In the Priority field, enter a priority for the task from 1 to 10, with 10 being the highest priority.
-
Continue to Assigning Users and User Groups to a Task.
Assigning Users and User Groups to a Task
As part of the task definition, you need to assign users or groups of users to the task in order for those users to be able to view and edit the task on the Worklist Manager Console or client. You can also specify that a user or group be excluded from a task.
The WLM SE supports security through either a file realm or through LDAP. The method you use to assign users and user groups to a task depends on which of the security methods you use. Perform the appropriate task below, depending on whether you are using file realm or LDAP security.
In this step, you create either static or dynamic assignments. With static assignments, you specify the specific users and groups to whom tasks will be assigned. With dynamic assignments, you specify a field in the incoming data that contains the name of the users or groups to whom the task will be assigned. This is done using XPath expressions. For more information, see Entering XPath Variables in Design View.
 To Assign File Realm Users and Groups to a
Task
This procedures describes how to manage user and group assignments for a task using file realm security through the GlassFish server. The users and groups you enter here must also be defined for the file realm as described in Defining Worklist Manager Console Security Using a File Realm.
Tip –
Instead of entering the actual user names and groups, you can assign users and groups using XPath expressions, which derive the values from the input data. For information and instructions, see Using XPath Expressions and Functions in Task Definitions.
-
Complete the steps under Creating the Worklist Manager Task Definition.
-
If it is not already open, double–click the task definition file to open it in the Task Definition Editor.
-
To assign a user to the task, do the following:
-
In the Assignments section under Users, click Add.
A new row appears in the Users list.
-
Select NewUser, and replace it with either the user login name or the XPath expression that will obtain the name from the input data.
Note –The user names you enter here must be defined in the GlassFish server file realm security.

-
-
To specify that a user be excluded from a task, do the following:
-
To delete an entry from the Users list, select the entry to delete and then click Remove in the Users section.
-
To assign a group to the task, do the following:
-
In the Assignments section under Groups, click Add.
A new row appears in the Groups list.
-
Select New Group, and then enter either a name for the group or an XPath expression that will obtain the group name from the input data.
Note –The group names you enter here must be defined in the GlassFish server file realm security.

-
-
To specify that a group be excluded from a task, do the following:
-
In the Assignments section under Groups, click Add Excluded.
A new row appears in the Groups list.
-
Select NewExcludedGroup, and then enter either a name for the group or an XPath expression that will obtain the group name from the input data.
The new name or expressions appears with strikes through the text.

-
-
To delete an entry from the Groups list, select the entry to delete and then click Remove in the Groups section.
-
Continue to Configuring Advanced Task Options.
 To Assign LDAP Users and Groups to a Task
The Task Definition Editor includes an LDAP browser that allows you to browse the LDAP directory, and then drag and drop users and groups directly from the LDAP browser into the assignment lists.
-
Complete the steps under (Optional) Connecting to the LDAP Server and Creating the Worklist Manager Task Definition.
-
If it is not already open, double–click the task definition file to open it in the Task Definition Editor.
-
In the Task Definition Editor toolbar, click the LDAP Connection icon (this looks like a blue triangle).
The LDAP Connection pane appears.
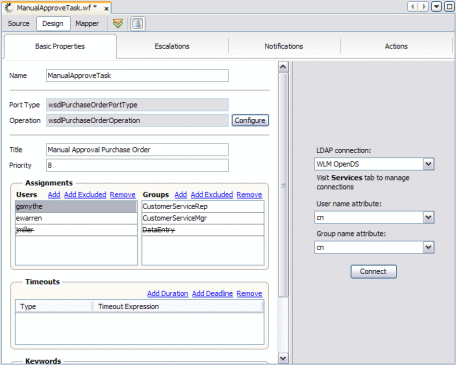
-
Select the name of the LDAP connection to connect to, and then select the user and group name attributes you want to browse. To select an attribute that is not in the list, select Other and then enter the attribute name in the dialog box that appears.
-
Click Connect.
The directory opens in the LDAP Connection panel.
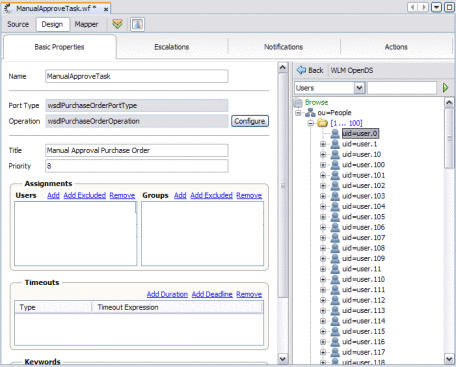
-
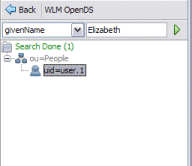
To search for a user or group entry, do the following:
-
In the top left field, select the LDAP entity or attribute you want to search by.
-
In the top right field, enter a value for that entity.
To perform a wildcard search, enter an asterisk (*) for any characters you are unsure of.
-
Click the right arrow button to initiate the search.
The results appear in the browser panel.
-
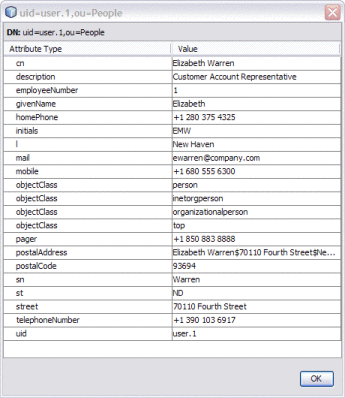
Double-click a result to view detailed information about the entry.
-
-
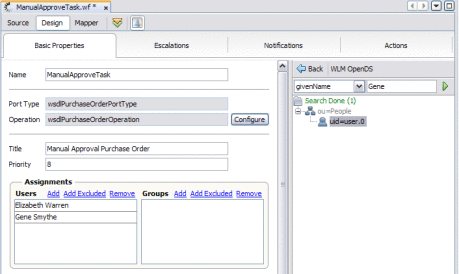
To assign a user to a task, display their entry in the browser panel and then drag and drop the entry into the Users list.
The user's name appears in the list.
-
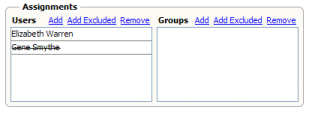
To exclude a user from a task, display their entry in the browser panel and then press the Ctrl key and drag and drop the entry into the Users list.
The user's name appears in the list with strikes through the text.
-
To delete an entry from the Users list, select the entry to delete and then click Remove in the Users section.
-
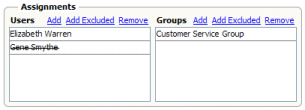
To assign a group to a task, display the group entry in the browser panel and then drag and drop the entry into the Groups list.
The group name appears in the list.
-
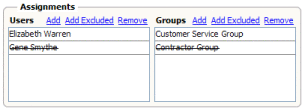
To exclude a group from a task, display their entry in the browser panel and then press the Ctrl key and drag and drop the entry into the Users list.
The user's name appears in the list with strikes through the text.
-
To delete an entry from the Groups list, select the entry to delete and then click Remove in the Groups section.
-
Click Save All on the NetBeans toolbar.
-
Continue to Configuring Advanced Task Options (optional).
Configuring Advanced Task Options
Perform any of the following tasks to configure advanced options for the Worklist Manager task:
Defining Time Limits and Deadlines for a Task
The WLM SE allows you define time periods or a specific date and time after which a task times out if it is not completed. When a task times out, it is treated as a failed process and return to the business process with a system fault.
If you define the timeout as a duration, the timer starts when the tasks is created and the task is timed out once the duration you specify is passed and no action has been taken on the task. The format for defining the duration is PyYmMdDThHmMsS, where y is the number of years, the first m is the number of months, d is the number of days, h is the number of hours, the second m is the number of minutes, and s is the number of seconds,
The following example indicates a duration of one and one-half hours:
P0Y0M0DT1H30M0S
If you define the escalation as a deadline, the task times out once the deadline you specify is passed and no action has been taken on the task. The format for defining the deadline is YYYY-MM-DDTHHmmSS, for example:
2010-01-30T23:00:00
 To Define Task Timeouts
-
Complete the steps under Assigning Users and User Groups to a Task.
-
If the task definition is not opened, open the file in the Task Definition Editor.
-
To define a duration from the start of the task to when it must be completed, do the following:
-
To define a deadline by which the task must be completed, do the following:
-
To remove a deadline or duration, select the line item to remove and then click Remove.
-
When you are done defining timeouts, click Save All on the NetBeans toolbar.
Adding Keywords to a Task
You can enter keywords that can be used to search for tasks on the Worklist Manager Console. Keywords can also be used to add custom columns to the task list on the Worklist Manager Console.
 To Add Keywords
-
Complete the steps under Assigning Users and User Groups to a Task.
-
If the task definition is not opened, open the file in the Task Definition Editor.
-
In the Keywords section of the Task Definition Editor, click Add.
A new line appears in the Keywords list.
-
Enter the keyword in the new line.

-
Repeat the above steps for each keyword to enter.
-
To remove a keyword, select the line to remove and then click Remove.
-
When you are done with your changes, click Save All on the NetBeans toolbar.
Defining Automatic Task Escalations
The WLM SE allows you define time periods or a specific date and time after which a task is automatically escalated to a higher level if it is not completed. Use the Notifications feature of the WLM SE to specify the people or groups to whom an automatic notification should be sent when a task is escalated. You can then select the defined notification for the escalation.
If you define the escalation as a duration, the timer starts when the tasks is created and the task is escalated once the duration you specify is passed and no action has been taken on the task. The format for defining the duration is PyYmMdDThHmMsS, where y is the number of years, the first m is the number of months, d is the number of days, h is the number of hours, the second m is the number of minutes, and s is the number of seconds,
The following example indicates a duration of one and one-half hours:
P0Y0M0DT1H30M0S
If you define the escalation as a deadline, the task is escalated once the deadline you specify is passed and no action has been taken on the task. The format for defining the deadline is YYYY-MM-DDTHHmmSS, for example:
2010-01-30T23:00:00
 To Define Automatic Escalations
When you define automatic escalations, you specify the users or groups to whom the task is escalated, and you can define notifications to be automatically sent out when a task is escalated.
-
Complete the steps under Assigning Users and User Groups to a Task.
-
If the task definition is not opened, open the file in the Task Definition Editor.
-
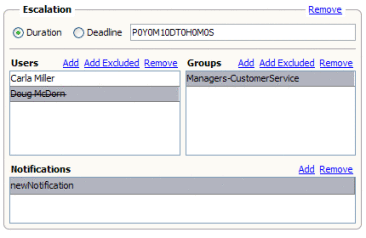
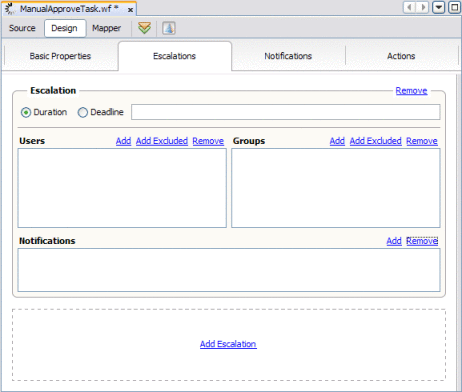
Click the Escalations tab.
-
Select either Duration or Deadline.
-
Do one of the following:
-
To add a user to whom the task will be escalated, click New in the Users section and then enter the name of the user.
-
To specify a user to whom that task should not be escalated, click Add Excluded in the Users section and then enter the name of the user.
Note –You can use the LDAP browser on the Escalations page to add and exclude users and groups for escalations. For more information about using the LDAP Browser to select users and groups, refer to To Assign LDAP Users and Groups to a Task.
-
To send out automatic notifications when a task is escalated, do the following:
-
Define a notification as described under Defining Automatic Task Notifications.
-
Click the Escalations tab.
-
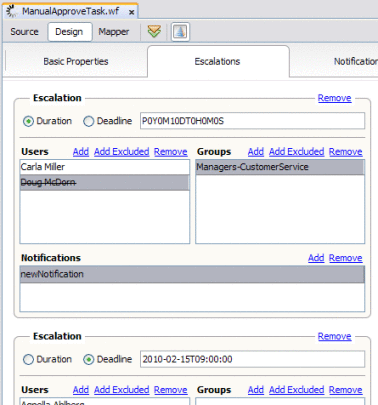
In the Notifications section for the escalation, click Add.
-
Click in the new line that appears, and then select the name of the notification to add.
-
-
On the NetBeans toolbar, click Save All.
Defining Automatic Task Notifications
Creating notifications is a three–step process. First you define the notification, and specify who will receive the notification and how the email is presented. Then you specify a task action, such as Claimed or Completed, and associate the action with the notification, or you associate the notification with a defined escalation. Finally you configure the Email Binding Component by modifying the automatically generated WSDL file, EmailNotificationHanlder.wsdl, that defines the email binding.
Perform these tasks in the following order to define automatic notifications:
 To Define Automatic Notifications
-
Complete the steps under Assigning Users and User Groups to a Task.
-
If the task definition is not opened, open the file in the Task Definition Editor.
-
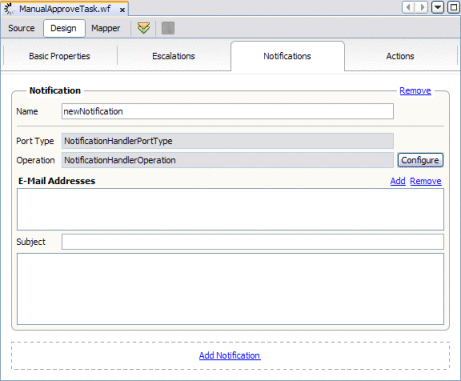
Click the Notification tab.
-
Enter a name for the notification.
-
In the Operation field, select an operation to handle the email notification from the email notification handler WSDL file.
Note –Both the port type and operation are defined in EmailNotificationHandler.wsdl. You only need to modify the operation if you customize the WSDL file. The port type cannot be modified.
-
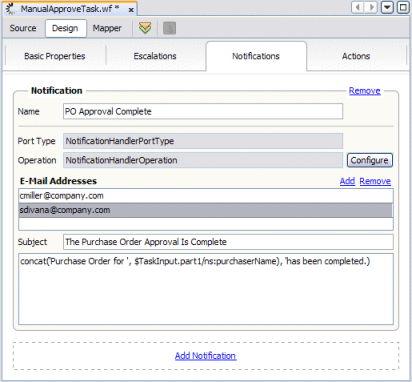
In the E-Mail Addresses section, click New and then enter an email address for the notification in the new line.
-
In the Subject field, enter a subject for the email that goes out.
-
Under the Subject field, enter the text that should appears in the email that goes out.
You can specify this in literal text, as a variable that takes the text from the incoming message, or a combination of both. For more information about XPath expressions, see Using XPath Expressions and Functions in Task Definitions.
-
Continue to To Associate a Notification With a Task Status Change or Escalation.
 To Associate a Notification With a Task Status
Change or Escalation
-
Complete the steps under To Define Automatic Notifications.
-
To associate a task status with the notification, do the following:
-
To associate an escalation with the notification, do the following:
-
On the NetBeans toolbar, click Save All.
 To Configure the Email BC for Task Notification
The Email BC WSDL file need to be configured for your email server.
-
Open EmailNotificationHandler.wsdl in the WSDL Editor.
-
Expand Services > EmailNotificationHandlerService > NotificationHandlerPortTypeBindingPort.
-
Select email:SMTPaddress.
The SMTP address properties appear in the Properties panel.
-
Configure the following properties for your email server:
-
emailServer: The email server host that is used for sending emails.
-
port: The port number for the email server.
-
userName: The user login name used for authentication on the email server.
-
password: The user password used for authentication.
-
useSSL: An indicator of whether to use SSL for connecting to the server.
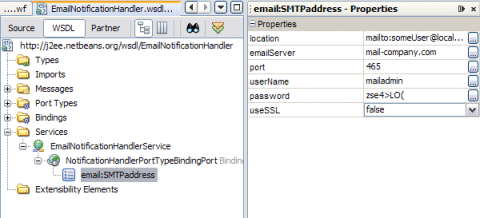
This is how the properties look in the WSDL code view:
<service name="EmailNotificationhandlerService"> <portname="NotificationHandlerPortTypeBindingPort" binding=”tns:NotificationHandlerPortTypeBinding"> <email:SMTPaddress location="mailto:someUser@localhost.com" emailServer=yourServer userSSL="false" port="465" userName="yourUserName" password="yourPassword"/> </port> </service> -
Defining Custom Notifications
By default, the notification feature of the WLM SE uses email to notify users of changes to tasks. You can define a custom notification method, such as invoking a web service when a tasks's status changes.
 To Define a Custom Notification
-
Complete the steps under Assigning Users and User Groups to a Task.
-
If the task definition is not opened, open the file in the Task Definition Editor.
-
Add the notification to the task, as described in To Define Automatic Notifications.
-
Associate the notification with a task action or escalation, as described in To Associate a Notification With a Task Status Change or Escalation.
-
In the WLM project, make a copy of EmailNotificationhandler.wsdl and rename the file.
-
Open the WSDL file you just copied, and change the binding to the required binding type, such as HTTP or JMS, and reconfigure the binding component.
Note –Do not change the operation's message type in this file.
-
In the WLM project, open the task definition file for which you are customizing the notifications.
-
Replace the following line:
<import location="EmailNotificationHandler.wsdl" namespace="http://j2ee.netbeans.org/wsdl/EmailNotificationHandler"/>
with this line:
<import location="new-wsdl-name.wsdl" namespace="new-namespace"
where new-wsdl-name is the name you gave to the WSDL file you copied above and new-namespace is a new namespace.
This replaces the email binding with your custom binding, and the custom binding is invoked when a notification is triggered.
Defining Trigger Actions Using the Mapper
You can define actions that change or assign a value to the output message when a task is changed to a specific status. For example, you could use this feature to assign a timestamp to the task output.
 To Define Trigger Actions Using the Mapper
-
Complete the steps under Assigning Users and User Groups to a Task.
-
If the task definition is not opened, open the file in the Task Definition Editor.
-
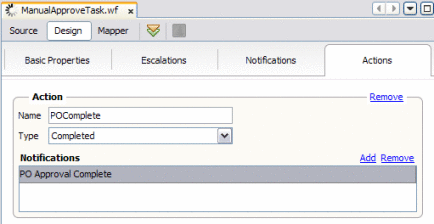
On the Task Definition Editor, click the Actions tab.
-
In the middle of the Actions window, click Add.
-
Enter a name for the action.
-
Select the status that will trigger the action.
When a task changes to the status specified here, the action you define is triggered.
-
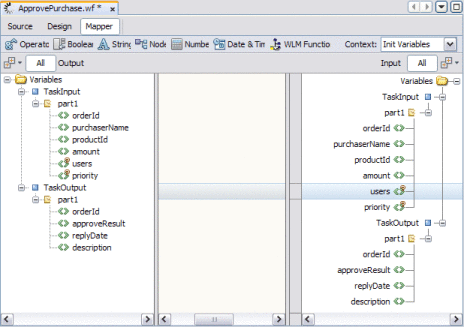
In the Task Definition Editor toolbar, click the Mapper tab.
The Task Mapper appears.
-
In the context field, select the name of the action you just defined.
-
Expand the variable trees until the fields you want to map are visible.
-
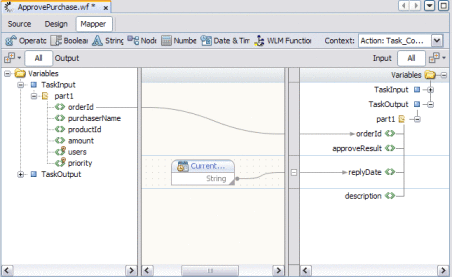
To pass a value from an input field to an output field with no changes, select the input field in the left pane and drag a connector to the output field in the right pane.
-
To transform a value from an input field before passing it to an output field, use the operators in the Task Mapper toolbar. For more information, see Using the Task Mapper.
Initializing Variables Using the Mapper
You can define default values for fields in the task output when it is presented to users on the Worklist Manager Console. When users complete the tasks, they can accept the default values or change them.
 To Initialize Variables Using the Mapper
-
Complete the steps under Assigning Users and User Groups to a Task.
-
If the task definition is not opened, open the file in the Task Definition Editor.
-
On the Task Definition Editor, click the Actions tab.
-
In the Task Definition Editor toolbar, click the Mapper tab.
The Task Mapper appears.

-
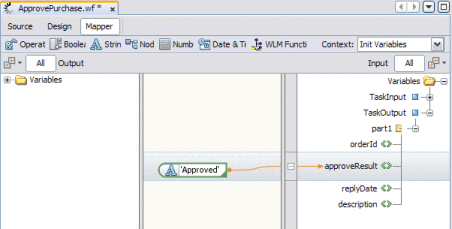
In the context field, select Init Variables.
-
Expand the tree in the left pane until the field you want to initialize visible, and then select that field.
-
In the Mapper toolbar, click String and then select String Literal.
The String Literal function box is added to the mapping panel.
Note –You can use any combination of functions that you need to define the initialized value. String Literal is used here for illustration purposes.
-
Enter a literal value into the function box, and map it to the output.
Creating the Worklist Manager Database
Perform the following steps to create the Worklist Manager database and configure the connection information so the Worklist Manager Service Engine can connect to the database. Note that if you are using a Java DB (Derby) database, most of these steps are performed automatically for you.
Creating the Worklist Manager Database
The way you create the database depends on the database platform you are using. Follow the appropriate procedure below for your database platform.
Creating the Database for JavaDB (Derby)
If you are using a JavaDB (Derby) database, you only need to start the WLM SE to create the database. The WLM SE installation automatically creates the default JDBC connection pool and data resource for the database (because the create flag is set to true for the connection pool). Starting the service engine automatically creates a Derby database named WORKFLOWDB with a schema named WORKFLOW. The login username and password for this database are both WORKFLOW.
 To Start the WLM Service Engine
-
In the NetBeans IDE, click the Services tab.
-
Expand Servers > GlassFish v2.1 > JBI > Service Engines.
-
Right-click sun-wlm-engine, and then select Start.
 To Connect to the Database From NetBeans
-
In the NetBeans IDE, click the Services tab.
-
Expand Databases, and then expand Drivers.
-
Right-click Java DB (Network), and then select Connect Using.
The New Database Connection dialog box appears.
-
Enter the following information:
-
Host: The name of the server on which the database is located. By default, this is localhost.
-
Port: The database port number. By default, this is 1527.
-
Database: The name of the Worklist Manager database. By default, this is WORKFLOWDB.
-
User Name: The user name under which the database schema was created. By default, this is WORKFLOW.
-
Password: The password for the above user. By default, this is WORKFLOW.
-
-
If you do not want to enter the password each time you connect to the database, select Remember Password.
-
Click OK.
-
Verify that the WORKFLOW schema is selected.
-
Click OK again.
Creating the Database for MySQL
To use MySQL server for the Worklist Manager database, create a database and user by running the following SQL commands. Run these commands by logging into MySQL as the root user. You can change the name of the database from WLMSE_USER_DB, and you can change the name of the user from WLMSE_USER.
CREATE DATABASE WLMSE_USER_DB; GRANT ALL ON WLMSE_USER_DB.* TO 'WLMSE_USER'@'%' IDENTIFIED BY 'WLMSE_USER'; |
Creating the Database for Oracle
To use Oracle for the Worklist Manager database, create a tablespace and user in an Oracle instance using the SQL commands below. You can use any database name in place of WLMSE_USER_DB, and any user name and password in place of WLMSE_USER.
CREATE TABLESPACE "WLMSE_USER_DB" DATAFILE 'WLMSE_USER_DB1.dat' SIZE 2000M, 'WLMSE_USER_DB2.dat' SIZE 2000M; CREATE USER WLMSE_USER IDENTIFIED BY WLMSE_USER DEFAULT TABLESPACE WLMSE_USER_DB QUOTA UNLIMITED ON WLMSE_USER_DB TEMPORARY TABLESPACE temp QUOTA 0M ON system GRANT CREATE session to WLMSE_USER; GRANT CREATE table to WLMSE_USER; GRANT CREATE procedure to WLMSE_USER; GRANT CREATE sequence to WLMSE_USER; -- To run these commands you need to be logged in as "sys as sysdba" grant select on sys.dba_pending_transaction to WLMSE_USER; grant select on sys.pending_trans$ to WLMSE_USER; grant select on sys.dba_2pc_pending to WLMSE_USER; grant execute on sys.dbms_system to WLMSE_USER; grant select on SYS.dba_2pc_neighbors to WLMSE_USER; grant force any transaction to WLMSE_USER; |
Setting the GlassFish JVM Classpath to the Database Drivers
The database JDBC drivers for Oracle or MySQL must be either set in the GlassFish JVM classpath (preferred) or placed in the /glassfish/lib directory before you create the connection pools. This is not necessary for the Derby (JavaDB) database. For example, if you are using Oracle and JDK 6, you would set your GlassFish JVM classpath to the ojdbc6.jar file.
 To set the GlassFish JVM Classpath settings
-
Open the GlassFish Admin Console. To access the Admin Console, do the following:
-
To access the GlassFish JVM classpath settings, do the following:
-
In the Classpath Suffix field, type the full path for your database JDBC driver on your local directory.
For example, C:\GlassFishESB\drivers\oracle11gDriver\ojdbc6.jar.
-
Click Save, and then restart GlassFish.
Creating the JDBC Connection Pool and JDBC Resource
The JDBC connection pool and data resource provide the connection information needed by the WLM SE to connect to the Worklist Manager database. You only need to perform these steps if you are using an Oracle or MySQL database.
 To Create the JDBC Connection Pool
-
Log in to the GlassFish Admin Console.
You can access the console from the Services window in NetBeans.
-
In the left portion of the Admin Console, expand Resources, expand JDBC, and then select Connection Pools.
-
On the Create Connection Pool page, click New.
-
Fill in the following information:
-
Name: A name for the connection pool.
-
Resource Type: The Java class to use for Worklist Manager database transactions.
-
Database Vendor: The database platform you are using.
-
-
Click Next.
-
In the DataSource Classname field, accept the default class or enter a new one to use.
-
In the additional properties section, enter the connection values for the Worklist Manager database. Be sure to enter the following information at a minimum (you might need to create some of these properties).
-
For Oracle:
-
URL – The URL that points to the database. The syntax of the URL is jdbc:oracle:thin:@host:port:database_name.
-
user – The login ID for the user you created for the database.
-
password – The password for the above user.
-
-
For MySQL:
-
URL – The URL that points to the database. The syntax of the URL is jdbc:mysql://server:port/database_name.
-
user – The login ID for the user you created for the database.
-
password – The password for the above user.
-
DatabaseName – The name of the database.
-
-
-
Click Finish.
 To Create the JDBC Resources
-
In the left portion of the Admin Console, expand Resources, expand JDBC, and then select JDBC Resources.
-
On the Create JDBC Resource page, click New.
-
In the JNDI Name field, enter a unique name for the JDBC resource.
-
In the Pool Name field, select the name of the JDBC connection pool you created above.
-
(Optional) In the Description field, enter a brief description of the resource.
-
In the Status field, select the Enabled check box.
-
Click OK.
Configuring the Service Engine to Use the Worklist Manager Database
You configure the service engine to connect to the database by modifying the service engine properties. If you are using the default Java DB database, you do not need to perform this step. The default JDBC resource is already specified.
 To Configure the Service Engine for the Database
-
In the Services window of the NetBeans IDE, expand Servers > GlassFish v2.1 > JBI > Service Engines.
-
Right-click sun-wlm-engine, and then select Properties.
The sun-wlm-engine Properties window appears.
-
In the DataSource JNDI field, enter the JNDI name you entered for the JDBC resource above.
-
In the DataSource Type field, select the database platform you are using.
-
Click Close.
Configuring Worklist Manager Service Engine Runtime Properties
The WLM SE Properties Editor allows you to view information about the service engine, configure database and LDAP properties, view statistics on the runtime components, and set log levels for various Worklist Manager components.
The following topics provide instructions for configuring the runtime properties and a reference of the available properties:
 To Configure WLM SE Runtime Properties
-
From the Services window of the NetBeans IDE, expand the Servers node.
-
If the application server is not already started, right-click the server and then select Start.
-
Under the application server, expand JBI and expand Service Engines.
-
If the WLM SE is not started, right-click sun–wlm-engine and then select Start.
-
If the WLM SE is not started, right-click sun–wlm-engine and then select Properties.
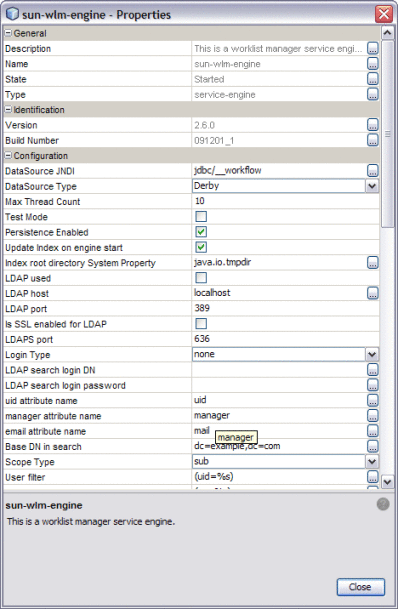
The Properties Editor appears.
-
Modify any of the properties listed in Worklist Manager Service Engine Runtime Property Descriptions.
Note –Statistic properties are automatically updated by the WLM SE. You do not need to modify these properties.
-
To apply the changes, stop and restart the WLM SE.
Worklist Manager Service Engine Runtime Property Descriptions
The following table lists and describes each Worklist Manager Service Engine runtime property.
Table 1 WLM SE General Runtime Properties|
Property |
Description |
|---|---|
|
Description |
A general description of the JBI component. |
|
Name |
A unique name for the WLM SE in the JBI environment. If you install more than one WLM Service Engine in a JBI environment, make sure that each has a unique name. When the service unit deploys the component, it is matched with the target component name defined in its descriptor file, jbi.xml, which can be modified as needed. |
|
State |
The current state of the JBI component. This value can be either Started, Stopped, or Shutdown. |
|
Type |
The type of JBI component (service-engine or binding-component). |
Table 2 WLM SE Identification Runtime Properties
|
Property |
Description |
|---|---|
|
Version |
The version number of the installed service engine. |
|
Build Number |
The build number of the installed service engine. |
Table 3 WLM SE Configuration Runtime Properties
Table 4 WLM SE Runtime Statistics
|
Property |
Description |
|---|---|
|
Activated Endpoints |
The number of activated endpoints. |
|
Active Exchanges |
The number of active exchanges. |
|
Avg. Component Time |
The average message exchange component time in milliseconds. |
|
Avg. D.C. Time |
The average message exchange delivery channel time in milliseconds. |
|
Avg. Msg. Service Time |
The average message exchange message service time in milliseconds. |
|
Avg. Response Time |
The average message exchange response time in milliseconds. |
|
Completed Exchanges |
The total number of completed exchanges. |
|
Error Exchanges |
The total number of error exchanges. |
|
Received Dones |
The total number of received dones. |
|
Received Errors |
The total number of received errors. |
|
Received Faults |
The total number of received faults. |
|
Received Replies |
The total number of received replies. |
|
Received Requests |
The total number of received requests. |
|
Sent Dones |
The total number of sent dones. |
|
Sent Errors |
The total number of sent errors. |
|
Sent Faults |
The total number of sent faults. |
|
Sent Replies |
The total number of sent replies. |
|
Sent Requests |
The total number of sent requests. |
|
Up Time |
The up time of this component in milliseconds. |
The Loggers properties specify the level of logging for each event. You can set the logging level for each logger to any of the following levels:
-
FINEST: provides highly detailed tracing
-
FINER: provides more detailed tracing
-
FINE: provides basic tracing
-
CONFIG: provides static configuration messages
-
INFO: provides informative messages
-
WARNING: messages indicate a warning
-
SEVERE: messages indicate a severe failure
-
OFF: no logging messages
By default, these are all set to the INFO level.
Table 5 WLM SE Logger Runtime Properties|
Property |
WLM Component |
|---|---|
|
sun-wlm-engine |
com.sun.jbi.engine.workflow |
|
WorkflowEngine |
com.sun.jbi.engine.workflow.WorkflowEngine |
|
WorkflowSEBootstrap |
com.sun.jbi.engine.workflow.WorkflowSEBootstrap |
|
WorkflowSEInOutThread |
com.sun.jbi.engine.workflow.WorkflowSEInOutThread |
|
WorkflowSELifeCycle |
com.sun.jbi.engine.workflow.WorkflowSELifeCycle |
|
WorkflowSEServiceUnitManager |
com.sun.jbi.engine.workflow.WorkflowSEServiceUnitManager |
|
WLMSEComponentManager |
com.sun.jbi.engine.workflow.base.WLMSEComponentManager |
|
WLMSEConfiguration |
com.sun.jbi.engine.workflow.base.WLMSEConfiguration |
|
WLMSEEndPointManager |
com.sun.jbi.engine.workflow.base.WLMSEEndPointManager |
|
WLMSEExchangeHandler |
com.sun.jbi.engine.workflow.base.WLMSEExchangeHandler |
|
WLMSEServiceUnitManager |
com.sun.jbi.engine.workflow.base.WLMSEServiceUnitManager |
|
DeploymentLookup |
com.sun.jbi.engine.workflow.com.sun.jbi.common.qos.descriptor.DeploymentLookup |
|
MessagingChannel |
com.sun.jbi.engine.workflow.com.sun.jbi.common.quos.messaging.MessagingChannel |
|
EndpointLifeCycle |
com.sun.jbi.engine.workflow.com.sun.jbi.component.tooklit.endpoint.EndpointLifeCycle |
|
AcceptPoller |
com.sun.jbi.engine.workflow.com.sun.jbi.component.toolkit.lifecycle.impl.AcceptPoller |
|
DBOperation |
com.sun.jbi.engine.workflow.db.opt.WorkflowSEInOutProvider |
|
WorkflowSEInOutProvider |
com.sun.jbi.engine.workflow.process.WorkflowSEInOutProvider |
|
PersistenceTaskManagerImpl |
com.sun.jbi.engine.workflow.runtime.model.impl.PersistenceTaskManagerImpl |
Defining Worklist Manager Console Security
The Worklist Manager Console can use either Java EE security or LDAP security for authentication. Java EE security is defined through the GlassFish server file realm security feature.
Perform one of the following procedures to define security for the Worklist Manager Console:
Defining Worklist Manager Console Security Using a File Realm
When you install the WLM SE, sample users and groups are defined for you in the GlassFish file realm. The users include staff1, staff2, and manager1. The password for each is the same as the username. The user groups (or roles) are staff and manager.
Perform the following steps to define file-realm security:
 To Create a User Login Profile in the File
Realm
-
In a web browser, log in to the GlassFish Admin Console.
The default URL for the Admin Console is http://localhost:4848, if GlassFish is installed on the computer from which you launched the web browser.
-
In the left navigation panel, expand Configuration > Security > Realms, and then select file.
-
On the Edit Realm page, click Manager Users.
-
On the File Users page, click New.
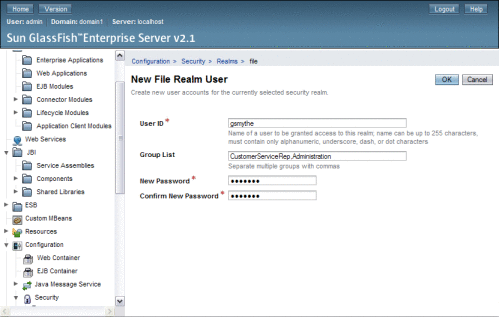
The New File Realm User page appears.
-
Enter the following information for the user:
-
User ID: The login user name for the user.
-
Group List: One or more user groups to which the user is assigned.
Note –These user groups need to be added to the Worklist Manager Console's web.xml file. This is described in the following task.
-
New Password: The login password for the user.
-
Confirm New Password: The same password as above.
-
-
Click OK.
-
Repeat the above steps for each Worklist Manager Console user.
-
Continue to To Define Security Roles for the Worklist Manager Console.
 To Define Security Roles for the Worklist
Manager Console
This procedure describes how to define abstract security roles to the default Worklist Manager Console. These roles can then be mapped to user groups.
-
In the NetBeans Projects window, expand the Worklist Manager Console folder (by default, WLMConsoleWeb).
-
Under the Worklist Manager Console folder, expand Web Pages and then expand WEB-INF.
-
Open the file web.xml.
The XML Editor appears.
-
Click the Security tab.
-
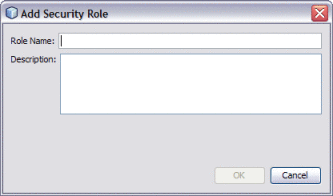
In the Security Roles section, click Add.
The Add Security Role dialog box appears.
-
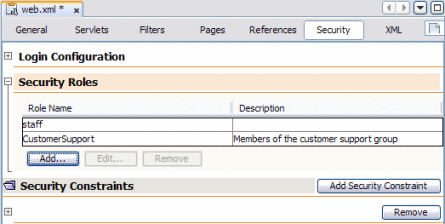
Enter a name and brief description for the role, and then click OK.
The new user role appears in the Security Roles list.
-
Repeat the above steps for each role you need to add.
-
Save and close the file.
-
Continue to To Map Groups to Security Roles for the Worklist Manager Console.
 To Map Groups to Security Roles for the Worklist
Manager Console
This procedure describes how to map user groups to the security roles you defined above for the default Worklist Manager Console.
-
In the NetBeans Projects window, expand the Worklist Manager Console folder (by default, WLMConsoleWeb).
-
Under the Worklist Manager Console folder, expand Web Pages and then expand WEB-INF.
-
Open the file sun-web.xml.
The XML Editor appears.
-
Click the Security tab.
The user roles you created above appear in the list.
-
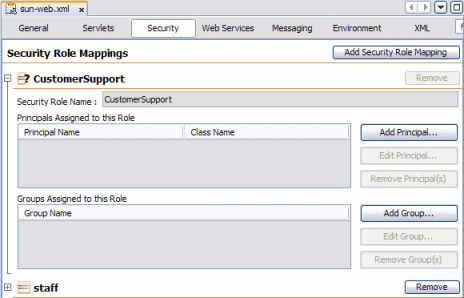
Expand the user role you need to map to a group.
-
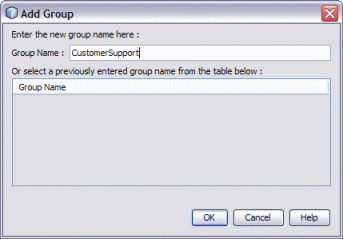
Click Add Group.
The Add Group dialog box appears.
-
Enter a name for the user group, and then click OK.
-
Repeat the above steps for each role you need to map.
-
Save and close the file.
Defining Worklist Manager Console Security Using LDAP
LDAP can be used for authentication, authorization, and user management. This section provides general instructions for working with LDAP security in the GlassFish server. For more information, see Chapter 9, Configuring Security, in Sun GlassFish Enterprise Server 2.1 Administration Guide.
Perform the following steps to configure the WLM SE and Console for LDAP:
-
To Update web.xml for the Worklist Manager Console (for LDAP)
-
To Map User Groups to Security Roles for the Worklist Manager Console (for LDAP)
 To Create an LDAP Realm in the GlassFish Server
-
Launch and log in to the GlassFish Admin Console.
The default URL for the console is http://localhost:4848.
-
In the left navigation panel, expand Configuration, expand Security, and then click Realms.
-
Above the Realms list, click New.
The New Realm page appears.
-
Enter LdapRealm for the name and select com.sun.enterprise.security.auth.realm.ldap.LDAPRealm for the class name.
-
Enter at least the following properties:
-
JAAS context: The type of login to use for this realm. For LDAP, it must be ldapRealm.
-
Directory: The URL of the directory server. For example, ldap://190.111.0.111:389.
-
Base DN: The base Distinguished Name (dn) for the user data.
You can specify additional optional properties for the realm.
-
-
Click OK.
-
Continue to To Update web.xml for the Worklist Manager Console (for LDAP)
.
 To Update web.xml for the Worklist Manager
Console (for LDAP)
The roles defined in web.xml are abstract roles are not used to match groups in the LDAP directory. The groups that are mapped to the roles in sun-web.xml are used to match LDAP groups.
-
In the NetBeans Projects window, expand the Worklist Manager Console folder (by default, WLMConsoleWeb).
-
Under the Worklist Manager Console folder, expand Web Pages and then expand WEB-INF.
-
Open the file web.xml.
The XML Editor appears.
-
Click the XML tab.
-
Modify the realm-name ID attribute in the login configuration section to be LDAPRealm. It should look similar to the following:
<login-config> <auth-method>FORM</auth-method> <realm-name id="LDAPRealm"/> <form-login-config> <form-login-page>/login.jsp</form-login-page> <form-error-page>/login-failed.jsp</form-error-page> </form-login-config> </login-config> -
Click the Security tab and expand Login Configuration.
-
In the Realm Name field, enter LdapRealm.
-
Expand Security Roles, and define the necessary security roles (as described in To Define Security Roles for the Worklist Manager Console.
-
Expand Security Constraints, and click Add Security Constraint.
A new constraint appears and is named Constraint with a number appended to the end.
-
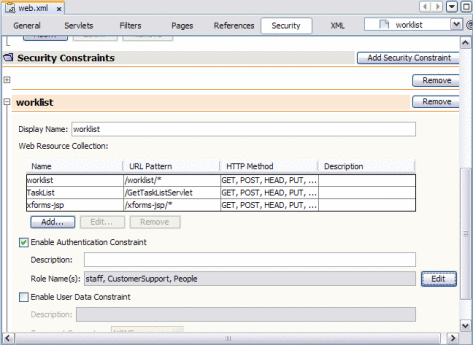
Name the new constraint worklist.
-
Under Web Resource Collection, do the following:
-
Click Add.
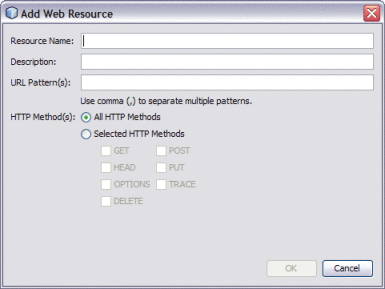
The Add Web Resource window appears.
-
For the Resource Name, enter worklist. For the URL Pattern, enter /worklist/*.
-
Select All HTTP Methods, and then click OK.
-
Repeat the above steps to add resources with the following names and URL patterns:
Resource Name
URL Pattern
TaskList
/GetTaskListServlet
xforms-jsp
/xforms-jsp/*
-
-
Select Enable Authentication Constraint.
-
Next to Role Name, click Edit.
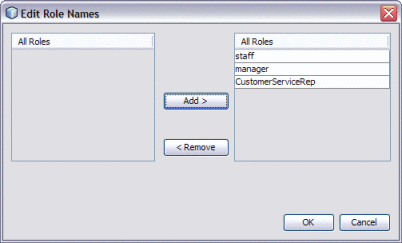
The Edit Role Names dialog box appears.
-
Select all LDAP roles in the left column, and click the right arrow button to transfer them to the right column.
-
Click OK.
The image below illustrates a defined security constraint.
-
Save and close web.xml.
-
Continue to To Map User Groups to Security Roles for the Worklist Manager Console (for LDAP).
 To Map User Groups to Security Roles for the
Worklist Manager Console (for LDAP)
-
In the NetBeans Projects window, expand the Worklist Manager Console folder (by default, WLMConsoleWeb).
-
Under the Worklist Manager Console folder, expand Web Pages and then expand WEB-INF.
-
Open the file sun-web.xml.
The XML Editor appears.
-
Map user groups to roles, as described in To Map Groups to Security Roles for the Worklist Manager Console.
-
Continue to To Configure the Worklist Manager Service Engine for LDAP.
 To Configure the Worklist Manager Service
Engine for LDAP
-
From the Services window of the NetBeans IDE, expand the Servers node.
-
If the application server is not already started, right-click the server and then select Start.
-
Under the application server, expand JBI and expand Service Engines.
-
If the WLM SE is not started, right-click sun-wlm-engine and then select Start.
-
Right-click the service engine and select properties.
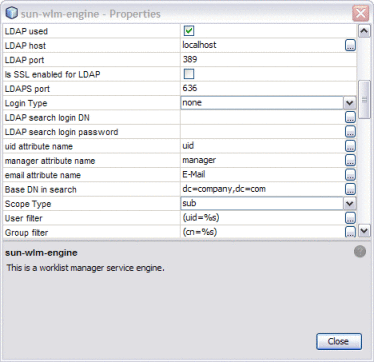
The Properties Editor appears.
-
In the properties, select the check box next to LDAP Used.
-
Modify the remaining LDAP properties, which are listed and described in Table 3 under Worklist Manager Service Engine Runtime Property Descriptions (beginning with LDAP Host).
-
To apply the changes, stop and restart the WLM SE.
Including the Worklist Manager Task in a BPEL Process
Once you define a Worklist Manager task, you can include it in a BPEL process. The following procedure includes very general instructions for creating the BPEL process. For more detailed information, see the BPEL Designer and Service Engine User’s Guide.
Note –
You can call the worklist manager task directly from a main BPEL process for synchronous operation; that is, the BPEL process waits for the task to be completed before continuing the process. This is described below.
For asynchronous operation, call the worklist manager task from a subprocess, which is in turned called from the main BPEL process. The subprocess is one-way, so the main process can create tasks asynchronously.
 To Include the Worklist Manager Task in a
BPEL Process
-
To create the BPEL Module project, do the following:
-
Copy the WSDL and XSD files from the WLM project to the new BPEL project.
Note –You do not need to copy the email handler WSDL file if you are using email notifications. The NetBeans Editor uses standard copy and paste features.
-
Create any necessary XSD and WSDL files to define the BPEL process interface.
-
If the BPEL process is not already open, double-click the process file in the Projects window to display it in the BPEL Editor Design view.
-
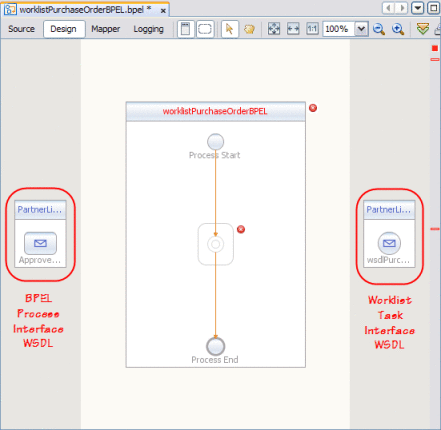
Add a partner link to the BPEL process:
-
In the Projects window, expand the BPEL project and select a WSDL file that defines the BPEL process interface.
-
Drag the WSDL file to one of the partner link sides of the BPEL Editor.
-
Repeat the above steps for each partner link to add.
-
Repeat the above steps to add the WSDL file you copied from the WLM project to the BPEL process.
-
-
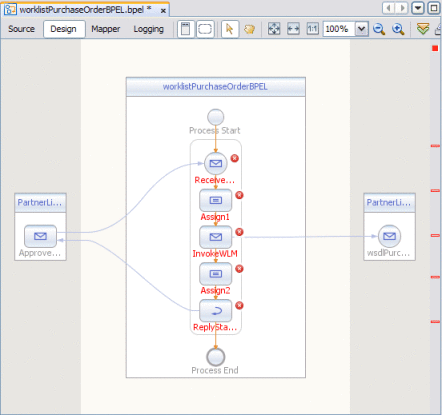
Add and configure any needed activities in the BPEL process. At the point where you want to call the Worklist Manager task, add an Invoke activity.
-
Link the Receive and Reply activities to the BPEL process partner links, and link the Invoke activity to the Worklist Manager task partner link.
-
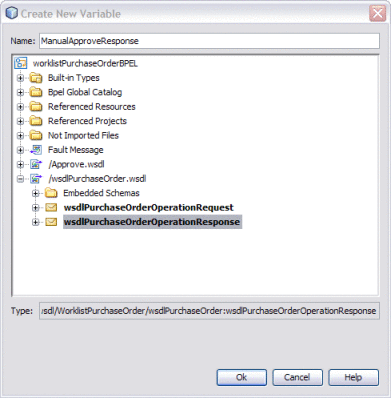
Create any necessary variables, including variables for the task input and task output.
-
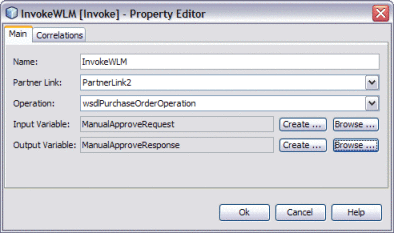
Configure the activities that require variables by adding the variables to the activities.
The following figure shows an example of Invoke activity variables for a Worklist Manager task.
-
Define any necessary variable mappings from one activity to the next.
-
Save the BPEL process.
-
Clean and build the BPEL process to be sure it is valid.
Creating and Deploying the Composite Application
When you create the composite application and add the WLM and BPEL components to it, the editor automatically creates links between the Worklist module and the BPEL module, and between the email port and the outbound email port if notifications are defined. Double-check this once you create the application.
 To Create and Deploy the Composite Application
-
Right-click in the NetBeans Projects window, and then select New Project.
The New Project Wizard appears.
-
Select SOA under Categories, and select Composite Application under Projects.
-
Click Next.
-
Enter a name for the composite application and then click Finish.
The CASA Editor appears.
-
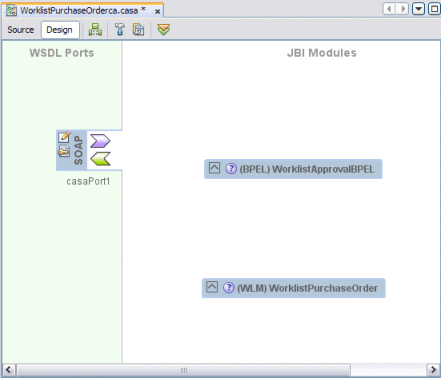
In the Projects window, select the BPEL project and drag it to the JBI Modules section of the editor.
-
In the Projects window, select the WLM project and drag it to the JBI Modules section of the editor.
-
Drag and drop a the appropriate WSDL binding from the palette to the WSDL Ports section of the editor.
Note –This is the WSDL binding for the BPEL process, not the Worklist Manager task. The type you use depends on how you configured the BPEL process.
-
Clean and build and composite application.
A link is generated between the BPEL process and the Worklist Manager task, and between the Worklist Manager task and a new Email Binding Component if notifications are defined.
-
Link the WSDL binding from step 7 to the BPEL process.
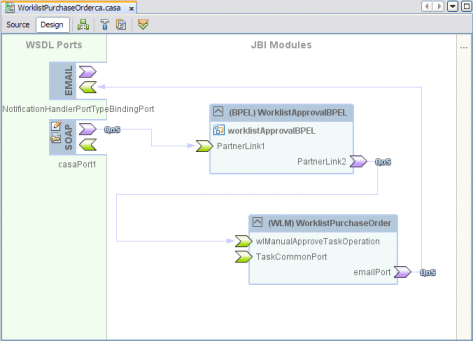
-
Clean and build the composite application once more.
-
Deploy the composite application to the server.
Testing the Worklist Manager Composite Application
Testing a deployed Worklist Manager application involves creating test cases in the composite application project that act as remote partner services. These test cases send messages to the BPEL Service Engine. When a Worklist Manager task is invoked, the BPEL SE waits for you to complete the task before the test is completed.
All steps in this section assume the following:
-
You have already created the Worklist and BPEL Module projects containing the required WSDL files for the operations you want to test.
-
You have added the Worklist and BPEL Module projects to a composite application project.
-
The Worklist Manager database is created and running.
-
Security is defined for the users and user groups to whom the tasks are assigned.
Creating a Test Case
You create the test case in the composite application. When you create the test case, you need to select the WSDL operation you want to test.
 To Create a Test Case
-
In the NetBeans IDE Projects window, expand the composite application project to expose the Test folder.
-
Right-click Test, and then select New Test Case.
The New Test Case Wizard appears.
-
Enter a name for the test case, and then click Next.
The Select the WSDL Document window appears.
-
Expand the BPEL Module project, select the WSDL file containing the operation to test, and then click Next.
The Select the Operation to Test window appears.
-
Select the operation to test, and then click Finish.
In the Projects tree, a new folder is created under the Test node, containing two files: Input.xml and Output.xml.
Note –If you view the test case in the Files window, you see Concurrent.properties as a third file.
Configuring Test Properties
 To Configure Test Properties
-
In the Projects window, expand the composite application and expand Test.
-
Right-click the test case you created, and then select Properties.
-
Set the properties of the test case as follows:
-
Description: A general description of the test case.
-
Destination: The URL from the WSDL file's <soap:address location="THIS"> tag. This identifies the location of the web service to be tested.
-
SoapAction: This can be left blank.
-
Concurrent Threads: The number of concurrent threads to run during the test. This value can be any integer. Each thread can invoke the test case multiple times (see the following property). For example, Concurrent Threads =2 and Invokes Per Thread=3, the test case will run 6 times (two threads, each run three times).
-
Invokes Per Thread: The number of times each thread invokes the test case. This can be any integer.
-
Test Timeout (sec): The length of time in seconds each thread has to finish (including completing the worklist portion of the test). If it does not finish in the allotted time, then an exception is thrown. This can be any integer.
-
Calculate Throughput: An indicator of whether to calculate the throughput during testing.
-
Comparison Type: The method in which the tester should compare the test output. Select one of the following options:
-
identical: Considers the output and actual output as a stream of characters.
-
binary: Considers the output and actual output as a stream of bytes.
-
equals: Considers the output and actual output as a XML documents.
-
-
Feature Status: Select one of the following options:
-
progress: Marks test completion as "success", regardless of the actual outcome.
-
done: Records the actual outcome of the test.
-
-
Defining the Test Input
The test input file allows you to define the input data for the Worklist Manger application. You can modify this file after each test to run multiple tests.
 To Define Test Input
-
In the Projects window, expand the composite application, expand Test, and expand your test case.
-
Right-click Input and select Edit.
-
Modify the contents as needed. For example, wherever you see <value>?string?</value> select ?string? and replace it with a string of any length.
Do not include the characters “<” (less-than sign) or “&” (ampersand) unless you use them with XML semantics.
-
When you are satisfied, click Save.
-
Right-click Output.xml and select Edit.
If this file is empty, this is a special state that triggers a special operation when the test is run. Each time the test is run, the current output is compared to the contents of Output.xml. If any differences are detected, they are stored in the Actual_yymmddhhmmss.xml file under the test case. However, when Output.xml starts empty, the output is written to Output.xml. In each run after the first, assuming Output.xml is no longer null, its contents are preserved and is never overwritten by new results.
Running Test Cases
You can run each test case in a project individually, or you can run all tests at once.
 To Run a Single Test Case
-
Right-click the Test you want to run, and select Run.
-
Launch the Worklist Manager Console from the GlassFish application server (click Web Applications, and then click Launch next to WorklistWebCompositeApp-WorklistWebApplication).
-
If necessary, perform a search for the task.
-
When you see a task in the list, select the task and click Checkout.
-
Modify the task output if necessary, and then click Save.
-
Click Complete to finish the task.
-
Check the Output window for the results.
 To Run All Test Cases in a Project
-
Right-click the composite application project and select Test.
-
Launch the Worklist Manager Console from the GlassFish application server (click Web Applications, and then click Launch next to WorklistWebCompositeApp-WorklistWebApplication).
-
If necessary, perform a search for the task.
-
When you see a task in the list, select the task and click Checkout.
-
Modify the task output if necessary, and then click Save.
-
Click Complete to finish the task.
-
Check the Output window for the results.
Reviewing Test Case Results
The first time you run a test, the results correctly report that it has failed. This happens because the output produced does not match the (empty) Output.xml file, and the file's null content is replaced with the output of the first run. If you run the test again without changing the input, the second and subsequent runs report success, since the output matches the contents of Output.xml.
Test results appear in the NetBeans Output window. Detailed results are appear in the JUnit Test Results window, which opens automatically when you run a test case. If you change the value in the Input.xml and rerun the test, the following occurs:
-
If the Feature Status property is set to progress, the test indicates success even though a mismatch occurred.
-
If the Feature Status property is set to done, the test indicates failure.
If you right-click the test case node and select Diff, the window displays the difference between the latest output and the contents of Output.xml.
Using the Default Worklist Manager Console
This topic provides instructions for using the default Worklist Manager Console provided with the WLM SE. This console is provided primarily for testing and development purposes, but you can customize it to fit your needs. You can also create a custom console for handling the Worklist Manager tasks using the client API. For more information, see Creating a Custom Worklist Manager Console.
The default Worklist Manager Console displays a search box below which any tasks that match a search are displayed. By default, tasks are ordered by their ID number (which is also the order in which the tasks were submitted). The worklist shows the task ID, title, status, submission date, users and groups to which it is assigned, the user who has claimed the task, and the deadline for completion.
Task IDs are highlighted based on the task priority.
-
Red indicates a high priority (8–10).
-
Yellow indicates a normal priority (4–7).
-
Blue indicates a low priority (1–3).
Typical steps for completing a task are searching for the task, claiming the task, and then marking it as complete. The last two steps can be combined into one. Perform any of the following procedures to manage worklist tasks:
Installing and Deploying the Worklist Manager Console Sample
The WLM SE includes several sample projects that you can use to quickly get started using Worklist Manager projects. One of the samples defines a Worklist Manager Console. You can download and use this sample, or customize it to fit your needs. By default, when you install the WLM SE, this sample is already deployed and ready to run.
 To Install and Deploy the Worklist Manager
Console Sample
-
Right-click in the NetBeans Projects window, and select New Project.
The New Project Wizard appears.
-
Under Categories, expand Samples and then select SOA.
-
Under Projects, select WLM Console.
-
Click Next.
-
Enter a name for the project, and then click Finish.
Two new projects appear in the projects tree. One is the Worklist Manager Console web project, and the other is the composite application for the console.
-
Make any necessary security changes to the console.
For more information, see Defining Worklist Manager Console Security.
-
Clean and build the web project and then the composite application project.
-
Deploy the composite application project.
Logging In to the Worklist Manager Console
You can log in to the default Worklist Manager Console either by launching the console from the GlassFish Admin Console or by entering the URL directly into a web browser.
 To Launch the Worklist Manager Console From
a Browser
-
Open a web browser, and enter one of the following URLs:
-
To launch the console that is automatically deployed by the WLM SE:
http://localhost:8080/wlm-sample
-
To launch the console that is manually deployed from the WLM Console sample projects:
http://localhost:8080/wlm
-
-
Enter one of the user names and passwords you defined in Defining Worklist Manager Console Security.
 To Launch the Worklist Manager Console From
the GlassFish Admin Console
-
From a web browser, launch the GlassFish Admin Console.
The default URL for the console is http:/localhost:4848.
-
In the left navigation panel, click Web Applications.
-
In the list that appears, click Launch next to one of the following web applications:
-
To launch the console that is automatically deployed by the WLM SE:
WLMConsoleCompApp-WLMConsoleWeb with the /wlm context root.
-
To launch the console that is manually deployed from the WLM Console sample projects:
WLMConsoleCompApp-WLMConsoleWeb (or whatever you named your Worklist Manager project and composite application) with the /wlm-sample context root.
The Login page of the Worklist Manager Console appears.
-
-
Enter one of the user names and passwords you defined in Defining Worklist Manager Console Security.
Searching for Tasks
The WLM SE supports full-text and keyword searches or Worklist Manager tasks.
 To Search for Tasks
-
To perform a basic search, enter a search term into the Search field and then click Search.
Any tasks that contain the search criteria and that do not have a status of Completed appear in the task list.
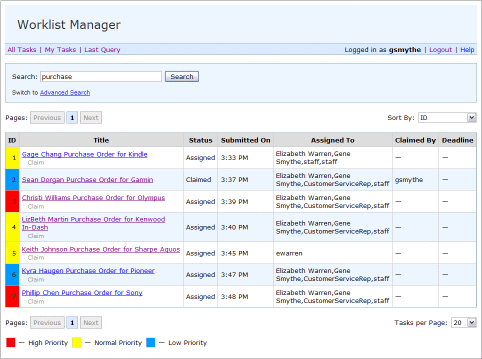
-
To perform an advanced search, do the following:
-
In the Search box, click Advanced Search.
The Advanced Search fields appear.
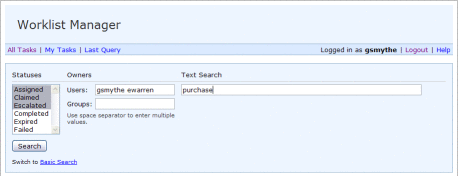
-
Enter any of the following information for the search:
-
Task Statuses: Select one or more of the following: Assigned, Claimed, Escalated, Completed, Expired, and Failed. Use the Ctrl and Shift keys to select multiple statuses.
-
Task Owners: Specify the names of users and groups who own the tasks you want to find. If you specify more than one user or group, separate the names with a space.
-
Text Search: Enter a word or words by which to search.
-
-
When you have entered all of your criteria, click Search.
Any tasks matching the criteria appear in the task list.
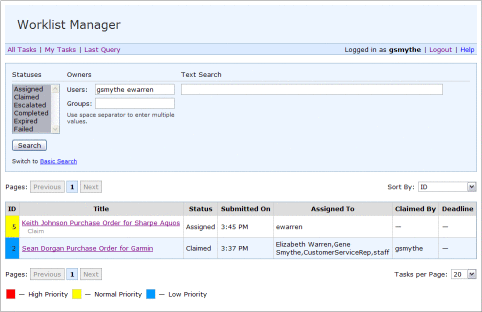
-
-
Once you perform a search, you can do any of the following:
-
To repeat the previous query, click Last Query above the Search box.
-
To view all tasks, click All Tasks above the Search box.
-
To view only the tasks you have claimed, click My Tasks above the Search box.
-
To re-sort the results of a search, click in the Sort By field and then select the column by which you want to sort.
-
To navigate back and forth through the worklist, use the Previous and Next buttons or the button corresponding to the page you want to view.
-
To change the number of tasks display on each page, select a new value from the Tasks per Page field.
-
Claiming a Task
Once a task you want to complete appears in the task list, you can claim the task. You can only complete tasks you have claimed, and you can claim and complete the task at the same time that you claim it.
 To Claim a Task
-
In the task list, select the task you want to claim.
The page changes to show the task information.
Note –The page you see may be different from the image below, depending on how the Worklist Module project was implemented.
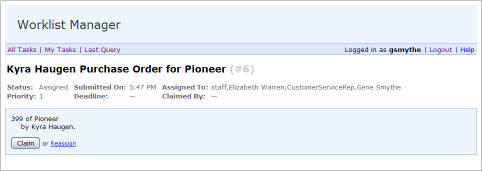
-
Click Claim.
Additional information for the task appears on the page, the Claimed By property changes to your user name, and the task status changes to Claimed.
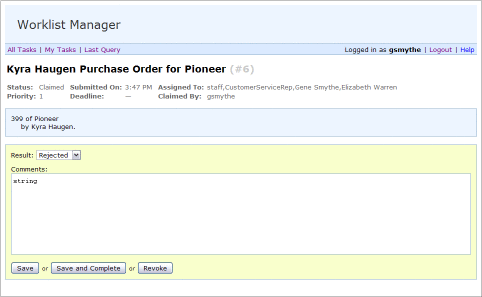
-
Do one of the following:
-
To modify the task output without completing the task, make the necessary changes and then click Save.
Any changes you made to the output are saved.
-
To complete the task, make the necessary changes to the task output and then click Save and Complete.
The status for the task changed the Completed.
-
If you do not want to claim the task after all, click Revoke.
The Claimed By property is cleared and the task status changes back to Assigned.
-
Completing a Claimed Task
If you did not complete a task at the time you claimed it, you can return to the task and update the required information to complete the task.
 To Complete a Task
-
In the task worklist, click on a task you have claimed (the task status will be Claimed).
-
In the response section of the window, modify any necessary information in the message.
Note –The page you see may be different from the image below, depending on how the Worklist Module project is implemented.
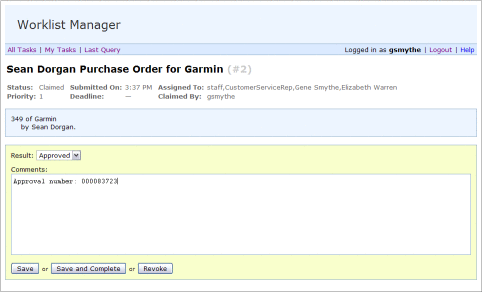
-
Click Save and Complete.
The status for the task changes to Complete.
Note –The task remains in the Worklist Manager database, and can be viewed by searching for tasks with a status of Complete.
Reassigning a Task
At times it might be necessary to reassign a task to someone other than yourself. This can only be done before a task is claimed.
 To Reassign a Task
-
Perform a search for the task to reassign.
-
In the worklist, select the task to reassign.
-
Click Reassign.
Two fields appear so you can reassign the task to a user or a group.
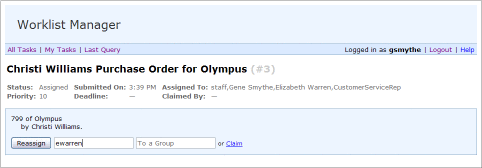
-
Enter the user or group name to which the task should be reassigned.
-
Click Reassign again.
The task's Assigned To properties change to user or group names you entered, and the task worklist reappears.
Using XPath Expressions and Functions in Task Definitions
You can use XPath expressions to dynamically derive the values for user names, notifications, escalations, and other properties of a task definition. Two internal variables are provided: TaskInput and TaskOutput. TaskInput is read-only and holds a single element of the input message from the workflow process that triggers the task instance. These are the values that are used to populate the task definition properties. TaskOutput holds the output message that is returned to the workflow process when the task completes. Initially it is an empty element.
TaskInput and TaskOutput are single-part variables. The Task Definition Editor provides a mapper that allows you to graphically define XPath expressions for initialization and changing these variables on the Actions tab. For the General, Escalations, and Notification tab, you can type the expressions manually. An XPath expression in the Task Definition Editor begins with an equals sign (=), which is stripped out in the actual source code.
About WLM XPath Functions
The WLM SE provides functions to retrieve information from the Worklist Manager database about task owners, email addresses, and LDAP UIDs. You can enter the functions directly into the task definition file using the syntax described below, or you can use the task mapper to graphically add the functions to the file. The mapper is described in Using the Task Mapper.
Standard Functions
Currently the WLM SE provides one function that retrieves the owner of a particular task.
wlmfn:get-task-owner as xs:string
This function returns the user who claims the task. If the task is not claimed, it returns null.TaskInstance.Owner is automatically assigned by the WLM SE when a user claims the task.
LDAP Functions
LDAP functions are only available when LDAP is used for task assignment and authorization. The namespace for these functions is http://jbi.com.sun/wfse/xpath-functions.
wlmfn:get-email() as xs:string
This function retrieves the email address for the user who claimed the task.
wlmfn:get-email($arg as xs:string) as xs:string
This function retrieves the email address for the user specified in the argument passed to the function.
wlmfn:get-manager-email() as xs:string
This function retrieves the email address for the manager of the user who claimed the task.
wlmfn:get-manager-email($arg as xs:string) as xs:string
This function retrieves the email address for the manager of the user specified in the argument passed to the function.
wlmfn:get-manager–uid() as xs:string
This function retrieves the LDAP UID for the manager of the user who claimed the task.
wlmfn:get-manager–uid($arg as xs:string) as xs:string
This function retrieves the LDAP UID for the manager of the user specified in the argument passed to the function.
Initializing Variables
Initializing a variable allows you to define some default value for the task output when a user views the task on the Worklist Manager Console. Variables are initialized using the init element of the task definition file. This is not a required section for the file. Variable initialization occurs before the task is created, and once the variable is assigned it cannot be changed. If you define the initialization using the Task Definition Editor Mapper, it automatically writes this section for you.
The format of the init element is as follows:
<init>
   <variables>
      ...
   </variables>
   <variable-init>
      <copy>
         <from>XPath_or_literal</from>
         <to>XPath_variable</to>
      </copy>
   </variable-init>
|
For example, this excerpt from the sample project maps the literal value “Approved” to the approveResult:
<variable-init>
      <copy>
         <from>'Approved'</from>
         <to>$TaskOutput.part1/ns:approveResult</to>
      </copy>
   </variable-init>
|
For an example of how this is implemented in the Mapper, see Initializing Variables Using the Mapper.
Entering XPath Variables in Design View
When you enter XPath expressions directly into the graphical Design view of the Task Definition Editor, you begin the expression with an equals sign (=) to let the editor know that the value is a variable and not a literal value. The equals sign is not part of the generated XPath in the source code.
For example, the variables in the figure below translate into the following source code in the task definition file:
-
Title
<title>concat($TaskInput.order/po:purchaserName, concat(' Purchase Order for ', $TaskInput.order/po:productId))</title>
-
Priority
<priority>$TaskInput.order/po:priority</priority>
-
Group
<group>$TaskInput.order/po:users</group>
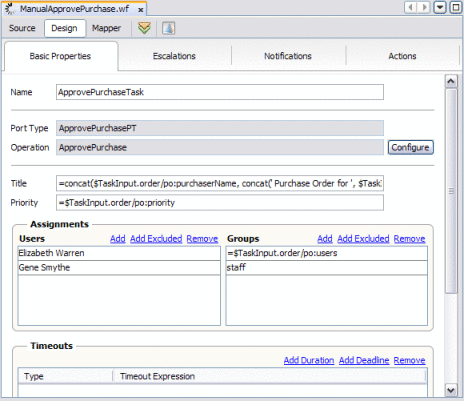
Using the Task Mapper
The WLM SE Mapper provides a framework for processing and directing worklist task data. The Mapper includes three panels to use for mapping and a menu bar that includes any functions you need to use to process the mapped data.
Use the following three panels to map input and output data for a task action:
-
Source tree panel: The source tree panel is the left-most panel and contains a list of variables and fields in tree format.
-
Mapping panel: The mapping panel is in the center and contains a canvas for creating worklist task mappings. When you select a function from the menu bar, a function box appears in the mapping pane. If the function accepts any arguments, there is one connector for each argument on the left side of the function box. If an argument is optional, a question mark appears after the argument name. The right side of the function box has one connector for the output.
-
Destination tree panel: The destination panel is the right-most panel and contains a list of variables and field in tree format.
The menu bar for the Mapper provides operators, necessary elements, and XPath functions you use to create task mappings. Below the menu bar, you can use the following buttons and menu items to work with function boxes and variables:
-
Expand Mapped Nodes: Expands all mapped nodes.
-
Collapse All: Collapses the entire variable list in the panel from which you select it.
-
Expand Non-Empty Graphs: Expands any mapped nodes in the variables list.
-
Collapse Other Nodes: Collapses all nodes in the panel from which you select it except for the selected node.
-
All: Displays all nodes.
-
Output: Displays only connected nodes.
Creating Worklist Manager Task Mappings
The mapping feature is only available from the Actions tab of the Task Definition Editor. You can map data directly from the source to the destination with no additional processing by creating a mapping from the source tree pane directly to the destination tree pane without using any of the functions.
You can also create a mapping that uses one or more XPath functions from the Mapper's menu bar. For example, you can use the Get Email (LDAP) function to obtain email addresses from the task input data.
 To Create a Mapping Without Using any Functions
-
In the source tree, expand the tree nodes until the node that you want to map from appears.
-
If the destination panel contains a tree, expand the tree nodes until the node that you want to map to appears.
-
Select the node in the source tree and drag the pointer to the node in the destination tree.
A link connects the nodes.
 To Use a Function in a Mapping
-
In the destination tree, expand the tree and select the node you want to map to.
A blue area appears on the mapping pane. The functions you select appear here.
-
Click the drop-down menu that contains the function you want to use.
-
In the list that appears, click the function.
A function box appears in the mapping pane.
-
Map any arguments into the appropriate connector on the left side of the function box.
The source can be a node in the source tree pane or the output from another function box.
-
Map the result from the right side of the function box.
The destination can be a node in the destination tree pane or the input into another function box.
 To Delete a Link or Function From a Mapping
XPath Function Reference
A collection of XPath functions are available in the Task Definition Editor Mapper menu bar. These functions are based on the XPath 1.0 specification.
The functions have zero, one, or multiple arguments. Each function returns a single result.
The menu bar contains the following drop-down menus:
Operator Functions
The Operator menu contains the following functions:
-
Greater: Checks whether the first argument is greater than the second and returns Boolean true if the first argument is greater; otherwise it returns false.
-
Greater or Equal: Checks whether the first argument is greater than or equal to the second and returns Boolean true if the first argument is greater or equal to the second; otherwise, it returns false.
-
Less: Checks whether the first argument is less than the second and returns Boolean true if the first argument is less than the first; otherwise it returns false.
-
Less or Equal: Checks whether the first argument is less than or equal to the second and returns Boolean true if the first argument is less than or equal to the second; otherwise it returns false.
-
Addition: Adds the input values and returns the sum of all arguments.
-
Subtraction: Subtracts the second argument from the first argument and returns the result.
-
Multiplication: Multiplies the arguments together and returns the product.
-
Division: Divides the first argument by the second and returns the quotient.
-
Remainder: Divides the first argument by the second and returns the remainder.
-
Negative: Converts the numerical value of the input argument to a negative value.
-
Not Equal: Compares the two arguments to see if they are not equal to one another. This function returns Boolean true if they are not equal; otherwise it returns false.
-
Equal: Compares the two arguments to see if they are equal to one another. This function returns Boolean true if they are equal; otherwise it returns false.
Boolean Functions
The Boolean menu contains the following functions:
-
Logical And: Checks whether both arguments are true and returns Boolean true if they are both true. If either argument is false, the function returns false.
-
Logical Or: Checks whether either argument is true and returns Boolean true if one argument is true. If both arguments are false, the function returns false.
-
Logical Not: Checks whether the argument is false and returns Boolean true if the argument is false. If the argument is true, the function returns false.
-
Language: Checks whether the language of the context node is the same as or is a sub-language of the language specified in the argument. The function returns Boolean true if the language is the same or a sublimating; otherwise it returns false.
-
Logical False: Returns Boolean false.
-
Logical True: Returns Boolean true.
-
Boolean: Converts the argument to a Boolean. For detailed information about the logic, see the XPath 1.0 specification.
String Functions
The String menu contains the following functions:
-
Contains: Checks whether the string in the first argument contains the string in the second argument string. If the first string contains the second, the function returns Boolean true; otherwise it returns false.
-
Normalize Space: Returns the string in the argument with whitespace normalized by stripping leading and trailing whitespace and by replacing sequences of whitespace characters with a single space.
-
String: Converts the given object to a string.
-
Starts With: Checks whether the string in the first argument starts with the string in the second argument, and if it does the function returns Boolean true. Otherwise, the function returns false.
-
String Length: Returns the number of characters in the input string.
-
Substring: Returns the substring of the first argument starting at the position specified in the second argument with the length specified in the third argument. The position of the first character is 1, the position of the second character is 2, and so on. The third argument is optional. If the third argument is not specified, then the function returns the substring starting at the position specified in the second argument and continuing to the end of the string.
-
Substring Before: Returns the substring of the string in the first argument that precedes the first occurrence of the string in the second argument. If the string in the first argument does not contain the second argument string, the function returns an empty string.
-
Substring After: Returns the substring of the string in the first argument string that follows the first occurrence of the string in the second argument. If the string in the first argument does not contain the second argument string, the function returns an empty string.
-
Translate: Returns the string in the first argument, but with occurrences of characters in the second argument replaced by the character at the corresponding position in the third argument.
-
Concat: Returns the concatenation of the arguments.
-
String Literal: Allows you to specify a literal string that can then be mapped to another argument or to a tree node.
Node Functions
The Nodes menu contains the following functions.
Note –
An expanded name consists of a local part and a namespace URI.
-
Local Name: Returns the local part of the expanded name of the node in the argument node-set that is first in document order.
-
Name: Returns the qualified name that represents the expanded name of the node in the argument node-set that is first in document order.
-
Namespace URI: Returns the namespace URI of the expanded name of the node in the argument node-set that is first in document order.
-
Position: Returns the context position.
-
Last: Returns the context size.
-
Count: Returns the number of nodes in the argument node-set.
Number Functions
The Number menu contains the following functions:
-
Number: Converts the argument to a number. For detailed information about the logic, see the XPath 1.0 specification.
-
Numeric Literal: Allows you to specify a literal number that you can then map to tree nodes or use as arguments for other functions.
-
Round: Returns the integer that is closest to the input argument.
-
Sum: Returns the sum of the result of converting the string values of each node in the argument node-set to a number.
-
Floor: Returns the largest integer that is not greater than the input argument.
-
Ceiling: Returns the smallest integer that is not less than the argument.
Date and Time Functions
The Date & Time menu contains the following functions:
-
Current Date: Returns the current date. This function takes no arguments.
-
Current Time: Returns the current time. This function takes no arguments.
-
Current Date and Time: Returns the current date and time. This function returns no arguments.
-
Deadline Literal: Returns a literal date and time for a deadline. When you select this function, a dialog appears to assist you with entering the deadline in the correct format.
-
Duration Literal: Returns a literal time period for a duration. When you select this function, a dialog appears to assist you with entering the duration in the correct format.
WLM Functions
The WLM Functions menu contains the following functions:
-
Get Email (LDAP): Returns the email address for the user specified in the input argument.
-
Get Task Owner: Returns the user who claims the task, or null if the task is not claimed. The task owner is automatically assigned by the WLM SE when a user claims the task.
-
Get Manager Email (LDAP): Returns the email address for the manager of the user specified in the input argument. To retrieve the email address of the manager of the user who claimed a task, use the result of Get Task Owner as the input for this argument.
-
Get Manager UID (LDAP): Returns the LDAP UID for the manager of the user specified in the input argument. To retrieve the email address of the manager of the user who claimed a task, use the result of Get Task Owner as the input for this argument.
Customizing the Worklist Manager Console
You can customize the sample Worklist Manager Console to update the look and feel, and to extend the functionality. The following topics provide information about how the Worklist Manager Console was designed, the standards implements, and how you can customize it.
About the Worklist Manager Console
The following topic provide information about the technology behind the Worklist Manager Console:
Pages
The application itself consists of the following four pages:
-
Login
The Login page is the first page you see when you open the console in a web browser. It allows you to enter your username and password to authenticate in the system. Additionally this page reappears whenever the HTTP session expires.
-
Tasks List
The Tasks List page is centered around letting you find the task you are interested in. By default it displays an unfiltered list of tasks that are available (visible) for the logged in user. It provides search capabilities, allowing you to filter the list of tasks to better fit the view you are interested in. Upon selecting a task from the list, you can navigate to the Task Info page for this particular task and assign the task to yourself.
-
Task Info
On the Task Info page you can view the detailed information about the task (including the task input data, in the format defined by the developer), assign the task to yourself, fill in the task output data, and finally complete the task.
-
Help
The Help page is ultimately static, simply displaying some text content that describes the usage scenarios for the application.
Addressable Entities
Given the above pages list, you can define which items need to be directly addressable by the user (from the browser), these include:
-
Login form
-
Not-filtered tasks list
-
Tasks list with a certain filter (search criteria) applied
-
Particular task info
-
Particular task action (e.g. checkout or complete)
For the tasks list (both unfiltered and filtered), it should also be possible to address a certain page with a specific page size.
Technologies
The web application is based on the following APIs, libraries, technologies, and standards.
Server
-
JSP 2.1
-
JAX-WS 2.0
Client
-
XHTML 1.0
-
CSS 2.1
-
Javascript 1.6
-
Document Object Model, Level 1
Communication Protocol
-
HTTP 1.1
The web application supports the following server-side environment:
-
GlassFish Enterprise Server v2.1.1
-
GlassFish ESB 2.2
The web application supports the following browsers and operating systems in the client-side environment.
Browsers
-
Mozilla Firefox 3.5.x
-
Microsoft Internet Explorer 7, with all available updates
-
Microsoft Internet Explorer 8, with all available updates
-
Safari 4.0.x
Operating Systems
-
Mac OS X 10.5.x
-
Windows XP Professional, with all available updates
-
Windows 7, with all available updates
Functionality and UI Semantics Specification
The following topics describe the pages of the web application, listing all the active UI elements and several passive elements, and describing their purpose and the result of the user actions.
Common page elements
All pages of the web application contain the following elements:
Page Header
The page header provides helper information for the user as well as some common controls. It includes the following blocks:
-
Title Block
A static text block showing the title of the web application.
-
Pages Menu Block
The Pages Menu is a set of links to the most commonly used pages of the application. Currently all of them point to the Tasks List page, but with different filters.
-
All Tasks link
A link control. If it is activated, the page is reloaded and the Tasks List page appears, showing all tasks visible to the user thfcat are in one of the following states: ASSIGNED, CLAIMED or ESCALATED.
-
My Tasks link
A link control. If it is activated the page is reloaded and the Tasks List page appears, showing all tasks that are claimed by the current user and are in one of the following states: CLAIMED, COMPLETED or ESCALATED.
-
Last Query link
A link control. If it is activated, the page is reloaded and the Tasks List page appears, showing the result of the last query run. If there is no such query, the link is not visible.
-
-
Other Menu Block
In this section of the menu, auxiliary information is displayed.
-
Current User Data
A static text block. If a user is logged in, it shows a welcome string together with the user's username. If no user is logged in (such as on the Login page) it shows a note about not being logged in.
-
Help Link
A link control. When it is activated, the page is reloaded and the Help page appears.
-
Page Footer
This control shows additional information about the current page and the web application as a whole. It includes the following elements:
-
Copyright Block
A static text block showing the copyright information, currently "(c) 2009 Sun Microsystems, Inc."
-
Debugging Information
A static text block showing some debug information about the current page, such as the amount of time it took to generate the page.
Login Page Elements
The URL of this page is: context-root/login.jsp. In addition to the common page elements the Login page shows the Login form, which allows a user to authenticate in the system using a private username and password combination.
-
Login Field
A regular text field. You enter a username into the field when logging into the system. There are no limitations on the characters allowed to be entered or the overall length of the field's value because these are dependent on the limitations of the underlying authentication system.
-
Password Field
A password text field and all characters are hidden. You enter a password into the field when logging into the system. There are no limitations on the characters allowed to be entered or the overall length of the field's value because these are dependent on the limitations of the underlying authentication system.
-
Submit Button
When this button is activated, the page reloads and the system attempts to log the user in. If the login procedure succeeds, the last opened page appears if the login was due to a session timeout; otherwise the non-filtered variant of the Tasks List appears. If the login procedure fails, the console returns to the Login page and an appropriate error message appears.
Tasks List Page Elements
The URL of the page is: context-root/index.jsp or just context-root/. In addition to the common page elements the Tasks List page shows the Tasks List Table, which is the main user interface element on the page. The table contains data about all the tasks that are currently available to the user. The tasks are displayed in pages, the display can be controlled by the pages navigator, the page size selector and the sort selector.
If no tasks were found the contents of the table are not shown, instead the user is presented with an appropriate information message. By default the tasks displayed in the table are those that allow any action from the user, which are those in one of the following states: ASSIGNED, ESCALATED, CLAIMED This can be refined using the Advanced search box. Each row in this table corresponds to a single task.
The table includes the following elements:
Tasks List Table
-
ID column
This column contains the numeric id of the current task and additionally the background of the column is painted according to the current task's priority. The colors used are defined in the Priorities legend. The column contains only static textual content.
-
Title Column
This column displays the textual title of the task. If the task does not have a title or it is an empty string, a special string like "<No title>" is displayed. The task title itself is just some static text. This column includes the following control:
-
Claim Link
This is a regular link. It is shown only for tasks which can be claimed, that is for tasks in ASSIGNED or ESCALATED states. When it is activated the page is reloaded and the Task Info for the current task is shown. The task is moved to the CLAIMED state
-
-
Status Column
This column displays the textual name of the current task's state. The column contains only static textual content.
-
Submitted On Column
This column displays the date and time of the moment when the task was created (submitted to the system). If this moment is today, only the hours and minutes are shown. If the moment is within a week, the date and time (day, month, hours, minutes) are shown. If the moment is at some more distant past, just the date (day, month, year) is shown. The column contains only static textual content.
-
Assigned To Column
This column shows the names of the groups and users which this task is available to (has been assigned to). If the current task is not assigned to anyone, an m-dash is displayed (which is an impossible situation, as in this case the current user would not see this task). The column contains only static textual content.
-
Claimed By Column
This column shows the name of the user that this task has been claimed by. If the current task was not claimed by anyone, an m-dash is displayed. The column contains only static textual content.
-
Deadline Column
This column shows the deadline moment of the current task. Like the Submitted On column, the date is formatted differently based on how far away the given moment is. If the moment is today, it is shown in hours and minutes. If it is within a week, it is shown in day, month, hours, and minutes. If it is in a more distant future, it is shown in day, month, and the year. If the current task has no deadline, an m-dash is displayed.
Page Navigator
This control helps you to navigate between the paged list of the available tasks. It is displayed twice, before the Tasks list table and after it. It is a composite control and contains the following elements:
-
First Link
A regular link. It is active (not static text) if there is a possibility to move to the first page; that is, the user is currently viewing a page with index larger than 1. When it is activated the page is reloaded and the user is taken to the first page of the tasks list. The URL of the page shows this fact in the start query string parameter.
-
Previous Link
A regular link. It is active (not static text) if there is a possibility to move to the previous page; that is, the user is currently viewing a page with index larger than 1. When it is activated the page is reloaded and the user is taken to the previous page of the tasks list (the one with index less by one). The URL of the page shows this fact in the start query string parameter.
-
Pages Links
A set of regular links. These links show the closest seven pages of the page list. For example, if the user is viewing the first page the following pages will be shown: 1, 2, 3, 4, 5, 6, 7. If the user is viewing page 7, then 4, 5, 6, 7, 8, 9, 10 are shown. If the user is viewing page 20 and 20 is the last page, then 14, 15, 16, 17, 18, 19, 20 are shown. The current page is not a link, but a regular static text. If there are not enough pages to show (that is. the total amount of pages is less than seven), a reduced set is shows. For example, if the total number of pages is three, the set of links will always contain: 1, 2, 3. When any of the links is activated the page reloads and the user is taken to the corresponding page of tasks list. The URL of the page shows this fact in the start query string parameter.
-
Next Link
A regular link. It is active (not static text) if there is a possibility to move to the next page; that is, the user is currently viewing a page with index less than the last page's one. When it is activated the page is reloaded and the user is taken to the next page of the tasks list (the one with index less by one). The URL of the page shows this fact in the start query string parameter.
-
Last Link
A regular link. It is active (not static text) if there is a possibility to move to the last page; that is, if the user is currently viewing a page with index less than the last page's one. When it is activated the page is reloaded and the user is taken to the last page of the tasks list (the one with index less by one). The URL of the page shows this fact in the start query string parameter.
Page Size Selector
This is a drop-down list. It allows you to define how many tasks should be shown on a single page. The available options are: 10, 20, 50 and 100. When the value of the selector changes, the page is reloaded and the user is presented with the updated list, this field's value on the reloaded page will contain the chosen value. This fact is reflected in the URL of the page in the size query string parameter. The system tries to keep you on the same page you were viewing before changing the size of the page. For example, if you were viewing page with the index 5, you will stay on this page unless there are not enough pages. In the latter case you is taken to the last page of the updated tasks list.
Sort Selector
This is a drop-down list. It allows you to define the sort order of the tasks list. The available options are ID, Title, Submitted on, Assigned to, Deadline, Priority, Claimed by, Status. The corresponding sort directions are ascending, ascending, descending, ascending, ascending, descending, ascending, ascending.
When the value of the selector changes the page is reloaded and the user is taken to the same page of the tasks list he was viewing before changing the sort order (that is, the index of the tasks list page stays the same.) This field's value on the reloaded page will contain the chosen value. The sort order is shown in the URL of the page in the order query string parameter.
Priorities Legend
This is a static block explaining the color values of the task priorities. Basically the priorities are split in three groups: blue (1-3), yellow (4-7) and red (8-10).
Search Box
This block contains one of the two possible sub-blocks: Basic search box and Advanced search box. By default the Basic search box is visible and the Advanced search box is hidden.
Basic Search Box
The basic search box allows you to perform a simple text-based search on the tasks list, and includes the following elements:
-
Search Criteria Field
A regular text field. When performing a basic search, enter the search criteria into this field. There are no limitations on the characters and total length of the field value.
-
Simple Search Button
A button. When it is activated the page is reloaded and the Tasks List page appears with the tasks list filtered according to the specified search criteria. The value of the Search criteria field in the reloaded page shows the value entered for the search. Additionally the search criteria are shown in the URL of the page in the search query string parameter.
-
Switch to advanced link
A regular link. When it is activated, the page is not reloaded, the Basic search box is hidden and the Advanced search box is shown instead of it.
Advanced Search Box
This block allows you to define fine-grained search criteria, and includes the following elements:
-
Status Selector
A multi-select list. It contains the statuses that can be used as search criteria, namely: ASSIGNED, CLAIMED, ESCALATED, COMPLETED, EXPIRED and FAILED. By default ASSIGNED and CLAIMED are selected.
-
Users Field
A regular text field without any limitations on the allowed characters and the total length. When performing an advanced search, enter the names of the users for the tasks you want to view.
-
Groups Field
A regular text field without any limitations on the allowed characters and the total length. When performing an advanced search, enter the names of the user groups for the tasks you want to view.
-
Text Search Field
A regular text field without any limitations on the allowed characters and the total length. This field is the same as the Search criteria field of the Basic search box, and allows the user to enter additional text criteria for an advanced search.
-
Advanced Search Button
A button. When it is activated, the page reloads and the Tasks List page appears with a list of tasks filtered according to the specified search criteria. The values of the Status Selector, Users Field, Groups Field and Text Search Field in the reloaded page show the values entered for the search, the Basic search box is hidden and Advanced search box is displayed instead. Additionally the search criteria are shown in the URL of the page in the status, users, groups and search query string parameters.
-
Switch to Simple Link
A regular link. When it is activated, the page is not reloaded, the Advanced search box is hidden and the Basic search box is shown instead.
Task Info Page Elements
The URL of the page is: context-root/task.jsp. In addition to the common page elements the Task Info page includes the following elements:
Task Info Box
This is a block of static text providing general information about the task being viewed. It includes the following elements:
-
Task Title and ID
The title of the current task alongside with its numerical ID.
-
Task Status
The textual representation of the current task's status.
-
Task Priority
The numerical value of the tasks priority (as opposed to the color coded indicator in ID column of the Tasks list table) .
-
Task Submitted On
The date time of the task creation (submission) moment. The rules for displaying the date time are the same as in the Submitted on column of the Tasks list table.
-
Task Deadline
The date time of the task deadline moment. The rules for displaying the date time are the same as in the Deadline column of the Tasks list table. If the current task has no deadline an m-dash is displayed.
-
Task Assigned To
The names of the groups and users to which this task is available. If the current task is not assigned to anyone, an m-dash is displayed. Note that this is an impossible occurrence as in this case the current user would not see this task.
-
Task Claimed By
The name of the user who claimed the task. If the current task has not been claimed, an m-dash is displayed.
Task Input Data Box
This block of user interface controls shows the information and the available actions for the current task and its input data. Since this is one of the major points for user-customization, we specify only the default controls here.
-
Task Input Data Field
A regular multiline text field. It has no limitations on the allowed characters or the total length. The value of the field is the input data (in XML format) of the current task. The text field is never editable because input data should never be modified. You can customize the display of this field according to the types of tasks you expect users to work with.
-
Claim Button
A regular button. It is available only if the task has not yet been claimed by any user; that is, the task is in one of the following states: ASSIGNED or ESCALATED. When it is activated the page is reloaded and the task is changed to the CLAIMED state.
-
Reassign Link
A regular link. It is available only if the task has not yet been claimed by any user; that is, the task is in one of the following states: ASSIGNED or ESCALATED. When it is activated the page is not reloaded; the Claim button and the Reassign link are hidden; and the Reassign button, To Users field, To Groups field, and Claim link appear.
-
Reassign Button
A regular button. It is available only if the task has not yet been claimed by any user; that is, the task is in one of the following states: ASSIGNED or ESCALATED. When it is activated the page is reloaded; the task is moved to the ASSIGNED state; the Assigned To value is set to the values specified in the To Users field and To Groups field; and the Tasks List page appears , filtered according to the last query.
-
To Users Field
A regular text field without any limitations on the allowed characters or the total length. It is available only if the task has not yet been claimed by any user; that is, the task. is in one of the following states: ASSIGNED or ESCALATED. Enter a space-separated list of user names to reassign the task to.
-
To Groups Field
A regular text field without any limitations on the allowed characters or the total length. It is available only if the task has not yet been claimed by any user; that is, the task is in one of the following states: ASSIGNED or ESCALATED. Enter a space-separated list of group names to reassign the task to
-
Claim Link
A regular link. It is available only if the task has not yet been claimed by any user; that is, the task is in one of the following states: ASSIGNED or ESCALATED. It is hidden by default. When it is activated the page is not reloaded, the Reassign button, To Users field, To Groups field, and Claim link are hidden, and the Claim button and the Reassign link appear.
Task Output Data Box
This block of user interface controls shows the information and the available actions for the current task and its output data. Since this is one of the major points for user customization, only the default controls are specified here. This block is shown only if the task is in one of the following states: CLAIMED, COMPLETED, EXPIRED, ESCALATED, or FAILED.
-
Task Output Field
A regular multiline text field. It has no limitations on the allowed characters or the total length. The value of the field is the output data (in XML format) of the current task. The field is editable only if the task in the CLAIMED state and has been claimed by the current user. A developer may customize the display of this field according to the types of tasks he's expecting the users to work with.
-
Save Button
A regular button. It is visible only if the task in the CLAIMED state and has been claimed by the current user. When it is activated the page is reloaded and the task's output data is updated according the value specified by the user. If an error occurs when updating the task's output data an error message is displayed, but the Task output field keeps the value entered by the user before attempting to save.
-
Save and Complete Button
A regular button. It is visible only if the task in the CLAIMED state and has been claimed by the current user. When it is activated the page is reloaded, the task's output data is updated according the value specified by the user and the task is moved to the COMPLETED state. If an error occurs when updating the task's output data an error message is displayed, the task is not moved to the COMPLETED state, but the Task output field keeps the value entered by the user before attempting to save and complete.
-
Revoke Button Revoke Button
A regular button. It is visible only if the task is in the CLAIMED state and has been claimed by the current user. When it is activated the page is reloaded and the task is moved back to the ASSIGNED state, the "Claimed by" value is cleared.
Help Page Elements
The URL of the page is: <context-root>/help.jsp. The Help page is inherently very simple. In addition to the common page elements, it shows a block of static text describing the usage scenarios of the web application.
Customizing the Worklist Manager Console
The following topics list the possible customization points of the web application that a developer might use to customize the application. This primarily involves customizing the appearance of the application, localizing the application, correcting security settings, and, most importantly, providing custom forms for different types of tasks.
All paths referenced in the instructions are relative to the sources root of the web application project.
For a list of the functions included in the client API, see WLM Client WSDL API
Customizing the Appearance
All style-defining information for the application pages is contained in the CSS style sheets. You can modify these files customize the appearance of the web application.
-
/web/css/common.css
The style information for the common page elements: global formatting div elements, the header, and the footer.
-
/web/css/login.css
This file contains the style data for the elements appearing on the Login page, that is for the login form.
-
/web/css/task.css
The styles for the elements appearing on the Task Info page (the task information block, task input data and the task output data). This is only for common task input and output data; not the task input and output fields themselves.
-
/web/css/tasks-list.css
The style data for the elements appearing on the Tasks List page (the tasks list table and the pages navigation). The styles for the search box are provided separately.
-
/web/css/search.css
The style data for the elements appearing on the Tasks List page, namely the search box.
-
/web/css/handlers/default.css
The styles for the task input data field and the task output data field for their default (non-customized) variants.
-
/web/css/handlers/purchase-order-sample.css
The styles for the task input data field and the task output data field for the customized forms covering the standard Purchase Order sample for the WLM SE.
The following conventions were used in authorizing the default web application:
-
All identifiers use CamelCase with no dash or underscore separators.
-
All CSS classes begin with an uppercase letter.
-
All element IDs begin with a lowercase letter.
-
All elements names in HTML are all-lowercase.
-
All element names in CSS are all-uppercase.
Localizing
There is only one localizing bundle for the application, which is located at /src/java/com/sun/glassfishesb/wlm/console/Messages.properties. You can add your own localizations according the standard Java rules (appending the language and country elements to the bundle name) and you can alter the current labels to fit the terminology used in your organization.
Correcting security settings
The application uses container-managed security exclusively. All security bindings are located in /web/WEB-INF/web.xml and /web/WEB-INF/sun-web.xml files. In the web.xml file, it is in the security-constraint and the security-role elements. By default the application accepts users with the staff role. If you need more roles, add more security-role elements and list them within auth-constraint.
The authentication realm used is file, and you can add another realm by editing the realm-name element. For GlassFish, the security roles defined in web.xml need to be mapped to user groups, which is done in the sun-web.xml file in the security-role-mapping element.
Correcting the Task Input Data Display
In order to customize the display of the task input data field, you need to perform the following steps:
-
Create the JSP file that will display the input data field and place it in the /web/WEB-INF/handlers/input/ directory.
-
Edit the /web/WEB-INF/includes/input-handler.jsp file. The if-else statement needs to be updated to make sure the newly created JSP file is included if the current task (represented by the iha_task variable) has the desired type (the iha_task.getTaskDefId() method).
In the actual JSP file that will render the task input data field, the following context is available via request attributes. Following are the attribute names, their types, and their meaning:
-
com.sun.glassfishesb.wlm.console.locale also defined as LOCALE_ATTRIBUTE in Constants.java.
A java.util.Locale class representing the current locale of the user's browser.
-
com.sun.glassfishesb.wlm.console.task-id also defined as TASK_ID_ATTRIBUTE in Constants.java.
A java.lang.Long representing the numerical ID of the current task.
-
com.sun.glassfishesb.wlm.console.user-id also defined as USER_ID_ATTRIBUTE in Constants.java.
A java.lang.String representing the username of the current user.
-
com.sun.glassfishesb.wlm.console.task also defined as TASK_ATTRIBUTE in Constants.java.
A TaskType class (automatically generated from the WLM SE's WSDL file) representing the current task.
-
com.sun.glassfishesb.wlm.console.task-input-data also defined as TASK_INPUT_DATA_ATTRIBUTE in Constants.java.
An org.w3c.dom.Element and the XML representation of the task's input data.
The handler JSP file is expected to output the HTML code suitable for display in the web browser.
You can also consult these files to get a better understanding of the processing logic that needs to be defined:
-
/web/WEB-INF/handlers/input/default.jsp
-
/web/WEB-INF/handlers/input/purchase-order-sample.jsp
Correcting the Task Output Data Display
To customize the display and, potentially, the behavior of the task output data field, you need to perform the following steps:
-
Create the JSP file that will display the output data field and place it in the /web/WEB-INF/handlers/output/ directory.
-
Edit the /web/WEB-INF/includes/output-handler.jsp file. You need to update the if-else statement to make sure the newly created JSP file is included if the current task (represented by the oha_task variable) has the desired type (the oha_task.getTaskDefId() method).
In the actual JSP file that renders the task output data field, the following context is available through request attributes. Following are the attribute names, their types, and their meaning:
-
com.sun.glassfishesb.wlm.console.localealso defined as LOCALE_ATTRIBUTE in Constants.java
A java.util.Locale class representing the current locale of the user's browser.
-
com.sun.glassfishesb.wlm.console.task-id also defined as TASK_ID_ATTRIBUTE in Constants.java
A java.lang.Long representing the numerical ID of the current task.
-
com.sun.glassfishesb.wlm.console.user-id also defined as USER_ID_ATTRIBUTE in Constants.java
A java.lang.String representing the username of the current user.
-
com.sun.glassfishesb.wlm.console.task also defined as TASK_ATTRIBUTE in Constants.java
A TaskType class (automatically generated from the WLM SE's WSDL file) representing the current task.
-
com.sun.glassfishesb.wlm.console.task-input-data also defined as TASK_INPUT_DATA_ATTRIBUTE in Constants.java
An org.w3c.dom.Element and the XML representation of the task's input data.
-
com.sun.glassfishesb.wlm.console.task-output-data also defined as TASK_OUTPUT_DATA_ATTRIBUTE in Constants.java
An org.w3c.dom.Element and the XML representation of the task's input data.
-
com.sun.glassfishesb.wlm.console.task-output-handler-mode also defined as TASK_OUTPUT_HANDLER_MODE_ATTRIBUTE in Constants.java
A java.lang.String that can take two values: "output-mode" or "parse-mode". It defines the mode of operation for the task output data handler.
-
com.sun.glassfishesb.wlm.console.task-output-data-read-only also defined as TASK_OUTPUT_DATA_READ_ONLY_ATTRIBUTE in Constants.java
A java.lang.Boolean indicating whether the handler should render the output data as read-only or read-write.
-
com.sun.glassfishesb.wlm.console.task-output-data-exception also defined as TASK_OUTPUT_DATA_EXCEPTION_ATTRIBUTE in Constants.java.
A java.lang.Throwable representing the exception that occurred while trying to parse or set the updated task output data. It should be null if no exceptions occurred.
The task output data handler is much more complex than the one for the input data. First it should be able to operate in two modes, and instructions on which mode to use are passed in with the corresponding request attribute. It should either render the output data in HTML, or parse the updated output data. There is no standard way to do this, as the customized handler prepares the input form itself and is the only entity that knows what the request parameter names are and how to use them. Second it should be able to store it into the request attribute. In the latter case the output data handler is expected to prepare the org.w3c.dom.Element object and place it in the com.sun.glassfishesb.wlm.console.task-output-data request attribute.
When in rendering mode, the output handler should watch out for two flags:
-
Whether the output data is currently read-only (in this case it should not render any input fields and so on)
-
Whether an exception occurred while parsing or trying to set the updated output data submitted by the user. If an exception occurred the output handler should not use the output data supplied through the request attribute, but use the one submitted by the user so the user can correct the mistakes made while filling out the output data form.
In rendering mode, the handler JSP file is expected to output the HTML code suitable for display in the web browser. You can also consult these files to get a better understanding of the logic that needs to be defined:
-
/web/WEB-INF/handlers/output/default.jsp
-
/web/WEB-INF/handlers/output/purchase-order-sample.jsp
Creating a Custom Worklist Manager Console
You can create a custom Worklist Manager Console by calling the client API, TaskCommonService, provided by the Worklist Manager Service Engine. The API is defined in the TaskCommon.wsdl file, which is generated by building the Worklist Module project.
Creating the Web Application and Composite Application
TaskCommon.wsdl is an abstract WSDL document with no bindings or services. You need to make the WSDL document concrete by adding bindings and services for the document. The following procedure does not provide detailed information for adding bindings and services. Refer to the user documentation for the type of binding you are adding for more information.
 To Configure the Web Application
Before You Begin
This task requires that you have already created and built the Worklist Module project that defines the tasks.
-
Create a web application project in the NetBeans IDE that defines the Worklist Manager Console.
-
Copy the TaskCommon.wsdl file from the Worklist Module project build directory into the web application project.
This file is located in the Worklist Module project home directory under the /build folder.
-
From the web application project, open the newly copied TaskCommon.wsdl file in the WSDL Editor.
-
In WSDL view, right-click Bindings and select Add Binding to add any necessary bindings and services to the file.
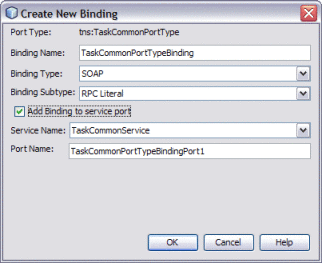
Note –When you add the bindings from the WSDL view, the binding operations are created automatically.
-
Do the following to create a Web Service Client in the web application that invokes TaskCommonService in TaskCommon.wsdl.
-
You can specify the package name for the Web Service Client rather than using a wrapper. To specify the package name, do the following:
-
Expand Web Service Reference, right-click TaskCommon, and then select Edit Web Service Attributes.
The attribute editor appears.
-
Click the WSDL Customization tab, and then expand Global Customization.
-
Deselect the Use Default check box, and enter the following class as the package name:
com.sun.workflow.client
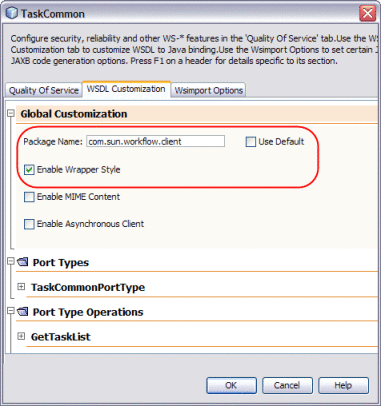
-
Click OK, and then click OK on the information dialog box.
-
-
Clean and build the web application project.
This generates the client stub classes in the build/generated folder.
-
Define you custom Worklist Manager Console web pages. Use the generated classes in your web application to invoke operations from TaskCommon.wsdl.
For a reference of the client API, see WLM Client WSDL API.
 To Create the Composite Application
-
In the NetBeans Projects window, create a new composite application project.
-
Drag the web application project you created above to the JBI Module section of the CASA Editor.
-
Build the composite application.
A SOAP endpoint is added, along with a connector to JBI module.
-
Delete the connector between the endpoint and JBI module.
-
Right-click the SOAP provide endpoint, and select Properties. On the Properties window that appears, click Disable in BC, and then click Close.
-
Drag an External Service Unit from the palette to the External Modules section (left panel) of the CASA Editor.
-
Name the External Service Unit WLMSE-TaskCommon.
-
Drag a Provide endpoint to the new service unit. Right-click the endpoint and click Properties. Configure the endpoint as follows:
-
Click the ellipsis next to the Interface Name property. On the Editor that appears, enter TaskCommonPortType as the Local Name and enter ns1:http://jbi.com.sun/wfse/wsdl/TaskCommon as the Namespace.
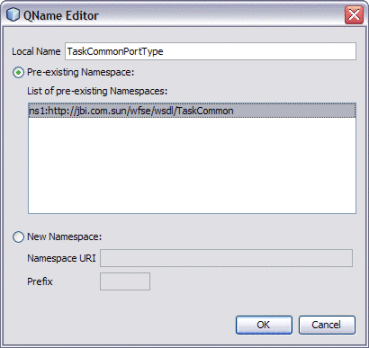
-
Click the ellipsis next to the Service Name property. On the Editor that appears, enter TaskCommonService as the Local Name and enter ns1:http://jbi.com.sun/wfse/wsdl/TaskCommon as the Namespace.
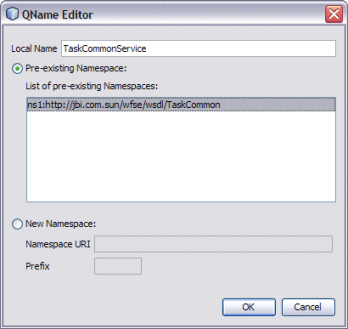
-
Name the endpoint TaskCommonPort.
The completed properties should look similar to the following figure.
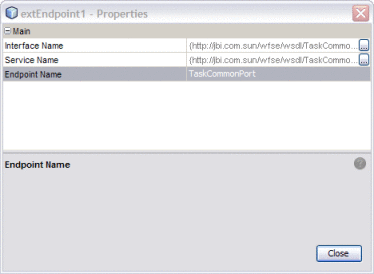
-
-
Link the JBI Module with the External Service Unit.
-
Build and deploy the composite application.
The composite application should appear similar to the following figure.
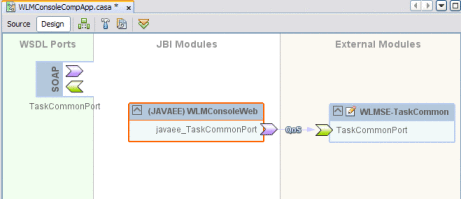
WLM Client WSDL API
The WLM SE provides a static WSDL file that exposes several functions that allow a web service to obtain task-related information from the Worklist Manager database.
GetTaskList
The GetTaskList function is called when a user performs a query for tasks. It returns a worklist of tasks that match the criteria that are passed in as parameters.
GetTask
The GetTask function returns a task whose task ID and user name match those that are passed in as parameters.
ClaimTask
The ClaimTask function is called when a user claims a task. It changes the status of a task to Claimed and adds the user name of the person who claimed the task to the task properties. It returns a result code of SUCCESS or FAILED.
CompleteTask
The CompleteTask function is called when a user marks a task as complete. It changes the status of a task to Complete and returns a result code of SUCCESS or FAILED.
GetTaskInput
The GetTaskInput function retrieves the data from the input message for the task that matches the given task ID and user name.
GetTaskOutput
The GetTaskOutput functions retrieves the data for the output message for the task that matches the given task ID and user name.
SetTaskOutput
The SetTaskOutput function sets the data for the output message for the task that matches the given task ID and user name. It returns a result code of SUCCESS or FAILED.
ReassignTask
The ReassignTask function reassigns the task with the given task ID to the specified user. It returns a result code of SUCCESS or FAILED.
RevokeTask
The RevokeTask function reverses a claim made to the task with the given task ID and reverts the Claimed By property to its previous value. It returns a result code of SUCCESS or FAILED.
- © 2010, Oracle Corporation and/or its affiliates


