Chapter 1 Developing OTDs for Application Adapters
The following sections provide instructions on how to create an OTD for an application adapter. OTDs contain the data structure and rules that define an object. They are generated by extracting the business services that have been exposed through an external system, and the Integration Objects available in that system's instance. For the adapters listed below, this operation is performed by their individual OTD Wizard.
This section covers the following topics:
Creating SAP BAPI OTDs
The SAP BAPI wizard is used to create BAPI and RFC OTDs. BAPI and RFC OTDs can be used in Java Collaborations and eInsight Business Processes, and Netbeans EJBs to communicate with SAP.
SAP BAPI Encoding
SAP BAPI/RFC OTDs are encoding independent of the SAP system. This means that OTDs created on a Unicode SAP instance can seamlessly interact with non-Unicode SAP instances, and vice versa. In addition, the marshal and unmarshal encoding methods on the IDOC_INBOUND_ASYNCHRONOUS OTD only apply to the data, and not to the SAP instance. The default for all processed byte data is UTF-8, regardless of connection type (Unicode or non-Unicode).
When attempting to unmarshal data flows using an encoding other than UTF-8, such as UTF-16, then you must also call the setUnmarshalEncoding method to specify this encoding. This enables the Adapter to properly unmarshal the byte array.
You also need to set the correct Character Set in the Environment parameters for an inbound Adapter when receiving data from SAP. This way, the Adapter knows whether it is receiving Unicode or non-Unicode data from the SAP instance. The setMarshalEncoding method is only for marshaling the OTD data into a byte array and is not related to the SAP system character set.
Like the outbound data flows mentioned above, attempting to marshal data flows using an encoding other than UTF-8, such as UTF-16, requires setting the setMarshalEncoding method to match this encoding. This enables the data received from SAP to be correctly converted to a byte array of the desired encoding.
Date and Time Stamp Requirements
Date and time stamp fields in the OTD are now typed as java.lang.String fields. This means that the OTD expects values assigned to date fields as YYYYMMDD, where February 14, 2006 becomes 20060214.
The data format time fields is HHMMSS, where 11:59:59 PM becomes 235959, or 12:00:00 AM becomes 000000.
Installing SAP JCo
The SAP Java Connector file, sapjco.jar, is a middleware component that enables the development of SAP-compatible components and applications in Java. This component is required by the SAP BAPI OTD Wizard to create BAPI and RFC OTDs during design time, and to support inbound and outbound SAP server communication during runtime.
Since we are installing the SAP Java Connector as standalone component, certain installation files are required. Download the installation files from SAPNet at http://service.sap.com/connectors/. Once logged in, this link redirects you to SAP Service Marketplace. Click the following links to access the SAP Java Connector (SAP JCo) tools and services page:
SAP NetWeaver > SAP NetWeaver in Detail > Application Platform > Connectivity > Connectors > SAP Java Connector > Tools & Services |
The following section details the basic guidelines for installation.
 To Install SAP JCo on Windows 32
-
Create a directory.
For example
C:\SAPJCo
and extract the JCo ZIP file into this directory.
-
Copy the files librfc32.dll and sapjcorfc.dll from your SAP JCo main directory to
C:\WINNT\SYSTEM32
Make sure that the version that is already there is not a more recent version than the one that is delivered with the SAP JCo.
-
Copy the file sapjco.jar from your SAP JCo main directory to
<JavaCAPS6>\netbeans\lib\ext
Where <JavaCAPS51> is the Sun Java Composite Application Platform Suite install directory.
-
The sapjco.jar file is also required during runtime. For this, add the JAR file to
<JavaCAPS6>\netbeans\is\lib
-
Download the following DLL files:
-
msvcp71.dll
-
msvcr71.dll
These are available, free of charge, from various sources on the Internet:
-
-
Manually add the DLL files to the following location:
c:\WINNT\system32
Note –Restart both Netbeans IDE and the domain after installing the JAR file.
 To Install SAP JCo on Unix
The instructions for the installation of SAP JCo on other operating systems are included in the corresponding download files.
-
On UNIX operating systems, add the OS specific shared lib files to the library path.
-
Check the SAP BAPI Adapter readme to confirm the supported operating systems.
-
Copy the JCo JAR file to the following location before deploying and running command line code generation.
\compile\lib\ext
-
Copy the JCo JAR file to the c:\Sun\ApplicationServer\lib folder before deploying and running via the Sun Java™ System Application Server Enterprise Edition 8.1.
-
Copy the JCo JAR file to the following location before deploying and running via the WebLogic Application Server, version 9.1.
c:\bea\weblogic91\samples\domains\wl_server\lib
Note –The SAP Java Connector file, JCo version 2.1.6 is not backwards compatible with previous versions, such as 2.1.3. Confirm backwards compatibility issues with SAP before attempting to switch between different JCo versions on different machines.
Note –SAP BAPI Adapters can run on a 64-bit JVM, but only after the correct 64-bit JCo files (version 2.1.3 or later) have been applied.
Note –The SAP application must be configured to communicate with the SAP BAPI Adapter as described in Configuring SAP in the SAP BAPI Adapter Intelligent Adapter User’s Guide.
Note –We recommend only using the directory path when setting your library path, not the directory path and file name.
Note –JCo 2.1.6 does not support mixed case, users may need to convert passwords to upper case for all design time and runtime SAP connection configurations.
Creating BAPI and RFC OTDs
You create BAPI and RFC OTDs with the SAP BAPI wizard in the Netbeans IDE.
 To create BAPI OTDs
-
In the Explorer tab of the Netbeans IDE, right click the Project, click New, and click Object Type Definition. The New Object Type Definition Wizard dialog box appears.
-
Click SAP BAPI and click Next. The Select SAP Object page appears.
-
To convert a BAPI object to OTD, select the BAPI option.
To convert an RFC object to OTD, select the RFC option.
-
Click Next. The System Parameters page appears.
-
Enter the information for the SAP system for the SAP Adapter to connect to:
For this option
Enter
System ID
System ID of the SAP system.
Application server
Host name of the SAP system.
System number
System number of the SAP system.
SAP Routing String
Router string of hostnames/IP addresses of all SAP routers between the Application Server and the SAP gateway host (optional).
Language
Language used for SAP access.
RFC Trace
NO to disable RFC tracing (default); YES to enable RFC tracing, which creates the trace files in: \netbeans\bin
-
Click Next. The Login Parameters page appears.
-
Enter the information to log into the SAP system:
For this option
Enter
Client Number
Client number of the SAP system.
User name
User name.
Password
Login password.
-
Click Next. The Select BAPI/RFC page appears, showing the application components
In the BAPI tree, you can navigate to a particular SAP application component and select a BAPI object.
-
Expand the SAP application component folder, click a BAPI, and click Finish. The OTD Editor window appears, displaying the OTD.
For information about the BAPI and RFC OTDs, refer to the section below.
You can now built the Collaborations or Business Processes as described in Building and Deploying the prjBAPIOutbound Sample Project and Building and Deploying the prjIDocInbound Sample Project. The section below describes the BAPI methods (operations) that are available for you to use in the Java Collaborations or Business Process.
Relaunching BAPI and RFC OTDs
When an OTD is built for an SAP business object such as:
Application Components g Controlling g CostCenter.
This creates an OTD which has methods corresponding to all BAPIs in the Cost Center Business Object of SAP.
The CostCenter OTD has nodes for each of the BAPIs in the CostCenter business object. The OTD also has WSDL operations such as GetListExecute and GetListReceive. These WSDL operations are used when the OTD is used in a Business Process. The execute methods are used for client mode operations. The receive methods are used for server mode operations.
If required, you can also use the Relaunch option of the OTD to relaunch the CostCenter OTD wizard, see the figure below, and rebuild the BAPI OTD for the same BAPI/RFC.
Please note that selecting a BAPI/RFC other than the original one used to build the OTD will corrupt your OTD and its associated Collaborations and Business Processes.
On Relaunch, the OTD is rebuilt again with the changed meta data, and any Java Collaborations and Business Processes using this BAPI OTD are synchronized with the new changes.
If your Java Collaborations or Business Processes are using OTD nodes that are now absent in the relaunched BAPI/RFC OTD, you will be prompted to correct the business rules by validation errors.
Creating a SAP ALE OTDs Wizard
The chapter describes how to use the SAP ALE OTD Wizard to create IDoc Object Type Definitions (OTDs). OTDs are used in the business logic in Java Collaboration Definitions and eInsight Business Processes. The SAP IDoc wizard is used to create IDoc OTDs.
You can create IDoc OTDs in one of two ways:
-
Let the IDoc wizard connect and retrieve the IDoc message format directly from the SAP system.
-
Provide the location for a saved IDoc description file.
To export an IDoc description file from an SAP system to be used by the IDoc wizard, see Exporting the IDOC File from SAP. Due to the significant SAPGUI changes that distinguish versions 4.6 and earlier and 4.7 and later, separate instructions are included in Saving the IDoc Description File (After 4.6).
SAP JCo and SAP IDoc Class Library Installation
Certain JAR files are required by the SAP ALE OTD Wizard to create IDoc OTDs.
-
From the SAP Java Connector:sapjco.jar
-
From the SAP Java Base IDoc Class Library:sapidoc.jar
-
From the SAP Java Connector IDoc Class Library:sapidocjco.jar
The SAP Java Connector
The SAP Java Connector file, sapjco.jar, is a middleware component that enables the development of SAP-compatible components and applications in Java. This component is required to support inbound and outbound SAP server communication during runtime.
Since you are installing the SAP Java Connector as standalone component, certain installation files are required. Download the installation files from SAPNet at http://service.sap.com/connectors/. Once logged in, this link redirects you to SAP Service Marketplace. Click the following links to access the SAP Java Connector (SAP JCo) tools and services page:
SAP NetWeaver > SAP NetWeaver in Detail > Application Platform > Connectivity > Connectors > SAP Java Connector > Tools & Services |
 To Install the SAP Java Connector on Windows
32
-
Create a directory. For example:
C:\SAPJCo
-
Extract the JCo ZIP file into the directory you just created.
-
Copy the librfc32.dll and sapjcorfc.dll files from the SAP JCo main directory. If the files are more recent than the target location, paste them into the following directory:
C:\WINNT\SYSTEM32
-
Copy the file sapjco.jar from your SAP JCo main directory to the following directory:
<JavaCAPS51>\edesigner\lib\ext
Where <JavaCAPS51> is the Sun Java Composite Application Platform Suite install directory.
-
The sapjco.jar file is also required during runtime. For this, add the JAR file to the following location:
<JavaCAPS51>\glassfish\is\lib
-
Download the following DLL files:
-
msvcp71.dll
-
msvcr71.dll
Note –These files are available, free of charge, from various sources on the Internet.
-
-
Manually add these files to the following location:
c:\WINNT\system32
-
Restart both the Netbeans IDE and the domain after installing the JAR file.
Procedures for UNIX
The instructions for the installation of SAP JCo on other operating systems are included in the corresponding download files. On UNIX operating systems, add the OS specific shared lib files to the library path. Check the SAP BAPI Adapter readme to confirm the supported operating systems.
SAP Java IDoc Class Library
The SAP Java IDoc Class Library consists of two parts, the SAP Java Base IDoc Class Library and the SAP Java Connector IDoc Class Library.
The packages of the SAP Java IDoc Class Library include the software as well as documentation. The SAP Java Base IDoc Class Library provides an API which helps navigating, reading, filling, and modifying IDocs. This base package is middleware independent. Creating, sending, and receiving IDocs is middleware dependent.
 To Download the SAP Java IDoc Class Library
Like the SAP Java Connector, download the required installation files from SAPNet at http://service.sap.com/connectors/.
-
Navigate to the following directory to access the SAP Java Connector (SAP JCo) tools and services page:
SAP NetWeaver > SAP NetWeaver in Detail > Application Platform > Connectivity >
 Connectors > SAP Java Connector > Tools & Services > SAP Java IDOC Class Library
This page contains links to the SAP Java Connector IDoc Class Library 1.0.6, and the SAP Java Base IDoc Class Library 1.0.3.
-
Uncompress and extract the archives into the same directory as the SAP Java Connector installation path <sapidocjco-install-path>.
-
Load <sapidocjco-install-path>/docs/idoc/jco/intro.html into your browser and follow the instructions under the link Installation.
Note –The SAP Java Connector file, JCo version 2.1.6 is not backwards compatible with previous versions, such as 2.1.3. Confirm backwards compatibility issues with SAP before attempting to switch between different JCo versions on different machines.
Note –We recommend only using the directory path when setting your library path, not the directory path and file name.
Note –JCo 2.1.6 does not support mixed case, users may need to convert passwords to upper case for all design time and runtime SAP connection configurations.
Note –You need to copy the JCo JAR file to the \compile\lib\ext folder before deploying and running command line codegen. You also need to copy the JCo JAR file to the c:\Sun\ApplicationServer\lib folder before deploying and running via the Sun Java™ System Application Server Enterprise Edition 8.1.
Note –You also need to copy the sapjco.jar, sapidoc.jar, and sapidocjco.jar files to the c:\bea\weblogic91\samples\domains\wl_server\lib folder before deploying and running via the WebLogic Application Server, version 9.1. When using CommandLineCodegen, please place sapjco.jar in <JavaCAPS6>commandlinecodegen\compile\lib\ext.
Creating IDoc OTDs
You create IDoc OTDs with the SAP IDoc wizard in the Netbeans IDE. You can choose to have the wizard connect to the SAP system and retrieve the IDoc message format automatically, or you can have the wizard use an IDoc definition file from a specified location. The IDoc definition file would be saved or downloaded from the SAP system as described in Exporting the IDOC File from SAP.
 To Create IDoc OTDs Directly From SAP
-
In the Explorer tab of the Netbeans IDE, right click a Project, then click New > Object Type Definition. The New Object Type Definition Wizard appears.
-
Click SAP IDoc and click Next. The Select metadata page appears.
-
To retrieve the IDocs message format directly from the connected SAP system, select the From SAP Directly, then click Next.
Note –Refer to SAP JCo and SAP IDoc Class Library Installation for a list of required files that must be installed in order to connect to SAP directly.
-
Click Next. The System Parameters page appears.
-
Enter the information for the SAP system for the IDoc wizard to connect to:
-
Click Next. The Login Parameters page appears.
-
Enter the information to log into the SAP system:
For This Option
Enter
Client Number
Client number of the SAP system.
User name
User name.
Password
Login password.
-
Click Next. The IDoc Metadata Parameters page appears.
-
Enter the following information about the IDoc:
For This Option
Enter
System Release
The SAP System release for this IDoc. All IDocs up to this release number are displayed in the list of available IDocs.
IDoc type
IDoc type, for example, CREMAS03. You cannot use a wild card.
IDoc type extension
Extension for this IDoc type (optional).
Record Type Version
Select the version of the IDoc record type. The default value is 3.
Message format
Blank padded for ALE format or CR-LF for EDI format.
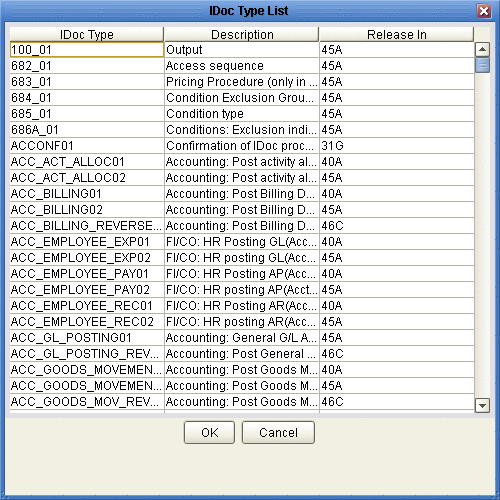
For IDoc type, click the List IDocs button to display a list of available IDocs supported by SAP, as seen in the figure below.
Figure 1–1 IDoc Type List
-
Select your needed IDoc type and click OK.
-
Click Next. The Review Selection page appears.
-
Review your selections and click Finish. The OTD Editor window appears, displaying the OTD.
Figure 1–2 CREMAS IDOC OTD
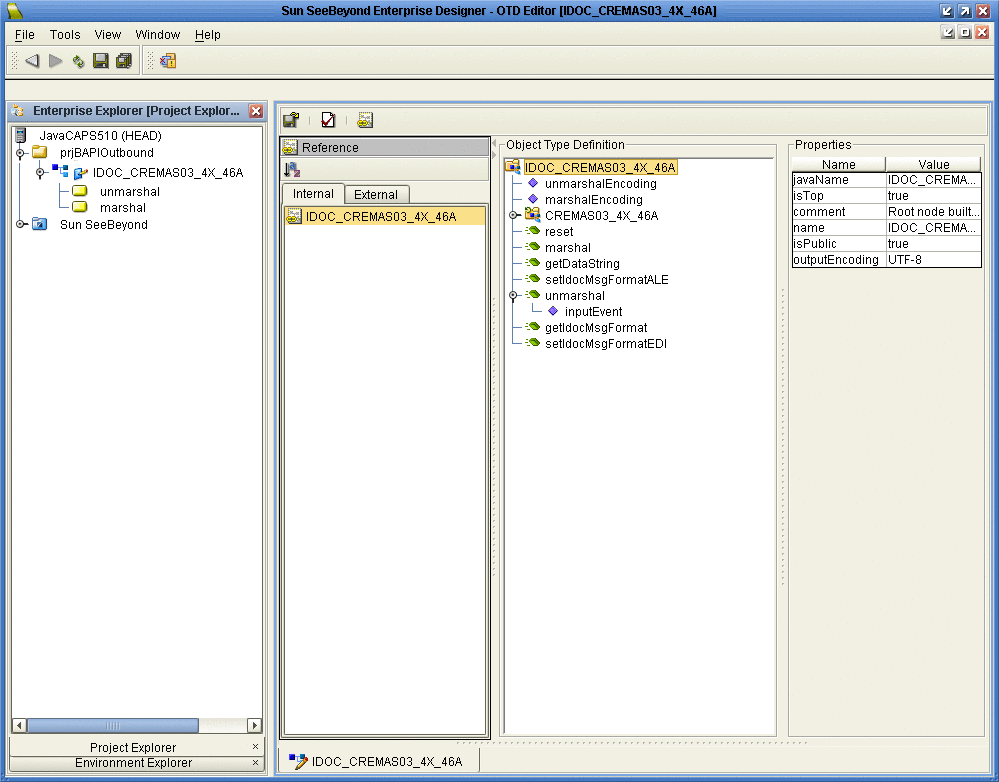
The figure above shows a CREMAS IDoc OTD in the OTD editor. The OTD has various methods which you can use in Java Collaborations for processing IDoc data.
The CREMAS IDoc OTD also has marshal and unmarshal Web Service operations as seen in the Project tree. You can use these operations when using the OTD in eInsight business processes.
The figure below shows the unmarshal operation in the eInsight Business Process editor. You can unmarshal byte or string data onto the IDoc OTDs bytes and contents nodes respectively. The bytes node takes in only UTF-8 encoded data. That is, if you want to perform an unmarshal operation using bytes as the input source, then you must ensure that the data is in UTF-8 before utilizing this node.
In this example we are unmarshaling byte data which is not UTF-8 encoded; therefore, you must perform a bytes to text conversion in editor, and then unmarshal string data to the contents node.
Figure 1–3 CREMAS unmarshal

If required, you can also use the Relaunch option of the OTD to relaunch the IDoc OTD wizard and rebuild the IDoc OTD for the same IDoc Type built with a particular system release.
On relaunch, the OTD is rebuilt again with the changed meta data. Any Java Collaborations and Business Processes using this IDoc OTD are also synchronized with the new changes.
If your Java Collaborations or business Processes are using OTD nodes that are now absent in the relaunched OTD, you will be prompted to correct the business rules by validation errors.
 To Create IDOC OTDs From a Description File
-
In the Explorer tab of the Netbeans IDE, right click the Project, click New, and click Object Type Definition.
The New Object Type Definition dialog box appears.
-
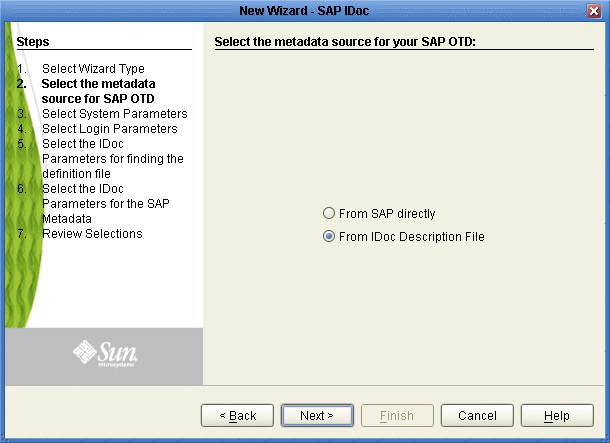
Click SAP IDoc and click Next. The Select metadata source page appears.
Figure 1–4 IDoc Wizard—Metadata Selection
-
To retrieve the IDocs from a description file, select the From Description File.
-
Click Next.
The Definition File Parameters page appears.
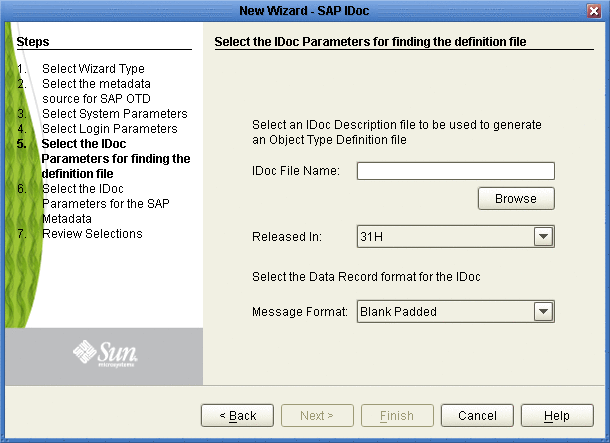
Figure 1–5 IDoc Wizard—Definition File Parameters
-
Enter the following information about the IDoc definition file:
For This Option
Enter
IDoc File Name
The path and filename for the IDoc description file to be used.
Released In
SAP IDoc release for this IDoc, for example, 4.6C.
Message format
Blank padded for ALE format or CR-LF for EDI format.
-
Click Next. The Review Selection page appears.
-
Review your selections and click Finish. The OTD Editor window appears, displaying the OTD.
Exporting the IDOC File from SAP
The following sections describe how to create and export the IDOC file from SAP. The procedures provided may vary depending on version and/or platform of SAP. Refer to the current documentation for your version of SAP. The procedures described in this section create the IDOC file an SAP system version 4.6 and earlier:
 To Download the IDoc Description File From
SAP
-
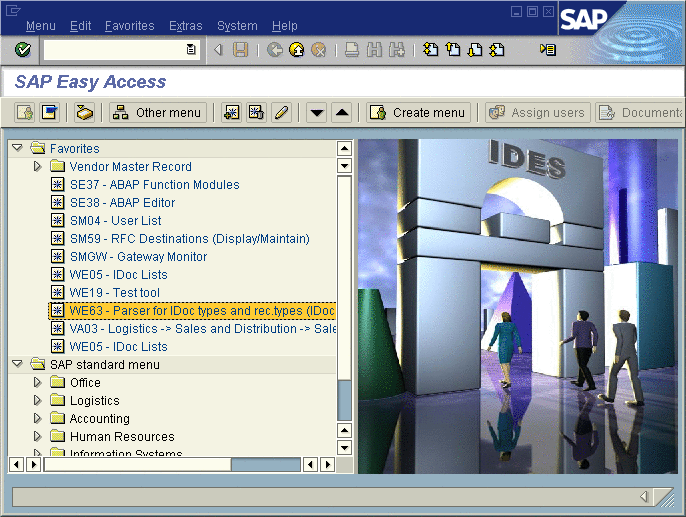
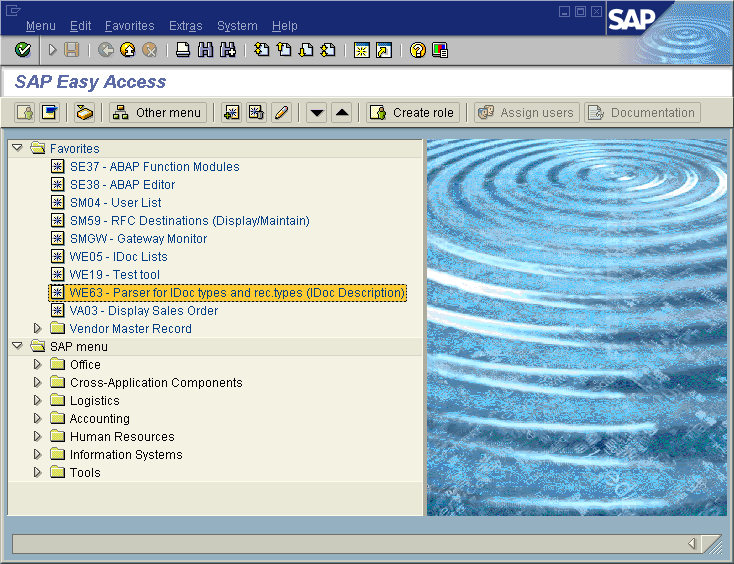
Log into the SAPGUI, and close the system messages. The SAP Easy Access window appears.
If the SAP Easy Access window does not display, click Exit.
Figure 1–6 SAP Easy Access Window
-
Double-click WE63.
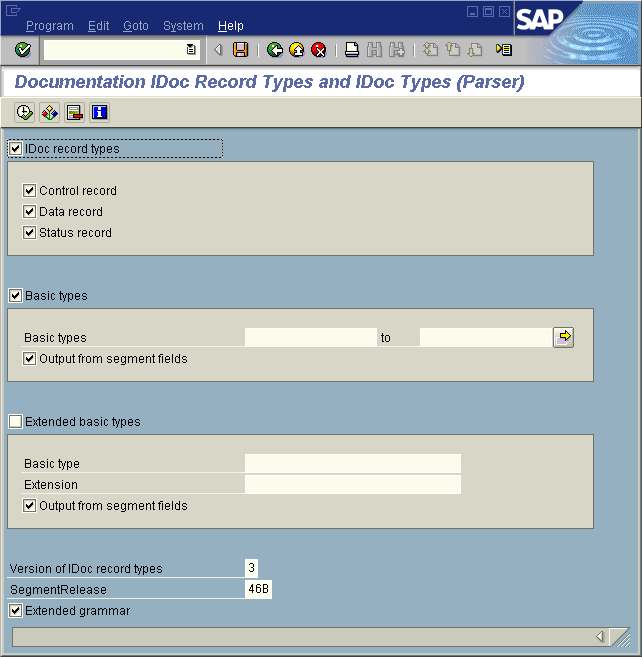
The Documentation IDoc Record Types window appears.
Figure 1–7 Documentation IDoc Record Types Window
-
In the Basic Types box, type or select the IDoc to be parsed.
-
Select any other options needed, and click Execute.
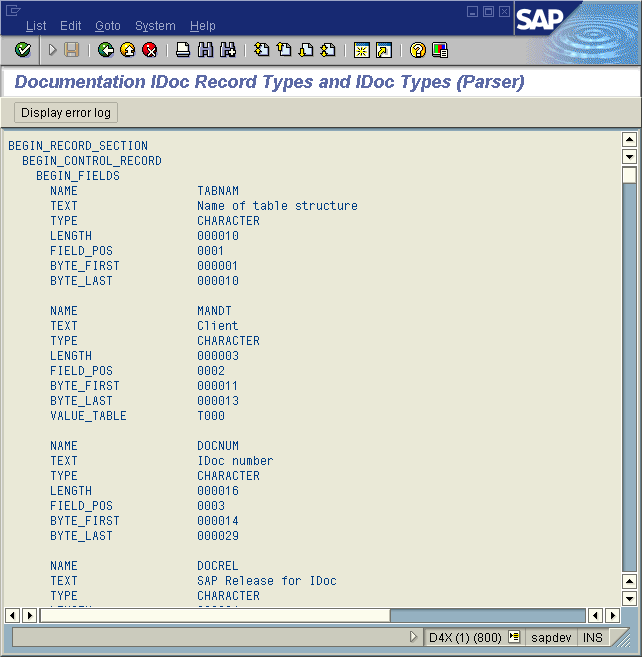
The Documentation IDoc Record Types window shows the parsed definition file.
Figure 1–8 Documentation IDoc Record Types Window—Parsed Definition File
-
On the System menu, click List, Save, and then Local File.
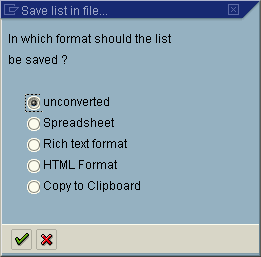
The Save List in File dialog box appears.
Figure 1–9 Save List in File Dialog box
-
If necessary, select Unconverted.
-
Click Save.
The Save As dialog box appears.
-
Navigate to the folder where you want to save the description file and click Save.
The Transfer List to a Local File dialog box displays.
Figure 1–10 Transfer List to a Local File Dialog Box

-
Enter the name and path of the local file to receive the IDoc description file.
-
Click Transfer.
This downloads the file.
Once you have downloaded the IDoc description file, create the IDoc OTD using the IDoc wizard as described in Creating IDoc OTDs. Use the From Description File option so that you can select the description file you downloaded.
Saving the IDoc Description File (After 4.6)
Follow the instructions below to download an IDoc description file from an SAP system version 4.7 and later.
Note –
The screenshots in the procedure below show the SAPGUI version 6.2 connecting to segment version 4.7.
 To Save the IDoc Description File From SAP
-
Log into the SAPGUI, and close the system messages window.
The SAP Easy Access window appears.
If the SAP Easy Access window does not display, click Exit.
Figure 1–11 SAP Easy Access Window
-
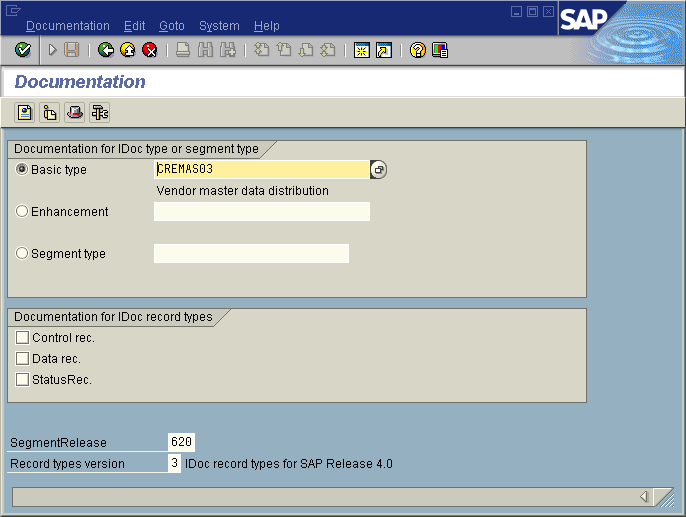
Double-click WE63.
The Documentation window appears as shown below.
Figure 1–12 Documentation Window
-
Enter the basic type, enhancement, and segment type information.
-
Select the IDoc record types to be included.
-
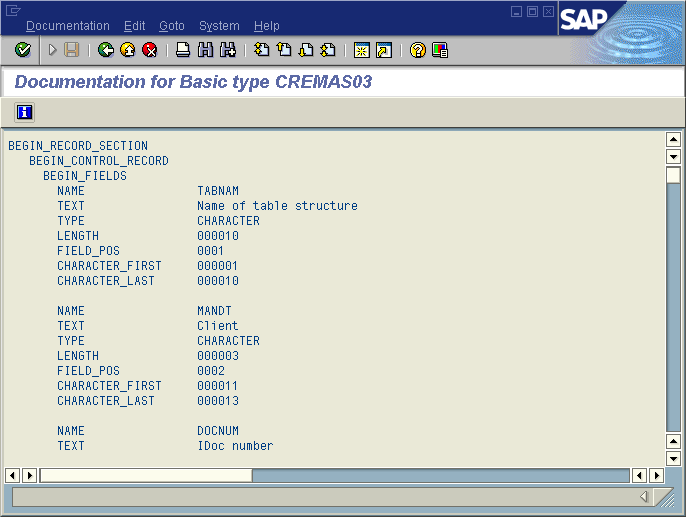
Click Parser. The Documentation window displays the parsed data.
Figure 1–13 Documentation Window—Parsed Definition File
-
On the System menu, click List, Save, and then Local File.
The Save List in File dialog box appears.
Figure 1–14 Save List in File Dialog box

-
If necessary, select Unconverted.
-
Click Save.
The Save As dialog box appears.
-
Navigate to the folder where you want to save the description file and click Save.
Once you have saved the IDoc description file, create the IDoc OTD using the IDoc wizard. Use the From Description File option so that you can select the description file you saved.
Creating Siebel EAI OTDs
Before Creating the OTD
Installing seebeyond.sif for Siebel 7.5.x
If you are using Siebel 7.5.x, before you create an OTD using the OTD Wizard, you must install the seebeyond.sif file into your Siebel Tools system. This file is installed in the Netbeans IDE’s user directory during the Netbeans IDE installation.
 To Install the seebeyond.sif File
-
Use the Siebel Tools utility to import the seebeyond.sif file into your Siebel Server
This file is installed with the Netbeans IDE. If you installed the Netbeans IDE in the c:\JavaCAPS\edesigner directory, then the file is located in
c:\JavaCAPS\edesigner\usrdir\modules\ext\siebeleaiadapter
-
After importing the file, use the Siebel Tools utility to compile your SRF file.
-
Stop the Gateway Server and the Siebel Server.
-
Replace the file on the Siebel Server with the one you created in step 2.
-
Restart the Gateway Server and the Siebel Server.
Installing SiebelMessage XSD Generation Process.xml for Siebel 7.7 and 7.8.x
If you are using Siebel 7.7 or 7.8.x, before you can create an OTD using the OTD Wizard, you must install the SiebelMessage XSD Generation Process.xml file.
 To Install the SiebelMessage XSD Generation
Process.xml File
-
Open the Siebel Tools utility.
-
In the Object Explorer, click the Workflow Process.
-
Right-click the item in the Object list, and then click Import Workflow Process.
-
Browse to the directory that contains SiebelMessage XSD Generation Process.xml.
This file is installed with the Netbeans IDE. If you installed the Netbeans IDE in the c:\JavaCAPS\edesigner directory, then the file is located in
c:\JavaCAPS\edesigner\usrdir\modules\ext\siebeleaiadapter
-
Click Open to begin importing the Workflow template.
-
Select your project.
-
Stop the Gateway Server and the Siebel Server.
-
Use the Siebel Tools utility to compile your SRF file.
-
Copy the SRF file to the objects folder in your Siebel Server.
-
Restart the Gateway Server and the Siebel Server.
Before Running the Netbeans IDE
The Netbeans IDE needs to be configured to use the appropriate JAR files to correspond with the version of your Siebel Server. Before you use the Netbeans IDE to create your Siebel EAI Project, you must make sure that your local Netbeans IDE installation is using the proper JAR files for your Siebel Server.
 To Run Netbeans with Siebel 7.5.x
-
Using Windows Explorer, navigate to the Siebel Adapter directory for your Netbeans IDE.
If you installed the Netbeans IDE in the c:\JavaCAPS\edesigner directory, then navigate to
c:\JavaCAPS\edesigner\usrdir\modules\ext\siebeleaiadapter
-
If you have previously used Siebel 7.7 or 7.8.x with this installation of the Netbeans IDE, then remove the following files from this directory:
-
Siebel.jar
-
SiebelJI_enu.jar
-
-
Copy the following files from your Siebel 7.5.x system (SiebelTools/Classes) to this location:
-
SiebelJI.jar
-
SiebelJI_Common.jar
-
SiebelJI_enu.jar
-
-
Restart the Netbeans IDE
 To Run the Netbeans IDE with Siebel 7.7 or 7.8.x
-
Using Windows Explorer, navigate to the Siebel Adapter directory for your Netbeans IDE.
If you installed the Netbeans IDE in the c:\JavaCAPS\edesigner directory, then navigate to
c:\JavaCAPS\usrdir\modules\ext\siebeleaiadapter
-
If you have previously used Siebel 7.5.x with this installation of the Netbeans IDE, then remove the following files from this directory:
-
SiebelJI.jar
-
SiebelJI_Common.jar
-
SiebelJI_enu.jar
-
-
Copy the following files from your Siebel 7.7 or 7.8.x system (SiebelTools/Classes) to this location:
-
Siebel.jar
-
SiebelJI_enu.jar
-
-
Restart the Netbeans IDE
Creating the OTD
Steps required to create an OTD include:
-
Selecting a wizard type
-
Specifying connection information
-
Selecting integration objects
-
Specifying OTD names
 To Create the OTD
-
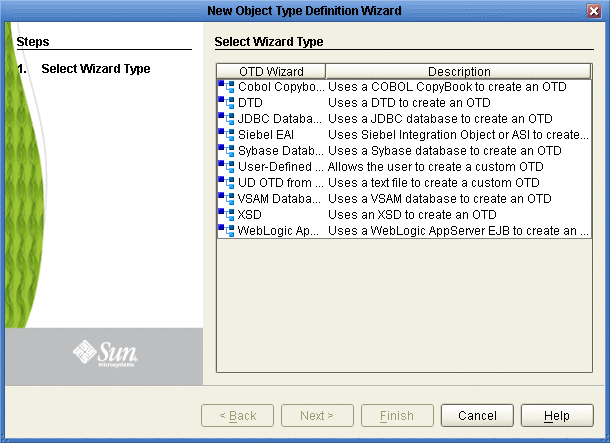
On the Project tree, right click the Project and select New ⇒ Object Type Definition from the shortcut menu. The Select Wizard Type page appears, displaying the available OTD wizards. See the following figure.
-
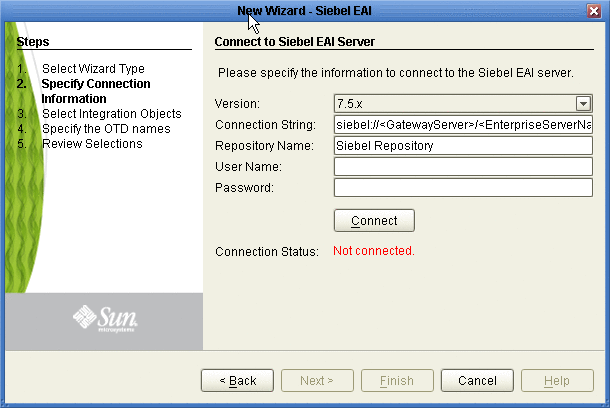
From the New Object Type Definition Wizard window, select SiebelEAIWizard and click the Next button. The Connect to Siebel EAI Server window appears.
-
Enter the following information into the text fields:
-
Version: the Siebel Server version (the same version used to create the OTD appears by default)
-
Connection String:
-
For Siebel 7.5.x:
siebel://<GatewayServer>/<EnterpriseServerName>/<ApplicationObjectManager>/<SiebelServerName>
-
For Siebel 7.7 and 7.8.x:
siebel://<SiebelServerName>:<port>/<EnterpriseServerName>/<ApplicationObjectManager>
-
-
Repository Name: Siebel Repository
-
User Name: a valid user name
-
Password: a valid password
-
-
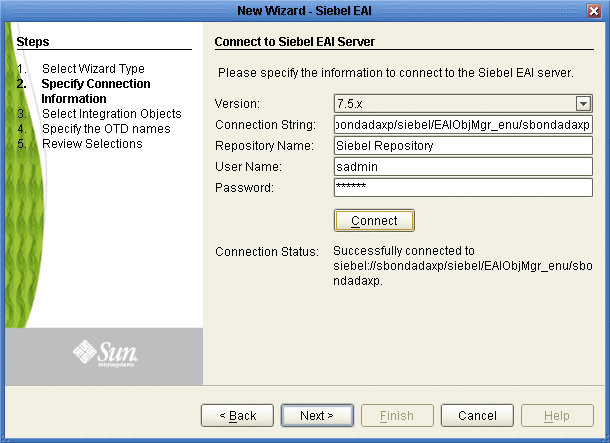
Click the Connect button. A message appears confirming a successful connection.
-
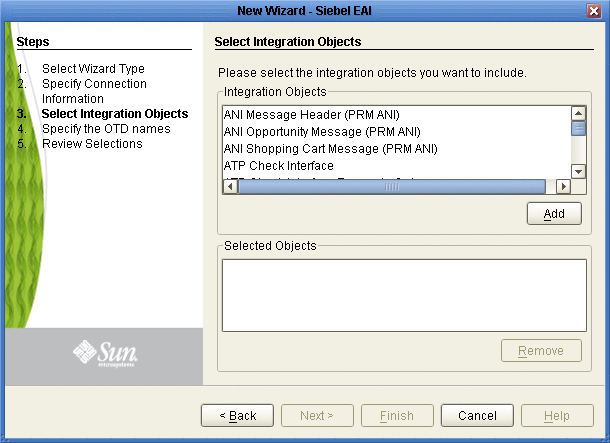
Click the Next button. The Select Integration Objects window appears.
-
Scroll down the Integration Objects selection table and select Account Interface.
-
Click the Add button. Account Interface appears in the Selected Objects window.
-
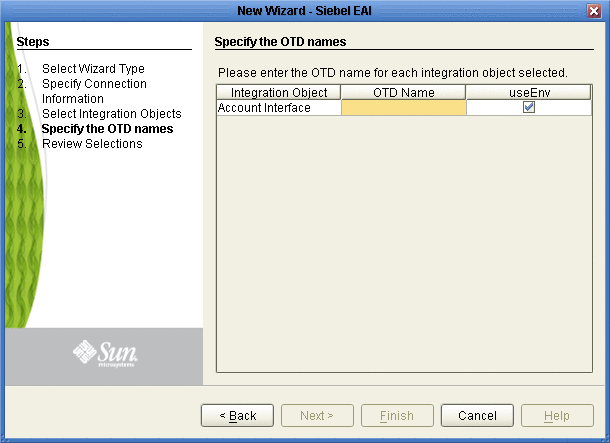
Click the Next button. The Specify the OTD names window appears.
-
In the OTD Name column, enter the name for the new OTD.
-
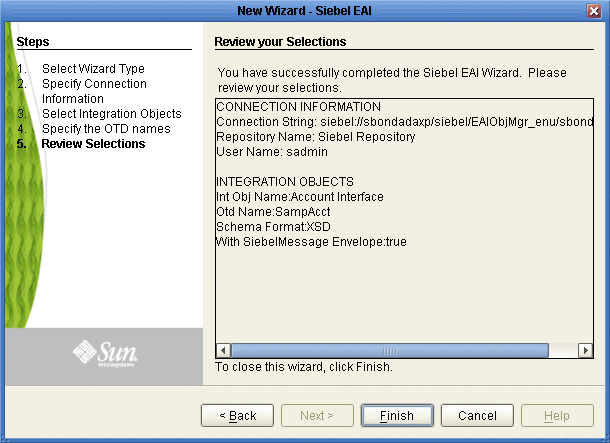
Click the Next button. The Review your Selections window appears.
-
Click the Finish button. A message appears confirming the successfully generated OTD. See the following figure.

 To Relaunch the OTD
-
From the Project tree, right-click the OTD and select Version Control ⇒ Check Out from the shortcut menu. The Version Control - Check Out dialog box appears.
-
Select Check Out on the Version Control - Check Out window.
-
Right-click the OTD once again and select Relaunch.
The Connect to Siebel EAI Server window appears.
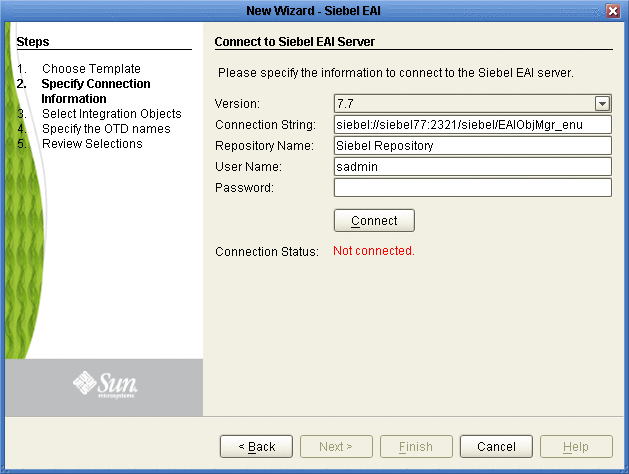
The fields (with the exception of Password) will be populated with metadata information selected when building the original OTD.
-
Enter a valid password in the Password field.
-
Click the Connect button. A message appears confirming a successful connection.
-
Click the Next button. The Select Integration Objects window appears. The Selected Objects window will already be populated with the previously selected Integration Object.
Note –If you attempt to select a different Integration Object, an error dialogue will appear.
-
Click the Next button. The OTD Name column will already be populated with the original OTD’s name.
-
Click the Next button. The Review your Selections window appears.
-
Click the Finish button. A message appears confirming the successfully generated OTD.
Creating COBOL Copybook OTDs
This topic describes how to use the COBOL Copybook Converter OTD Wizard to build OTDs and introduces the Converter’s OTD methods. You use the COBOL Copybook wizard within Netbeans IDE to create Copybook Converter OTDs. These OTDs can then later be used in Collaboration Definitions to create the business logic behind the Collaborations.
 To create COBOL Copybook OTDs
-
On the Project tree, right click the Project and select New > Object Type Definition from the shortcut menu. The New Object Type Definition Wizard window appears, displaying the available OTD wizards.
-
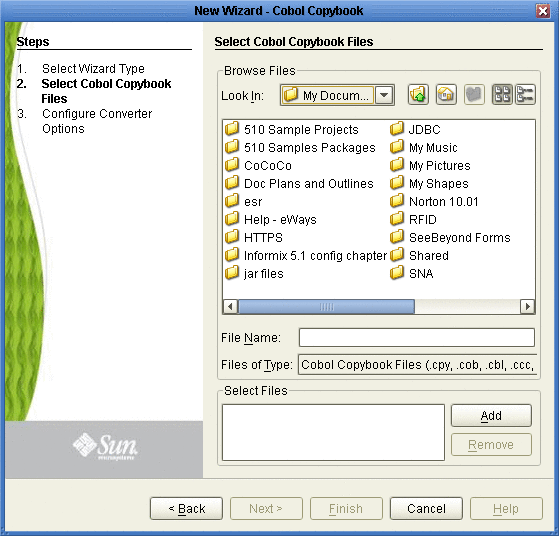
Click COBOL Copybook and click Next. The New Wizard - Cobol Copybook window appears.
Figure 1–15 COBOL Copybook Wizard—COBOL Copybook Selection
-
Browse for the desired COBOL Copybook file and highlight it.
-
Click the Add button to include a copybook file in a project.
-
Repeat Steps 3 and 4 for each file to include in the project. To remove a copybook file from the project, highlight the file name in the Select Files container and click Remove.
-
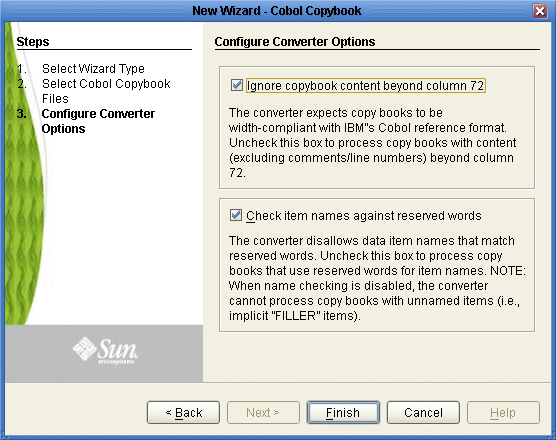
Click Next. The Configure Converter Options page appears.
Figure 1–16 COBOL Copybook Wizard—Configure Converter Options
-
Optionally, add/remove checks from boxes to enable/disable options:
-
Ignore copybook content beyond column 72 -- The Converter expects copybooks to be width-compliant with IBM’s COBOL reference format. Uncheck this box to process books with content (excluding comments/line numbers) beyond column 72. Default: enabled (box is checked).
-
Check Item names against reserved words -- The Converter disallows data item names that match reserved words. Uncheck this box to process copy books that use reserve words for item names. When name checking is disabled, the Converter cannot process copy books with unnamed items (i.e., implicit ”FILLER’ items). Default: enabled (box is checked).
-
Click Finish. The OTD Editor window appears, displaying the OTD.
Parsing Copybook Entries
New functionality in COBOL Copybook Converter 5.1.2 and above, allows for more accurate parsing of data entries. The Converter’s parser no longer assigns globally unique names to identical data entries. If there are more than two data entries with identical names, level numbers, and same direct parent data entry, an exception will be thrown at parsing time, as follows:
com.stc.cococo.builder.CocoParseException: CCCB4200: Parse exception at line 126, column 64, item (n/a), token (n/a): CCCB4201: Copybook item processing error. CCCB4228: Identical data name ’9 DEDUCTIBLE-LOSS-SETTLMNT-COOL FQN = FORMATTER-COPYBOOK:SEEB-GROUP-LST-END-3-0006RG:NEW-IMPORT-GROUP-LST-END-3:IMPORT-GRP-LST-END-3-0026EV:IE01-ENDORSEMENT-SUBJEC-0026ET:DEDUCTIBLE-LOSS-SETTLMNT-COOL’ found under parent data item ’7 IE01-ENDORSEMENT-SUBJEC-0026ET FQN = FORMATTER-COPYBOOK:SEEB-GROUP-LST-END-3-0006RG:NEW-IMPORT-GROUP-LST-END-3:IMPORT-GRP-LST-END-3-0026EV:IE01-ENDORSEMENT-SUBJEC-0026ET’ |
COBOL Copybook OTD
When an OTD is built from a copybook file, it creates an OTD which contains methods that may be used with the converted contents of the copybook business object.
Figure 1–17 Sample Copybook OTD
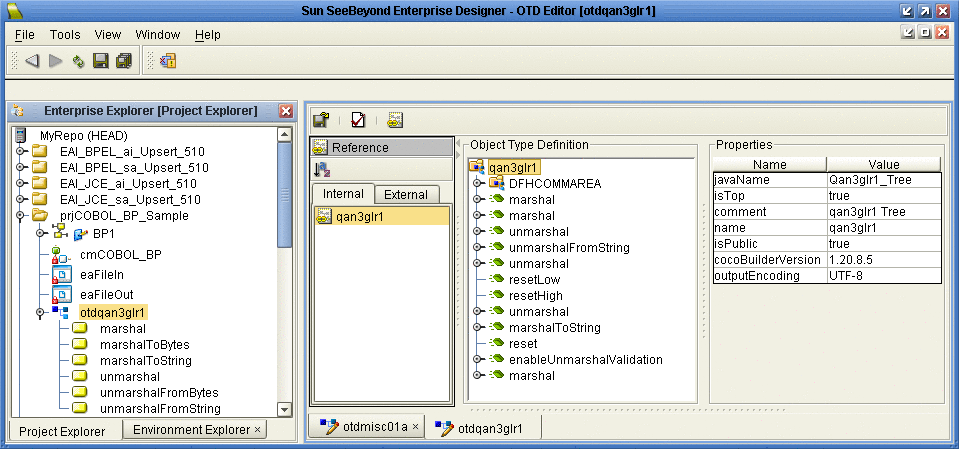
The figure above shows the Copybook Converter OTD built from the sample copybook qan3glr1.cobol. The OTD has a node for each of the business processes that may be performed on the converted copybook. The unmarshal method allows business processes to flow data into the copybook OTDs and access contents field-by-field.
Relaunching OTDs
A single OTD can consist of many lines of metadata. When a change to the metadata occurs in an OTD, it does not have to be recreated from scratch. Using the Relaunch function allows the OTD to be rebuilt and saved under the same name, then relaunched back to the same Java Collaboration Definition (JCD) or Business Process Execution Language (BPEL).
 To Relaunch an Existing OTD
-
In the Enterprise Explorer, right-click on the OTD. From the submenu, click Relaunch. The Select Files Wizard opens.
-
Enter the File Name (or Browse and Select) that you wish to be relaunched and click Next.
Note –The File Name must be identical to the original since the name is used to generate the OTD name.
-
Continue with the Wizard as described when creating the OTD.
-
Click the Finish button to save the changes.
When relaunching an OTD, an existing collaboration will not be affected if:
-
New columns are added
-
Deleted columns are not used in the original collaboration
Note –Validation will fail if existing collaborations are not modified when columns are renamed or deleted.
-
COBOL Copybook OTD Methods
The Object Type Definitions (OTDs) created by the COBOL Copybook Converter provide the method that you can use to extract or insert content into OTDs.
This section describes the COBOL copybook methods (operations) that are available for you to use in the source code for the Collaborations or Business Activities.
OTD Method Guidelines
This section addresses the concerns of global behavior, effects, and assumptions inherent to most methods.
Encoding Behavior for Redefinitions
The unmarshal and marshal methods of a COBOL Copybook OTD (with the exception of the marshalToString and unmarshalFromString) have been reimplemented to heed the OTD structure’s data type information. When data flows into or out of the OTD, character set encoding is applied only to the portions of the data that fall on or draw from OTD fields corresponding to items in the Copybook specification that store character data (i.e., usage display items, whether implicitly or explicitly specified). Data for other types of OTD fields are not subject to charset encoding, since these fields are capable of containing binary (non-character) data.
An ambiguity arises when an OTD field, corresponding to a usage display item, is also the object of redefinition(s) in the Copybook. Redefined items may have alternate, multiple storage types, and to deal with such an item, the OTD must decide which one of the multiple definition is in effect at the time of unmarshaling or marshaling, in relation to the available data. The current implementation of COBOL Copybook OTDs resolve this ambiguity by ignoring redefinitions. The decision whether or not to apply encoding to a field is based solely on the item’s original storage specification in the Copybook.
DBCS Items
COBOL Copybook OTDs do not support any particular Double Byte Character Set (DBCS) encoding. When inserted into DBCS nodes, it will not perform inspections of data to determine what specific DBCS encoding is used by character codes or byte sequences (e.g., discerning between a double-byte and a multi-byte encoding). As a consequence:
-
DBCS items are represented in the OTD by Java byte array nodes, and their content will be treated as binary "blobs" with the following rules:
-
If content is set directly to a DBCS node, it is stored as-is.
-
If the content is retrieved directly from the DBCS node, the content that was originally set is also returned as-is.
-
If content is unmarshaled via the OTD root, the portion corresponding to the DBCS node is stored as-is. It should be noted however, that correctness of the aggregate input is the responsibility of the root-level unmarshal call (e.g., do not use unmarshalFromString if the OTD contains DBCS items).
-
If the OTD’s content is marshaled, the portion corresponding to the DBCS node is yielded as-is, and is excluded from any character set transcoding that character data nodes of the OTD may be subjected to.
Copybook OTDs will not auto-truncate DBCS data. Since the OTD cannot know the specific DBCS encoding of the data, it cannot correctly truncate it at the correct character boundaries. If the content which is set directly to a DBCS node exceeds the item’s width, the OTD will raise an exception.
-
Root-level Methods
The following methods are the root-level methods provided:
enableUnmarshalValidation(boolean enable) Method
The enableUnmarshalValidation(boolean enable) method causes the OTD to validate data flow during an unmarshal call.
Table 1–1 enableUnmarshalValidation(boolean enable) Method|
Syntax |
Throws |
Examples |
|---|---|---|
|
void enableUnmarshalValidation(boolean enable) |
None. |
// enable validation during unmarshal // call to unmarshal may raise an exception if content is not compatible byte[] content = ... OTD_1.enableUnmarshalValidation(true); OTD_1.unmarshal(content); // disable validation during unmarshal // call to unmarshal will not raise data-related exceptions // instead, data-related exceptions may/will occur when // accessing specific nodes with invalid data. byte[] content = ... OTD_1.enableUnmarshalValidation(false); OTD_1.unmarshal(content) |
marshal() Method
The marshal() method serializes the OTD’s content as an array of bytes. The content is encoded with the OTD’s current encoding, which is the encoding specified when data was last unmarshaled (see setEncoding() and unmarshal() for additional details). If no data was unmarshaled prior to a marshal call, then the OTD defaults to EBCDIC CP037 encoding. If the OTD content is incompatible with the current encoding (this can happen when data was unmarshaled with a different encoding than the current one), a com.stc.otd.runtime.MarshalException occurs.
Table 1–2 marshal() Method|
Syntax |
Throws |
Examples |
|---|---|---|
|
byte [] marshal() |
MarshalException, IOException, UnsupportedEncodingException |
// populate OTD and marshal entire content in EBCDIC OTD_1.setField1(... OTD_1.setField2(... ... byte[] output = OTD_1.marshal(); // write ASCII data to OTD // edit some fields // marshal OTD data (still ASCII) byte[] content = ... OTD_1.unmarshal(content, "US-ASCII"); OTD_1.setField9(... OTD_1.setField10(... byte[] output = OTD_1.marshal(); // write ASCII data to OTD // edit some fields // marshal OTD data using different encoding (may fail depending on data) byte[] content = ... OTD_1.unmarshal(content, "US-ASCII"); OTD_1.setField9(... OTD_1.setField10(... OTD_1.useEncoding("CP277"); byte[] output = OTD_1.marshal(); |
marshal(String charset) Method
The marshal(String charset) method serializes the content of the OTD as an array of bytes. The content is encoded using the user-specified character set. The encoding specified in this call acts as a temporary override to the OTD’s current encoding, but does not become the current encoding (see setEncoding and unmarshal documentation for information). If the OTD content is not compatible with the current encoding (this can happen if data was unmarshaled using an encoding different from the current one), com.stc.otd.MarshalException occurs. If the specified charset value does not name a supported character set, a java.io.UnsupportedEncodingException is generated.
Table 1–3 marshal(String charset) Method|
Syntax |
Throws |
Examples |
|---|---|---|
|
byte[] marshal(String charset) |
MarshalException, IOException, UnsupportedEncodingException |
byte[] content = cocoOtd.marshal("cp037"); // retrieve OTD content as EBCDIC databyte[] content = cocoOtd.marshal("US-ASCII"); // retrieve OTD content as ASCII data |
marshal(OtdOutputStream out) Method
The marshal(OtdOutputStream out) method serializes the content of the OTD and writes it to the supplied output stream object. The output is encoded using the same user-specified encoding used when the data was last unmarshaled (see setEncoding and unmarshal documentation for additional details). If no data was unmarshaled prior to the call to marshal, then EBCDIC CP037 encoding is used. If the OTD content is not compatible with the current encoding (this can happen if the data was unmarshaled using an encoding different from the current one), com.stc.otd.MarshalException occurs. A java.io.IOException is generated if an output error occurs in attempting to write data to the stream object.
Table 1–4 marshal(OtdOutputStream out) Method|
Syntax |
Throws |
Examples |
|---|---|---|
|
void marshal(OtdOutputStream out) |
MarshalException, IOException, UnsupportedEncodingException |
marshal(OtdOutputStream out, String charset) Method
The marshal(OtdOutputStream out, String charset) method flows data out from the OTD to the supplied stream object, using the specified charset encoding. The given encoding acts as a temporary override to the OTD’s current encoding, it does not become the current encoding (see setEncoding and unmarshal documentation for information).
If the specified charset is not compatible with the OTD content (this can happen when the data was unmarshaled to the OTD using a different encoding), com.stc.otd.runtime.MarshalException occurs. If the encoding is not supported or recognized, java.io.UnsupportedEncodingException is generated.
Table 1–5 marshal(OtdOutputStream out, String charset) Method|
Syntax |
Throws |
Examples |
|---|---|---|
|
void marshal(OtdOutputStream stream, String charset) |
MarshalException, IOException, UnsupportedEncodingException |
marshalToString() Method
The marshalToString() method serializes the content of the OTD to a String object. The String is created by decoding the byte data with the OTD’s current encoding, which is the encoding specified when data was last unmarshaled (see setEncoding and unmarshal documentation for additional details). If no data was unmarshaled prior to a marshal call, then the OTD defaults to EBCDIC CP037 encoding. Only use this method with copybook OTDs built from copybooks comprised solely of usage display entries. Using this method on OTDs designed to hold binary data (e.g., packed decimal, internal decimal) may invalidate the data, because portions of the binary content may not have a suitable mapping to UTF-8. A java.io.UnsupportedEncodingException may occur if the current encoding (i.e., the encoding used by the last unmarshal call) is not capable of encoding the data. This is possible because certain charset encodings in Java are not two-way encodings (encodings that can decode or encode, but not both).
Table 1–6 marshalToString Method|
Syntax |
Throws |
Examples |
|---|---|---|
|
String marshalToString() |
MarshalException, IOException, UnsupportedEncodingException |
reset() Method
The reset() method initializes the storage space of the OTD as follows:
-
alphanumeric fields (PIC X) - blank spaces (EBCDIC value 0x40)
-
numeric fields (PIC 9) - binary zero
-
packed decimal fields - signed-trailing packed binary zero
|
Syntax |
Throws |
Examples |
|---|---|---|
|
void reset() |
None. |
resetHigh() Method
The resetHigh() method initializes the entire storage space of the OTD to high bit values; each byte is initialized to 0xFF.
Table 1–8 resetHigh() Method|
Syntax |
Throws |
Examples |
|---|---|---|
|
void resetHigh() |
None. |
resetLow() Method
The resetLow() method initializes the OTD storage space to low bit values; each byte is initialized to 0x0.
Table 1–9 resetLow() Method|
Syntax |
Throws |
Examples |
|---|---|---|
|
void resetLow() |
None. |
retrieveEncoding() Method
The retrieveEncoding() method returns the canonical name of the current OTD encoding. The default current OTD encoding is "CP037" until it is changed by a successful useEncoding call, or by a call to one of the encoding-specifiable unmarshal methods. The canonical name may differ from the one used previously to set the current encoding. See the Java 2 API documentation for java.nio.charset. Charset for more information.
Table 1–10 retrieveEncoding() Method|
Syntax |
Throws |
Examples |
|---|---|---|
|
String retrieveEncoding() |
None. |
unmarshal(byte[] in) Method
The unmarshal(byte[] in) method deserializes the given input into an internal data tree. Data flowed to the OTD using this method must use EBCDIC CP037 encoding. This method sets the OTD’s current encoding to EBCDIC CP037, which is used when data is subsequently marshaled without an overriding encoding; e.g., as allowed in a marshal(OtdOutputStream, String) call.
Table 1–11 unmarshal(byte[] in) Method|
Syntax |
Throws |
Examples |
|---|---|---|
|
void unmarshal(byte[] in) |
UnmarshalException, IOException |
unmarshal(OtdInputStream in) Method
Th unmarshal(OtdInputStream in) method populates the OTD using the supplied OtdInputStream object as the data source. The supplied object must be an opened stream with available data. A com.stc.otd.runtime.UnmarshalException is generated if the data obtained from the stream is incompatible with the OTD, and a java.io.IOException is generated if any other input error occurs in attempting to read data from the stream object. The stream object must flow data encoded in EBCDIC CP037. This method sets the OTD’s current encoding to EBCDIC CP037, which is used when data is subsequently marshaled without overriding encoding; e.g., as allowed in a marshal (OtdOutputStream, String) call.
Table 1–12 unmarshal(OtdInputStream in) Method|
Syntax |
Throws |
Examples |
|---|---|---|
|
void unmarshal(OtdInputStream in) |
UnmarshalException, IOException |
unmarshal(OtdInputStream in, String charset) Method
The unmarshal(OtdInputStream in, String charset) method flows data to the OTD from the supplied Stream object. The stream must be open and have available data. The charset argument specifies the encoding of the stream data. The specified encoding becomes the current encoding of the OTD and is used when data is subsequently marshaled without overriding encoding; e.g., as allowed in a marshal(OtdOutputStream, String) call.
If the stream data is incompatible with the OTD, a com.stc.otd.runtime.UnmarshalException is generated. If the stream data cannot be read, a java.io.IOException is generated. If the charset value does not name a supported charset, or if it names a supported charset with one-way encoding (capable of decoding or encoding, but not both), a java.io.UnsupportedEncodingException is generated.
Table 1–13 unmarshal(OtdInputStream in, String charset) Method|
Syntax |
Throws |
Examples |
|---|---|---|
|
void unmarshal(OtdInputStream in, String charset) |
UnmarshalException, IOException, UnsupportedEncodingException |
unmarshal(byte[] in, String charset) Method
This method populates the OTD using the data supplied in the byte array in. The charset argument specifies the encoding of the given data. The specified encoding becomes the current encoding of the OTD, and is used when data is subsequently marshaled without an overriding encoding; e.g., as allowed in a marshal (OtdOutputStream, String) call. If the specified charset value does not name a supported character set or names a supported charset with one-way encoding (one that can decode or encode, but not both), a java.io.UnsupportedEncodingException is generated.
Table 1–14 unmarshal(byte[] in, String charset) Method|
Syntax |
Throws |
Examples |
|---|---|---|
|
void unmarshal(byte[] in, String charset) |
Unmarshal Exception, IOException, UnsupportedEncodingException |
byte[] bytes = ...cocoOtd.unmarshal(bytes, "cp037"); // Interpret bytes content as EBCDIC datacocoOtd.unmarshal(bytes, "US-ASCII"); // Interpret bytes content as ASCII data |
unmarshalFromString(String in) Method
The unmarshalFromString(String in) method populates the OTD using the specified String object as the input source. This method is useful only to unmarshal data to copybook OTDs comprised solely of character-data records (entries specified implicitly or explicitly as USAGE DISPLAY). The current OTD encoding (see setEncoding and unmarshal document for additional details) is used to encode the String’s bytes.
Table 1–15 unmarshalFromString(String in) Method|
Syntax |
Throws |
Examples |
|---|---|---|
|
void unmarshalFromString(String in) |
UnmarshalException, IOException |
useEncoding(String enc) Method
Use the useEncoding(String enc) method to designate a particular encoding to be used as the OTD’s current encoding. The current OTD encoding is used when the OTD is marshaled without an overriding encoding, which is permitted for the marshal (OtdOutputStream, String) method.
An OTD’s current encoding is initially EBCDIC (CP037) when it is instantiated. There are two ways to change it:
-
Unmarshaling the data, whereby the data’s stated encoding becomes the current encoding.
-
Using this method to specify it.
Changing the encoding through the use of this method causes reset() to be subsequently (and automatically) called, causing the OTD’s existing content to be erased. This behaviour exists to avoid situations where data, successfully unmarshaled with one charset, fails to marshal under a different charset, due to the absence of codepoint mappings between the two encodings. Use the marshal(String) method when data, which flowed in using a charset, must then be flowed out with a different charset.
If the specified encoding is the same as the current OTD encoding, the call returns without affecting the OTD’s state (i.e., reset() is not called) and the data and current encoding will remain unchanged.
If the specified encoding is not supported, or is not a two-way encoding (one that can decode or encode, but not both), a java.io.UnsupportedEncodingException is thrown.
Table 1–16 useEncoding(String enc) Method|
Syntax |
Throws |
Examples |
|---|---|---|
|
void useEncoding(String enc) |
UnsupportedEncodingException |
Non-Root Methods
Every leaf node in a COBOL Copybook OTD represents an elementary item in the Copybook source. For every given leaf node, the OTD provides “getter” and “setter” methods of which the return type and input types depend on the data type and usage type specified in the copybook for the elementary item to which the node corresponds.
For a given non-repeating leaf node named Datum, the following method forms are provided, where T is determined from the follow table.
-
T getDatum()
-
void setDatum(T)
|
Data Types |
Display |
COMP or COMP-4 |
COMP-1 |
COMP-2 |
COMP-3 |
COMP-5 |
INDEX |
|---|---|---|---|---|---|---|---|
|
Alphabetic For example: PIC AAA |
String | ||||||
|
Alphanumeric For example: PIC X9 |
String |
String |
String | ||||
|
Alphanumeric edited For example: PIC XB9 |
String | ||||||
|
Numeric edited For example: PIC ZZZ99 |
String | ||||||
|
DBCS For example PIC GGBGG |
byte[] | ||||||
|
External floating point For example: PIC +9V99E+99 |
BigDecimal | ||||||
|
Numeric integer (9 digits or less) |
int |
int |
int |
int |
|||
|
Numeric floating point (COMP-1 or COMP-2 items) |
BigDecimal | ||||||
|
Numeric Integer (10 to 18 digits) |
long |
long |
long |
long | |||
|
Numeric integer (19 digits or more) |
BigDecimal |
Big Decimal |
Big Decimal |
Big Decimal |
For repeating leaf nodes, these two alternative methods are provided:
-
T getDatum(int i)
-
void setDatum(int i, T)
where i is expected to be a value from 0, representing the ordinal of the desired repetition instance, and where T is determined as previously described.
BPEL Operations
When using eInsight to process COBOL copybooks, the operations in Table are available.
Table 1–18 BPEL COBOL Operations|
eInsight Operation |
Activity |
|---|---|
|
Marshal |
Allows you to marshal an OTD instance to a string. |
|
MarshalToBytes |
Marshals an OTD instance (or OTD tree) to byte array using current encoding (CP037). |
|
MarshalToString |
Marshals an OTD instance (or OTD tree) to string using current encoding (CP037). |
|
Unmarshal |
This operation is retained for purposes of compatibility with the previous release of the COBOL Copybook Converter. The Unmarshal operation allows you to select unmarshaling from byte array or from string. |
|
UnmarshalFromBytes |
Unmarshals data from byte array into an OTD instance. |
|
UnmarshalFromString |
Unmarshals data from string into an OTD instance. |
Note –
It is recommended that you use the Marshal and Unmarshal methods since they allow for more control over the output data. Both methods are available for purposes of increased compatibility.
Creating an Oracle Applications OTD
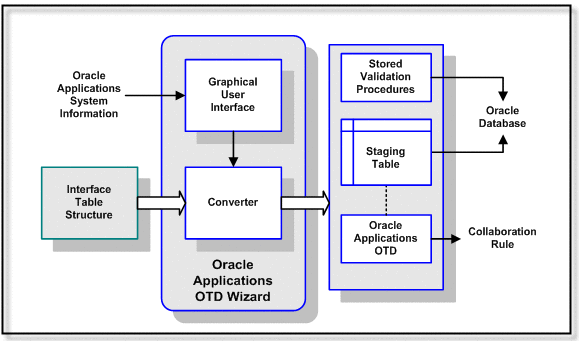
The Oracle Applications Adapter uses a wizard-based OTD builder to create OTDs based on your Oracle tables. The wizard queries the Oracle tables to determine the hierarchies of the interface tables for a particular module, and creates a corresponding OTD. It also sets up the necessary staging table and the stored validation procedures to be run against the table.
Figure 1–18 Oracle Applications OTD
When building an OTD, the wizard calls many JDBC APIs (for example, getProcedureColumns()) which in turn queries the database and returns the resultset. While the Adapter itself doesn’t issue the queries directly, it is the Oracle driver that translates the API into multiple queries. In a situation where there is a lot of data in the database, it may take a while to return all the resultsets to the wizard. The performance of the queries is dependent on the execution path which is formulated when a SQL call is prepared. Not having good stats in the data dictionary could produce a long running query.
Oracle recommends doing the following to gather vital stats to improve performance:
-
Set the following in either the init.ora file or spfile (whichever is appropriate for their install):
_table_lookup_prefetch_size=0
-
Analyze the SYS schema for the system as follows:
-
Start sqlplus
-
Connect as sys user
-
exec dbms_stats.gather_schema_stats(’SYS’);
Keep in mind that significant changes to the database would affect the data dictionary (like new tables, indexes, etc). You should consider running the analysis regularly.
Note –Please consult your Database Administrator or Oracle before taking these steps as it may impact other applications.
-
The following steps are required to create a new OTD for the Oracle Applications adapter.
Select Wizard Type
Select the type of wizard required to build an OTD in the New Object Type Definition Wizard.
 To Select the Oracle Applications OTD Wizard
-
In the Enterprise Designer Project Explorer, right-click your Project, click New, and then click Object Type Definition.
The Object Type Definition Wizard appears.
-
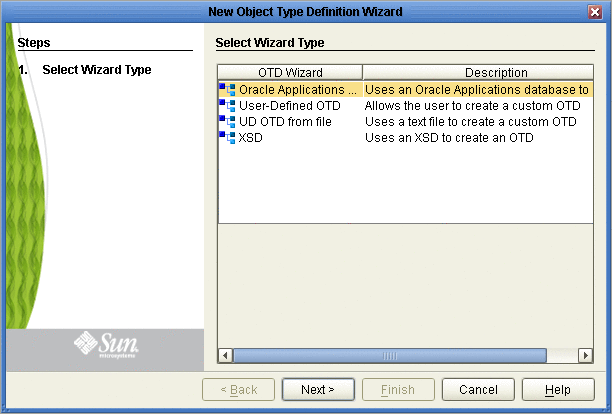
From the New Object Type Definition Wizard window, select the Oracle Applications Wizard and click Next.
Figure 1–19 OTD Wizard Selection
Connect To Database
Enter the Oracle Applications connection information in the Connection Information frame.
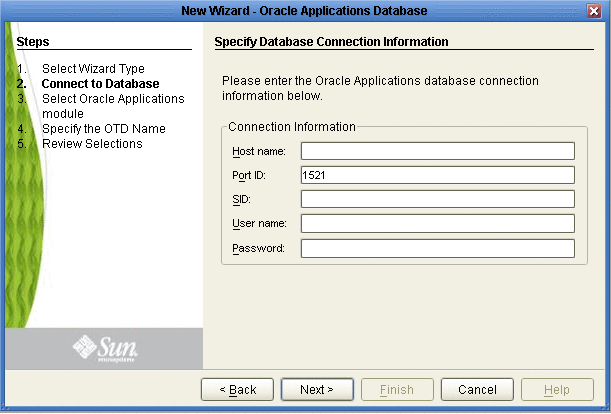
 To Connect to the Database
-
Specify the applicable connection information for your database including:
-
Host Name - The server where Oracle Applications resides.
-
Port ID- The port number of Oracle Applications.
-
SID - The name of the Oracle instance (equivalent to the database name).
-
User Name - The user name that the Adapter uses to connect to the database.
-
Password - The password used to access the database.
-
-
Click Next.
The Select Oracle Applications module window appears.
Select Oracle Applications Module
Select the type of Oracle Applications Module you want included in the OTD.
 To Select the Oracle Applications Module
-
In the Select Oracle Applications Module dialog box (shown below), select the Business Function and Module and choose whether to use fully-qualified names and to replace existing stored procedures.
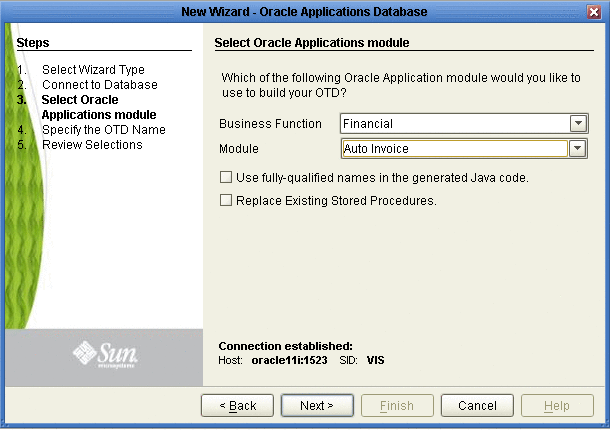
Note –A set of stored procedures are installed with the Oracle Applications Adapter. Unless these stored procedures are somehow deleted, the only way to create the OTD is by selecting Replace Existing Stored Procedures, otherwise, the existing stored procedures are not overwritten, an error appears, and the wizard stops.
-
Click Next to continue.
The Specify the OTD Name window appears.
Specify the OTD Name
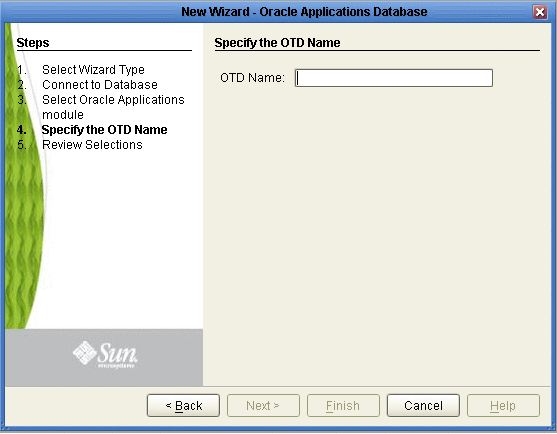
Specify the name that your OTD will display in the Java CAPS IDE.
 To Specify the OTD Name
-
Enter a name for the OTD.
Figure 1–20 Naming an OTD
-
Click Next.
The Review Your Selections dialog box is displayed.
Review Selections
Review the selections made for the new OTD.
 To Review Your OTD Selections
-
View the summary of the OTD. If you find you have made a mistake, click Back and correct the information.
-
If you are satisfied with the OTD information, click Finish to begin generating the OTD.
 Caution –
 If the Oracle Applications DDL Scripts have not been properly installed, an error message will be generated before the OTD can be successfully generated.
The resulting OTD appears in the Java CAPS IDE. The time it takes the OTD to generate depends on the module you selected and your system performance.
Figure 1–21 Database Wizard - Summary
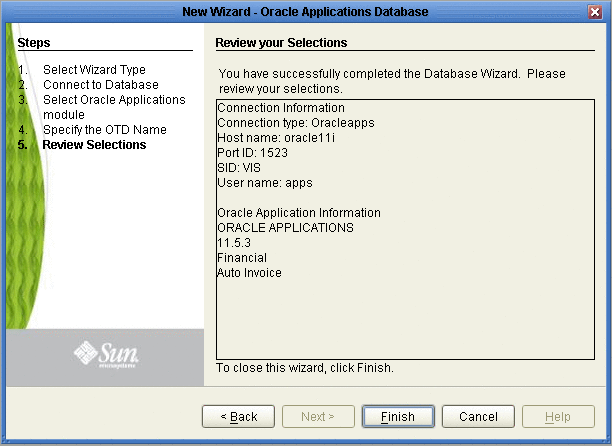
The generated OTD appears in the OTD Editor. Nodes and methods for your OTD depend on the module you selected and the configuration of your tables.
Figure 1–22 OTD Editor
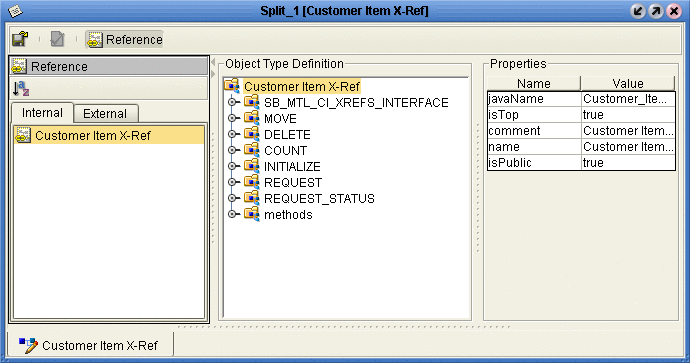
Exposed Oracle Applications OTD Nodes
Staging Table Node
This node represents the Sun Staging Table created inside the Oracle database. All columns in the table are exposed, and can be dragged and dropped in the Java Collaboration. The node has a name of the form SB_<Oracle_Interface_Table_name> having a maximum length of 30 characters.
The Staging Table is created from the Interface Table with the following six extra fields used to support the pre-validation process:
-
SB_EWAY_ID
-
SB_GROUP_ID
-
SB_OBJECT_ID
-
SB_PASS_OR_FAIL
-
SB_ERROR_CODE
-
SB_ERROR_MESSAGE
All of the ID fields (the first three fields shown above) are used for pre-validation purposes within CAPS.
COUNT
Description
Stored procedures for both the OTD level and the interface tables level are defined in the utility package.
-
If it is located at the OTD root level, the data is counted from all Staging Tables.
-
If it is located at the Staging Table level, the data is counted only for that specific Staging Table.
Parameters
Depends upon specific implementation. Typically, it contains at least four input VARCHAR parameters corresponding to:
-
sb_eway_id
-
sb_group_id
-
sb_object_id
Note –If you do not assign a value (including the null value) to the above parameters, the procedure acts on all associated records.
-
sb_pass_or_fail
This parameter accepts the following values:
-
P– records that have passed
-
F– for records that have failed
-
I– all records
-
Requirements
The stored procedure name is derived from the Open Interface name or the Staging Table name, according to the following convention:
-
At the root level:
If the OPEN_INTERFACE tab has a Util_Name attribute, then this value is used: FN_CNT_<UTILNAME>. Otherwise, the value of the attribute Name is used: FN_CNT_<Open_Interface_Name>.
For example:
-
Customer Item: FN_CNT_CUSTITEMS
-
Item Import: FN_CNT_ITEM_IMPORT
At the staging table level:
If the Interface_Table tag has a Util_Name attribute, then this value is used: FN_CNT_<UTILNAME>. Otherwise, the short name of the Name attribute is used: FN_CNT_<Short_Table_Name>.
For example:
-
Customer Item: FN_CNT_MTL_CI_INTERFACE_INT
-
Item Import: FN_CNT_MTL_SYSTEM_ITEMS_INT
-
DELETE
Description
Stored procedures for both OTD level and interface level are defined in the utility package.
-
If it is located at the OTD root level, the data from all Staging Tables is deleted.
-
If it is located at the Staging Table level, only the data for that specific Staging Table is deleted.
Parameters
Depends upon the specific implementation. Typically, it contains at least four input VARCHAR parameters corresponding to:
-
sb_eway_id
-
sb_group_id
-
sb_object_id
Note –If you do not assign a value (including the null value) to the above parameters, the procedure acts on all associated records.
-
sb_pass_or_fail
This parameter accepts the following values:
-
P– records that have passed
-
F– for records that have failed
-
I– all records
-
Requirements
The stored procedure name is derived from the Open Interface name or the Staging Table name, according to the following conventions:
-
At the root level:
If the OPEN_INTERFACE tab has a Util_Name attribute, then this value is used: SP_DEL<UTILNAME>. Otherwise, the value of the attribute Name is used: SP_DEL_<Open_Interface_Name>.
For example:
-
Customer Item: SP_DEL_CUSTITEMS
-
Item Import: SP_DEL_ITEM_IMPORT
At the staging table level:
If the Interface_Table tag has a Util_Name attribute, then this value is used: SP_DEL_<UTILNAME>. Otherwise, the short name of the Name attribute is used: SP_DEL_<Short_Table_Name>.
For example:
-
Customer Item: SP_DEL_MTL_CI_INTERFACE_INT
-
Item Import: SP_DEL_MTL_SYSTEM_ITEMS_INT
-
INITIALIZE
Description
This optional packaged stored procedure is used to initialize the user’s profile for Oracle Applications.
Parameters
Depends upon the specific implementation. Typically, it accepts the Organization ID as a parameter.
Requirements
Inside the script package, this stored procedure must have the name Initialize_Profile.
MOVE
Description
Stored procedures for both OTD level and interface tables level are defined in the utility package.
-
If it is located at the OTD root level, it copies the data from all Sun Staging Tables to the corresponding Oracle Interface Tables.
-
If it is located at the Interface Table level, then the data for only that specific Staging Table is copied to its corresponding Open Interface Table.
This procedure acts only on records with the ID values specified.
Parameters
Depends upon the specific implementation. Typically, it contains at least four input VARCHAR parameters corresponding to:
-
sb_eway_id
-
sb_group_id
-
sb_object_id
-
sb_pass_or_fail
This parameter accepts the following values:
-
P– records that have passed
-
F– for records that have failed
-
I– all records
-
Requirements
The stored procedure name is derived from the Open Interface name or the Staging Table name, according to the following convention:
-
At the root level:
If the OPEN_INTERFACE tab has a Util_Name attribute, then this value is used: SP_MOV<UTILNAME>. Otherwise, the value of the attribute Name is used: SP_MOV_<Open_Interface_Name>.
For example:
-
Customer Item: SP_MOV_CUSTITEMS
-
Item Import: SP_MOV_ITEM_IMPORT
At the staging table level:
If the Interface_Table tag has a Util_Name attribute, then this value is used: SP_MOV_<UTILNAME>. Otherwise, the short name of the Name attribute is used: SP_MOV_<Short_Table_Name>.
For example:
-
Customer Item: SP_MOV_MTL_CI_INTERFACE_INT
-
Item Import: SP_MOV_MTL_SYSTEM_ITEMS_INT
-
REQUEST
Description
Concurrent Manager request function. This function is used to submit the concurrent management request to Oracle Applications.
Parameters
Depends upon specific implementation.
Requirements
The function name is derived from the Open Interface name specified in the SML, and has the form FN_REQUEST_<ORACLE_INTERFACE_NAME>.
REQUEST_STATUS
Description
Function used to retrieve the status of the Concurrent Manager request.
Parameters
-
INp_request_id IN NUMBER
Request Id for the concurrent Manager; basically, the return value from REQUEST.
-
INp_interval_sec IN NUMBER
The interval in seconds for the program to query for the result of a Concurrent Manager request.
-
INp_maximum_sec IN NUMBER
The maximum allowed interval (in seconds) for the program to time out. This parameter must have a non-zero value.
-
OUTp_detailed_status OUT VARCHAR2
Output parameter having the detailed description of the concurrent request.
Requirements
In order for Request_Status to correctly retrieve the Concurrent Manager request, you must call commit after the Request stored procedure call; otherwise, Request_Status always returns Pending status after a time-out.
VALIDATE
Description
This packaged stored procedure is used to perform the pre-validation of data in the Staging Table.
-
If it is located at the OTD root level, the data in all Staging Tables is validated.
-
If it is located at the Staging Table level, only the data in that specific Staging Table is validated.
Parameters
Depends upon specific implementation. By default, it contains three input VARCHAR parameters corresponding to:
-
sb_eway_id
-
sb_group_id
-
sb_object_id
-
sb_pass_or_fail
Requirements
Inside the script package, this stored procedure must have the name VALIDATE.
SWIFT Alliance Gateway Adapter OTD Features
The SWIFT AG Adapter includes the SAGOutboundadapter Object Type Definition.
The SAGOutboundadapter OTD structure is organized into five sections: Configuration, Constants, Primitives, RemoteApis (Remote APIs), and Services.
Figure 1–23 SAGOutboundadapter OTD
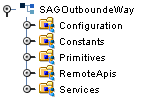
The figure above shows the SAGOutbound adapter OTD as displayed in the Collaboration Editor.
Configuration Node
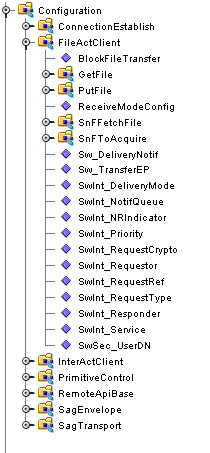
The Configuration node directly corresponds to the adapter Connectivity Map and Environment Configuration properties. The OTD Configuration node offers dynamic configuration (configuration on the fly). Dynamic configuration allows you to edit the configuration, based on your Collaboration’s Business Rule logic, from the Java Collaboration Editor, dynamically changing a parameter without shutting down your Project.
As displayed in the figure below, the Configuration section of the OTD is a Java representation of the SWIFT AG Adapter Configuration file.. The Configuration section with the expanded FileActClient node and sub-nodes is displayed in the figure below.
Figure 1–24 SAGOutboundadapter OTD - Configuration Node
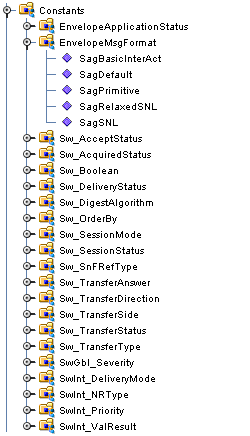
Constants Node
The Constants node provides a convenient way to select SNL related constants. Constants are literal values that have a name (see the figure below).
OTD Constants are presented in the Collaboration Editor so that you can simply drag and drop the Constant to a Business Rule, avoiding possible case or spelling errors.
Figure 1–25 SAGOutboundadapter OTD - Constants Node
Primitives Node
The Primitives node provides the full set of SNL Primitives as defined by the SNL specification. For information regarding any of the SNL Primitives, refer to the SWIFTAlliance Gateway Documentation. The SNL Primitives node and sub-nodes are displayed in the figure below.
Advanced users can construct their own Primitives and send the Primitive using the SWIFT AG Adapter API, directly communicating with SWIFTNet. Once they get a response to their request, they can parse the response based on their Primitives. The parser is provide in the OTDs Primitives section. The response can be dragged to the appropriate node to parse the response.
Figure 1–26 SAGOutboundadapter OTD - Primitives Node

Remote APIs Node
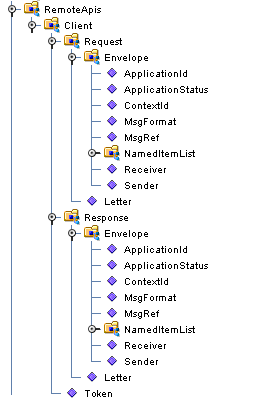
The SAGOutboundadapter OTD’s RemoteApis node exposes the SWIFT Remote API’s client APIs. Just as the Primitives section provide a “message structure”, the RemoteApis section provides a “communication function structure”. The Remote APIs allow you to perform special lower level communication functions.
Figure 1–27 SAGOutboundadapter OTD - Remote APIs Node
Service Node
The Service section of the OTD allows you to perform higher level message and communication functions. Right-click the FileActClient or InterActClient node in the Collaboration to view the available methods to perform your business functions (exchange message, get file, put file, queue access, and so forth).
Figure 1–28 SAGOutboundadapter OTD - Services Node
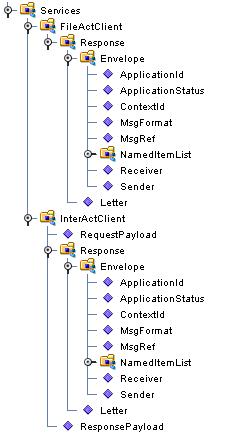
See the sample Projects for an example of how this OTD is used to create your business logic. The prjSAGCert Project demonstrates several business functions with one Collaboration.
Generating DTDs from PeopleTools 8.13
This chapter describes how to generate DTDs from PeopleSoft 8.13, and use these DTDs to create the OTDs used to create the business logic for the PeopleSoft Adapter.
To create the OTD used with the eInsight PeopleSoft Adapter Project, use the PeopleTools Application Designer 8.13 to generate the necessary Document Type Definitions (DTDs) using third-party software. You can then create an OTD that uses the generated DTD as described in Creating OTDs.
This section describes an alternative procedure that “reverse-engineers” a DTD from a sample XML message generated within PeopleSoft.
This procedure may not work for all message definitions. You must know the data constraints for a particular message definition to correctly populate the message with sample data.
Creating PeopleSoft DTDs involves the following steps:
Generating and Publishing an XML Test Message
The first step to generate a DTD is to use the PeopleSoft 8 Application Designer to generate a PeopleSoft XML test message based on a particular message definition.
 To generate a PeopleSoft XML message
-
Log into PeopleTools.
-
Log into the Application Designer.
-
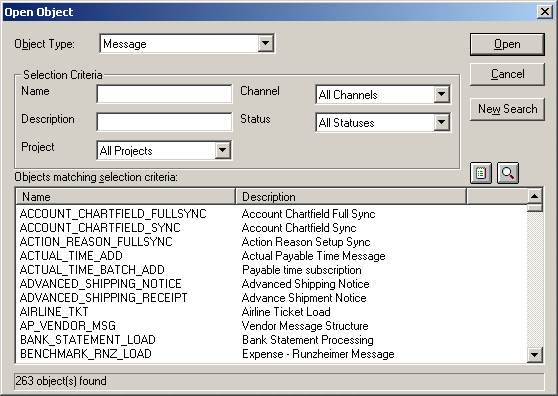
From the Application Designer’s File menu, click Open. The Open Object dialog box appears (see the figure below).
Figure 1–29 Open Object Dialog Box - Object Type Message
-
Select Message as the object type, and click Open. A list of all available message definitions is displayed.
-
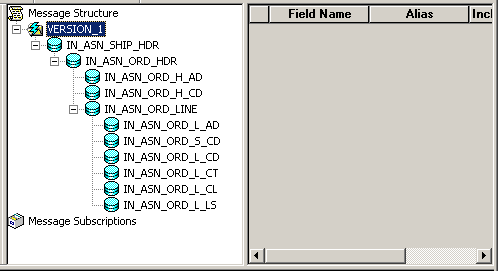
Double-click the message definition for your message, for example, ADVANCED_SHIPPING_RECEIPT. The Message window displays the message structure (see the figure below).
Figure 1–30 Message Structure Details
-
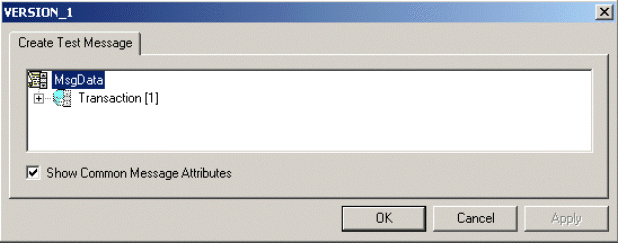
Right-click Version_1 in the message structure tree, and select Create Test Message from the shortcut menu. The Version_1 dialog box appears displaying the records contained in the ADVANCED_SHIPPING_RECEIPT message (see the figure below).
Figure 1–31 Creating a Test Message
-
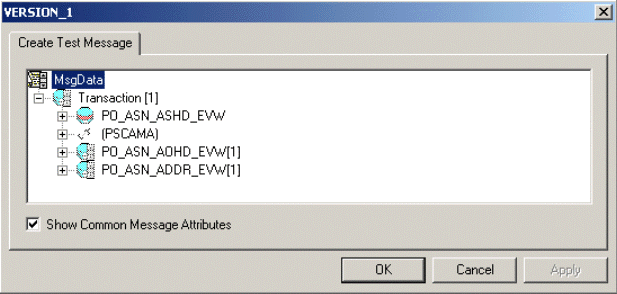
Expand the Transaction record to display all sub-records within the transaction record, as displayed in the figure below.
Figure 1–32 Displaying Transaction Subrecords
Records can nest multiple levels as displayed in the figure below.
Figure 1–33 Expanding Transaction Subrecords
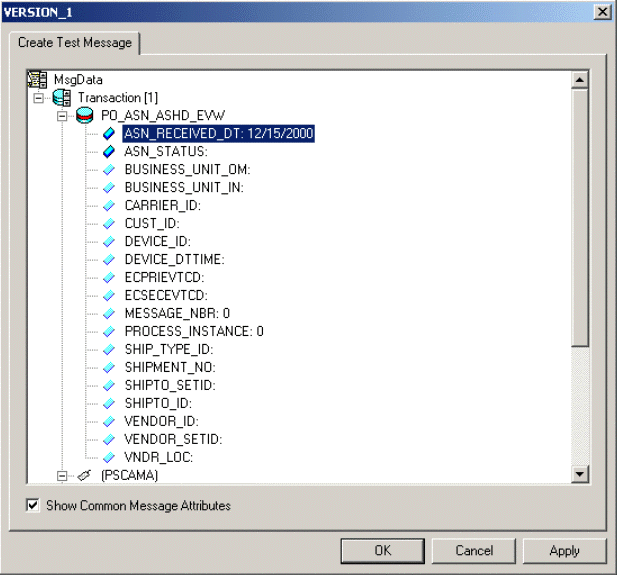
For the purpose of this example, only the fields ASN_RECEIVED_DT: 12/15/2000 and ASN_STATUS: have data contained within them.
If there are no constraints requiring you to populate all fields in a record, then generate a well-formed XML message by populating only one field in each record and sub-record. For most message definitions, only one field is required to be populated with data (some contain default values).
If there are constraints, then all fields in each record and sub-record must be populated.
-
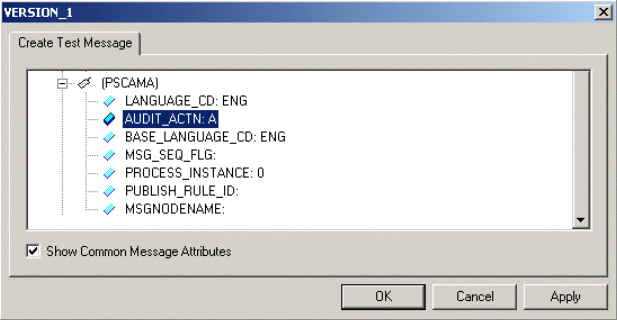
Enter data for the PSCAMA records as follows:
-
Continue entering data until all other required records and sub-records are populated using the same method as above.
-
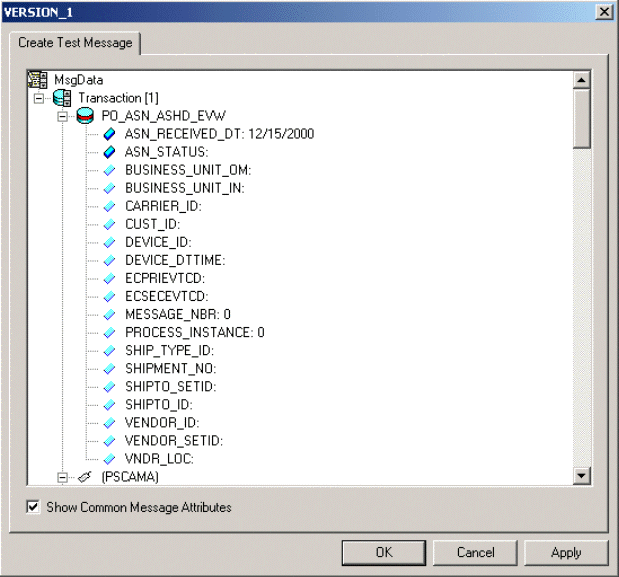
Once all records and sub-records of the message have been populated with data, click Apply to have the updates published to the PSFT_EP Message Node (see the figure below). A message confirms that publication was successful.S
Figure 1–35 Viewing the Test Message
-
Click OK to close the dialog box.
Extracting and Viewing the XML Test Message
The XML test message that you generated and published in the prior section can now be viewed using a supported Web browser. Refer to PeopleSoft PeopleBooks for more information about using the PeopleSoft 8 Application.
 To view the XML message
-
Within a supported Web browser, log into the PeopleSoft 8 Application.
-
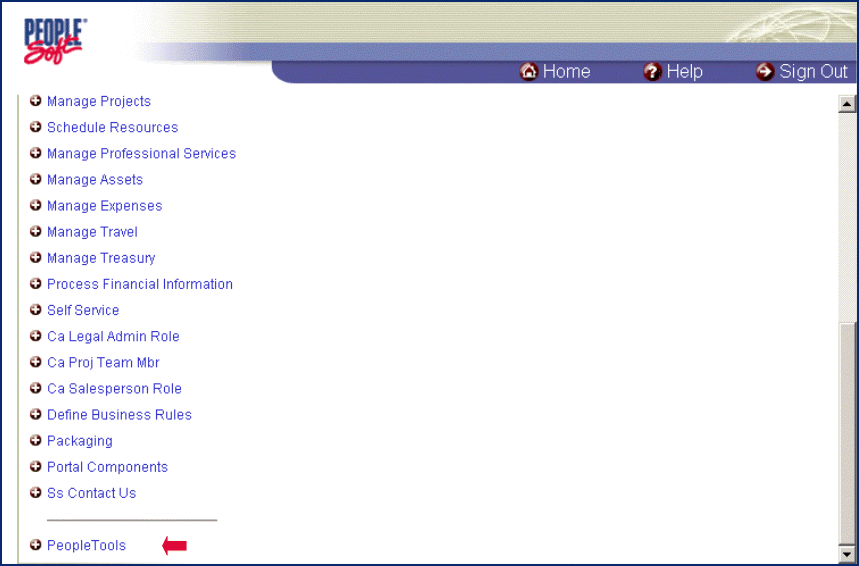
In PeopleSoft 8, click PeopleTools to open the PeopleTools application (see the figure below).
Figure 1–36 PeopleSoft 8 Application Contents Page
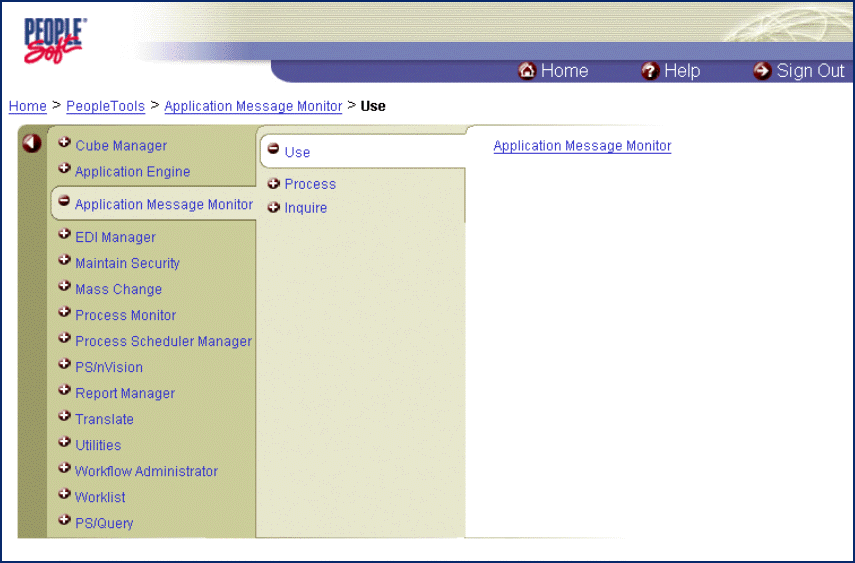
The PeopleTools Directory Tree appears as displayed in the figure below.
Figure 1–37 PeopleTools Directory Tree
-
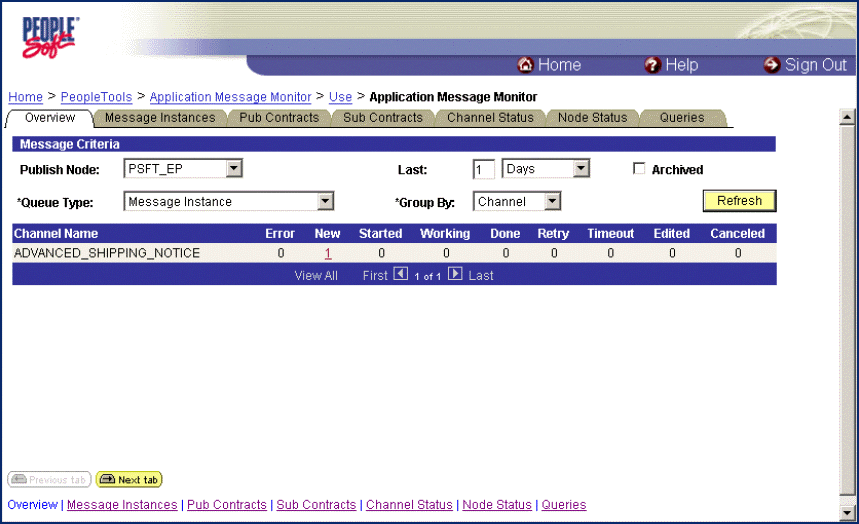
Click Application Message Monitor > Use > Application Message Monitor, and click the hyperlink. The Application Message Monitor page opens to the Overview tab (see the figure below).
Figure 1–38 Application Message Monitor - Overview Tab
-
From the Publish Node field, select the PSFT_EP message node.
-
Click Refresh. The number of messages published for the selected grouping, using the Create Test Message tool, is displayed.
-
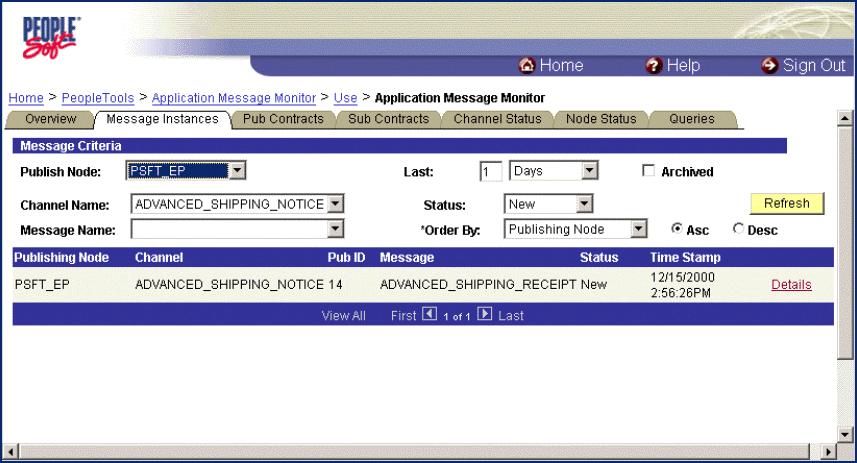
Click the link indicated by the number of messages in the New, Done, or Working columns. The Message Instances tab appears, displaying a summary of the published messages (see the figure below).
Figure 1–39 Application Message Monitor - Message Instances Tab
-
Click the Details link to view the properties of the published XML message (see the figure below).
Figure 1–40 Message Properties Tab
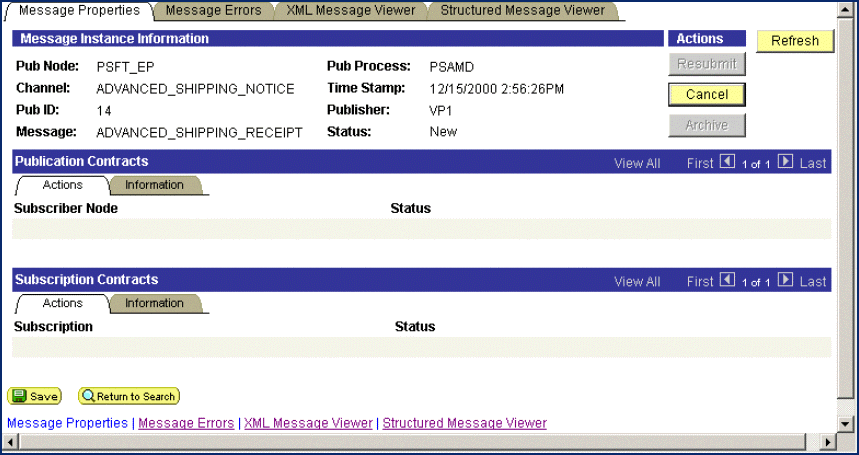
-
Click the XML Message Viewer tab to review the message itself.
-
Select the entire XML message (see the figure below).
Figure 1–41 XML Message Viewer Tab
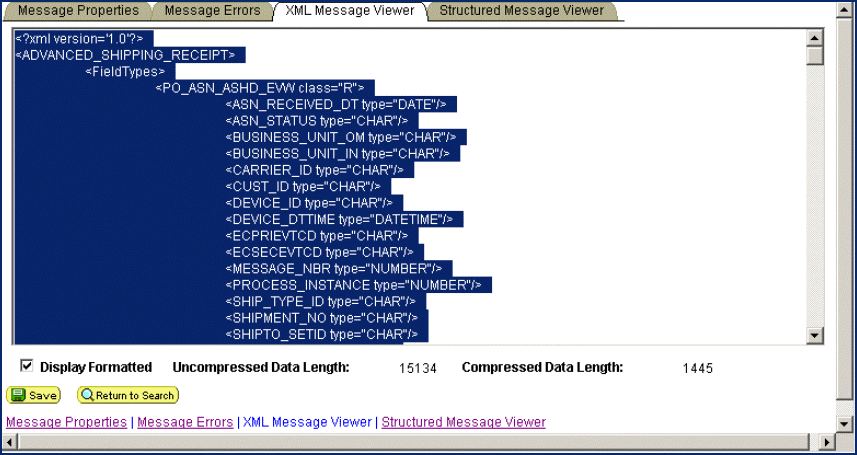
-
Copy and paste the XML message into a text editor and save it, with a .xml extension, to a temporary location. Use the same naming convention used for the name of the Message Definition. The example in the figure below shows the saved XML Message ADVANCED_SHIPPING_RECEIPT.
Figure 1–42 ADVANCED_SHIPPING_RECEIPT.xml
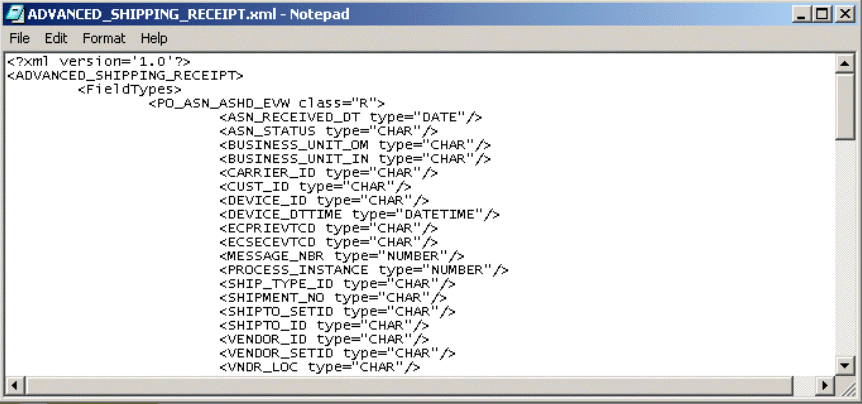
Generating a DTD for the XML File
The structure of the XML message must now be described in a DTD, from which an OTD is subsequently generated. PeopleSoft does not provide a DTD generation utility, but third-party utilities are available to accomplish this task.
A free, online DTD Generator utility is available at the following URL:
This utility is presented to illustrate the general procedures for generating a DTD. Sun Microsystems Inc. has no connection with, and does not support, this product.
-
From the XML Document to DTD field browse to and select the .xml file with the saved XML Message. For this example:
c:\temp\ADVANCED_SHIPPING_RECEIPT.xml
-
Click Open. The DTD Generator page reappears with the path and file displayed in the XML Document box (see Generating a DTD for the XML File).
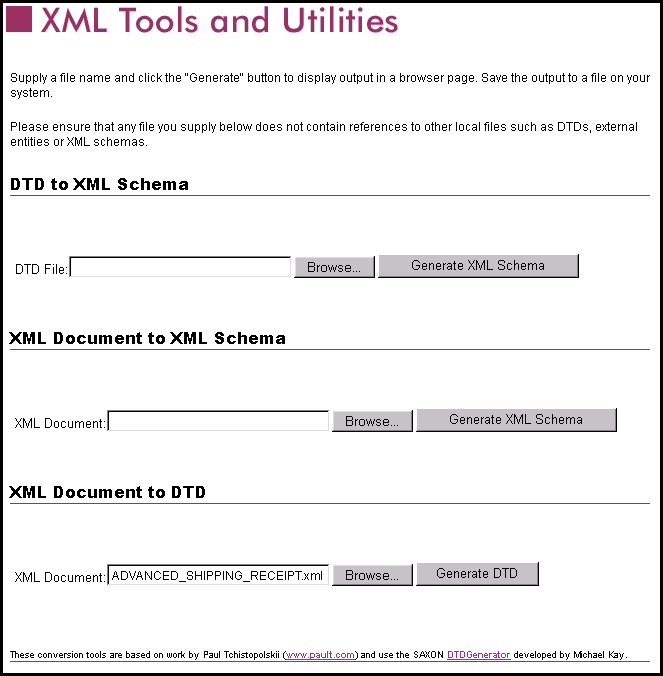
-
Click Generate DTD to generate the DTD. The DTD appears as displayed in Generating a DTD for the XML File.
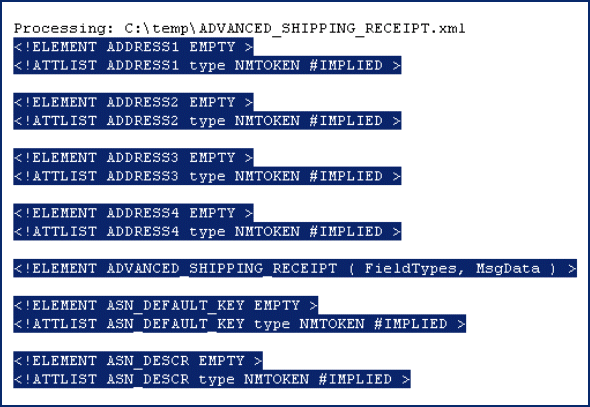
-
Select only the DTD-related information (usually all information except the first line).
-
Copy and paste the text into a text editor and save it with a .dtd extension to a temporary location. Use the same naming convention to name the message definition (for the example, ADVANCED_SHIPPING_RECEIPT).
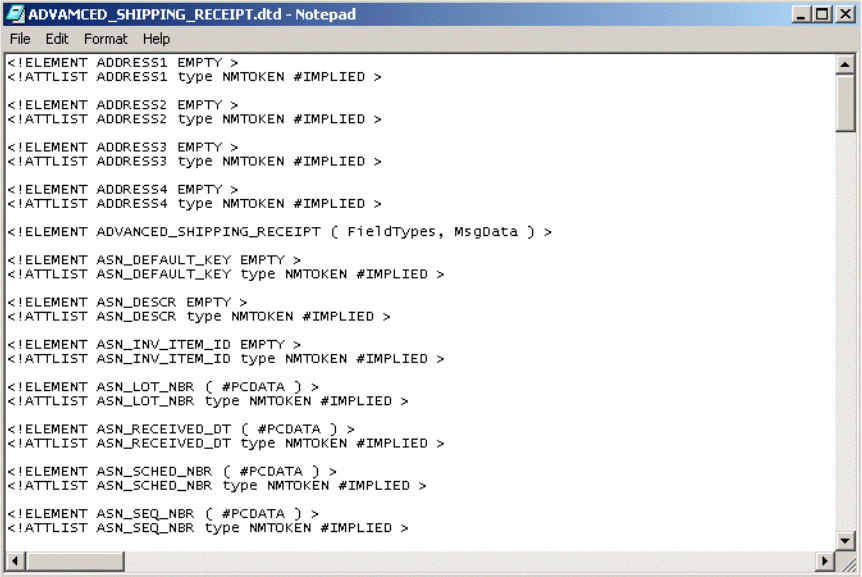
You can now use the DTD to create a PeopleSoft OTD using the Netbeans IDE’s DTD OTD wizard (see Creating OTDs).
Creating OTDs
To create OTDs for PeopleSoft Business Processes and Collaborations, you use the DTDs generated from PeopleSoft as described in Generating DTDs from PeopleTools 8.13. You then create an OTD from the DTD using the Netbeans IDE’s DTD OTD Wizard. For information about creating an OTD from a DTD, refer to Developing OTDs.
OTD Methods and Business Process Operations
For Enterprise Service Bus Collaborations, the PeopleSoft Adapter provides the sendMessage() method. For eInsight Business Processes, the sendMessage and ProcessRequest operations are available. This section describes the method and operations. The PeopleSoft Adapter provides the following methods:
sendMessage() method
Syntax
sendMessage() |
Description
Used in outbound Collaborations to send a message to the PeopleSoft client using HTTP.
Parameters
None.
Return Value
None.
Throws
PSoftHttpApplicationException
sendMessage Operation
Description
Used in outbound Business Processes to send a message to the PeopleSoft client using HTTP.
Input and Output
|
eInsight Operation |
Input |
Output |
|---|---|---|
|
sendMessage |
webRequest |
webResult |
processRequest Operation
Description
Used in inbound Business Processes to process a message received from the PeopleSoft server using HTTP.
Input and Output
|
eInsight Operation |
Input |
Output |
|---|---|---|
|
processRequest |
n/a |
webRequest |
- © 2010, Oracle Corporation and/or its affiliates

