| Exit Print View | |
Sun Netra CP3270 ATCA Blade Server User’s Guide |

|
Documentation, Support, and Training
Evaluating Product Compatibility
Preparing to Install the Blade Server
Installing Components and Blade Server
Installing Optional Components
Software and Firmware Upgrades
Software and Firmware Upgrades
Administering Parameters and Configurations
Administering User Accounts and Security
If you are returning the blade server for service, or if you are replacing a DIMM with another DIMM, remove the DIMM from the blade server.
Note - Safely store the original factory-shipped DIMM and related DIMM packaging. Store any removed DIMM in the new DIMM packaging.
Take antistatic precautions: attach and electrically ground the wrist strap.
 | Caution - Always wear a grounded antistatic wrist strap when handling DIMMs. |
Remove the blade server from the shelf as explained in ![]() Remove the Blade Server.
Remove the Blade Server.
 | Caution - Do not place blade servers on top of an antistatic bag unless the outside of the bag also has antistatic protective properties. |
Locate the DIMM you want to remove from the blade server.
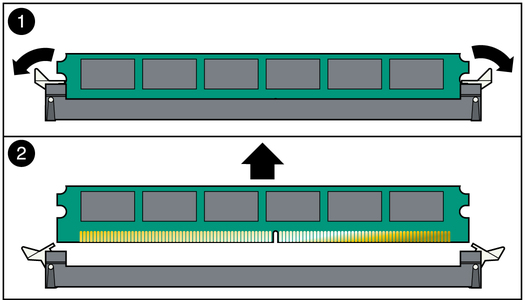
Simultaneously pull both spring retainer clips outward from the slot for the DIMM you want to remove.
Grasp the DIMM by the edges, and carefully pull it out of its connector.

Place the DIMM in an antistatic bag.
If you are replacing the DIMM you removed with a new DIMM, install it.
Perform one of the following actions:
If the blade server is to be reinstalled or replaced, install it.
If the slot is to remain empty, install a filler panel in the slot.