JavaScript is required to for searching.
Skip Navigation Links
Exit Print View
Oracle Java CAPS LDAP Binding Component Tutorial     Java CAPS Documentation
search filter icon
search icon

Document Information

Using the LDAP Binding Component in a Project

Tutorial Overview

Tutorial Requirement

Tutorial Plan

LDAP Binding Component Project in a Nutshell

Starting the GlassFish Application Server

To Start the GlassFish Application Server

To Start the JBI Components

Creating a BPEL Module Project For the Add Feature

To Create a BPEL Module Project

Creating a WSDL Document

To Create a WSDL Document: Add Operation

Create a WSDL Document For Type: SOAP

To Create a WSDL Document: SOAP

Creating a BPEL Process

To Create a BPEL Process

To Add a Partner Link

To Add a Web Service and Basic Activities

To Edit the Web Service: Receive1

To Edit the Web Service: Invoke1

To Edit the Web Service: Reply1

To Edit the Basic Activities: Assign1

To Edit the Basic Activities: Assign2

Creating a Composite Application Project

To Create a Composite Application Project

Deploying a Composite Application

To Deploy a Composite Application

Testing the Composite Application

To Test the Composite Application

Source View

Design View: Notification

Create a WSDL Document: Search

Create a WSDL Document: Update Feature

Create a WSDL Document: Delete Feature

Creating a WSDL Document

In this section, create a WSDL Document in the BPEL Module project using the Add feature. For this example, create AddWSDL.wsdl in the BPEL project. Use the Partner view of the WSDL editor to configure the components of the WSDL Document.
To Create a WSDL Document: Add Operation

  1. Expand the BPEL Module project node in the Projects tab.
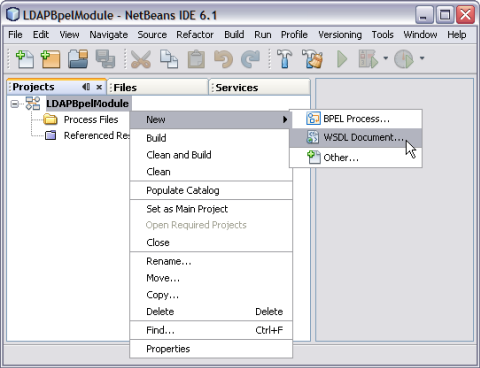
  2. Right-click the project node or Process Files node. Select New —> WSDL Document.
    image:New WSDL Document

    This opens the New WSDL Document wizard.

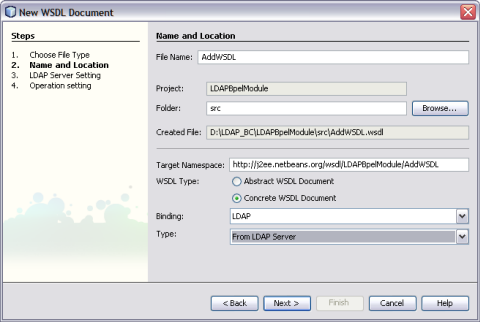
  3. In the File Name field, enter AddWSDL.wsdl.
  4. Select Concrete WSDL Document.
  5. In the Binding field, select LDAP from the drop-down list.
  6. Choose any one of the following Types from the drop-down list.
    • From LDAP Server

    • From LDIF File


    image:WSDL Type Document Options
  7. Click Next.
  8. Enter the Root DN and LDAP Server URL.

    DN is the base object entry search relative to.

    In the figure below, the Root DN is dc=sun,dc=com. The format for the LDAP Server URL is ldap://hostname:port .
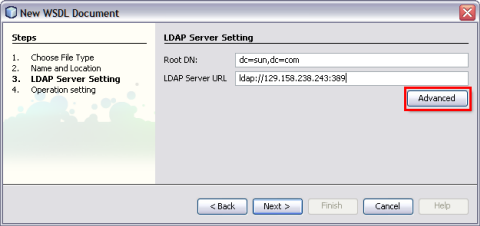
  9. Click Advanced.
    image:LDAP Server Options

    The Advanced Login dialog box appears.
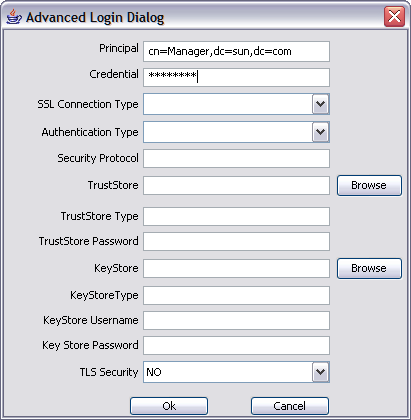

    image:Advanced Options
    Field
    Description
    Required Value
    Principal
    The principal needed when using an authentication mechanism other than the anonymous login (authentication = none).
    The fully qualified Distinguished Name (DN) of the user.

    For example: cn=Administrator, cn=Users,dc=stc,dc=com

    Credentials
    The credentials needed when using an authentication mechanism other than anonymous login (authentication = none).
    The appropriate credentials, such as valid password.
    SSL Connection Type
    The SSL connection type.
    Select None, Enable SSL, or TLS On Demand. Enter the desired value as follows:
    • None: No SSL, simple plain connection.

    • Enable SSL: SSL is enabled. All communication to the LDAP server uses a secure communication channel.


      Note - If you are using the Enable SSL option, the ProviderURL property must point to a secure LDAP port.


    Authentication
    The method authentication (none or simple). Select the desired authentication as follows:
    • None: No authentication, that is, an anonymous login. If you use this setting, ensure that the LDAP server supports anonymous logins if you are using this setting.

    • Simple: Authentication is based on a user name and password. Provide the user name and password in the appropriate fields (Use the Principal and Credentials).

    Select None or Simple.

    The default is None.

    TrustStore
    The default TrustStore. The TrustStore is used for CA certificate management when establishing SSL connections.

    Click Browse to select the trust store file.

    A valid TrustStore file.

    There is no default value.

    TrustStore Type
    The TrustStore type of the TrustStore used for CA certificate management while establishing an SSL connection. If the TrustStore type is not specified, the application uses JKS as the default TrustStore Type.
    A valid TrustStore type.
    TrustStore Password
    The default TrustStore password. The password is meant to access the TrustStore used for CA certificate management while establishing SSL connections.
    A valid TrustStore password.

    There is no default value.

    KeyStore
    The default KeyStore file. The keystore is used for key/certificate management while establishing SSL connections.

    Click Browse to select the key store file.

    A valid package location.

    There is no default value.

    KeyStore Type
    The default KeyStore type. The keystore type is used for key/certificate management when establishing SSL connections. If the KeyStore type is not specified, the default KeyStore type is used.
    A valid KeyStore type.
    KeyStore Username
    The user name for accessing the keystore used for key/certificate management when establishing SSL connections.
    A valid KeyStore user name.
    KeyStore Password
    The default KeyStore password. The password is used to access the KeyStore used for key/certificate management when establishing SSL connections; there is no default.
    A valid KeyStore password.

    There is no default value.

    TLS Security
    An indicator of whether TLS security is enabled.
    The default value is NO
  10. Click OK to close the Advanced Login Dialog.
  11. Click Next.

    The New WSDL Document — Operation Setting dialog box opens.


    Note - You can perform any one of following operations.

    • Search

    • Add

    • Update

    • Delete


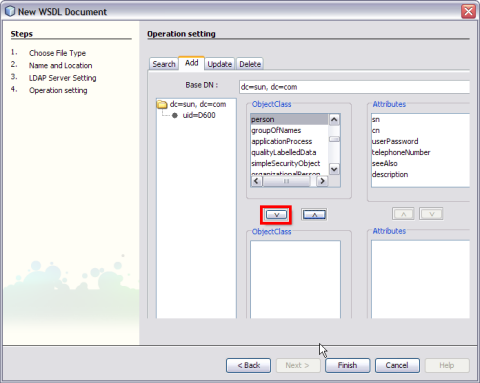
  12. Click the Add tab.
    image:Operation Setting

    Select the following Object Class:

    1. person
    2. inetOrgPerson

    Click the down arrow to move them from the top-left pane to the bottom-left pane.


    Note - The attributes related to the schema are selected.

    Each schema is made up of a set of attributes.


    For example,

    • person — person.sn and person.cn

    • inetOrgPerson — inetOrgPerson.uid and inetOrgPerson.mail

      They are represented as follows:

      schemaname.Attributename

      1. sn — Surname

      2. cn — Common Name

      3. uid — Unique id

      4. mail — Email


    Note - Use the down arrow to move the selected Object Class or Attributes from the top-left pane to the bottom-left pane. Use this to also move from the top-right pane to the bottom-right pane.
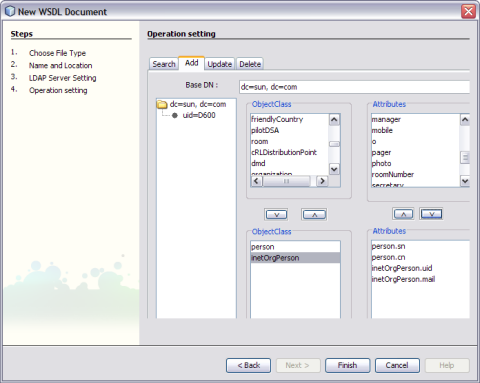


    image:Select Object Class
  13. Set any one of the Attributes to Relative Distinguished Name (RDN).

    A Relative Distinguished Name (RDN) is a component of the distinguished name, for example, cn=John Doe, ou=People is a RDN relative to the root RDN dc=sun.com.
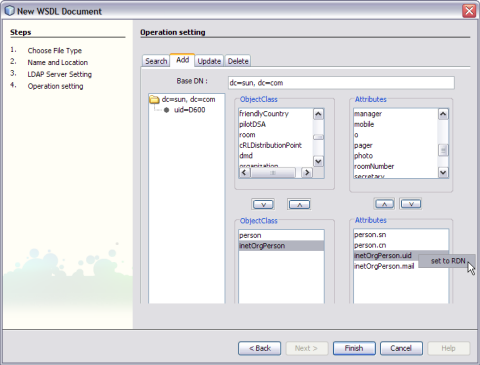

    image:Set to RDN

    For example, set inetOrgPerson.uid = RDN.

  14. Click Finish.

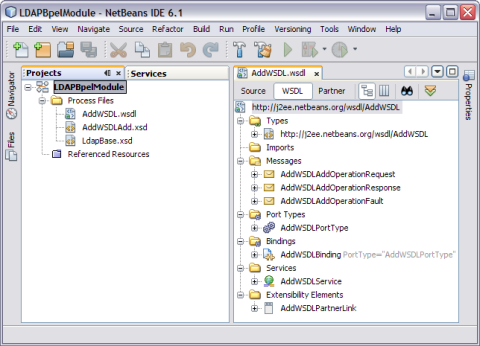
    The illustration is as shown.


    image:Tree Structure

    A tree structure is formed as follows:

    1. AddWSDL.wsdl — Target WSDL
    2. AddWSDLAdd.xsd
    3. LdapBase.xsd