JavaScript is required to for searching.
Skip Navigation Links
Exit Print View
Oracle Java CAPS LDAP Binding Component Tutorial     Java CAPS Documentation
search filter icon
search icon

Document Information

Using the LDAP Binding Component in a Project

Tutorial Overview

Tutorial Requirement

Tutorial Plan

LDAP Binding Component Project in a Nutshell

Starting the GlassFish Application Server

To Start the GlassFish Application Server

To Start the JBI Components

Creating a BPEL Module Project For the Add Feature

To Create a BPEL Module Project

Creating a WSDL Document

To Create a WSDL Document: Add Operation

Create a WSDL Document For Type: SOAP

To Create a WSDL Document: SOAP

Creating a BPEL Process

To Create a BPEL Process

To Add a Partner Link

To Add a Web Service and Basic Activities

To Edit the Web Service: Receive1

To Edit the Web Service: Invoke1

To Edit the Web Service: Reply1

To Edit the Basic Activities: Assign1

To Edit the Basic Activities: Assign2

Creating a Composite Application Project

To Create a Composite Application Project

Deploying a Composite Application

To Deploy a Composite Application

Testing the Composite Application

To Test the Composite Application

Source View

Design View: Notification

Create a WSDL Document: Search

Create a WSDL Document: Update Feature

Create a WSDL Document: Delete Feature

Creating a BPEL Process

In this section, add a BPEL process file named AddBPEL.bpel. You will also learn to add a partner link and associate three activities to the BPEL process file. Create a BPEL Module project to orchestrate.

To Create a BPEL Process

  1. Expand the project node in the Projects window. Right-click the node or Process Files node. Choose New —> BPEL Process.

    This opens the New BPEL Process wizard.
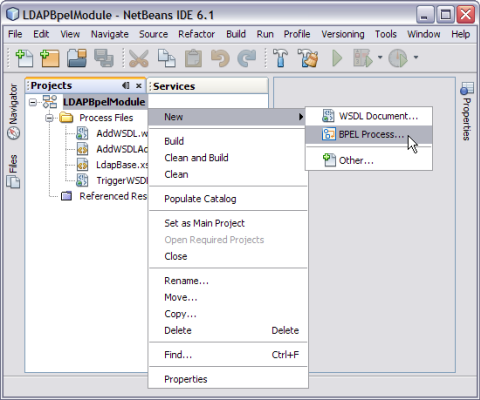

    image:BPEL Process
  2. In the File Name field, enter AddBPELProcess.
  3. Click Finish.
    image:BPEL Process WSDL

    Note -

    • In the Projects window, the IDE adds a AddBPELProcess.bpel node under the Process Files node.

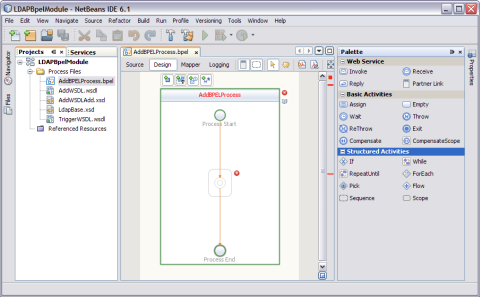
    • The AddBPELProcess.bpel file is open in the BPEL Designer.

    • The Properties window is open.

      Choose Window —> Properties if the Properties window is not visible.

    • The Navigator window shows the BPEL Logical View of the BPEL Process document.


To Add a Partner Link

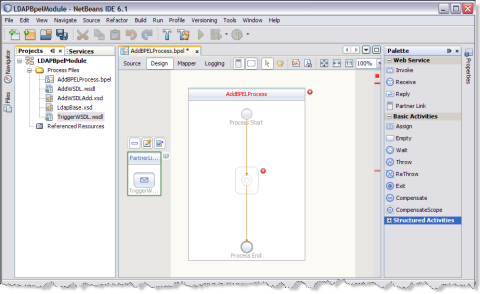
  1. Select the TriggerWSDL.wsdl Partner Link from the Projects tab. Drag and drop it to the left panel of the design area.

    This is the Input WSDL.


    image:Trigger WSDL Created
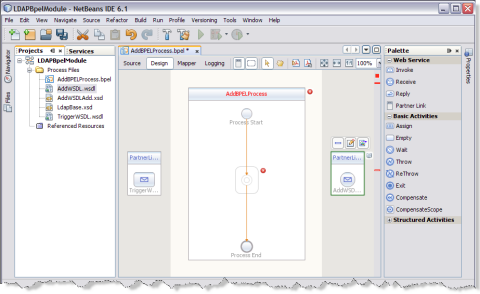
  2. Select the AddWSDL.wsdl Partner Link from the Projects tab. Drag and drop it to the right panel of the design area.

    This is the Output WSDL.


    image:AddWSDL Created

To Add a Web Service and Basic Activities

Drag and Drop the following Web Services:

Drag and Drop the Basic Activities: Assign.

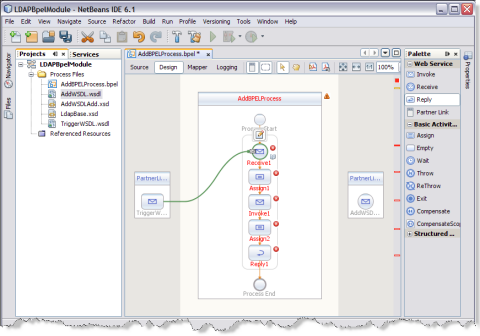
  1. Select Receive in the Web Service section of the Palette.
  2. Drag the selection to the box in the design area between the Process Start and the Process End activities.

    The IDE provides the visual clues to show an appropriate location to drop the selection.
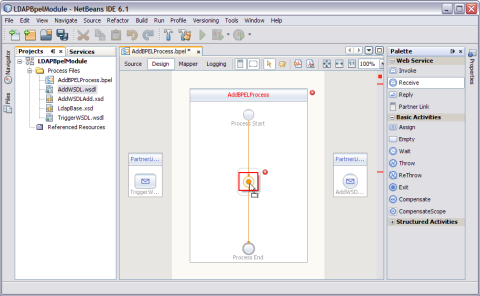

    image:Visual Clues

    This action places a Web Service Receive called Receive1 in the Design view.

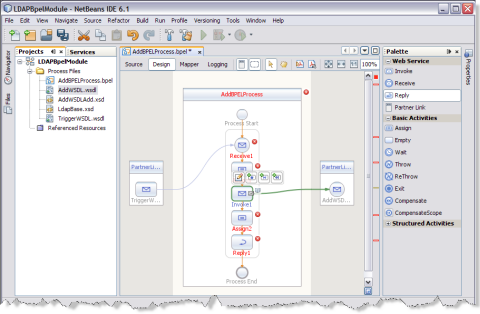
  3. Select the Basic Activities. Choose Assign in the Basic Activities section of the Palette.

    This action places a Assign activity called Assign1 in the Design view.

  4. Drag the selection to the AddBpelProcess box in the design area, between the Process Start and the Process End activities.

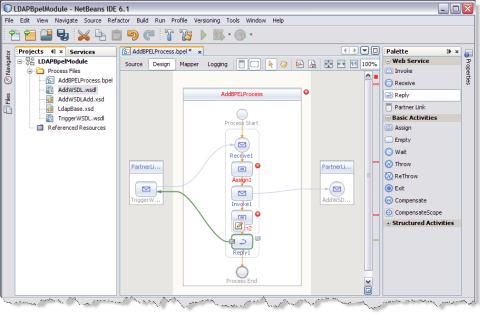
    Note - Repeat steps 1 through 4 to select Invoke1, Assign2, and Reply1.

    Choose the following:

    • Select the Web Service: Invoke and Basic Activities: Assign.

    • Select the Web Service: Reply.


    The icon symbolizes that the Web Services can be edited.


    Note - In the diagram, a red cross next to an element means that the element has not passed validation and the output contains errors. Edit each Sequence to pass validation.
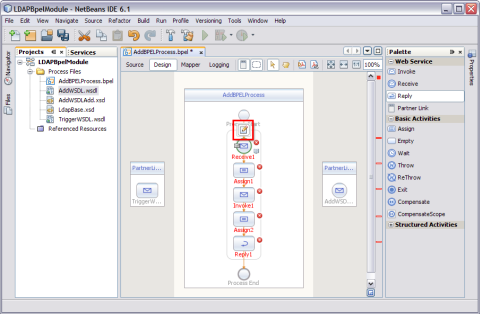


    image:Edit Enabled

To Edit the Web Service: Receive1

  1. Click Web Service — Receive1 and click Edit.

    This opens the Receive1 [Receive] - Property Editor.

  2. Select the properties of this service from the Main tab. Select PartnerLink1.

    The Operation drop-down list refreshes to display TriggerWSDLOperation.
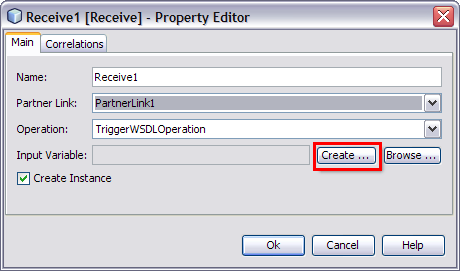

    image:Trigger Receive Editor
  3. Create a new input variable.

    Perform the following:

    • Click the Create button next to the Input Variable field.

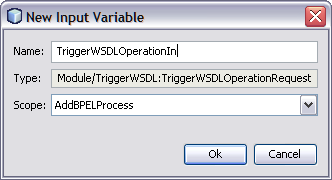
      This opens the New Input Variable dialog box.

    • The Name, Type, and Scope variable fields are refreshed with their default values.

      Change the value in the Name field.

    • Click OK.


    image:Input Variable

    Note -

    • All the fields are populated with the assigned values.

      The Input Variable is TriggerWSDLOperationIn

    • Create Instance check box is checked, by default.
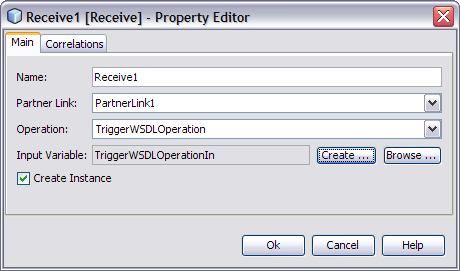


    image:Receive Property
  4. Click OK to close the Receive1 [Receive] - Property Editor.
  5. Save the project.
    image:Receive Edit Map

To Edit the Web Service: Invoke1

  1. Click Web Service — Invoke1 and click Edit.

    This opens the Invoke1 [Invoke] - Property Editor.

  2. Select the properties from the Main tab. Select PartnerLink2 from the drop-down list.

    The Operation drop-down list refreshes to display AddWSDLAddOperation.
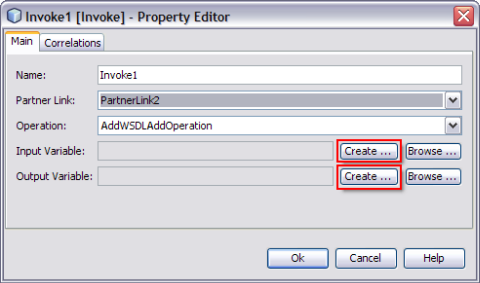

    image:Invoke Property Dialog
  3. Follow these steps to create a new input and an output variable.
    1. Click the Create button next to the Input Variable field.

      This opens the New Input Variable dialog box.
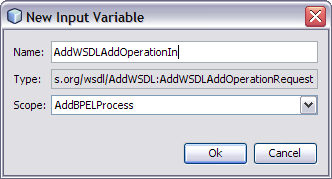

      image:New Input Variable

      The Name, Type, and Scope variable fields are refreshed with their default values.

      You can also change the value in the Name field.

    2. Click OK to close the New Input Variable dialog box.
    3. Click the Create button next to the Output Variable field.

      This opens the New Output Variable dialog box.
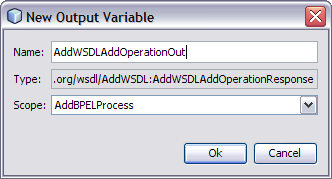

      image:New Output Variable

      The Name, Type, and Scope variable fields are refreshed with their default values.

      You can also change the value in the Name field.

    4. Click OK to close the New Output Variable dialog box.

    Note - All the fields are populated with the assigned values.

    Select the following Variables:

    • Input Variable: AddWSDLAddOperationIn

    • Output Variable: AddWSDLAddOperationOut
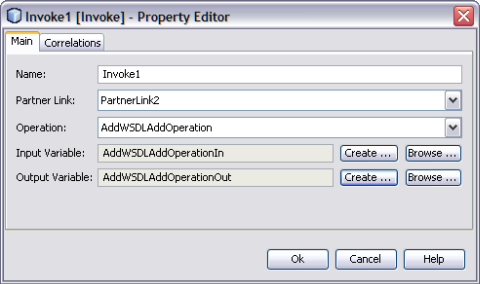


    image:Invoke Property Editor
  4. Click OK to close the Invoke1 [Invoke] - Property Editor.
  5. Save the project.
    image:Invoke Edit Map

To Edit the Web Service: Reply1

  1. Click Web Service: Reply1. Click Edit.

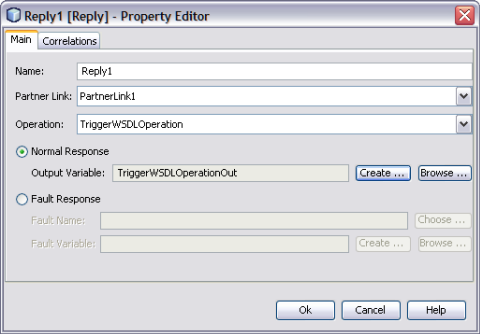
    This opens the Reply1 [Reply] - Property Editor.

  2. Select the properties from the Main tab. Select PartnerLink1 from the drop-down list.

    The Operation drop-down list refreshes to display TriggerWSDLOperation.
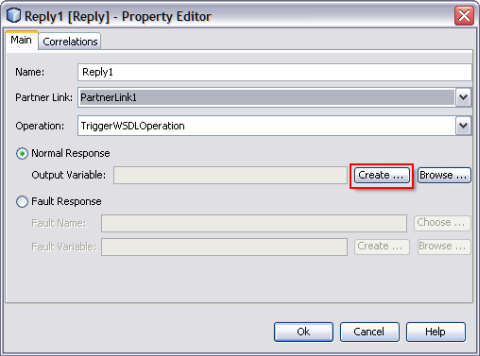

    image:Reply Property Editor
  3. Follow the steps to create a New Output Variable.
    1. Make sure to select the Normal Response radio button.
    2. Click the Create button next to the Output Variable field.

      This opens the New Output Variable dialog box.
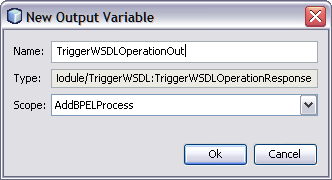

      image:Trigger New Output
    3. Change the value in the Name field. This is optional.

      TriggerWSDLOperationOut is displayed, by default.
    4. Click OK.
      image:Reply1 Property Editor
  4. Click OK to close the Reply1 [Reply] - Property Editor.
    image:Final Mapper

To Edit the Basic Activities: Assign1

  1. Double-click the Basic Activity: Assign1.

    This displays the BPEL Mapper window.


    Note - Choose Window —> Other —> BPEL Mapper from the main menu if the BPEL Mapper window is not visible.


  2. Expand the node in the Source tree pane (the left pane) of the BPEL Mapper under Output —> Variables.

    A Trigger1n node appears under the TriggerWSDLOperationIn node.

  3. Expand the node in the Destination tree pane (the right pane) of the BPEL Mapper under Input —> Variables.

    A request node appears under the AddWSDLAddOperationIn node.

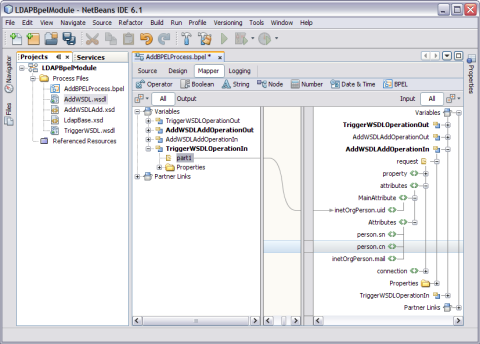
  4. Select the node in the Source tree pane. Drag the selection and map it to the node in the Destination tree pane.

    For example,

    1. Source tree pane: TriggerWSDLOperationIn — Trigger1n
    2. Destination tree node: AddAddOperationIn — request — attributes — MainAttribute — inetOrgPerson.uid

    Map the following:

    TriggerIninetOrgPerson.uid


    image:Map Trigger In
  5. Click Save All.
  6. Expand the node in the Destination tree pane (the right pane) of the BPEL Mapper under Input —> Variables; for example, AddWSDLAddOperationIn.
    1. Select request — attributes — Attributes
      1. Select person.sn.
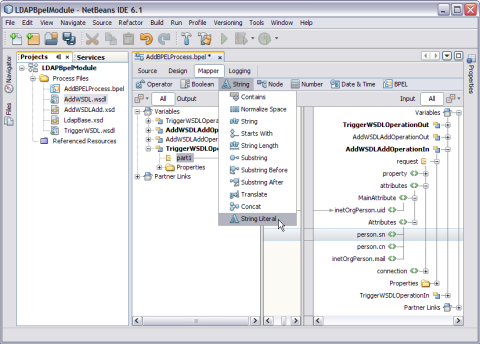
      2. Click String and select String Literal from the drop-down list.
        image:String Literal
      3. Enter the values in the String Literal and map the String Literal with person.sn.

        For example, person.sn = Joe, where sn = surname and person.cn = Jane where cn = common name.


      Note - Similarly, select person.cn and follow steps b and c.
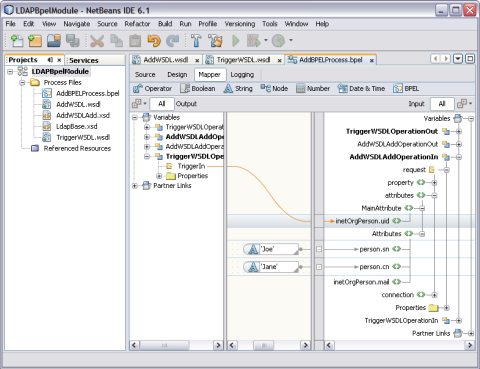


    image:String Literal Mapper
  7. Click Save All.
  8. Click the Design tab.

    Note - A red icon marked against Basic Activities — Assign1 is not shown.
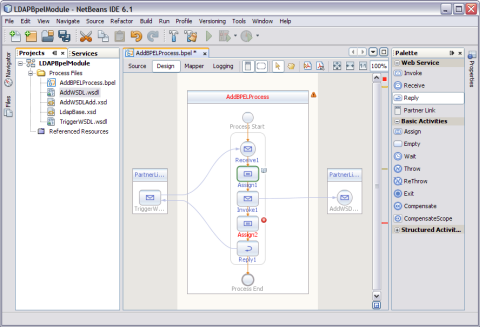


    image:Assign1 Cleared

To Edit the Basic Activities: Assign2

  1. Double-click the Basic Activity: Assign2.

    This displays the BPEL Mapper window.


    Note - Choose Window —> Other —> BPEL Mapper from the main menu if the BPEL Mapper window is not visible.


  2. Expand the node in the Source tree pane (the left pane) of the BPEL Mapper under Output — Variables.

    You should see AddWSDLAddOperationOut.

    Expand response — OperationResult.

  3. Expand the node in the Source tree pane (the right pane) of the BPEL Mapper under Input — Variables.

    You should see TriggerWSDLOperationOut.
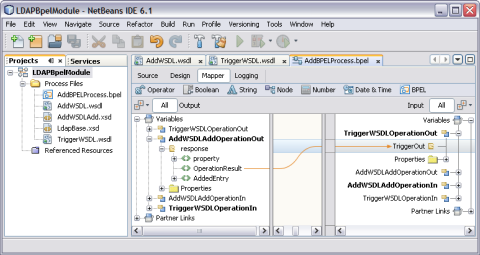
  4. Map OperationResult to TriggerOut.
  5. Click Save All.
    image:Assign2 Mapper
  6. Click the Design tab.

    The final output is as shown in the illustration.
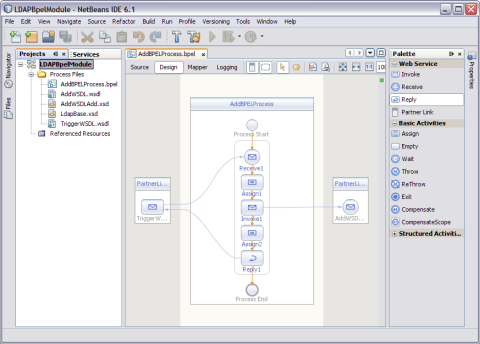

    image:Final Mapper
  7. Right-click the LDAPBpelModule BPEL Module and select Clean and Build.

    The following message appears.

    BUILD SUCCESSFUL (total time: 3 seconds).
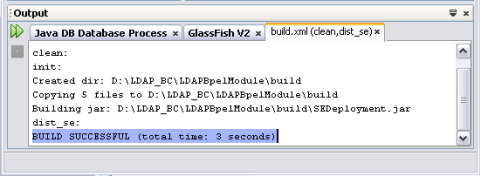
    image:Clean and Build
  8. Click Save All.