You use a scenario to define the people who receive the promotion. (For detailed information on scenarios, see the Creating Scenarios chapter in the ATG Personalization Guide for Business Users.) The scenario tells the system to watch for specific visitor actions or behavior and apply the promotion to those visitors. For example, you decide that you want to offer a special promotion called “New Members” to people who have just registered at your site; the promotion gives them 10% off their first order. You create the promotion as described in this chapter. Then you set up a scenario that tells the system to do the following:
Watch for site visitors to register.
For those visitors, add the “New Members” promotion to the
activePromotionsattribute in their profiles.
When those visitors order a product, the system checks their profile, sees the “New Members” promotion in the activePromotions attribute, and deducts 10% from the total price of the order.
Note: If, when you set up the promotion, you set the Automatically Apply to All Orders attribute to True, you do not need to create a scenario. The system automatically makes this promotion available to all site visitors and checks to see if any such promotions exist whenever a site visitor performs an action that involves a price request.
To create a scenario for a promotion, do the following:
Create a new empty scenario (or a new segment in an existing scenario, if you have one that is appropriate). For more information, see the Creating Scenarios chapter in the ATG Personalization Guide for Business Users.
Add elements that define any visitor behavior or profile attributes that you want to use to trigger the promotion. For example, if you want to give the promotion to people in a particular profile group, add a Condition element that specifies the profile group.
Add an Action element that gives the promotion to the specified visitors. To do this, select Action to display the a list of actions that appears as follows:
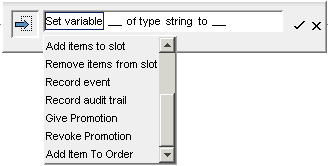
Select Give Promotion from the list of actions.
Click No Items Specified and then click Choose Promotions, as follows:
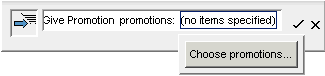
The Choose Items From Product Catalog dialog box appears.
Click List to display all the promotions you have previously set up in your Promotions repository.
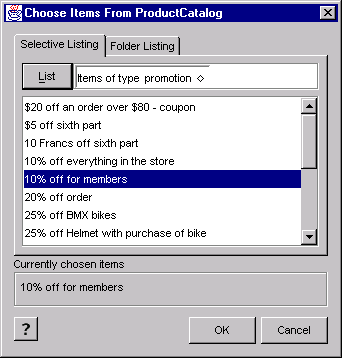
Select the promotion you want to include in this scenario and then click OK. You can include more than one promotion by holding down the Ctrl key and clicking the promotions you want.
Click the checkmark at the end of the element to add it to the scenario.
Enable the scenario and then copy it to the production server. For more information, see the Creating Scenarios chapter in the ATG Personalization Guide for Business Users.
You can add other elements to this scenario if needed. For example, you can add more promotions by adding other Give Promotion elements. Or you can include different elements that extend the scope of the scenario; for example, you could add a Send Email element that sends a message giving information about the promotion to the people to whom it now applies. You could also add an Audit Trail element so that you can keep track of the promotions that you offer to site visitors. (For more information on audit trails, see the Creating Scenarios chapter in the ATG Personalization Guide for Business Users.)
The following shows a simple scenario that makes a promotion called “10% off order” available to anyone who registers to become a member:

In this scenario, the system watches for any site visitor to register. Then it adds the promotion called “10% off for members” to the activePromotions attribute in the profiles of the people who just registered. Finally, this scenario includes an Audit Trail element that records the Give Promotion action in the predefined Audit Trail dataset.
Note: You can also deliver a promotion to site visitors via a URL on a JSP. Your page or application developer can embed the ID of the promotion you want to offer in a URL. When a site visitor clicks that URL, the promotion is added to the visitor’s activePromotions Profile property. For more information, see Delivering a Promotion via a URL.
Withdrawing Promotions
You can limit the duration of promotional campaigns in various ways; ideally, you include a Time element in the promotion scenario that limits the period during which the system can apply the discount.
You can also use a scenario Action element called Revoke Promotion to withdraw a promotion for specific visitors under certain circumstances. For example, you might set up a complex series of promotions that, in rare cases, would allow a visitor to receive a double discount on a particular item, and you might decide that this behavior is undesirable. To correct it, you could set up a Revoke Promotion element that would cancel one of the promotions if necessary.
The Revoke Promotion element works the same way as the Give Promotion element. You set up a scenario segment that defines the visitor behavior or the circumstances that will trigger the withdrawal of the promotion, and then you add the Revoke Promotion element, specifying the name of the promotion to withdraw.
