Once you have created Closeness Qualifiers for a promotion by deciding when they should display to users and the products associated with them, you need to create a trigger action that signals ATG Commerce to check whether a Closeness Qualifier is appropriate for a user.
There are two ways of doing this. Instruct a page developer to use the ClosenessQualiferDroplet servlet bean on a page to check to see if any of the Closeness Qualifiers are applicable to the active user and to display the media item on that page. For example, if this servlet bean were used in a checkout page, when applicable Closeness Qualifiers are detected, you can display a media item beside a list of products in the shopping cart and their totals. For instructions on using the ClosenessQualiferDroplet servlet bean, see ClosenessQualifierDroplet.
Another way to detect when a user deserves Closeness Qualifier is to use scenarios. You can create a scenario that determines when a user qualifies for a Closeness Qualifier and then performs some other action, such as adding an item to a slot or sending an email. You can also use a scenario to determine when a user no longer qualifies for a Closeness Qualifier and react accordingly (for example, remove an item from a slot). Here are scenario elements that you should know about:
The Promotion Closeness Qualification event determines when a user obtains a Closeness Qualifier. You can use this event to listen for any Closeness Qualifier or for a Closeness Qualifier with a certain
repositoryId. See Promotion Closeness Qualification for more information.The Promotion Closeness Disqualification event is activated when a user no longer qualifies for a Closeness Qualifier. You can focus this event to monitor all Closeness Qualifiers or a Closeness Qualifier with a certain
repositoryId. See Promotion Closeness Disqualification for more information.The Add Item to Slot action allows you to add Closeness Qualifiers using
PromotionUpsellTargeterto a slot. Only Closeness Qualifiers that are relevant for the specified event are added here.The Add Item to Slot action allows you to add products that are part of an Upsell Action to a product slot using
PromotionUpsellProductTargeter. Only Upsell Actions that are relevant for the specified event’s Closeness Qualifiers are added here.
The sections below describe sample scenarios that provide upsell incentives.
Adding an Item to a Slot When Users Qualifies for a Closeness Qualifier
The following scenario specifies that, when a user has one or more Closeness Qualifiers, those Closeness Qualifiers are added to a slot. Then, a page developer can access the media items designed for each Closeness Qualifiers and display them to users in rotating succession.
Follow these steps to create the scenario:
In the Scenarios task area, create a new empty scenario (or a new segment in an existing scenario, if you have one that is appropriate). For more information, see the Creating Scenarios chapter in the ATG Personalization Guide for Business Users.
Add an Event element to the scenario.
Select Promotion Closeness Qualification from the list of events. This event checks to see whether the user has any Closeness Qualifiers.
Click the check mark in the scenario element to close it.
Add an Action element to the scenario.
Select Add Items to Slot from the list of actions.
Select each of the following values from the successive drop down lists in the element editor:
namea slot able to hold Closeness Qualifiers
from targeterPromotionUpsellTargeter
Click the check mark in the scenario element to close it.

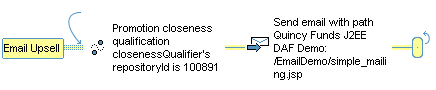
Sending an Email When Users Qualifies for A Closeness Qualifier
This example demonstrates how to create a scenario that sends an email to a user when that user qualifies for a particular Closeness Qualifier.
In order to create the scenario, you need to know the ID for the Closeness Qualifier. To find this information, locate the Closeness Qualifier in the Catalog Management > Catalog Elements task area by causing Items of type Closeness Qualifier to display.
Select the Closeness Qualifier. The
repositoryIDis in the ID field. If the ID field is not visible, go to Tools > Preferences on the menu, and select the Show expert-level information checkbox. Take note of therepositoryIDfor future reference.In the Scenarios task area, create a new empty scenario (or a new segment in an existing scenario, if you have one that is appropriate). For more information, see the Creating Scenarios chapter in the ATG Personalization Guide for Business Users.
Add an Event element to the scenario.
Select Promotion Closeness Qualification from the list of events. This event checks to see whether the user has any Closeness Qualifiers.
Specify the particular Closeness Qualifier by selecting each of the following values from the successive drop down lists in the element editor:
whereclosenessQualifier's(Be sure that you selectclosenessQualifier's, not the default selectionclosenessQualifer.)repositoryIdisType a string
In the space provided, enter the ID for the Closeness Qualifier that you noted earlier and click the check mark in the scenario element to close it.
Add an Action element to the scenario.
Select Send email from the list of actions. This action allows you to specify an email template that will be sent to all qualifying users.
Depending on where the email template lives, select With Path or With Dynamo Path. Use With Path when your template is on your file system. Use With Dynamo Path when your template exists in a context path defined within the ATG platform.
Click Choose mail template to open the Select a Document dialog box.
In the top portion, select the context path folder in which your template lives.
In the bottom portion, select the template. Click OK.
Click the check mark in the scenario element to close it.
Removing Closeness Qualifiers From a Slot When They No Longer Apply
Assume that each Closeness Qualifier appropriate for a user is added to a slot. If a user performs an action that makes him or her lose that Closeness Qualifier, you should remove the Closeness Qualifier from the slot.
In the Scenarios task area, create a new empty scenario (or a new segment in an existing scenario, if you have one that is appropriate). For more information, see the Creating Scenarios chapter in the ATG Personalization Guide for Business Users.
Add an Event element to the scenario.
Select Promotion Closeness Disqualification from the list of events. This event checks to see whether the user has previously qualified for Closeness Qualifiers that he or she no longer qualifies for.
Click the check mark in the scenario element to close it.
Add an Action element to the scenario.
Select Remove Items from Slot from the list of actions.
Select each of the following values from the successive drop down lists in the element editor:
namea slot able to hold Products
from targeterPromotionUpsellProductTargeter
Click the check mark in the scenario element to close it.

