Use the Maintain
Classes - Class Details page (LM_ACT) to define the class in terms
of such things as minimum and maximum attendees, size of the waitlist,
last enrollment date, drop dates and penalties for drops, and fees
and reminders.
Navigation
select Enterprise Learning, then select Catalog, then select Maintain Classes, then select Class Details
Image: Maintain Classes - Class Details page (1 of
3)
This example
illustrates the fields and controls on the Maintain Classes - Class
Details page (1 of 3).
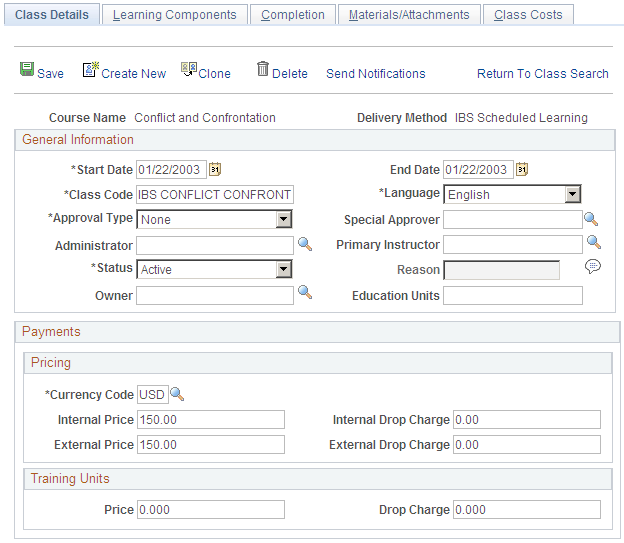
Image: Maintain Classes - Class Details page (2 of
3)
This example
illustrates the fields and controls on the Maintain Classes - Class
Details page (2 of 3).
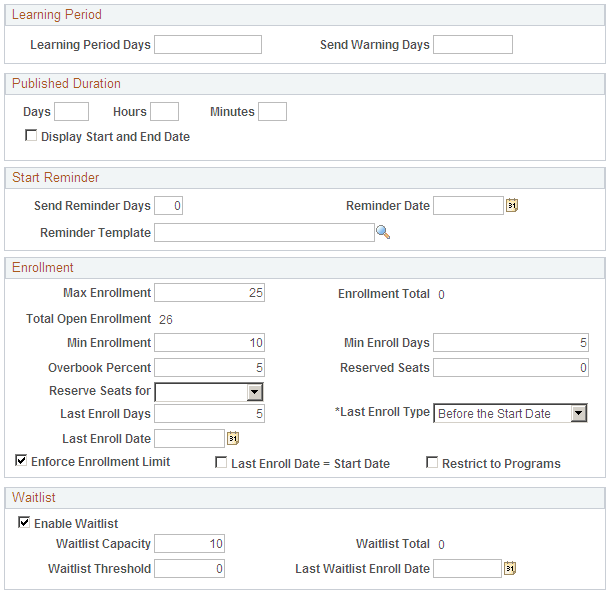
Image: Maintain Classes - Class Details page (3 of
3)
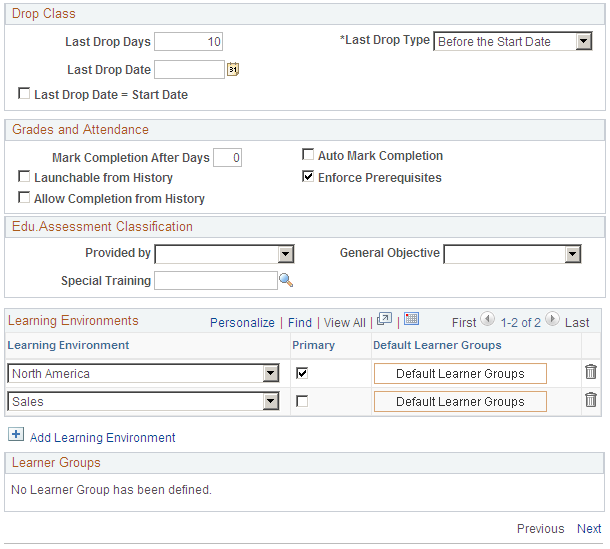
This example
illustrates the fields and controls on the Maintain Classes - Class
Details page (3 of 3).
Note: When you modify the Class
Code, Status, Start Date, or End Date fields you must re-build the catalog index
before the learning catalog reflects the changes. You must also re-build
the catalog index if you add or delete learning environments or learner
groups. You can run the Build Catalog Search Index (LM_VER_IDX) application
engine process manually, or you can schedule it to run at predetermined
intervals.
See Updating the Catalog Indexes.
General Information
| Class Code |
The class code appears on the course catalog and
during registration and is used by administrators, instructors, and
learners to identify specific classes. The value that you enter must
be unique if the Class Code Option on the Install Defaults - General
page is set to Restricted. If that option is set to Restricted by
LE, the value you enter must be unique to your learning environment.
Note: If you enable automatic class code generation on
the Install Defaults - Counter Records (LM_CNTR_SETUP_PG) page, the
system creates a class code for new classes when you click Save.
See Install Defaults - Counter Records Page.
|
| Start Date |
Enter the class's start date. This is the fist day
learners can launch content from classes that contain web-based, survey,
and test learning components.
The system uses this date to determine when to send
class reminders if you enter a value in the Send Reminder field. It also uses this value to determine
when to send the minimum enrollment notification if you enter a value
in the Min Enroll Days field,
and it uses this value to determine the last date a learner can drop
the class without incurring drop charges if you entered a value in
the Last Drop field.
|
| End Date |
Enter the class's end date. This is the last day
learners can launch content from classes that contain web-based, survey,
and test learning components. The end date is also the last date learners
can enroll in the class, unless the last enrollment date set for the
class comes first. In addition, the class end date triggers the Auto
Mark Class Completion process if you selected the Auto Mark Completion check box. End date
also triggers the Learning Period Expiration notification (LM_ACT_LRNPD)
when the end date precedes the end of the learning period.
Note: When you enter both a class end date and a learning
period, the system uses the date that comes first to determine the
end of the class.
Important! (FRA) If you plan to generate the 2483 report with
cost data that you export to the Administer Training business process
in PeopleSoft HR, it is recommended that you set the end date of self-based
classes to December 31 and clone the class for each subsequent year
the class is offered. The end date ensures that the 2483 report includes
only those costs that are attributable to the reporting year.
See Understanding Cost Management.
|
| Approval Type |
If enrollment in the class requires approval, select
the approval process definition here. The approval process definition
defines the conditions under which enrollment must be approved and
who must give their approval. The system populates this field by default
from the Item Details page.
|
| Special Approver |
This field is applicable when you select a value
in the Approval Type field.
You can designate any Enterprise Learning Management user as a special
approver for class enrollment. The approval process definition selected
in the Approval Type field determines
when the person named here is required to approve the enrollment.
If the approval process does not require a special approver, the system
ignores the name entered here.
|
| Administrator |
Enter or select the name of the enrollment administrator
from the internal and external learners in your system.
|
| Primary Instructor |
Enter the default instructor for any session learning
components associated with the class. In addition, entering a primary
instructor here can be useful for self-paced learning components (web-based,
test, survey, assignment) that do not have instructors assigned at
the learning component level. The system does not process any costs
associated with instructors entered here. The system only uses instructors
added to session templates, session patterns, or sessions to calculate
costs for a class. The system populates this field by default from
the Delivery Method page.
|
| Status |
Set the status of the class. The status of the class
impacts enrollment in the class as described. Values are:
Active: Class
appears in the Learning Catalog and learners can self-enroll into
the class.
Closed: Classes
that are closed appear in the learning catalog for learners in self-service
but learners cannot self-enroll. Whenever a class is closed, only
the learning administrators can enroll learners into that class.
Concluded: Concluded classes do not appear in the learning catalog for learners
to view or enroll in through self-service. Concluded classes are available
to administrators and they can enroll learners into this class. An
administrator must mark this status manually.
Inactive: Classes that are inactive do not appear in the learning catalog for
learners to view or enroll in through self-service. Whenever a class
becomes inactive, all enrollments (except for those that are completed
or incomplete) are automatically dropped, and an email notification
is sent to all the learners (whose enrollments are dropped).
When you select this status, the Reason field and Inactive Status Comments icon become available.
Pending: This is the default for classes when they are first created. Classes
with an enrollment status of pending can be viewed and managed by
administrators but cannot be viewed or enrolled in by learners through
self-service.
Note: You cannot save classes with Active, Closed, or Concluded statuses that do not have any learning components.
|
| Reason |
Enter the reason that you are setting the status
of the class to Inactive. Values
are: Class Cancelled, Class Correction Needed, Class Removed, and Class Schedule Change.
These are delivered values. You can add, delete,
or modify reasons on the Reason Code page.
See Reason Codes Page.
Note: The Reason field is available only if you select a value of Inactive in the Status field.
|
| Inactive Status Comments |
Click this icon to access the Update Comments for
Inactive Class Status page where you can enter additional information
about why you changed the class status to Inactive.
Note: This icon is available only if you select a value
of Inactive in the Status field.
|
| Language |
Indicate the language the class will be offered
in.
|
| Education Units |
Enter the number of continuing education units that
you want accredited to the learner on completion of this class. The
value is for informational purposes only. The system populates this
field by default from the Items Detail page.
|
| Owner |
The owner is the person who is notified when the
minimum enrollment is not met for the class. By default, the system
displays the name of the administrator who creates the class.
The Owner field works in conjunction with the Min
Enrollment field and the Min Enroll Days field. Workflow must be activated
for the minimum enrollment notice to be sent.
|
Pricing
| Currency Code |
Select the currency code that applies to the monetary
amounts entered in this group box. The system populates this field
by default from the Delivery Method page.
|
| Internal Price |
Enter the price you are charging internal learners
to enroll in this class. Internal learners are learners that you
track in your human resource database, such as employees, contractors,
and workers. The system populates this field by default from the Delivery
Method page.
|
| Internal Drop Charge |
Enter the amount you want to charge internal learners
for dropping this class after the drop period, as defined in the Drop
Period group box.
|
| External Price |
Enter the price you are charging external learners
to enroll in this class. External learners are those who you do not
track in your human resource database, such as non employees. The
system populates this field by default from the Delivery Method page.
|
| External Drop Charge |
Enter the amount you want to charge external learners
for dropping this class after the drop period, as defined in the Drop
Period group box. The system populates this field by default from
the Delivery Method page.
|
Training Units
| Price |
Enter the number of training units you want this
class to be worth. If you selected training units as a payment option
on the Learning Environments - Defaults page, external learners will
see the value you enter here when registering for the course. The
system populates this field by default from the Delivery Method page.
Note: Training units only apply to external learners.
|
| Drop Charge |
Enter the number of training units you want learners
to be charged after dropping the class after the drop period. The
system populates this field by default from the Delivery Method page.
|
Learning Period
| Learning Period |
Enter the number of days after the start date or
enrollment date (whichever is greater) that learners have to complete
the class. The end of a learning period triggers the Auto Mark Class
Completion process, which sets the learner's learning component and
class completion statuses to Completed or Not Completed, depending
on whether the learner achieved the requirements for completion.
The system populates this field by default from
the Delivery Method page. Learning periods are particularly useful
for classes that contain web-based, test, or survey learning components.
Note: When you enter both a class end date and a learning
period, the system uses the date that comes first to determine the
end of the class.
|
| Send Warning |
Enter the number of days before the end of the learning
period that you want the system to send an email notification to the
learner expressing that the learning period is about to expire. The
warning will also be sent based on the end date if it comes before
the end of the learning period. This field triggers the PeopleSoft
Application Engine process to send the Learning Period Expiration
notification (LM_ACT_LRNPD)
|
Published Duration
| Days, Hours,
and Minutes |
Enter an estimate of how long the class should take.
This should be the total of the durations of the learning components
that make up this class, plus any other time you think it might take
the learner to complete. The class duration you enter here appears
on the Class Details and Class Progress pages.
Learning component durations do not roll up to the
class durations, so you must enter it manually if you want to provide
a duration estimate to learners. Duration is not related to learning
period. Duration is the amount of time the class should actually take
to complete, whereas the learning period is the amount of time the
learner has to complete the class. Most often the learning period
will be longer than the duration. The system populates this field
by default from the Delivery Method page.
|
| Display Start and End Date |
Select if you want to display the class start and
end date to learners. The default for this field is selected. Clear
this field to display "- -" to learners in enrollment notifications
and in the class header on the Class Details and Progress pages. Learners
also see "Anytime" in the Start Date column on the <Class Name> page. Clear this field if displaying
the start date would be confusing to learners, such as for a self-paced
class in which the start date is often not applicable to learners.
|
Start Reminder
| Send Reminder |
Enter the number of days from the class start date
that you want an email sent to learners and instructors reminding
them about the start of the class. Alternatively, you can specify
a particular date for the reminder to be issued in the Reminder Date field. A scheduled PeopleSoft
Application Engine process performs the class reminder notification.
See Class Reminder.
|
| Reminder Date |
Enter the date on which you want an email sent to
learners and instructors reminding them about the start of the class.
Alternatively, you can enter in the Send
Reminder field the number of days before the start date
that you want the reminder sent. A scheduled PeopleSoft Application
Engine process performs the class reminder notification.
|
| Reminder Template |
Select an email template from the templates that
you have set up. You set these up in
PeopleSoft delivers the following default reminder
template: LM_ACT_RMNDR.
.
|
Enrollment
| Max Enrollment (maximum enrollment) |
Enter the maximum number of learners you want to
enroll in this class. When this number has been reached, the system
closes the class to further enrollment unless overbooking is permitted,
in which case the system continues to enroll learners up to the user-specified
overbook percentage. If waitlisting is also permitted, learners become
waitlisted when the overbook percentage is reached. The system populates
this field by default from the Delivery Method page.
The system uses the number that you enter here when
calculating the per seat cost of the class if the maximum number of
learners enroll. You must enter a maximum enrollment value in order
to calculate per seat costs.
See Assigning Class Costs.
Note: If an administrator enrolls a waitlisted learner
after the maximum enrollment number has been met, the system increments
the maximum enrollment number by one. For example, if the maximum
enrollment number is 10, the enrollment total is 10, the overbook
percentage is zero, and the enrollment limit is enforced, the system
increments the maximum enrollment number from 10 to 11 when the administrator
uses the Maintain Enrollments component to enroll a waitlisted learner.
|
| Enrollment Total |
Displays the number of learners who have successfully
enrolled in the class. The total reduces if enrollments are cancelled
or postponed. The enrollment process keeps this field updated.
|
| Total Open Enrollment |
The system displays the total amount of seats that
are currently available for open enrollment. The system derives this
number by increasing the maximum enrollment number by the overbook
percentage, then subtracting the number of reserved seats, and finally
subtracting the number of learners already enrolled . So if maximum
enrollment equals 25, overbook percentage equals 5%, reserved seats
equals 10, and 5 learners have already enrolled, then 25 + 1 [25 x
.05 = 1.25] – 5 – 10 = 11. The total open enrollment would equal 11.
|
| Min Enrollment (minimum enrollment) |
Enter the minimum number of learners you want to
be enrolled for this class to proceed. The system populates this field
by default from the Delivery Method page.
The system uses the number that you enter here when
calculating the per seat cost of the class if only the minimum number
of learners enroll. You must enter a minimum enrollment value in order
to calculate per seat costs. The value you enter here also triggers
the Minimum Enrollment Met Alert notification (LM_ACT_MINEN).
See Minimum Enrollment Met Alert.
|
| Min Enroll Days (minimum enrollment days) |
Enter the number of days before the class start
date that you want the minimum enrollment notification sent to the
enrollment administrator and class owner to alert them that the minimum
enrollment has not been reached. A scheduled PeopleSoft Application
Engine process performs the Minimum Enrollment Met Alert notification
(LM_ACT_MINEN). This notification gives the class administrator and
owner the opportunity to cancel this class due to low enrollment.
The system populates this field by default from the Learning Environments
- Defaults page.
|
| Overbook |
Enter the percentage above the maximum enrollment
value that you will allow enrollment. The overbook value, multiplied
by the maximum enrollment number, is the total number of enrollments
that the system accepts before the system assigns the waitlist status
to a learner who tries to enroll in this class. The system populates
this field by default from the Learning Environments - Defaults page.
|
| Reserved Seats |
Enter the number of seats you want available in
reserve. Only training administrator can enroll learners into reserved
seats. Use reserved seats to reserve seats for groups of learners
without naming specific learners. For example, you could reserve seats
for new hire orientation, where you have a large number of learners
who will enroll but who are not yet in your system. You can revise
the number of reserved seats at anytime.
|
| Reserve Seats For and Name |
Enter a value in these fields if you want to reserve
seats for a specific Department or Organization. Select the
specific department or organization in the Name field that becomes available when you select a value
in the Reserve Seats For field.
The system reserves seats only for learners associated with the department
or organization that you select.
|
| Last Enroll (last enrollment) |
Enter the number of days Before the Start Date or After
the Start Date to indicate the last day enrollment is
permitted. This is useful, for instance, when you want to close enrollment
to accommodate the ordering of materials for the class. You can set
days in this field or a specific date in the Last Enroll Date (last enrollment date) field. The system
populates this field by default from the Learning Environments - Defaults
page.
|
| Last Enroll Date |
Enter a date that represents the last day on which
enrollment into this class is permitted. Alternatively, you can specify
how many days before or after the class start date learners can enroll
in the Last Enroll field or
you can set the last enroll date at the class start date by selecting
the Last Enroll Date = Start Date check box.
|
| Last Enroll Date = Start Date |
Select if you want the last day learners can enroll
in this class to equal the class start date. Alternatively, you can
enter a last enrollment date in the Last Enroll Date or you can specify
how many days before or after the class start date learners can enroll
in the Last Enroll field.
|
| Enforce Enrollment Limit |
Select to prevent learners from enrolling in this
class when the maximum enrollment number plus the overbook percentage
is reached. You must select this check box to have the system generate
a waitlist for this class. Deselect the check box if there is no maximum
enrollment limit. The system populates this field by default from
the Delivery Method page.
|
| Restrict to Programs |
Select if you want this class to only be available
to a learner who is enrolled in programs that require this class for
completion.
Administrators can enroll learners in classes that
are restricted to programs by using the Enroll Learners component.
See Enroll Learners - Search for Learning Page.
See Understanding Programs.
|
Waitlist
| Enable Waitlist |
Select if you want the system to accept waitlisted
learners for this class when the maximum enrollment number has been
reached. If overbooking is permitted, the system does not waitlist
learners until the overbook percentage is reached. The system populates
this field by default from the Delivery Method page.
|
| Waitlist Capacity |
Enter the maximum number of learners that the system
can put on the waitlist. The system populates this field by default
from the Delivery Method page.
|
| Waitlist Total |
Displays the number of learners on the waitlist.
The enrollment process increases or decreases this number as learners
are added to or removed from the waitlist.
|
| Waitlist Threshold |
Enter the number of learners on the waitlist that
will trigger a notification to the administrator.
|
| Last Waitlist Enroll Date: |
Enter the date after which the system no longer
automatically enrolls waitlisted learners when an enrolled learner
drops a class.
If you leave this field blank, the system uses the
class's Start Date as the last
date for automatically enrolling waitlisted learners.
|
Drop Class
| Last Drop |
Enter the number of days Before the Start Date or After
the Enrollment Date that a learner can drop the class
without paying the drop fee. Alternatively, you can enter a specific
date in the Last Drop Date field.
The system populates this field by default from the Learning Environments
- Defaults page.
|
| Last Drop Date |
Enter the date until which a learner can drop the
class without paying the drop fee.
|
| Last Drop Date = Start Date |
Select if you want the last day learners can drop
this class without having to pay a drop fee to equal the class start
date.
|
Grades and Attendance
| Auto Mark Completion (automatically mark completion) |
Select to have the system automatically update completion
statuses at the completion of a class. The rules for marking attendance
depend upon the learning components within the class. The system populates
this field by default from the Delivery Method page.
See Marking Attendance and Passing Statuses Automatically.
|
| Launchable from History |
Select if you want the links associated with web-based,
test, or survey learning components to be launchable from the learner's
All Learning page after the class achieves a completion status of Completed or Not Completed. The system populates this field by default
from the Delivery Method page.
Note: You must select this check box if you select Allow Completion from History.
|
| Enforce Prerequisites |
Select if you want the enrollment process to enforce
required class prerequisites. If this check box is cleared, the classes'
required prerequisites will not be enforced during enrollment. Even
if this check box is selected, the learning administrator can still
override prerequisites for individual learners during group and mass
enrollment. Managers cannot override prerequisites for a learner directly,
but can use the Supplemental Learning page to give learners waivers
on courses, objectives, and programs. The system populates this field
by default from the learning environments defaults or installation
defaults. Define prerequisites on the Item Details - Prerequisites
page.
|
| Mark Completion After |
If you selected the Auto
Mark Completion check box, enter the number of days after
completion of the class that the system is to automatically update
the attendance and passing statuses. If the value is 0, the system updates the attendance records
on the completion date. The system populates this field by default
from the Delivery Method page.
|
| Allow Completion from History |
Select if you want learners to be able to complete
classes that have web-based, test, or survey learning components after
the class achieves a completion status of Completed or Not Completed.
For example, if a learner does not pass or complete a class the first
time through he or she can return later to try to complete it. If
the Launchable from History check
box is selected and this check box is cleared, then learners can launch
the content but their progress will not be updated and no changes
will be made to the class's completion or passing status.
Note: If you select this check box be sure to also select
the Launchable from History check
box.
|
Edu. Assessment Classification (educational
assessment classification)
This group box appears only for classes of courses
that are eligible for DIF. The information you enter in the fields
of this group box are used to generate the Educational Assessment
report for external learners.
| Provided By |
Indicate by whom the training was provided. Values
are: Org as Subcontractor (organization
as subcontractor), Organization, Subcontractor of Org (subcontractor
of organization).
|
| General Objective |
Enter the general objective of the class. Values
are: Guidance/Support, Level I or II, Level III, Level IV, Level V, Other, Skills
Assessment, Training recog. by RNCP (training recognized
by Le Répertoire National
des Certifications Professionnelles)
|
| Specialist Training |
Enter any specialist training that applies to the
class. You define the valid values for this field on the Specialist
Training page.
See Specialist Training Page.
|
Learning Environments
| Learning Environment |
By default, the administrator's learning environment
is listed here. You can associate other learning environments with
this class provided the learning environments are also associated
with the corresponding course.
The learning environments selected here control
which learner groups you can associate with the class.
|
| Primary |
Indicate the primary learning environment.
See Understanding Learning Environments.
|
| Default
Learner Groups |
When you click this button, the system adds all
learner groups that are associated with the class's course for this
learning environment. For example, say that the course is associated
with the North America learning environment and with two learner groups
for North America. When you click the Default Learner Groups button
on this page, the system automatically associates both learner groups
with this class.
|
Learner Groups
A learner must be a member of a learner group that
is listed here to access this class when browsing or searching the
catalog. When you click the Default Learner Groups button, the system
lists the defaulted learner groups. You can make access to the class
more restrictive by removing learner groups or by combining learner
groups, but you cannot add learner groups that are not already associated
with the related course.
To further define learner group access, click the
Edit Learner Group Security link. This causes additional fields to
appear:
| Relationship |
Specify how this learner group is related to others
in the list when used to determine whether or not a person has access.
Values are:
And: A learner
must be a member of both this learner group and the next in the list.
Or: A learner
must be in this learner group or the next in the list.
End: A placeholder
for the last learner group in the list. The system ignores any learner
groups that are listed after End.
To define security such that a learner must be a
member of learner group A, and a member of learner group B or C, you
must reuse learner group A. The resulting security would look like
this:
Learner group A and
Learner group B or
Learner group A and
Learner group C end.
Important! Associate a class with at least one learner group.
If you do not select a learner group, learners cannot access this
class.
|
| Clone Class |
This button is enabled after you save a class. It
enables you to clone and modify the class.
|
| Delete Class |
Click to delete the class. If the class has any
enrollments, the button is hidden.
|