Defining Default Processing Rules and Options
To define default system settings and options, use the Install Defaults (LM_IN_DFLT_CMP) component and the Payment Methods (LM_SYS_PYT_MTHD_DF) component.
This topic provides an overview of default values and discusses how to:
Set up general installation defaults.
Set up installation defaults for enrollment.
Define installation defaults for attendance.
Define installation defaults for programs.
Set counter records.
Select default payment methods for organizations.
Pages Used to Define Default Processing Rules and Options
|
Page Name |
Definition Name |
Navigation |
Usage |
|---|---|---|---|
|
Install Defaults - General |
LM_IN_DFLT_GEN |
|
Define general default values and rules at the installation level. |
|
Install Defaults - Enrollment |
LM_IN_DFLT_ENRLMT |
|
Define default values and rules for enrollment at the installation level. |
|
Install Defaults - Attendance |
LM_IN_DFLT_ATTN |
|
Select the attendance status values that you want the Auto Mark Class Completion process to assign to a learner's attendance record when it determines that the learner has attended, not attended, or initiated attendance in the learning component. |
|
Install Defaults - Programs |
LM_IN_DFLT_PRG |
|
Define default rules for programs at the installation level. |
|
Install Defaults - Counter Records |
LM_CNTR_SETUP_PG |
|
Reset the counter records for various IDs that you create throughout the Enterprise Learning Management system. |
|
Install Defaults - Dashboard |
LM_IN_DFLT_DASHBRD |
|
Define default rules for the Learning Home dashboard at the installation level. |
|
Payment Methods |
LM_SYS_PYT_MTHD_DF |
|
Define default payment methods for an organization. |
Understanding Default Values
Defining default values provides a convenient way to assign consistent business rules to classes. Most entries that you make in the Install Defaults component become the default values for selected fields that are within the learning environment, course, delivery method, class, and program components. Default values for certain fields have a cascading effect. For example, the language that is selected on the Install Defaults page becomes the default language for the learning environment, which becomes the default language for the delivery method. In most cases, you can override the default value at another level. For example, you can override the default language at the learning environment level, the delivery method level, or both.
The following table shows where various install default values are used throughout the system:
|
Field Name |
Learning Environment |
Course |
Delivery Method |
Class |
Program |
|---|---|---|---|---|---|
|
Allow Completion from History |
X |
X |
X |
||
|
Allow Cascading Expirations |
X |
||||
|
Allow Concurrent Enrollment |
X |
||||
|
Allow Nested Programs |
X |
||||
|
Currency Code |
X |
X |
X |
X |
|
|
Default Requestor |
X |
||||
|
Display Certification Status on the Self Service Home Page |
X |
||||
|
Display Objectives on the Self Service Home Page |
X |
||||
|
Enable Learning Request |
X |
X |
|||
|
Enable Waitlist |
X |
X |
X |
||
|
Enforce Prerequisites |
X |
X |
|||
|
Estimated Cost |
X |
X |
X |
||
|
Hourly Cost |
X |
X |
|||
|
Language Code |
X |
X |
X |
||
|
Last Drop |
X |
X |
|||
|
Last Drop Date = Start Date |
X |
X |
|||
|
Last Enroll |
X |
X |
|||
|
Last Enroll Date = Start Date |
X |
X |
|||
|
Launchable from History |
X |
X |
X |
||
|
Learning Period |
X |
X |
X |
||
|
Learning Request Threshold |
X |
X |
|||
|
Min Enroll Days (minimum enrollment days) |
X |
X |
|||
|
Overbook |
X |
X |
|||
|
Require eSignature on Updates |
X |
||||
|
Session Start Time |
X |
X* |
|||
|
Session End Time |
X |
X* |
|||
|
Time Zone |
X |
X* |
|||
|
Waitlist Threshold |
X |
X |
X |
||
|
Warning Period |
X |
X |
X |
* Session components only.
Install Defaults - General Page
Use the Install Defaults - General page (LM_IN_DFLT_GEN) to define general default values and rules at the installation level.
Image: Install Defaults page
This example illustrates the fields and controls on the Install Defaults page.
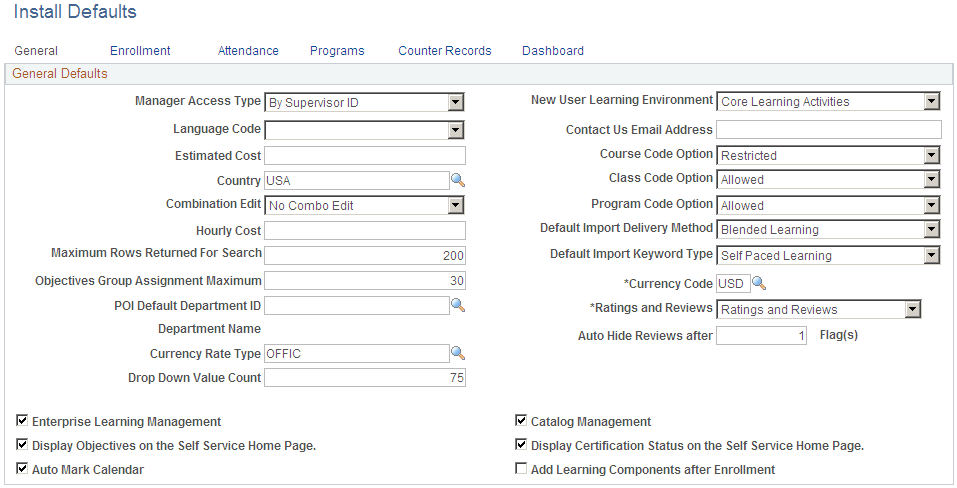
| Manager Access Type |
Select the management reporting structure that you want Enterprise Learning Management to recognize. The choice should be consistent with the management structure that the human resources system uses. The option that you select determines which internal learners a manager sees when accessing the manager self-service pages. It also determines who must approve enrollment when a class requires manager approval, and which manager receives enrollment notifications. After you make a selection, you must also run the Load Manager Data (LM_MGRVWAE) process, through the Load Manager Data component, to update the manager view definition with the appropriate script based on the manager access type that you select here. Options are:
You can import the Reports To and Supervisor ID fields from PeopleSoft HCM by using Enterprise Integration Points (EIPs). If you use a third-party human resources system, and want to use an option other than Dept/Mgr, map the Reports To and Supervisor ID fields in the PS_LM_PERSON_JOB table to corresponding fields in the human resources system before importing your data. |
| New User Learning Environment |
The system assigns this value by default as the learning environment for all new departments that you import through the DEPT_SYNC or DEPT_FULLSYNC Enterprise Integration Points (EIPs). You can change the learning environment for departments on the Review Departments page. Note: To complete this field, you must first define learning environments. When completing the Install Defaults page for the first time, you can leave this field empty and return to this page in Update mode after you create learning environments. |
| Language Code |
Select the default language for classes. The system uses this value as the default value for learning environments and delivery methods of a class. |
| Contact Us Email Address |
To enable Enterprise Learning Management users to send email inquiries about various aspects of the learning system to a central email address, enter the address here. Entering the address here causes the system to display the Contact Us link at the bottom of some self-service pages, including the enrollment pages and learning plan pages. |
| Estimated Cost |
This field pertains to training plan budget reports. Enter the estimated cost, per learner, of delivering a class. When you generate a training plan that includes classes for which no estimated hourly amount is defined, the system can use this value to determine the forecasted cost for the class. You can override this value at the learning environment, course, and delivery method levels. |
| Course Code Option |
Specify whether the same course code can be assigned to more than one course. Options are:
|
| Country |
Select the default country code that is to be used for addresses. PeopleSoft provides an Enterprise Integration Point (EIP) that you can use to synchronize country codes with the system of record (for example, PeopleSoft HCM). |
| Class Code Option |
Specify whether the same class code can be assigned to more than one class. Options are:
|
| Combination Edit |
Combination editing enables the system to validate Chartfield values that are dependent on each other. This field integrates with PeopleSoft Financials applications. Select Synch Edit to activate synchronization of the Enterprise Learning Management combination editing tables with PeopleSoft Financials combination editing tables. The system validates sets of Chartfield values against the Chartfield combination editing rules that are defined in PeopleSoft Financials whenever you save an Enterprise Learning Management page that has ChartFields. Select None if you do not want to synchronize the combination editing table. For example, perhaps you have a third-party financial system. |
| Program Code Option |
Specify whether the same program code can be assigned to more than one program. Options are:
|
| Hourly Cost |
This field pertains to training plan budget reports. Enter the estimated hourly cost, per learner, of delivering a class. When you generate a training plan, the system can use this value to determine the forecasted cost for a class based on the hours defined for each of the class's components on the Recommended Duration page. You can override this value at the learning environment and delivery method levels. |
| Default Import Delivery Method |
Select a default delivery method for classes created using class templates. |
| Maximum Rows Returned for Search |
Enter the maximum number of rows that the system returns during searches. |
| Default Import Keyword Type |
Select a default keyword type for classes created using class templates. Keywords are an optional feature used to help learners and administrators find specific learning options in the learning catalog. |
| Objectives Group Assignment Maximum |
Enter the maximum number of learners to which an administrator can assign the same learning objective through group objective assignment. During group objective assignment, if the group of learners exceeds the number that is set here, the system warns the administrator that the group exceeds the limit. The administrator then has the option to continue with the assignment for learners up to the maximum, switch to mass objective assignment, or refine the group criteria to achieve a group that is within the limits. |
| Catalog Search Operator |
Select the operator that the system uses when you initiate a search from the Search Catalog or My Learning page. Values are: IN: If you select this value, the system searches for complete words that you specify. SUBSTRING: If you select this value, the system searches by matching the character string you specify. The character string can occur at the beginning of a field value, within a field value, or at the end of a field value. |
| POI Default Department ID (person of interest default department ID) |
Select the department to associate with internal learners who do not have a department ID in your HR application. (Typically, these are persons of interest without jobs.) The learning environment for these learners will be derived from the department specified here, instead of from the New User Learning Environment field. An internal learner's department controls chargeback information for enrollment fees. It may also determine who approves a learner's enrollment and registration requests. If a department is later assigned to the learner in the HR application, the department is uploaded into the learner's profile in Enterprise Learning Management. The learning environment is not automatically updated; you can change it on the learner's Job Data page, if necessary. If this field is cleared, and you try to import a learner without a department, the import validation process will generate an error, preventing creation of the learner profile. Note: To complete this field, you must first import departments from the HR application. When completing the Install Defaults page for the first time, you can leave this field empty and return to this page in Update mode after you import departments. |
| Currency Rate Type |
Select the market rate type to identify the exchange rate table to use for currency conversions. You can purchase currency conversion tables from third-party vendors. The system displays OFFIC as the default value. To illustrate the use of this field, suppose that you define a class with currency code of USD and assign the class an instructor who has a currency code of CAD. The system uses the table that you specify here to look up the exchange rate to apply to the instructor's fee. |
| Currency Code |
Enter the default currency code that applies to the fees and costs that are associated with classes and programs. An administrator can override this value at the learning environment, delivery method, class, and program levels. PeopleSoft provides an Enterprise Integration Point (EIP) that you can use to synchronize currency codes with the system of record (for example, PeopleSoft HCM). |
| Drop Down Value Count |
Enter the maximum number of values to display in some of the drop-down value lists in the system. Sort order is determined by ID. Note: This value applies only to certain drop down lists in the system, not all of them. |
| Ratings and Reviews |
Select how you want to implement the review framework for your system.
|
| Auto Hide Reviews after |
Enter the number of flags after which the system hides a review. Users can flag reviews on the Review Details page. |
| Enterprise Learning Management |
This check box controls the recognition of the installed Enterprise Learning Management product. Do not edit this check box. The installation process selects this check box automatically when you install the product. Be sure the setting for this check box is accurate before using your Enterprise Learning Management system. Warning! Once the install process selects this check box, the check box must remain selected. Do not deselect this check box or else you can lose functionality. |
| Catalog Management |
Catalog Management relates to PeopleSoft Enterprise Components and is reserved for future use. This check box should be selected. |
| Display Objectives on the Self Service Home Page |
Select to have objectives with a status of needed or in progress appear in a separate grid on the My Learning page. The My Learning Objectives grid lists each objective's name, proficiency, status, target completion date, who assigned the objective, and the associated class or program. An administrator can override this value at the learning environment level. |
| Display Certification Status on the Self Service Home Page |
Select to have certification programs with a status of complete, expired, or warning display in a separate grid labeled My Certification Status on the self-service My Learning page. The system will display the program name, status, date, and a Recertify button. An administrator can override this value at the learning environment level. |
| Auto Mark Calendar |
Select to automatically send scheduled class information to learners' calendars. |
| Add Learning Components after Enrollment |
Select to allow learning components to be added to classes after learners have already enrolled in it. You can add learning components to a class as long as its status is not Completed for any of the enrolled learners. |
Install Defaults - Enrollment Page
Use the Install Defaults - Enrollment page (LM_IN_DFLT_ENRLMT) to define default values and rules for enrollment at the installation level.
Image: Install Defaults - Enrollment page
This example illustrates the fields and controls on the Install Defaults - Enrollment page.
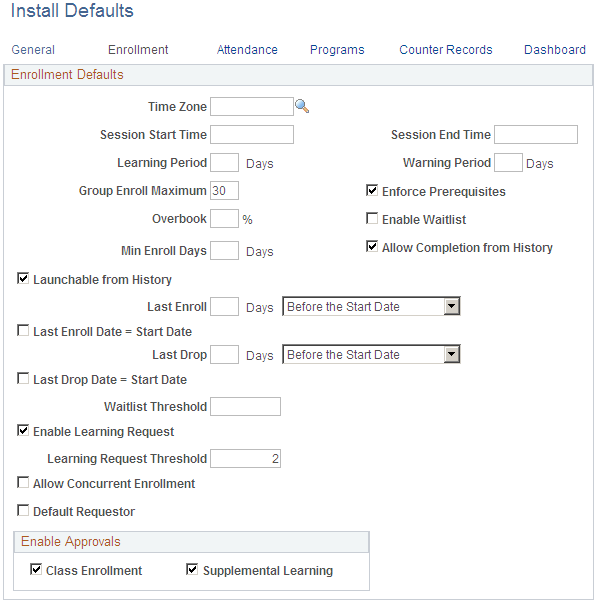
Enable Approvals
Select to enable approvals for Class Enrollments or Supplemental Learning.
Note: Selecting these does not indicate that approvals are required for enrollments or supplemental learning. It only indicates that the approval functionality is available.
Install Defaults - Attendance Page
Use the Install Defaults - Attendance page (LM_IN_DFLT_ATTN) to select the attendance status values that you want the Auto Mark Class Completion process to assign to a learner's attendance record when it determines that the learner has attended, not attended, or initiated attendance in the learning component.
Image: Install Defaults - Attendance page
This example illustrates the fields and controls on the Install Defaults - Attendance page.
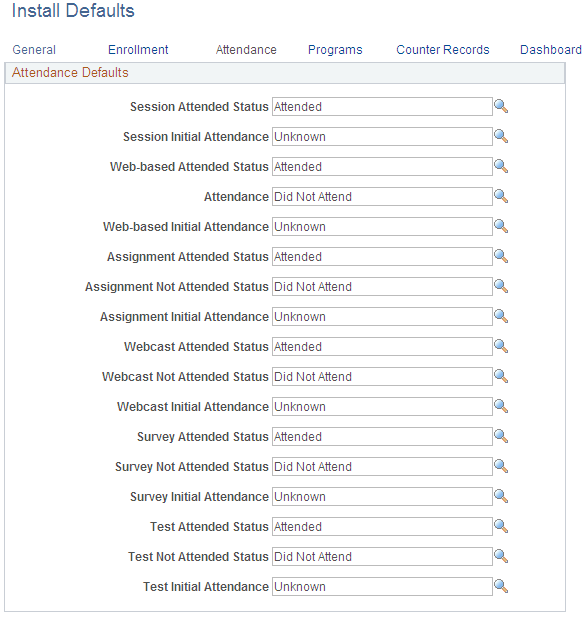
For each type of learning component, select the attendance status values that you want the Auto Mark Class Completion process to assign to a learner's attendance record when the process determines that the learner has attended, not attended, or initiated attendance in the learning component. The attendance values that you select are based on the values that you define on the Attendance Schemes page. For an attendance scheme, you can create multiple labels for each of these three core attendance statuses—attended, did not attend, and unknown—and you can give each one a label that specifically meets the needs of your organization's learning environment for a given learning component. When you run the Auto Mark Class Completion process, the engine uses the values that you set on the Install Defaults - Attendance page to mark attendance for learners.
For all learning component types but session, the Auto Mark Class Completion process can track initial attendance. Therefore, you can define the initial attendance status for these component types on this page. For sessions, however, instructors track attendance and enter the data into the system. To save instructors time, the Auto Mark Class Completion process automatically marks all learners as attended for sessions. Instructors can then mark learners as not attended.
Install Defaults - Programs Page
Use the Install Defaults - Programs page (LM_IN_DFLT_PRG) to define default rules for programs at the installation level.
Image: Install Defaults - Programs page
This example illustrates the fields and controls on the Install Defaults - Programs page.
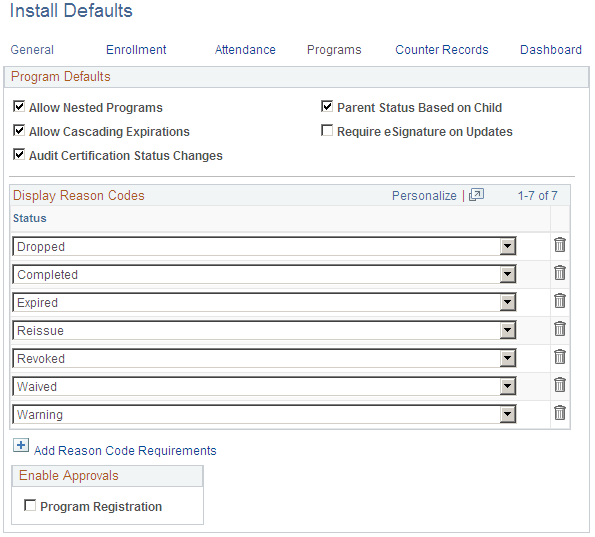
Program Defaults
Display Reason Codes
You can enable administrators to select a reason code when they make certain updates to a learner's certification status through the program roster. Use the Reason Codes page to create reason codes and the Reason Code Mapping page to associate reason codes with the certification statuses that you select here.
See Defining Reasons for Program and Class Status Updates.
Enable Approvals
Selecting the Program Registration check box causes an Approval Type field and a Special Approver field to display on the Maintain Programs - Details page. An administrator can use these fields to define the approval requirements for program registrations.
Install Defaults - Counter Records Page
Use the Install Defaults - Counter Records page (LM_CNTR_SETUP_PG) to reset the counter records for various IDs that you create throughout the Enterprise Learning Management system.
Image: Install Defaults - Counter Records page (1 of 3)
This example illustrates the fields and controls on the Install Defaults - Counter Records page (1 of 3).
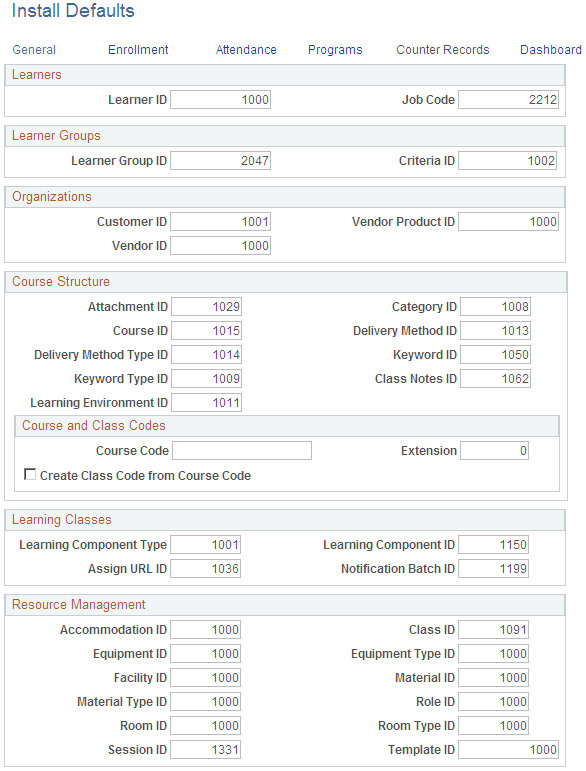
Image: Install Defaults - Counter Records page (2 of 3)
This example illustrates the fields and controls on the Install Defaults - Counter Records page (2 of 3).
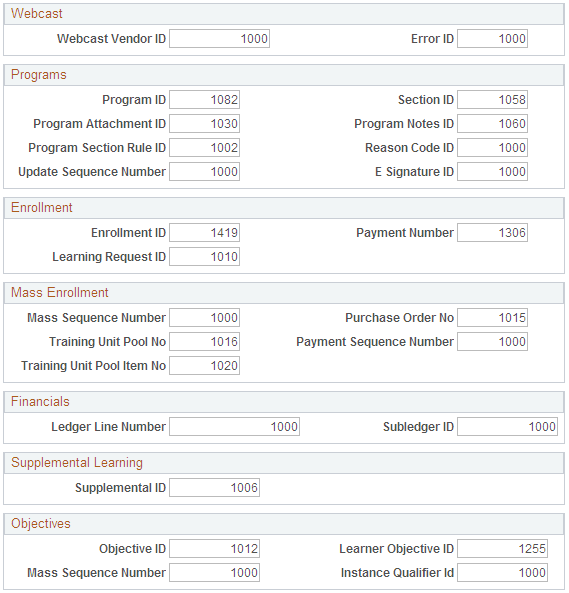
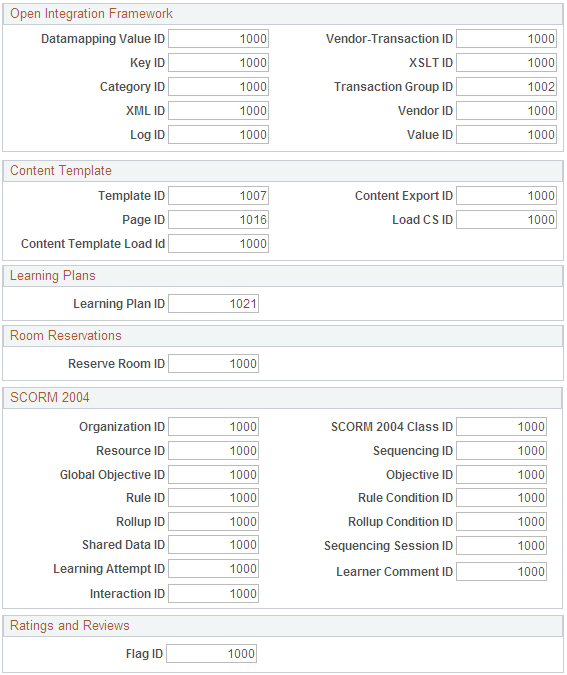
Image: Install Defaults - Counter Records page (3 of 3)
This example illustrates the fields and controls on the Install Defaults - Counter Records page (3 of 3).
Enterprise Learning Management automatically assigns an ID number or counter to many records as they are created. Initially, counters are set to 0 or 1000, depending on the type of record. When a new record is created, the system increments the counter by one. For example, if the Learner ID is set to 1000, when you add a new learner, the system assigns the learner ID, 1001. The ID numbers that were last assigned are always displayed on the Install Defaults - Counter Records page.
You can adjust the counters if necessary. For example, if during implementation you need to import legacy records that already have IDs, you can set the counter to a number higher than the last legacy ID. This ensures that the system will assign a unique ID to each new record that you add in Enterprise Learning Management.
Note: The system incrementally increases all counters for any internal Enterprise Learning Management processes. It does not increment IDs for data that you load from external sources through external means, such as through Structured Query Language.
Course and Class Codes
Install Defaults - Dashboard Page
Use the Install Defaults - Dashboard page (LM_IN_DFLT_DASHBRD) to define default rules for the Learning Home dashboard at the installation level.
Image: Install Defaults - Dashboard page
This example illustrates the fields and controls on the Install Defaults - Dashboard page.

My Current Learning Pagelet
| Maximum Rows Displayed |
Specify the maximum number of rows that appear in the My Current Learning pagelet of the Learning Home. |
Team Learning Pagelet
- Maximum Rows Retrieved
-
Specify how many rows the Team Learning Pagelet displays when you click the View All link.
- Learning Plan Threshold
-
Specify the number of days that the system uses to determine when to display the Due Soon icon for a learning plan in the Team Learning and My Current Learning pagelets.
- Learning Objective Threshold
-
Specify the number of days that the system uses to determine when to display the Due Soon icon for an objective in the Team Learning and My Current Learning pagelets.
Popular Learning Pagelets
New Learning Pagelet
Payment Methods Page
Use the Payment Methods page (LM_SYS_PYT_MTHD_DF) to define default payment methods for an organization.
Image: Payment Methods page
This example illustrates the fields and controls on the Payment Methods page.
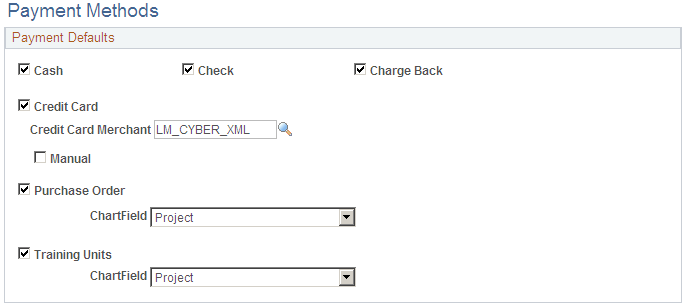
Payment methods relate to the payment of enrollment and registration fees. The payment methods that you select on this page appear by default on the Learning Environments - Defaults page in the Learning Environments component, where you can override the default values.