Adding assets to the asset tray does not add them to a project. Assets in the asset tray are added to a project only when they are changed, for example, if they are successfully updated as part of a Multi Edit operation. Assets remain in the asset tray when you log out of the Business Control Center or your session expires.
Note: To learn how to add assets to the asset tray in Layout view, see Working with Visual Merchandising.
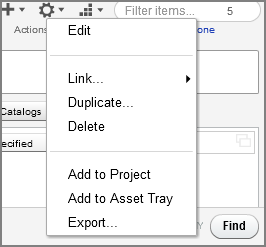
To add assets to the asset tray:
In the Find or Browse panel, select the assets you want to edit. See Using the Navigation Pane for details. When you add assets to the asset tray, child assets are not automatically selected.
Click the Actions button in the toolbar and select Add to Asset Tray.
Alternately, you can drag the selected assets to the asset tray. For more information, see Tips for Dragging Assets to the Asset Tray and Using Drag and Drop in Merchandising.
The asset tray expands and displays one or more tiles. Each tile represents one or more assets. By default, if you selected different types of assets, Merchandising automatically groups them by type. For example, if you drag both products and SKUs to the asset tray, two tiles appear; one contains the products and one contains the SKUs.
Note: Your administrator may have configured Merchandising so that each asset you add to the asset tray appears as a separate tile by default.
Each tile shows the number and type of assets it represents.
If a new tile represents a group of assets, enter a descriptive name for the tile. This name simply helps you keep track of assets in the asset tray; it does not become a property of any of the assets in the group. If you do not enter names for tiles, Merchandising automatically names them Untitled 1, Untitled 2, and so on.

To remove a tile from the asset tray, move the mouse pointer over the tile until an X appears in its upper-right corner. Click the X.
