Managing Receipts
This section discusses how to Manage Receipts
|
Page Name |
Definition Name |
Usage |
|---|---|---|
|
PO_PICK_ORDERS |
Search for and retrieve purchase order schedules against which to create receipts. Select the PO Receipt check box before entering the Select Purchase Order page. This page is not available when creating a receipt for non-purchase order items. |
|
|
RECV_WPO |
Create receipts for non-purchase order and purchase order line items. |
|
|
Item Description Page |
RECV_ITEM_DESCR, RTV_ITEM_DESCR_FS, PO_PICK_IT_DESCR |
Enter and view descriptions for a specific item. |
|
RECV_WPO_HDR |
View and enter receipt header information. |
|
|
Maintain Receipts - Receipt Header Comments Page |
RECV_COMMENTS_SEC |
View and enter comments for the receipt header level. |
|
Maintain Receipts - Activities Page |
RECV_ACTIVITY_SEC |
Enter information that pertains to the receipt activity. You can use this page to record comments, due dates, and activity status. |
|
Receipt DOC Status Page |
PRCR_DOCSTAT_INQ |
Access and review information about procurement documents associated with a receipt. |
|
RTV_LN_DISP_SEC |
View details about any RTV transactions created for the selected receipt. |
|
|
RUN_RECVACCR_OL |
Run the Receipt Accrual process, the Miscellaneous Charges process, or both. |
|
|
RECV_WPO_DETAILS |
View receipt line item details. |
|
|
RECV_WPO_AM |
View and enter information about asset purchases. This information is passed to PeopleSoft Asset Management. This page is available for entry only if the selected receipt is targeted for PeopleSoft Asset Management. One or more of the distributions must have a PeopleSoft Asset Management business unit and AM profile designated, and optionally, other asset management data. |
|
|
RECV_WPO_PUTAWAY |
View and enter overriding information used to put items away in inventory business unit storage locations. This page is available only if the receipt line is targeted for inventory (one or more of the distributions must have an inventory business unit assigned). This is applicable to purchase order and non-purchase order receipts. |
|
|
Device Tracking Page |
RECV_WPO_DEVICE |
View and enter serial/component and lot/batch information. This page is only accessible for items that have been flagged for device tracking. This option is only available if you select device tracking for the receipt line. The device tracking value appears by default from the Item Master table. |
|
Receipt Line Comments Page |
RECV_COMMENTS_SEC |
View and enter comments and attachments for the receipt line. |
|
RECV_WPO_DIST |
View distribution information for the selected receipt. |
|
|
PO Distribution Details Page |
RECV_WPO_PO_DIST |
View purchase order distribution information. |
|
RECV_WPO_MFG |
Maintain manufacturing information for the receipt line. |
|
|
RECV_INV_ITEMS_SP |
View detailed inventory information entered for an inventory-related item. |
|
|
RECV_STOR_LOC_SRCH |
Search available storage locations for the material that you are receiving. |
|
|
Putaway Locations Page |
IN_PTWY_LOC_SP |
Define directed putaway information for receipt items. This button is active only if you have enabled Directed Putaway for the business unit and defined putaway rules on the Putaway Rules page. |
|
RECV_WPO_PRO |
Add receipt progressive numbers. |
|
|
RECV_PO_LN_COMMENT |
View purchase order header, line, and ship to comments for the associated purchase order line or purchase order schedule levels. |
|
|
Pegging Workbench Page |
IN_PEG_DETAIL_SP |
View the pegging information. |
|
Pre-AM 1 Page |
INTFC_PRE_AM_01 |
Preview data in the Pre-Interface Pre-AM 1 table. You can correct information in the fields that are available for data entry. |
|
Purge ASN History Page |
RUN_PO_ASN_PURGE |
To purge the EC rows when transaction is complete |
Use the Select Purchase Order page (PO_PICK_ORDERS) to search for and retrieve purchase order schedules against which to create receipts.
Select the PO Receipt check box before entering the Select Purchase Order page.
Navigation:
Purchasing, Receipts, Add/Update Receipts, select a purchase order
Click the Select Purchase Order link on the Maintain Receipts - Receiving page.
This example illustrates the fields and controls on the Select Purchase Order page. You can find definitions for the fields and controls later on this page.
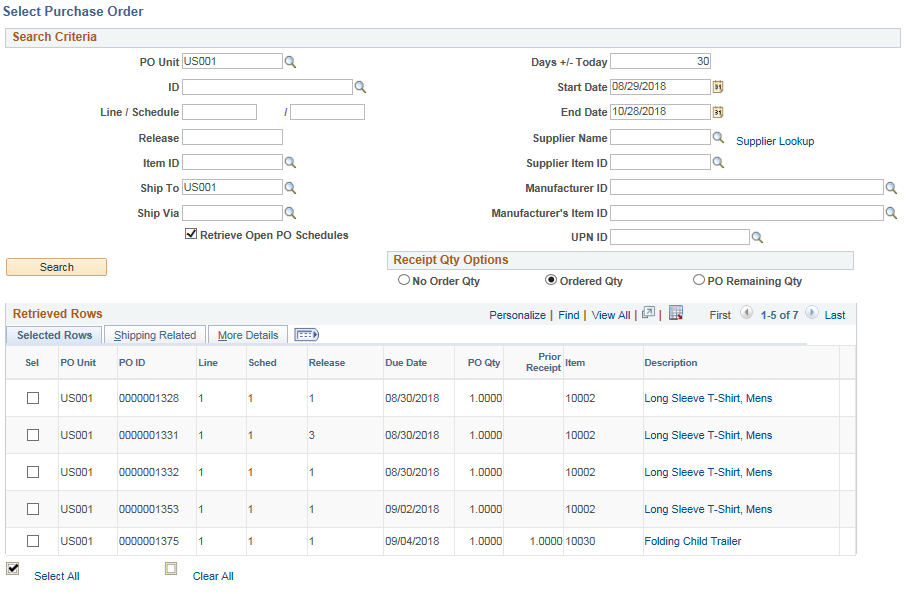
Note: This page is only available if you select the PO Receipt check box on the Add/Update Receipt dialog box.
The search functionality of this page enables you to perform a broad or narrow search on purchase orders based on a variety of search criteria. You can use one or all of the available fields. After the search retrieves a list of purchase order line and schedules that meet the search criteria, you can select the purchase order line and schedules and have the system place them on the transaction document.
Field or Control |
Description |
|---|---|
PO Unit (PeopleSoft Purchasing business unit) |
Select the business unit. |
ID |
Enter the purchase order number or purchasing contract number. Entering a contract ID retrieves all of the purchase order schedules associated with the contract. Note: The open purchase order schedules is controlled by the Retrieve Open PO Schedules check box. |
Line and /Sched Num (schedule number) |
Enter the purchase order line and schedule numbers. |
Release |
Enter the release number of the contract associated with the item, if applicable. |
Retrieve Open PO Schedules |
Select this check box to retrieve only purchase order schedules that haven't been fully received. If you do not select this check box, purchase orders that have been fully received appear in the search, as well as purchase order schedules that haven't been fully received. |
Days +/- Today |
Enter a value to further restrict or expand the number of purchase order schedules that appear within the start date and end date values. This value is added or subtracted from the current date to calculate the start date and end date values. The default value appears from the User Preferences - Procurement: Receiver Setup page. You may also enter the start date and end date. The system will select all schedules whose due date falls on or between the two dates. |
Start Date and End Date |
Used as a comparison against the purchase order due date to determine which schedules are retrieved. These values appear by default to the current date plus or minus the value in the Days +/- Today field. |
UPN ID (Universal Product Number Identifier) |
Enter a UPN ID, which is one of the search criteria to retrieve the PO Line. |
Receipt Qty Options
Select No Order Qty (no order quantity), Ordered Qty (ordered quantity), or PO Remaining Qty (purchase order remaining quantity) to determine the receipt quantity to appear. These fields specify quantities to transfer to the receipt. Accessibility to these fields is determined by the user's blind receipt authorization set on the User Preferences - Procurement: Receiver Setup page.
Field or Control |
Description |
|---|---|
No Order Qty (no order quantity) |
Select this option to signify that the receiver must enter the actual quantity received. This selection requires a live count of the items prior to receipt in the system. If selected, the copy function does not transfer order quantities to the receipt. You will need to manually enter all receipt quantities. |
Ordered Qty (ordered quantity) |
Select this option to automatically make the received quantity the purchase order quantity. This selection makes the receipt quantity the purchase order quantity regardless of any prior receipt quantity. |
PO Remaining Qty (purchase order remaining quantity) |
Select this option to have the receipt display the numeric difference between the quantity ordered and the current quantity received. Selecting this option replaces the received quantity with the quantity that has not yet been received. |
Search |
Click this button to display purchase order lines and schedules that match the entered criteria in the Retrieved Rows group box. |
Retrieved Rows
In this group box, all the purchase order lines and schedules that match the search criteria appear.
Selected Rows
Field or Control |
Description |
|---|---|
Sel (select) |
Click this check box next to a purchase order line to work with a particular line. You can select multiple schedules at once when this page is accessed from the Maintain Receipts - Receiving and Return To Vendor pages. |
Prior Receipt |
Displays the number of items already received. |
Shipping Related
Select the Shipping Related tab.
Field or Control |
Description |
|---|---|
Orig Prom (original promise date) |
This values appears by default from the purchase order schedule and contains the purchase order schedule original due date. |
More Details
Select the More Details tab.
Field or Control |
Description |
|---|---|
UPN Type |
Displays the UPN Type for the PO line. |
UPN ID |
Displays the UPN ID for the PO line. |
PO Amount (purchase order amount) |
Displays the monetary value of the merchandise on the selected purchase order line. |
Recv Reqd (receiving required) |
Displays whether receiving is required for this item. Values are:
If receiving is required, the item is subject to any receiving tolerances defined for the item. |
Rcv Tol % (receiving tolerance percentage) |
If tolerance is activated for the receipt of this item, the tolerance percentage appears. This percentage determines how much of an over shipment is allowed without having to reject items. |
Price |
Displays the unit price of the item on the selected purchase order line. |
Use the Maintain Receipts - Receiving page (RECV_WPO) to create receipts for non-purchase order and purchase order line items.
Navigation:
(PO receipt) Select a purchase order line on the Select Purchase Order page and click the OK button.
This example illustrates the fields and controls on the Maintain Receipts - Receiving Page. You can find definitions for the fields and controls later on this page.

Note: If a supplier sent you ASR information using electronic data exchange and the receipts have already been created by the Receive Load process, the receipt information appears in the scroll area for your review in Update/Display mode.
Field or Control |
Description |
|---|---|
Header Details |
Click this link to access the Maintain Receipts - Header Details page. Use this page to view and enter receipt header information. |
Receipt Status |
Status of the receipt header. Values are: Closed (closed receipt) Hold (hold receipt) Moved (moved to destination) Open (open) Received (fully received) Canceled (canceled) |
|
Click the Cancel Receipt button to cancel the entire receipt. Canceling the transaction cannot be reversed. |
Add/Edit Comments |
Click the Add Comments link to access the Maintain Receipts - Receipt Header Comments page. Use this page to add header level comments that will be associated with this receiver ID. Once comments are added, the link will be displayed as Edit Comments. Click the link to add additional header level comments or to review existing ones. |
Activities |
Click this link to access the Maintain Receipts - Activities page. Use this page to add or review activities associated with the receipt header. |
Document Status |
Click this link to access the Receipt DOC Status page. Use this page to review information about procurement documents associated with the receipt. |

Header
Field or Control |
Description |
|---|---|
Supplier ID, Supplier Location, and Ship To Location |
Select the supplier ID, supplier location, and Ship To location for the non-purchase order receipt item. These fields must be entered before you can continue with a non-purchase order receipt. For purchase order receipts these fields are display only and appear by default from the purchase order. |
Close Short All Lines |
Click to select the Close Short check box for all eligible receipt lines in the Receipt Lines grid box. Then, you can click the Run Close Short check box at the bottom of the page to initiate the closing of purchase orders at the time of receipt. If the Run Close Short check box is selected when the receipt is saved, and one or more of the receipt lines have the Close Short check box selected, the Receipt Push process (PO_RECVPUSH) process calls the Close Short (PO_CLSSHORT) process. The Receipt Push process deselects the Run Close Short check box after the Close Short process has run. You can also run the Close Short process using the Close Short menu option. You can also include receipts created using mobile devices when the Close Short process is run. When you save the receipt in the Mobile Inventory Management application and the Receipt Push process runs, the process calls the Close Short process to create the close short transactions for the purchase orders included in the receipt. See Understanding How to Receive Stock in PeopleSoft Inventory Using Mobile Receiving. You select the Run Close Short check box on the User Preferences Receiver Setup page to provide users with permission to close a purchase order. |
Print Delivery Report |
Click this button to save the currently entered receipt information and initiate the RECV_DEL multi-process job in the same business event. The RECV_DEL multi-process job contains the Receipt Delivery (PO_RECVDELV) application engine process that gathers data for the Receipt Delivery Detail report (receiving data along with purchase order header and line comments) and the Receipt Delivery Detail (POY5030) report that produces a report from the gathered information. Note: This job can also be activated from a mobile device using the Mobile Inventory Management application. See Understanding How to Record Deliveries in PeopleSoft Purchasing Using Mobile Inventory Management. |
Run PO Receipt Accrual |
Click this button to access the Accrue Receipt page where you can run the Receipt Accrual process, the Miscellaneous Charges process, or both. The button is only available if the receipt has been saved and is eligible for accrual. Note: An error will appear if Do Not Generate Reversal is not selected as the reversal code on the Journal Generator Template. |
Select Purchase Order |
Click this link to access the Select Purchase Order page. Use this page to search for and retrieve purchase order schedules against which to create a receipt. |
Receipt Lines
Receipt lines display in this group box for the purchase order lines selected on the Select Purchase Order page.
Field or Control |
Description |
|---|---|
|
Click the Details button to access the Receipt Line Details for Line page, where you can view details about the receipt. This page formats the information you see here and on the subsequent tabs in a single long page format. |
Description |
If you are receiving against a purchase order, the item selected and its description will be displayed. If you are entering a non-purchase order receipt, you can enter an existing item ID and a description and category will be displayed. If you have the authority to change a non-purchase order receipt price, you can enter just a description for the item you are receiving. After you enter the description for the item, the Category field is available for entry. |
|
This icon appears on a transaction line whenever the ‘Original Substituted Item field’ is populated. This indicator helps the Requester or Buyer to know whether the item has been substituted. If Original Substituted Item and Description are already displayed in the component, i.e. Requisition and PO, a text ‘Substitute Item in Use’ and the Original Substituted Item and Description fields will appear. If the Original Substituted Item and Description fields are not displayed anywhere in the component, click on the icon to view another page displaying these values |
Original Substituted Item and Description |
The ‘Original Substituted Item’ field displays the original Item ID on the transaction line that was replaced when a Substitute Item was found. Once the field is populated, the original Item ID will not be overridden with another Item ID If the Item ID field is changed directly by the Requester or Buyer, the ‘Original Substituted Item’ field is cleared out. Similarly, if the Supplier ID/Location field is changed by the Requester or Buyer, then the value in the ‘Original Substituted Item’ field is cleared and the value is moved back to the Item ID field These fields are displayed from the Requisition through to the PO. However, these fields do not appear in case of online update by the Requester or Buyer. The Original Substituted Item Description field displays the Item Description for the Original Substituted Item, if the field is populated When using ‘Copy From’ to copy a Requisition into a new Requisition or a Purchase Order into a new Purchase Order, the ‘Original Substituted Item’ for each transaction line is cleared out and the value is moved back to the Item ID field. When using ‘Copy From’ to copy a Requisition into a Purchase Order, values remain the same |
Receipt Price |
When an item is received against the purchase order, the item's purchase order price is displayed in the receiving unit of measure. If you are entering a non-purchase order receipt and have specified an item ID, the item's purchasing item attributes price is displayed. If you have the authority to change a non-purchase order receipt price, you can make modifications here. Additionally, if you entered a description only item, you would enter the price here. When the price is changed the new price will be used to recalculate transaction and base merchandise amounts on the receipt line. Note: The item description, price, and category will no longer be available for modification once the non-purchase order receipt line has been moved to inventory, moved to assets, or accounts payable matching has fully or partially matched a voucher. |
Receipt Qty (receipt quantity) and Recv UOM (received unit of measure) |
Enter the quantity delivered and the UOM in which it was received. When you enter the receipt quantity for a line, the Accept Qty value is calculated by subtracting the rejected quantity from the receipt quantity. If you are using the supplier rebate functionality, you can still change the receipt quantity that was previously entered, even if there are accrued rebate transactions tied to this receipt with a vendor rebate claim. However, in this case the rebate accrual transaction won't be recalculated but a workflow and/or email notification will be sent to the rebate manager. After reviewing the changes, the rebate manager must decide whether manual actions, such as adjusting the subsequent claim amount, is required. If there are no accrued rebate transactions you can change the receipt quantity and the Rebate Accruals process will recalculate the rebate accrual transaction. |
|
Click the Copy quantity down button to enter the same Receipt Qty (received quantity) value on the selected line to all Receipt Qty fields for all subsequent lines. |
Accept Qty (accepted quantity) |
Displays the quantity of items accepted. When you enter a Receipt Qty value for a line, the accepted quantity is calculated by subtracting the rejected quantity from the receipt quantity. |
Status |
Displays the status of the receipt line. Closed (closed schedule) Hold (hold schedule) Open (open schedule) Received (received schedule) Canceled (canceled schedule) |
Category |
If you have entered a description only for a non-purchase order receipt line item, select the category to associate with the item. |
Close Short |
Select to indicate that you want to include this receipt line when the Close Short process is run. When you select the Run Close Short check box and if one or more receipt lines are selected, the Receipt Push process calls the Close Short process to create the close short transactions for the purchase orders. After the Close Short process is run, the system deselects the Run Close Short check box. To select all eligible receipt lines, click the Close Short All Lines button on the receipt header. |
Serial |
Identifies if the receipt line is serial controlled. If you are receiving a description-only purchase order line (no item ID) and the line is asset-related, the serial check box can be selected. For serial-controlled items, you must enter the serial ID at the time of receipt or the receipt line status stays in the Open status and is not eligible for interfacing to inventory or assets. |
Device Track |
Indicates whether a receipt line is device tracked. The default value is selected and unavailable for device-tracked items unless they are description only (no item ID). The field is available for items that are description only. |
AM Status (asset management status) |
Displays the status of the item data in relation to PeopleSoft Asset Management. Values are: Pending: Indicates that the receipt line is asset-related and is pending interface with PeopleSoft Asset Management. Click the link to access the Asset Management Information for Line page where asset information can be recorded. Moved: Indicates that the receipt line has been interfaced to PeopleSoft Asset Management. If the receipt line is not asset-related this field is blank. |
INV Status (inventory move status) |
Displays the item status in relation to PeopleSoft Inventory. Values are: Pending: Indicates that the receipt line is inventory-related and is pending interface with PeopleSoft Inventory. Click the link to access the Inventory Putaway Information for Line page where storage location information can be reviewed or entered. Moved: Indicates that the receipt line has been interfaced to PeopleSoft Inventory. If the receipt line is not inventory-related this field is blank. |


More Details
Select the More Details tab.
Inspection processing may be performed as a separate business process for the organization. This involves receiving all goods, moving them to an inventory holding area, and then performing the inspection process. To have the receiving agents process shipments and receipts in this manner, select the Separate Inspection check box when setting up the purchasing definitions on the Purchasing Definition - Business Unit Options page. This makes the Inspect Qty field unavailable for entry during the receiving transaction. Inspections are performed in a separate inspection transaction using the Inspection page. If you want the receivers to be able to inspect items and enter inspection quantity at time of receipt, do not select the Separate Inspection check box.
Field or Control |
Description |
|---|---|
Inspect |
If selected, this check box indicates that the receipt line requires inspection. |
Field or Control |
Description |
|---|---|
Reject Qty (rejected quantity) |
Enter the quantity of items to reject. The values in the Net Receipt Quantity (net received) and Accept Qty (accepted quantity) fields are calculated by subtracting the reject quantity from the receipt quantity. |
Reject Action |
Select an action for the rejects. Values are: C (return for credit) R (return for replacement) When you enter or modify a rejection against a PeopleSoft Manufacturing receipt line, and the receipt has already been moved to PeopleSoft Manufacturing, the following adjustments apply when updating the Manufacturing interface table:
|
Reject Reason |
Select a reason for rejecting the item or subcontracted item. If the receipt line is subcontracted related, and you want to perform the streamline process, this reason code you select here must be a valid production scrap code if the reject action is return for credit. |
RMA Number (return material authorization number) and RMA Line |
If available, enter the RMA number the supplier assigned to the rejected item. Supplying this information helps you and the supplier to associate the rejected goods to the original purchase order. RMA information from any return-to-vendor transactions (RTVs) associated with the receipt line does not update the receipt RMA information. |
Net Receipt Quantity |
Displays the number of items received. This is the received quantity less the quantity of items rejected and returned. The quantity returned is included in this calculation if the RTV return action is return for replacement and the RTV Adjust Source check box is selected at the business unit level. |
Allocation Type |
Displays the allocation type for the receipt. The method selected is used when the receipt quantity is less that the quantity ordered. This field appears by default from the Purchasing Definition - Business Unit Options page. Values are: FIFO: (first-in-first-out): Allocations to the distribution quantities are fulfilled based on the sequence in which they are added to the purchase order schedule for purchase order receipts or the receipt line for non-purchase order receipts. Prorate: The receipt amount is prorated across the distributions for the schedule based on what percentage the receipt amount is to the total purchase order schedule's distribution amount. For example, if 50% of the required items were received, each distribution line would be allocated 50 percent of its required quantity. Specify: The user will specify the quantity received for each distribution line. Split Distributions: The receipt quantity is allocated to the distributions in the same manner as the prorate type and the resulting receipt asset lines are all assigned to the same asset. For serialized items, each individual unit is split across all the distributions and grouped together under a separate asset. |
Ship To |
Displays the location to which the supplier delivered the items. |
Attention To |
Displays the person to whom, or place to where the services or goods are to be delivered. This value is copied from the purchase order and can originate from a requisition. |
Links and Status
Field or Control |
Description |
|---|---|
Line Comments |
Click the Comments icon to access the Maintain Receipts - Receipt Line Comments page. Use this page to add line level comments that will be associated with this receiver ID. Click the link to add additional line level comments or to review existing ones. |
Item / Mfg Data
Select the Item / Mfg Data tab.
Field or Control |
Description |
|---|---|
|
Click the Manufacturing Info button to access the Maintain Receipts - Manufacturing Information for Line page. Use this page to maintain the inventory putaway information related to the receipt line for the manufactured item when the related subcontracted operation is the last operation on the operation list. |
UPN Type |
Displays the UPN Type for the receipt line. |
UPN ID (Universal Product Number Identifier) |
Displays the UPN ID for the receipt line. |

Note: The UPN Type and UPN ID field values defaults from the referred PO line for a PO receipt. In case of a non-PO receipt, the values for these fields are taken from the UPN defaulting hierarchy.
Optional Input
Select the Optional Input tab.
Field or Control |
Description |
|---|---|
Hold |
Select this check box to put the receipt line on hold. When selected, the receipt line status is set to H (hold). |
Invoice Number |
Enter the invoice ID assigned by the supplier. The invoice ID from the receipt header appears by default to the receipt lines. If no invoice ID is assigned to the receipt header or line, the packing slip value will be copied to the invoice ID when the receipt is saved. An invoice ID is required for ERS processing of the receipt. |
Packing Slip |
Enter the packing slip ID for the received merchandise. The packing slip appears by default from the receipt header. |
Pro Number (progressive number) |
Enter the tracking number assigned to the shipment in which the material arrived. This progressive number appears by default from the receipt header. If multiple progressive numbers exist for this receipt line, you cannot change the value in the field. Click the Multiple Pro link to access the Maintain Receipts - PRO Numbers page where you can change the numbers. |
Multiple Pros(multiple progressive numbers) |
Click to access the Maintain Receipts - PRO Numbers page where you can view or add additional progressive numbers. Using the page, you can specify progressive numbers or you can add them using an auto-sequence function to create numbers. |
Origin Country |
Select the country from which the received items were shipped. This value is used for Intrastat reporting. |
Replacement |
Indicate that a shipment is a replacement for a prior return. This is used for Intrastat reporting. NA (not applicable) RN (replaced goods not returned): Indicates that this shipment is a replacement for goods that were not returned to the supplier. RR (replacement of returned goods): Indicates that this shipment is a replacement for goods that were returned to the supplier. |
Intrastat Distribution Status |
Used for Intrastat reporting and indicates whether this receipt has been processed by the Intrastat reporting process. Valid values are: Distribute (Distributed) Ignore (Ignored) Archive (Archival entry) Reversal (Reversal entry) Undefined (Undefined) |
Source Information
Select the Source Informationtab.
Field or Control |
Description |
|---|---|
Original Substituted Item |
Displays the original item ID on a procurement transaction that is being substituted. Once an Original Substituted Item is designated for a procurement transaction, it is carried all the way through to the receipt and cannot be changed. (The field name is also referred to as Original Item in some cases where the Item may or may not have been substituted.) |
|
Click the Pegging Inquiry button to access the Pegging Workbench page. Use this page to view details associated with the pegged line. |
Procurement Group ID |
(Display only) Displays the Procurement Group ID for the item if the purchasing group options are enabled and if you selected a procurement group for your purchase order. See Purchasing Options Page and Setting Up Procurement Groups. |
Primary Unit |
(Display only) Displays as selected if this item is the primary unit for the Procurement Group ID, if applicable. |
Unit Allocation Qty |
(Display only) Displays if applicable. If the receipt distribution quantity exceeds the allocation quantity, the system repeats the first RECV_LN_ASSET row for the remainder of the allocation quantity until it totals the distribution quantity. |
Unit Allocation Amt |
(Display only) Displays if applicable. If the receipt distribution amount exceeds the allocation amount, the system repeats the first RECV_LN_ASSET row for the remainder of the allocation amount until it totals the distribution amount. You can also view the Procurement Group data on the Receipt Line Details page. |

Additional Information
Field or Control |
Description |
|---|---|
Interface Receipt |
This check box setting appears by default from the selection of this field on the User Preferences - Procurement: Receiver Setup page. Select this check box if you want to automate the passing of inventory, asset, and manufacturing information through the receiving process. If the Interface Receipt check box is selected on the receipt, then one of the multiprocess jobs is submitted to the process scheduler upon saving the receipt. The type of receipt related lines determine which job is submitted by the system. |
Run Close Short |
Select to run the Close Short process when you save this receipt. When you select the check box and save the receipt, and one or more of the receipt lines have the Close Short check box selected, the Receipt Push process (PO_RECVPUSH) process calls the Close Short (PO_CLSSHORT) process. The Receipt Push process deselects the Run Close Short check box after the Close Short process has run. You can also run the Close Short process using the Close Short menu option. You select the Run Close Short check box on the User Preferences Receiver Setup page to provide users with permission to close a receipt short. |
Subcontract Streamline |
This check box will appear at the bottom of the page if one or more of the receipt lines is subcontracted related. This check box indicates you want to use the streamline processing between purchasing receiving and subcontract completions in manufacturing. If selected during online receiving, the system will perform the purchase order receipt and the production completion in one step rather than multiple steps. If the receipt is subcontracted related, this check box setting appears by default from the selection of this field on the User Preferences - Procurement: Receiver Setup page. This check box will be cleared and unavailable if:
Also, you will not be able to change this check box setting if the source for the receipt is data collections. If the Interface Receipt check box and the Subcontract Streamline check box are both selected on the receipt, then one of the multiprocess jobs is submitted to the process scheduler upon saving the receipt. The type of receipt related lines determine which job is submitted by the system. |
Interface Asset Information |
Click this link to access the Pre-AM1 page. Use this page to preview and correct data that is being sent to PeopleSoft Asset Management. |
Note: The SAC_PO_RECV_CI is not designed to work with Excel to CI or the Handler Tester.
Use the Maintain Receipts - Header Details page (RECV_WPO_HDR) to view and enter receipt header information.
Navigation:
Click the Header Details link on the Maintain Receipts - Receiving page.
You will find the Custom Field on clicking on the Header Details link. Click the Custom Field to access the Custom Page to enter the custom detail information.
Field or Control |
Description |
|---|---|
Receive Source mobile receiving |
Identifies the method used to create the receipt. Included in the field values is Mobile. When this value appears, the receipt was created using a mobile device in the PeopleSoft Mobile Inventory Management application. The other values for Receive Source are: 'On-line' when created by Add / Update receipt component, 'ASN' when created by receive load from Advanced Shipment Receipts, and 'Data Collect' when created by receipt load from Data Collection transactions. Using the application, you can receive items with or without a purchase order. See .Understanding How to Receive Stock in PeopleSoft Inventory Using Mobile Receiving |
Receipt Date |
Indicates the date when you physically received the material. |
Receipt Time |
Indicates the time that you physically received the material. |
User ID |
Identifies the operator who entered or is entering the transaction. |
Last Change Date |
Displays the date and time of the last change to the receipt. |
Last User to Modify |
Displays the last user to modify the receipt. |
Shipping Information
Field or Control |
Description |
|---|---|
Ship Date |
Select a shipping date for this receipt. |
Carrier ID |
Enter the Carrier ID. This identifies the carrier who delivered the shipment. |
Vehicle ID |
Enter a Vehicle ID. This identifies the vehicle that delivered the shipment. |
Driver ID |
Enter a Driver ID. This identifies the driver who delivered the shipment. |
Bill of Lading |
Enter the bill of lading. The bill of lading that you enter here appears by default onto the receipt lines. |
Pack Slip |
Enter the packing slip. The pack slip value that you enter here appears by default to the packing slip on the receipt line. The field becomes unavailable when the match status on the receipt is Matched or Partially Matched. |
Shipment Number |
Enter the shipment number assigned to the shipment. |
Pro Number (progressive number) |
Enter the carrier's tracking number for this delivery of materials. The progressive number that you enter here appears by default to the progressive number on the receipt line. |
Container ID |
Enter a Container ID. This identifies the container in which the goods were shipped. |
Nbr Cartons (number of cartons) |
Enter the number of cartons received. |
Pallets In |
Enter the number of pallets delivered. |
Pallets Out |
Enter the number of empty pallets returned in exchange. |
Port of Unloading |
For international shipments when Intrastat reporting is required, identify the port of unloading. This is the actual shipping port where the goods were first unloaded when arriving in the destination country. |
Ship From Country |
Select the country from which the goods were shipped. |
Ship From Location |
Identifies the location from which the goods were shipped. |
Match Options
Field or Control |
Description |
|---|---|
Invoice |
The supplier-assigned invoice ID for the shipment. The value that you enter here appears by default as the invoice number on the receipt line. |
Invoice Dt Op (invoice date options) |
This value is used in PeopleSoft Payables voucher processing to determine the invoice date for ERS vouchers. Values are: Frt Terms (freight terms): Use freight terms to determine the invoice date. Recv Date (receipt date): Use the receipt date to determine the invoice date. |
Freight Terms |
Enter receipt freight terms, if applicable. The freight terms reflect who holds legal responsibility for the material until ownership has passed. |
Allow ERS (allow evaluated receipt settlement) |
If this check box is selected, the receipt can be used by PeopleSoft Payables for ERS (evaluated receipt settlement). |
Match Status |
Displays the receipt's matching status. Values are: Matched (fully matched) No Match (no match) Partial (partially matched) To Match (to be matched) Vouchered(vouchered) |
Match Rule |
Displays the match rule assigned to the receipt, if applicable. |
Receipt Hold Options
Field or Control |
Description |
|---|---|
Hold Receipt |
Select this check box to hold processing of this receipt in PeopleSoft Purchasing. |
Hold Inventory |
Select this check box to hold any received inventory items from moving to PeopleSoft Inventory for putaway processing. |
Hold Assets |
Select this check box to hold any received items with asset management information from moving to PeopleSoft Asset Management for further processing. |
Custom Field
The user definable fields in this Custom Fields section are available when you check the Enable Custom Fields checkbox on the Purchasing Installation Options page. You can customize these fields for your use. The custom fields are informational only. .
For more information SeeUnderstanding User-Definable Fields
Use the Maintain Receipts - Receipt Line Details for Line page (RECV_WPO_DETAILS) to view receipt line item details.
Navigation:
Click the Details button under any of the tabs of the Maintain Receipts - Receiving page.
Receipt Quantity
Field or Control |
Description |
|---|---|
Receipt Qty (receipt quantity) |
Displays the quantity received on the receipt line. |
Reject Qty (reject quantity) |
Displays the quantity rejected on the receipt line. |
Accept Qty (accept quantity) |
Displays the quantity accepted on the receipt line. |
Return Qty (return quantity) |
Displays the quantity returned on the receipt line. |
Inspect Qty (inspected quantity) |
Displays the quantity inspected on the receipt line. |
Recv UOM (receiving unit of measure) |
Displays the unit of measure in which the items were received. |
Vndr UOM (supplier or ordering unit of measure) |
Displays the unit of measure in which the items were ordered from the supplier. |
Std UOM (standard unit of measure) |
Displays the standard unit of measure for the item. |
Stock UOM (stocking unit of measure) |
Displays the unit of measure in which the items are to be stocked in inventory. |
Conversion Rate
Field or Control |
Description |
|---|---|
Convert to PO |
Displays the conversion rate applied to the receipt UOM quantity to determine the purchase order UOM quantity. |
Convert to Stock |
Displays the conversion rate applied to the receipt UOM quantity to determine the stocking UOM quantity to put away the item. |
Supplier to Std Rate |
Displays the conversion rate applied to the supplier / purchase order UOM quantity to determine the standard UOM quantity for the receipt line. |
Convert Stock to Standard |
Displays the conversion rate applied to the stocking UOM quantity to determine the standard UOM quantity for the receipt line. |
Receipt Status
Field or Control |
Description |
|---|---|
Asset Applicable |
Designates whether the receipt line is an asset related line, along with its status. Values are: Moved: The receipt line has been interfaced to PeopleSoft Asset Management. N/A (not applicable): The receipt line is not asset-related. Pending: The receipt line is an asset item that has not been moved to the assets staging area and is pending interface with PeopleSoft Asset Management. |
Intrastat Distribution Status |
Used for Intrastat reporting and indicates whether this receipt has been processed by the Intrastat reporting process. Values are: Distribute (distributed) Ignore (ignored) Archive (archival entry) Reversal (reversal entry) Undefined (undefined) |
Inventory |
Designates whether the receipt line is an inventory related line, along with its status. Values are: Moved: The receipt line has been interfaced to PeopleSoft Inventory. N/A (not applicable): The receipt line is not inventory-related. Pending: The receipt line is inventory-related and is pending interface with PeopleSoft Inventory. |
Mfg Applicable (manufacturing applicable) |
Designates whether the receipt line is a PeopleSoft Manufacturing related line, along with its status. Values are: Moved: The receipt line has been interfaced to PeopleSoft Manufacturing (production management). N/A (not applicable): The receipt line is not manufacturing-related. Pending: The receipt line is manufacturing-related and is pending interface with PeopleSoft Manufacturing (production management). |
Serial Control |
Designates whether the receipt line is serial controlled, along with one of the following statuses: Complete or Incomplete. |
Inspection |
Designates whether the receipt line item requires inspection, along with one of the following statuses: Complete or Incomplete. |
Process Complete |
Displays Y if the Receiver Interface Push process has completed for the receipt line. This includes the creation of receipt-landed cost transactions and receipt-notification transactions. |
Lot Control |
Designates whether the receipt line item is lot controlled, along with one of the following statuses: Complete or Incomplete. |
Ship Date Status |
Displays the status of the ship date. Values are: Date OK (passes date check): Shipment date passed the ship date tolerance check. Early Ship (early shipment): Shipment date was too early to pass the ship date tolerance check. Late Ship (late shipment): Shipment date was too late to pass the ship date tolerance check. |
Due Date |
Displays the requested due date and due time of the receipt line. |
Quantity Status |
Displays the tolerance status of the receipt line item's received quantity. Values are: Qty OK (passes quantity check): Received quantity passed the quantity tolerance check. Over Ship (over shipment): Received quantity was greater than the quantity tolerance. Under Ship (under shipment): Received quantity was less than the quantity tolerance. |
Ship Days |
Displays the number of days the shipment was late. |
Matching |
Indicates whether matching is required for the receipt line. |
Ship Qty Pct (ship quantity percentage) |
Displays the percentage of items that were overshipped. |
Match Status |
Displays the receipt line matching status. Values are: Matched (fully matched) No Match (no match) Partial (partially matched) To Match (to be matched) Vouchered (vouchered) |
Manufacturer Information
Field or Control |
Description |
|---|---|
IN Unit (PeopleSoft Inventory business unit) |
Displays the PeopleSoft Inventory business unit value used for PeopleSoft Manufacturing-related transaction. |
Operation Sequence |
Displays the operation sequence of the PeopleSoft Manufacturing-related transaction. This is the manufacturing subcontracted operation for which the outside processing service was performed. |
Production ID |
Displays the production ID of the PeopleSoft Manufacturing-related transaction. This is the production ID for which the outside processing services were performed. |
Revision |
Displays the revision number of the item if applicable. |
Manufacturer ID |
Displays the item's manufacturer ID. |
Manufacturer |
Displays the name of the manufacturer. |
Model |
Displays the model of the item. |
Mfg Itm ID (manufacturing item ID) |
Displays the manufacturer item ID for the item. |
Configuration Code |
Displays the identification code assigned to specific configuration details for the items, if applicable. |
Optional Data
Click on the Optional Data Tab and select a line, you will see the Custom Fields link. Click on the Custom Field Link to enter the Custom Details Information.
The user definable fields in this Custom Fields section are available when you check the Enable Custom Fields checkbox on the Purchasing Installation Options page. You can customize these fields for your use. The custom fields are informational only. .
For Custom Details SeeUnderstanding User-Definable Fields
Field or Control |
Description |
|---|---|
Hold |
Displays the line hold status. Y if on hold and a N if not on hold. |
Bill of Lading |
Displays the bill of lading for the receipt line. |
Replacement |
Identifies if the receipt line is for goods returned for replacement. Possible values are Replacement of Returned Goods, Replace Goods Not Returned, and Not Applicable. |
Pro Number |
Displays the progressive number of the receipt line. |
Origin Country |
Displays the country from which the receipt line item originated. |
Invoice ID |
Displays the supplier assigned invoice ID assigned to the shipment for the receipt line. |
Packing Slip |
Displays the shipment packing slip for the receipt line. |
Source Information
Field or Control |
Description |
|---|---|
PO Unit (PeopleSoft Purchasing business unit) |
Displays the PeopleSoft Purchasing business unit of the purchase order schedule associated with the receipt line. |
PO Amount |
Displays the merchandise amount of the purchase order schedule associated with the receipt line. |
PO ID |
Displays the purchase order ID of the purchase order schedule associated with the receipt line. |
PO Type |
Displays the type of purchase order from which the receipt line was created. This is a user-defined value. Types are not used in purchase order processing, with the exception of Kanban; however, you can use them for tracking and reporting purposes. |
PO Line |
Displays the purchase order line number of the purchase order schedule associated with the receipt line. |
PO Schedule |
Displays the purchase order schedule number of the purchase order schedule associated with the receipt line. |
Amount Only |
If Y, indicates that the receipt line is to be received by amount only. |
Distribute by |
Displays the distribution method used for the receipt line. The method can be by quantity or by amount. |
Procurement Group ID |
(Display only) Displays the Procurement Group ID for the item if the purchasing group options are enabled and if you selected a procurement group for your purchase order. See Purchasing Options PageSetting Up Procurement Groups |
Primary Unit |
(Display only) Displays as selected if this item is the primary unit for the Procurement Group ID, if applicable. |
Unit Allocation Qty |
Display only) If the Allocate Purchasing Group option is enabled on the Purchasing Options page, the value in this field determines how many asset lines are generated: one asset line per each unit of allocation quantity until the sum totals the receipt line distribution quantity. If the receipt distribution quantity exceeds the allocation quantity, the system repeats the first RECV_LN_ASSET row for the remainder of the allocation quantity until it totals the distribution quantity. |
Unit Allocation Amt |
(Display only) If the Allocate Purchasing Group option is enabled on the Purchasing Options page, the value in this field determines how many asset lines are generated: one asset line per each unit of allocation amount until the sum totals the receipt line distribution amount. If the receipt distribution amount exceeds the allocation amount, the system repeats the first RECV_LN_ASSET row for the remainder of the allocation amount until it totals the distribution amount. Note: The Receipt Load batch process, unlike online Receipts, will not load Receipts that have ties to procurement groups if the Allocate Purchasing Group option is enabled on the Purchasing Options page. |
PO Quantity (purchase order quantity) |
Displays the purchase order quantity available for this receipt line. This field does not appear when the Blind Receiving Only check box is selected for the user on the User Preferences - Procurement: Receiver Setup page. |
PO Merchandise Amount (purchase order merchandise amount) |
Displays the purchase order merchandise amount for this receipt line. This field does not appear when the Blind Receiving Only check box is selected for the user on the User Preferences - Procurement: Receiver Setup page. |
Total Qty Received (total quantity received) |
Displays the total quantity that has been received for this receipt line. This field does not appear when the Blind Receiving Only check box is selected for the user on the User Preferences - Procurement: Receiver Setup page. |
Total Received Amount |
Displays the total amount that has been received for this receipt line. This field does not appear when the Blind Receiving Only check box is selected for the user on the User Preferences - Procurement: Receiver Setup page. |
Total Open PO Qty (total open purchase order quantity) |
Displays the total open purchase order quantity for this receipt line. This field does not appear when the Blind Receiving Only check box is selected for the user on the User Preferences - Procurement: Receiver Setup page. |
Total Open PO Amount (total open purchase order amount) |
Displays the total open purchase order amount for this receipt line. This field does not appear when the Blind Receiving Only check box is selected for the user on the User Preferences - Procurement: Receiver Setup page. |
Procurement Group ID |
Displays a procurement group ID to include this line in a procurement group. A procurement group gathers a group of line items on a requisition, purchase order, or receipt to help organize a larger item. For example, the Procurement Groups feature can be used in combination with PeopleSoft Asset Management to collect all item IDs that belong to a larger asset such as an air conditioning unit. |
Primary Unit |
Displays as a selected check box if this line item is the main item for an item-grouping in a procurement group; for example, an air conditioning unit could be the primary unit in a procurement group to create a complete asset |
Unit Allocation Qty |
Displays the quantity of this item needed to complete a primary unit in a procurement group; for example, four brackets per air conditioning unit. If this page is for the primary unit item and it is serial-controlled then this quantity is restricted to one. This field is only available if the Amount Only field is N. It is utilized during receiving and asset integration. |
Unit Allocation Amt |
Displays the amount or price of this item needed to complete a primary unit in a procurement group; for example, 500 USD of installation services per air conditioning unit. This field is only available for amount-only transactions lines that have Y in the Amount Only field. It is utilized during receiving and asset integration. |
Custom Fields
The user definable fields in this Custom Fields section are available when you check the Enable Custom Fields checkbox on the Purchasing Installation Options page. You can customize these fields for your use. The custom fields are informational only. .
For Information on Custom Fields See Understanding User-Definable Fields
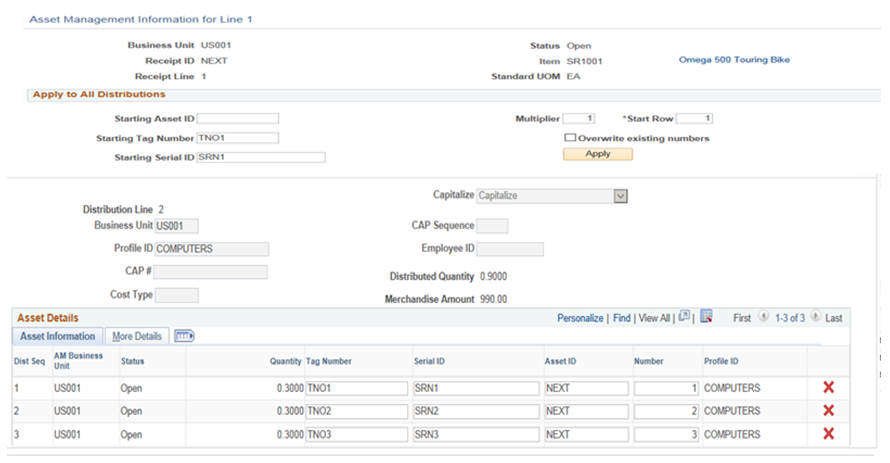
Use the Asset Management Information for Line page (RECV_WPO_AM) to view and enter information about asset purchases.
This information is passed to PeopleSoft Asset Management. This page is available for entry only if the selected receipt is targeted for PeopleSoft Asset Management. One or more of the distributions must have a PeopleSoft Asset Management business unit and Asset Management profile designated, and optionally, other Asset Management data.
Navigation:
Click the Asset Management Status Pending or Moved link under the Receipt Lines tab of the Maintain Receipts - Receiving page.
If available, this link appears in the Asset Management Status column in the grid section of the Maintaining Receipts - Receiving page.
Example of Asset Management Information for Line Page for Split Distributions.
This example illustrates the fields and controls on the Asset Management Information for Line page. You can find definitions for the fields and controls later on this page.
Note: If the defaults for the asset purchases are setup in such a way that you do not need to override them during the receiving process, it is not necessary to access the Assets pages in PeopleSoft Asset Management. These rows are generated and populated with defaults at save time. However, if the receipt line is serial controlled, you must supply the appropriate required information.
If the purchase order distribution has a PeopleSoft Asset Management business unit and asset profile ID specified, the receipt items are identified as asset purchases. Use this page to enter or override default asset information to be sent to PeopleSoft Asset Management.
If the item being received requires serialization, the number of rows generated is equal to the distribution quantity converted to the standard unit of measure.
If the item does not require serialization, then one row is generated with a quantity equal to the distribution quantity.
The asset rows populate automatically when the receiving agent accesses the Asset Management Information for Line page.
Use this page to accommodate split-funded assets. For example, if you purchased a vehicle to be shared by three departments, use this page to split-fund the vehicle between the departments. This can occur only if the purchased vehicle is an asset and is not inventory-related, meaning there is no inventory business unit specified for it on the purchase order distribution. In this scenario, a single asset tag number is assigned to the vehicle and associated with each of the three department distributions
In addition, if the receipt line is serial controlled, the system verifies the following for the selected receipt line:
The sum of interface record quantities for any given serial ID is 1.
Only one Asset ID is assigned to any given serial ID on the receipt line.
Only one tag number is assigned to any given serial ID on the receipt line.
Field or Control |
Description |
|---|---|
Next Asset ID |
Click this button to temporarily assign a value of AUTO-ASSIGN as the line item asset ID value. This value is replaced with the next available asset ID value upon saving the receipt. Note: This button is hidden when the Split Distributions receipt allocation type is in effect since the grouping of assets requires special handling for Split Distributions. |
Use One Asset ID |
Click this button to group multiple receipt distribution lines into a single Asset Identification. Note: This functionality is not available if the receipt line has a single distribution only. Furthermore, this button is hidden when the Split Distributions receipt allocation type is in effect since the grouping of assets requires special handling for Split Distributions. |
Distribution Information
Field or Control |
Description |
|---|---|
Business Unit |
PeopleSoft Asset Management business unit associated with the selected distribution line. The PeopleSoft Asset Management unit can be entered for new non-purchase order receipts, but cannot be changed once the receipt has been saved. |
Profile ID |
Displays the identifier for the receipt item product profile defined in PeopleSoft Asset Management. |
CAP # (capital acquisition planning number) |
Displays the capital acquisition plan identifier. This identifier is defined in PeopleSoft Asset Management. |
Cost Type |
Displays the cost type code for the receipt item, if applicable. Cost types represent different components of the cost of an asset, such as materials, labor, and overhead. For example, you can differentiate between the cost of building an asset and its market value by allocating the cost of production to one cost type and the margin of profit to another cost type. Cost type, in combination with asset category and transaction code, determines into which accounts the costs are entered in the general ledger. |
Capitalize |
Designates whether or not the receipt item is capitalized. Values are: Non Cap(not a capitalized asset) Capitalize (capitalized asset) |
CAP Sequence (capital acquisition planning sequence) |
Displays the sequence number for the capital acquisition plan. |
Apply to All Distributions
(Displayed for FIFO, Prorate, and Specify allocation types)
Field or Control |
Description |
|---|---|
Assign Tag ID and Assign Serial ID |
If the receipt line is serial controlled, both the Assign Serial ID and Assign Tag ID options are available. If the receipt line is not serial controlled, only Assign Tag ID is available. |
Enter Starting Number |
If you assign serial IDs, this represents the starting serial ID, which is assigned to the first detail row and is indicated by the Start Row field. If you assign tag IDs, this represents the starting tag ID, which is assigned to the first detail row and is indicated by the Start Row field. |
Multiplier |
Enter the number multiplier. The system used this value to increment the starting number from detail row to detail row. |
Start Row |
This is a required field and automatically changes to a value of 1. Indicate the detail row to use as the starting point for assigning values that are determined by the starting number and multiplier. |
Overwrite existing numbers |
Select to override existing values in the detail grid rows for either the tag ID or serial ID, depending on which action is selected (Assign Tag IDs or Assign Serial IDs). |
Apply |
Click this button to assign values to the detail rows in the grid. When you click this button, the system uses the Starting Tag and/or Starting Serial ID’s and/or Starting Asset ID to the receipt asset lines under first distribution and then repeat the exact same assignment across the remaining distributions associated with the receipt line. |
Apply to All Distributions
(Displayed for Split Distributions allocation type)
Field or Control |
Description |
|---|---|
Starting Asset ID |
Enter the Asset ID to be applied to the first asset line on all the distributions for the receipt line. |
Starting Tag Number |
Enter the tag number to be applied to the first asset line on all the distributions for the receipt line. |
Starting Serial ID |
Enter the Serial ID to be applied to the first asset line on all the distributions for the receipt line. |
Multiplier |
Enter the number multiplier. The system used this value to increment the starting number from detail row to detail row. |
Start Row |
This is a required field and automatically changes to a value of 1. Indicate the detail row to use as the starting point for assigning values that are determined by the starting number and multiplier. |
Overwrite existing numbers |
Select to override existing values in the detail grid rows depending on which starting IDs or numbers are entered (Starting Asset ID and/or Tag Number and/or Serial ID). |
Apply |
Click this button to assign values to the detail rows in the grid When you click this button, the system uses the Starting Asset ID and/or Starting Tag and/or Starting Serial ID, the multiplier, and the start row values to determine how values are assigned to the grid. The system assigns the values to the asset lines under the first distribution and then repeats the same assignment across the remaining distributions associated with the receipt line so that each split unit is assigned the same values. |
Asset Information
Field or Control |
Description |
|---|---|
AM Business Unit (PeopleSoft Asset Management business unit) |
Displays the PeopleSoft Asset Management business unit. |
Status |
Displays the receipt asset row status. Identifies whether or not this specific asset row has been passed to the PeopleSoft Asset Management system. One asset row can have a status of Moved and another row on the same distribution can have a status of Open. |
Quantity |
Displays the quantity assigned to the asset row. If the receipt line is serial controlled, the quantity is not available for change. Note: The sum of the quantities on the asset rows must equal the distributed quantity on the receipt. |
Tag Number |
Enter the asset tag number for the asset row. If you enter the tag number value on the purchase order distribution, those values appear by default from the purchase order distribution. In addition, the system checks the tag number that you entered on the receipt to make sure it is not already assigned to an asset, when the Allow Dup Tags option is not set for the PeopleSoft Asset Management business unit. If the tag number has already been assigned to another asset the system gives you a warning message. The system only looks at the Assets table it does not look at the interface tables, previously entered receipts, purchase orders, or requisitions to see if the tag number has been assigned to another pending transaction. |
Serial ID |
Serial ID for the distribution sequence. This field is available for entry only when the Serial option is selected for the selected line on the Maintain Receipts - Receiving page. |
Asset ID |
Asset ID for the asset row. The default value is NEXT. If you do not override this value, NEXT is passed to PeopleSoft Asset Management, where the next asset ID is assigned. You may choose to override the NEXT value and manually enter an asset ID or assign one by using the Next Asset ID button. If the Asset ID value is anything other than NEXT and the same Asset ID value is assigned to multiple asset rows for the selected receipt line, then these asset rows must all have the same custodian, location, model, and manufacturer values as well. |
Number (sequence number) |
When the Asset ID is NEXT, this field facilitates the grouping of multiple asset lines under the same asset. All asset lines across all distributions with the same number in this field will be assigned to the same asset. |
Profile ID |
Identifier for the receipt item product profile. This value is not available for change by the receiving agent and is populated by the value on the receipt distribution. |
|
Click the Cancel Row button to cancel this asset row information. This row is a child of the distribution line. If the receipt has not been interfaced, this asset row is not be interfaced and is deleted during receipt interface processing. If the receipt has been interfaced, then a retirement asset transaction is passed to PeopleSoft Asset Management. |

More Details
Select the More Details tab.
Field or Control |
Description |
|---|---|
VIN |
(Optional) Enter the VIN number for each individual serial receipt. Only one VIN can be assigned to each serial ID. Note: This field is available only if you are receiving a serial-controlled item and the Asset Type associated with the item and asset profile is FLEET. |
Custodian |
Enter the recipient of the asset item on the selected distribution sequence. If the asset ID value is anything other than NEXT and the same asset ID value is assigned to multiple asset rows for the selected receipt line, then this value must be the same on those same asset rows. |
Location |
Select the delivery location for the distribution sequence. If the asset ID value is anything other than NEXT and the same asset ID value is assigned to multiple asset rows for the selected receipt line, this value must be the same on the asset rows. |
Mfg ID (manufacturer ID) |
The manufacturer ID for the item appears by default from the manufacturer ID assigned to the purchase order line using the Maintain Purchase Order - Details for Line page. You can also select a manufacturer ID if one is not displayed. Once you select a manufacturer ID the description for the manufacturer appears in the Manufacturer field. |
Model |
The model appears by default from the model associated with the item on the Purchasing Attributes - Purchasing Attributes page. If a model does not appear, you can modify or select the model of the product. If the asset ID value is anything other than NEXT and the same asset ID value is assigned to multiple asset rows for the selected receipt line, this value must be the same on the asset rows. |
Manufacturer |
Select the manufacturer of the product. If the asset ID value is anything other than NEXT and the same asset ID value is assigned to multiple asset rows for the selected receipt line, this value must be the same on the asset rows. Note: If a manufacturer ID is entered for the line then you will not be able to select a Manufacturer. If the manufacturer ID field is blank then you can select a manufacturer using this field. |
Capitalize |
Displays whether or not the receipt item is capitalized. Appears by default from the value of the parent distribution row, but can be overridden by validation edits. |
PO Comment
Displays the purchase order line comments for the selected item. Information such as the asset tag numbers can be entered upon creation of the order.
Validations Edits
Edits and validations are performed when you click the OK button on the Asset Management Information for Line page. Capitalization to asset ID cross-edits ensures that the capitalization flag is either on or off for all asset rows for a given asset ID. Rows with an asset ID of AUTO-ASSIGN or NEXT are not included in the edit. However, the row with an asset ID of NEXT and a sequence number value (NEXT1, NEXT2, and so forth) will be included in the edit. If a combination of on and off capitalization flags are detected for one asset ID, a message appears requiring an action to be selected.
If you select Yes on the message prompt, the system turns on the capitalization flag for all asset rows with the same asset ID.
If you select No on the message prompt, the system turns off the capitalization flag for all asset rows with the same asset ID.
The original capitalization flag value copied from the purchase order distribution remains on the receipt distribution. Only the receipt line asset row changes.
The system performs edits on the Tag Number, Custodian, Location, Model, and Manufacturer fields to ensure that these fields contain consistent values for the same asset ID within the receipt line.
Additional edits and validations are performed at receipt save time to ensure that a specific asset ID assignment has only one profile ID, serial ID, and tag number value.
Split Distributions
For serialized items, the Split Distributions receipt allocation type directs online Receipts to split each unit (i.e. quantity of 1) across all the distributions according to the distribution percentage. Each split unit will automatically be assigned the same asset grouping sequence number so PeopleSoft Asset Management will assign the same Asset ID to each fractional unit.
Example of Split Distributions for Serialized Items
If the receipt line has a quantity of 3 and there are 2 distribution lines with the first allocating 70% to fund F100 and the second allocating 30% to F200, each unit will be split so that a quantity of .7 is assigned to the receipt asset line for the first distribution and .3 is assigned to the receipt asset line under the second distribution.
After the quantity is split across all the distributions, the system will then automatically assign a Number (i.e. asset sequence number) of 1 to the asset lines which represent the first unit so that they are assigned to the same asset ID downstream by PeopleSoft Asset Management. The remaining 2 units are broken down the same way and assigned the next sequence number (i.e. 2 and 3). The end result is 3 receipt asset lines under the first distribution with a quantity of .7 and an asset sequence number of 1 through 3, and 3 receipt asset lines under the second distribution with a quantity of .3 and an asset sequence of 1 through 3 as well. In other words, there will be 3 assets assigned to each split unit.
|
Distribution |
Asset Line |
Asset Line Qty |
Fund |
Tag |
Serial ID |
Asset ID |
|---|---|---|---|---|---|---|
|
1 |
1 |
0.7 |
F100 |
T1 |
S1 |
NEXT1 |
|
1 |
2 |
0.7 |
F100 |
T2 |
S2 |
NEXT2 |
|
1 |
3 |
0.7 |
F100 |
T3 |
S3 |
NEXT3 |
|
2 |
1 |
0.3 |
F200 |
T1 |
S1 |
NEXT1 |
|
2 |
2 |
0.3 |
F200 |
T2 |
S2 |
NEXT2 |
|
2 |
3 |
0.3 |
F200 |
T3 |
S3 |
NEXT3 |
Note: The Asset ID in the table above represents the default value of NEXT appended to the Number field on the Asset Management Information page. In the example above, there are to be 3 separate system generated Asset IDs.
Non Serialized Items
For non-serialized items, the Split Distributions receipt allocation type behaves just like prorate in distributing the quantity across the distributions according to the distribution percentage. Unlike the prorate option, however, the Split Distributions type will ensure that all the asset lines are grouped together under the same asset. The system will default the asset line 'Number' field to 1. If the Asset ID has been manually entered, the system will verify that the Asset ID is the same across all the asset lines.
Procurement Groups and Split Distributions
With Procurement Groups, one or more items are assigned the same Procurement Group ID and one of the items is marked as the primary item. Each item in the group has its own Unit Allocation Quantity (or amount) which defines how much of the item must be received in order to make up a complete set of that Procurement Group. Each set becomes a single asset in Asset Management and the Serial and Tag IDs are only taken from the primary item per asset.
For more information See Understanding Procurement Groups in PeopleSoft
Split Distributions within Procurement Groups is dependent on the Unit Allocation Quantity (or Amount) and this is best described in the following 3 scenarios:
When Unit Allocation Quantity (or amount) is equal to Line Quantity (or amount) or the item is serialized and the Unit Allocation Quantity is 1.
When Unit Allocation Quantity (or amount) is less than the Line Quantity (or amount).
When Unit Allocation Quantity (or amount) is greater than the Line Quantity (or amount).
When Unit Allocation Quantity (or amount) is equal to Line Quantity (or amount) or the item is serialized and the Unit Allocation Quantity is 1
For Procurement Groups, the asset is associated with the primary unit (i.e. primary item) only and the unit allocation quantity determines the number of assets created. If the unit allocation quantity (or amount) is equal to the receipt line quantity (or amount), the receipt asset lines generated for Split Distributions automatically reflect a single procurement group unit for that item and, as such, do not require further parsing. The same can be said for serialized items where the unit allocation quantity is 1 since serialized items are automatically split across the distributions for each unit in that case.
The asset sequencing arranged by Split Distributions in the Add/Update Receipts component for both primary and non-primary items in the procurement group is ineffectual since the primary item determines the asset, and the asset sequencing for procurement groups is handled by the Receipt Push process.
On the other hand, the Receipt Push process does maintain the integrity of the Split Distributions by grouping the procurement group asset lines across the distributions rather than sequentially in preparation for the PeopleSoft Asset Management Interface Processes.
When Unit Allocation Quantity (or amount) is less than the Line Quantity (or amount)
This is somewhat similar to serialized items where each unit (or quantity of 1) is split across the distributions. The difference is that the unit allocation quantity, for example, does not have to be 1. Thus, instead of dividing 1 across the distributions, the unit allocation quantity is split across the distributions.
Assume there is a single line with a non-serialized item and a line quantity of 20 and having a 50/20/30 split across the distributions with a unit allocation quantity of 5.
In the table below, each unit allocation quantity of 5 is divided across the distributions according to the distribution percentage. As a result, the distribution percentage is preserved both in terms of the total asset quantity per distribution as well as the individual asset line quantity across the distributions.
Formula to calculate Asset Line Quantity:
Asset Line Quantity = ((Distribution Quantity ) * (Unit Allocation Quantity)) / (Line Quantity)
Distribution
Asset Line
Asset Line Qty
Fund
Tag
Asset ID Grouping
1
1
2.5
F100
T1
NEXT 1
1
2
2.5
F100
T2
NEXT 2
1
3
2.5
F100
T3
NEXT 3
1
4
2.5
F100
T4
NEXT 4
2
1
1.0
F101
T1
NEXT 1
2
2
1.0
F101
T2
NEXT 2
2
3
1.0
F101
T3
NEXT 3
2
4
1.0
F101
T4
NEXT 4
3
1
1.5
F102
T1
NEXT 1
3
2
1.5
F102
T2
NEXT 2
3
3
1.5
F102
T3
NEXT 3
3
4
1.5
F102
T4
NEXT 4
When Unit Allocation Quantity (or amount) is greater than the Line Quantity (or amount).
In the event that the unit allocation quantity is greater than the line quantity, the system has to wait for the same item to come in on another receipt in order to complete the procurement group unit (and set of items). This is standard behavior for Procurement Group allocation and the entire quantity (or amount) will be subject to the Split Distributions for that receipt line.
Note: It is recommended for users to verify that multiple receipts with the same procurement group items with incomplete assets like this utilize the same 'Split Distributions' receipt allocation type. It is also recommended for users to verify that the receipt distributions for these incomplete assets are identical.
Use the Inventory Putaway Information for Line page (RECV_WPO_PUTAWAY) to view and enter overriding information used to put items away in inventory business unit storage locations.
This page is available only if the receipt line is targeted for inventory (one or more of the distributions must have an inventory business unit assigned). This is applicable to purchase order and non-purchase order receipts.
Navigation:
Click the INV Status Pending or Moved link under the Receipt Lines tab of the Maintain Receipts - Receiving page.
If available, this link appears in the IN Status column in the grid section of the Maintain Receipts - Receiving page.
Note: If the defaults for the inventory purchases are set up in such a way that you do not need to override them during the receiving process, it is not necessary to access the Putaway pages. These rows are generated and populated with defaults at save time. However, if the receipt line is serial controlled or lot controlled, you must supply the appropriate required information.
Companies typically accept items through receiving and then route them to a staging area. In PeopleSoft Purchasing, items are staged until you initiate material putaway. The putaway process assigns the items to appropriate inventory business unit storage locations.
If purchase order distributions have an inventory business unit specified, the Inventory field on the Line Status Details page is set to Y. When receiving items are identified as inventory purchases, you can override the default information for the putaway process on this page.
Distribution Information
Field or Control |
Description |
|---|---|
Distributed Quantity |
Displays the number of items being received for this distribution line. This value is dependent on the value entered in the Quantity field. |
Merchandise Amt (merchandise amount) |
Displays the merchandise amount allocated to this distribution, expressed in the transaction currency. This value is dependent on the value entered in the Quantity field. |
Base Amt (base amount) |
Displays the distribution merchandise amount in the PeopleSoft General Ledger business unit currency. This value is dependent on the value entered in the Quantity field. |
Default Location |
Displays the location designated as the default putaway location for this item. This is not required on the receipt. You can enter an override location on the receipt or assign a default location in inventory before running the Putaway process after the Receiver Interface Push process (PO_RECVPUSH). |
Consigned |
If this check box is selected, indicates that the distribution items are consignment items. Consigned items can only be putaway in non-owned locations. |
Non-Owned Item |
If this check box is selected, indicates that the distribution items are non-owned. Non owned items can only be putaway in non-owned locations. |
Apply to Details
This group box is only available when the receipt is serial controlled or lot controlled.
Putaway Information
Field or Control |
Description |
|---|---|
Status |
Displays the receipt putaway row status. Identifies whether the specific putaway row has passed to the PeopleSoft Inventory system. One putaway row can have a status of Moved, while another row on the same distribution can have a status of Open. |
Quantity |
Enter the number of items being received for the distribution sequence. The value in this field determines the values that appear in the Distributed Quantity, Merchandise Amt, and Base Amt fields. If the receipt line is serial controlled, the quantity is not available for change. Note: The sum of the quantities on the putaway rows must equal the distributed quantity on the receipt distribution. |
Serial ID |
Enter the serial ID for the distribution sequence. This field is only available for entry if the Serial check box is selected for the receipt line on the Maintain Receipts - Receiving page. |
Lot ID |
Enter the lot ID for the distribution sequence. This field is only available when lot control is Y (yes) for the receipt line on the Maintain Receipts - Receiving page. If the item being received for inventory is lot controlled, then a lot ID has to be specified on the receipt putaway page. If the target inventory business unit Allow Auto-Add of New Lots check box is selected, a lot ID that does not exist within inventory may be specified. Otherwise, enter an existing lot ID or select a lot ID from the list of values. If you enter a new lot ID and the business unit does not permit the automatic adding of new lots, the system validates the lot ID against the existing list. You can use the Lookup button to find existing lot IDs. |
Supplier Lot |
Enter the identifier assigned to the item's lot by the supplier. This field is only available when the lot control status is Y (yes) for the receipt line on the Maintain Receipts - Receiving page. The system checks for duplicate serial IDs for all serial-controlled lines on a receipt document. This edit is only for serial ID assigned within the receipt document. Note: The supplier lot value defaults to the value that you enter for the lot ID. |
Expiration Date |
Expiration date for a lot-controlled item. If the item is a non-inventory receipt line (subcontract, expense only, or an asset only interface receipt), then this field is left blank. If the item lot ID has been assigned an expiration date, this value cannot be changed. If the item lot ID doesn't have an assigned expiration date, the item shelf-life value (if greater than zero) is added to the receipt date to calculate the expiration date. You can override this value. You must enter a value if the item's shelf life is zero. |
Field or Control |
Description |
|---|---|
|
Click the Cancel Row button to cancel the putaway row of the distribution line. If the receipt has not been interfaced, this putaway row is not to be interfaced and is deleted during receipt interface processing. If the receipt has been interfaced, the putaway rows are removed from inventory at receipt save time. |

Putaway Location
Select the Putaway Location tab.
Field or Control |
Description |
|---|---|
IN Unit (PeopleSoft Inventory business unit) |
Identifies the PeopleSoft Inventory business unit for the distribution. For non-purchase order receipts, this value appears by default from the ship to location. For purchase order receipts, this value appears by default from the purchase order distribution. |
Container ID |
Displays the container with which the received item is associated. |
Kanban ID |
Displays the identification code assigned to the Kanban card associated with the putaway of this item. This code appears by default from the kanban details. |
Using the Receiving Putaway Integration
These conditions control the receiving putaway integration after PO_RECVPUSH has processed the receipt transaction and set the status to moved:
If the receipt has not started the putaway process, then all putaway fields on the Inventory Putaway Information for Line page (quantity, serial ID, lot ID, container, and putaway location) are available for entry, and any changes are immediately propagated to the appropriate STAGED_INF_INV row.
If the receipt has gone through the Load Staged Items process, but an error was found, all putaway fields on this page are available for entry, and any change is immediately propagated to the STAGED_ITEM_INV row.
An example of such an error is when information in STAGED_ITEM_INV/STAGED_COST_INV has a putaway status of 3. No data validation is necessary, because the Load Staged Errors process validates the information.
If the receipt has gone through the Load Staged Items process without errors, then the only fields available for entry on the Inventory Putaway Information for Line page are the Quantity field and the Cancel Row button.
All other fields are unavailable for entry. This is necessary, because the original putaway information has already gone through validation and cannot be validated again.
If you made a mistake entering the lot ID, serial ID, container, or putaway location on the Inventory Putaway Information for Line page, cancel the original putaway row by clicking the Cancel Row button for the row and then inserting a new row with the correct information.
This row goes through the Process Receipts process that writes the information to STAGED_INF_INV. The canceled row is deleted from STAGED_ITEM_INV.
If there are multiple staging rows in STAGED_ITEM_INV for a given receipt line and distribution sequence number, a warning appears before the quantity change is propagated to the Staging table.
This may happen if a user on the putaway side splits a receipt quantity over multiple storage locations. For a quantity increase, the change is made to the original STAGED_ITEM_INV row; that is, the row with the smallest STAGED_NUM. For a quantity decrease, the change is made starting with the original row (smallest STAGED_NUM) and continuing with each subsequent STAGED_NUM row, until the total quantity decrease has been applied. If a row's quantity becomes 0, it is deleted from the table.
If a receipt is on a putaway plan (that is, if it has been assigned a putaway plan ID and line) or if it has already been flagged for putaway, a warning appears when a quantity change is made or when you click the Cancel Row button.
If the receipt has gone through the full putaway process, the only putaway fields that are available for entry on the Inventory Putaway Information for Line page are the Quantity field and Cancel Row button.
All other fields are unavailable for entry. If you need to change other fields, cancel or decrease the quantity of the original row and insert a new one. The new rows will go through the regular Process Receipts process, which then writes the information to STAGED_INF_INV.
If the quantity is increased, the appropriate PHYSICAL_INV, LOT_CONTROL_INV (if the item is lot controlled), and BU_ITEMS_INV rows are updated to reflect this change.
A row is written to the transaction history table (TRANSACTION_INV) with the quantity increase and a transaction group 010 or 020, depending on whether or not the item requires inspection. If the item is standard costed, the PPV (purchase price variance) should be calculated and a row written to TRANSACTION_INV. If the item is average costed, the average cost should be recalculated. If the quantity increase should go through the putaway process, insert a new row on the Maintain Receipts - Receiving page. This enables you to decide for yourself how you want quantity increases to be handled.
If the quantity is decreased, the appropriate inventory tables are searched to determine whether the change is allowed.
If the quantity decrease is allowed, the corresponding tables are updated to reflect this change. A row is written to the transaction history table with the quantity decrease.
If there are multiple rows in PHYSICAL_INV corresponding to the receipt line/distribution sequence number, then a warning appears before the quantity change is propagated to PHYSICAL_INV.
For a quantity increase, the change is made to the PHYSICAL_INV row corresponding to the smallest STAGED_NUM. For a quantity decrease, the change is made starting with the original row (smallest STAGED_NUM) and continuing with each subsequent STAGED_NUM row until the total quantity decrease has been applied.
If part of the receipt quantity is still in STAGED_ITEM_INV while the rest has been put away, then the STAGED_ITEM_INV rows reflect this change.
If the changes cannot be fully transferred to the staging table, then the quantity that has already been put away should be updated. For quantity increases, only the first STAGED_ITEM_INV row is updated. For quantity decreases, STAGED_ITEM_INV is updated first, then if there is an additional quantity to decrease, the putaway quantity is updated.
Use the Inventory Item Information page (RECV_INV_ITEMS_SP) to view detailed inventory information entered for an inventory-related item.
Navigation:
Click the Item Detail link on the Inventory Putaway Information for Line page.
Click the Item Detail link on the Maintain Receipts - Manufacturing Information for Line page.
Field or Control |
Description |
|---|---|
Shlf Life (shelf life) |
Displays the item shelf life expressed in days. PeopleSoft Inventory calculates the lot-expiration date by adding the value of the shelf life to the creation date of the lot. The shelf-life value appears by default from the value defined on the Business Unit Item Definition - Inventory: Shipping/Handling page. |
MSDS ID (material safety data sheet ID) |
If this item requires an MSDS, the appropriate MSDS ID appears. |
Hazard Code |
As required for business needs, the appropriate code appears. This field is informational only. |
Use the Storage Location Search page (RECV_STOR_LOC_SRCH) to search available storage locations for the material that you are receiving.
Navigation:
Click the Storage Location Search button under the Putaway Location tab of the Inventory Putaway Information for Line page.
Click the Storage Location Search button under the Putaway Location tab of the Maintain Receipts - Manufacturing Information for Line page.
Field or Control |
Description |
|---|---|
Storage Location and Storage Level 1 - 4 |
Select storage location areas and levels to search. |
Search |
Click the Additional Search Criteria button to search on the storage location values that you entered in the Storage Location and Storage Level fields. The search results appear in the scroll area. |
Use the Maintain Receipts - Receipt Distributions for Line page (RECV_WPO_DIST) to view distribution information for the selected receipt.
Navigation:
Click the Distribution button under the Links and Status tab of the Maintain Receipts - Receiving page.
You can also access the Custom Field by clicking the Distribution button. The Custom Field link appears on the Details Tab. You can click the Custom Field to enter the custom related information.
The user definable fields in this Custom Fields section are available when you check the Enable Custom Fields check box on the Purchasing Installation Options page. You can customize these fields for your use. The custom fields are informational only.
This example illustrates the fields and controls on the Maintain Receipts - Receipt Distributions for Line page. You can find definitions for the fields and controls later on this page.

For More information See Understanding User-Definable Fields
Field or Control |
Description |
|---|---|
Allocation Type |
Displays the allocation type for the receipt. This field appears by default from the Maintain Receipts - Receiving page. This field becomes available if there are multiple distributions for a schedule. Values are: FIFO (first-in-first-out): Allocations to the receipt distributions are fulfilled based on the sequence in which they are added to the purchase order schedule for purchase order receipts or the receipt line for non-purchase order receipts. Prorate: Allocate the receipt amount across the distributions for the schedule based on what percentage the purchase order distribution amount is of the purchase order schedule amount for purchase order receipts. Specify: Allocate the receipt amount or quantity across multiple distributions for the schedule based on the quantity or amount that you enter for the distribution lines. When you select this value, the Qty Std UOM or the Amount field become available for entry. Split Distributions: This behaves just like the prorate type for non-serialized items. The receipt quantity is allocated to the distributions in the same manner as the prorate type and the resulting receipt asset lines are all assigned to same asset. For serialized items, each individual unit is split across all the distributions and grouped together under a separate asset. Note: The Prorate and Split Distributions allocation types are hidden when the item is designated for inventory. |
Details
Field or Control |
Description |
|---|---|
Line |
Displays the distribution line number. |
Status |
Displays the status of the distribution row. |
Location |
Enter the location to where the goods are to be delivered. |
Qty Std UOM (quantity in the standard unit of measure) |
Displays the quantity of items being distributed, expressed in the standard UOM. If you select an allocation type of Specify, enter the quantity received across the multiple distribution lines. |
Qty VND UOM (quantity in the supplier's unit of measure) |
Displays the quantity of items being distributed, expressed in the supplier UOM. |
Amount |
Displays the merchandise amount for the distribution row in the transaction currency. If you select an allocation type of Specify, enter the amount received across the multiple distribution lines. |
Currency |
Displays the transaction currency code. |
Base Amt (base amount) |
Displays the merchandise amount for the distribution row in the base currency code. |
Currency |
Displays the base currency code which is used by general ledger, inventory, and asset integration. |
IN Unit (PeopleSoft Inventory business unit) |
If the item is an inventory item, it displays the PeopleSoft Inventory business unit associated with the item. |
Attention To |
Enter the name of the person who should receive the line item. This field defaults to the name entered in the Attention To field on the PO Distribution Line page when the purchase order was created. |
Consigned |
Designates whether the item is consigned or not. You may override the setting on this page for non-purchase order items only. This setting can only be overridden if it appears by default from the item as consigned. If the setting changes to not consigned, this setting cannot be overridden. |
Non-Owned |
Designates whether an item is owned or non-owned. This value is set at the item level. An item is non-owned if it is maintained in inventory but is not owned by the associated business unit. |
|
Click the PO Distribution Details button to access the PO Distribution Details page where you can view the details of the purchase order distribution and also set up the Custom Field. Click on the Custom field link to access the Custom Field page to set up the custom details. The user definable fields in this Custom Fields section are available when you check the Enable Custom Fields checkbox on the Purchasing Installation Options page. You can customize these fields for your use. The custom fields are informational only. . For more information on Custom Fields SeeUnderstanding User-Definable Fields |
|
Click the Pegging Inquiry button to access the Pegging Workbench page. Use this page to view details associated with the pegged distribution. |


See Pegging Inquiry Page.
Asset Details
Select the Asset Details tab.
You can also access the Custom Field from the Asset Detail Tab. The Custom Field Links appears on the More Details Tab of Asset Line. You can click the Custom Field Link to modify the custom settings.
The user definable fields in this Custom Fields section are available when you check the Enable Custom Fields checkbox on the Purchasing Installation Options page. You can customize these fields for your use. The custom fields are informational only. .
For more information on Custom Fields SeeUnderstanding User-Definable Fields
Field or Control |
Description |
|---|---|
AM Business Unit (PeopleSoft Asset Management business unit) |
Displays the PeopleSoft Asset Management business unit assigned to the purchase order for the selected receipt items by the originating PeopleSoft Purchasing business unit. |
Profile ID |
Identifier of the item's asset management profile. |
Capitalize |
Displays the capitalize asset indicator. Values are Capitalize or Non Cap. |
Cap # |
Displays the asset's capital acquisition plan number. |
Cap Sequence |
Displays the asset's capital sequence number. |
Employee ID |
Displays the employee ID associated with the asset. |
Use the Maintain Receipts - Manufacturing Information for Line page (RECV_WPO_MFG) to maintain manufacturing information for the receipt line.
Navigation:
Click the Manufacturing Info button under the Item / Mfg Data tab of the Maintain Receipts - Receiving page.
This example illustrates the fields and controls on the Maintain Receipts - Manufacturing Information for Line. You can find definitions for the fields and controls later on this page.
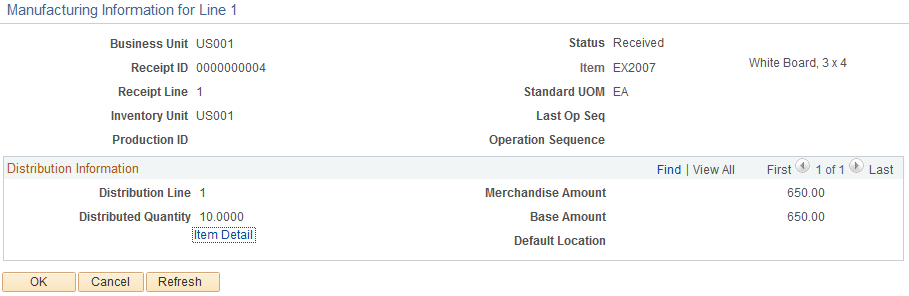
This page contains three types of information. At the top of the page, the details for the receipt line pertaining to manufacturing appear. In the Distribution Information group box, the receipt distribution details appear along with the default inventory putaway location and other inventory details.
Note: The Putaway Information grid appears only when the Operation Sequence field and the Last Op Seq (last operation sequence) field are equal.
Field or Control |
Description |
|---|---|
Item |
Displays the item related to the manufacturing information. When the receipt line is subcontracted related, the assembly item ID (manufactured item) and its description appear. |
Last Op Seq (last operation sequence) |
Displays the last operation sequence for the production ID. |
Operation Sequence |
Displays the operation sequence for the subcontracting operation on the production ID. |
Production ID |
Displays the manufacturing production ID. When the receipt line is subcontracted related, the production ID that contains the subcontracting operation appears. |
Distribution Information
Field or Control |
Description |
|---|---|
Item Detail |
Click this link to access the Inventory Item Information page. Use this page to view the detailed inventory information entered for an inventory-related item. |
Default Location |
Displays the default inventory putaway location for the inventory business unit and item ID. |
Putaway Information
Use this section of the page to enter the putaway inventory information for a receipt that is subcontracted related.
Field or Control |
Description |
|---|---|
Status |
Displays the status of the last operation. Values are: Open or Canceled. |
Serial ID |
Select the serial ID for the assembly. This field is not available for non-serial controlled items. |
Lot ID |
Select the lot IDs for the assembly. This field is not available for non-lot controlled items. |
|
Click the Cancel Row button to cancel the detail row. |
|
Click the Add a New Row button to add a row to the putaway information grid. This button is available for non-serial controlled items that do not have a status of canceled. It also enables you to split the quantity received between lot IDs or different storage locations. |


Putaway Location
Select the Putaway Location tab.
Field or Control |
Description |
|---|---|
|
Click the Storage Location Search button to access the Storage Location Search page. Use this page to search for available storage locations for the material that you are receiving. |
|
Click the Putaway Locations button to access the Storage Location Search page. Use this page to define directed putaway information for the receipt items. |


Use the Maintain Receipts - PRO Numbers page (RECV_WPO_PRO) to add receipt progressive numbers.
Navigation:
Click the Multiple Pros link under the Optional Input tab of the Maintain Receipts - Receiving page.
You can assign multiple progressive numbers on receipt lines for multiple receipts for each line.
Field or Control |
Description |
|---|---|
Starting Number |
Enter a starting value for progressive numbers. The system assigns this value to the progressive number row that you specify in the Start Row field. When you click the Apply button, the system applies the values that you define to the rows in the Pro Numbers grid box. |
Overwrite existing numbers |
Select to override existing values in the Pro Number grid rows with the new values that you enter. The numbers are overridden when you click the Apply button. |
Start Row |
Enter the first row to which you want to apply the values you define. For example if you have 10 rows and you want to replace the rows starting with row seven, you would enter 7 in the Start Row field. When you apply the new values, the system applies your updates starting with row seven. |
Multiplier |
Enter the number multiplier. The system uses this value to increment the starting number from detail row to detail row. |
Apply |
Click to assign values that you have entered to the detail rows in the Pro Numbers grid box. |
Pro Number |
Enter a progressive number value. You can enter as many values as needed. You can manually enter a value or use the Apply to Details section to define a range of values. |
Use the PO Comments page (RECV_PO_LN_COMMENT) to view purchase order header, line, and ship to comments for the associated purchase order line or purchase order schedule levels.
Navigation:
Click the PO Comments button under the Source Information tab of the Maintain Receipts - Receiving page.
The purchase order header, line, and ship to comments that are related to the receipt line appear.
Field or Control |
Description |
|---|---|
Send to Supplier |
If this check box is selected, designates that these comments were sent to the supplier as a part of the purchase order dispatch. |
Use the RTV Information page (RTV_LN_DISP_SEC) to view details about any RTV transactions created for the selected receipt.
Navigation:
Click the Return To Vendor Data link on the Maintain Receipts - Receiving page.
All RTV lines associated with the receipt ID appear.
Field or Control |
Description |
|---|---|
Status |
The status of the RTV line. |
Action |
Return action designated for the returned item. |
Disposition |
Method of disposal designated for the returned item. |
Reason Code |
The return reason code for the returned item. |
Rev (revision) |
Displays the item's revision number, if applicable. |
Return Qty (return quantity) |
Number of items being returned in the supplier unit of measure. This does not include any quantities rejected before receipt. |
Ship Qty (ship quantity) |
Number of items being shipped back to the supplier in the supplier unit of measure. This does not include any quantities rejected before receipt. |
Price |
The per supplier unit of measure price. |
Supplier UOM |
The supplier unit of measure used on the receipt. |
Use the Accrue Receipt page (RUN_RECVACCR_OL) to run the Receipt Accrual process, the Miscellaneous Charges process, or both.
Navigation:
Click the Run PO Receipt Accrual button on the Maintain Receipts - Receiving page. The button is only available if the receipt has been saved and is eligible for accrual.
This page enables you to enter parameters to initiate a process request.
Field or Control |
Description |
|---|---|
Accounting Date |
(Required) Select the accounting date. The current date appears by default. An error appears when you click the OK button, if the date used is not in an open period. |
Default Entry Event Code |
Displays only if entry events are enabled on the Installation Options - Entry Event page, and cannot be left blank if entry events are required. The values available are set at the business unit level. A warning appears when you click the OK button if this is not a purchase order receipt and entry events are optional and the field is blank. For purchase order receipts with no entry event code on the purchase order distribution line, the value selected here populates the expense and accrual accounting lines. The encumbrance line is blank. If there is already an entry event code on the purchase order distribution line, it is not to be replaced by the value selected on this page and the entry event code populates expense, accrual, and encumbrance accounting lines. For non-purchase order receipts, the value selected here populates the expense and accrual accounting lines. |
Use the Purge ASN History Page (RUN_PO_ASN_PURGE) to purge the EC rows when transaction is complete
Navigation:
This example illustrates the fields and controls on the Purge ASN History page. You can find definitions for the fields and controls later on this page.
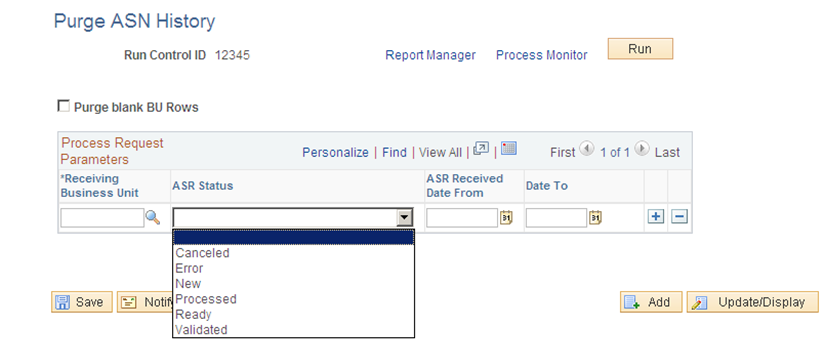
Field or Control |
Description |
|---|---|
Receiving Business Unit |
Provides the Receiving Business unit the user is authorized for. |
ASR Status |
Used for selection criteria. This is an optional field. The ASR Statuses are as follows:
Note: If you do not specify a status, the statuses, ‘Processed’ and ‘Cancelled’ are considered for deletion. |
ASR Received Date From and Date To |
Used for selection criteria. This is an optional field. |
Purge blank BU’s row |
Processes the blank Receipt BU rows. The process deletes rows from the following tables after the successful execution.
|